rear view mirror LEXUS RCF 2021 Owner's Manual
[x] Cancel search | Manufacturer: LEXUS, Model Year: 2021, Model line: RCF, Model: LEXUS RCF 2021Pages: 408, PDF Size: 8.25 MB
Page 182 of 408
1824-5. Using the driving support systems
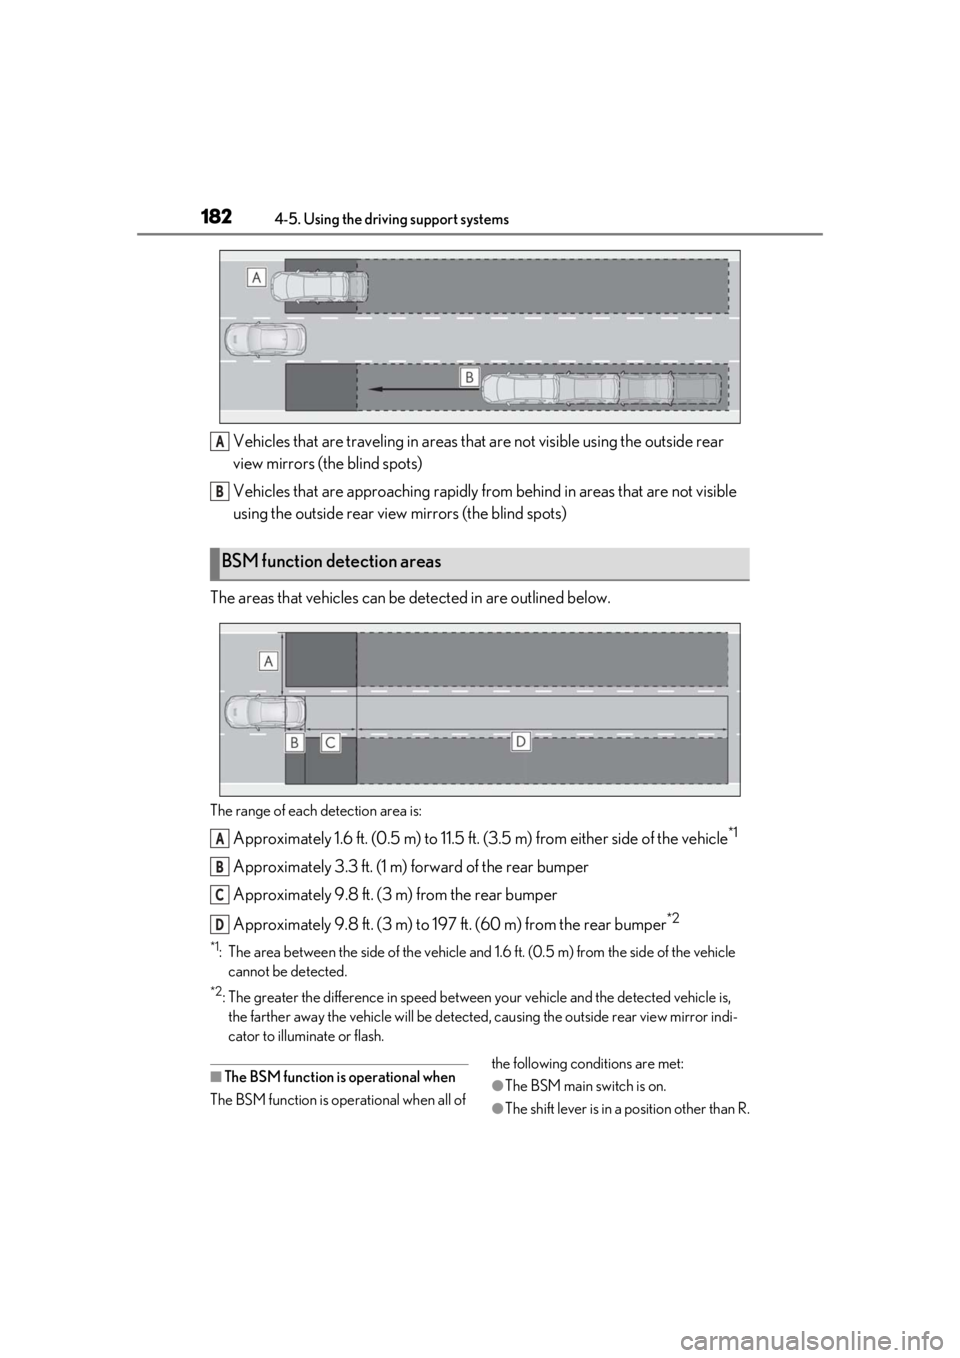
Vehicles that are traveling in areas that are not visible using the outside rear
view mirrors (the blind spots)
Vehicles that are approaching rapidly from behind in areas that are not visible
using the outside rear view mirrors (the blind spots)
The areas that vehicles can be detected in are outlined below.
The range of each detection area is:
Approximately 1.6 ft. (0.5 m) to 11.5 ft. (3.5 m) from either side of the vehicle*1
Approximately 3.3 ft. (1 m) forward of the rear bumper
Approximately 9.8 ft. (3 m) from the rear bumper
Approximately 9.8 ft. (3 m) to 19 7 ft. (60 m) from the rear bumper
*2
*1: The area between the side of the vehicle and 1.6 ft. (0.5 m) from the side of the vehicle
cannot be detected.
*2: The greater the difference in speed between your vehicle and the detected vehicle is, the farther away the vehicle will be detected, causing the outside rear view mirror indi-
cator to illuminate or flash.
■The BSM function is operational when
The BSM function is operational when all of the following conditions are met:●The BSM main switch is on.
●The shift lever is in a position other than R.
BSM function detection areas
A
B
A
B
C
D
Page 184 of 408
1844-5. Using the driving support systems
sory is installed to the rear of the vehicle
■Operation of the RCTA function
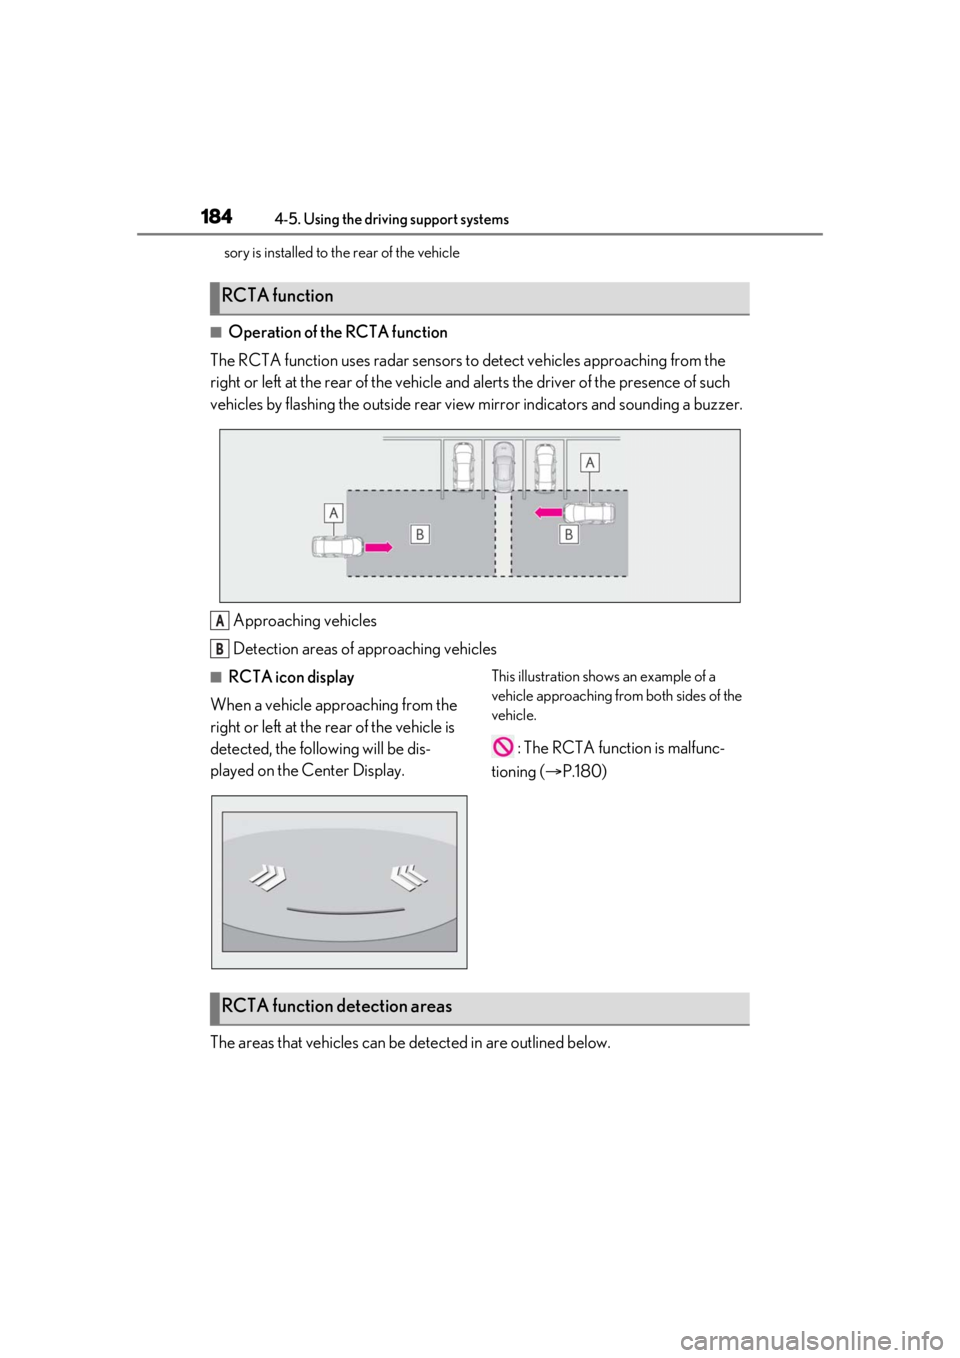
The RCTA function uses radar sensors to detect vehicles approaching from the
right or left at the rear of the vehicle and alerts the driver of the presence of such
vehicles by flashing the outside rear view mirror indicators and sounding a buzzer.
Approaching vehicles
Detection areas of approaching vehicles
■RCTA icon display
When a vehicle approaching from the
right or left at the rear of the vehicle is
detected, the following will be dis-
played on the Center Display.This illustration shows an example of a
vehicle approaching from both sides of the
vehicle.
: The RCTA function is malfunc-
tioning ( P.180)
The areas that vehicles can be detected in are outlined below.
RCTA function
A
B
RCTA function detection areas
Page 213 of 408

2135-2. Using the air conditioning system
5
Interior features
5-2.Using the air conditioning system
Left-hand side temperature control switch
Automatic mode switch
Off switch
Fan speed down switch
Fan speed up switch
Air flow mode switch
Right-hand side temperature control switch
DUAL mode switch
A/C switch
Outside/recirculated air mode switch
Rear window defogger and outside rear view mirror defoggers switch
Windshield defogger switch
Automatic air conditioning system
Air outlets and fan speed are automati cally adjusted according to the tem-
perature setting.
Press the “MENU” button on the Remote Touch, then select “Climate” to dis-
play the air conditioning control screen. ( P.210)
The air conditioning system can be displayed and operated on the side display.
Air conditioning controls
A
B
C
D
E
F
G
H
I
J
K
L
Page 214 of 408
2145-2. Using the air conditioning system
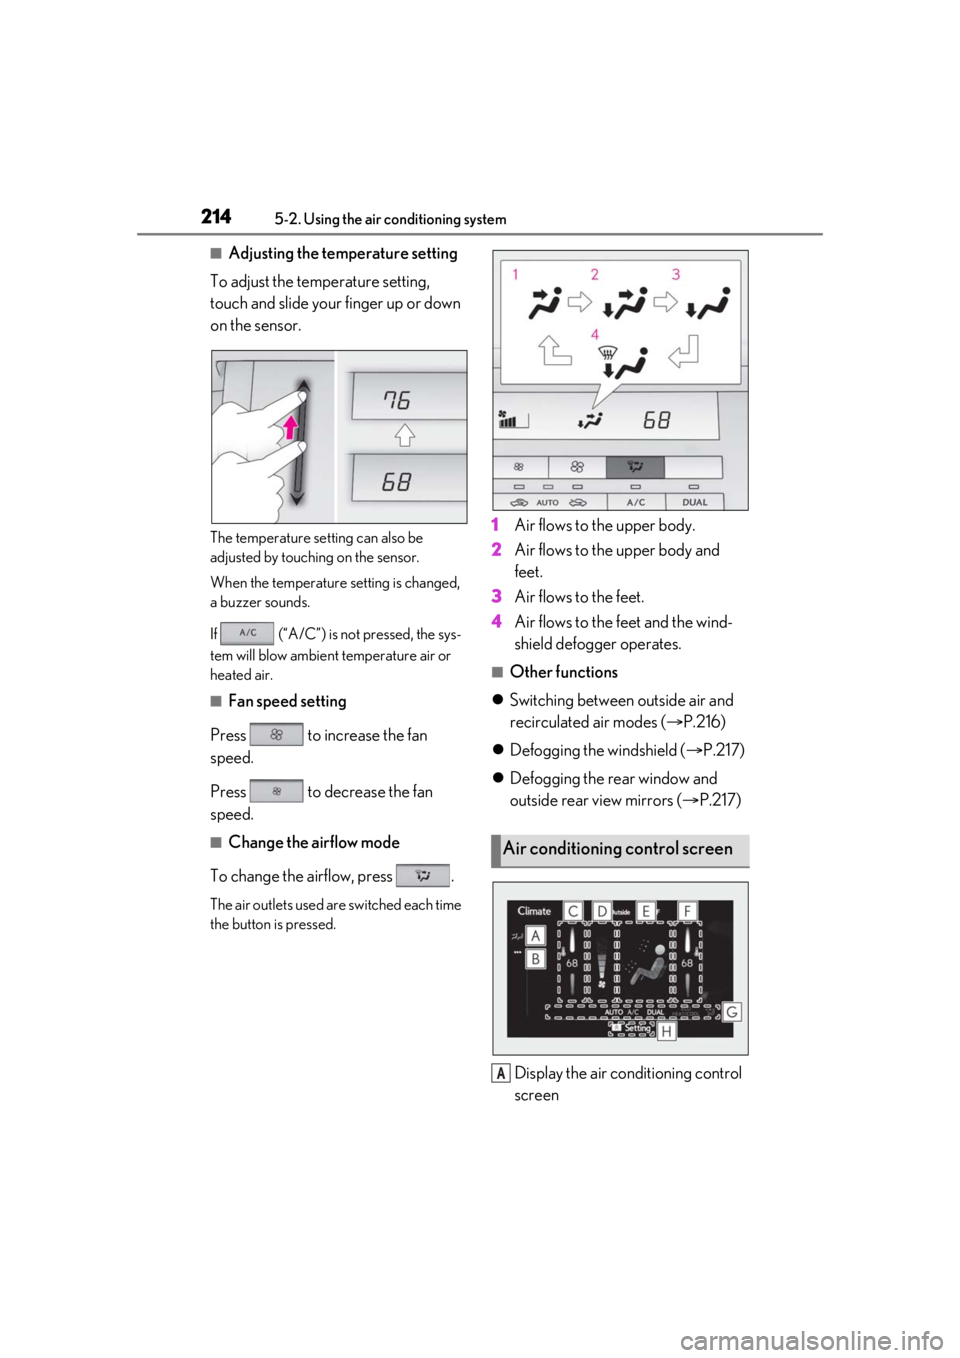
■Adjusting the temperature setting
To adjust the temperature setting,
touch and slide your finger up or down
on the sensor.
The temperature setting can also be
adjusted by touching on the sensor.
When the temperature setting is changed,
a buzzer sounds.
If (“A/C”) is not pressed, the sys-
tem will blow ambient temperature air or
heated air.
■Fan speed setting
Press to increase the fan
speed.
Press to decrease the fan
speed.
■Change the airflow mode
To change the airflow, press .
The air outlets used are switched each time
the button is pressed.
1 Air flows to the upper body.
2 Air flows to the upper body and
feet.
3 Air flows to the feet.
4 Air flows to the feet and the wind-
shield defogger operates.
■Other functions
Switching between outside air and
recirculated air modes ( P.216)
Defogging the windshield ( P.217)
Defogging the rear window and
outside rear view mirrors ( P.217)
Display the air conditioning control
screen
Air conditioning control screen
A
Page 217 of 408
2175-2. Using the air conditioning system
5
Interior features
automatically.
The indicator above the selected button
comes on.
■Micro dust and pollen filter
Pollen is removed from the air and the
air flows to the upper part of the body.
Select on the option control
screen.
When the micro dust and pollen filter is on, is displayed on the air conditioning
control screen.
In order to prevent the windshield from
fogging up when the outside air is cold, the
dehumidification function may operate.
Pollen is filtered even if the micro dust and
pollen filter is turned off.
■Defogging the windshield
Defoggers are used to defog the wind-
shield and side windows.
Press .
Set the outside/recirc ulated air mode but-
ton to outside air mode if the recirculated
air mode is used. (It may switch automati-
cally.)
To defog the windshield and the side win-
dows early, turn the air flow and tempera-
ture up.
To return to the previous mode, press
again when the windshield is
defogged.
■Defogging the rear window and
outside rear view mirrors
Defoggers are used to defog the rear
window, and to remove raindrops, dew
and frost from the outside rear view
mirrors. Press .
The defoggers will automatically turn off
after a period of time.
■Windshield wiper de-icer (if
equipped)
This feature is used to prevent ice from
building up on the windshield and
wiper blades.
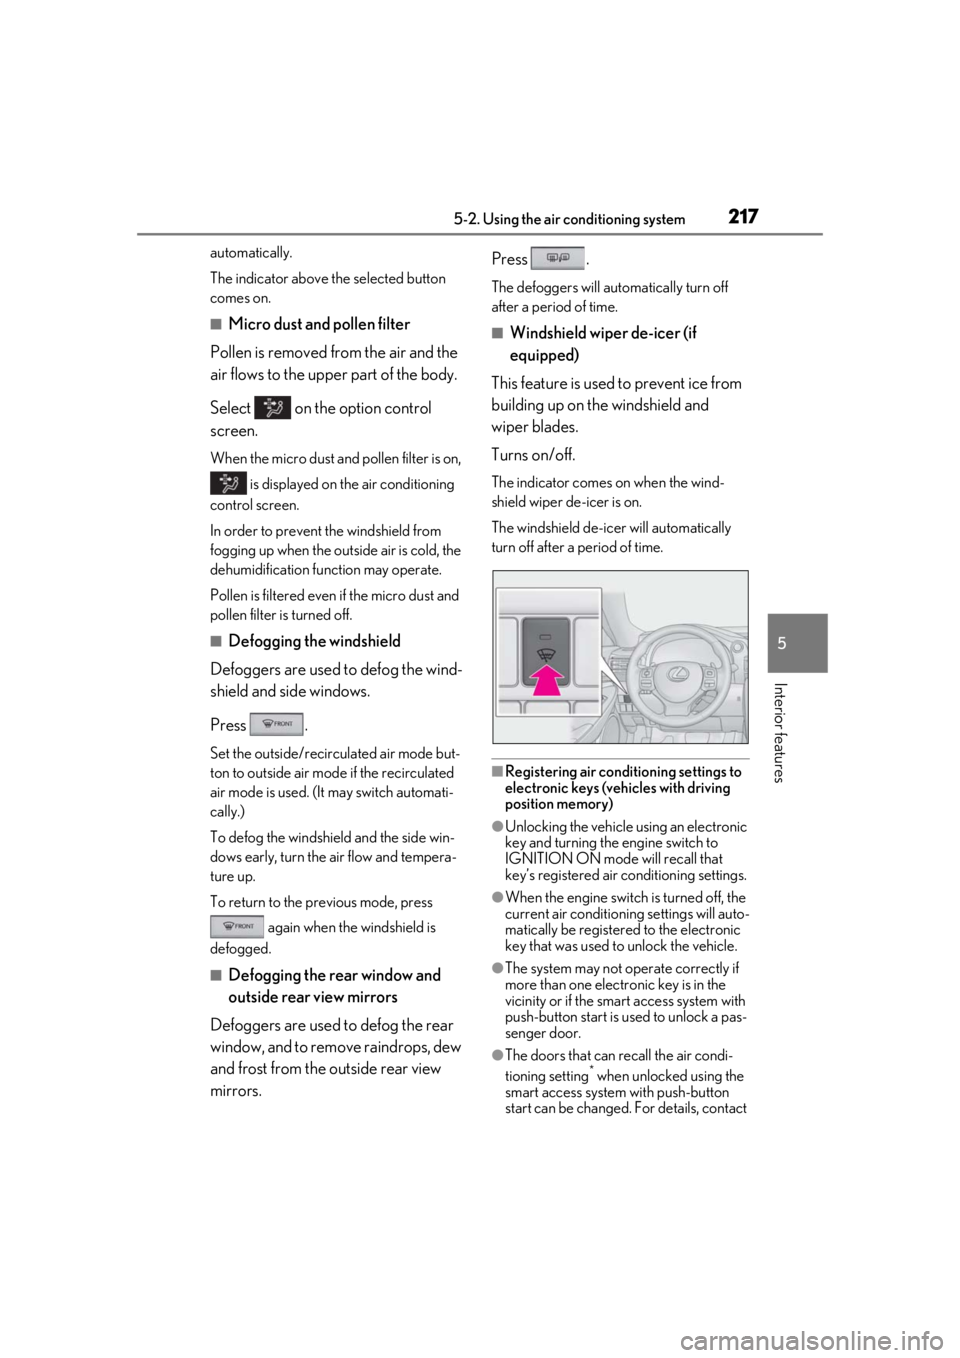
Turns on/off.
The indicator comes on when the wind-
shield wiper de-icer is on.
The windshield de-icer will automatically
turn off after a period of time.
■Registering air conditioning settings to
electronic keys (vehicles with driving
position memory)
●Unlocking the vehicle using an electronic
key and turning the engine switch to
IGNITION ON mode will recall that
key’s registered air conditioning settings.
●When the engine switch is turned off, the
current air conditioning settings will auto-
matically be registered to the electronic
key that was used to unlock the vehicle.
●The system may not operate correctly if
more than one electr onic key is in the
vicinity or if the smart access system with
push-button start is used to unlock a pas-
senger door.
●The doors that can recall the air condi-
tioning setting* when unlocked using the
smart access system with push-button
start can be changed. For details, contact
Page 220 of 408
2205-2. Using the air conditioning system
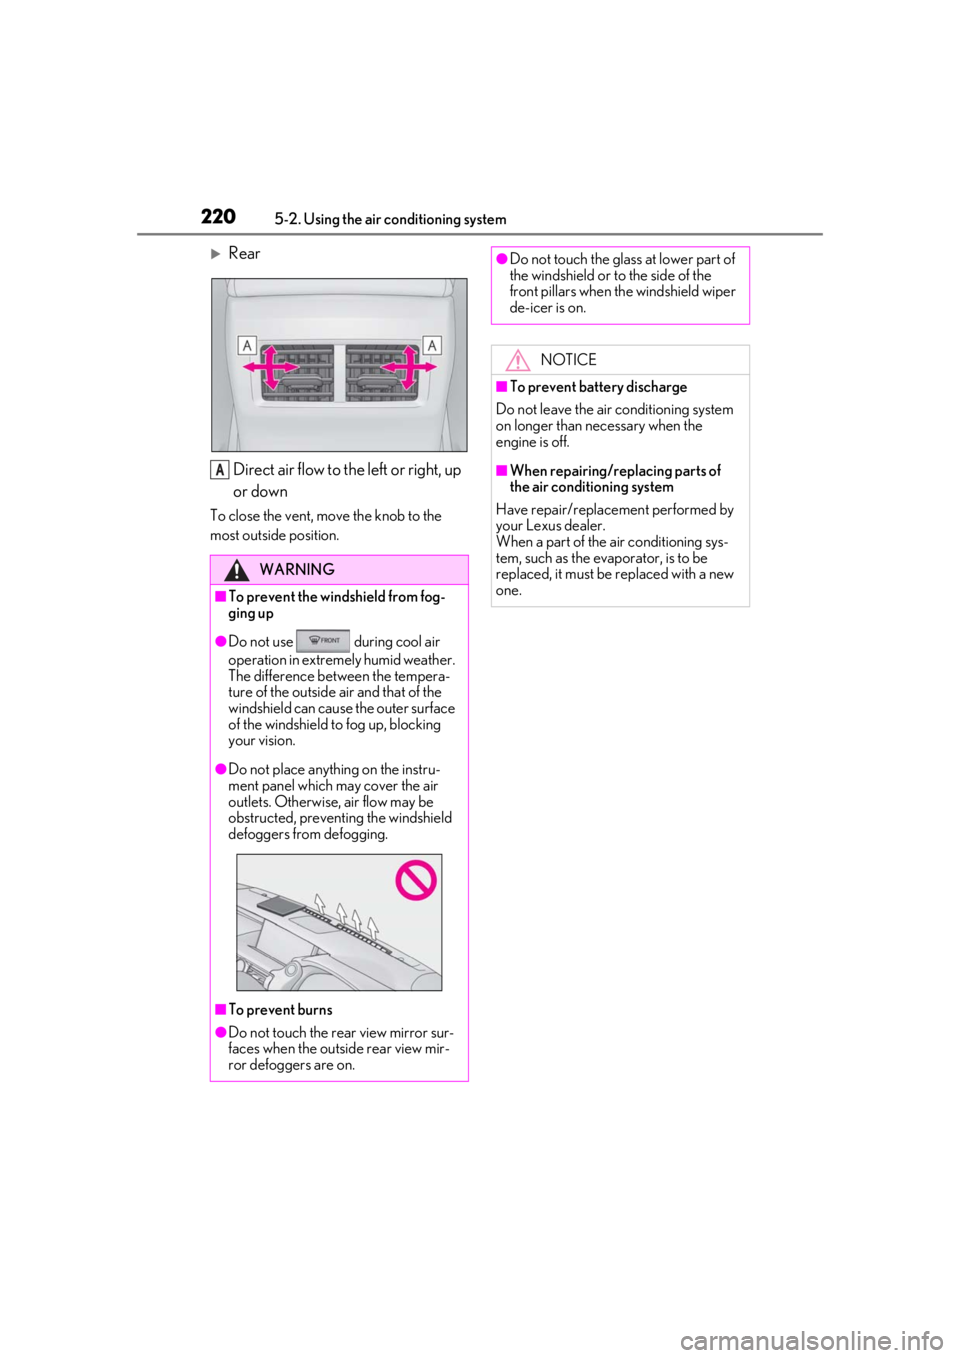
RearDirect air flow to the left or right, up
or down
To close the vent, move the knob to the
most outside position.
WARNING
■To prevent the windshield from fog-
ging up
●Do not use during cool air
operation in extremely humid weather.
The difference between the tempera-
ture of the outside air and that of the
windshield can cause the outer surface
of the windshield to fog up, blocking
your vision.
●Do not place anything on the instru-
ment panel which may cover the air
outlets. Otherwise, air flow may be
obstructed, preventing the windshield
defoggers from defogging.
■To prevent burns
●Do not touch the rear view mirror sur-
faces when the outside rear view mir-
ror defoggers are on.
A
●Do not touch the glass at lower part of
the windshield or to the side of the
front pillars when th e windshield wiper
de-icer is on.
NOTICE
■To prevent battery discharge
Do not leave the air conditioning system
on longer than necessary when the
engine is off.
■When repairing/replacing parts of
the air conditioning system
Have repair/replace ment performed by
your Lexus dealer.
When a part of the air conditioning sys-
tem, such as the evaporator, is to be
replaced, it must be replaced with a new
one.
Page 232 of 408
2325-5. Using the other interior features
tery be placed in the remote control
transmitter for more accurate pro-
gramming.
Garage door opener motors manu-
factured after 1995 may be
equipped with rolling code protec-
tion. If this is the case, you may need
a stepladder or other sturdy, safe
device to reach the “Learn” or
“Smart” button on the garage door
opener motor.
■Programming HomeLink®
Steps 1 through 3 must be performed
within 60 seconds, otherwise the indi-
cator light will stop flashing and pro-
gramming will not be able to be
completed.
1 Press and release the HomeLink
®
button you want to program and
check that the HomeLink
® indica-
tor light flashes (orange).
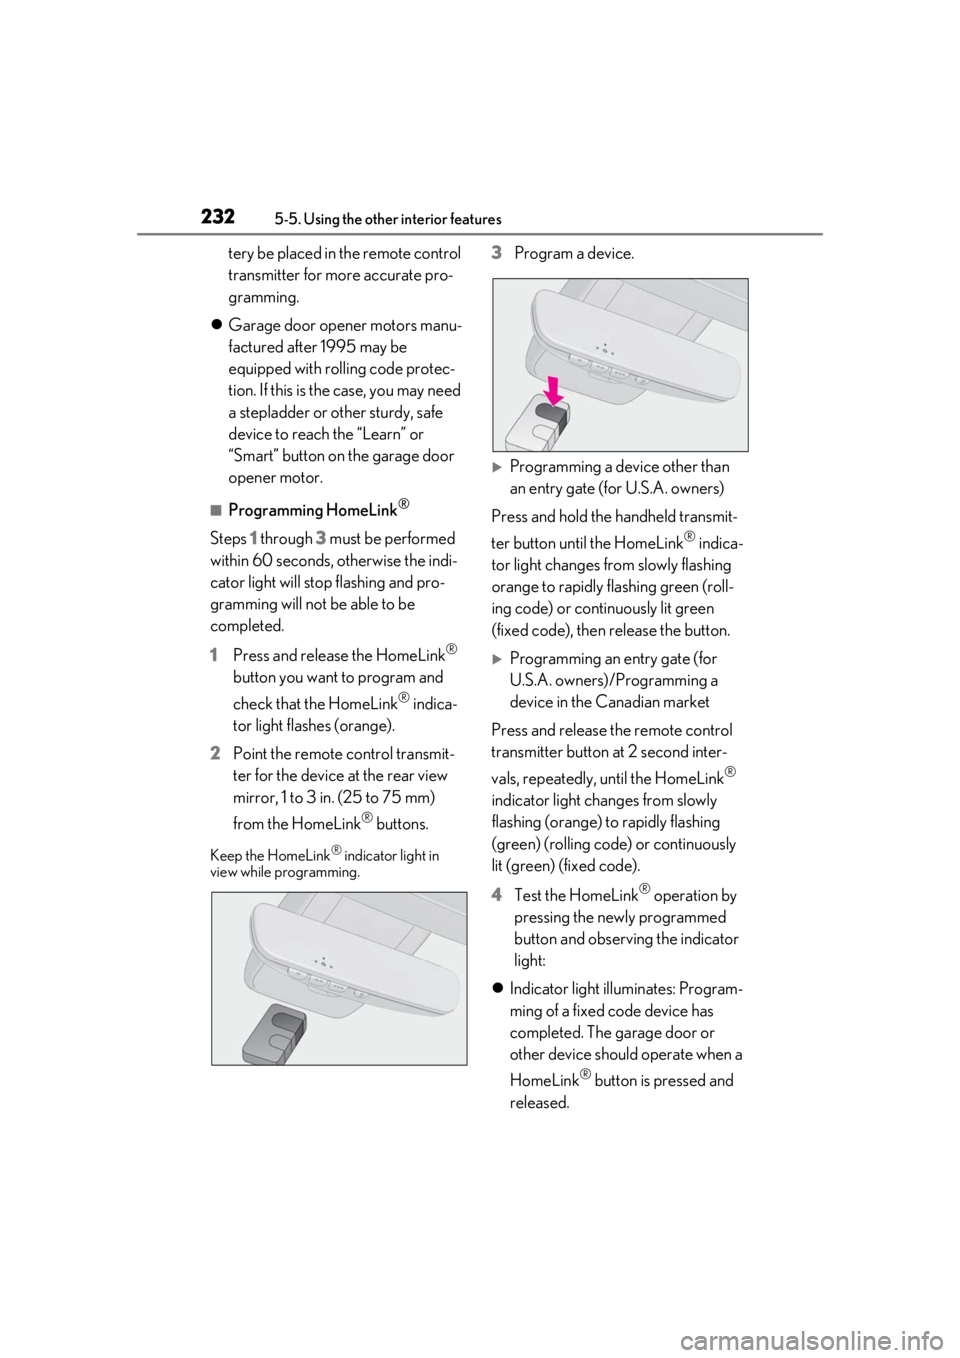
2 Point the remote control transmit-
ter for the device at the rear view
mirror, 1 to 3 in. (25 to 75 mm)
from the HomeLink
® buttons.
Keep the HomeLink® indicator light in
view while programming.
3 Program a device.
Programming a device other than
an entry gate (for U.S.A. owners)
Press and hold the handheld transmit-
ter button until the HomeLink
® indica-
tor light changes from slowly flashing
orange to rapidly flashing green (roll-
ing code) or continuously lit green
(fixed code), then release the button.
Programming an entry gate (for
U.S.A. owners)/Programming a
device in the Canadian market
Press and release the remote control
transmitter button at 2 second inter-
vals, repeatedly, until the HomeLink
®
indicator light changes from slowly
flashing (orange) to rapidly flashing
(green) (rolling code) or continuously
lit (green) (fixed code).
4 Test the HomeLink
® operation by
pressing the newly programmed
button and observing the indicator
light:
Indicator light illuminates: Program-
ming of a fixed code device has
completed. The garage door or
other device should operate when a
HomeLink
® button is pressed and
released.
Page 236 of 408

2365-5. Using the other interior features
*:If equipped
To turn the compass on or off, press
and hold the switch for 3 seconds.
Directions are displayed as follows:
■Conditions unfavorable to correct
operation
The compass may not show the correct
direction in the following conditions:
●The vehicle is stopped immediately after
turning.
●The vehicle is on an inclined surface.
●The vehicle is in a place where the earth’s
magnetic field is subject to interference
by artificial magnetic fields (under-
ground car park/parking lot, under a
steel tower, between buildings, roof car
park/parking lot, near an intersection,
near a large vehicle, etc.).
●The vehicle has become magnetized.
(There is a magnet or metal object near
the inside rear view mirror.)
●The battery has been disconnected.
●A door is open.
Compass*
The compass on the inside rear
view mirror indicates the direction
in which the vehicle is heading.
Operation and displays
DisplayDirection
“N”North
“NE”Northeast
“E”East
“SE”Southeast
“S”South
“SW”Southwest
“W”West
“NW”Northwest
WARNING
■While driving the vehicle
Do not adjust the display. Adjust the dis-
play only when the vehicle is stopped.
NOTICE
■To avoid compass malfunctions
Do not place magnets or any metal
objects near the inside rear view mirror.
Doing this may cause the compass sen-
sor to malfunction.
■To ensure normal operation of the
compass
●Do not perform circling calibration of
the compass in a place where the
earth’s magnetic field is subject to
interference by artificial magnetic
fields.
●During calibration, do not operate
electric systems (moon roof, power
windows, etc.) as they may interfere
with the calibration.
Page 394 of 408

394Alphabetical Index
Seat belts........................................................ 245
Wheels and wheel ornaments.............. 241
Cargo capacity............................................... 126
Cargo hooks ..................................................227
Center Display ...............................................210
Chains .............................................................. 205
Child restraint system Fixed with a LATCH system .................. 49
Fixed with a seat belt................................... 46
Front passenger occupant classification system ............................................................. 36
Installing a CRS to the front passenger seat ................................................................... 44
Points to remember .....................................42
Riding with children ......................................42
Types of child restraint system installation method ........................................................... 43
Using an anchor bracket ............................ 51
Child safety Airbag precautions.......................................32
Battery precautions ...................... 272, 336
Child restraint system................................. 43
Heated steering wheel or seat heater precautions.................................................. 221
How your child should wear the seat belt ............................................................................ 25
Moon roof precautions ............................. 116
Power window lock switch...................... 113
Seat belt extender precautions ............. 25
Seat belt precautions ...................................42
Trunk precautions ........................................ 95
Cleaning Exterior ...................................240, 248, 252
Interior ............................................................. 245
Radar sensor..................................................153
Seat belts........................................................ 245
Wheels and wheel ornaments.............. 241
Clock ................................................................ 230
Clock settings ............................................... 230
Coat hooks..................................................... 229
Compass ......................................................... 236
Condenser ..................................................... 270 Console box ...................................................227
Consumption screen .................................... 83
Cooling system............................................. 269
Engine overheating................................... 337
Cruise control Dynamic radar cruise control................. 171
Cup holders Front cup holders ...................................... 226
Rear cup holders........................................ 226
Current fuel consumption .......................... 75
Curtain shield airbags .................................. 28
Customizable features .............................. 360
D
Daytime running light system .................. 138
Daytime running lights Replacing light bulbs ............................... 289
Defogger Outside rear view mirrors....................... 217
Rear window .................................................. 217
Windshield ...................................................... 217
Differential Differential oil ....... ................................. .......346
Dimension ...................................................... 342
Dinghy towing................................................. 127
Display Center Display ............................................. 210
Drive information .......................................... 75
LDA (Lane Departure Alert with steering control) ......................................................... 166
Multi-information display .......................... 73
Warning message ...................................... 310
Do-it-yourself maintenance .................... 258
Door courtesy lights ................................... 223
Door lock Doors .................................................................. 92
Smart access system with push-button start ...................................................................98
Wireless remote control ...........................90
Doors Automatic door lock ing and unlocking
system.............................................................. 94
Page 395 of 408

395Alphabetical Index
Door glasses ....................................................112
Door lock.......................................................... 92
Open door warning buzzer93, 94, 306
Open door warning light ......................306
Outside rear view mirrors ....................... 110
Drive distance ...................................................75
Drive info 1/Drive info 2/Drive info 3.....75
Drive information ............................................75
Driver’s and front passenger’s seat belt reminder light............................................. 306
Driver’s seat position memory Driving position memory........................ 105
Memory recall function ........................... 106
Power easy access system .................... 105
Drive-start control ......................................... 119
Driving Break-in tips .................................................... 119
Correct driving posture .............................23
Driving mode select switch .................... 192
Procedures ...................................................... 118
Winter drive tips......................................... 204
Driving information display .........................75
Driving position memory........................... 105 Memory recall function ........................... 106
Power easy access system .................... 105
Driving range ....................................................75
Driving support system information display ...............................................................................81
Dynamic radar cruise control ................... 171 Warning message.......................................178
E
Eco Driving Indicator.....................................76
Eco Driving Indicator Light .........................76
EDR (Event data recorder) ............................7
Elapsed time ......................................................75
Electric Power Steering (EPS) ..............200Electric power steer ing system warning
light ................................................................304
Electronic key .................................................. 88 Battery-saving function ............................. 99 If the electronic key does not operate
properly ....................................................... 332
Replacing the battery ...............................283
Emergency flashers .................................... 294
Emergency tire puncture ...........................319
Emergency, in case of If a warning buzzer sounds...................302
If a warning light turns on.......................302
If a warning message is displayed ...... 310
If the battery is discharged ....................334
If the electronic key does not operate properly ....................................................... 332
If the engine will not start........................329
If the fuel filler do or cannot be opened
........................................................................... 331
If the vehicle is trapped in rising water ..........................................................................295
If you have a flat tire ......................... 313, 319
If you lose your keys .................................. 331
If you think something is wrong......... 300
If your vehicle becomes stuck .............339
If your vehicle has to be stopped in an emergency ................................................. 294
If your vehicle needs to be towed ..... 297
If your vehicle overheats ........................ 337
Engine ACCESSORY mode............................... 130
Compartment.............................................. 267
Engine switch ................................................ 128
Fuel pump shut off system...................... 301
Hood ................................................................ 264
Identification number ...............................343
If the engine will not start........................329
If your vehicle has to be stopped in an emergency ................................................. 294
Ignition switch (engine switch)............. 128
Overheating ................................................. 337
Tachometer ..................................................... 66
Engine coolant Capacity .........................................................344
Checking .......................................................269