brake LEXUS RCF 2021 Repair Manual
[x] Cancel search | Manufacturer: LEXUS, Model Year: 2021, Model line: RCF, Model: LEXUS RCF 2021Pages: 408, PDF Size: 8.25 MB
Page 317 of 408

3177-2. Steps to take in an emergency
7
When trouble arises
1Remove any dirt or foreign matter
from the wheel contact surface.
If foreign matter is on the wheel contact
surface, the wheel nuts may loosen while
the vehicle is in motion, causing the tire to
come off.
2 Install the spare tire and loosely
tighten each wheel nut by hand by
approximately the same amount.
When replacing an aluminum wheel with
an aluminum wheel, turn the wheel nuts
until the washers come into contact
with the disc wheel .
WARNING
■Replacing a flat tire
●Do not touch the disc wheels or the
area around the brakes immediately
after the vehicle has been driven.
After the vehicle has been driven the
disc wheels and the area around the
brakes will be extremely hot. Touching
these areas with hands, feet or other
body parts while changing a tire, etc.
may result in burns.
●Failure to follow these precautions
could cause the wheel nuts to loosen
and the tire to fall of f, resulting in death
or serious injury.
• Never use oil or grease on the wheel bolts or wheel nuts.Oil and grease may
cause the wheel nuts to be excessively
tightened, leading to bolt or disc wheel
damage. In addition, the oil or grease
can cause the wheel nuts to loosen and
the wheel may fall off, causing a serious
accident. Remove any oil or grease
from the wheel bolts or wheel nuts.
• Have the wheel nuts tightened with a torque wrench to 76 ft•lbf (103 N•m,
10.5 kgf•m) as soon as possible after
changing wheels.
• Do not attach a heavily damaged wheel ornament, as it may fly off the
wheel while the vehicle is moving.
• When installing a tire, only use wheel nuts that have been specifically
designed for that wheel.
• If there are any cracks or deformations in the bolt screws, nut threads or bolt
holes of the wheel, have the vehicle
inspected by your Lexus dealer.
NOTICE
■Precaution for CCB (Carbon
Ceramic Brake) discs (if equipped)
Do not subject the carbon ceramic brake
disc to strong impact.
It the carbon ceramic brake disc has
been subjected to a strong impact, even
if there is no obvious damage, have the
vehicle inspected by your Lexus dealer.
Installing the spare tire
A
B
Page 318 of 408
3187-2. Steps to take in an emergency
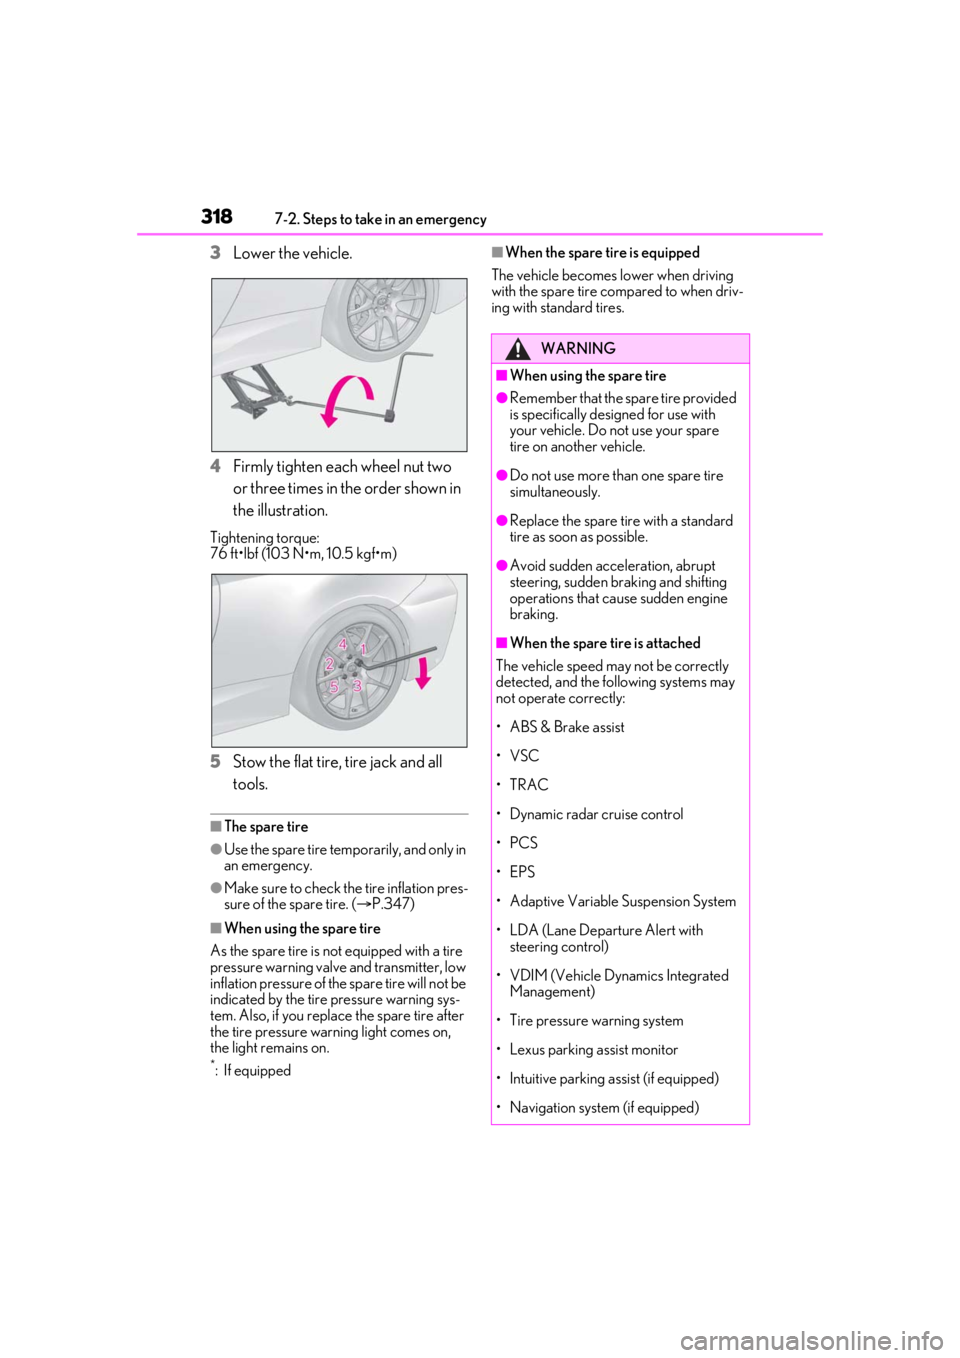
3Lower the vehicle.
4 Firmly tighten each wheel nut two
or three times in the order shown in
the illustration.
Tightening torque:
76 ft•lbf (103 N•m, 10.5 kgf•m)
5Stow the flat tire, tire jack and all
tools.
■The spare tire
●Use the spare tire temporarily, and only in
an emergency.
●Make sure to check the tire inflation pres-
sure of the spare tire. ( P.347)
■When using the spare tire
As the spare tire is not equipped with a tire
pressure warning valve and transmitter, low
inflation pressure of the spare tire will not be
indicated by the tire pressure warning sys-
tem. Also, if you replace the spare tire after
the tire pressure warning light comes on,
the light remains on.
*:If equipped
■When the spare tire is equipped
The vehicle becomes lower when driving
with the spare tire compared to when driv-
ing with standard tires.
WARNING
■When using the spare tire
●Remember that the sp are tire provided
is specifically designed for use with
your vehicle. Do not use your spare
tire on another vehicle.
●Do not use more than one spare tire
simultaneously.
●Replace the spare tire with a standard
tire as soon as possible.
●Avoid sudden acceleration, abrupt
steering, sudden br aking and shifting
operations that cause sudden engine
braking.
■When the spare tire is attached
The vehicle speed may not be correctly
detected, and the following systems may
not operate correctly:
• ABS & Brake assist
•VSC
•TRAC
• Dynamic radar cruise control
•PCS
•EPS
• Adaptive Variable Suspension System
• LDA (Lane Departure Alert with steering control)
• VDIM (Vehicle Dynamics Integrated Management)
• Tire pressure warning system
• Lexus parking assist monitor
• Intuitive parking assist (if equipped)
• Navigation system (if equipped)
Page 319 of 408
3197-2. Steps to take in an emergency
7
When trouble arises
Stop the vehicle in a safe place on a
hard, flat surface.
Set the parking brake.
Shift the shift lever to P.
Stop the engine.
Turn on the emergency flashers.
( P.294)
Check the degree of the tire dam-
age.
A tire should only be repaired with the
emergency tire puncture repair kit if
the damage is caused by a nail or
WARNING
■Speed limit when using the spare tire
Do not drive at speeds in excess of 50
mph (80 km/h) when a spare tire is
installed on the vehicle.
The spare tire is not designed for driving
at high speeds. Failu re to observe this
precaution may lead to an accident caus-
ing death or serious injury.
■After using the tools and jack
Before driving, make sure all the tools
and jack are securely in place in their
storage location to reduce the possibility
of personal injury during a collision or
sudden braking.
NOTICE
■Driving with tire chains and the spare
tire
Do not fit tire chains to the spare tire.
Tire chains may damage the vehicle body
and adversely affect driving perfor-
mance.
■When replacing the tires
When removing or fitting the wheels,
tires or the tire pressure warning valve
and transmitter, contact your Lexus
dealer as the tire pr essure warning valve
and transmitter may be damaged if not
handled correctly.
■Precaution for CCB (Carbon
Ceramic Brake) discs (if equipped)
P.317
If you have a flat tire (vehi-
cles with an emergency tire
puncture repair kit)
Your vehicle is not equipped with a
spare tire, but instead is equipped
with an emergency tire puncture
repair kit.
A puncture caused by a nail or
screw passing through the tire
tread can be repaired temporarily
with the emergency tire puncture
repair kit.
WARNING
■If you have a flat tire
Do not continue driving with a flat tire.
Driving even a short distance with a flat
tire can damage the tire and the wheel
beyond repair. Driving with a flat tire may
cause a circumferential groove on the
side wall. In such a case, the tire may
explode when using the emergency tire
puncture repair kit, re sulting in death or
serious injury.
Before repairing the vehicle
Page 327 of 408
3277-2. Steps to take in an emergency
7
When trouble arises
step 22.
21 Turn the compressor switch on to
inflate the tire until the recom-
mended tire inflation pressure is
reached. Drive for about 3 miles (5
km) and then perform step 19 .
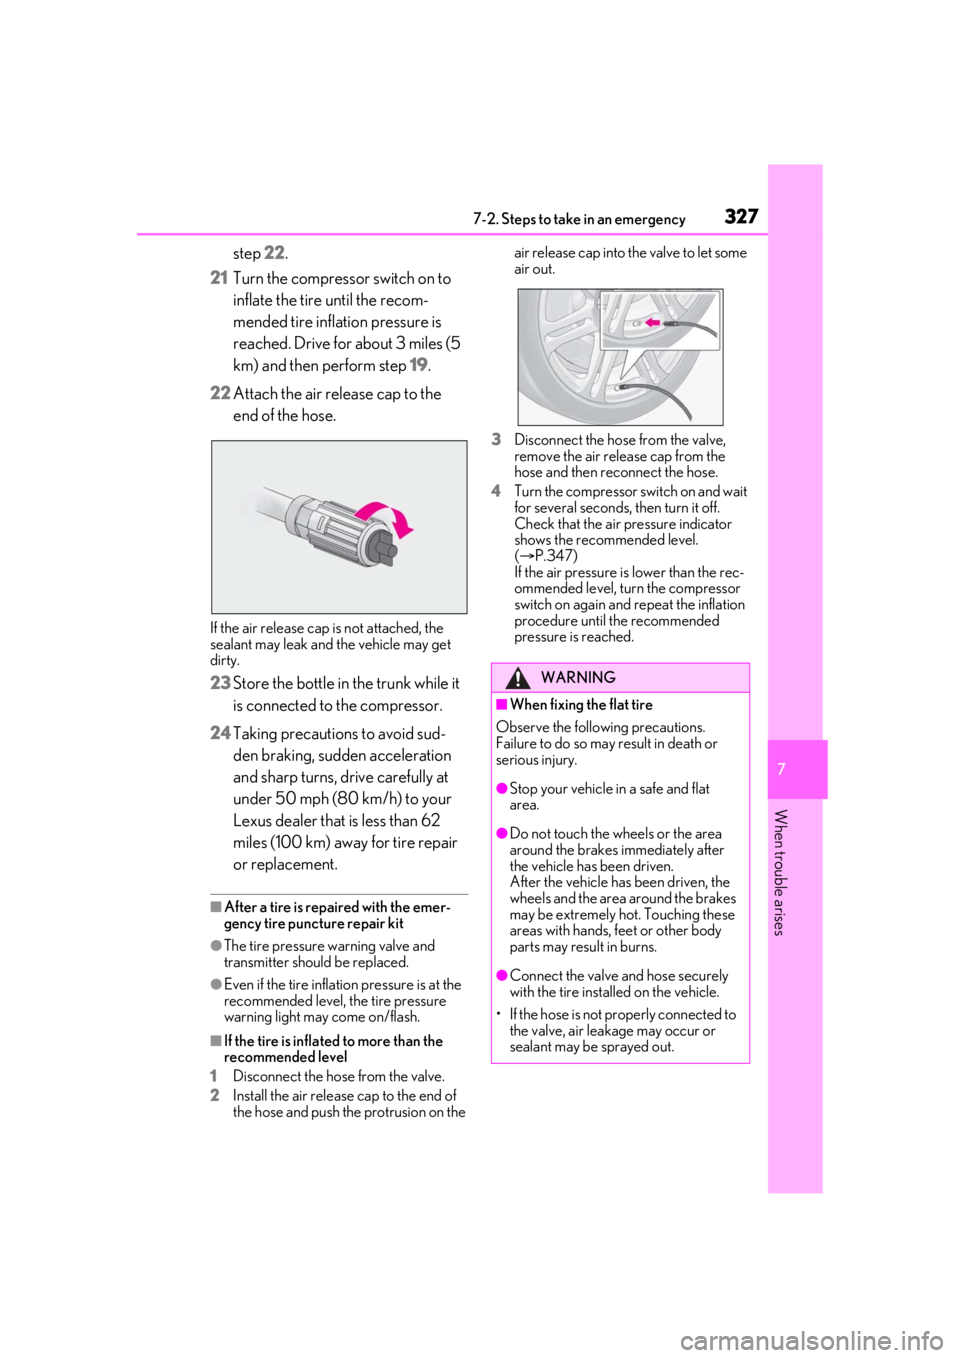
22 Attach the air release cap to the
end of the hose.
If the air release cap is not attached, the
sealant may leak and the vehicle may get
dirty.
23Store the bottle in the trunk while it
is connected to the compressor.
24 Taking precautions to avoid sud-
den braking, sudd en acceleration
and sharp turns, drive carefully at
under 50 mph (80 km/h) to your
Lexus dealer that is less than 62
miles (100 km) away for tire repair
or replacement.
■After a tire is repaired with the emer-
gency tire puncture repair kit
●The tire pressure warning valve and
transmitter should be replaced.
●Even if the tire inflat ion pressure is at the
recommended level, the tire pressure
warning light may come on/flash.
■If the tire is inflated to more than the
recommended level
1 Disconnect the hose from the valve.
2 Install the air release cap to the end of
the hose and push th e protrusion on the air release cap into the valve to let some
air out.
3 Disconnect the hose from the valve,
remove the air release cap from the
hose and then reconnect the hose.
4 Turn the compressor switch on and wait
for several seconds, then turn it off.
Check that the air pressure indicator
shows the recommended level.
( P.347)
If the air pressure is lower than the rec-
ommended level, turn the compressor
switch on again and repeat the inflation
procedure until the recommended
pressure is reached.
WARNING
■When fixing the flat tire
Observe the following precautions.
Failure to do so may result in death or
serious injury.
●Stop your vehicle in a safe and flat
area.
●Do not touch the wheels or the area
around the brakes immediately after
the vehicle has been driven.
After the vehicle has been driven, the
wheels and the area around the brakes
may be extremely hot. Touching these
areas with hands, feet or other body
parts may result in burns.
●Connect the valve and hose securely
with the tire installed on the vehicle.
• If the hose is not properly connected to the valve, air leakage may occur or
sealant may be sprayed out.
Page 330 of 408
3307-2. Steps to take in an emergency
The engine starting system may be
malfunctioning due to an electrical
problem such as electronic key battery
depletion or a blown fuse. However, an
interim measure is available to start the
engine. (P.330)
One of the following may be the cause
of the problem:
One or both of the battery terminals
may be disconnected. ( P.271)
The battery may be discharged.
( P.334)
There may be a malfunction in the
steering lock system.
Contact your Lexus dealer if the problem
cannot be repaired, or if repair procedures
are unknown.
When the engine does not start, the
following steps can be used as an
interim measure to start the engine if
the engine switch is functioning nor-
mally:
1 Set the parking brake.
2 Shift the shift lever to P.
3 Turn the engine switch to ACCES-
SORY mode. 4
Press and hold the engine switch
for about 15 seconds while
depressing the brake pedal firmly.
Even if the engine can be started using
the above steps, the system may be
malfunctioning. Have the vehicle
inspected by your Lexus dealer.
The starter motor does not turn
over
The starter motor does not turn
over, the interior lights and head-
lights do not turn on, or the horn
does not sound.
Emergency start function
Page 333 of 408
3337-2. Steps to take in an emergency
7
When trouble arises
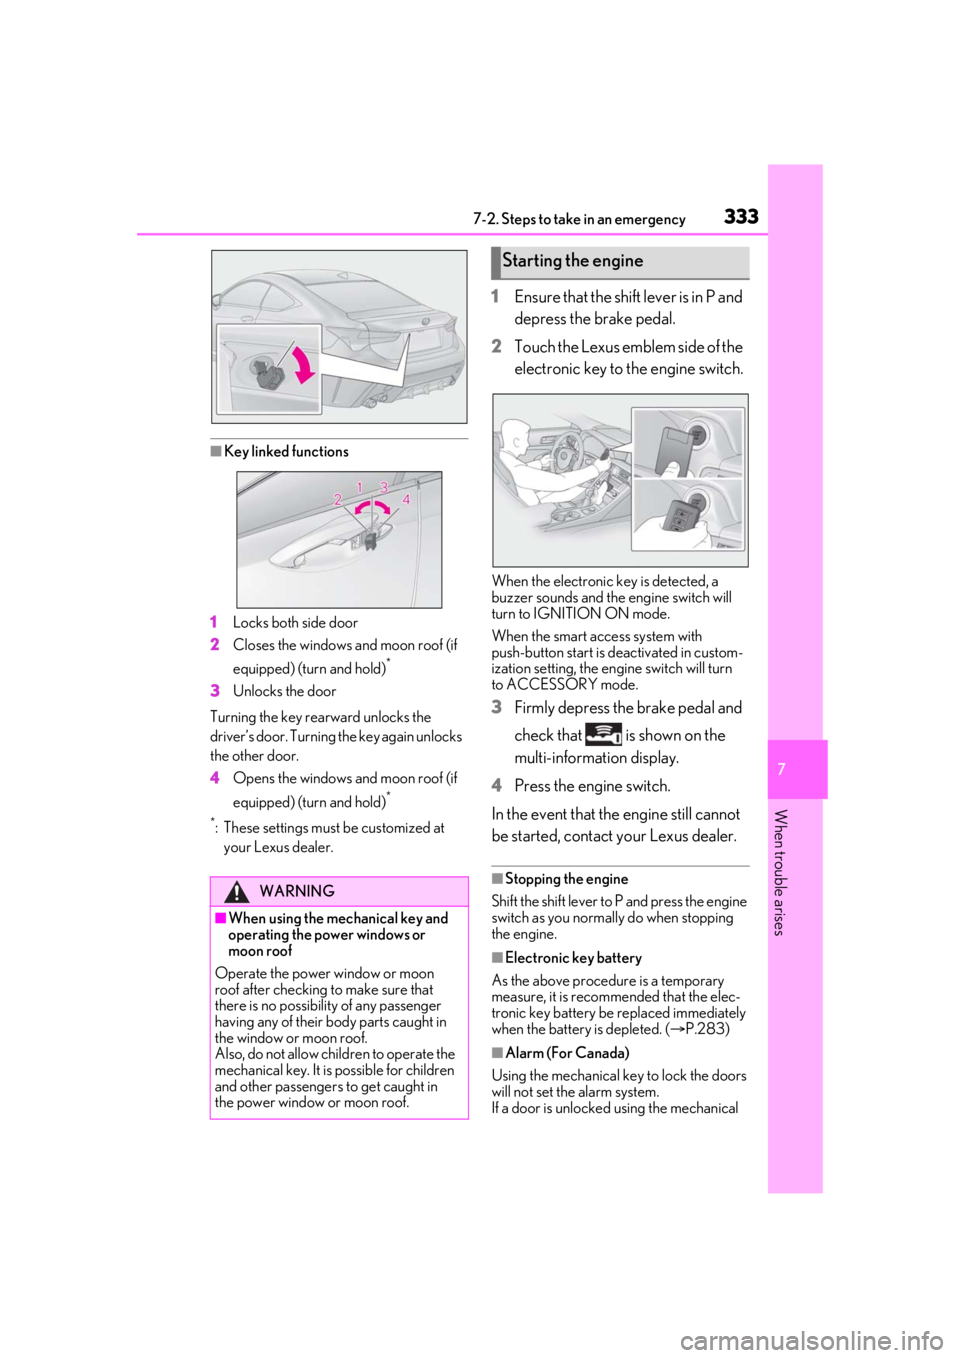
■Key linked functions
1 Locks both side door
2 Closes the windows and moon roof (if
equipped) (turn and hold)
*
3Unlocks the door
Turning the key rearward unlocks the
driver’s door. Turning the key again unlocks
the other door.
4 Opens the windows and moon roof (if
equipped) (turn and hold)
*
*
: These settings must be customized at
your Lexus dealer.
1 Ensure that the shift lever is in P and
depress the brake pedal.
2 Touch the Lexus emblem side of the
electronic key to the engine switch.
When the electronic key is detected, a
buzzer sounds and the engine switch will
turn to IGNITION ON mode.
When the smart access system with
push-button start is deactivated in custom-
ization setting, the engine switch will turn
to ACCESSORY mode.
3 Firmly depress the brake pedal and
check that is shown on the
multi-information display.
4 Press the engine switch.
In the event that the engine still cannot
be started, contact your Lexus dealer.
■Stopping the engine
Shift the shift lever to P and press the engine
switch as you normally do when stopping
the engine.
■Electronic key battery
As the above procedure is a temporary
measure, it is recommended that the elec-
tronic key battery be replaced immediately
when the battery is depleted. ( P.283)
■Alarm (For Canada)
Using the mechanical ke y to lock the doors
will not set the alarm system.
If a door is unlocked using the mechanical
WARNING
■When using the mechanical key and
operating the power windows or
moon roof
Operate the power window or moon
roof after checking to make sure that
there is no possibilit y of any passenger
having any of their body parts caught in
the window or moon roof.
Also, do not allow ch ildren to operate the
mechanical key. It is possible for children
and other passengers to get caught in
the power window or moon roof.
Starting the engine
Page 334 of 408

3347-2. Steps to take in an emergency
key when the alarm system is set, the alarm
may be triggered.
■Changing engine switch modes
Release the brake pedal and press the
engine switch in step 3 above.
The engine does not start and modes will be
changed each time the switch is pressed.
( P.130)
If you have a set of jumper (or booster)
cables and a second vehicle with a
12-volt battery, you can jump start your
vehicle by following the steps below.
1 Confirm that the electronic key is
being carried.
When connecting the jumper (or booster)
cables, depending on the situation, the
alarm may activate and doors locked.
( P.59)
2 Open the hood. ( P.264)
3 Remove the engine cover.
Raise the rear of the engine cover
to remove the rear clip, and then
If the vehicle battery is dis-
charged
The following procedures may be
used to start the engine if the vehi-
cle’s battery is discharged.
You can also call your Lexus dealer
or a qualified repair shop.
Restarting the engine
Page 339 of 408
3397-2. Steps to take in an emergency
7
When trouble arises
1Stop the engine. Set the parking
brake and shift the shift lever to P.
2 Remove the mud, snow or sand
from around the rear wheels.
3 Place wood, stones or some other
material under the rear wheels to
help provide traction.
4 Restart the engine.
5 Shift the shift lever to D or R and
release the parking brake. Then,
while exercising caution, depress
the accelerator pedal.
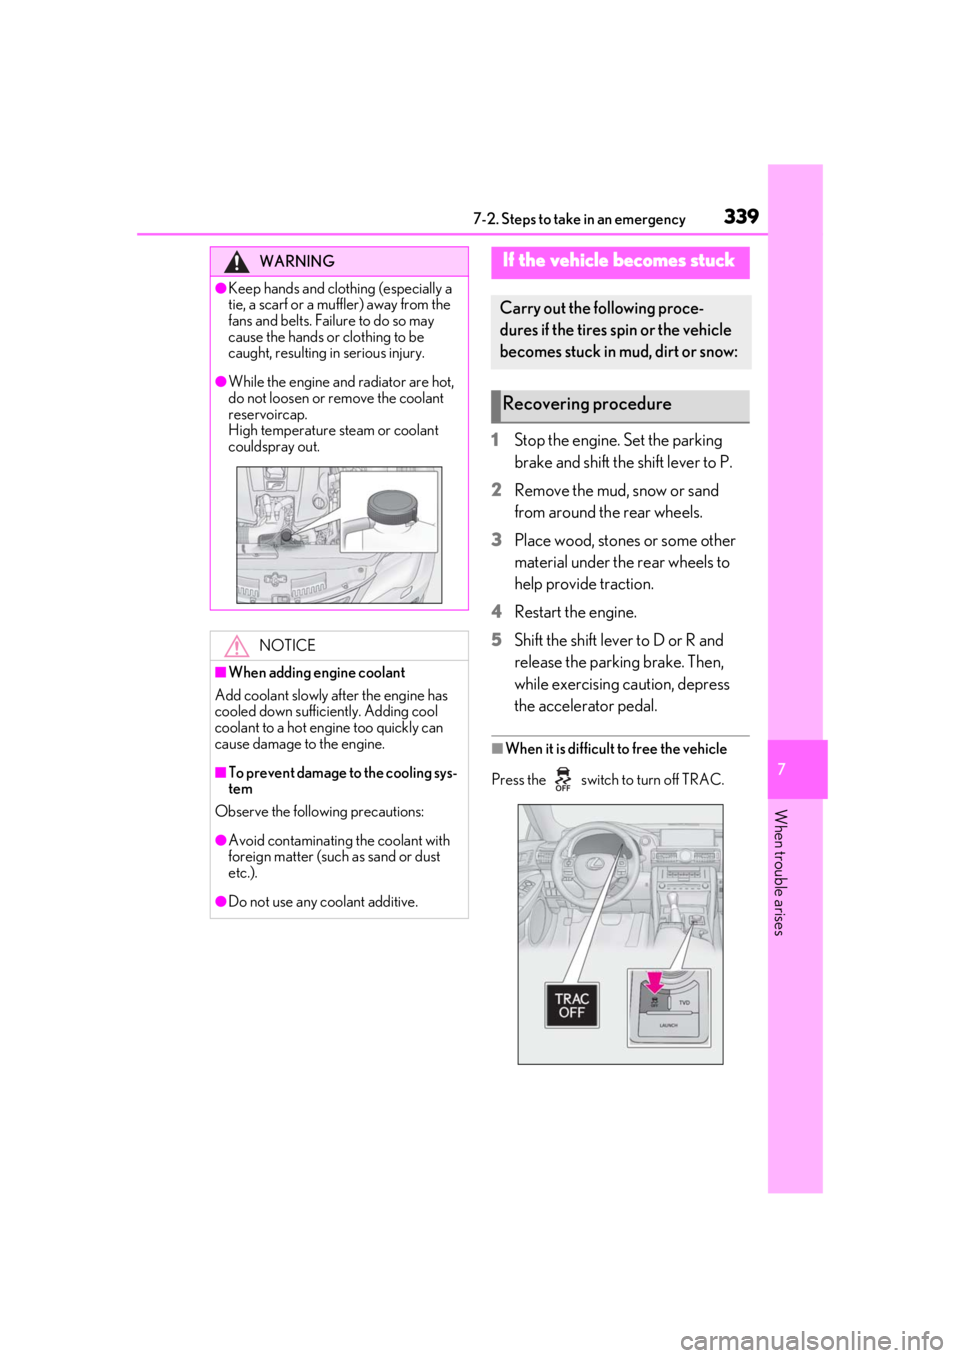
■When it is difficult to free the vehicle
Press the switch to turn off TRAC.
WARNING
●Keep hands and clothing (especially a
tie, a scarf or a muffler) away from the
fans and belts. Failure to do so may
cause the hands or clothing to be
caught, resulting in serious injury.
●While the engine and radiator are hot,
do not loosen or remove the coolant
reservoircap.
High temperature steam or coolant
couldspray out.
NOTICE
■When adding engine coolant
Add coolant slowly after the engine has
cooled down sufficiently. Adding cool
coolant to a hot engine too quickly can
cause damage to the engine.
■To prevent damage to the cooling sys-
tem
Observe the following precautions:
●Avoid contaminating the coolant with
foreign matter (such as sand or dust
etc.).
●Do not use any coolant additive.
If the vehicle becomes stuck
Carry out the following proce-
dures if the tires spin or the vehicle
becomes stuck in mud, dirt or snow:
Recovering procedure
Page 346 of 408

3468-1. Specifications
Vehicles without TVD (Torque Vectoring Differential)
Vehicles with TVD (Torque Vectoring Differential)
*1: Your Lexus vehicle is filled with “Toyota Genuine Differential Gear Oil” at the factory.
Use Lexus approved “Toyota Genuine Differenti al Gear Oil” or an equivalent oil of
matching quality to satisfy the above specification. Please contact your Lexus dealer for
further details.
*2: Torque transfer modules are located on the right and left sides of the rear differential- unit.
*3: Using torque transfer module fluid other than “Toyota Genuine ATF WS” may cause deterioration of performance, vibration, or ultimately damage the TVD system of your
vehicle.
Differential
Oil capacity1.42 qt. (1.35 L, 1.19 Imp. qt.)
Oil type and viscosityToyota Genuine Differential Gear Oil LX
75W-85 GL-5 or equivalent
*1
DifferentialTorque transfer module*2
Oil capacity1.42 qt. (1.35 L, 1.19 Imp. qt.)
Left-hand side: 0.74 qt. (0.70 L,
0.62 Imp. qt.)
Right-hand side: 0.74 qt. (0.70 L,
0.62 Imp. qt.)
Oil type and viscos-
ityToyota Genuine Differential
Gear Oil LT
75W-85 GL-5 or equivalent
*1Toyota Genuine ATF WS*3
Brakes
Pedal clearance*14.0 in. (101 mm) Min.
Pedal free play0.04 0.24 in. (1.0 6.0 mm)
Brake pad wear limit0.04 in. (1.0 mm)
Parking brake lining wear limit0.04 in. (1.0 mm)
Parking brake pedal travel*28 - 11 clicks
Fluid typeSAE J1703 or FMVSS No.116 DOT 3, or SAE
J1704 or FMVSS No.116 DOT 4 brake fluid
Page 347 of 408
3478-1. Specifications
8
Vehicle specifications
*1: Minimum pedal clearance when depressed with a force of 112.4 lbf (500 N, 51.0 kgf)
while the engine is running.
*2: Parking brake pedal travel when depressed wi th a force of 67.4 lbf (300 N, 30.6 kgf)
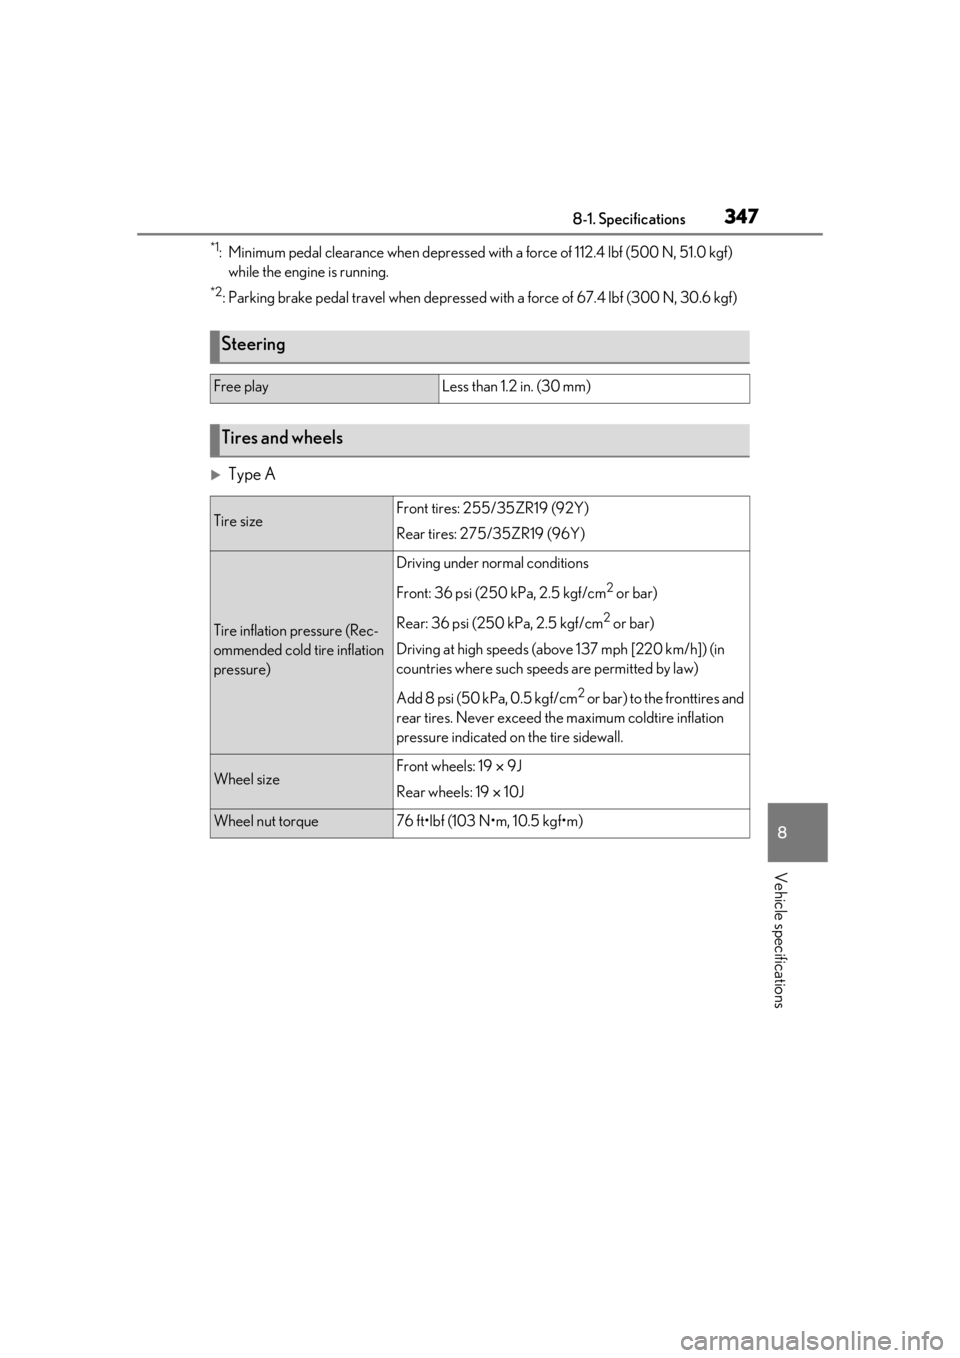
Type A
Steering
Free playLess than 1.2 in. (30 mm)
Tires and wheels
Tire sizeFront tires: 255/35ZR19 (92Y)
Rear tires: 275/35ZR19 (96Y)
Tire inflation pressure (Rec-
ommended cold tire inflation
pressure)
Driving under normal conditions
Front: 36 psi (250 kPa, 2.5 kgf/cm
2 or bar)
Rear: 36 psi (250 kPa, 2.5 kgf/cm
2 or bar)
Driving at high speeds (above 137 mph [220 km/h]) (in
countries where such speeds are permitted by law)
Add 8 psi (50 kPa, 0.5 kgf/cm
2 or bar) to the fronttires and
rear tires. Never exceed th e maximum coldtire inflation
pressure indicated on the tire sidewall.
Wheel sizeFront wheels: 19 9J
Rear wheels: 19 10J
Wheel nut torque76 ft•lbf (103 N•m, 10.5 kgf•m)