child seat LEXUS RX200T 2017 Owner's Guide
[x] Cancel search | Manufacturer: LEXUS, Model Year: 2017, Model line: RX200T, Model: LEXUS RX200T 2017Pages: 776, PDF Size: 44.51 MB
Page 72 of 776
721-2. Child safety
RX350/RX200t_EE_OM48F32E
Key of letters inserted in the above table:
X: Not suitable seat position for ISOFIX child restraint systems in this mass
group and/or size class.
IUF: Suitable for ISOFIX forward-facing child restraint systems of “universal”
category approved for use in this mass group.
IL: Suitable for ISOFIX child restraint systems of the categories for “specific
vehicles”, “restricted”, or “semi-universal”, approved for use in this mass
group.
*: If the head restraint interferes with your child restraint system, and the head restraint
can be removed, remove the head restraint. Otherwise, put the head restraint in the
upper most position.
When securing some types of child restrain t systems in second row seats, it may
not be possible to properly use the seat belts in positions next to the child
restraint without interfering with it or affecting seat belt effectiveness. Be sure
your seat belt fits snugly across your shoulder and low on your hips. If it does not,
or if it interferes with the child restraint, move to a different position. Failure to do
so may result in death or serious injury.
The child restraint systems mentioned in the table may not be available outside
the EU area.
●When installing a child restraint in the rear seats, adjust the front seat so that it
does not interfere with the child or child restraint system.
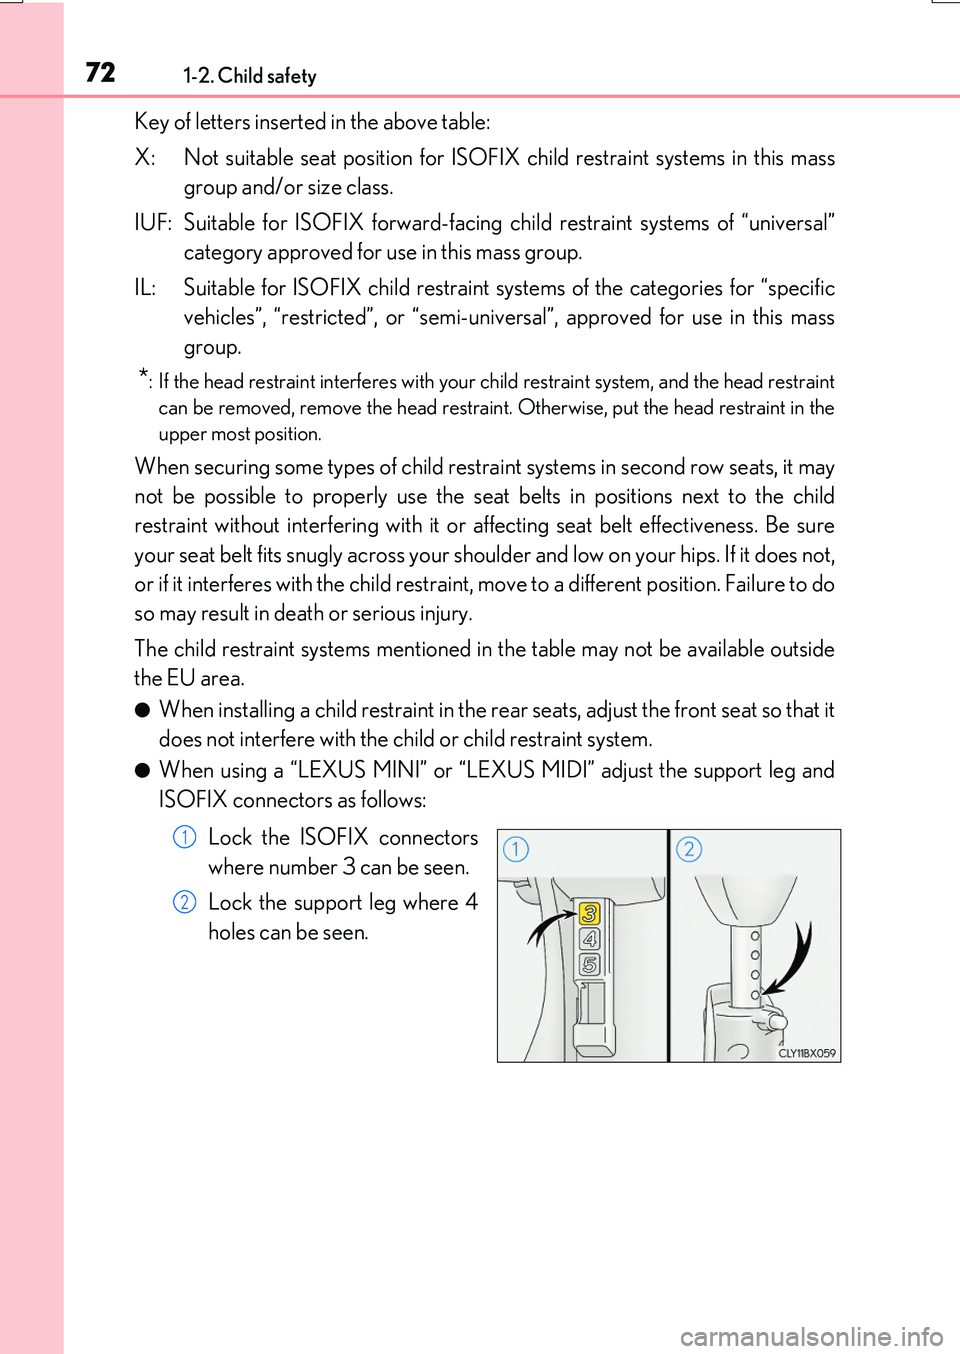
●When using a “LEXUS MINI” or “LEXUS MIDI” adjust the support leg and
ISOFIX connectors as follows:
Lock the ISOFIX connectors
where number 3 can be seen.
Lock the support leg where 4
holes can be seen.
1
2
Page 73 of 776

731-2. Child safety
1
For safety and security
RX350/RX200t_EE_OM48F32E
■Child restraint system suitability table
(Installed using i-Size [Child restraint system conforms with ECE R129])
If your child restraint system is of “i-Size” category, you can install it on the
positions mentioned by i-U in the table below. Child restraint system category
can be found in the child restraint system manual.
Key of letters inserted in the above table:
X: Not suitable for use with i-Size child restraint systems.
i-U: Suitable for i-Size “universal” child restraint systems forward and rearward
facing.
*: If the head restraint interferes with your child restraint system, and the head restraint
can be removed, remove the head restraint. Otherwise, put the head restraint in the
upper most position.
When securing some types of child restrain t systems in second row seats, it may
not be possible to properly use the seat belts in positions next to the child
restraint without interfering with it or affecting seat belt effectiveness. Be sure
your seat belt fits snugly across your shoulder and low on your hips. If it does not,
or if it interferes with the child restraint, move to a different position. Failure to do
so may result in death or serious injury.
When installing a child restraint in the re ar seats, adjust the front seat so that it
does not interfere with the child or child restraint system.
Seating position
Front seatRear seat
Passenger seatOutboardCenter
i-Size child
restraint systemsXi-U*X
Page 74 of 776

741-2. Child safety
RX350/RX200t_EE_OM48F32E
■Installation with ISOFIX rigid anchor (ISOFIX child restraint system)
Install the child restraint system in accordance to the operation manual
enclosed with the child restraint system.
Adjust the seat
Adjust the seatback angle to the most uplight position.
Remove the head restraint if it interferes with your child restraint system.
( P. 200)
If the head restraint cannot be removed, raise it to the uppermost position.
Check the positions of the exclu-
sive fixing bars, and install the
child restraint system to the seat.
The bars are installed in the clear-
ance between the seat cushion and seatback.
After installing the child restraint system, rock it back and forth to ensure
that it is installed securely. ( P. 68)
1
2
3
WARNING
■When installing a child restraint system
Observe the following precautions. Failure to do so may result in death or serious injury.
●After securing a child restraint system, never adjust the seat.
●When using the lower anchors, be sure that there are no foreign objects around the anchors and that the seat belt is not caught behind the child restraint system.
●Follow all installation instructions provided by the child restraint system manufacturer.
4
Page 75 of 776

751-2. Child safety
1
For safety and security
RX350/RX200t_EE_OM48F32E
■Anchor brackets (for top strap)
Anchor brackets are provided for the outboard rear seat.
Use anchor brackets when fixing the
top strap.
■Fixing the top strap to the anchor bracket
Install the child restraint system in accordance to the operation manual
enclosed with the child restraint system.
Remove the head restraint if it interferes with your child restraint system.
( P. 200)
If the head restraint cannot be removed, raise it to the uppermost position.
Open the anchor bracket cover,
latch the hook onto the anchor
bracket and tighten the top strap.
Make sure the top strap is securely
latched. ( P. 68) When installing th e child restraint system with the head restraint being
raised, be sure to have the top strap pass underneath the head restraint.
Using an anchor bracket (for top strap)
Top strap
Anchor brackets
1
Hook Top strap
2
Page 76 of 776
761-2. Child safety
RX350/RX200t_EE_OM48F32E
WARNING
■When installing a child restraint system
Observe the following precautions. Failure to do so may result in death or serious injury.
●Firmly attach the top strap and make sure that the belt is not twisted.
●Do not attach the top strap to anything other than the anchor bracket.
●After securing a child restraint system, never adjust the seat.
●Follow all installation instructions provided by the child restraint system manufacturer.
●When installing the child restraint system with the head restraint being raised, after the head restraint has been raised and then the anchor bracket has been fixed, do not
lower the head restraint.
NOTICE
■Anchor brackets (for top strap)
When not in use, make certain to close the lid. If it remains open, the lid may be dam- aged.
Page 145 of 776
1453-2. Opening, closing and locking the doors
3
Operation of each component
RX350/RX200t_EE_OM48F32E
■Conditions affecting the operation of the smart entry & start system or wireless remote control
P. 170
■Customization
Some functions can be customized. ( P. 740)
WARNING
■To prevent an accident
Observe the following precautions while driving the vehicle.
Failure to do so may result in a door open ing and an occupant falling out, resulting in death or serious injury.
●Ensure that all doors are properly closed and locked.
●Do not pull the inside handle of the doors while driving.
Be especially careful for the front doors, as the doors may be opened even if the inside lock buttons are in locked position.
●Set the rear door child-protector locks wh en children are seated in the rear seats.
■When opening or closing a door
Check the surroundings of the vehicle such as whether the vehicle is on an incline,
whether there is enough space for a door to open and whether a strong wind is blow- ing. When opening or closing the door, hold the door handle tightly to prepare for any unpredictable movement.
■When using the wireless remote control and operating the power windows or themoon roof or panoramic moon roof
Operate the power windows or the moon roof or panoramic moon roof after checking
to make sure that there is no possibility of any passenger having any of their body parts caught in the windows or the moon roof or panoramic moon roof. Also, do not allow children to operate the wireless remote contro l. It is possible for children and other
passengers to get caught in the power windows or the moon roof or panoramic moon roof.
Page 193 of 776
1933-3. Adjusting the seats
3
Operation of each component
RX350/RX200t_EE_OM48F32E
WARNING
■When folding down the rear seatbacks and when the rear seatbacks are folded
Observe the following precautions. Failure to do so may result in death or serious injury.
●Do not fold down the rear seatbacks while driving.
●Stop the vehicle on level ground, apply the parking brake and shift the shift lever to P.
●Do not allow anyone to sit on a folded rear seatback or in the luggage compartment
while driving.
●Do not allow children to enter the luggage compartment.
■When operating the rear seatback
Observe the following precautions.
Failure to do so may result in death or serious injury.
●Keep other passengers from being hit by the rear seatback.
●Do not put your hands between the seats or near the moving parts, or let any part of
your body get caught.
●Power seat: Do not let children operate the rear seatback. Other passengers may get caught in the seat.
●Power seat: Check that there are no passengers sitting in a seat before folding itdown. Do not let passengers sit in the seat while it is being folded down.
■Seat adjustment
To reduce the risk of sliding under the lap be lt during a collision, do not recline the seat
more than necessary. If the seat is reclined excessively, the lap be lt may slide past the hips and apply restraint forces directly to the abdomen, or your ne ck may contact the shoulder belt, increasing
the risk of death or serious injury in the event of an accident. Adjustments should not be made while driving as the seat may unexpectedly move andcause the driver to lose control of the vehicle.
■After returning the rear seatback to the upright position
Observe the following precautions. Failure to do so may result in death or serious injury.
●Make sure that the rear seatback is secure ly locked in position by lightly pushing it back and forth.
●Check that the seat belts are not twisted or caught between or behind in the rear
seatback.
Page 549 of 776
5496-2. Using the air conditioning system and defogger
6
Interior features
RX350/RX200t_EE_OM48F32E
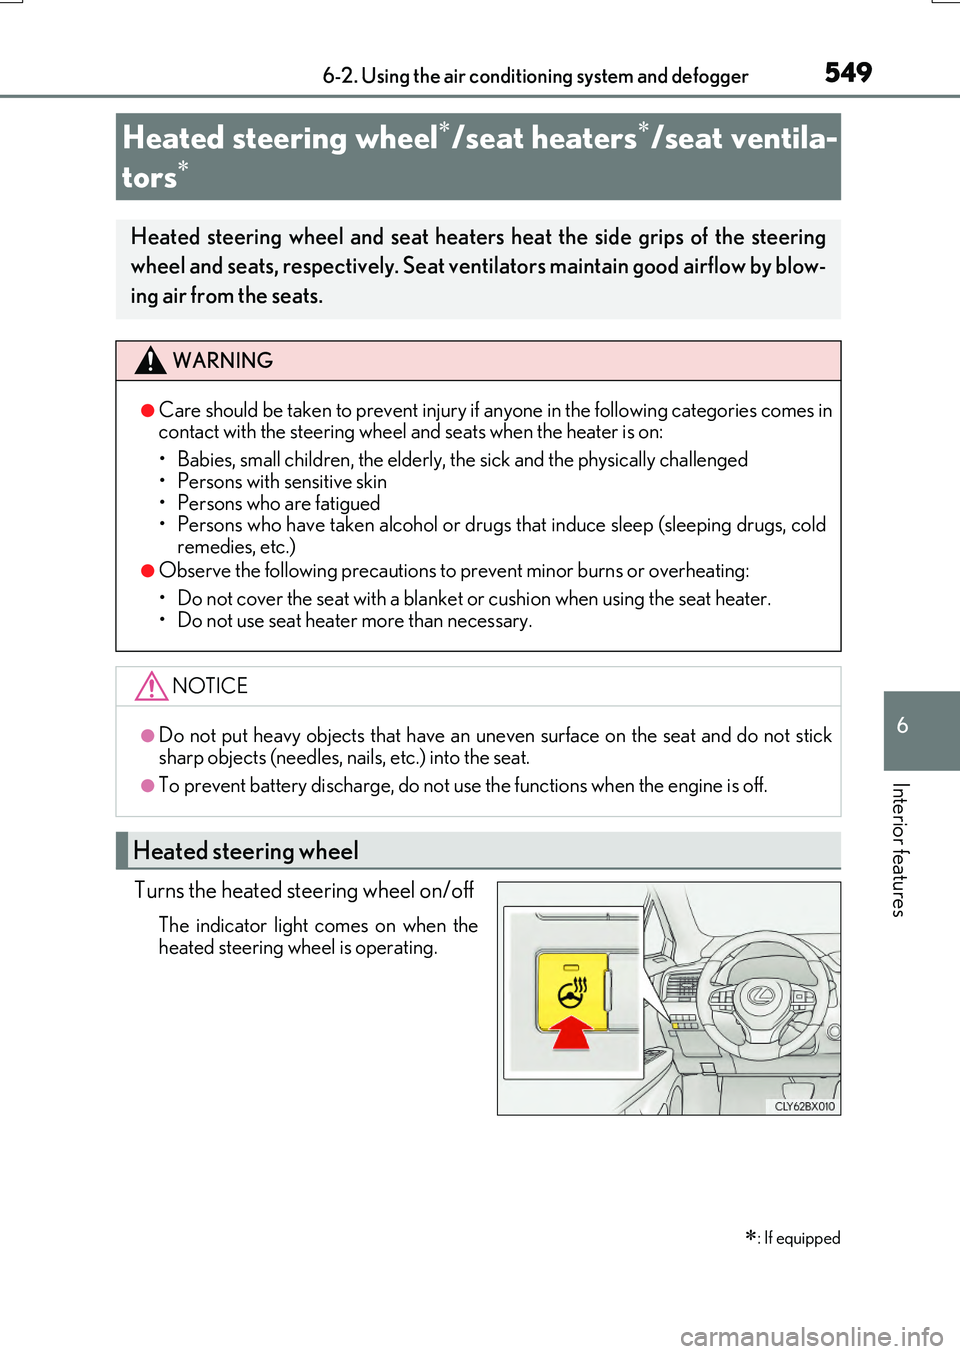
Turns the heated steering wheel on/off
The indicator light comes on when the
heated steering wheel is operating.
Heated steering wheel/seat heaters/seat ventila-
tors
: If equipped
Heated steering wheel and seat heaters heat the side grips of the steering
wheel and seats, respectively. Seat ventilators maintain good airflow by blow-
ing air from the seats.
WARNING
●Care should be taken to prevent injury if anyone in the following categories comes in contact with the steering wheel and seats when the heater is on:
• Babies, small children, the elderly, the sick and the physically challenged
• Persons with sensitive skin • Persons who are fatigued• Persons who have taken alcohol or drugs that induce sleep (sleeping drugs, cold
remedies, etc.)
●Observe the following precautions to prevent minor burns or overheating:
• Do not cover the seat with a blanket or cushion when using the seat heater. • Do not use seat heater more than necessary.
NOTICE
●Do not put heavy objects that have an uneven surface on the seat and do not sticksharp objects (needles, na ils, etc.) into the seat.
●To prevent battery discharge, do not use the functions when the engine is off.
Heated steering wheel
Page 758 of 776

758
RX350/RX200t_EE_OM48F32E
Alphabetical index
Alphabetical index
A/C ............................................................ 536
Air conditioning filter........................ 633
Automatic air conditioning
system ..................................................536
Blower customization .....................543
S-FLOW mode................................. 538
ABS (Anti-lock Brake System) ....... 422
Warning light ....................................... 667
Adaptive High-beam System .......... 269
Adaptive Variable Suspension
System.................................................... 423
Air conditioning filter .......................... 633
Air conditioning system ..................... 536
Air conditioning filter........................ 633
Automatic air conditioning
system ..................................................536
Blower customization .....................543
S-FLOW mode................................. 538
Airbag manual on-off system .............. 51
Airbags ........................................................ 40
Airbag manual on-off system ..........51
Airbag operating conditions ........... 47
Airbag precautions
for your child ........................................43
Airbag warning light ........................ 667
Correct driving posture.....................34
Curtain shield airbag
operating conditions ........................ 47
Curtain shield airbag
precautions .......................................... 45
General airbag precautions ............43
Locations of airbags ........................... 40
Modification and disposal
of airbags ...............................................46
Seat cushion airbag............................. 40
Side airbag operating
conditions .............................................. 47
Side airbag precautions.....................43
Side and curtain shield airbags
operating conditions ........................ 47
Side and curtain shield airbags
precautions ...........................................43
SRS airbags ............................................. 40
A
Page 760 of 776
760Alphabetical index
RX350/RX200t_EE_OM48F32E
Back door
Back door................................................146
Power back door.................................. 151
Touchless power back door......... 153
Wireless remote control ................... 151
Back-up lights
Replacing light bulbs........................ 643
Wattage..................................................738
Battery
Battery checking ................................607
If the battery is discharged .............. 714
Preparing and checking
before winter .................................... 429
Warning light .......................................666
Blind Spot Monitor (BSM) ................355
Blind Spot Monitor function...........361
Rear Crossing Traffic
Alert function ....................................365
Bluetooth®............................................... 513
Audio system ...................................... 490
Hands-free system
(for cellular phone)........................ 492
Boost gauge ............................................. 107
Bottle holders .........................................560
Brake
Brake Hold ........................................... 263
Fluid .......................................................... 736
Parking brake ......................................259
Warning light .......................................666
Brake assist.............................................. 422
Brake Hold .............................................. 263
Warning light....................................... 667
Break-in tips............................................ 228
Brightness control
Instrument panel light control ........ 98
BSM (Blind Spot Monitor) ............... 355
Blind Spot Monitor function .......... 361
Rear Crossing Traffic
Alert function.................................... 365
Card key ....................................................134
Care
Aluminum wheels..............................585
Exterior ................................................... 584
Interior.....................................................589
Seat belts ...............................................590
Self-restoring coat ............................ 584
Cargo hooks .......................................... 562
Cargo net hooks................................... 562
CD player ................................................ 466
Chains ....................................................... 430
Child restraint system............................ 54
Child seats definition .......................... 54
Child seats installation ...............62, 69
Installing a CRS to the
passenger seat ................................... 59
Installing CRS with ISOFIX
rigid anchors ........................................ 74
Installing CRS with seat belts ......... 66
Installing CRS with top strap ...........75
B
C