LEXUS RX350 2011 Owners Manual
RX350 2011
LEXUS
LEXUS
https://www.carmanualsonline.info/img/36/58968/w960_58968-0.png
LEXUS RX350 2011 Owners Manual
Page 66 of 821
66
nBack door closer (with power back door)
If the back door is left slightly open, it will close automatically.
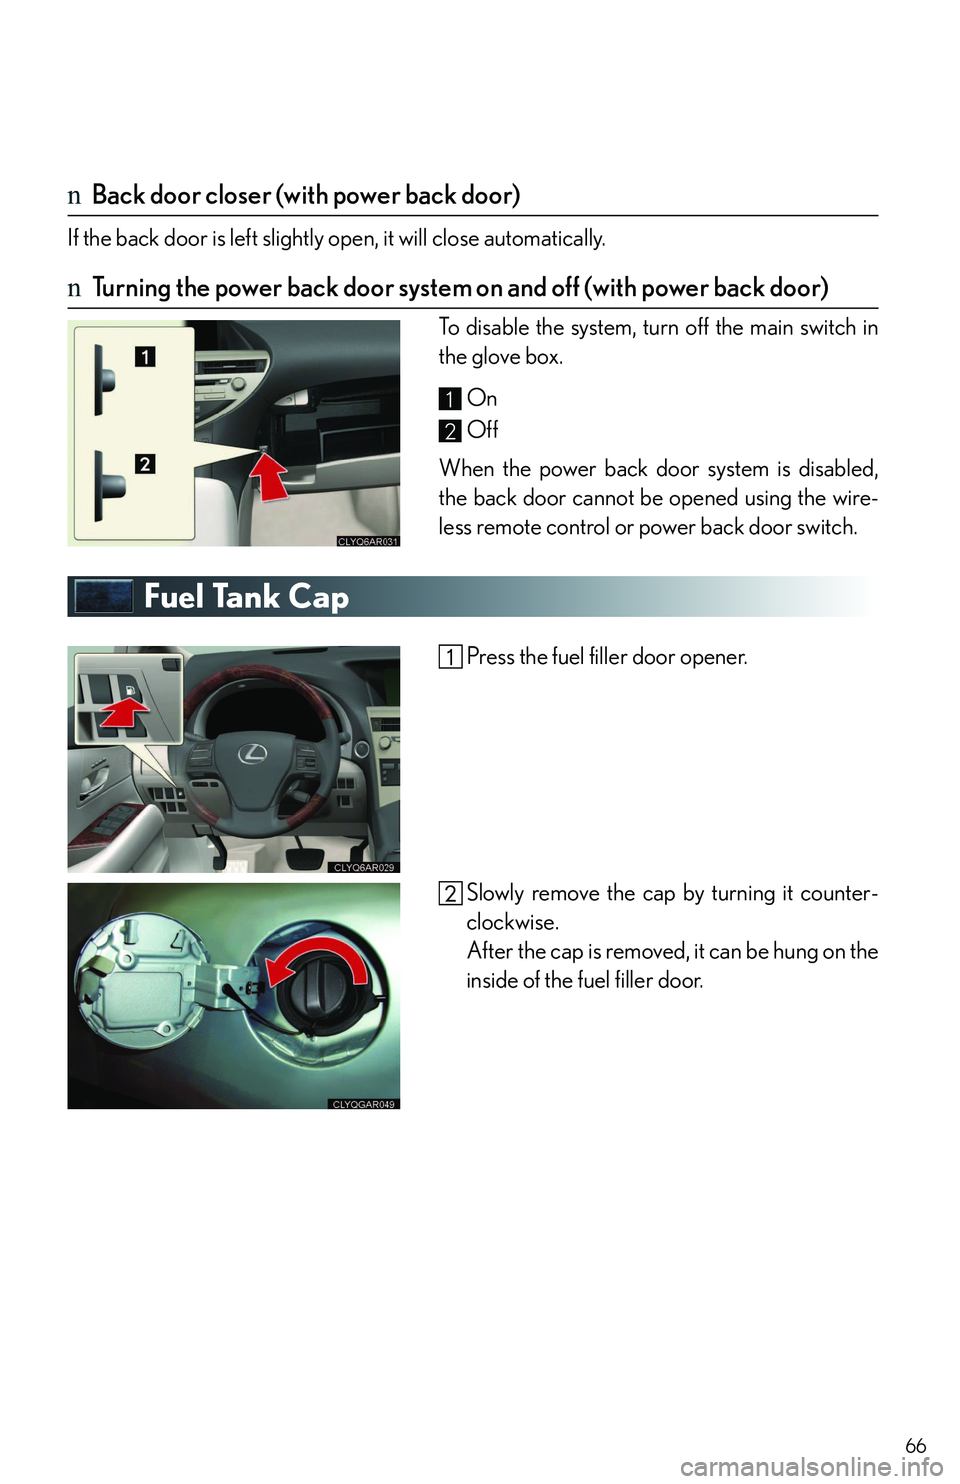
nTurning the power back door system on and off (with power back door)
To disable the system, turn off the main switch in
the glove box.
On
Off
When the power back door system is disabled,
the back door cannot be opened using the wire-
less remote control or power back door switch.
Fuel Tank Cap
Press the fuel filler door opener.
Slowly remove the cap by turning it counter-
clockwise.
After the cap is removed, it can be hung on the
inside of the fuel filler door.
1
2
Page 91 of 821
17
A
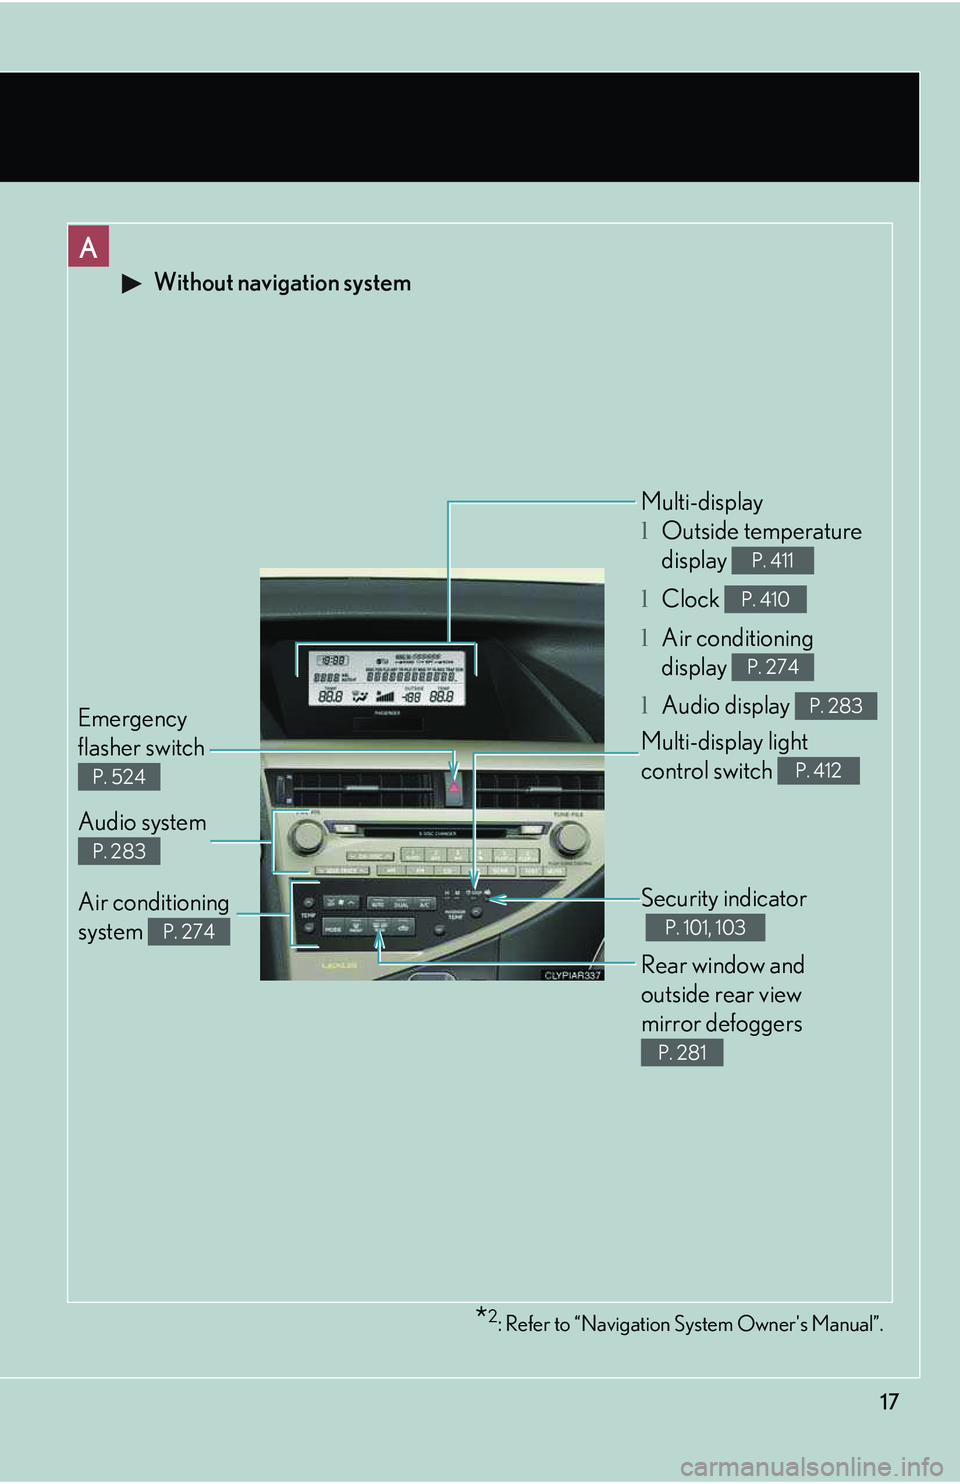
Without navigation system
Security indicator
P. 101, 103
Audio system
P. 283
Emergency
flasher switch
P. 524
Multi-display
lOutside temperature
display
lClock
lAir conditioning
display
lAudio display
P. 411
P. 410
P. 274
P. 283
Air conditioning
system P. 274
Rear window and
outside rear view
mirror defoggers
P. 281
*2: Refer to “Navigation System Owner's Manual”.
Multi-display light
control switch P. 412
Page 405 of 821
335
3-2. Using the audio system
3
Interior features
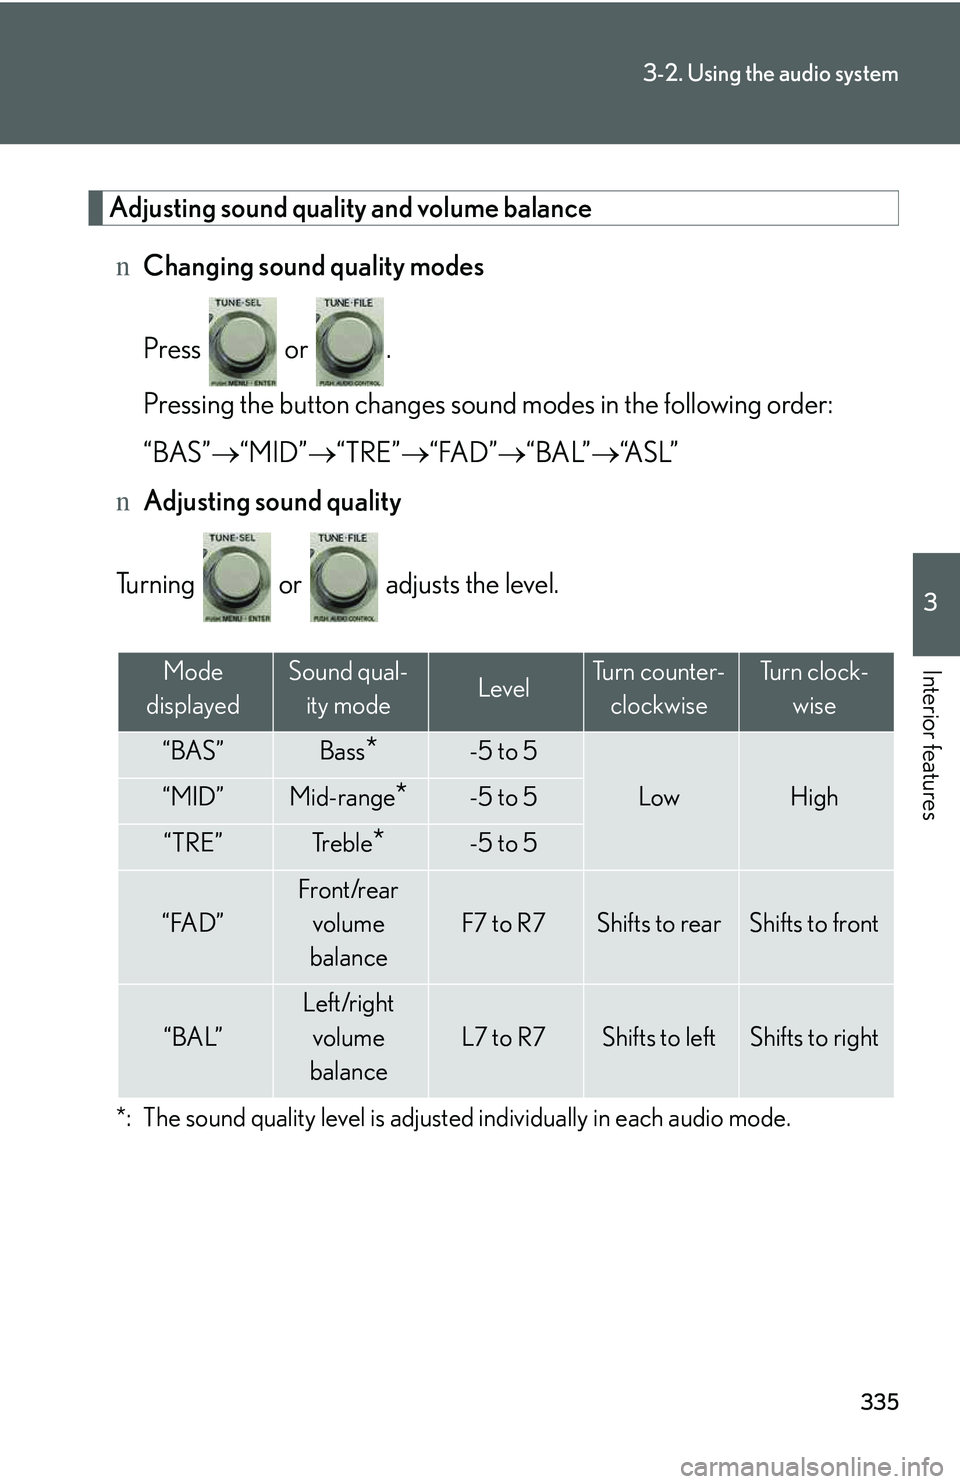
Adjusting sound quality and volume balance
nChanging sound quality modes
Press or .
Pressing the button changes sound modes in the following order:
“BAS”�→“MID”�→“TRE”�→“FAD”�→“BAL”�→“A S L ”
nAdjusting sound quality
Turning or adjusts the level.
*: The sound quality level is adjusted individually in each audio mode.
Mode
displayed
Sound qual-
ity modeLevelTurn counter-
clockwise
Tu r n c l o c k -
wise
“BAS”Bass*-5 to 5
LowHigh“MID”Mid-range*-5 to 5
“TRE”Tr e b l e*-5 to 5
“FAD”
Front/rear
volume
balance
F7 to R7Shifts to rearShifts to front
“BAL”
Left/right
volume
balance
L7 to R7Shifts to leftShifts to right
Page 406 of 821
336
3-2. Using the audio system
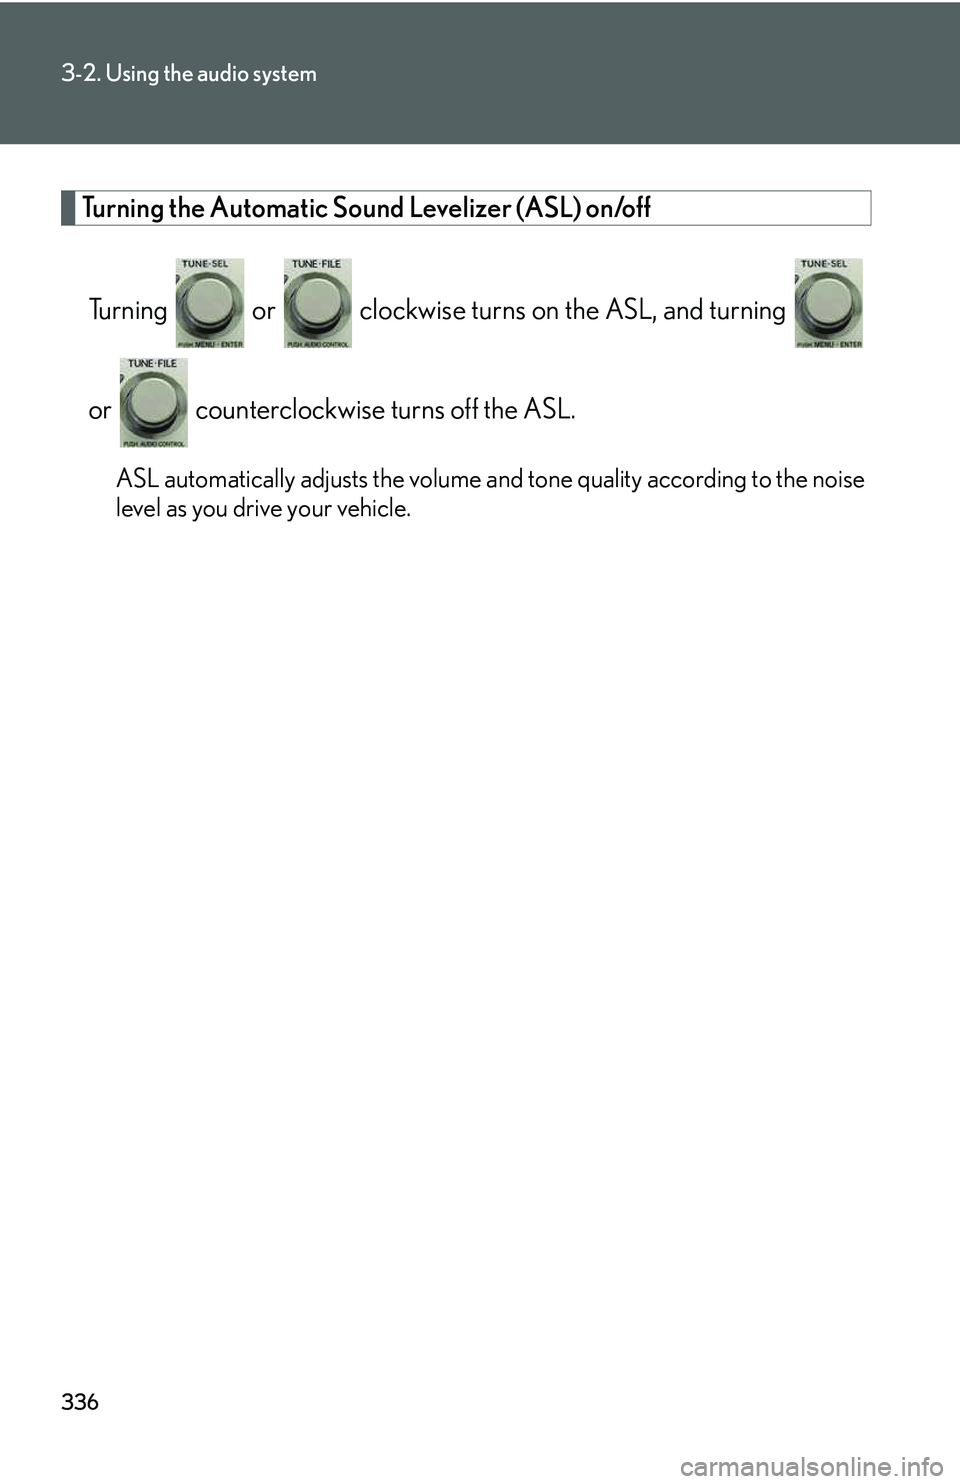
Turning the Automatic Sound Levelizer (ASL) on/off
Turning or clockwise turns on the ASL, and turning
or counterclockwise turns off the ASL.
ASL automatically adjusts the volume and tone quality according to the noise
level as you drive your vehicle.
Page 457 of 821
387
3-4. Using the hands-free phone system (for mobile phones)
3
Interior features
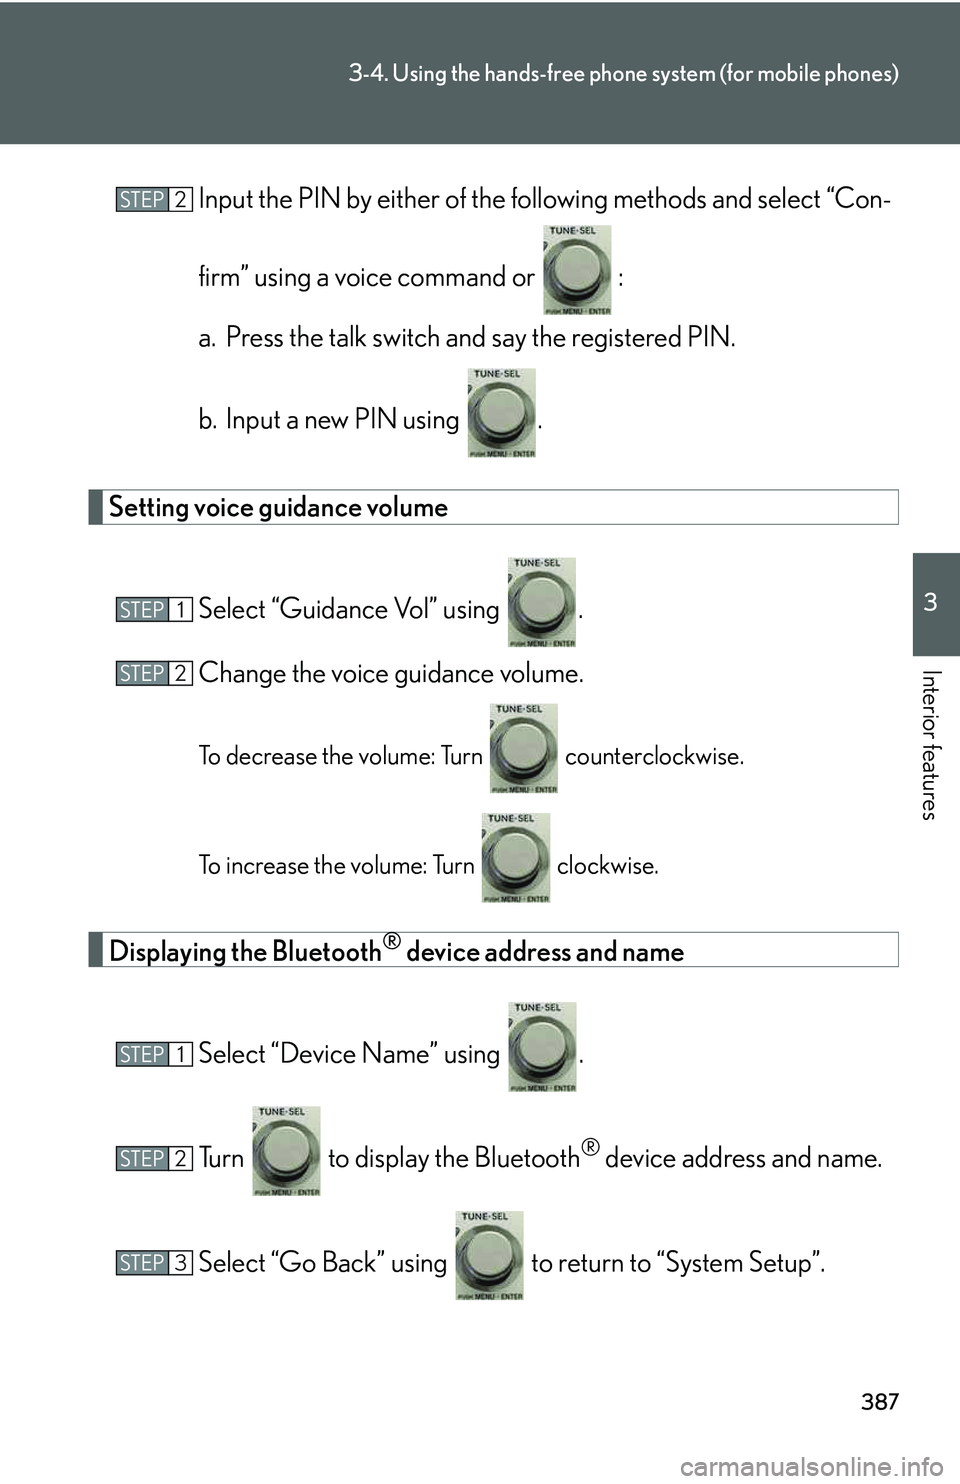
Input the PIN by either of the following methods and select “Con-
firm” using a voice command or :
a. Press the talk switch and say the registered PIN.
b. Input a new PIN using .
Setting voice guidance volume
Select “Guidance Vol” using .
Change the voice guidance volume.
To decrease the volume: Turn counterclockwise.
To increase the volume: Turn clockwise.
Displaying the Bluetooth® device address and name
Select “Device Name” using .
Turn to display the Bluetooth® device address and name.
Select “Go Back” using to return to “System Setup”.
STEP2
STEP1
STEP2
STEP1
STEP2
STEP3
Page 480 of 821
410
3-7. Other interior features
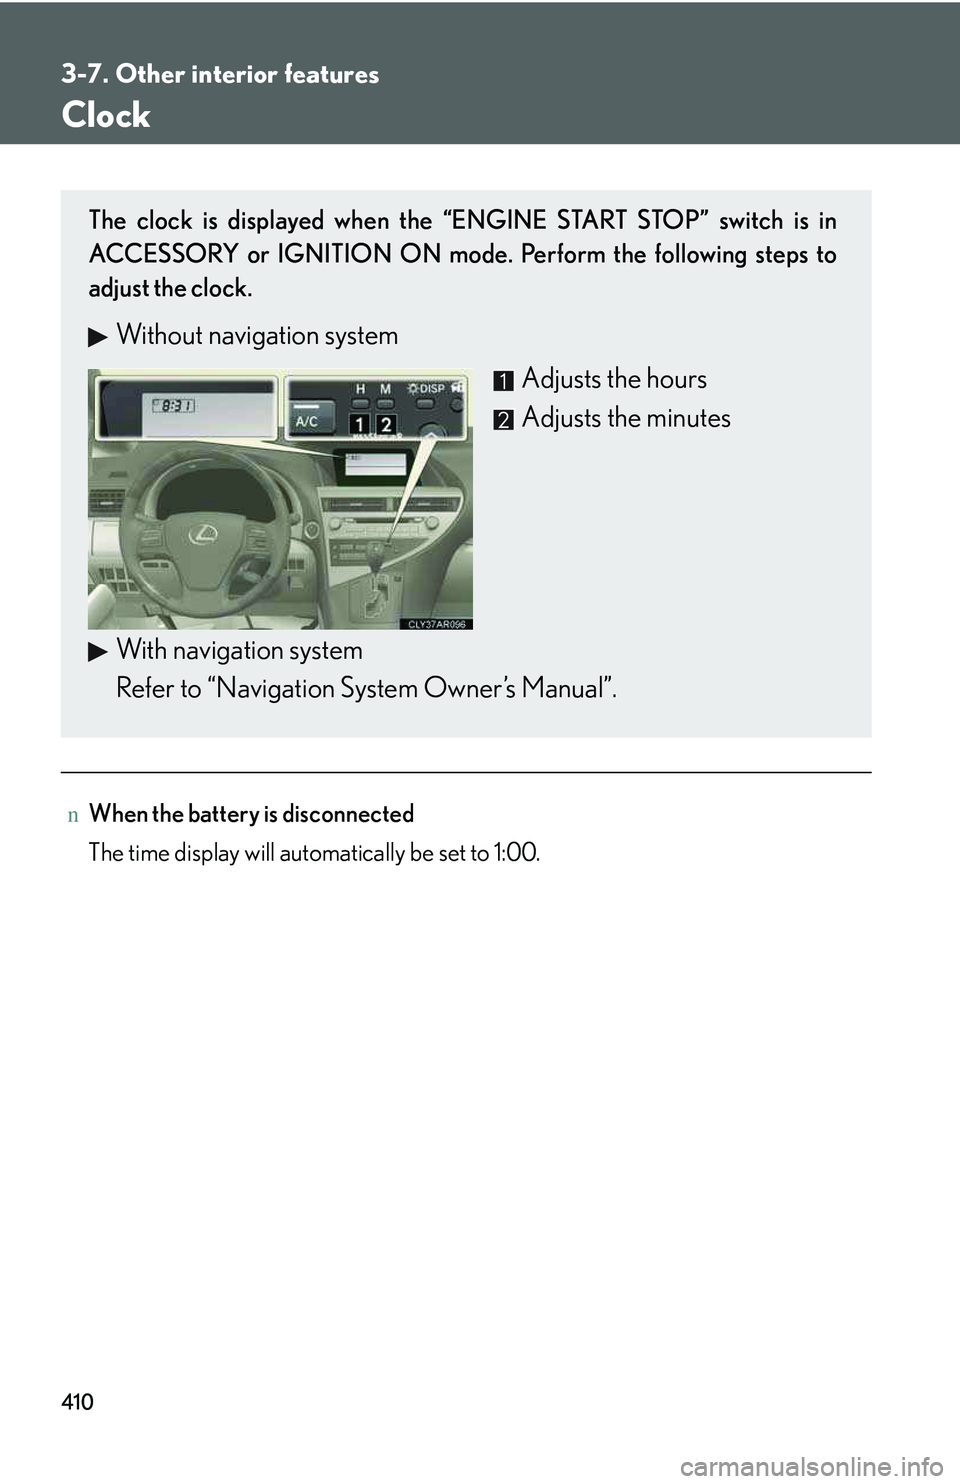
Clock
nWhen the battery is disconnected
The time display will automatically be set to 1:00.
The clock is displayed when the “ENGINE START STOP” switch is in
ACCESSORY or IGNITION ON mode. Perform the following steps to
adjust the clock.
Without navigation system
Adjusts the hours
Adjusts the minutes
With navigation system
Refer to “Navigation System Owner’s Manual”.
Page 537 of 821
467
4-3. Do-it-yourself maintenance
4
Maintenance and care
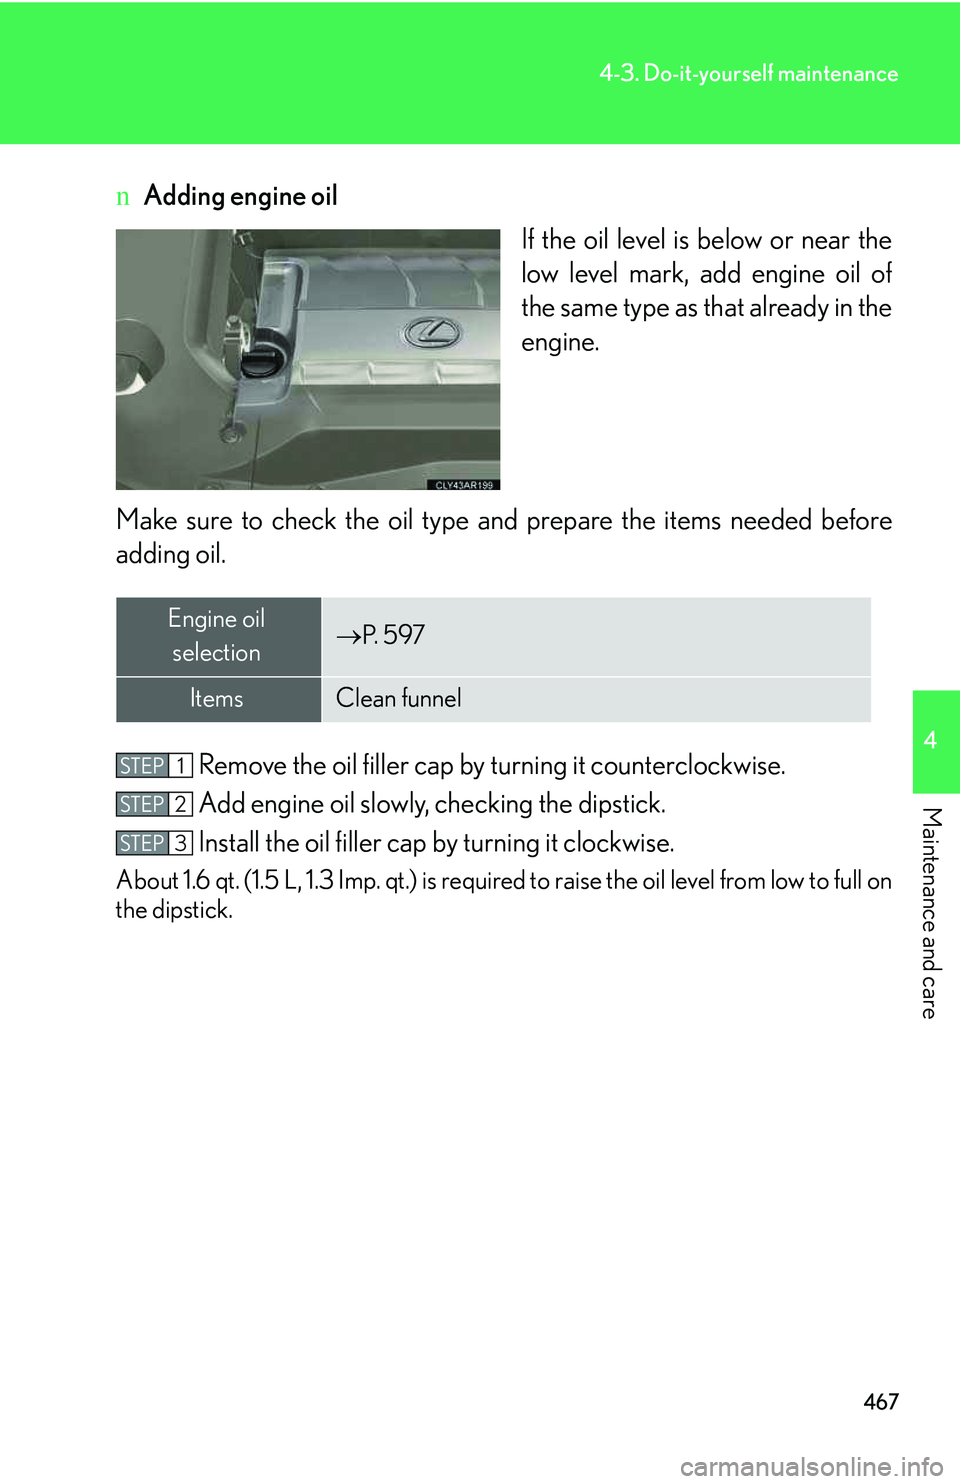
nAdding engine oil
If the oil level is below or near the
low level mark, add engine oil of
the same type as that already in the
engine.
Make sure to check the oil type and prepare the items needed before
adding oil.
Remove the oil filler cap by turning it counterclockwise.
Add engine oil slowly, checking the dipstick.
Install the oil filler cap by turning it clockwise.
About 1.6 qt. (1.5 L, 1.3 Imp. qt.) is required to raise the oil level from low to full on
the dipstick.
Engine oil
selection�→P. 5 9 7
ItemsClean funnel
STEP1
STEP2
STEP3
Page 583 of 821
513
4-3. Do-it-yourself maintenance
4
Maintenance and care
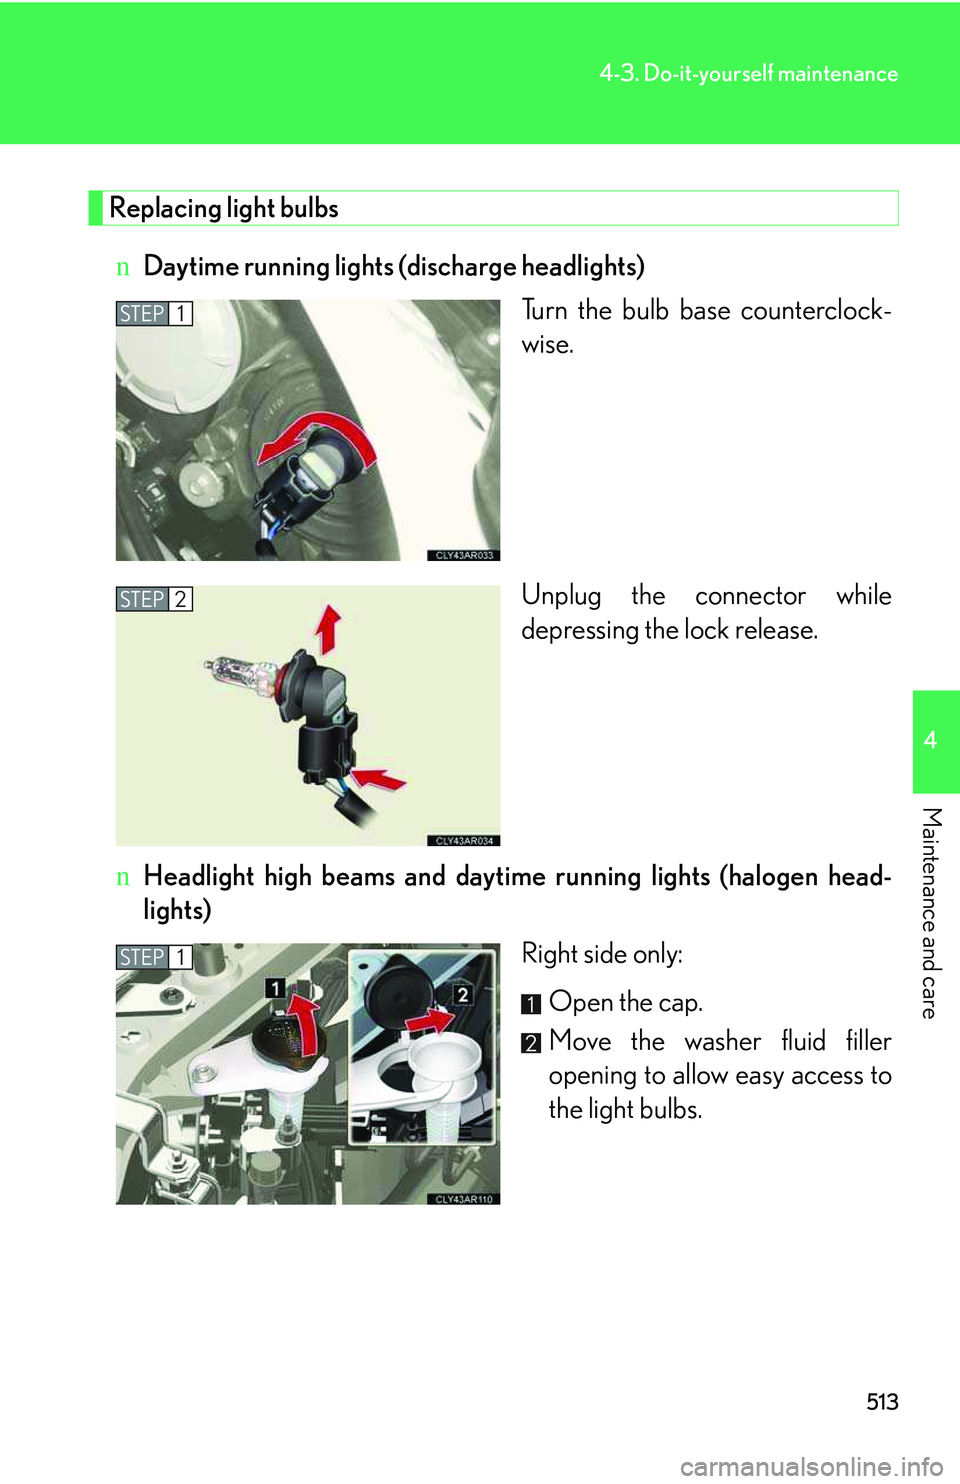
Replacing light bulbs
nDaytime running lights (discharge headlights)
Turn the bulb base counterclock-
wise.
Unplug the connector while
depressing the lock release.
nHeadlight high beams and daytime running lights (halogen head-
lights)
Right side only:
Open the cap.
Move the washer fluid filler
opening to allow easy access to
the light bulbs.
STEP1
STEP2
STEP1
Page 584 of 821
514
4-3. Do-it-yourself maintenance
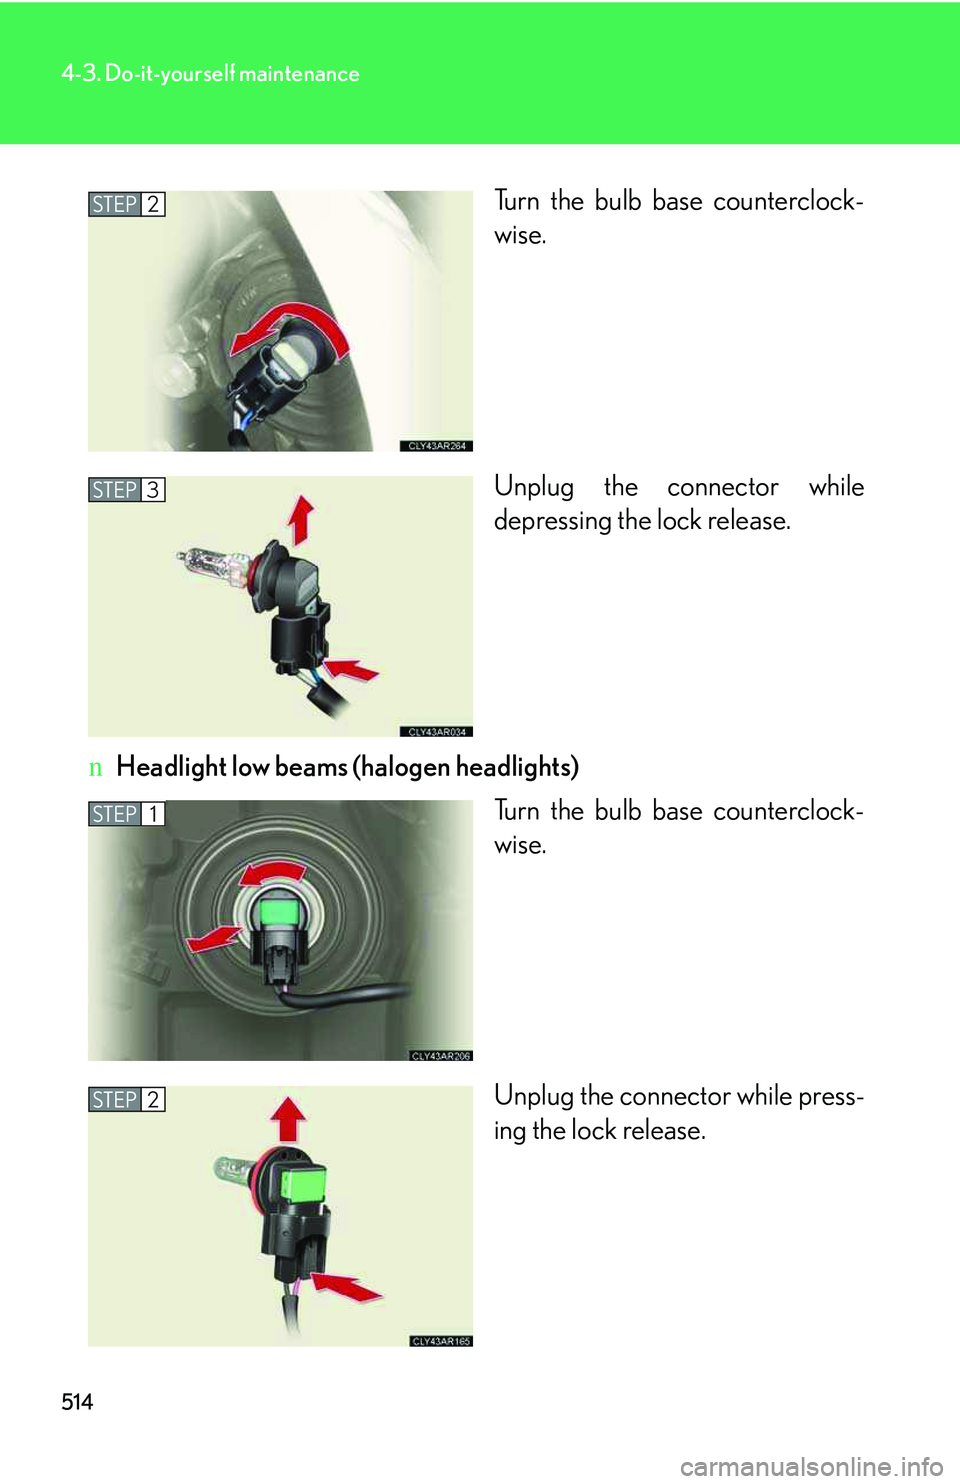
Turn the bulb base counterclock-
wise.
Unplug the connector while
depressing the lock release.
nHeadlight low beams (halogen headlights)
Turn the bulb base counterclock-
wise.
Unplug the connector while press-
ing the lock release.
STEP2
STEP3
STEP1
STEP2
Page 585 of 821
515
4-3. Do-it-yourself maintenance
4
Maintenance and care
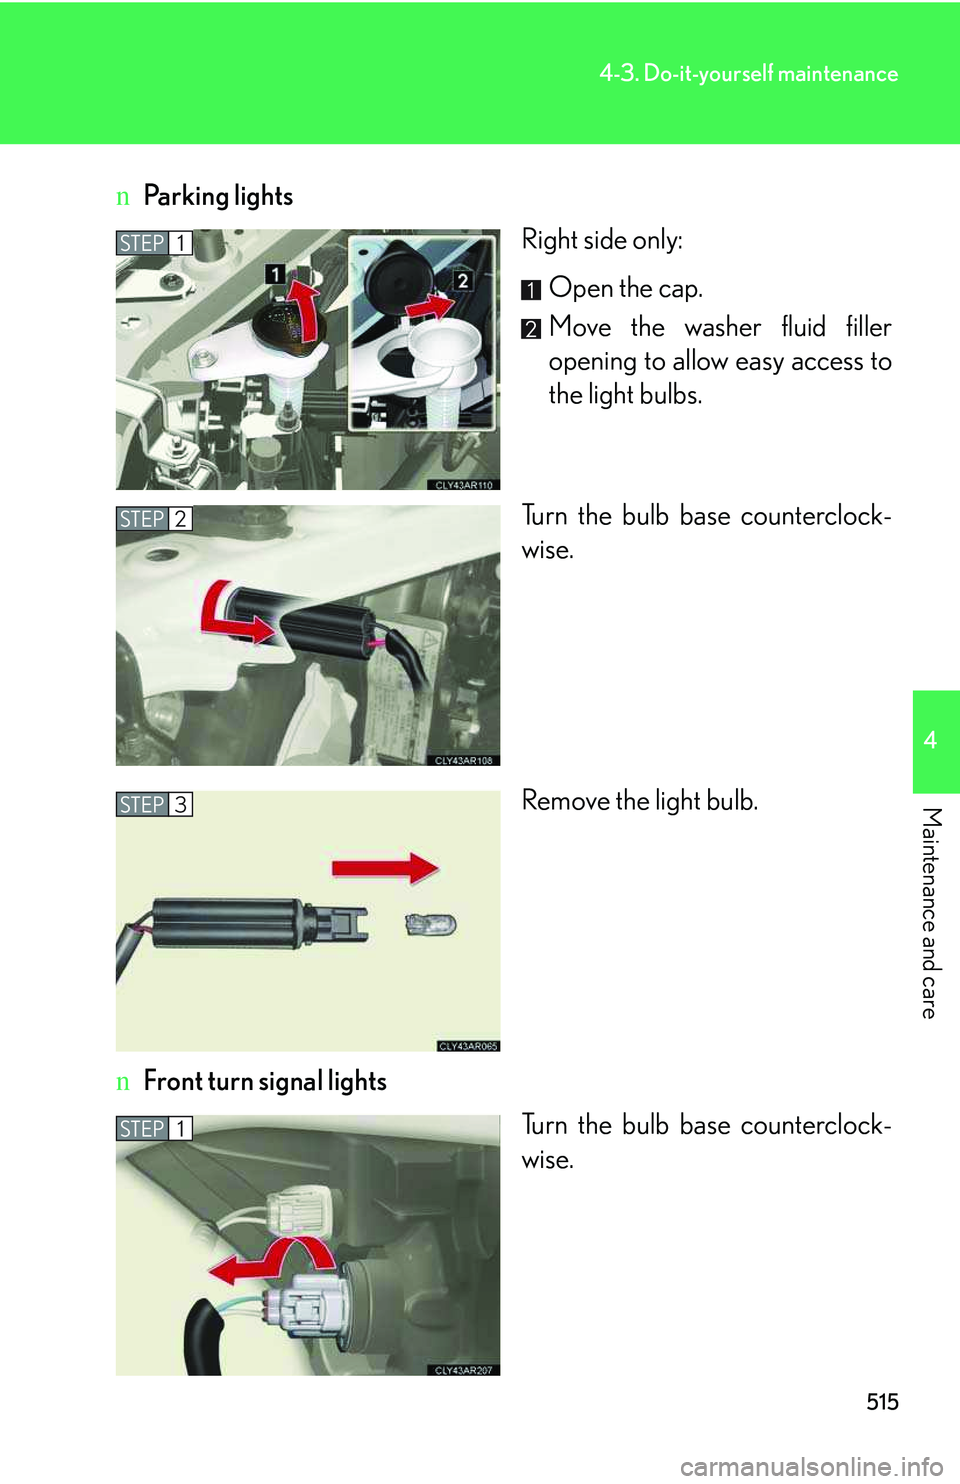
nParking lights
Right side only:
Open the cap.
Move the washer fluid filler
opening to allow easy access to
the light bulbs.
Turn the bulb base counterclock-
wise.
Remove the light bulb.
nFront turn signal lights
Turn the bulb base counterclock-
wise.
STEP1
STEP2
STEP3
STEP1
