LEXUS RX350 2019 Owners Manual
Manufacturer: LEXUS, Model Year: 2019, Model line: RX350, Model: LEXUS RX350 2019Pages: 777, PDF Size: 12.44 MB
Page 551 of 777
550 6-5. Using the other interior features
RX350/RX350L_U NOTICE ■
Conditions in which the wireless charger may not operate correctly
In the following situations, the wire less charger may not operate correctly:●
When a portable device is fully charged ●
When there is a foreign object between the charging area and portable device●
When a portable device becomes hot while charging●
When a portable device is placed on the wireless area with its charging surface fac-
ing up ●
When a portable device is not centered on the charging area ●
When the vehicle is near a TV tower, electric power plant, gas station, radio station,
large display, airport or other facility that generates stro ng radio waves or electrical
noise ●
When the portable device is in contact with, or is covered by any of the following
metallic objects:
• Cards to which aluminum foil is attached
• Cigarette boxes that ha ve aluminum foil inside
• Metallic wallets or bags
•Coins
•Metal hand warmers
• Media such as CDs and DVDs ●
When wireless keys (that emit radio waves) other than those of your vehicle are being
used nearby.
If in situations other than above the wirele ss charger does not operate properly or the
operation indicator light is blinking, the wireless charge r may be malfunctioning. Con-
tact your Lexus dealer. ■
To prevent failure or damage to data ●
Do not bring magnetic cards, such as a cr edit card, or magnetic recording media,
close to the wireless charger while charging. Otherwise, data may be erased due to
the influence of magnetism.
Additionally, do not bring pr ecision instruments such as wrist watches, close to the
wireless charger, as such objects may malfunction. ●
Do not leave portable devices in the cab in. The temperature inside the cabin may
become high when parked in the sun, and cause damage to the device. ■
To prevent battery discharge
Do not use the wireless charger for a long pe riod of time with the engine is stopped.
Page 552 of 777
5516-5. Using the other interior features
6
Interior features
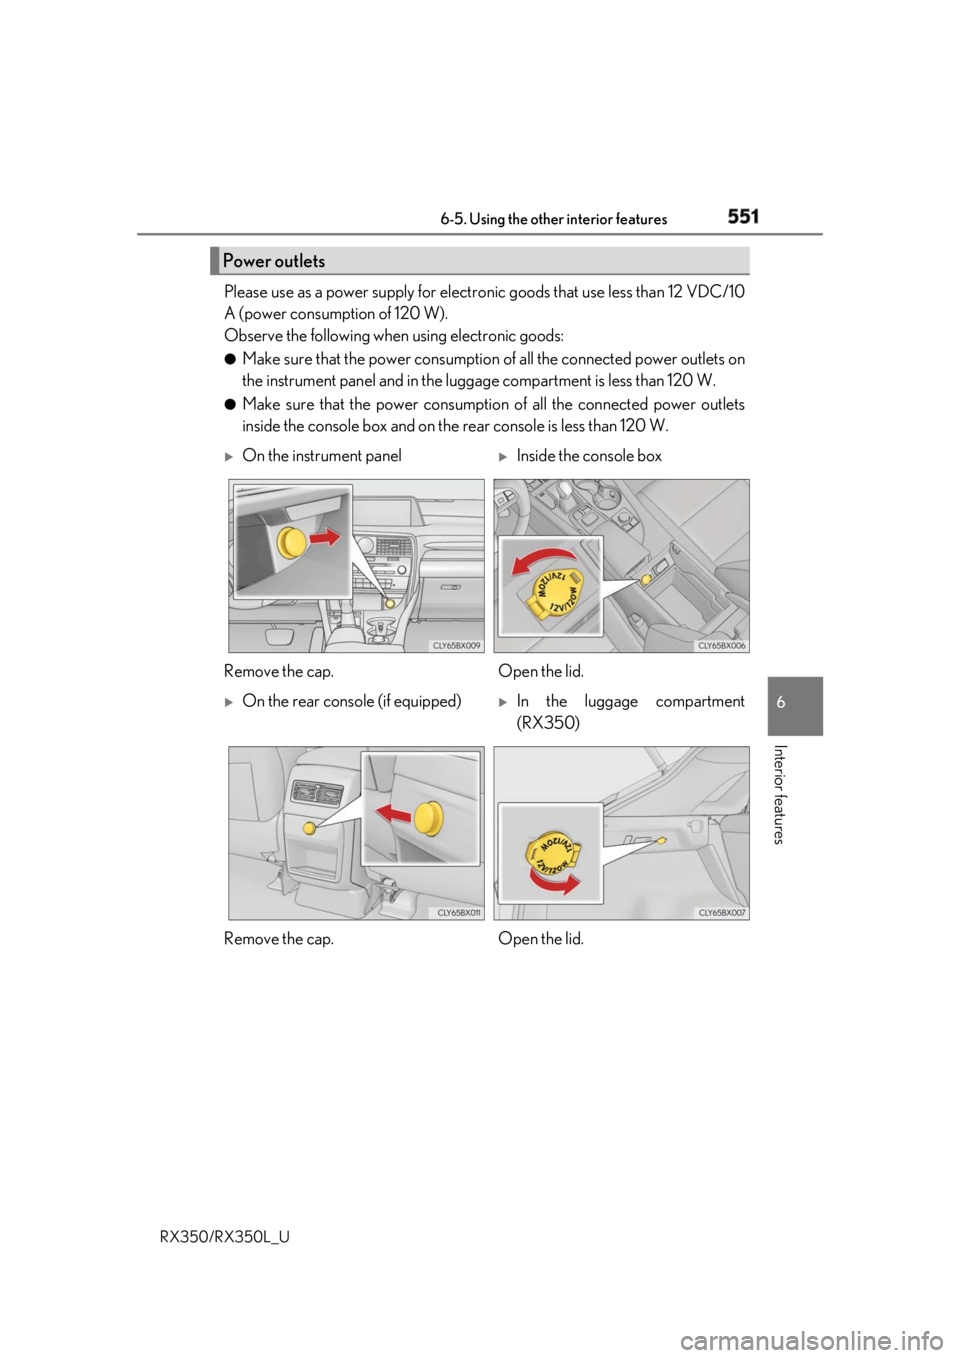
RX350/RX350L_U Please use as a power supply for electronic goods that use less than 12 VDC/10
A (power consumption of 120 W).
Observe the following when using electronic goods: ●
Make sure that the power consumption of all the connected power outlets on
the instrument panel and in the lugg age compartment is less than 120 W.●
Make sure that the power consumptio n of all the connected power outlets
inside the console box and on the rear console is less than 120 W.Power outlets
On the instrument panel
Inside the console box
Remove the cap. Open the lid.
On the rear console (if equipped)
In the luggage compartment
(RX350)
Remove the cap. Open the lid.
Page 553 of 777
552 6-5. Using the other interior features
RX350/RX350L_U ●
The power outlets can be used when the engine switch is in ACCESSORY or
IGNITION ON mode.
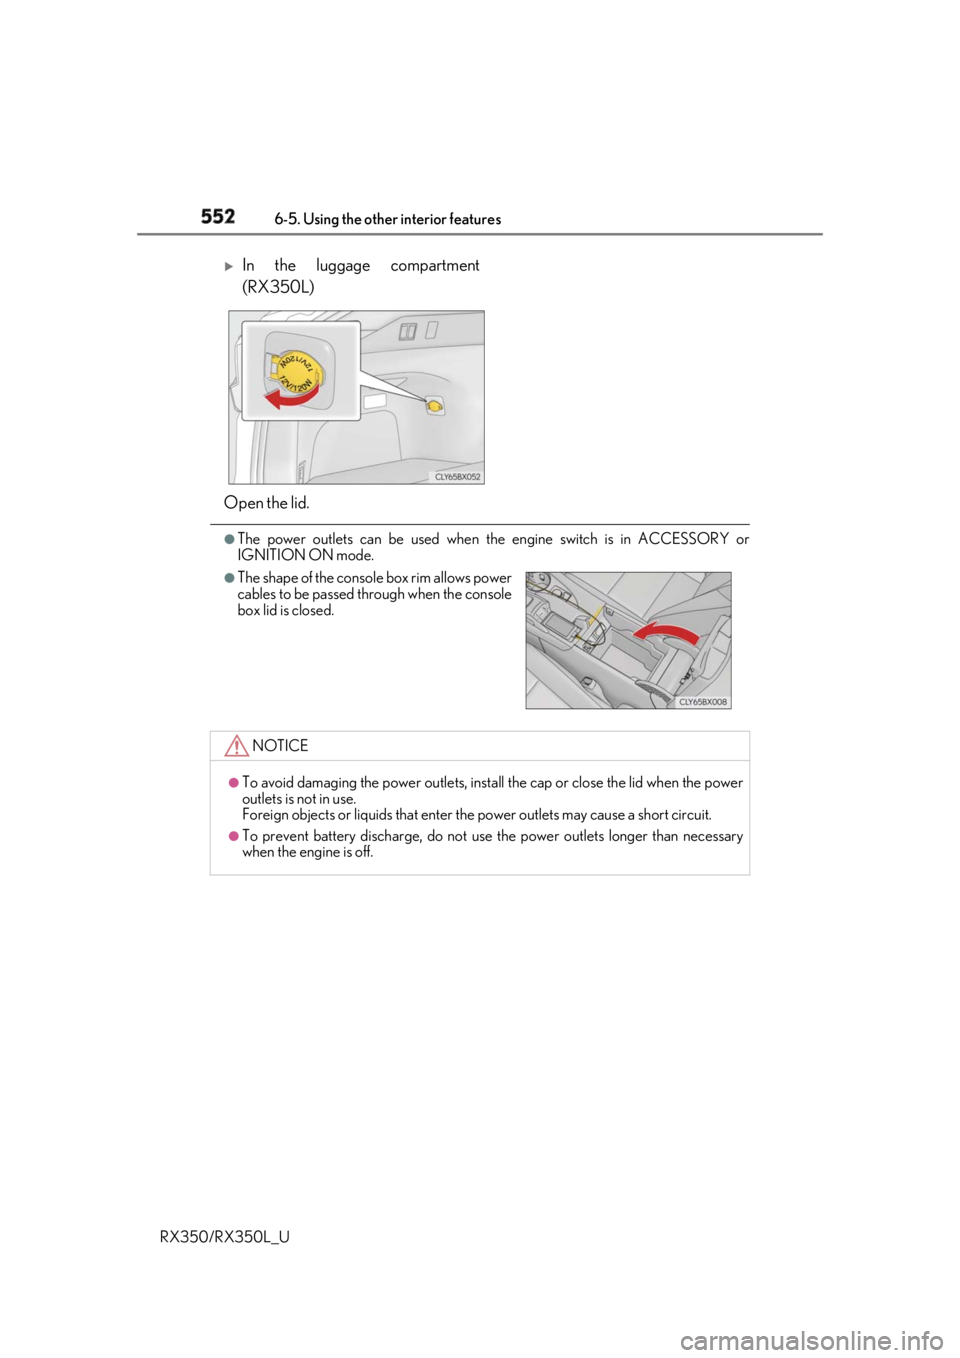
In the luggage compartment
(RX350L)
Open the lid. ●
The shape of the console box rim allows power
cables to be passed through when the console
box lid is closed.
NOTICE ●
To avoid damaging the power outlets, insta ll the cap or close the lid when the power
outlets is not in use.
Foreign objects or liquids that enter the power outlets may cause a short circuit. ●
To prevent battery discharge, do not use the power outlets longer than necessary
when the engine is off.
Page 554 of 777
5536-5. Using the other interior features
6
Interior features
RX350/RX350L_U The USB charging ports are used to supply 2.1 A of electricity at 5 V to external
devices. The USB charging ports are for charging only. They are not designed for
data transfer or other purposes. Depending on the external device, it may not
charge properly. Refer to the manual in cluded with the device before using a
USB charging port. ■
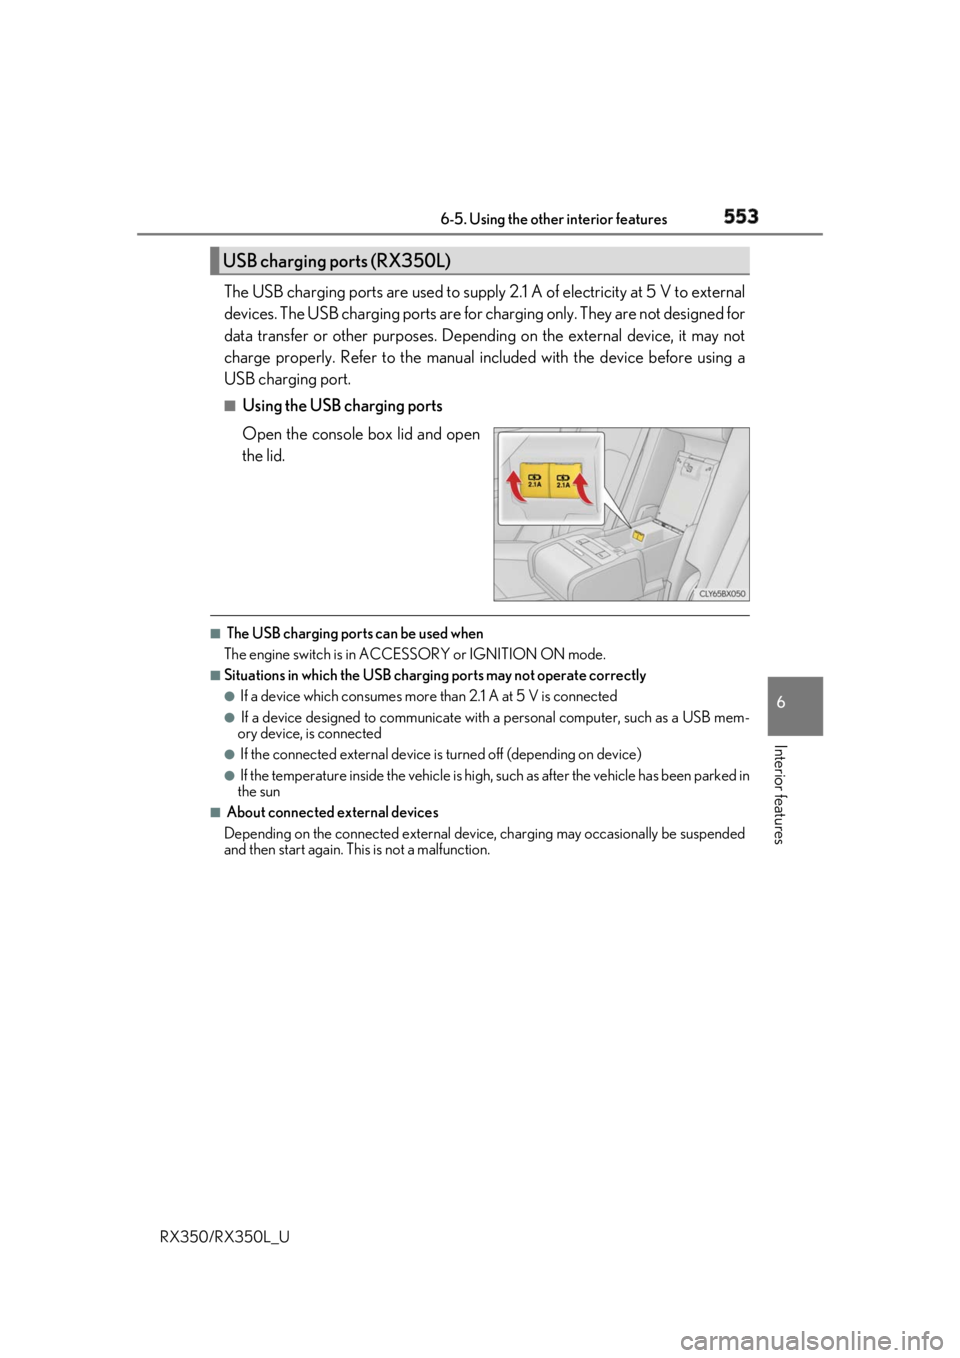
Using the USB charging ports
Open the console box lid and open
the lid. ■
The USB charging ports can be used when
The engine switch is in ACCESSORY or IGNITION ON mode. ■
Situations in which the USB charging ports may not operate correctly ●
If a device which consumes more than 2.1 A at 5 V is connected●
If a device designed to communicate with a personal computer, such as a USB mem-
ory device, is connected ●
If the connected external device is turned off (depending on device)●
If the temperature inside the vehicle is high, such as after the vehicle has been parked in
the sun ■
About connected external devices
Depending on the connected external device , charging may occasionally be suspended
and then start again. This is not a malfunction.USB charging ports (RX350L)
Page 555 of 777
554 6-5. Using the other interior features
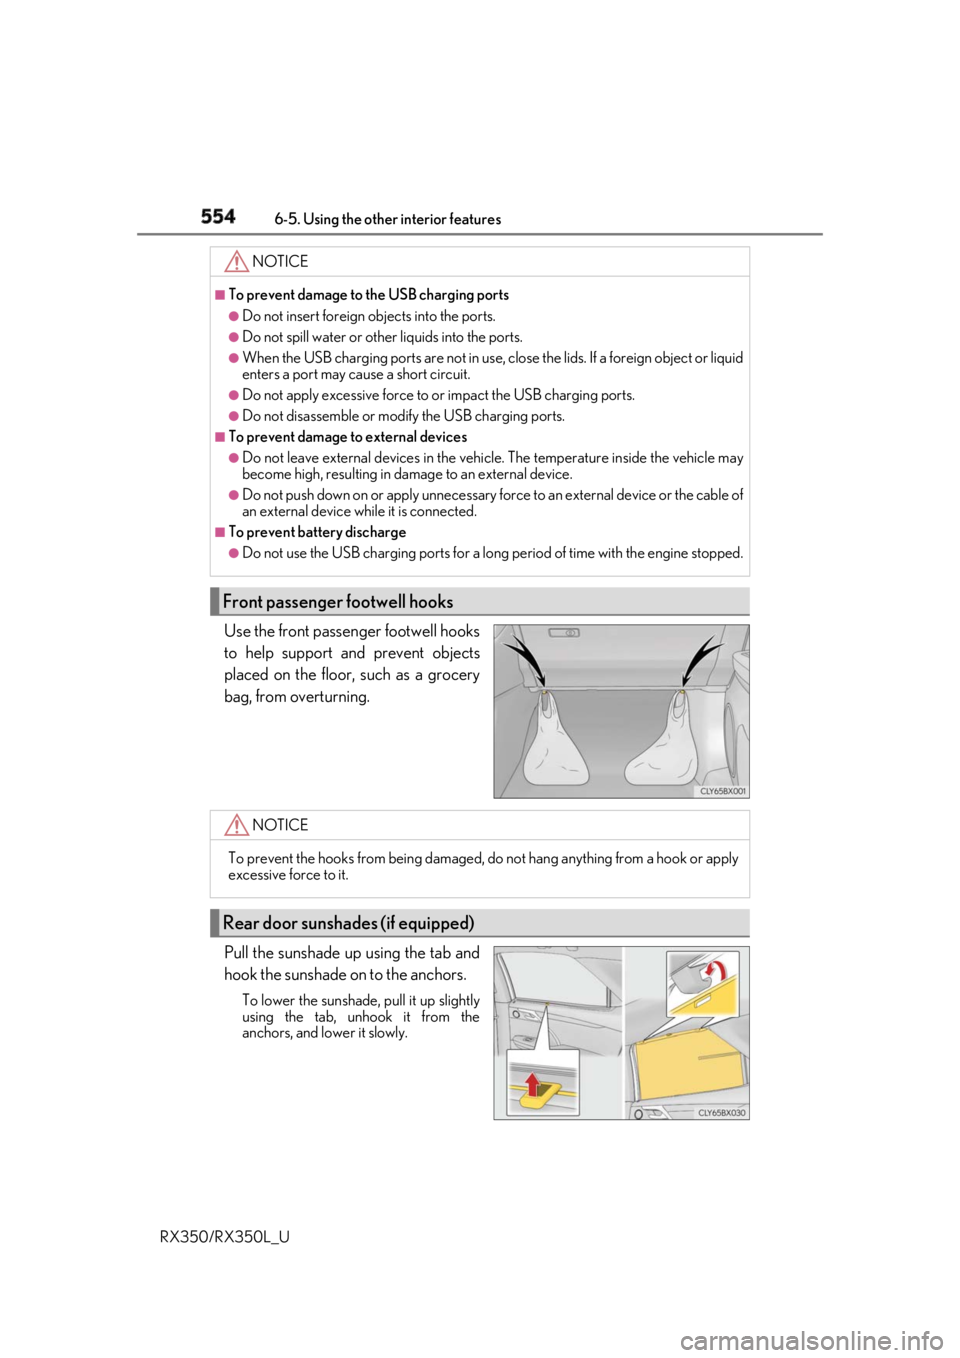
RX350/RX350L_U Use the front passenger footwell hooks
to help support and prevent objects
placed on the floor, such as a grocery
bag, from overturning.
Pull the sunshade up using the tab and
hook the sunshade on to the anchors. To lower the sunshade, pull it up slightly
using the tab, unhook it from the
anchors, and lower it slowly. NOTICE ■
To prevent damage to the USB charging ports●
Do not insert foreign objects into the ports. ●
Do not spill water or othe r liquids into the ports.●
When the USB charging ports are not in use, close the lids. If a foreign object or liquid
enters a port may cause a short circuit. ●
Do not apply excessive force to or impact the USB charging ports.●
Do not disassemble or modi fy the USB charging ports.■
To prevent damage to external devices●
Do not leave external devices in the vehicle. The temperature inside the vehicle may
become high, resulting in damage to an external device. ●
Do not push down on or appl y unnecessary force to an exte rnal device or the cable of
an external device while it is connected. ■
To prevent battery discharge ●
Do not use the USB charging ports for a long period of time with the engine stopped.
Front passenger footwell hooks
NOTICE
To prevent the hooks from being damaged, do not hang anything from a hook or apply
excessive force to it.
Rear door sunshades (if equipped)
Page 556 of 777
5556-5. Using the other interior features
6
Interior features
RX350/RX350L_U
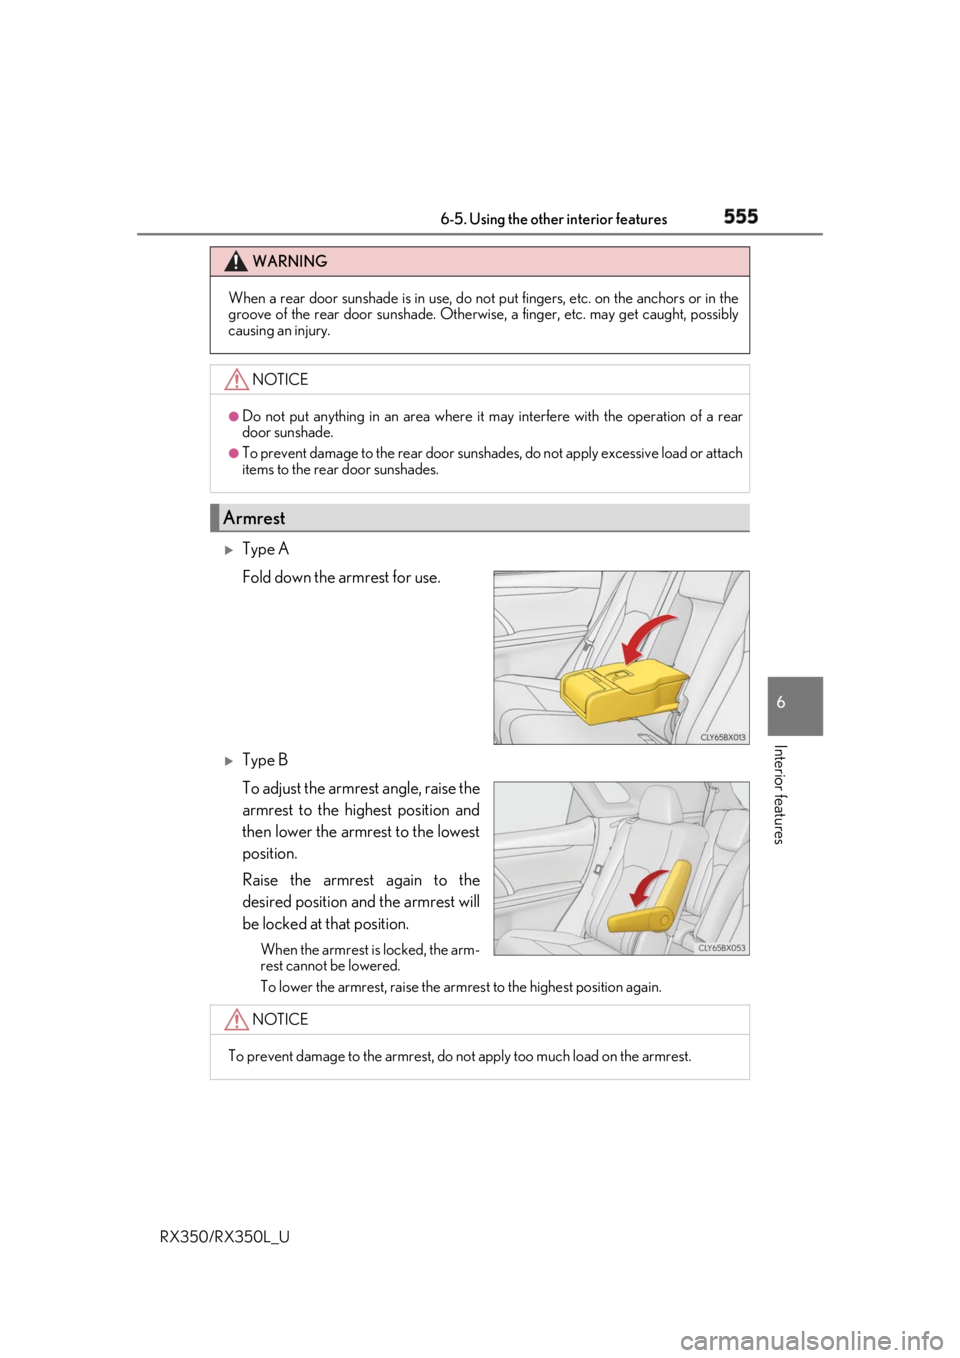
Type A
Fold down the armrest for use.
Type B
To adjust the armrest angle, raise the
armrest to the highest position and
then lower the armrest to the lowest
position.
Raise the armrest again to the
desired position and the armrest will
be locked at that position. When the armrest is locked, the arm-
rest cannot be lowered.
To lower the armrest, raise the armrest to the highest position again.WARNING
When a rear door sunshade is in use, do not put fingers, etc. on the anchors or in the
groove of the rear door suns hade. Otherwise, a finger, etc. may get caught, possibly
causing an injury.
NOTICE ●
Do not put anything in an area where it may interfere with the operation of a rear
door sunshade. ●
To prevent damage to the rear door sunshades, do not apply excessive load or attach
items to the rear door sunshades.
Armrest
NOTICE
To prevent damage to the armrest, do not apply too much load on the armrest.
Page 557 of 777
556 6-5. Using the other interior features
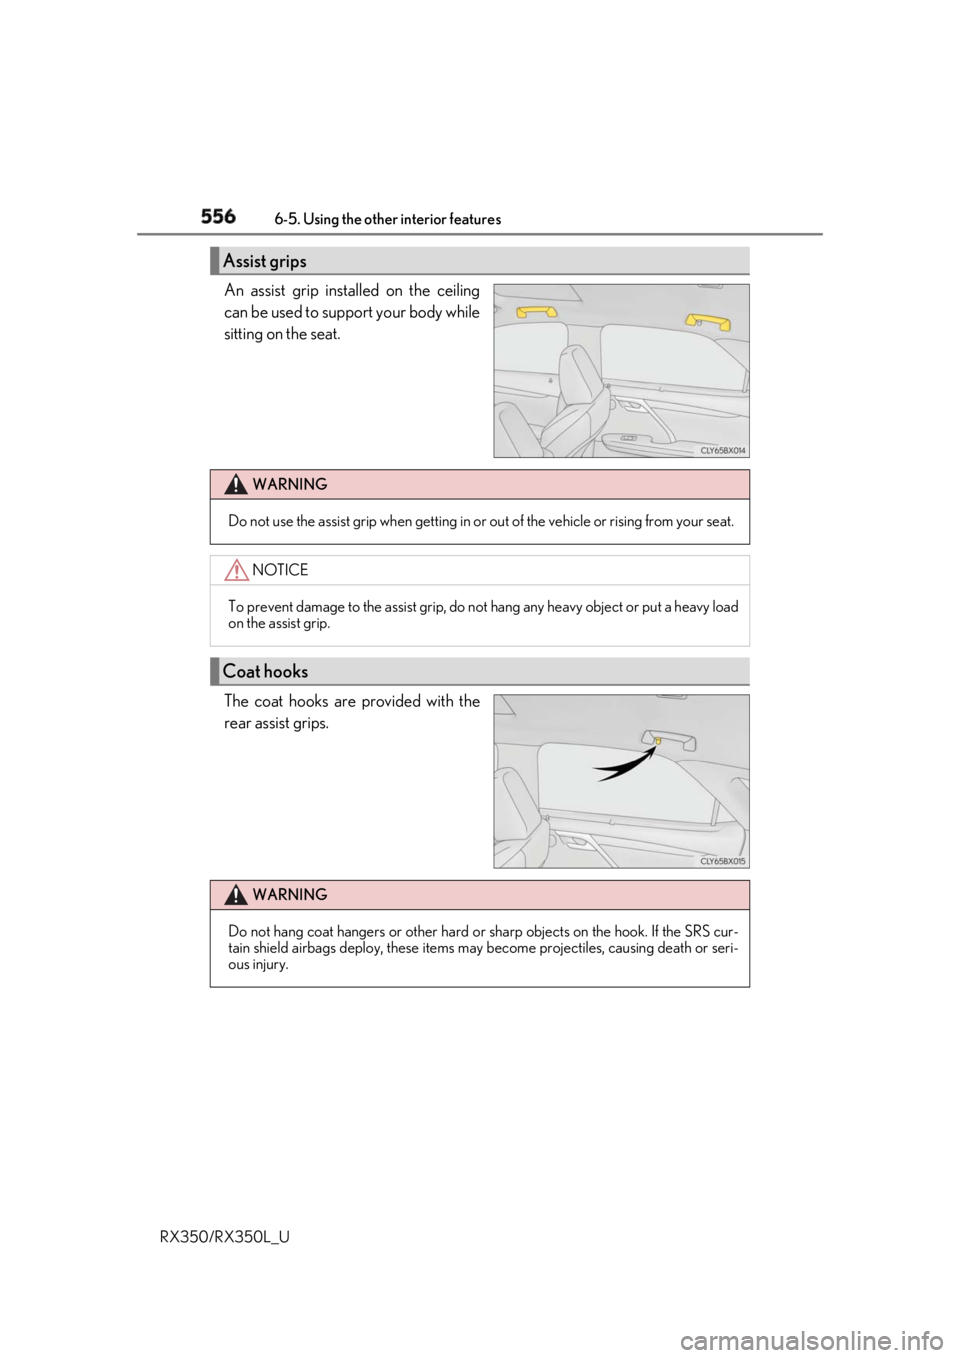
RX350/RX350L_U An assist grip installed on the ceiling
can be used to support your body while
sitting on the seat.
The coat hooks are provided with the
rear assist grips.Assist grips
WARNING
Do not use the assist grip when getting in or out of the vehicle or rising from your seat.
NOTICE
To prevent damage to the assist grip, do not hang any heavy object or put a heavy load
on the assist grip.
Coat hooks
WARNING
Do not hang coat hangers or other hard or sharp objects on the hook. If the SRS cur-
tain shield airbags deploy, these items may become projectiles, causing death or seri-
ous injury.
Page 558 of 777
5576-5. Using the other interior features
6
Interior features
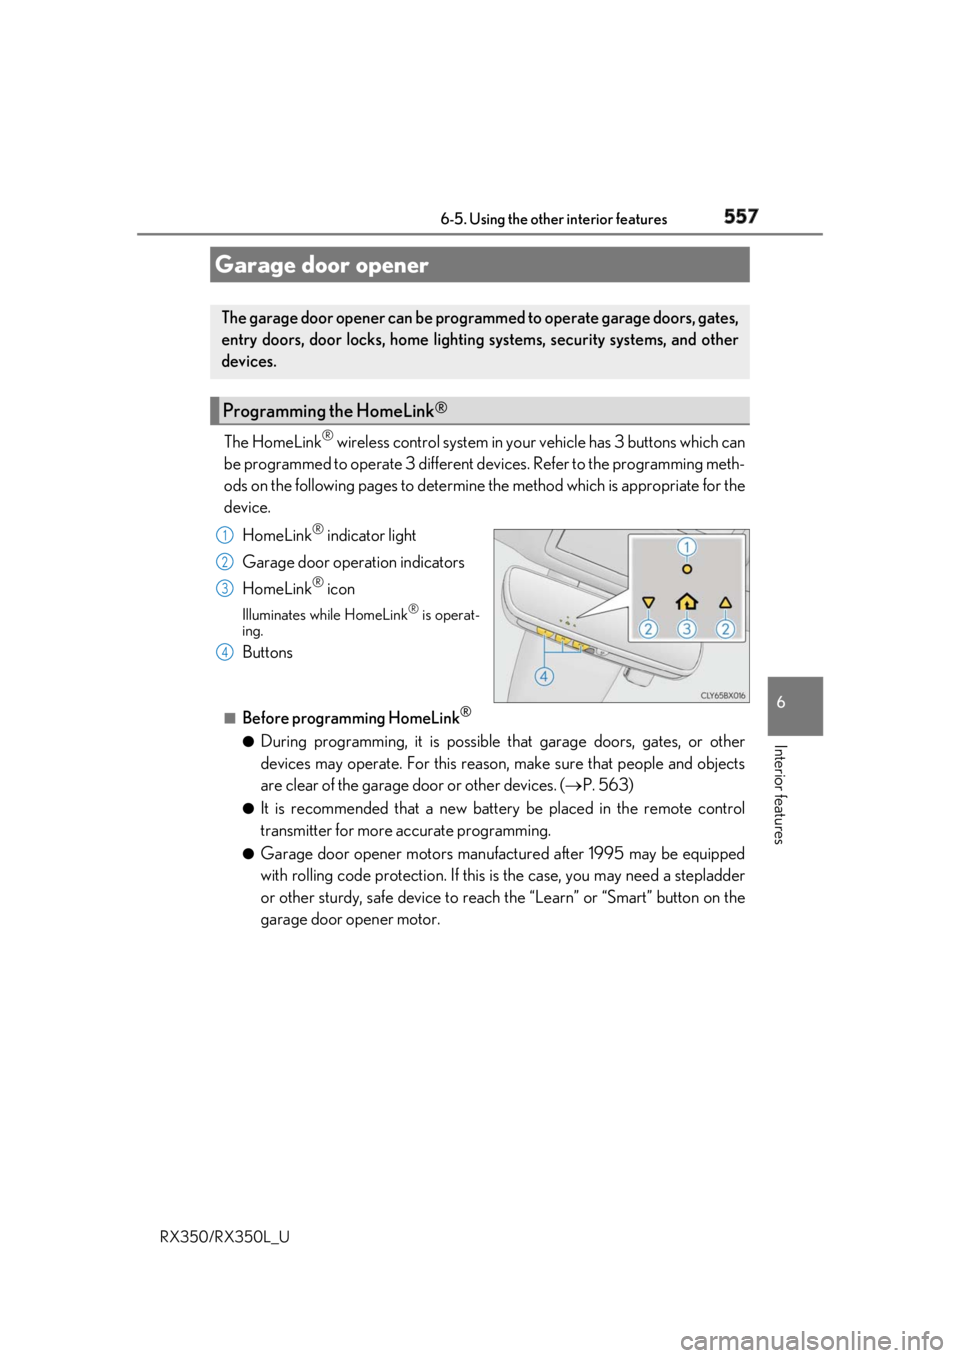
RX350/RX350L_U The HomeLink ®
wireless control system in your vehicle has 3 buttons which can
be programmed to operate 3 different de vices. Refer to the programming meth-
ods on the following pages to determine the method which is appropriate for the
device.
HomeLink ®
indicator light
Garage door operation indicators
HomeLink ®
iconIlluminates while HomeLink ®
is operat-
ing.
Buttons ■
Before programming HomeLink ®
●
During programming, it is possible that garage doors, gates, or other
devices may operate. For this reason, make sure that people and objects
are clear of the garage door or other devices. ( P. 563)●
It is recommended that a new batter y be placed in the remote control
transmitter for more accurate programming. ●
Garage door opener motors manufa ctured after 1995 may be equipped
with rolling code protection. If this is the case, you may need a stepladder
or other sturdy, safe device to reach the “Learn” or “Smart” button on the
garage door opener motor.Garage door opener The garage door opener can be programmed to operate garage doors, gates,
entry doors, door locks, home lightin g systems, security systems, and other
devices.
Programming the HomeLink ®
1
2
3
4
Page 559 of 777
558 6-5. Using the other interior features
RX350/RX350L_U ■
Programming HomeLink ®
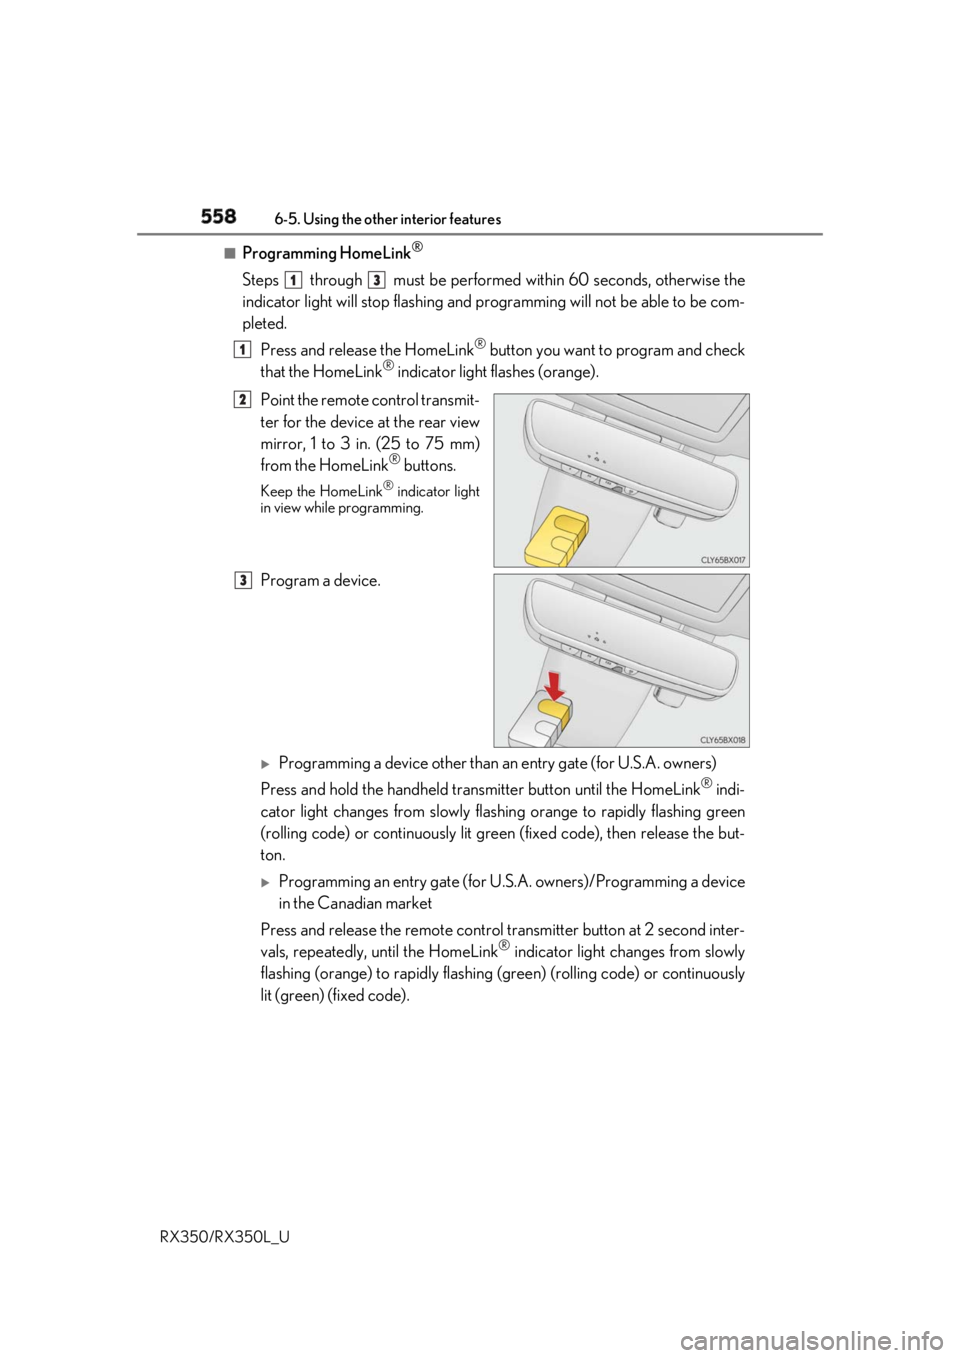
Steps through must be performed within 60 seconds, otherwise the
indicator light will stop flashing and pr ogramming will not be able to be com-
pleted.
Press and release the HomeLink ®
button you want to program and check
that the HomeLink ®
indicator light flashes (orange).
Point the remote control transmit-
ter for the device at the rear view
mirror, 1 to 3 in. (25 to 75 mm)
from the HomeLink ®
buttons.Keep the HomeLink ®
indicator light
in view while programming.
Program a device.
Programming a device other than an entry gate (for U.S.A. owners)
Press and hold the handheld transmitter button until the HomeLink ®
indi-
cator light changes from slowly flashi ng orange to rapidly flashing green
(rolling code) or continuously lit green (fixed code), then release the but-
ton.
Programming an entry gate (for U. S.A. owners)/Programming a device
in the Canadian market
Press and release the remo te control transm itter button at 2 second inter-
vals, repeatedly, until the HomeLink ®
indicator light changes from slowly
flashing (orange) to rapidly flashing (green) (rolling code) or continuously
lit (green) (fixed code). 1 3
1
2
3
Page 560 of 777
5596-5. Using the other interior features
6
Interior features
RX350/RX350L_U Test the HomeLink ®
operation by pressing the newly programmed button
and observing the indicator light: ●
Indicator light illuminates: Programming of a fixed code device has com-
pleted. The garage door or other de vice should operate when a Home-
Link ®
button is pressed and released.●
Indicator light flashes rapidly: The garage door opener motor or other
device is equipped with a rolling co de. To complete programming, firmly
press and hold the HomeLink ®
button for 2 seconds then release it.●
If the garage door or other device does not operate, proceed to “Pro-
gramming a rollin g code system”.
Repeat the steps above to program anot her device for any of the remaining
HomeLink ®
buttons.■
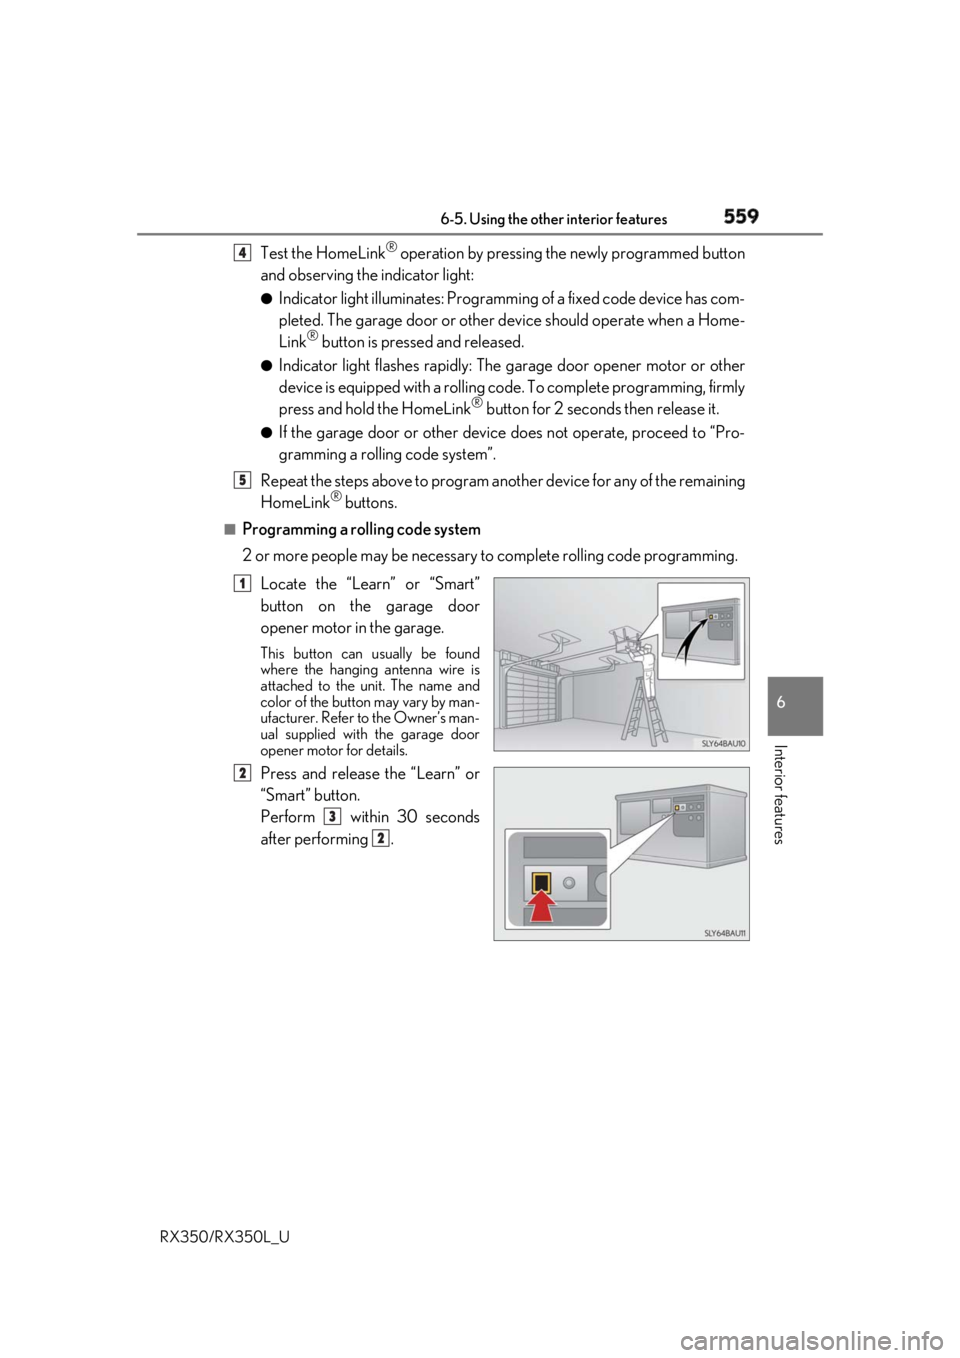
Programming a rolling code system
2 or more people may be necessary to complete rolling code programming.
Locate the “Learn” or “Smart”
button on the garage door
opener motor in the garage. This button can usually be found
where the hanging antenna wire is
attached to the unit. The name and
color of the button may vary by man-
ufacturer. Refer to the Owner’s man-
ual supplied with the garage door
opener motor for details.
Press and release the “Learn” or
“Smart” button.
Perform within 30 seconds
after performing . 4
5
1
2
3
2