windshield wipers LEXUS RX350 2020 User Guide
[x] Cancel search | Manufacturer: LEXUS, Model Year: 2020, Model line: RX350, Model: LEXUS RX350 2020Pages: 516, PDF Size: 17.3 MB
Page 200 of 516
2004-3. Operating the lights and wipers
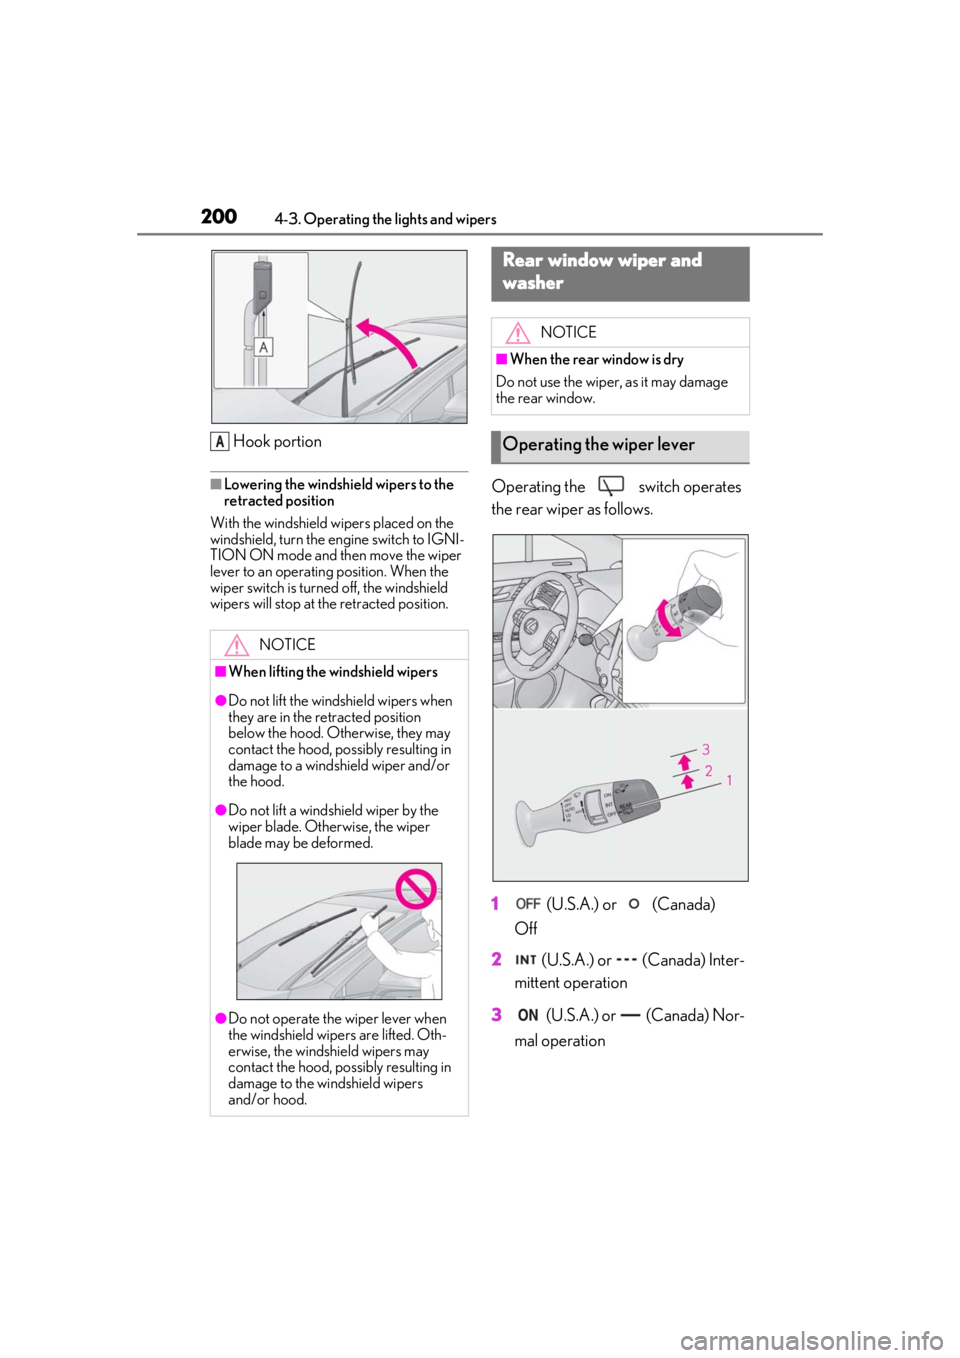
Hook portion
■Lowering the windshield wipers to the
retracted position
With the windshield wi pers placed on the
windshield, turn the engine switch to IGNI-
TION ON mode and then move the wiper
lever to an operating position. When the
wiper switch is turned off, the windshield
wipers will stop at the retracted position.Operating the switch operates
the rear wiper as follows.
1 (U.S.A.) or (Canada)
Off
2 (U.S.A.) or (Canada) Inter-
mittent operation
3 (U.S.A.) or (Canada) Nor-
mal operation
NOTICE
■When lifting the windshield wipers
●Do not lift the windshield wipers when
they are in the retracted position
below the hood. Otherwise, they may
contact the hood, possibly resulting in
damage to a windshield wiper and/or
the hood.
●Do not lift a windshield wiper by the
wiper blade. Otherwise, the wiper
blade may be deformed.
●Do not operate the wiper lever when
the windshield wipers are lifted. Oth-
erwise, the windsh ield wipers may
contact the hood, possibly resulting in
damage to the windshield wipers
and/or hood.
A
Rear window wiper and
washer
NOTICE
■When the rear window is dry
Do not use the wiper, as it may damage
the rear window.
Operating the wiper lever
Page 206 of 516
2064-5. Using the driving support systems
WARNING
●Keep the radar sensor and the radar
sensor cover clean at all times.
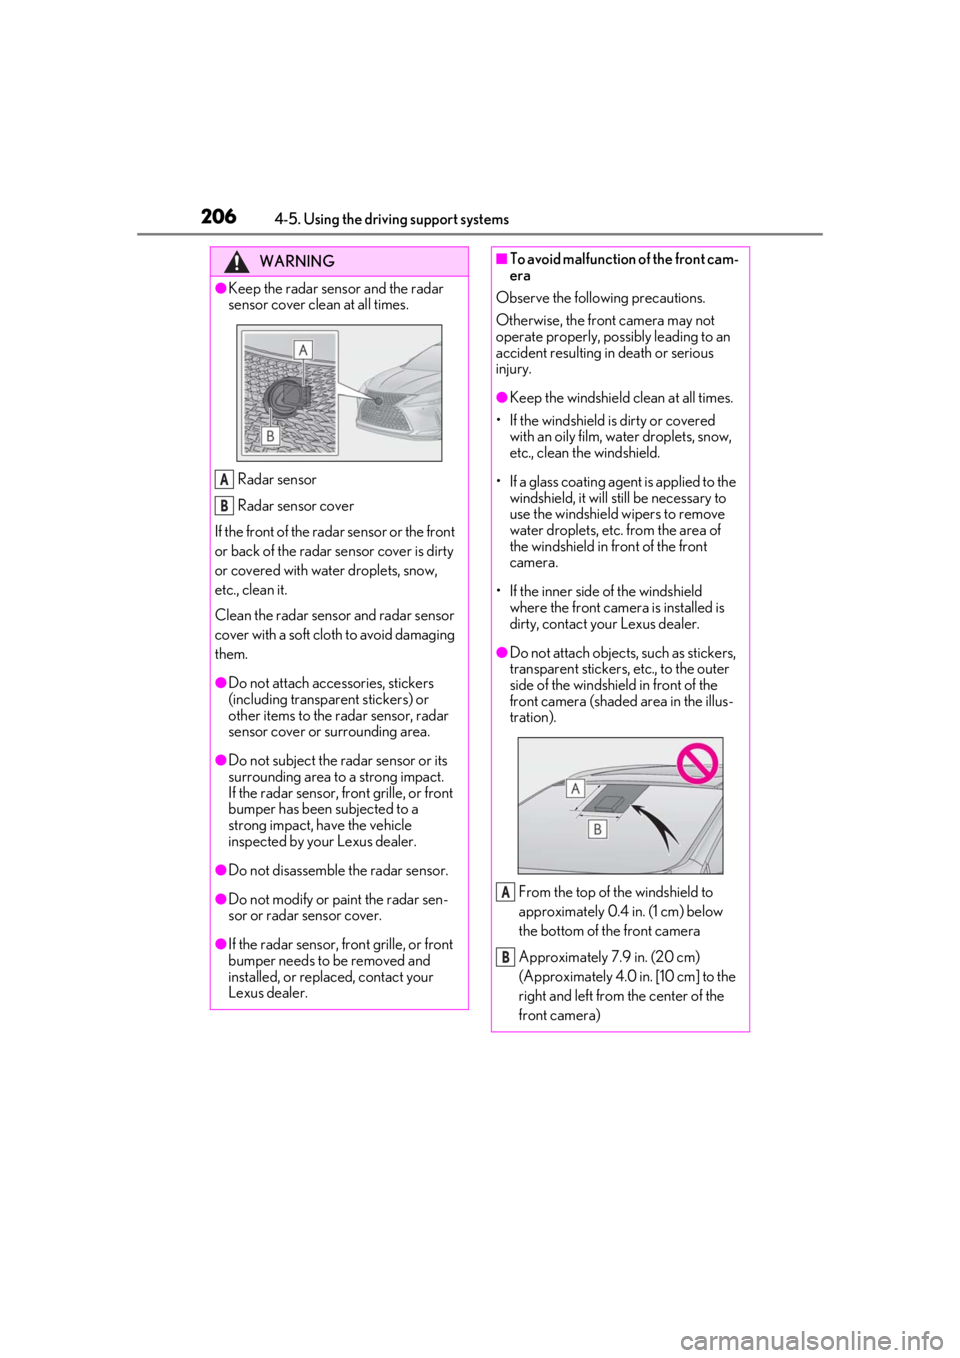
Radar sensor
Radar sensor cover
If the front of the rada r sensor or the front
or back of the radar sensor cover is dirty
or covered with water droplets, snow,
etc., clean it.
Clean the radar sensor and radar sensor
cover with a soft cloth to avoid damaging
them.
●Do not attach accessories, stickers
(including transpar ent stickers) or
other items to the radar sensor, radar
sensor cover or surrounding area.
●Do not subject the radar sensor or its
surrounding area to a strong impact.
If the radar sensor, front grille, or front
bumper has been subjected to a
strong impact, have the vehicle
inspected by your Lexus dealer.
●Do not disassemble the radar sensor.
●Do not modify or paint the radar sen-
sor or radar sensor cover.
●If the radar sensor, front grille, or front
bumper needs to be removed and
installed, or replaced, contact your
Lexus dealer.
A
B
■To avoid malfunction of the front cam-
era
Observe the following precautions.
Otherwise, the front camera may not
operate properly, possibly leading to an
accident resulting in death or serious
injury.
●Keep the windshield clean at all times.
• If the windshield is dirty or covered with an oily film, water droplets, snow,
etc., clean the windshield.
• If a glass coating agent is applied to the windshield, it will still be necessary to
use the windshield wipers to remove
water droplets, etc. from the area of
the windshield in front of the front
camera.
• If the inner side of the windshield where the front camera is installed is
dirty, contact your Lexus dealer.
●Do not attach objects, such as stickers,
transparent stickers, etc., to the outer
side of the windshield in front of the
front camera (shaded area in the illus-
tration).
From the top of the windshield to
approximately 0.4 in. (1 cm) below
the bottom of the front camera
Approximately 7.9 in. (20 cm)
(Approximately 4.0 in. [10 cm] to the
right and left from the center of the
front camera)
A
B
Page 207 of 516
2074-5. Using the driving support systems
4
Driving
WARNING
●If the part of the windshield in front of
the front camera is fogged up or cov-
ered with condensation, or ice, use the
windshield defogger to remove the
fog, condensation, or ice. (P.296)
●If water droplets cannot be properly
removed from the area of the wind-
shield in front of the front camera by
the windshield wipers, replace the
wiper insert or wiper blade.
• To replace a wiper insert:
P.388
• If the wiper blades need to be replaced, contact your Lexus dealer.
●Do not attach window tint to the wind-
shield.
●Replace the windshield if it is damaged
or cracked.
If the windshield needs to be replaced,
contact your Lexus dealer.
●Do not allow liquids to contact the
front camera.
●Do not allow bright lights to shine into
the front camera.
●Do not dirty or damage the front cam-
era.
When cleaning the inside of the wind-
shield, do not allow glass cleaner to
contact the lens of the front camera.
Also, do not touch the lens.
If the lens is dirty or damaged, contact
your Lexus dealer.
●Do not subject the front camera to a
strong impact.
●Do not change the installation position
or direction of the front camera or
remove it.
●Do not disassemble the front camera.
●Do not modify any components of the
vehicle around the front camera
(inside rear view mirror, etc.) or ceiling.
●Do not attach any accessories to the
hood, front grille or front bumper that
may obstruct the front camera. Con-
tact your Lexus dealerfor details.
●If a surfboard or other long object is to
be mounted on the roof, make sure
that it will not obstruct the front cam-
era.
●Do not modify the headlights or other
lights.
Page 209 of 516
2094-5. Using the driving support systems
4
Driving
■If a warning message is displayed on the multi-information display
A system may be temporarily unavailable or there may be a malfunction in the system.
●In the following situations, perform the actions specified in the table. When the normal
operating conditions are detected, the message will disappear and the system will
become operational.
If the message does not disappea r, contact your Lexus dealer.
SituationActions
When the area around a sensor is covered
with dirt, moisture (fogged up, covered with
condensation, ice, etc.), or other foreign
matterTo clean the part of the windshield in front of
the front camera , use the windshield wipers
or the windshield defo gger of the air condi-
tioning system ( P.296).
Page 284 of 516
2844-6. Driving tips
length)
Regulations regarding the use of tire
chains vary depending on location and
type of road. Always check local regu-
lations before installing chains.
■Tire chain installation
Observe the following precautions when
installing and removing chains:
●Install and remove tire chains in a safe
location.
●Install tire chains on the front tires only.
Do not install tire chains on the rear tires.
●Install tire chains on fr ont tires as tightly as
possible. Retighten chains after driving
1/4 1/2 mile (0.5 1.0 km).
●Install tire chains following the instruc-
tions provided with the tire chains.
To enable the windshield wipers to be
lifted when heavy snow or icy condi-
tions are expected, change the rest
position of the windshield wipers from
the retracted position below the hood
to the service position using the wiper
lever. ( P.199)
Specific design characteristics give
it a higher center of gravity than
ordinary passenger cars. This vehi-
cle design feature causes this type
of vehicle to be more likely to roll-
over. And, utility vehicles have a sig-
nificantly higher rollover rate than
other types of vehicles.
An advantage of th e higher ground
clearance is a better view of the
road allowing you to anticipate
problems.
It is not designed for cornering at
the same speeds as ordinary pas-
senger cars any more than
low-slung sports cars are designed
to perform satisfactorily under
off-road conditions. Therefore,
sharp turns at excessive speeds may
cause the vehicle to rollover.
Regulations on the use of tire
chains
NOTICE
■Fitting tire chains
The tire pressure warning valves and
transmitters may not function correctly
when tire chains are fitted.
Windshield wipers
Utility vehicle precautions
This vehicle belongs to the utility
vehicle class, which has higher
ground clearance and narrower
tread in relation to the height of its
center of gravity.
Utility vehicle feature
WARNING
■Utility vehicle precautions
Always observe the following precau-
tions to minimize the risk of death, seri-
ous injury or damage to your vehicle:
Page 351 of 516
3516-1. Maintenance and care
6
Maintenance and care
■Front side windows water-repellent
coating
●The following precautions can extend the
effectiveness of the water-repellent coat-
ing.
• Remove any dirt, etc. from the front side windows regularly.
• Do not allow dirt and dust to accumulate
on the windows for a long period.
Clean the windows with a soft, damp
cloth as soon as possible.
• Do not use wax or glass cleaners that contain abrasives when cleaning the win-
dows.
• Do not use any metallic objects to remove condensation build up.
●When the water-repellent performance
has become insufficie nt, the coating can
be repaired. Contact your Lexus dealer.
■Plated portions
If dirt cannot be removed, clean the parts as
follows:
●Use a soft cloth dampened with an
approximately 5% solution of neutral
detergent and water to clean the dirt off.
●Wipe the surface with a dry, soft cloth to
remove any remaining moisture.
●To remove oily deposits, use alcohol wet
wipes or a similar product.
WARNING
■When washing the vehicle
Do not apply water to the inside of the
engine compartment. Doing so may
cause the electrical components, etc. to
catch fire.
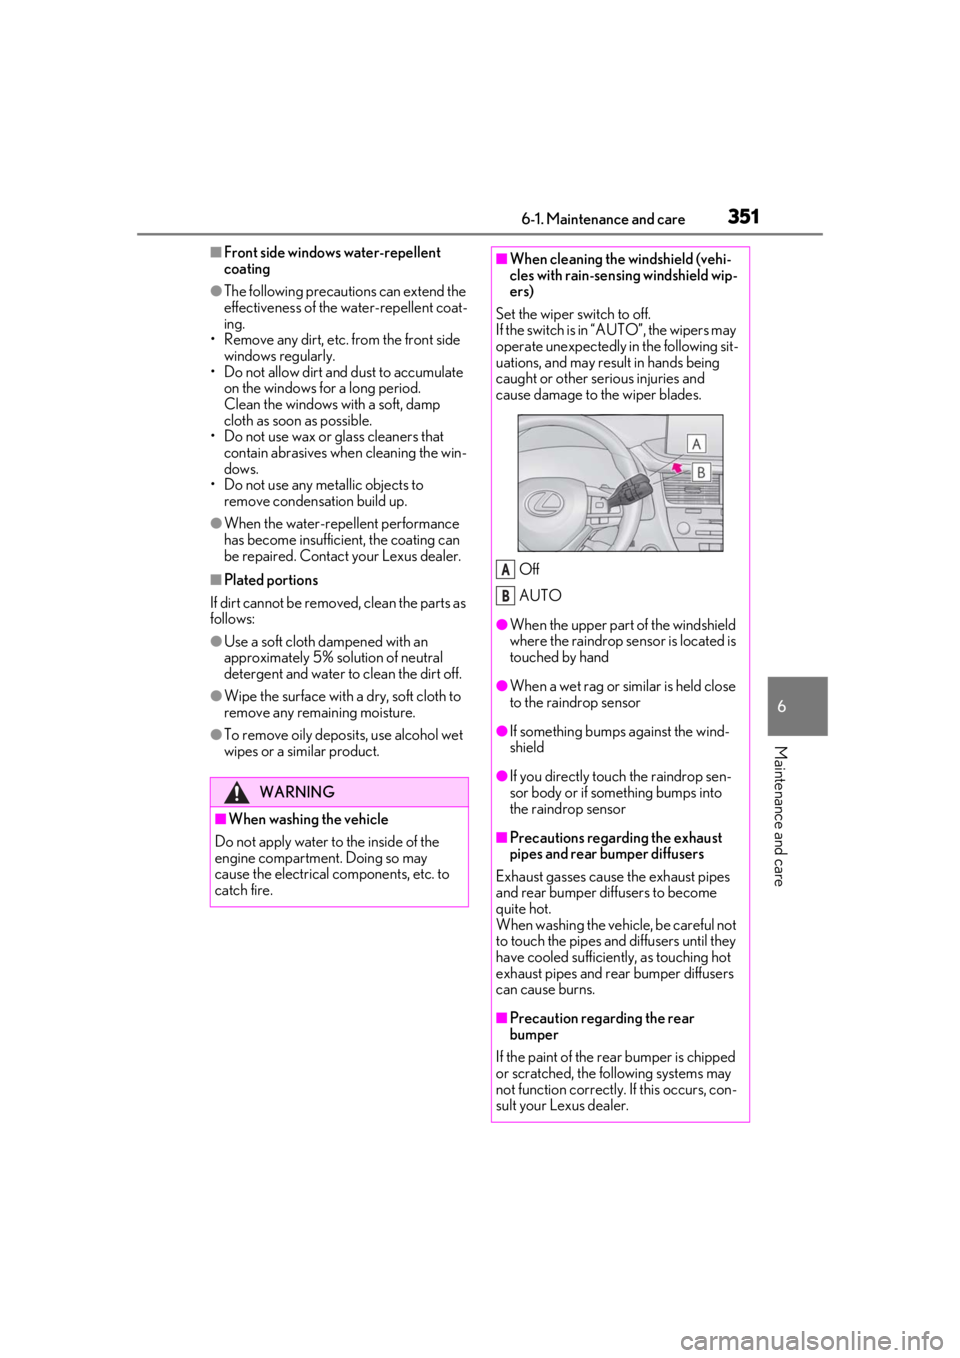
■When cleaning the windshield (vehi-
cles with rain-sensing windshield wip-
ers)
Set the wiper switch to off.
If the switch is in “AUTO”, the wipers may
operate unexpectedly in the following sit-
uations, and may result in hands being
caught or other serious injuries and
cause damage to the wiper blades.
Off
AUTO
●When the upper part of the windshield
where the raindrop sensor is located is
touched by hand
●When a wet rag or similar is held close
to the raindrop sensor
●If something bumps against the wind-
shield
●If you directly touch the raindrop sen-
sor body or if something bumps into
the raindrop sensor
■Precautions regarding the exhaust
pipes and rear bumper diffusers
Exhaust gasses cause the exhaust pipes
and rear bumper diffusers to become
quite hot.
When washing the vehicle, be careful not
to touch the pipes and diffusers until they
have cooled sufficiently, as touching hot
exhaust pipes and rear bumper diffusers
can cause burns.
■Precaution regarding the rear
bumper
If the paint of the re ar bumper is chipped
or scratched, the following systems may
not function correctly. If this occurs, con-
sult your Lexus dealer.
A
B
Page 352 of 516
3526-1. Maintenance and care
WARNING
●Lexus Safety System + 2.0
●BSM (if equipped)
●RCTA (if equipped)
●PKSB (if equipped)
NOTICE
■To prevent paint deterioration and
corrosion on the body and compo-
nents (aluminum wheels, etc.)
●Wash the vehicle immediately in the
following cases:
• After driving near the sea coast
• After driving on salted roads
• If coal tar or tree sap is present on the paint surface
• If dead insects, in sect droppings or
bird droppings are present on the
paint surface
• After driving in an area contaminated with soot, oily smoke, mine dust, iron
powder or chemical substances
• If the vehicle becomes heavily soiled with dust or mud
• If liquids such as benzene and gasoline are spilled on the paint surface
●If the paint is chip ped or scratched,
have it repaired immediately.
●To prevent the wheels from corroding,
remove any dirt and store in a place
with low humidity when storing the
wheels.
■Cleaning the exterior lights
●Wash carefully. Do not use organic
substances or scrub with a hard brush.
This may damage the surfaces of the
lights.
●Do not apply wax to the surfaces of the
lights.
Wax may cause damage to the lenses.
■When using an automatic car wash
(vehicles with rain-sensing windshield
wipers)
Set the wiper switch to the off position.
If the wiper switch is in “AUTO”, the wip-
ers may operate and the wiper blades
may be damaged.
■When using a high pressure car wash
●When washing the vehicle, do not let
water of the high pressure washer hit
directly or the vicinity of the camera.
Due to the shock from the high pres-
sure water, it is possible the device may
not operate as normal.
●Do not bring the nozzle tip close to
boots (rubber or resin manufactured
cover), connectors or the following
parts. The parts may be damaged if
they come into contact with high-pres-
sure water.
• Traction related parts
•Steering parts
• Suspension parts
• Brake parts
●Keep the cleaning nozzle at least 11.9
in. (30 cm) away from the vehicle
body. Otherwise resin section, such as
moldings and bumpers, may be
deformed and damaged.
Also, do not continuously hold the nozzle
in the same place.
●Do not spray the lower part of the
windshield continuously.
If water enters the air conditioning sys-
tem intake located near the lower part of
the windshield, the air conditioning sys-
tem may not operate correctly.
Page 388 of 516
3886-3. Do-it-yourself maintenance
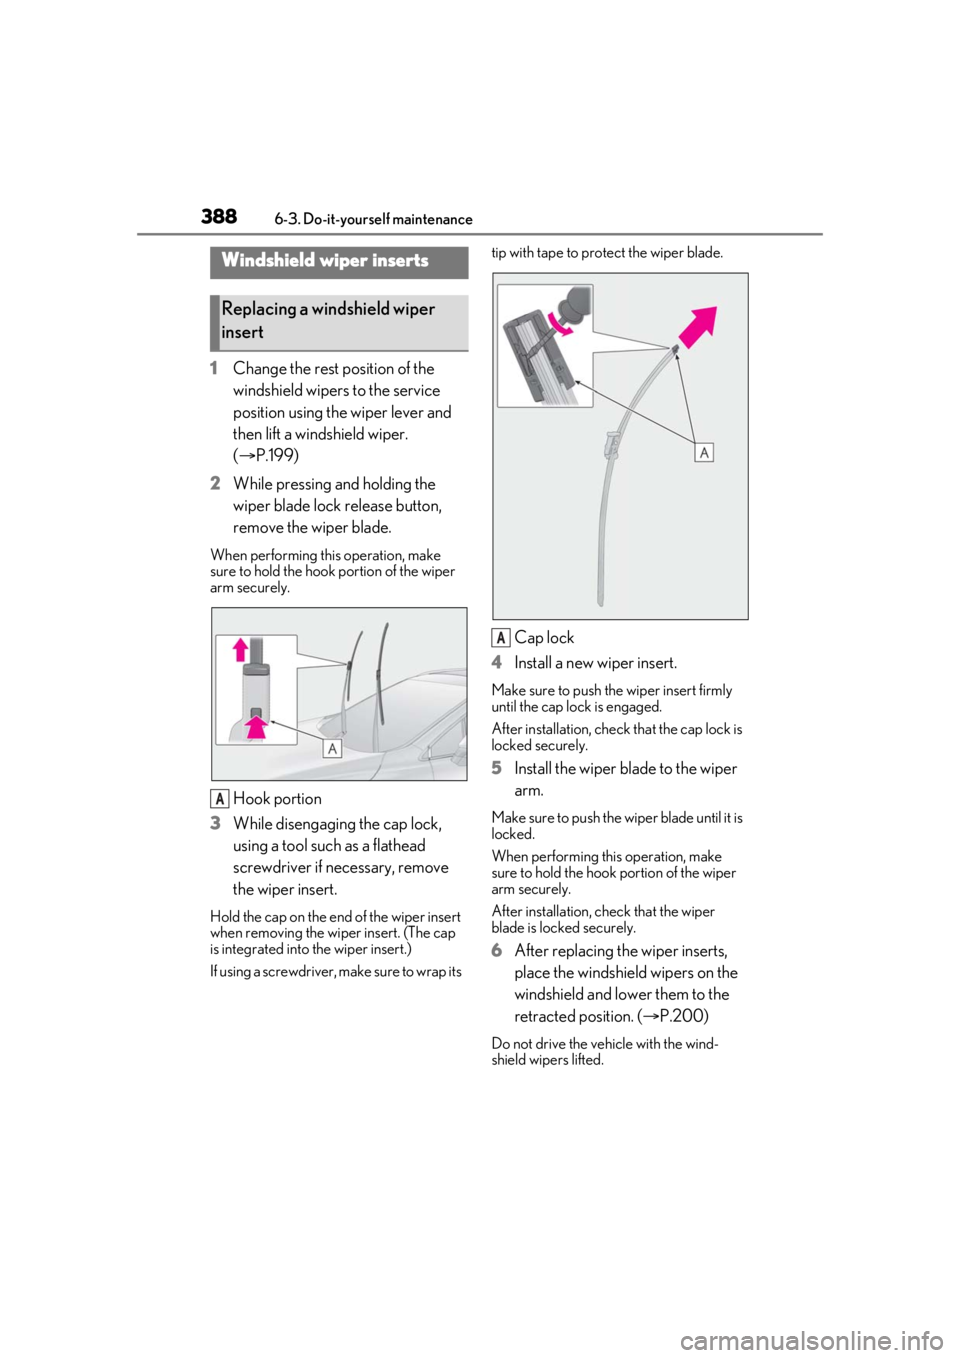
1Change the rest position of the
windshield wipers to the service
position using the wiper lever and
then lift a windshield wiper.
(P.199)
2 While pressing and holding the
wiper blade lock release button,
remove the wiper blade.
When performing this operation, make
sure to hold the hook portion of the wiper
arm securely.
Hook portion
3 While disengaging the cap lock,
using a tool such as a flathead
screwdriver if necessary, remove
the wiper insert.
Hold the cap on the end of the wiper insert
when removing the wi per insert. (The cap
is integrated into the wiper insert.)
If using a screwdriver, make sure to wrap its tip with tape to protect the wiper blade.
Cap lock
4 Install a new wiper insert.
Make sure to push the wiper insert firmly
until the cap lock is engaged.
After installation, check that the cap lock is
locked securely.
5Install the wiper blade to the wiper
arm.
Make sure to push the wiper blade until it is
locked.
When performing this operation, make
sure to hold the hook portion of the wiper
arm securely.
After installation, check that the wiper
blade is locked securely.
6 After replacing the wiper inserts,
place the windshield wipers on the
windshield and lower them to the
retracted position. ( P.200)
Do not drive the vehicle with the wind-
shield wipers lifted.
Windshield wiper inserts
Replacing a windshield wiper
insert
A
A
Page 477 of 516
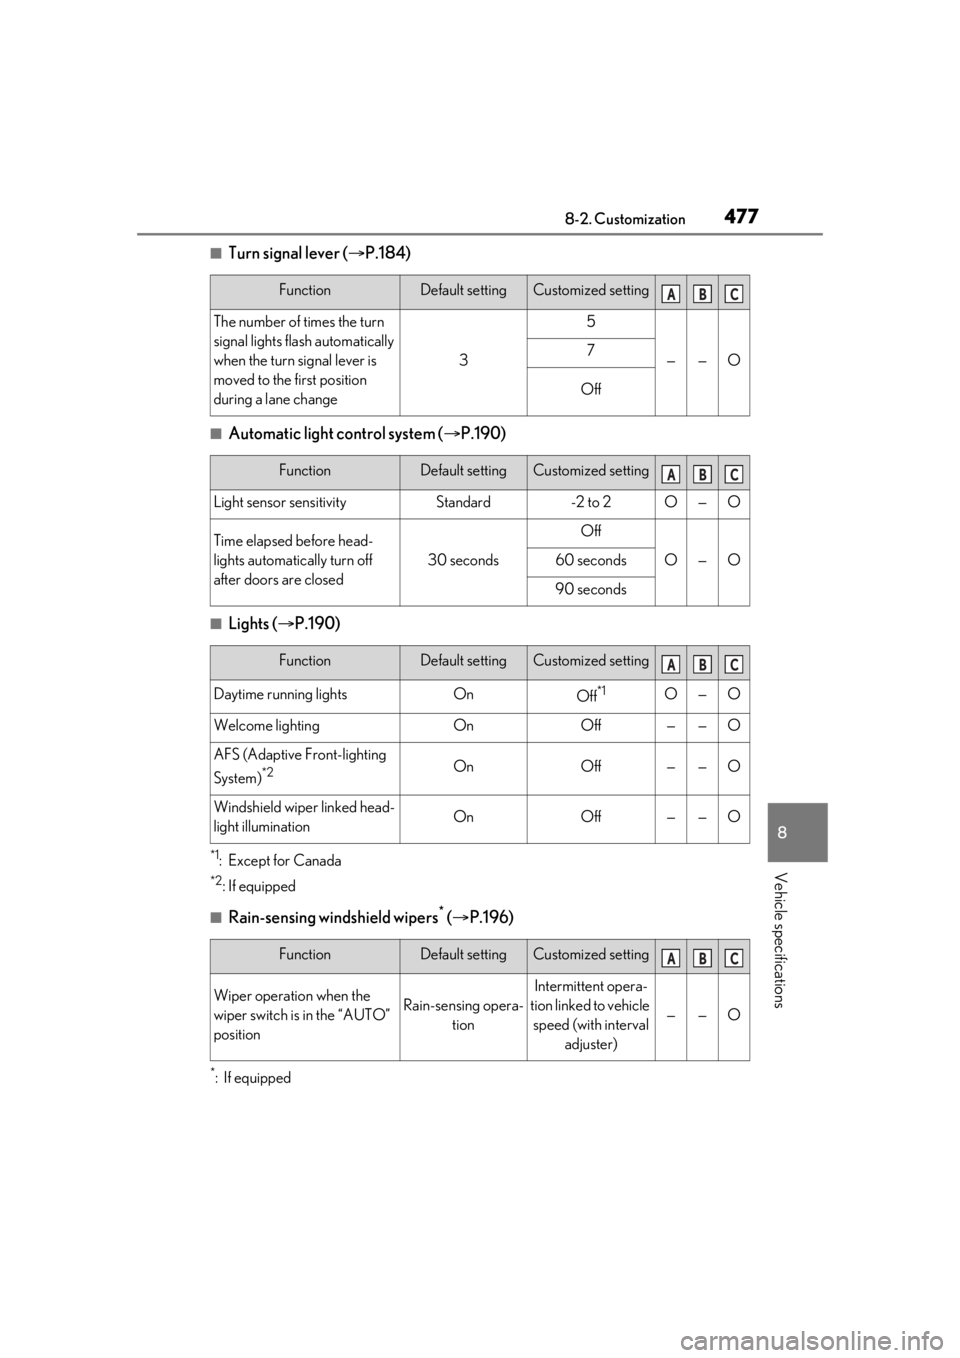
4778-2. Customization
8
Vehicle specifications
■Turn signal lever (P.184)
■Automatic light control system ( P.190)
■Lights ( P.190)
*1:Except for Canada
*2: If equipped
■Rain-sensing windshield wipers* ( P.196)
*:If equipped
FunctionDefault settingCustomized setting
The number of times the turn
signal lights flash automatically
when the turn signal lever is
moved to the first position
during a lane change
3
5
——O7
Off
FunctionDefault settingCustomized setting
Light sensor sensitivityStandard-2 to 2O—O
Time elapsed before head-
lights automatically turn off
after doors are closed
30 seconds
Off
O—O60 seconds
90 seconds
FunctionDefault settingCustomized setting
Daytime running lightsOnOff*1O—O
Welcome lightingOnOff——O
AFS (Adaptive Front-lighting
System)
*2OnOff——O
Windshield wiper linked head-
light illuminationOnOff——O
FunctionDefault settingCustomized setting
Wiper operation when the
wiper switch is in the “AUTO”
positionRain-sensing opera-
tion
Intermittent opera-
tion linked to vehicle speed (with interval adjuster)
——O
ABC
ABC
ABC
ABC
Page 511 of 516
511Alphabetical Index
Rear side marker lightsLight switch .................................................... 190
Replacing light bulbs................................395
Rear turn signal lights Replacing light bulbs................... 395, 399
Turn signal lever .......................................... 184
Wattage..........................................................458
Rear view mirror Inside rear view mirror................................141
Outside rear view mirrors ...................... 142
Rear window defogger ............................. 298
Rear window wiper.....................................200
Refueling Capacity ......................................................... 454
Fuel types....................................................... 454
If the fuel filler door cannot be opened.........................................................................440
Opening the fuel tank cap .................... 202
Remote Touch .............................................. 290
Replacing Electronic key battery..............................389
Fuses ..................................................................391
Light bulbs..................................................... 394
Tires .................................................................. 426
Resetting the message indicating mainte- nance is required ...................................... 356
Rev indicator .....................................................76
Rev peak.............................................................. 77
Road Sign Assist ...........................................227
RSA (Road Sign Assist) .............................227
S
Seat belt reminder ligh t...............................416
Seat belts............................................................ 26 Automatic Locking Retractor ................ 28
Child restraint system installation ......... 46
Cleaning and maintaining the seat belt.........................................................................353
Emergency Locking Retractor .............. 28
How to wear your seat belt ......................27
How your child should wear the seat belt .............................................................................27 Pregnant women, proper seat belt use
............................................................................. 26
Reminder light and buzzer .................... 416
Seat belt extender......................................... 27
Seat belt pretensioners .............................. 29
SRS warning light.........................................414
Seat heaters .................................................... 310
Seat position memory..................................134
Seat ventilators .............................................. 310
Seating capacity.............................................164
Seats Adjustment ............................................122, 124
Adjustment precautions .................122, 123
Child seats/child restraint system installa-tion .................................................................... 45
Cleaning .........................................................353
Driving position memory .........................134
Folding down the rear seatbacks ........124
Head restraints..............................................137
Power easy access system .....................134
Properly sitting in the seat ........................ 25
Seat heaters ................................................... 310
Seat position memory ...............................134
Seat ventilators ............................................. 310
Sensor Automatic headlight system .................. 190
Automatic High Beam system ............. 193
Inside rear view mirror ............................... 141
Intuitive parking assist .............................. 247
LTA (Lane Tracing Assist) ..................... 218
Parking Support Brake function (rear-crossing vehicles) ...................... 270
Parking Support Brake function (static objects) ........................................................265
Radar sensor ....................................205, 242
Rain-sensing windshield wipers .......... 198
RCTA...............................................................255
Service reminder message ..................... 356
Shift lever Automatic transmission ........................... 180
Shift lever light ................................................313
Side airbags ...................................................... 30