Sound LEXUS RX350 2021 Owner's Guide
[x] Cancel search | Manufacturer: LEXUS, Model Year: 2021, Model line: RX350, Model: LEXUS RX350 2021Pages: 508, PDF Size: 10.33 MB
Page 150 of 508
1503-5. Opening, closing the windows and moon roof
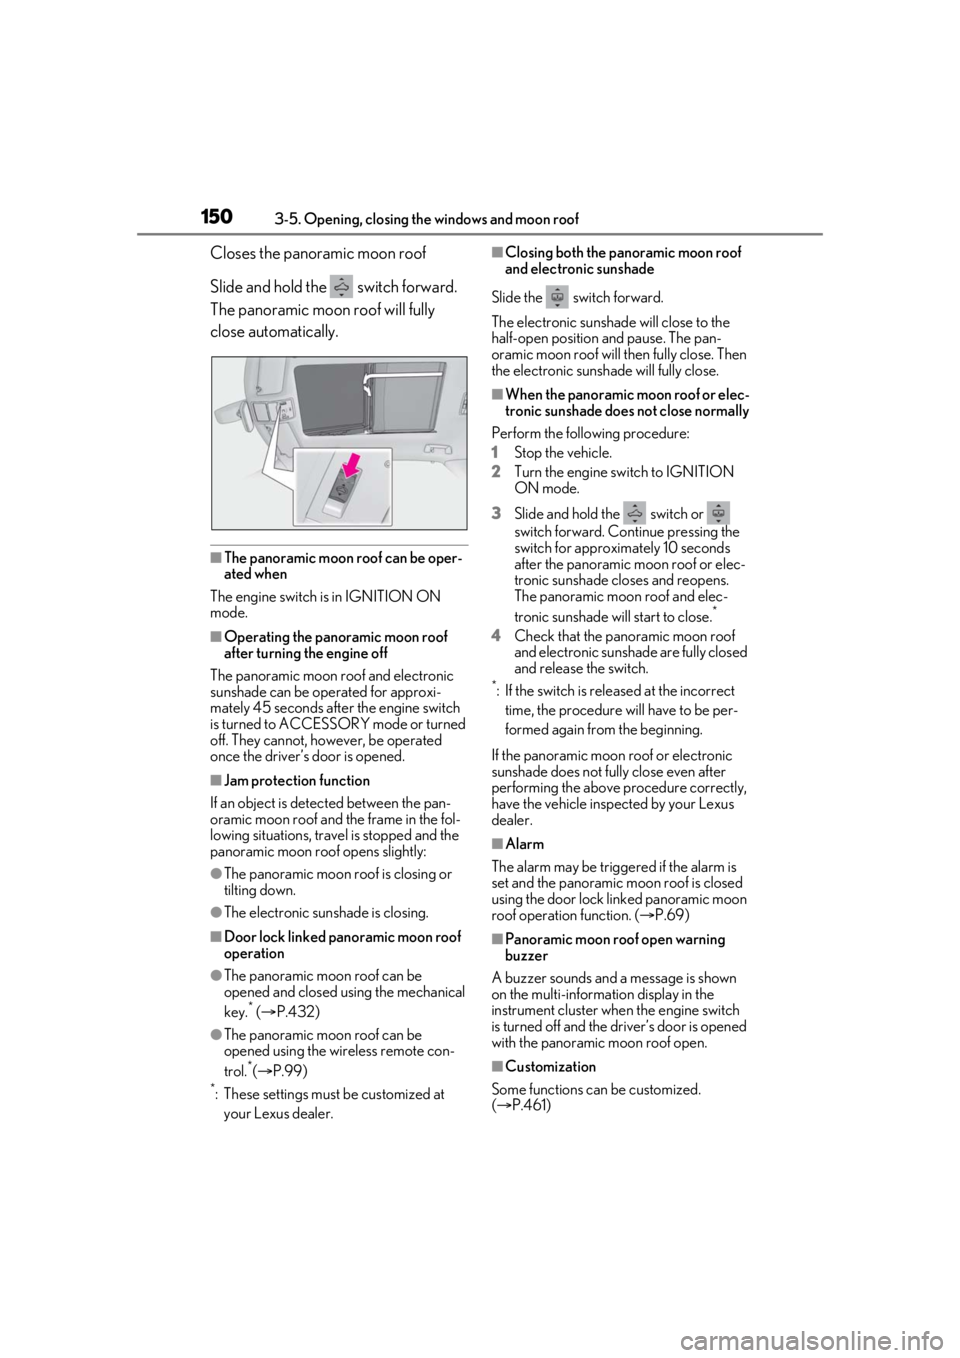
Closes the panoramic moon roof
Slide and hold the switch forward.
The panoramic moon roof will fully
close automatically.
■The panoramic moon roof can be oper-
ated when
The engine switch is in IGNITION ON
mode.
■Operating the panoramic moon roof
after turning the engine off
The panoramic moon roof and electronic
sunshade can be operated for approxi-
mately 45 seconds afte r the engine switch
is turned to ACCESSORY mode or turned
off. They cannot, ho wever, be operated
once the driver’s door is opened.
■Jam protection function
If an object is detected between the pan-
oramic moon roof and the frame in the fol-
lowing situations, travel is stopped and the
panoramic moon roof opens slightly:
●The panoramic moon roof is closing or
tilting down.
●The electronic sunshade is closing.
■Door lock linked panoramic moon roof
operation
●The panoramic moon roof can be
opened and closed using the mechanical
key.
* ( P.432)
●The panoramic moon roof can be
opened using the wireless remote con-
trol.
*( P.99)
*: These settings must be customized at
your Lexus dealer.
■Closing both the panoramic moon roof
and electronic sunshade
Slide the switch forward.
The electronic sunshade will close to the
half-open position and pause. The pan-
oramic moon roof will then fully close. Then
the electronic sunshade will fully close.
■When the panoramic moon roof or elec-
tronic sunshade does not close normally
Perform the following procedure:
1 Stop the vehicle.
2 Turn the engine switch to IGNITION
ON mode.
3 Slide and hold the switch or
switch forward. Continue pressing the
switch for approximately 10 seconds
after the panoramic moon roof or elec-
tronic sunshade closes and reopens.
The panoramic moon roof and elec-
tronic sunshade will start to close.
*
4Check that the panoramic moon roof
and electronic sunshade are fully closed
and release the switch.
*: If the switch is released at the incorrect
time, the procedure will have to be per-
formed again from the beginning.
If the panoramic moon roof or electronic
sunshade does not fully close even after
performing the above procedure correctly,
have the vehicle inspected by your Lexus
dealer.
■Alarm
The alarm may be triggered if the alarm is
set and the panoramic moon roof is closed
using the door lock linked panoramic moon
roof operation function. ( P.69)
■Panoramic moon roof open warning
buzzer
A buzzer sounds and a message is shown
on the multi-informat ion display in the
instrument cluster when the engine switch
is turned off and the driver’s door is opened
with the panoramic moon roof open.
■Customization
Some functions can be customized.
( P.461)
Page 159 of 508

1594-1. Before driving
4
Driving
Cargo capacity depends on the total
weight of the occupants.
(Cargo capacity) = (Total load capac-
ity) — (Total weight of occupants)
Steps for Determining Correct Load
Limit —
(1) Locate the statement “The com-
bined weight of occupants and cargo
should never exceed XXX kg or XXX
lbs.” on your vehicle’s placard.
(2) Determine the combined weight of
the driver and passengers that will be
riding in your vehicle.
(3) Subtract the combined weight of
the driver and passengers from XXX
kg or XXX lbs.
(4) The resulting figure equals the
available amount of cargo and luggage
load capacity.
For example, if the “XXX” amount
equals 1400 lbs. and there will be five
150 lb passengers in your vehicle, the
amount of available cargo and luggage
load capacity is 650 lbs. (1400 − 750
(5 150) = 650 lbs.)
(5) Determine the combined weight of
luggage and cargo being loaded on
the vehicle. That weight may not safely
exceed the available cargo and lug-
NOTICE
■If you get a flat tire while driving
A flat or damaged ti re may cause the fol-
lowing situations. Hold the steering
wheel firmly and gradually depress the
brake pedal to slow down the vehicle.
●It may be difficult to control your vehi-
cle.
●The vehicle will make abnormal
sounds or vibrations.
●The vehicle will lean abnormally.
Information on what to do in case of a flat
tire (
P.416)
■When encountering flooded roads
Do not drive on a road that has flooded
after heavy rain etc. Doing so may cause
the following serious damage to the vehi-
cle:
●Engine stalling
●Short in electrical components
●Engine damage caused by water
immersion
In the event that you drive on a flooded
road and the vehicle is flooded, be sure
to have your Lexus dealer check the fol-
lowing:
●Brake function
●Changes in quantity and quality of oil
and fluid used for the engine, transaxle,
transfer (AWD models), rear differen-
tial (AWD models), etc.
●Lubricant condition for the propeller
shaft (AWD models), bearings and
suspension joints (where possible),
and the function of all joints, bearings,
etc.
Cargo and luggage
Take notice of the following infor-
mation about storage precautions,
cargo capacity and load.
Capacity and distribution
Page 181 of 508

1814-2. Driving procedures
4
Driving
■Shift ranges and their functions
A lower shift range will provide greater
engine braking forces than a higher shift
range.
■Automatic deactivation of shift range
selection in the D position
Shift range selection in the D position will
be deactivated in the following situations:
●When the vehicle comes to a stop
●If the accelerator pedal is depressed for
more than a certain period of time
●When the shift lever is shifted to a posi-
tion other than D
●The “+” paddle shift switch is held down
for a period of time
■Downshifting restriction warning
buzzer
To help ensure safety and driving perfor-
mance, downshifting operation may some-
times be restricted. In some circumstances,
downshifting may not be possible even
when the shift lever or paddle shift switch is
operated. (A buzzer will sound twice.)
To enter M mode, shift the shift lever to
M. Gears can then be selected by
operating the shift lever or paddle shift
switches, allowing you to drive in the
gear of your choosing. 1
Upshifting
2 Downshifting
The gear changes once every time the shift
lever or paddle shift switch is operated.
The selected gear, from M1 to M8, will be
fixed and displayed on the meters.
When in the M position, the gear will
not change unless the shift lever or
paddle shift switches are operated.
However, even when in the M position,
the gears will be automatically
changed in the following situation:
When vehicle speed drops (down-
shift only).
When the automatic transmission
fluid or engine coolant temperature
is low.
When automatic transmission fluid
temperature is high (upshift only).
When the needle of the tachometer
is in the red zone (the range which
exceeds the allowable revs of the
Meter dis-
playFunction
D2 - D8
A gear in the range between
1 and the selected gear is
automatically chosen
depending on vehicle speed
and driving conditions
D1Setting the gear at 1
Selecting gears in the M position
Page 182 of 508

1824-2. Driving procedures
engine).
In the following situations, the gear will
not shift even if the shift lever or paddle
shift switches are operated.
The vehicle speed is low (upshift
only).
■Downshifting restriction warning
buzzer
To help ensure safety and driving perfor-
mance, downshifting operation may some-
times be restricted. In some circumstances,
downshifting may not be possible even
when the paddle shift switch is operated. (A
buzzer will sound twice.)
1 Right turn
2 Lane change to the right (move the
lever partway and release it)
The right hand signals will flash 3 times.
3Lane change to the left (move the
lever partway and release it)
The left hand signals will flash 3 times.
4Left turn
■Turn signals can be operated when
The engine switch is in IGNITION ON
mode.
■If the indicator flashes faster than usual
Check that a light bulb in the front or rear
turn signal lights has not burned out.
■If the turn signals stop flashing before a
lane change has been performed
Operate the lever again.
Turn signal lever
Operating instructions
Page 185 of 508
1854-2. Driving procedures
4
Driving
operate, manually release the parking
brake.
■If “Parking Brake Overheated Parking
Brake Unavailable” is displayed on the
multi-information display
If the parking brake is operated repeatedly
over a short period of time, the system may
restrict operation to prevent overheating. If
this happens, refrain from operating the
parking brake. Normal operation will return
after about 1 minute.
■If “EPB Activation Stopped Incom-
pletely” or “Parking Brake Unavailable”
is displayed on th e multi-information
display
Operate the parking brake switch. If the
message does not disappear after operat-
ing the switch several times, the system may
be malfunctioning. Have the vehicle
inspected by your Lexus dealer immedi-
ately.
■Parking brake operation sound
When the parking brake operates, a motor
sound (whirring sound) may be heard. This
does not indicate a malfunction.
■Parking brake indicator light and park-
ing brake light
●Depending on the engine switch mode,
the parking brake in dicator light and
parking brake light will turn on and stay
on as described below:
IGNITION ON mode: Comes on until
the parking brake is released.
Not in IGNITION ON mode: Stays on
for approximately 15 seconds.
●When the engine switch is turned off with
the parking brake set, the parking brake
indicator light and parking brake light will
stay on for about 15 seconds. This does
not indicate a malfunction.
■Changing the mode
When changing the automatic mode on/off,
the message will be shown on the
multi-information display and the buzzer
sounds.
■Parking the vehicle
P.154
■Parking brake engaged warning buzzer
A buzzer will sound if the vehicle is driven
with the parking brake engaged. “Release
Parking Brake” is displayed on the
multi-information display.
■Warning messages and buzzers
Warning messages and buzzers are used to
indicate a system malfunction or to inform
the driver of the need for caution. If a warn-
ing message is shown on the multi-informa-
tion display, read the message and follow
the instructions.
■If the brake system warning light comes
on
P.403
■Usage in winter time
P.282
WARNING
■When parking the vehicle
Do not leave a child in the vehicle alone.
The parking brake may be released unin-
tentionally and there is the danger of the
vehicle moving that may lead to an acci-
dent resulting in death or serious injury.
■Parking brake switch
Do not set any objects near the parking
brake switch. Objects may interfere with
the switch and may lead the parking
brake to unexpectedly operate.
NOTICE
■When parking the vehicle
Before you leave the vehicle, shift the
shift lever to P, set the parking brake and
make sure that the vehicle does not
move.
■When the system malfunctions
Stop the vehicle in a safe place and
check the warning messages.
Page 186 of 508
1864-2. Driving procedures
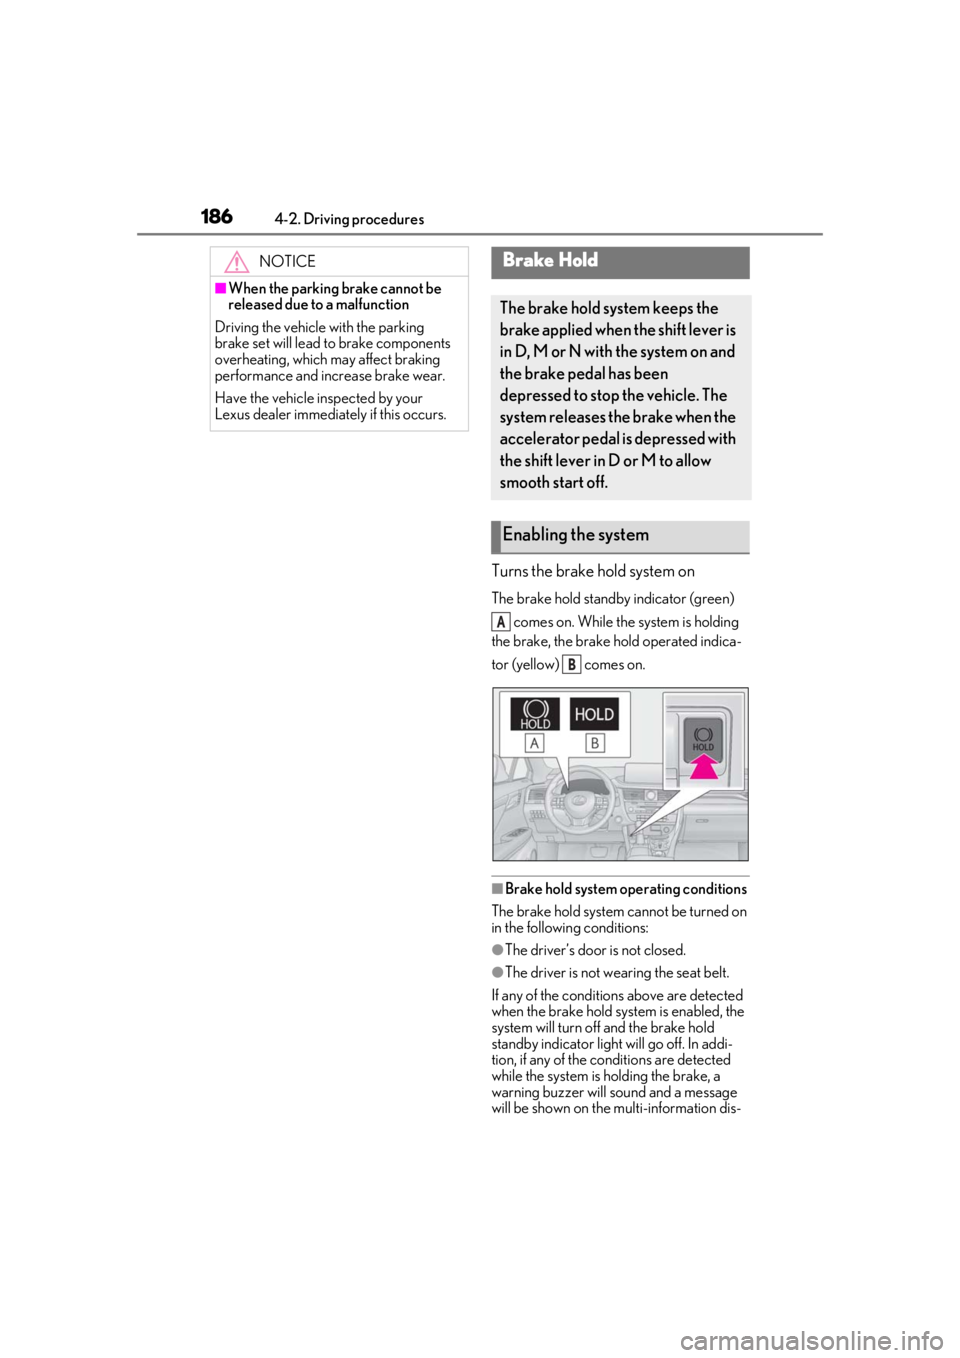
Turns the brake hold system on
The brake hold standby indicator (green) comes on. While the system is holding
the brake, the brake hold operated indica-
tor (yellow) comes on.
■Brake hold system operating conditions
The brake hold system cannot be turned on
in the following conditions:
●The driver’s door is not closed.
●The driver is not wearing the seat belt.
If any of the conditions above are detected
when the brake hold system is enabled, the
system will turn off and the brake hold
standby indicator light will go off. In addi-
tion, if any of the conditions are detected
while the system is holding the brake, a
warning buzzer will sound and a message
will be shown on the multi-information dis-
NOTICE
■When the parking brake cannot be
released due to a malfunction
Driving the vehicle with the parking
brake set will lead to brake components
overheating, which may affect braking
performance and increase brake wear.
Have the vehicle inspected by your
Lexus dealer immediately if this occurs.
Brake Hold
The brake hold system keeps the
brake applied when the shift lever is
in D, M or N with the system on and
the brake pedal has been
depressed to stop the vehicle. The
system releases the brake when the
accelerator pedal is depressed with
the shift lever in D or M to allow
smooth start off.
Enabling the system
A
B
Page 187 of 508
1874-2. Driving procedures
4
Driving
play. The parking brake will then be set
automatically.
■Brake hold function
●If the brake pedal is left released for a
period of about 3 minutes after the sys-
tem has started holding the brake, the
parking brake will be set automatically. In
this case, a warning buzzer sounds and a
message is shown on the multi-informa-
tion display.
●To turn the system off while the system is
holding the brake, firmly depress the
brake pedal and press the button again.
●The brake hold function may not hold the
vehicle when the vehicle is on a steep
incline. In this situation, it may be neces-
sary for the driver to apply the brakes. A
warning buzzer will sound and the
multi-information display will inform the
driver of this situation. If a warning mes-
sage is shown on the multi-information
display, read the message and follow the
instructions.
■When the parking brake is set automati-
cally while the system is holding the
brakes
Perform any of the follo wing operations to
release the parking brake.
●Depress the accelerator pedal. (The
parking brake will not be released auto-
matically if the seat belt is not fastened.)
●Operate the parking brake switch with
the brake pedal depressed.
Make sure that the pa rking brake indicator
light goes off. ( P.183)
■When an inspection at your Lexus
dealer is necessary
When the brake hold standby indicator
(green) does not illuminate even when the
brake hold switch is pressed with the brake
hold system operating conditions met, the
system may be malfun ctioning. Have the
vehicle inspected at your Lexus dealer.
■If “Brake Hold Fault Depress Brake to
Deactivate Visit Your Dealer” or “Brake
Hold Malfunction Visit Your Dealer” is
displayed on the multi-information dis-
play
The system may be ma lfunctioning. Have
the vehicle inspected by your Lexus dealer.
■Warning messages and buzzers
Warning messages and buzzers are used to
indicate a system malfunction or to inform
the driver of the need for caution. If a warn-
ing message is shown on the multi-informa-
tion display, read the message and follow
the instructions.
■If the brake hold operated indicator
flashes
P.409
WARNING
■When the vehicle is on a steep incline
When using the brake hold system on a
steep incline exercise caution. The brake
hold function may not hold the vehicle in
such a situation.
■When stopped on a slippery road
The system cannot stop the vehicle when
the gripping ability of the tires has been
exceeded. Do not use the system when
stopped on a slippery road.
NOTICE
■When parking the vehicle
The brake hold system is not designed
for use when parking the vehicle for a
long period of time. Turning the engine
switch off while the system is holding the
brake may release the brake, which
would cause the vehicle to move. When
operating the engine switch, depress the
brake pedal, shift the shift lever to P and
set the parking brake.
Page 189 of 508

1894-3. Operating the lights and wipers
4
Driving
Doing so interferes with the sensor detect-
ing the level of ambient light and may cause
the automatic headlight system to malfunc-
tion.
■Automatic light off system
●When the headlights come on: The head-
lights and tail lights turn off 30 seconds
after a door is opened and closed if the
engine switch is turned to ACCESSORY
mode or turned off. (The lights turn off
immediately if on the key is pressed
after all the doors are locked.)
●When only the tail lights are on: The tail
lights turn off automatically if the engine
switch is turned to ACCESSORY mode
or turned off and the driver’s door is
opened.
To turn the lights on again, turn the engine
switch to IGNITION ON mode, or turn the
light switch off once and then back to
or .
■Automatic headlight leveling system (if
equipped)
The level of the headlights is automatically
adjusted according to the number of pas-
sengers and the loading condition of the
vehicle to ensure that the headlights do not
interfere with other road users.
■Light reminder buzzer
A buzzer sounds when the engine switch is
turned off or turned to ACCESSORY
mode and the driver’s door is opened while
the lights are turned on.
■Welcome lighting
If the headlight switch is turned to and
the surrounding area is dark, unlocking the
doors using the smart access system with
push-button start or wireless remote con-
trol will turn the parking lights and tail lights
on automatically.
■Windshield wiper linked headlight illu-
mination
When driving during daytime with the
headlight switch turned to , if the wind-
shield wipers are used, the headlights will turn on automatically after several seconds
to help enhance the visibility of your vehicle.
■Battery-saving function
In order to prevent the battery of the vehicle
from discharging, if the headlights and/or
tail lights are on when the engine switch is
turned off the battery saving function will
operate and automatically turn off all the
lights after approximately 20 minutes.
When the engine switch is turned to IGNI-
TION ON mode, the battery-saving func-
tion will be disabled.
When any of the following are performed,
the battery-saving function is canceled
once and then reactivated. All the lights will
turn off automatically 20 minutes after the
battery- saving function has been reacti-
vated:
●When the headlight switch is operated
●When a door is opened or closed
■Customization
Some functions can be customized.
( P.461)
1 With the headlights on, push the
lever away from you to turn on the
high beams.
NOTICE
■To prevent battery discharge
Do not leave the lights on longer than
necessary when the engine is off.
Turning on the high beam head-
lights
Page 200 of 508
2004-4. Refueling
4-4.Refueling
Close all the doors and windows,
and turn the engine switch off.
Confirm the type of fuel.
■Fuel types
P.450
■Fuel tank opening for unleaded gasoline
To help prevent incorrect fueling, your vehi-
cle has a fuel tank opening that only accom-
modates the special nozzle on unleaded
fuel pumps.
■If the malfunction indicator lamp illumi-
nates
The malfunction indicator lamp may illumi-
nate erroneously if refueling is performed
repeatedly when the fuel tank is nearly full.
Opening the fuel tank cap
Perform the following steps to open
the fuel tank cap:
Before refueling the vehicle
WARNING
■When refueling the vehicle
Observe the following precautions while
refueling the vehicle. Failure to do so may
result in death or serious injury.
●After exiting the vehicle and before
opening the fuel door, touch an
unpainted metal surface to discharge
any static electricity. It is important to
discharge static electricity before refu-
eling because sparks resulting from
static electricity can cause fuel vapors
to ignite while refueling.
●Always hold the grips on the fuel tank
cap and turn it slowly to remove it.
A whooshing sound may be heard
when the fuel tank cap is loosened.
Wait until the sound cannot be heard
before fully removing the cap. In hot
weather, pressurized fuel may spray
out of the filler neck and cause injury.
●Do not allow anyone that has not dis-
charged static electricity from their
body to come close to an open fuel
tank.
●Do not inhale vaporized fuel.
Fuel contains substances that are
harmful if inhaled.
●Do not smoke while refueling the vehi-
cle.
Doing so may cause the fuel to ignite
and cause a fire.
●Do not return to the vehicle or touch
any person or object that is statically
charged.
This may cause static electricity to
build up, resulting in a possible ignition
hazard.
■When refueling
Observe the following precautions to
prevent fuel overflowing from the fuel
tank:
●Securely insert the fuel nozzle into the
fuel filler neck.
●Stop filling the tank after the fuel noz-
zle automatically clicks off.
●Do not top off the fuel tank.
NOTICE
■Refueling
Do not spill fuel during refueling.
Doing so may damage the vehicle, such
as causing the emission control system to
operate abnormally or damaging fuel
system components or the vehicle’s
painted surface.
Page 209 of 508

2094-5. Using the driving support systems
4
Driving
The system can detect the following:
Vehicles
Bicyclists
Pedestrians
■Pre-collision warning
When the system determines that the
possibility of a frontal collision is high, a
buzzer will sound and a warning mes-
sage will be displayed on the
multi-information display to urge the driver to take evasive action.
■Pre-collision brake assist
When the system determines that the
possibility of a frontal collision is high,
the system applies greater braking
force in relation to how strongly the
brake pedal is depressed.
■Pre-collision braking
If the system determines that the possi-
bility of a frontal collision is extremely
high, the brakes are automatically
applied to help avoid the collision or
reduce the impact of the collision.
■Suspension control (if equipped)
When the system determines that the
possibility of a frontal collision is high,
the Adaptive Variable Suspension Sys-
tem ( P.275) will control the damping
force of the shock absorbers to help
maintain an appropriate vehicle pos-
ture.
PCS (Pre-Collision System)
The pre-collision system uses a
radar sensor and front camera to
detect objects ( P.209) in front of
the vehicle. When the system
determines that the possibility of a
frontal collision with an object is
high, a warning operates to urge
the driver to take evasive action
and the potential brake pressure is
increased to help the driver avoid
the collision. If the system deter-
mines that the possibility of a frontal
collision with an object is extremely
high, the brakes are automatically
applied to help avoid the collision or
help reduce the impact of the colli-
sion.
The pre-collision system can be dis-
abled/enabled and the warning tim-
ing can be changed. ( P.211)
Detectable objects
System functions