engine LEXUS RX450h 2015 Workshop Manual
[x] Cancel search | Manufacturer: LEXUS, Model Year: 2015, Model line: RX450h, Model: LEXUS RX450h 2015Pages: 878, PDF Size: 11.62 MB
Page 660 of 878
6604-3. Do-it-yourself maintenance
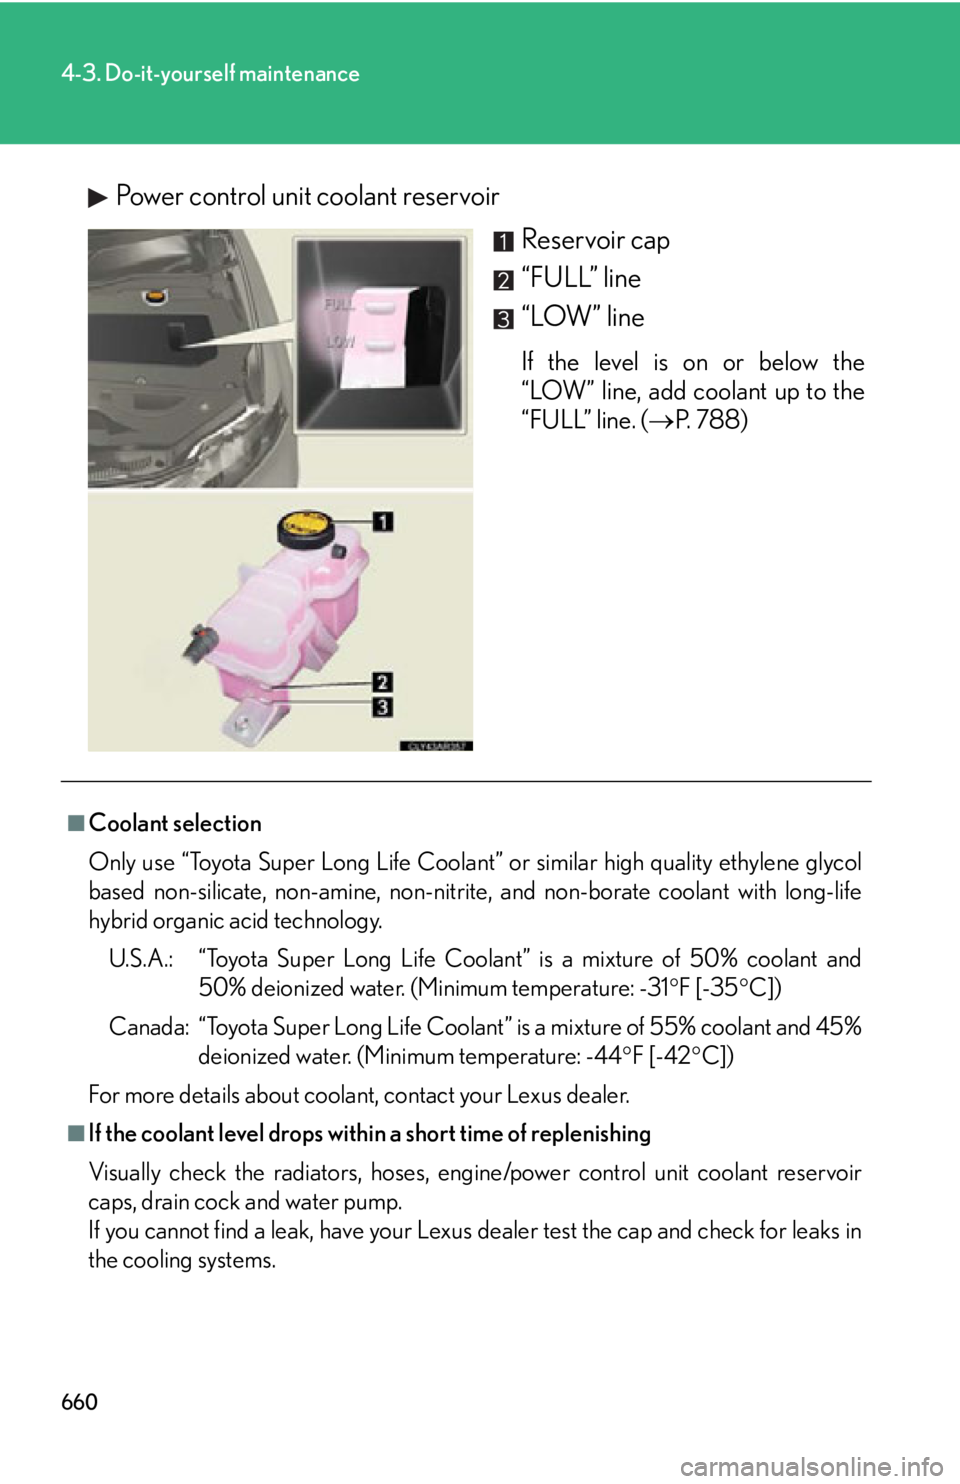
Power control unit coolant reservoir
Reservoir cap
“FULL” line
“LOW” line If the level is on or below the
“LOW” line, add coolant up to the
“FULL” line. ( P. 788)
■
Coolant selection
Only use “Toyota Super Long Life Coolant” or similar high quality ethylene glycol
based non-silicate, non-amine, non-nitrite, and non-borate coolant with long-life
hybrid organic acid technology.
U.S.A.: “Toyota Super Long Life Coolant” is a mixture of 50% coolant and
50% deionized water. (Minimum temperature: -31 F [-35 C])
Canada: “Toyota Super Long Life Coolant” is a mixture of 55% coolant and 45%
deionized water. (Minimum temperature: -44 F [-42 C])
For more details about coolant, contact your Lexus dealer.
■
If the coolant level drops within a short time of replenishing
Visually check the radiators, hoses, engine/power control unit coolant reservoir
caps, drain cock and water pump.
If you cannot find a leak, have your Lexus dealer test the cap and check for leaks in
the cooling systems.
Page 661 of 878
6614-3. Do-it-yourself maintenance
4
Maintenance and care
Radiator and condenser
Check the radiator and condenser an d clear away any foreign objects.
If either of the above parts are extremely dirty or you are not sure of their
condition, have your vehicle checked by your Lexus dealer. CAUTION■
When the engine and hybrid system are hot
Do not remove the coolant reservoir cap.
The cooling system may be under pressure and may spray hot coolant if the cap is
removed, causing serious injuries, such as burns.
NOTICE■
When adding coolant
Coolant is neither plain water nor straight antifreeze. The correct mixture of water
and antifreeze must be used to provide proper lubrication, corrosion protection
and cooling. Be sure to read the antifreeze or coolant label.■
If you spill coolant
Be sure to wash it off with water to prevent damaging to parts or paint.
CAUTION■
When the hybrid system is hot
Do not touch the radiator or condenser as they may be hot and cause serious inju-
ries, such as burns.
Page 663 of 878
6634-3. Do-it-yourself maintenance
4
Maintenance and care
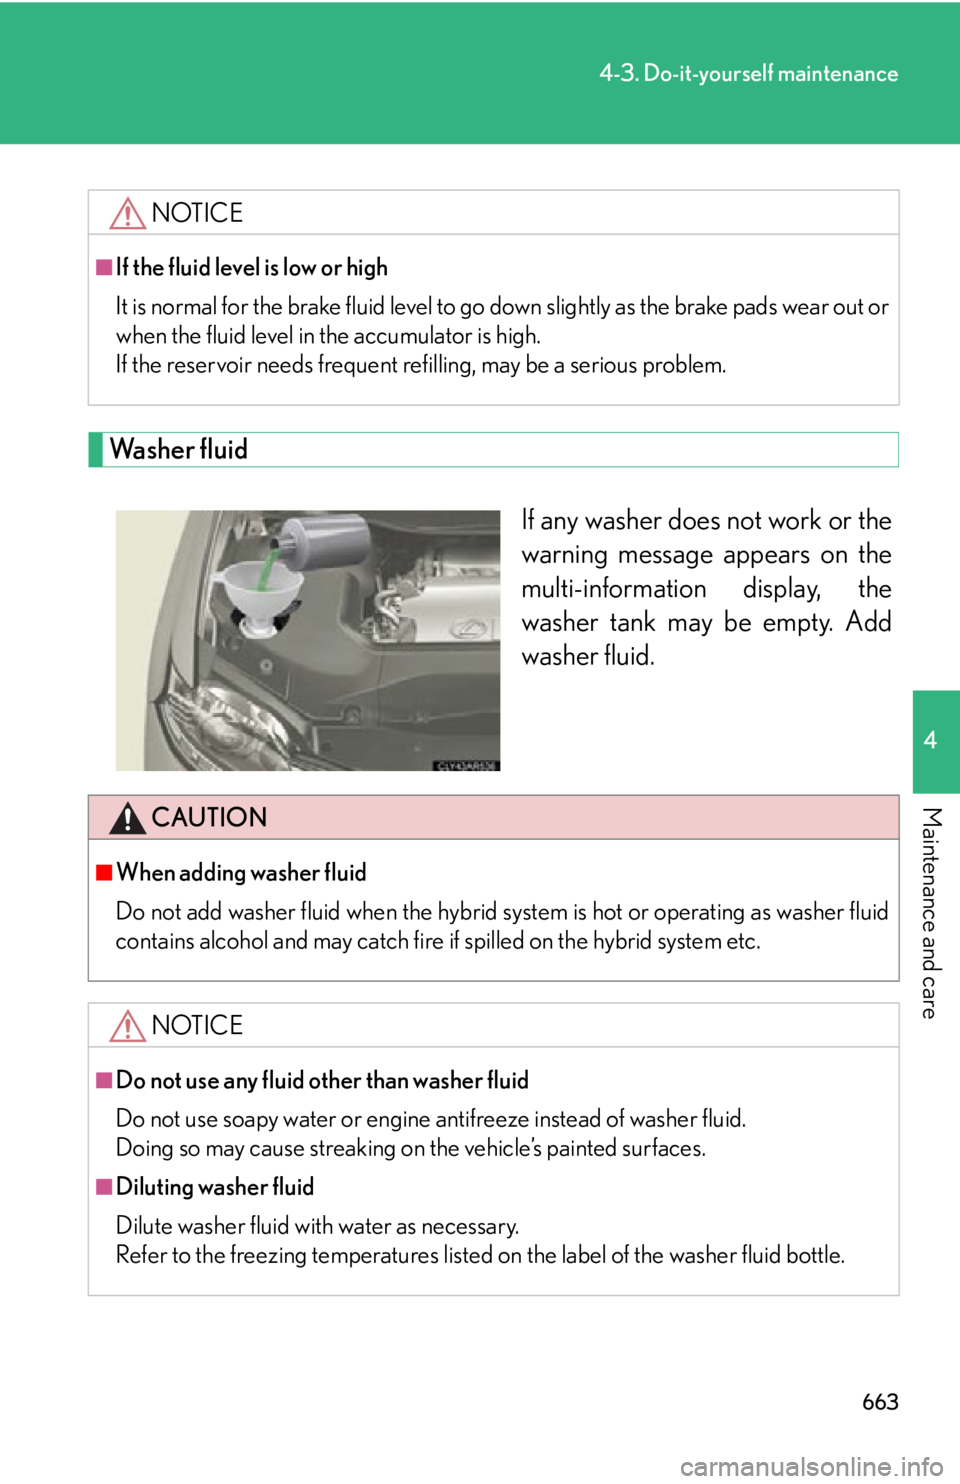
Washer fluid
If any washer does not work or the
warning message appears on the
multi-information display, the
washer tank may be empty. Add
washer fluid.NOTICE■
If the fluid level is low or high
It is normal for the brake fluid level to go down slightly as the brake pads wear out or
when the fluid level in the accumulator is high.
If the reservoir needs frequent re filling, may be a serious problem.
CAUTION■
When adding washer fluid
Do not add washer fluid when the hybrid system is hot or operating as washer fluid
contains alcohol and may catch fire if spilled on the hybrid system etc.
NOTICE■
Do not use any fluid other than washer fluid
Do not use soapy water or engine antifreeze instead of washer fluid.
Doing so may cause streaking on the vehicle’s painted surfaces.
■
Diluting washer fluid
Dilute washer fluid with water as necessary.
Refer to the freezing temperatures listed on the label of the washer fluid bottle.
Page 689 of 878
6894-3. Do-it-yourself maintenance
4
Maintenance and care Checking and replacing fuses If any of the electrical components do not operate, a fuse may have blown.
If this happens, check and re place the fuses as necessary.
Turn the “POWER” switch off.
After a system failure, see “Fuse layout and amperage ratings”
for details about which fuse to check. ( P. 694)
Engine compartment:
To gain access to the fuse box, remove the engine compart-
ment cover. ( P. 655)
Luggage compartment:
To gain access to the fuse box, secure the deck board with
the hook and then remove th e spare tire cover and 12-volt
battery cover. ( P. 664)
Open the fuse box cover.
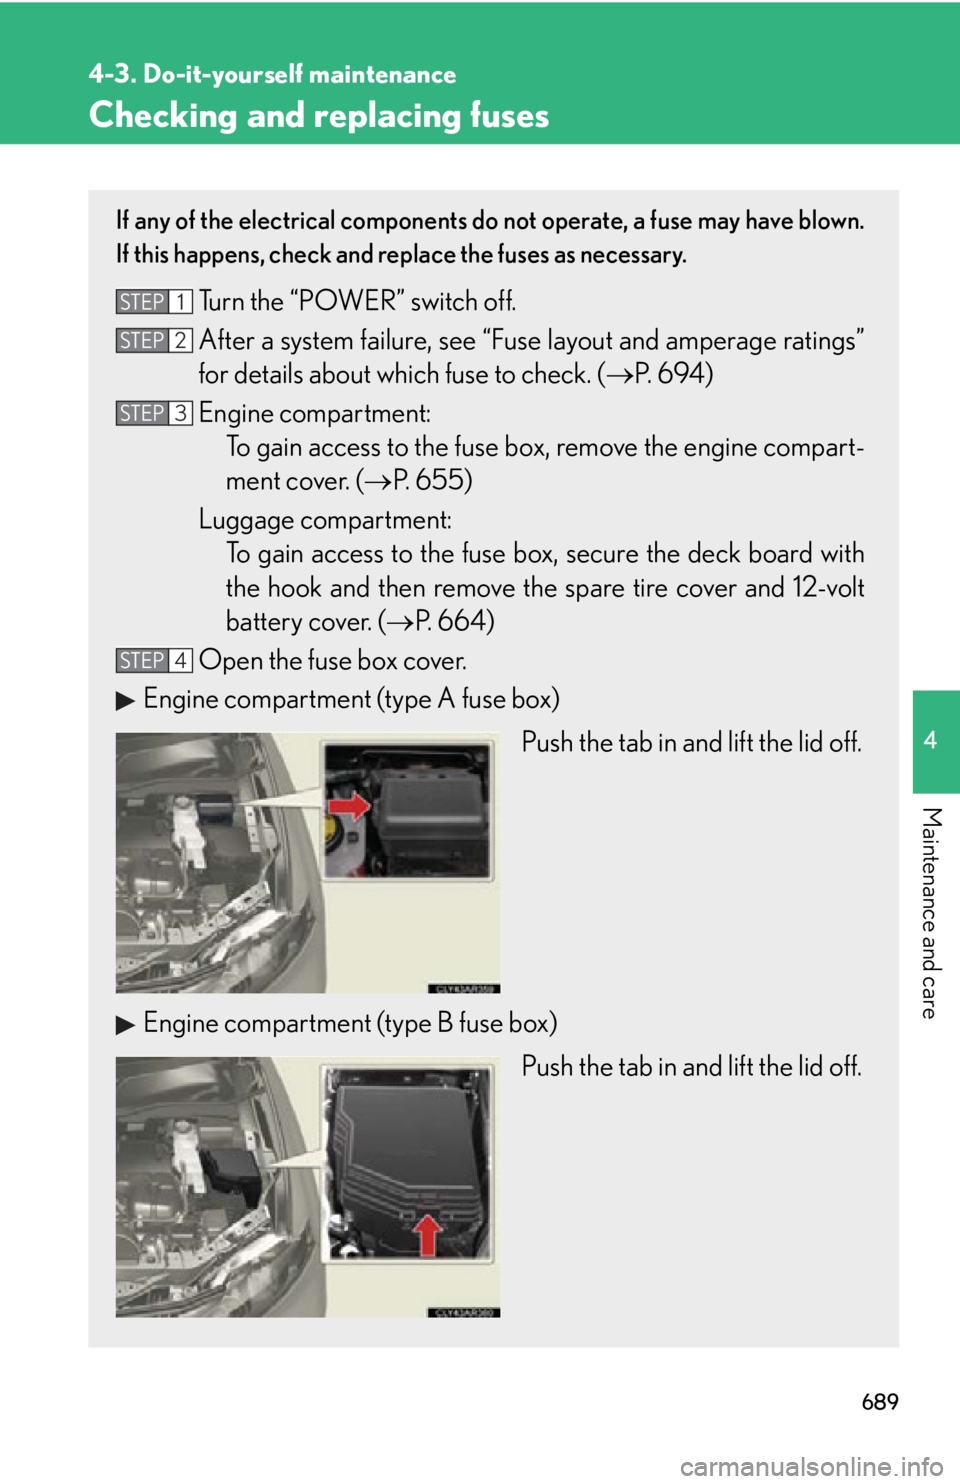
Engine compartment (type A fuse box)
Push the tab in and lift the lid off.
Engine compartment (type B fuse box)
Push the tab in and lift the lid off.STEP 1
STEP 2
STEP 3
STEP 4
Page 690 of 878
6904-3. Do-it-yourself maintenance
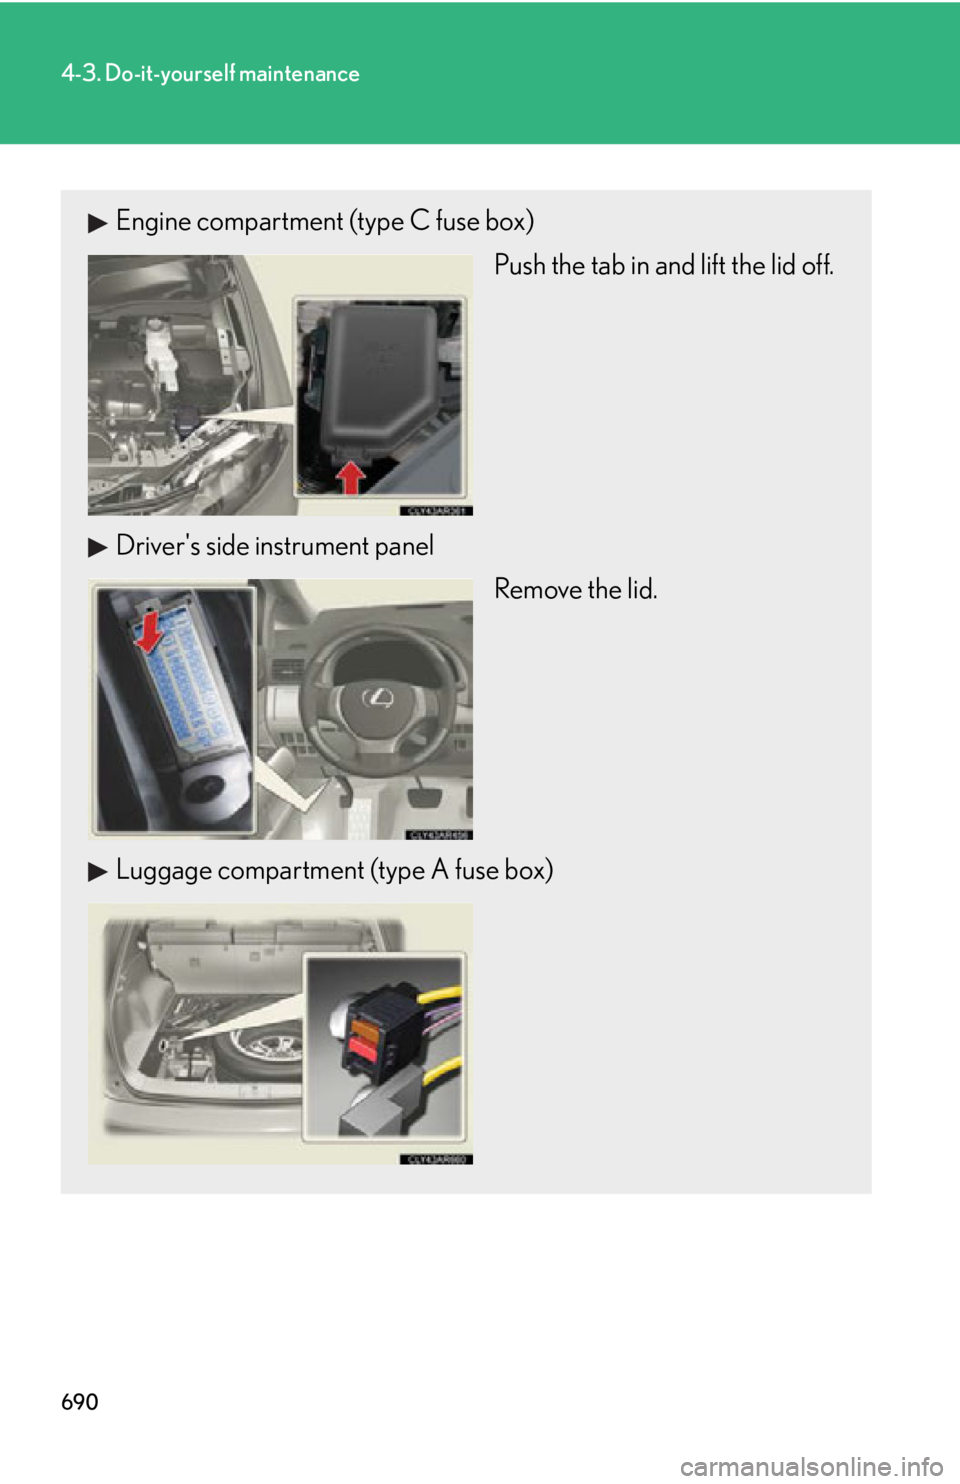
Engine compartment (type C fuse box)
Push the tab in and lift the lid off.
Driver's side instrument panel
Remove the lid.
Luggage compartment (type A fuse box)
Page 694 of 878
6944-3. Do-it-yourself maintenance
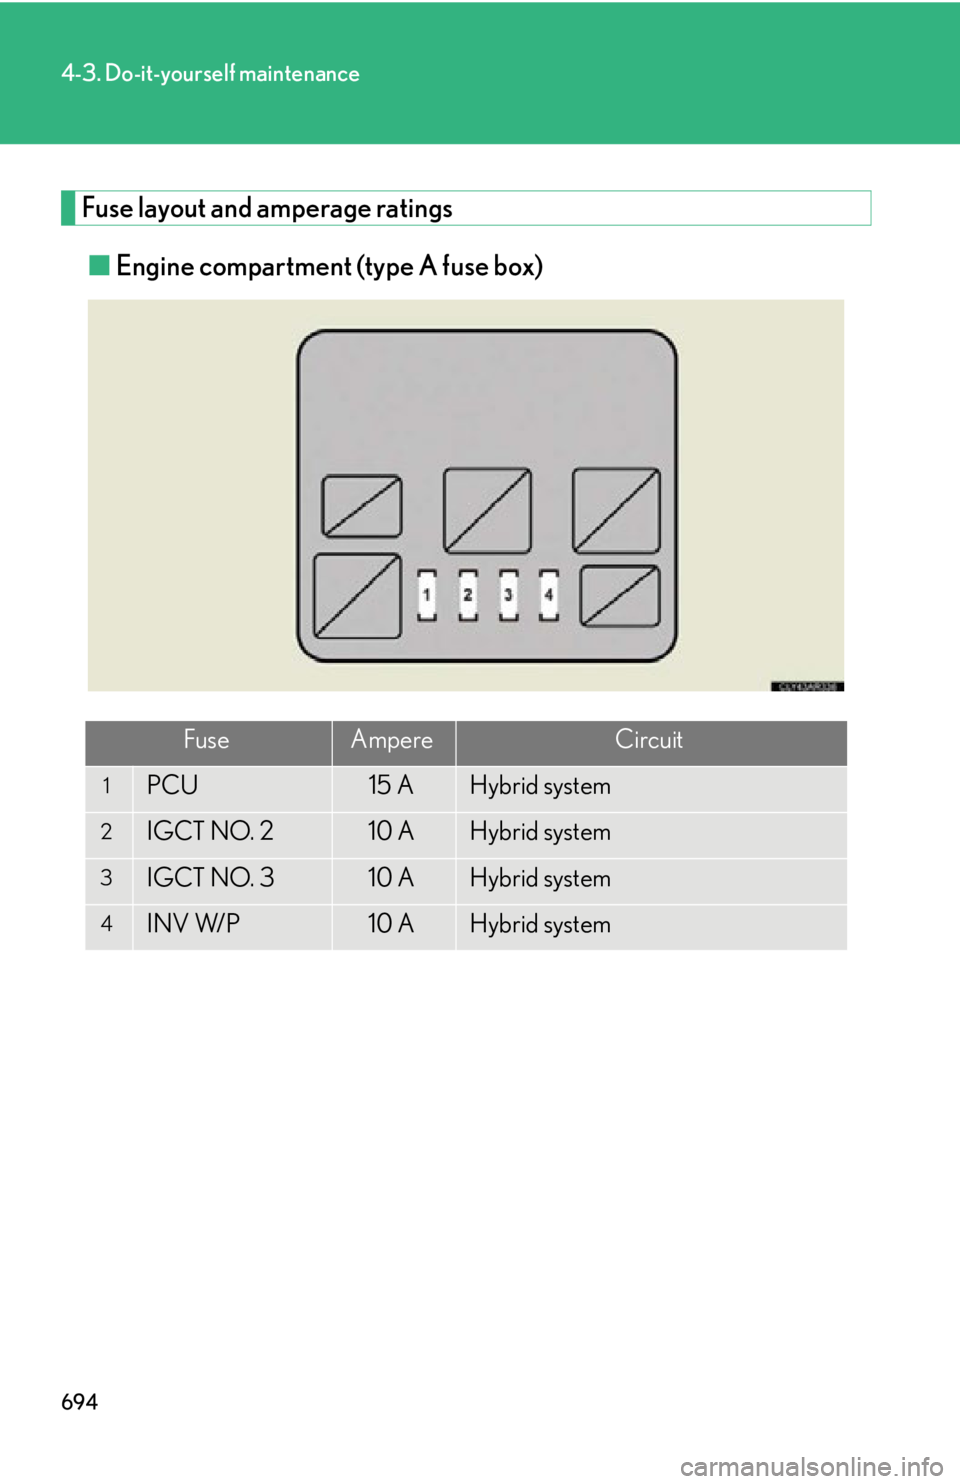
Fuse layout and amperage ratings
■ Engine compartment (type A fuse box)
Fuse Ampere Circuit1
PCU 15 A Hybrid system2
IGCT NO. 2 10 A Hybrid system3
IGCT NO. 3 10 A Hybrid system4
INV W/P 10 A Hybrid system
Page 695 of 878
6954-3. Do-it-yourself maintenance
4
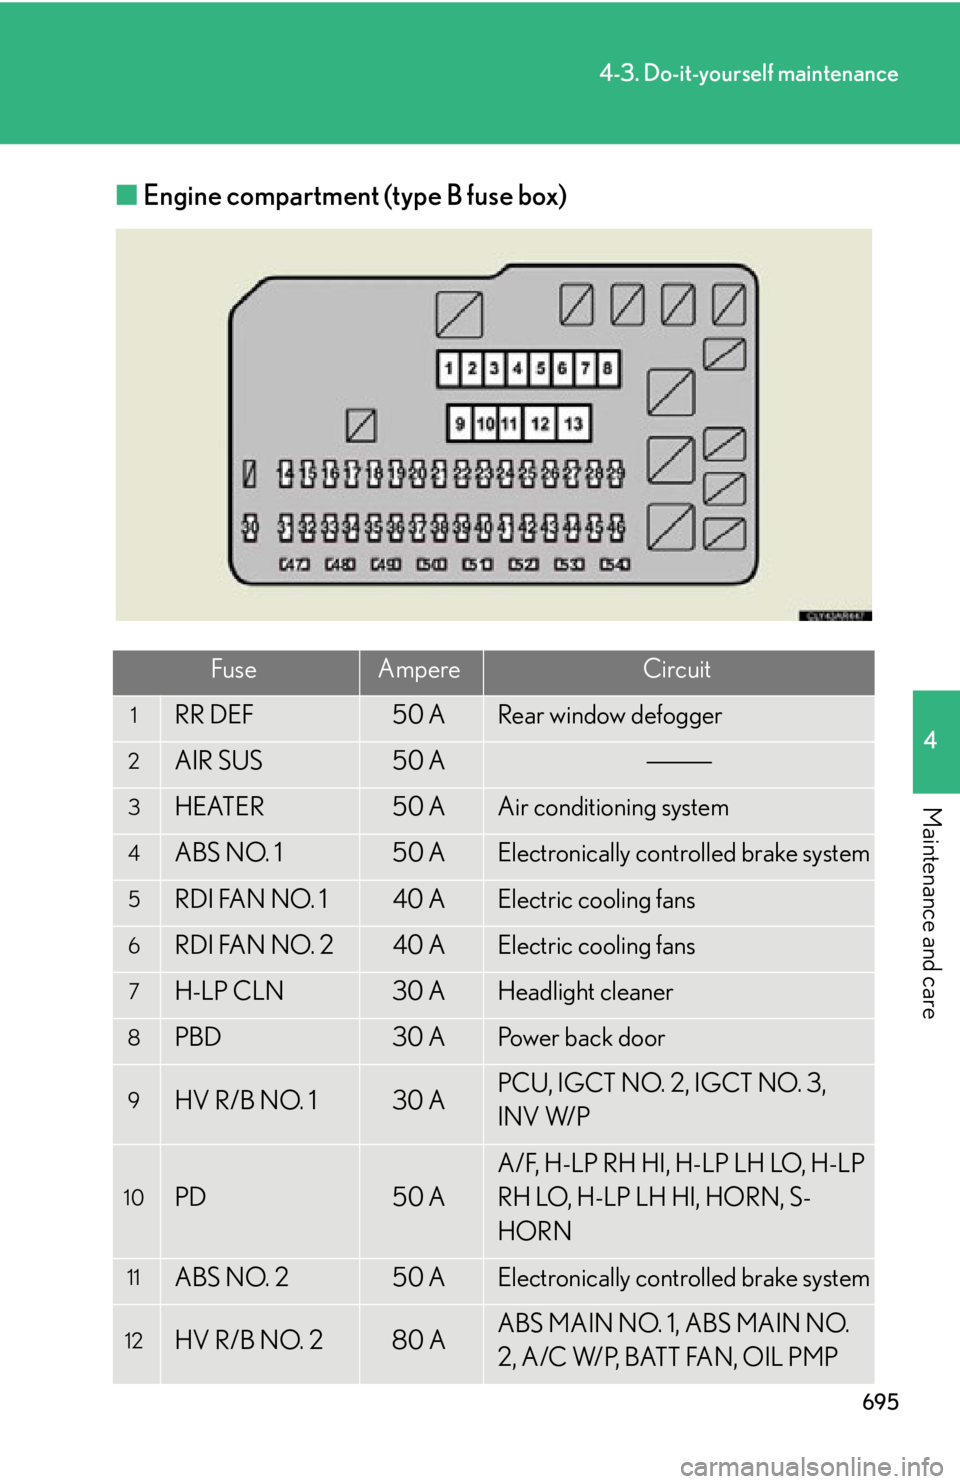
Maintenance and care ■ Engine compartment (type B fuse box)
Fuse Ampere Circuit1
RR DEF 50 A Rear window defogger2
AIR SUS 50 A3
HEATER 50 A Air conditioning system4
ABS NO. 1 50 A Electronically controlled brake system5
RDI FAN NO. 1 40 A Electric cooling fans6
RDI FAN NO. 2 40 A Electric cooling fans7
H-LP CLN 30 A Headlight cleaner8
PBD 30 A Power back door9
HV R/B NO. 1 30 A PCU, IGCT NO. 2, IGCT NO. 3,
INV W/P
10
PD 50 A A/F, H-LP RH HI, H-LP LH LO, H-LP
RH LO, H-LP LH HI, HORN, S-
HORN
11
ABS NO. 2 50 A Electronically controlled brake system
12
HV R/B NO. 2 80 A ABS MAIN NO. 1, ABS MAIN NO.
2, A/C W/P, BATT FAN, OIL PMP
Page 699 of 878
6994-3. Do-it-yourself maintenance
4
Maintenance and care
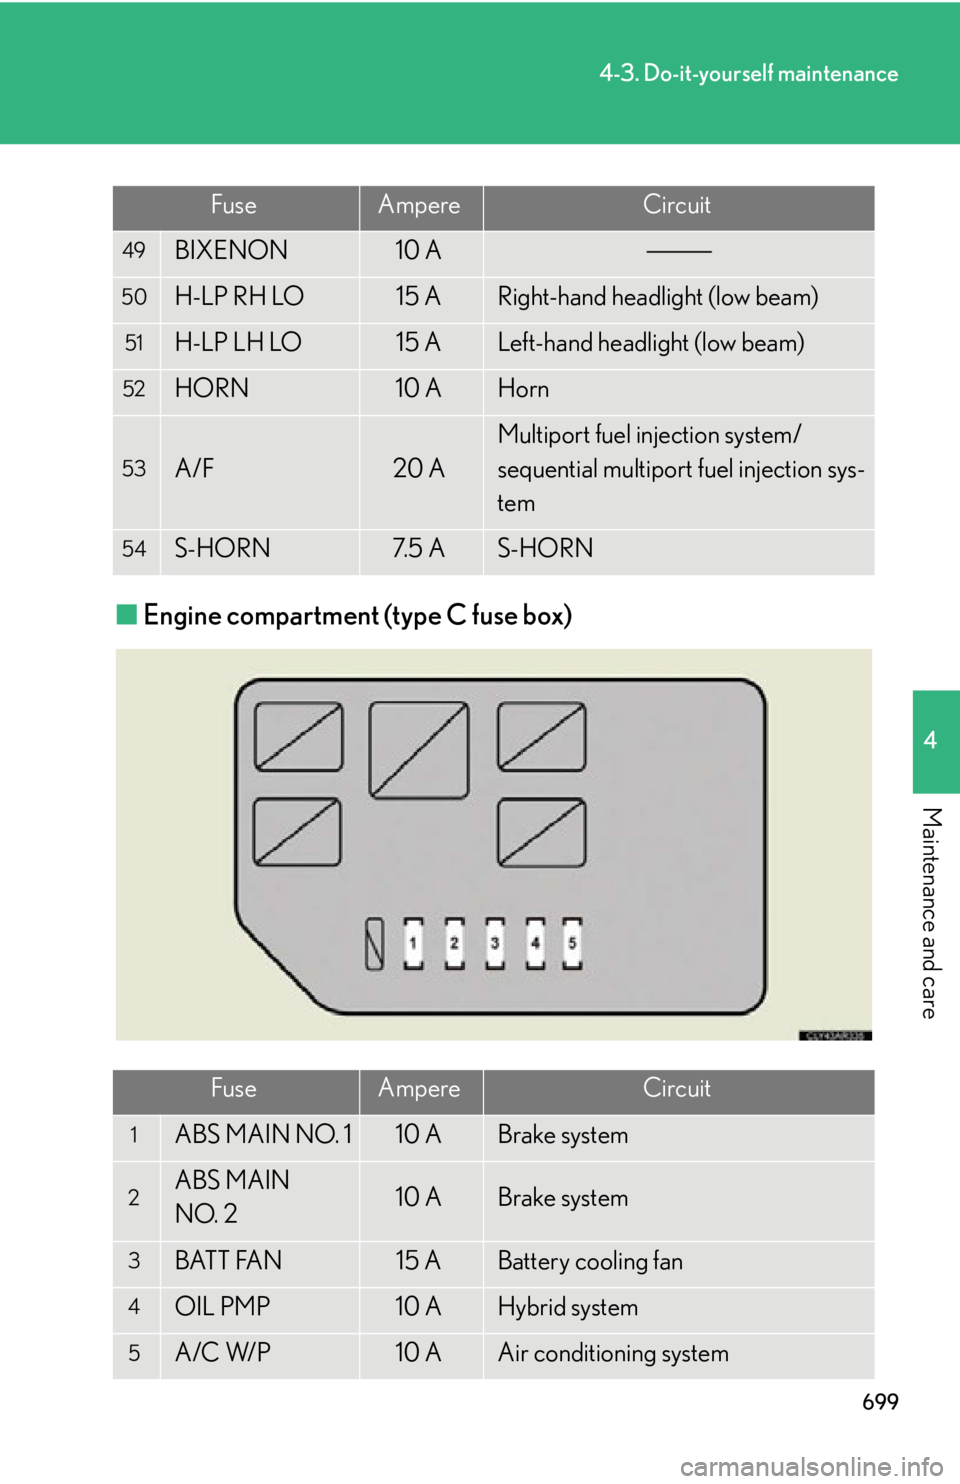
■ Engine compartment (type C fuse box) 49
BIXENON 10 A50
H-LP RH LO 15 A Right-hand headlight (low beam)51
H-LP LH LO 15 A Left-hand headlight (low beam)52
HORN 10 A Horn53
A/F 20 A Multiport fuel injection system/
sequential multiport fuel injection sys-
tem54
S-HORN 7. 5 A S-HORN
Fuse Ampere Circuit1
ABS MAIN NO. 1 10 A Brake system
2
ABS MAIN
NO. 2 10 A Brake system
3
BATT FAN 15 A Battery cooling fan
4
OIL PMP 10 A Hybrid system
5
A/C W/P 10 A Air conditioning systemFuse Ampere Circuit
Page 705 of 878
7054-3. Do-it-yourself maintenance
4
Maintenance and care Headlight aim (vehicles without LED headlights) ■ Removing the engine compartment cover
P. 6 5 5
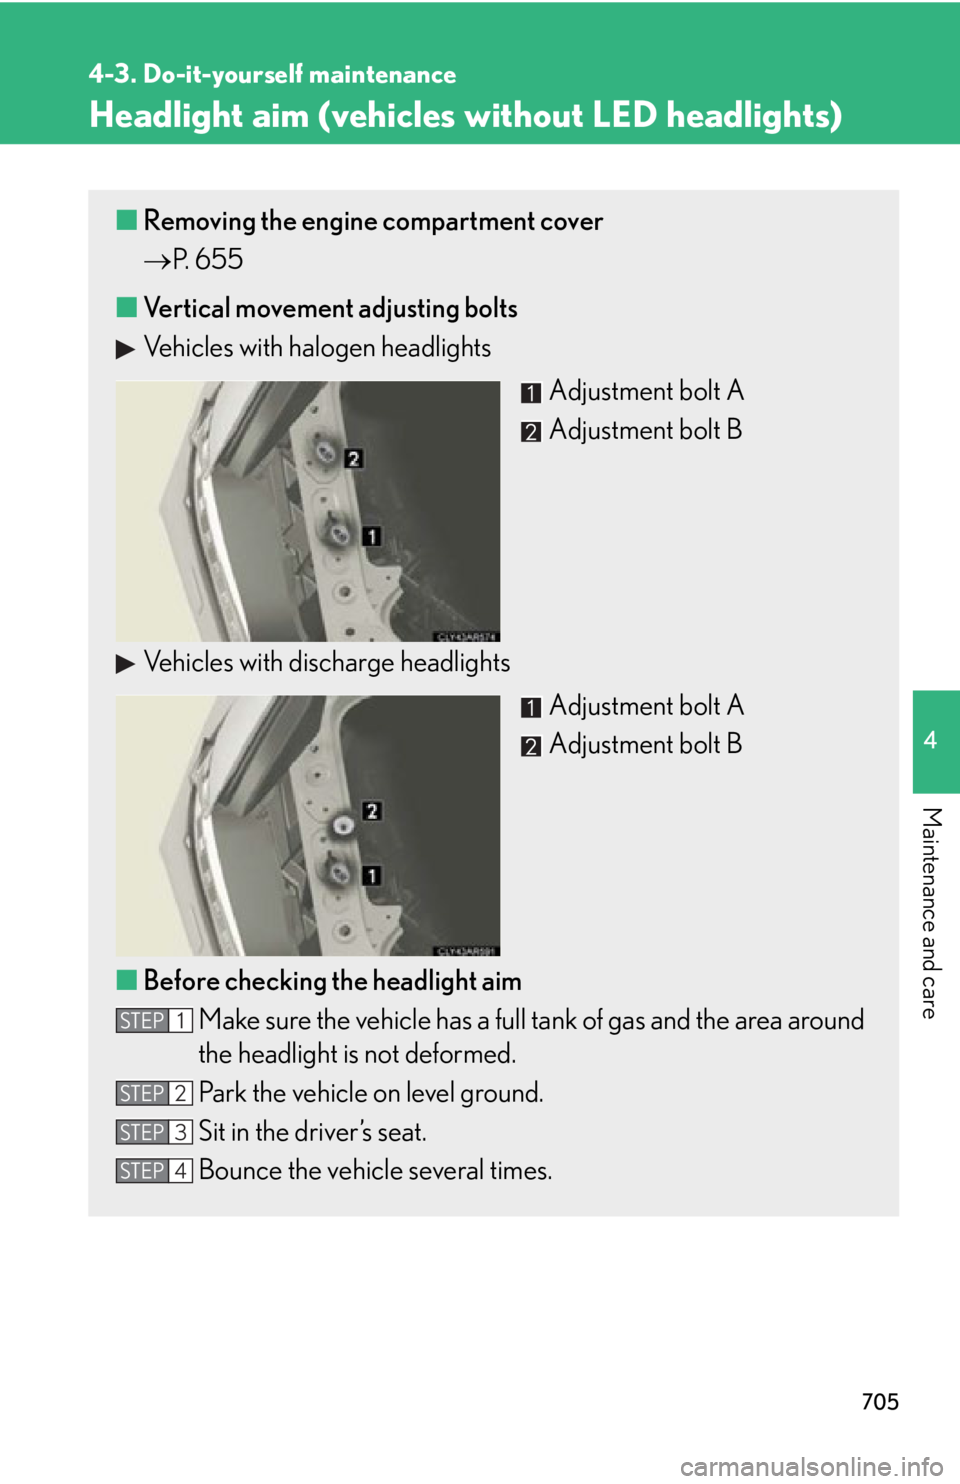
■ Vertical movement adjusting bolts
Vehicles with halogen headlights
Adjustment bolt A
Adjustment bolt B
Vehicles with discharge headlights
Adjustment bolt A
Adjustment bolt B
■ Before checking the headlight aim
Make sure the vehicle has a full tank of gas and the area around
the headlight is not deformed.
Park the vehicle on level ground.
Sit in the driver’s seat.
Bounce the vehicle several times.STEP 1
STEP 2
STEP 3
STEP 4
Page 708 of 878
7084-3. Do-it-yourself maintenance
Light bulbs You may replace the following bulbs by yourself. The difficulty level of
replacement varies depending on the bulb. If necessary bulb replacement
seems difficult to perform, contact your Lexus dealer.
For more information about replacing other light bulbs, contact your Lexus
dealer.
■ Preparing for light bulb replacement
Check the wattage of the light bulb to be replaced. ( P. 8 0 9 )
■ Removing the engine compartment covers
P. 6 5 5
■ Turning off the power back door main switch
P. 7 7
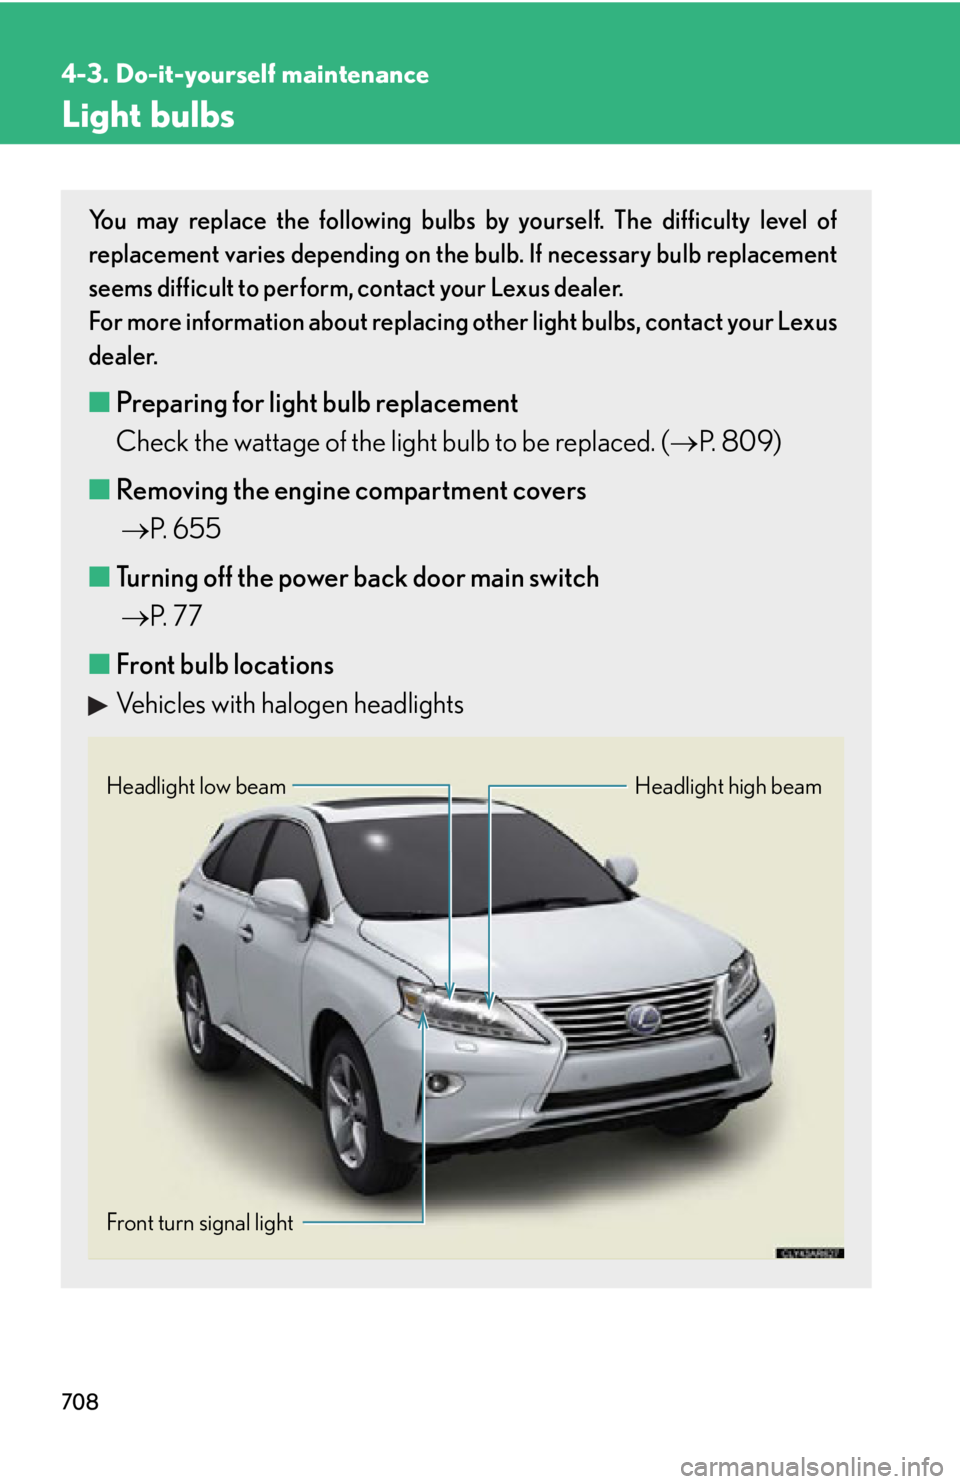
■ Front bulb locations
Vehicles with halogen headlights Headlight high beamHeadlight low beam
Front turn signal light