check LEXUS RX450H 2016 Owners Manual
[x] Cancel search | Manufacturer: LEXUS, Model Year: 2016, Model line: RX450H, Model: LEXUS RX450H 2016Pages: 660, PDF Size: 14.85 MB
Page 504 of 660
5046-3. Do-it-yourself maintenance
RX450h_U_OM0E013U
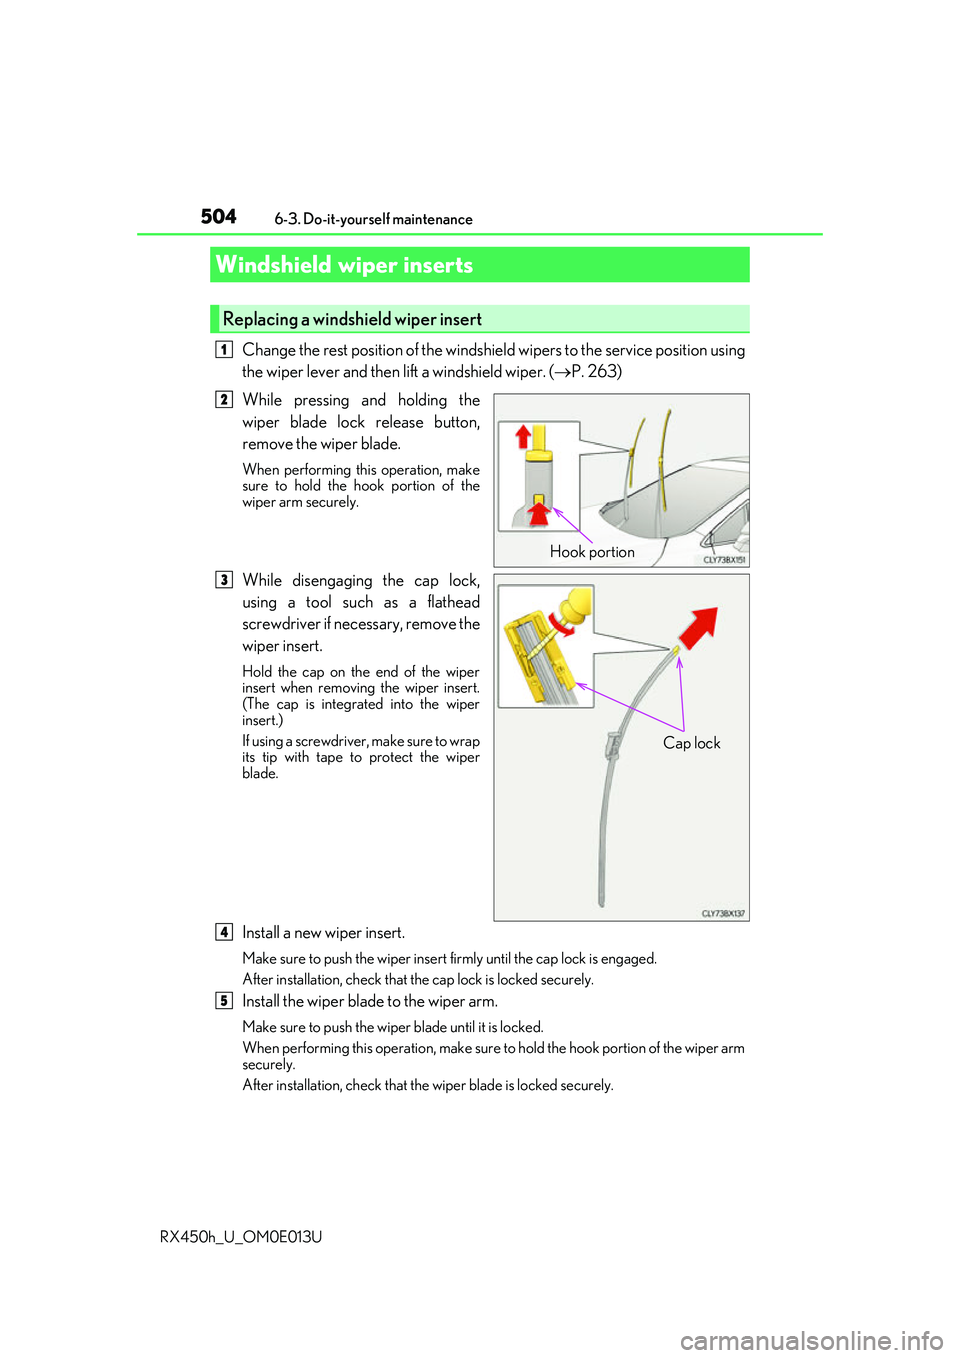
Change the rest position of the windshie ld wipers to the service position using
the wiper lever and then lift a windshield wiper. ( P. 263)
While pressing and holding the
wiper blade lock release button,
remove the wiper blade.
When performing this operation, make
sure to hold the hook portion of the
wiper arm securely.
While disengaging the cap lock,
using a tool such as a flathead
screwdriver if necessary, remove the
wiper insert.
Hold the cap on the end of the wiper
insert when removing the wiper insert.
(The cap is integrated into the wiper
insert.)
If using a screwdriver, make sure to wrap
its tip with tape to protect the wiper
blade.
Install a new wiper insert.
Make sure to push the wiper insert firmly until the cap lock is engaged.
After installation, check that th e cap lock is locked securely.
Install the wiper blade to the wiper arm.
Make sure to push the wiper blade until it is locked.
When performing this operation, make sure to hold the hook portion of the wiper arm
securely.
After installation, check that the wiper blade is locked securely.
Windshield wiper inserts
Replacing a windshield wiper insert
1
Hook portion
12
Cap lock
3
14
5
Page 508 of 660
5086-3. Do-it-yourself maintenance
RX450h_U_OM0E013U
Turn the power switch off.
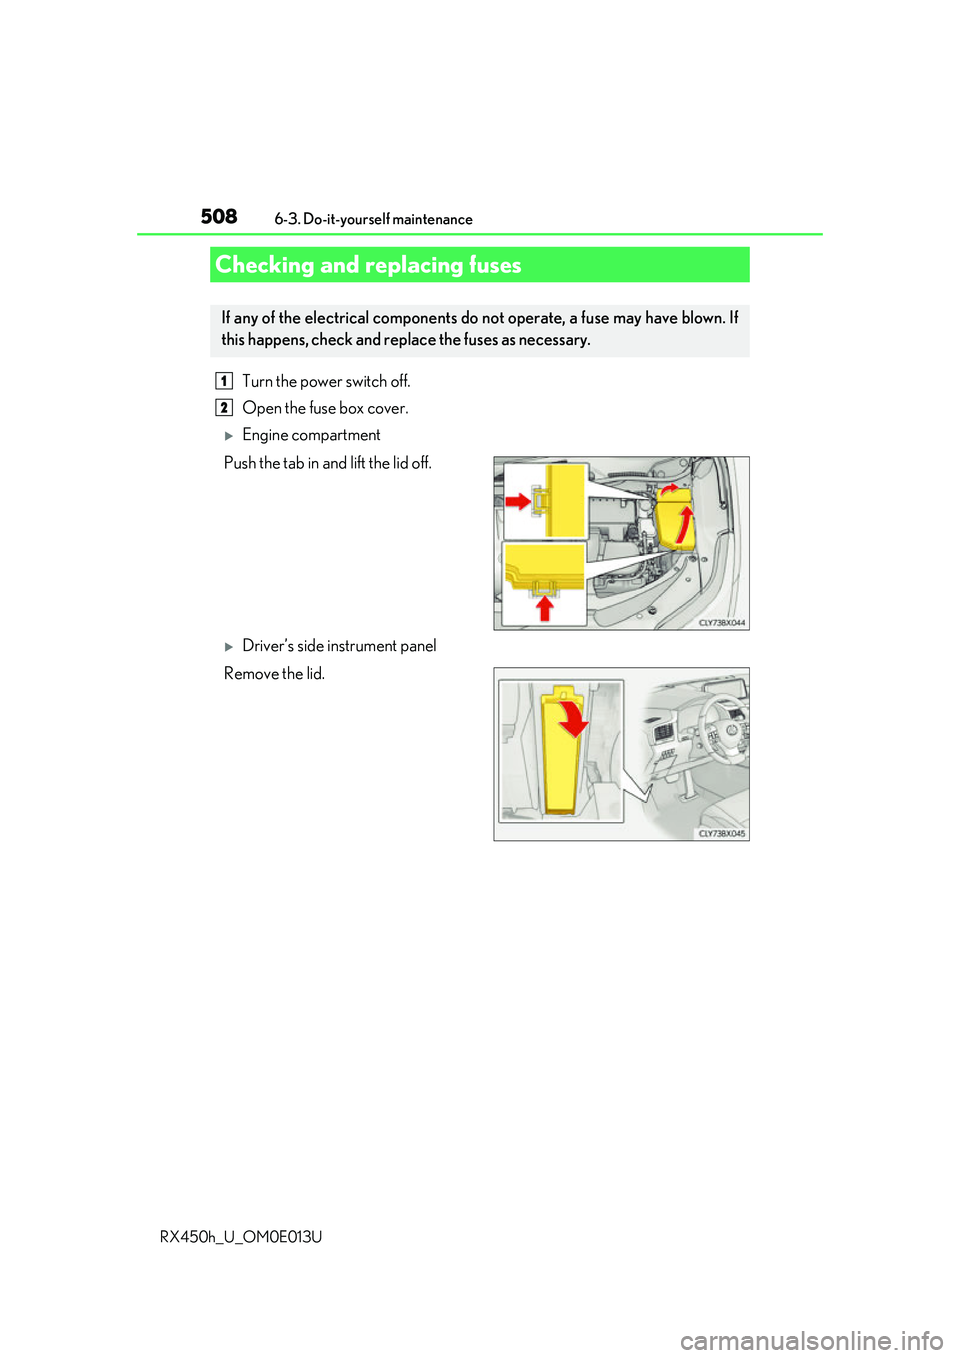
Open the fuse box cover.
Engine compartment
Push the tab in and lift the lid off.
Driver’s side instrument panel
Remove the lid.
Checking and replacing fuses
If any of the electrical components do not operate, a fuse may have blown. If
this happens, check and repl ace the fuses as necessary.
1
2
Page 509 of 660
5096-3. Do-it-yourself maintenance
6
Maintenance and care
RX450h_U_OM0E013U
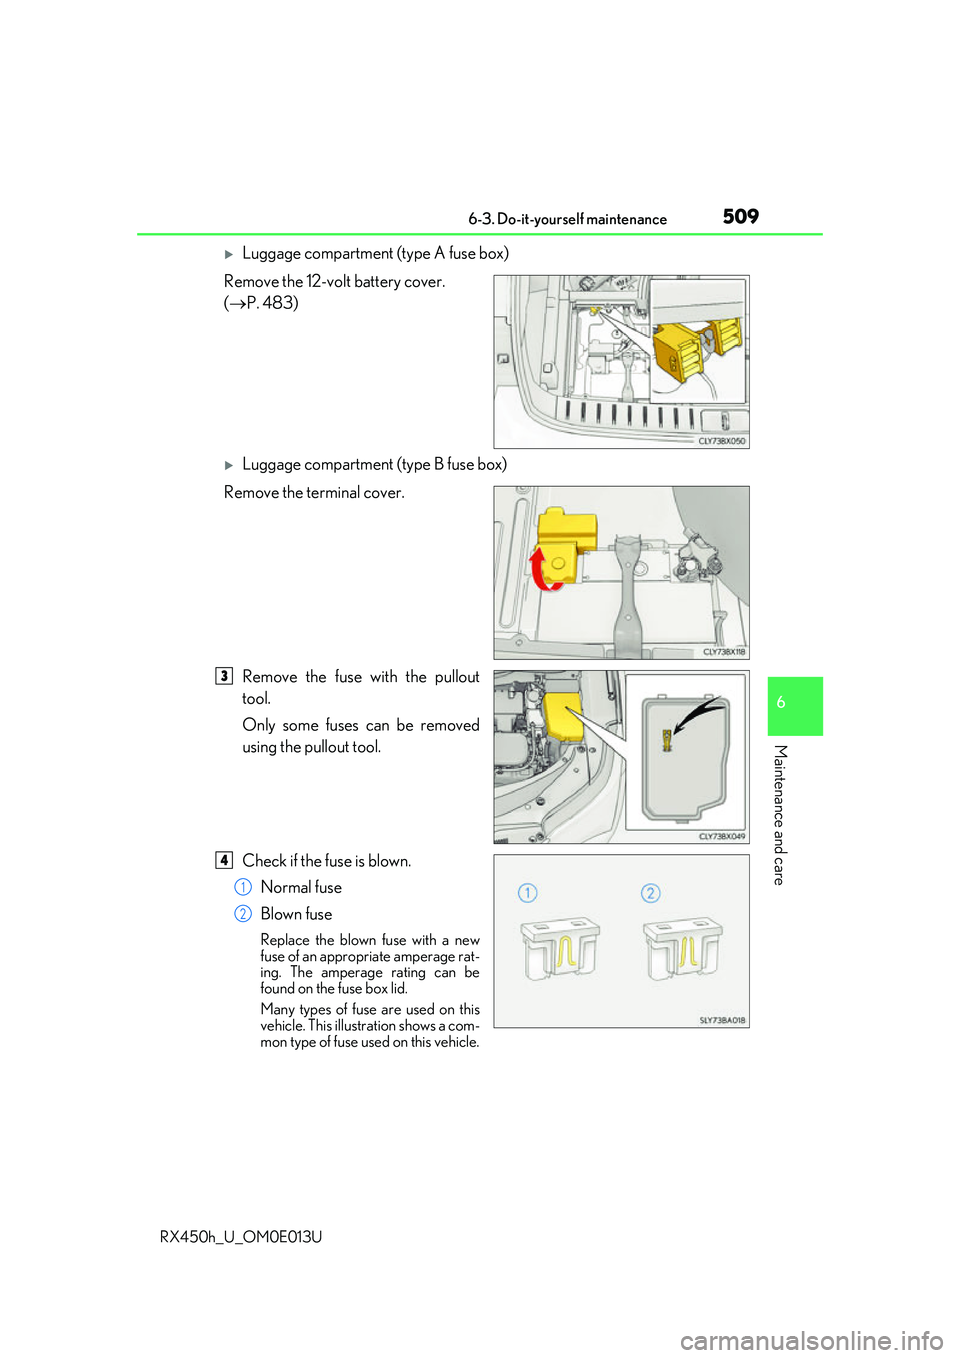
Luggage compartment (type A fuse box)
Remove the 12-volt battery cover.
( P. 483)
Luggage compartment (type B fuse box)
Remove the terminal cover.
Remove the fuse with the pullout
tool.
Only some fuses can be removed
using the pullout tool.
Check if the fuse is blown.Normal fuse
Blown fuse
Replace the blown fuse with a new
fuse of an appropriate amperage rat-
ing. The amperage rating can be
found on the fuse box lid.
Many types of fuse are used on this
vehicle. This illustration shows a com-
mon type of fuse used on this vehicle.
3
4
1
2
Page 510 of 660
5106-3. Do-it-yourself maintenance
RX450h_U_OM0E013U
■After a fuse is replaced
●If the lights do not turn on even after the fuse has been replaced, a bulb may need
replacement. ( P. 513)
●If the replaced fuse blows again, have th e vehicle inspected by your Lexus dealer.
■If there is an overload in a circuit
The fuses are designed to blow, protecting the wiring harness from damage.
■When replacing light bulbs
Lexus recommends that you use genuine Lexus products designed for this vehicle.
Because certain bulbs are connected to circuits designed to prevent overload, nongenu-
ine parts or parts not designed for this vehicle may be unusable.
WARNING
■To prevent system breakdowns and vehicle fire
Observe the following precautions.
Failure to do so may cause damage to th e vehicle, and possibly a fire or injury.
●Never use a fuse of a higher amperage rating than that indicated, or use any other
object in place of a fuse.
●Always use a genuine Lexus fuse or equivalent.
Never replace a fuse with a wire, even as a temporary fix.
●Do not modify the fuses or fuse boxes.
■Fuse box near the power control unit
Never check or replace the fuses as there are high volt age parts and wiring near the
fuse box.
Doing so may cause electric shock, re sulting in death or serious injury.
NOTICE
■Before replacing fuses
Have the cause of electrical overload determined and repaired by your Lexus dealer as
soon as possible.
Page 511 of 660
5116-3. Do-it-yourself maintenance
6
Maintenance and care
RX450h_U_OM0E013U
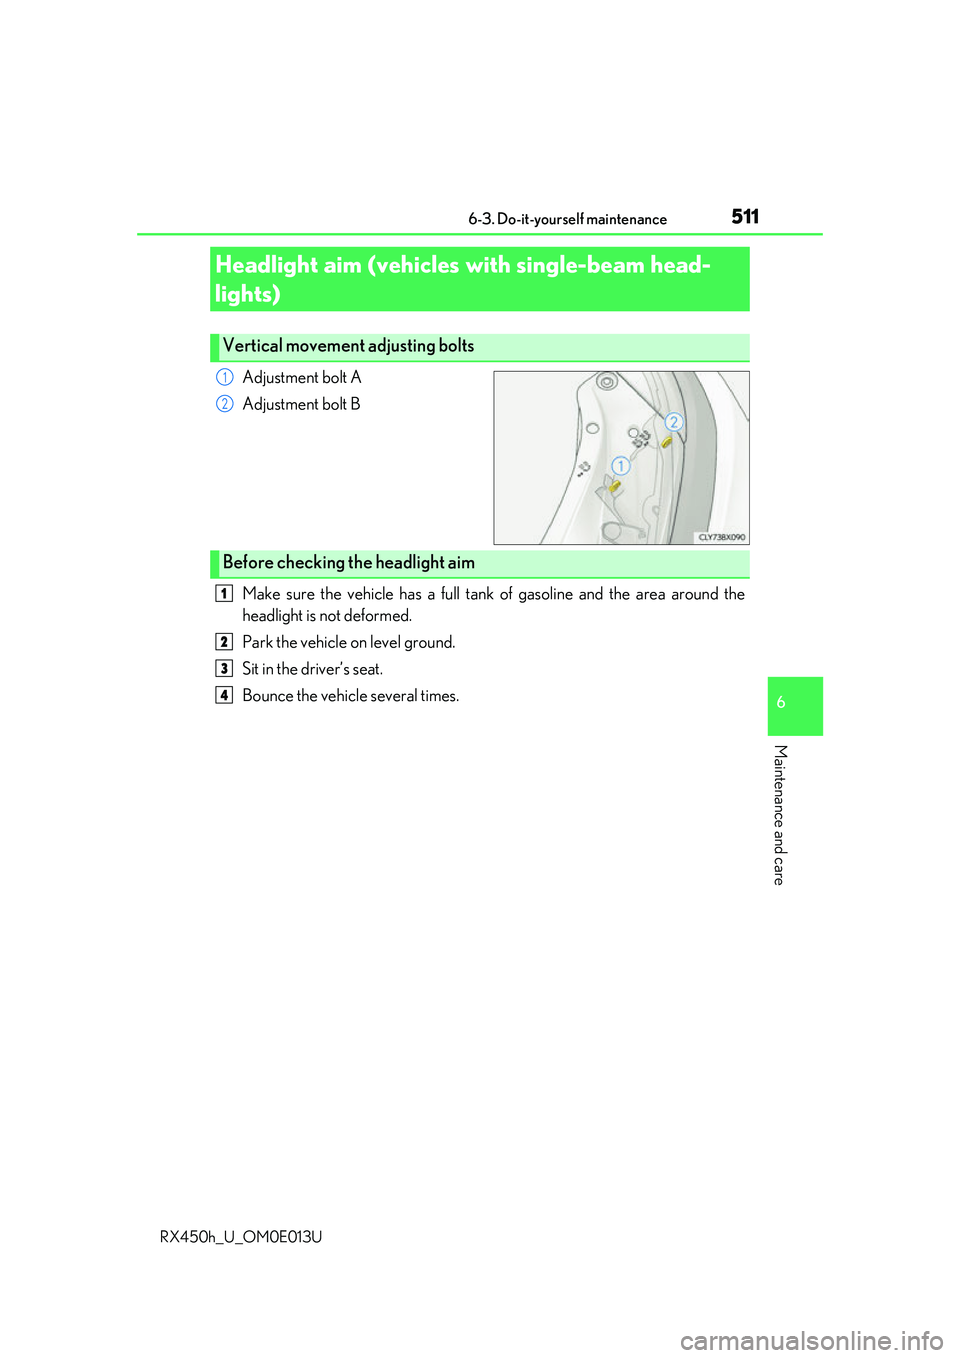
Adjustment bolt A
Adjustment bolt B
Make sure the vehicle has a full tank of gasoline and the area around the
headlight is not deformed.
Park the vehicle on level ground.
Sit in the driver’s seat.
Bounce the vehicle several times.
Headlight aim (vehicles with single-beam head-
lights)
Vertical movement adjusting bolts
1
2
Before checking the headlight aim
1
2
3
4
Page 513 of 660
5136-3. Do-it-yourself maintenance
6
Maintenance and care
RX450h_U_OM0E013U
Check the wattage of the light bulb to be replaced. (P. 590)
P. 146
Light bulbs
You may replace the following bulbs by yo urself. The difficulty level of replace-
ment varies depending on the bulb. If necessary bulb replacement seems diffi-
cult to perform, contact your Lexus dealer.
For more information about replacing other light bulbs, contact your Lexus
dealer.
Preparing for light bulb replacement
Canceling the power back door system
Page 517 of 660
5176-3. Do-it-yourself maintenance
6
Maintenance and care
RX450h_U_OM0E013U
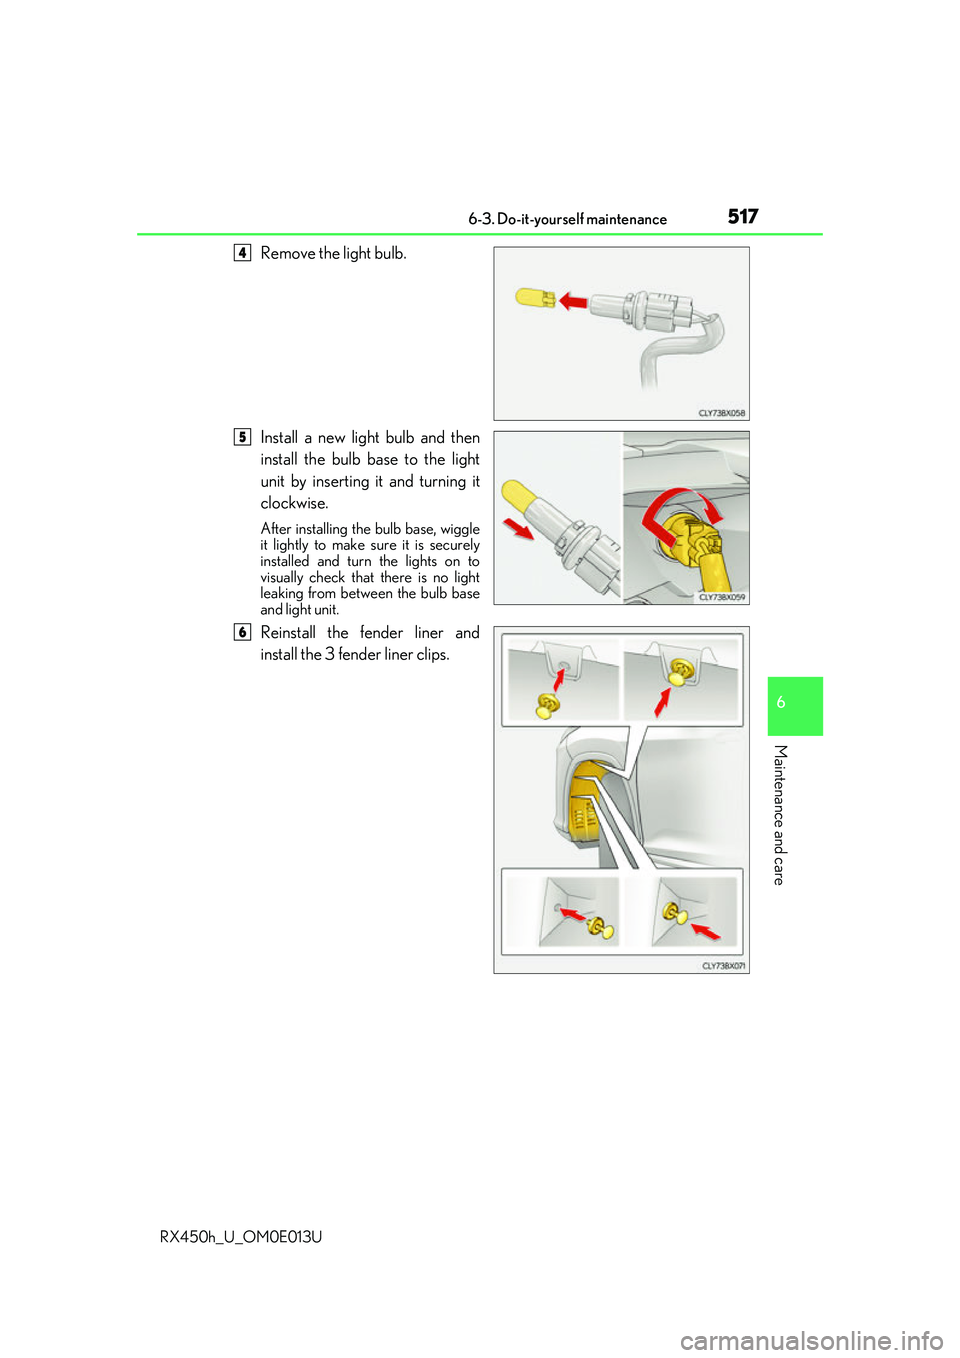
Remove the light bulb.
Install a new light bulb and then
install the bulb base to the light
unit by inserting it and turning it
clockwise.
After installing the bulb base, wiggle
it lightly to make sure it is securely
installed and turn the lights on to
visually check that there is no light
leaking from betw een the bulb base
and light unit.
Reinstall the fender liner and
install the 3 fender liner clips.
4
5
6
Page 519 of 660
5196-3. Do-it-yourself maintenance
6
Maintenance and care
RX450h_U_OM0E013U
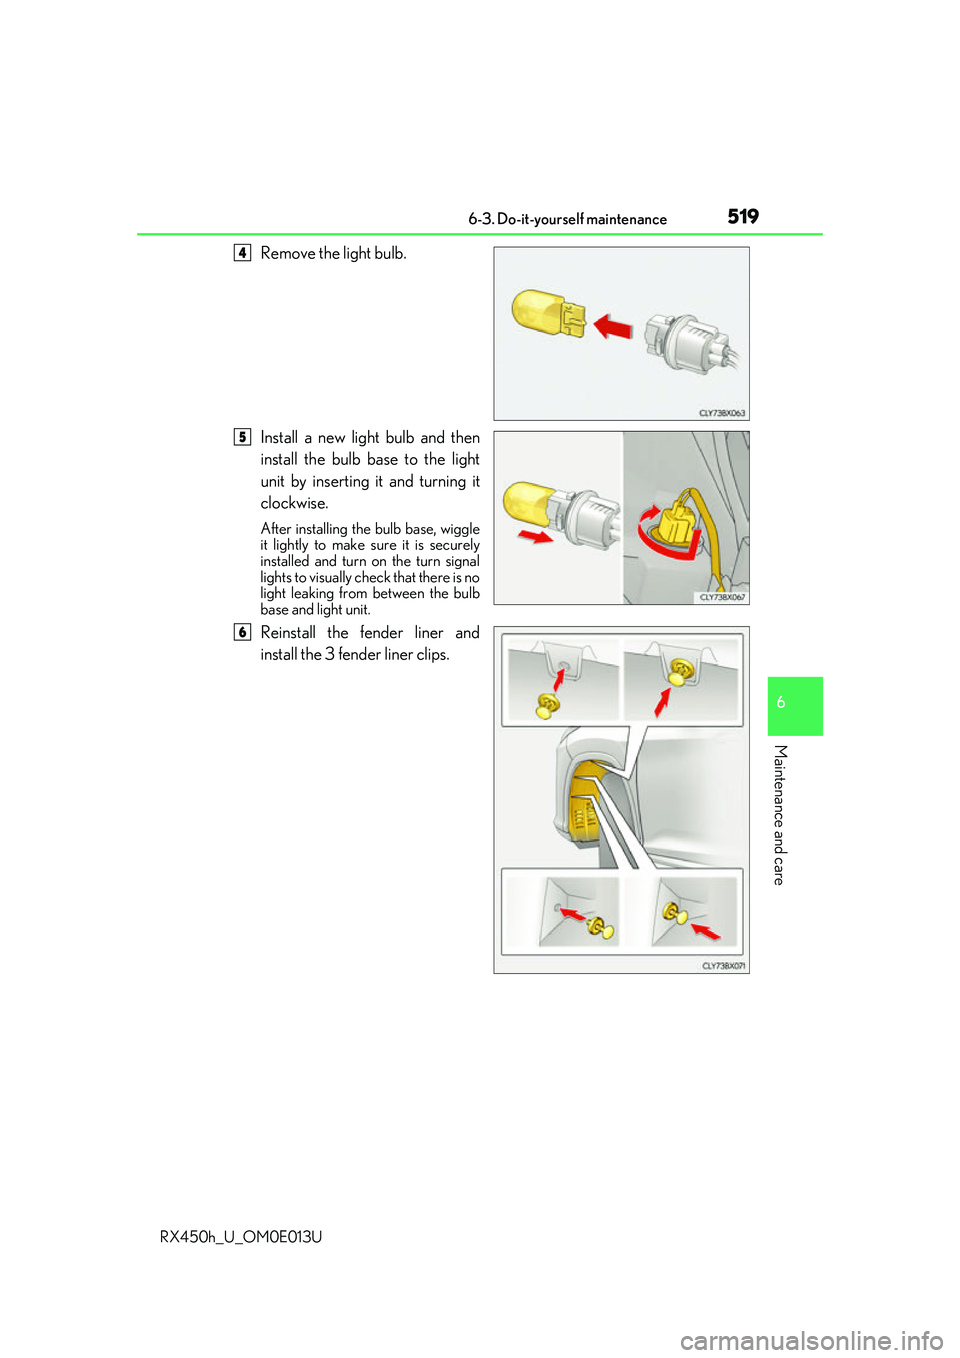
Remove the light bulb.
Install a new light bulb and then
install the bulb base to the light
unit by inserting it and turning it
clockwise.
After installing the bulb base, wiggle
it lightly to make sure it is securely
installed and turn on the turn signal
lights to visually check that there is no
light leaking from between the bulb
base and light unit.
Reinstall the fender liner and
install the 3 fender liner clips.
4
5
6
Page 522 of 660
5226-3. Do-it-yourself maintenance
RX450h_U_OM0E013U
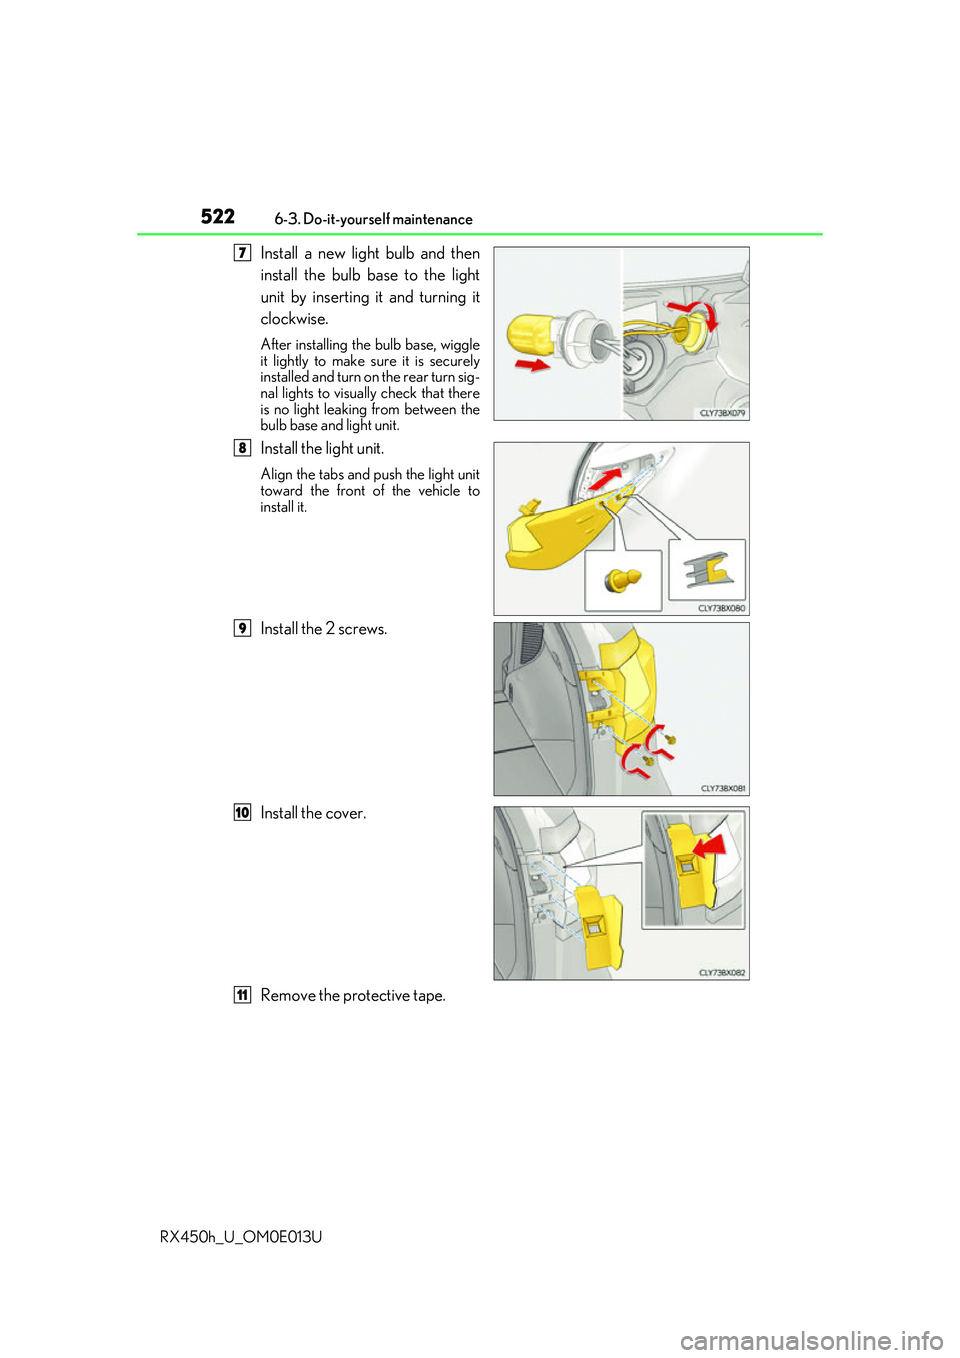
Install a new light bulb and then
install the bulb base to the light
unit by inserting it and turning it
clockwise.
After installing th e bulb base, wiggle
it lightly to make sure it is securely
installed and turn on the rear turn sig-
nal lights to visually check that there
is no light leaking from between the
bulb base and light unit.
Install the light unit.
Align the tabs and push the light unit
toward the front of the vehicle to
install it.
Install the 2 screws.
Install the cover.
Remove the protective tape.
47
8
9
10
11
Page 523 of 660
5236-3. Do-it-yourself maintenance
6
Maintenance and care
RX450h_U_OM0E013U
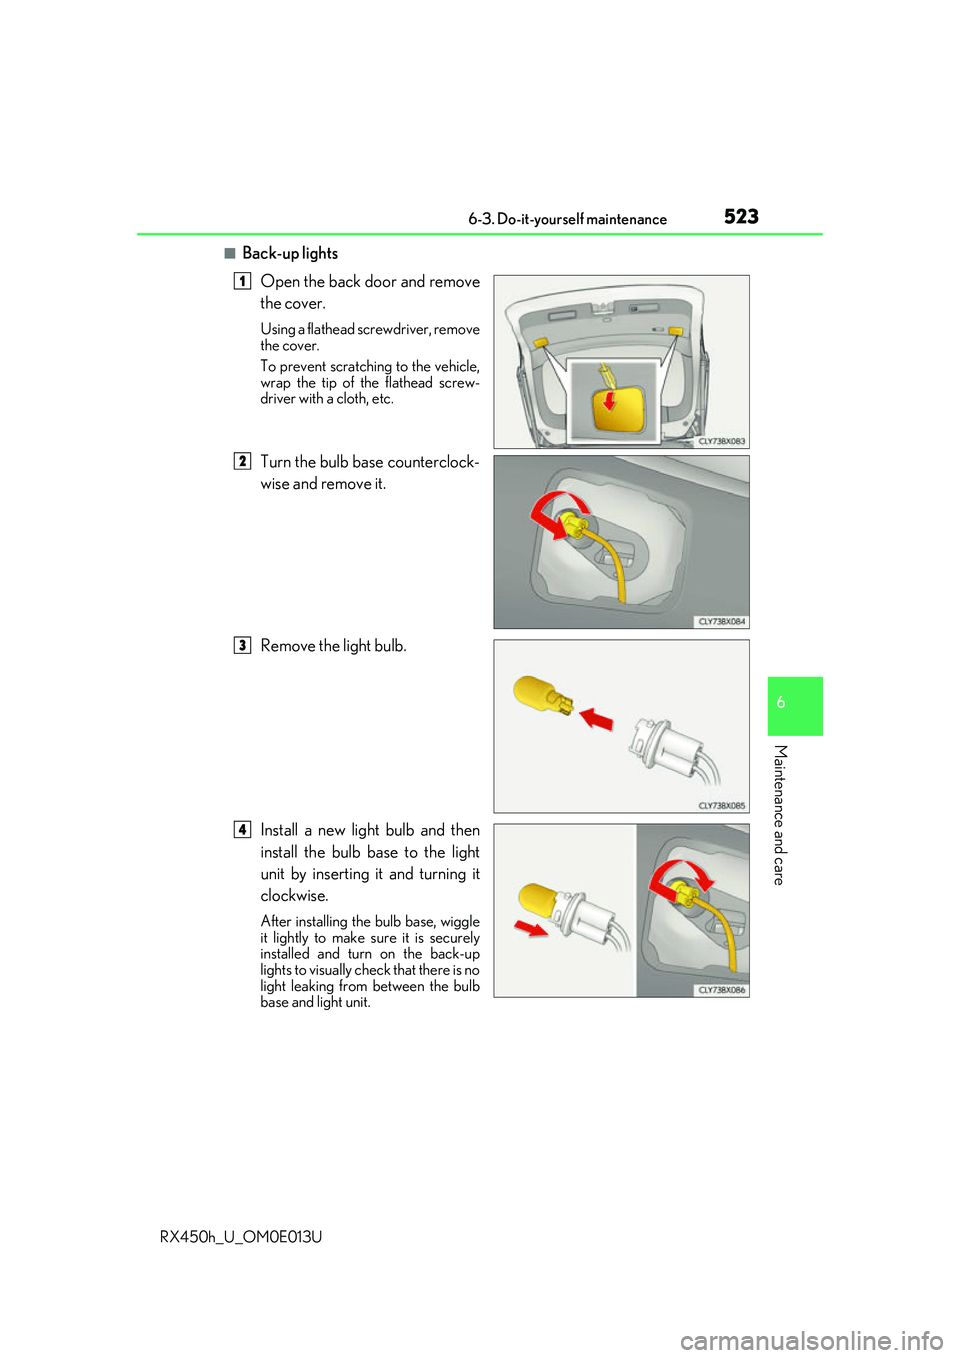
■Back-up lightsOpen the back door and remove
the cover.
Using a flathead screwdriver, remove
the cover.
To prevent scratching to the vehicle,
wrap the tip of the flathead screw-
driver with a cloth, etc.
Turn the bulb base counterclock-
wise and remove it.
Remove the light bulb.
Install a new light bulb and then
install the bulb base to the light
unit by inserting it and turning it
clockwise.
After installing th e bulb base, wiggle
it lightly to make sure it is securely
installed and turn on the back-up
lights to visually check that there is no
light leaking from between the bulb
base and light unit.
1
2
3
4