check LEXUS RX450H 2016 Repair Manual
[x] Cancel search | Manufacturer: LEXUS, Model Year: 2016, Model line: RX450H, Model: LEXUS RX450H 2016Pages: 660, PDF Size: 14.85 MB
Page 388 of 660
3884-6. Driving tips
RX450h_U_OM0E013U
◆Delays
Repeated acceleration and deceleration, as well as long waits at traffic lights,
will lead to bad fuel economy. Check traffic reports before leaving and avoid
delays as much as possible. When drivin g in a traffic jam, gently release the
brake pedal to allow the vehicle to move forward slightly while avoiding over-
use of the accelerator pedal. Doing so can help control excessive gasoline
consumption.
◆Highway driving
Control and maintain the vehicle at a co nstant speed. Before stopping at a toll
booth or similar, allow plenty of ti me to release the accelerator and gently
apply the brakes. A greater amount of electrical energy can be regenerated
when slowing down.
◆Air conditioning
Use the air conditioning only when necessary. Doing so can help reduce
excessive gasoline consumption.
In summer: When the ambient temperature is high, use the recirculated air
mode. Doing so will help to reduce the burden on the air conditioning system
and reduce fuel consumption as well.
In winter: Because the gasoline engine will not automatically cut out until it
and the interior of the vehicle are warm , it will consume fuel. Also, fuel con-
sumption can be improved by av oiding overuse of the heater.
◆Checking tire inflation pressure
Make sure to check the tire inflation pr essure frequently. Improper tire infla-
tion pressure can cause poor fuel economy.
Also, as snow tires can cause large amou nts of friction, their use on dry roads
can lead to poor fuel economy. Use tires that are appropriate for the season.
Page 390 of 660
3904-6. Driving tips
RX450h_U_OM0E013U
●Use fluids that are appropriate to the prevailing outside temperatures.
•Engine oil
• Engine/power cont rol unit coolant
• Washer fluid
●Have a service technician inspect the condition of the 12-volt battery.
●Have the vehicle fitted with four snow tires or purchase a set of tire chains for
the front tires.
Ensure that all tires are of the specified size and the same brand, and that chains
match the size of the tires.
Perform the following according to the driving conditions:
●Do not try to forcibly open a window or move a wiper that is frozen. Pour
warm water over the frozen area to me lt the ice. Wipe away the water imme-
diately to prevent it from freezing.
●To ensure proper operation of the c limate control system fan, remove any
snow that has accumulated on the air inlet vents in front of the windshield.
●Check for and remove any excess ice or snow that may have accumulated on
the exterior lights, vehicle’s roof, chassi s, around the tires or on the brakes.
●Remove any snow or mud from the bottom of your shoes before getting in the
vehicle.
Winter driving tips
Carry out the necessary preparations an d inspections before driving the vehi-
cle in winter. Always drive the vehicle in a manner appropriate to the prevail-
ing weather conditions.
Pre-winter preparations
Before driving the vehicle
Page 391 of 660
3914-6. Driving tips
4
Driving
RX450h_U_OM0E013U
Accelerate the vehicle slowly, keep a safe distance between you and the vehicle
ahead, and drive at a reduced spee d suitable to road conditions.
Park the vehicle and move the shift lever to P without setting the parking brake.
The parking brake may freeze up, preventing it from being released. If necessary,
block the wheels to prevent in advertent sliding or creeping.
When the parking brake is in automatic mo de, release the parking brake after shifting
the shift lever to P. ( P. 245)
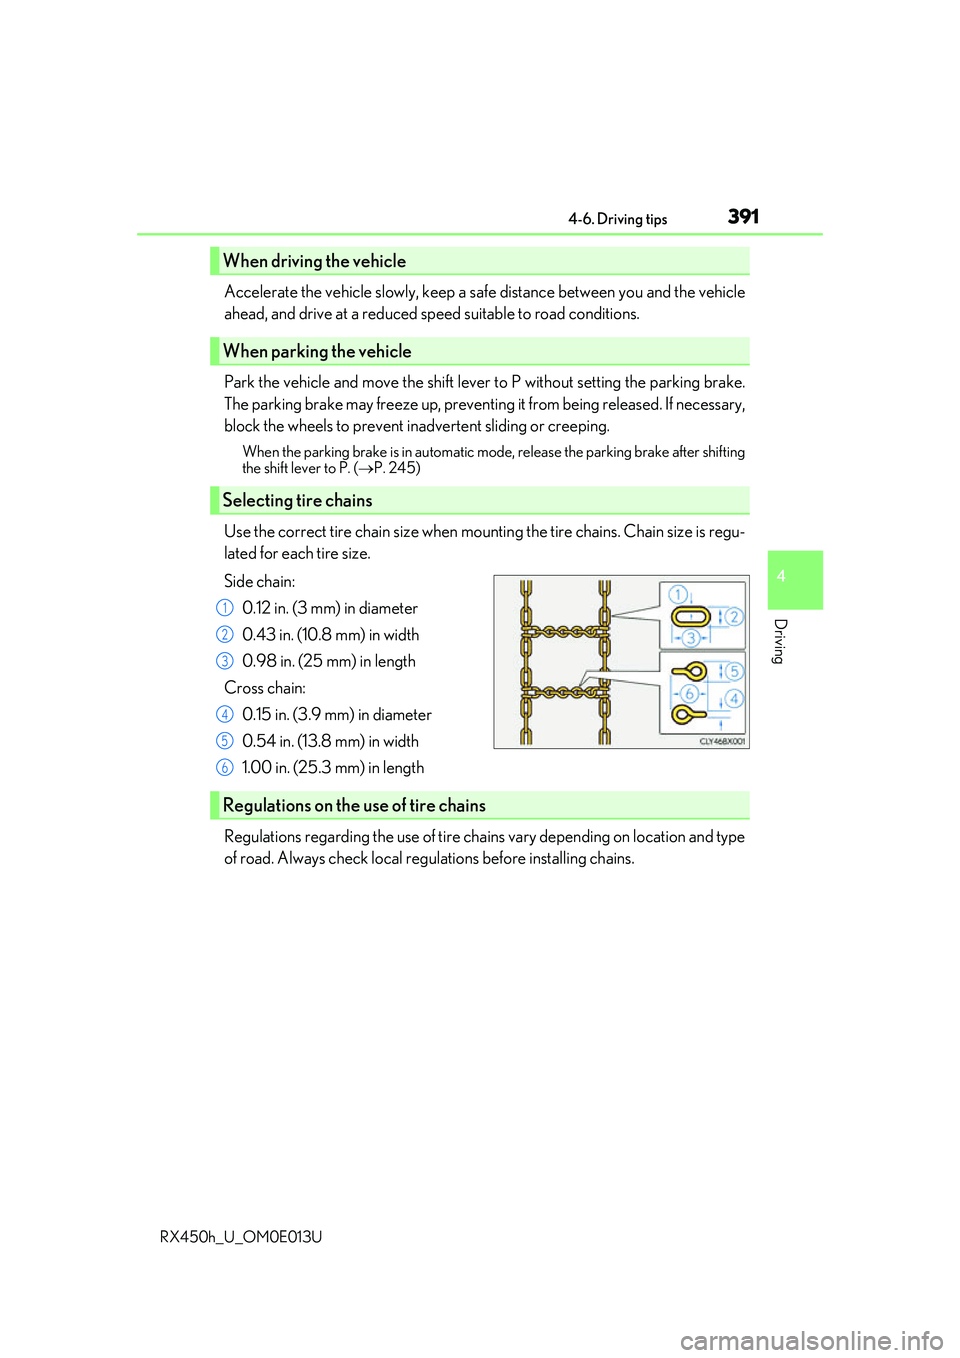
Use the correct tire chain size when mounti ng the tire chains. Chain size is regu-
lated for each tire size.
Side chain:
0.12 in. (3 mm) in diameter
0.43 in. (10.8 mm) in width
0.98 in. (25 mm) in length
Cross chain: 0.15 in. (3.9 mm) in diameter
0.54 in. (13.8 mm) in width
1.00 in. (25.3 mm) in length
Regulations regarding the use of tire chains vary depending on location and type
of road. Always check local regu lations before installing chains.
When driving the vehicle
When parking the vehicle
Selecting tire chains
1
2
3
4
5
6
Regulations on the use of tire chains
Page 396 of 660
3964-6. Driving tips
RX450h_U_OM0E013U
WARNING
■Off-road driving precautions
Always observe the following precautions to minimize the risk of death, serious injury
or damage to your vehicle:
●Drive carefully when off the road. Do not ta ke unnecessary risks by driving in danger-
ous places.
●Do not grip the steering wheel spokes when driving off-road. A bad bump could jerk
the wheel and injure your hands. Keep both hands and especially your thumbs on the
outside of the rim.
●Always check your brakes for effectiveness immediately after driving in sand, mud,
water or snow.
●After driving through tall grass, mud, rock , sand, rivers, etc., check that there is no
grass, bush, paper, rags, stone, sand, etc. adhering or trapped on the underbody.
Clear off any such matter from the underbody. If the vehicle is used with these materi-
als trapped or adhering to the underbody, a breakdown or fire could occur.
●When driving off-road or in rugged terrain , do not drive at excessive speeds, jump,
make sharp turns, strike obje cts, etc. This may cause loss of control or vehicle rollover
causing death or serious injury. You are also risking expensive damage to your vehi-
cle’s suspension and chassis.
NOTICE
■To prevent water damage
Take all necessary safety measures to ensure that water damage to the hybrid battery
(traction battery), hybrid system or other components does not occur.
●Water entering the engine compartment may cause severe damage to the hybrid
system. Water entering the interior may cause the hybrid battery (traction battery)
stowed under the rear seats to short circuit.
●Water entering the hybrid transmission and rear electric motor (traction motor)
(AWD models only) will cause deterioration in transmission quality. The malfunction
indicator may come on, and the vehicle may not be drivable.
●Water can wash the grease from wheel be arings, causing rusting and premature fail-
ure, and may also enter the hybrid transmissi on case, reducing the gear oil’s lubricat-
ing qualities.
■When you drive through water
If driving through water, such as when cro ssing shallow streams, first check the depth of
the water and the bottom of the riverbed for firmness. Drive slowly and avoid deep
water.
■Inspection after off-road driving
●Sand and mud that has accumulated around brake discs may affect braking efficiency
and may damage brake system components.
●Always perform a maintenance inspection afte r each day of off-road driving that has
taken you through rough terrain, sand, mud, or water. For scheduled maintenance
information, refer to the “Warranty and Services Guide/Owner’s Manual Supple-
ment/Scheduled Maintenance”.
Page 436 of 660
4365-5. Using the other interior features
RX450h_U_OM0E013U
■If a cover or accessory is attached to the portable device
Do not charge a portable device if a cover or accessory which is not Qi compatible is
attached. Depending on the type of cover an d/or accessory attached, it may not be pos-
sible to charge the portable device. If the po rtable device is placed on the charging area
and does not charge, remove the cover and/or accessories.
■If interference is heard in AM radio broadcasts while charging
Turn off the wireless charger and check if the noise is reduced. If noise is reduced, press
and hold the power supply switch of the wireless charger for 2 seconds. The frequency of
the wireless charger is changed and noise may be reduced. When the frequency is
changed, the operation indicator lig ht will blink (orange) 2 times.
■Charging precautions
●If the electronic key cannot be detected in the cabin, charging cannot be performed.
When a door is opened and closed, ch arging may be temporarily suspended.
●While charging, the wireless charger and the po rtable device will become warm. This is
not a malfunction.
If a portable device become s warm while charging and ch arging stops due to the pro-
tection function of the portable device, wait until the portable device cools down and
charge it again.
■Sound generated during operation
When the power supply switch is turned on or while a portable device is being identified,
operation sounds may be heard. This is not a malfunction.
■Cleaning the wireless charger
P. 463
■Certification for the wireless charger
FCC Note: This equipment has been tested and found to comply with Part 18 of the FCC
Rules. These limits are designed to provide re asonable protection against harmful inter-
ference in a reside ntial installation.
FCC Caution: Any changes or modification s not expressly approved by the party
responsible for compliance could void the user’s authority to operate this equipment.
Page 446 of 660
4465-5. Using the other interior features
RX450h_U_OM0E013U
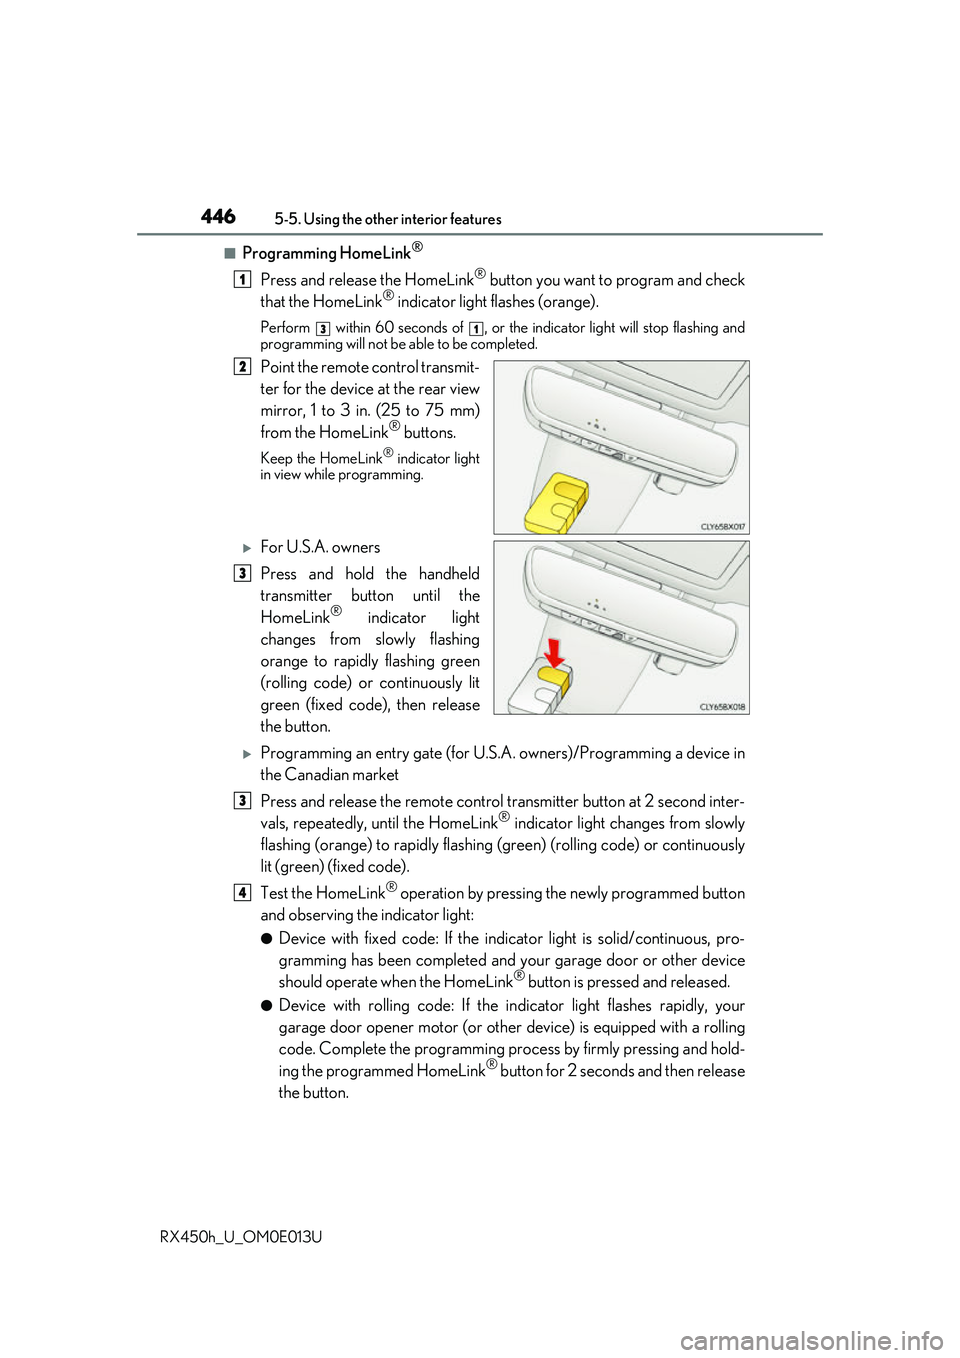
■Programming HomeLink®
Press and release the HomeLink® button you want to program and check
that the HomeLink® indicator light flashes (orange).
Perform within 60 seconds of , or the indicator light will stop flashing and
programming will not be able to be completed.
Point the remote control transmit-
ter for the device at the rear view
mirror, 1 to 3 in. (25 to 75 mm)
from the HomeLink
® buttons.
Keep the HomeLink® indicator light
in view while programming.
For U.S.A. owners
Press and hold the handheld
transmitter button until the
HomeLink
® indicator light
changes from slowly flashing
orange to rapidly flashing green
(rolling code) or continuously lit
green (fixed code), then release
the button.
Programming an entry gate (for U.S. A. owners)/Programming a device in
the Canadian market
Press and release the remote control transm itter button at 2 second inter-
vals, repeatedly, until the HomeLink
® indicator light changes from slowly
flashing (orange) to rapidly flashing (green) (rolling code) or continuously
lit (green) (fixed code).
Test the HomeLink
® operation by pressing the newly programmed button
and observing the indicator light:
●Device with fixed code: If the indicator light is solid/continuous, pro-
gramming has been completed and your garage door or other device
should operate when the HomeLink
® button is pressed and released.
●Device with rolling code: If the in dicator light flashes rapidly, your
garage door opener motor (or other device) is equipped with a rolling
code. Complete the programming process by firmly pressing and hold-
ing the programmed HomeLink
® button for 2 seconds and then release
the button.
1
31
2
3
3
4
Page 448 of 660
4485-5. Using the other interior features
RX450h_U_OM0E013U
■Enabling 2-way communication with a garage door (only available for com-
patible devices)
When enabled, 2-way communication allo ws you to check the status of the
opening and closing of a garage door through indicators in your vehicle.
2-way communication is only available if the garage door opener motor used
is a compatible device. (To check devi ce compatibility, refer to www.Home-
Link.com.)
Within 5 seconds after programming the garage door opener has been
completed, if the garage door op ener motor is trained to HomeLink
®,
both garage door operation indicator s will flash rapidly (green) and the
light on the garage door opener moto r will blink twice, indicating that 2-
way communication is enabled.
If the indicators do not flash, perform and within the first 10 presses of
the HomeLink
® button after programming has been completed.
Press a programmed HomeLink
® button to operate a garage door.
Within 1 minute of pressing the HomeLink
® button, after the garage door
operation has stopped, press the “Learn” or “Smart” button on the garage
door opener motor. Within 5 seconds of the establishment of 2-way com-
munication with the garage door opener, both garage door operation indi-
cators in the vehicle will flash rapidly (green) and the light on the garage
door opener motor will blink twice, indicating that 2-way communication is
enabled.
■Reprogramming a single HomeLink® button
When the following procedure is performed, buttons which already have
devices registered to them can be overwritten: With one hand, press and hold the desired HomeLink
® button.
When the HomeLink
® indicator starts flashing (orange), continue to hold
the HomeLink® button and perform “Programming HomeLink®” (it
takes 20 seconds for the HomeLink® indicator to start flashing).
Press the appropriate HomeLink
® button. The HomeLink® indicator light
should turn on.
Operating HomeLink®
1
23
2
3
1
2
1
Page 449 of 660
4495-5. Using the other interior features
5
Interior features
RX450h_U_OM0E013U
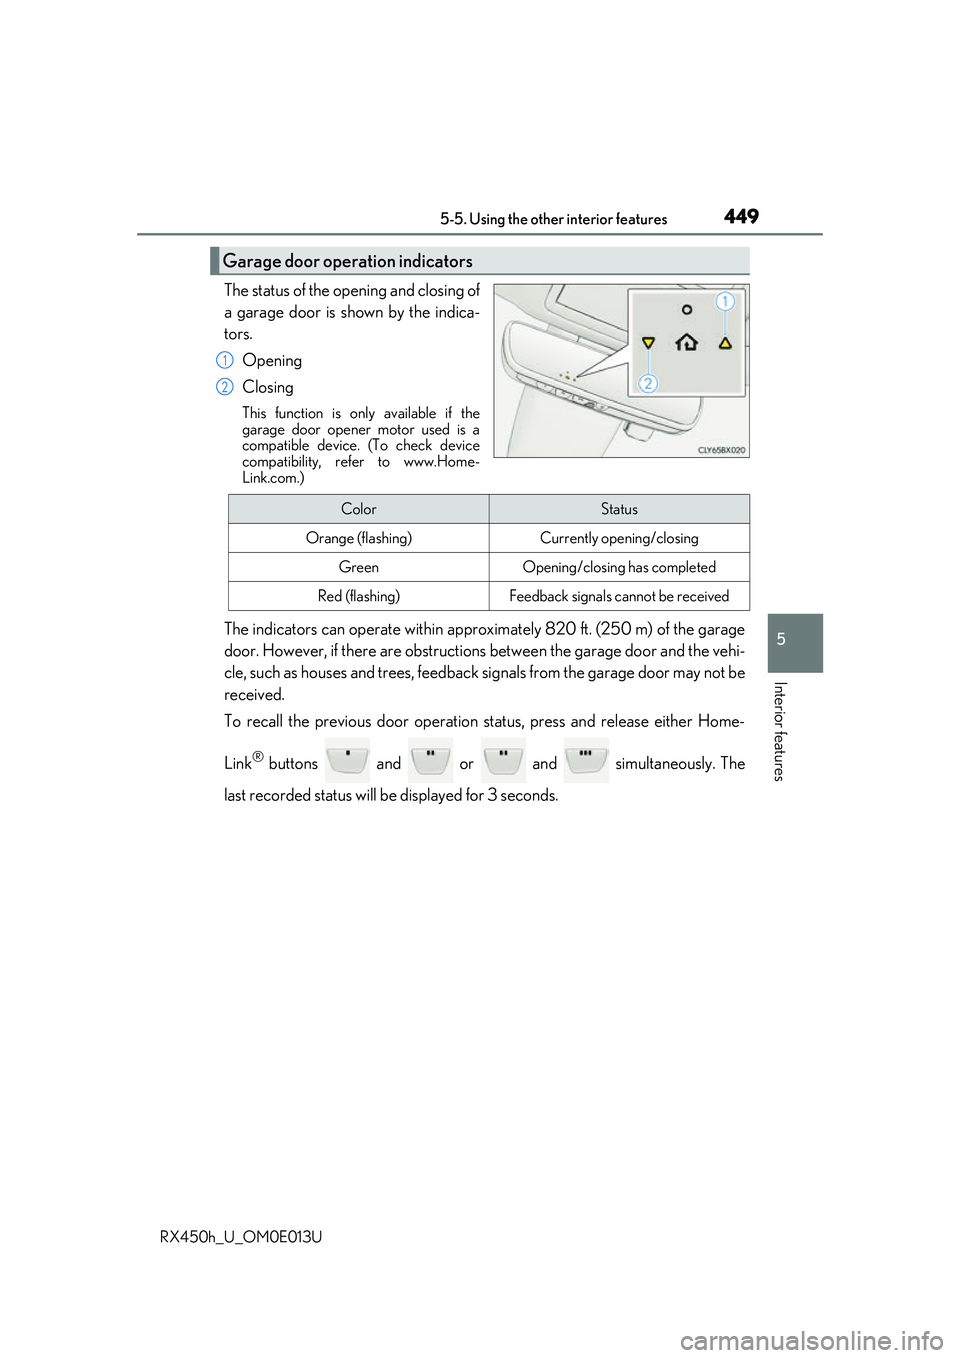
The status of the opening and closing of
a garage door is shown by the indica-
tors.Opening
Closing
This function is only available if the
garage door opener motor used is a
compatible device. (To check device
compatibility, refer to www.Home-
Link.com.)
The indicators can operate wi thin approximately 820 ft. (250 m) of the garage
door. However, if there are obstructions between the garage door and the vehi-
cle, such as houses and trees, feedback signals from the garage door may not be
received.
To recall the previous door operation status, press and release either Home-
Link
® buttons and or and simultaneously. The
last recorded status will be displayed for 3 seconds.
Garage door operation indicators
1
2
ColorStatus
Orange (flashing)Currently opening/closing
GreenOpening/closing has completed
Red (flashing)Feedback signals cannot be received
Page 457 of 660
457
6Maintenance and care
RX450h_U_OM0E013U
6-1. Maintenance and careCleaning and protecting the vehicle exterior................ 458
Cleaning and protecting the vehicle interior ..................462
6-2. Maintenance Maintenance requirements.............................465
General maintenance .............. 467
Emission inspection and maintenance (I/M)
programs ....................................470 6-3. Do-it-yourself
maintenance
Do-it-yourself service precautions..................................471
Hood ............................................... 473
Positioning a floor jack ............ 474
Engine compartment ............... 475
12-volt battery .............................483
Tires ................................................. 487
Tire inflation pressure............... 496
Wheels ........................................... 499
Air conditioning filter ................ 501
Windshield wiper inserts ........504
Electronic key battery ..............506
Checking and replacing fuses ............................................. 508
Headlight aim ................................. 511
Light bulbs...................................... 513
Page 458 of 660
458
RX450h_U_OM0E013U6-1. Maintenance and care
●Working from top to bott
om, liberally apply water to the vehicle body, wheel
wells and underside of the vehicl e to remove any dirt and dust.
●Wash the vehicle body using a sponge or soft cloth, such as a chamois.
●For hard-to-remove marks, use car wa sh soap and rinse thoroughly with
water.
●Wipe away any water.
●Wax the vehicle when the waterproof coating deteriorates.
If water does not bead on a clean surface, apply wax when the vehicle body is cool.
■Self-restoring coat
The vehicle body has a self-restoring coating that is resistant to small surface scratches
caused in a car wash etc.
●The coating lasts for 5 to 8 years from when the vehicle is delivered from the plant.
●The restoration time differs depending on the depth of the scratch and outside tem-
perature. The restoration ti me may become shorter when the coating is warmed by
applying warm water.
●Deep scratches caused by keys, coins, etc. cannot be restored.
●Do not use wax that contain abrasives.
■Automatic car washes
●Before washing the vehicle:
• Fold the mirrors
• Turn off the power back door
Start washing from the front of the vehicle. Extend the mirrors before driving.
●Brushes used in automatic car washes may scratch the vehicle surface and harm your
vehicle’s paint.
●Rear spoiler may not be wash able in some automatic car washes. There may also be an
increased risk of damage to vehicle.
■High pressure car washes
●Do not allow the nozzles of the car wash to come within close proximity of the windows.
●Before using the car wash, check that the fuel filler door on your vehicle is closed prop-
erly.
Cleaning and protecting the vehicle exterior
Perform the following to protect the ve hicle and maintain it in prime condi-
tion: