clock LEXUS RX450h 2022 Owners Manual
[x] Cancel search | Manufacturer: LEXUS, Model Year: 2022, Model line: RX450h, Model: LEXUS RX450h 2022Pages: 532, PDF Size: 27.62 MB
Page 85 of 532
832-1. Instrument cluster
2
Vehicle status information and indicators
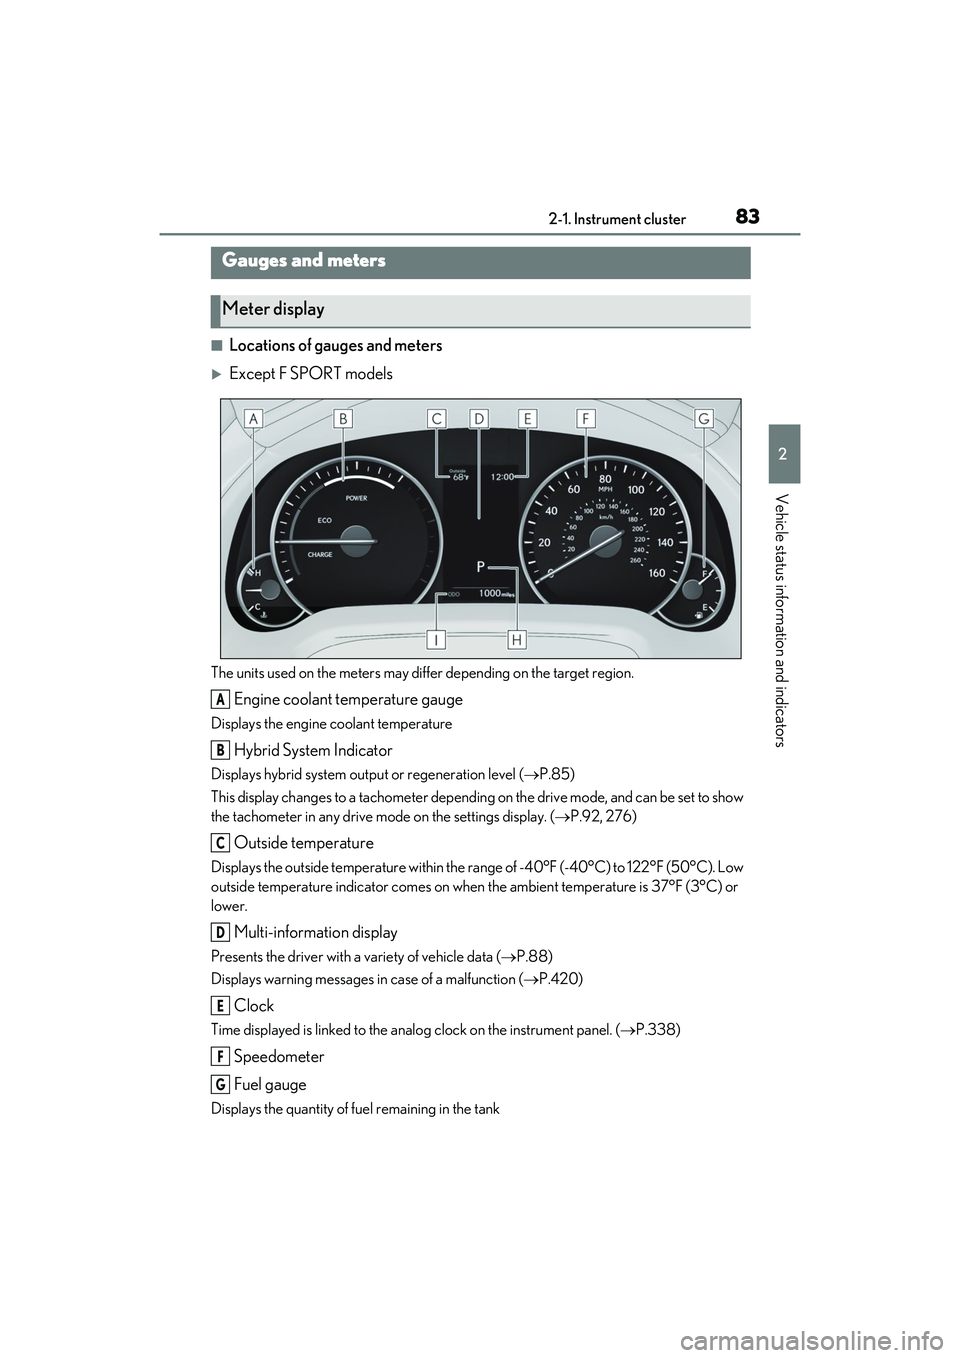
■Locations of gauges and meters
Except F SPORT models
The units used on the meters may differ depending on the target region.
Engine coolant temperature gauge
Displays the engine coolant temperature
Hybrid System Indicator
Displays hybrid system output or regeneration level (P.85)
This display changes to a tachometer depending on the drive mode, and can be set to show
the tachometer in any drive mode on the settings display. (P.92, 276)
Outside temperature
Displays the outside temperature within the range of -40°F (-40°C) to 122°F (50°C). Low
outside temperature indicator comes on when the ambient temperature is 37°F (3°C) or
lower.
Multi-information display
Presents the driver with a variety of vehicle data (P.88)
Displays warning messages in case of a malfunction (P.420)
Clock
Time displayed is linked to the analog clock on the instrument panel. (P.338)
Speedometer
Fuel gauge
Displays the quantity of fuel remaining in the tank
Gauges and meters
Meter display
A
B
C
D
E
F
G
Page 86 of 532
842-1. Instrument cluster
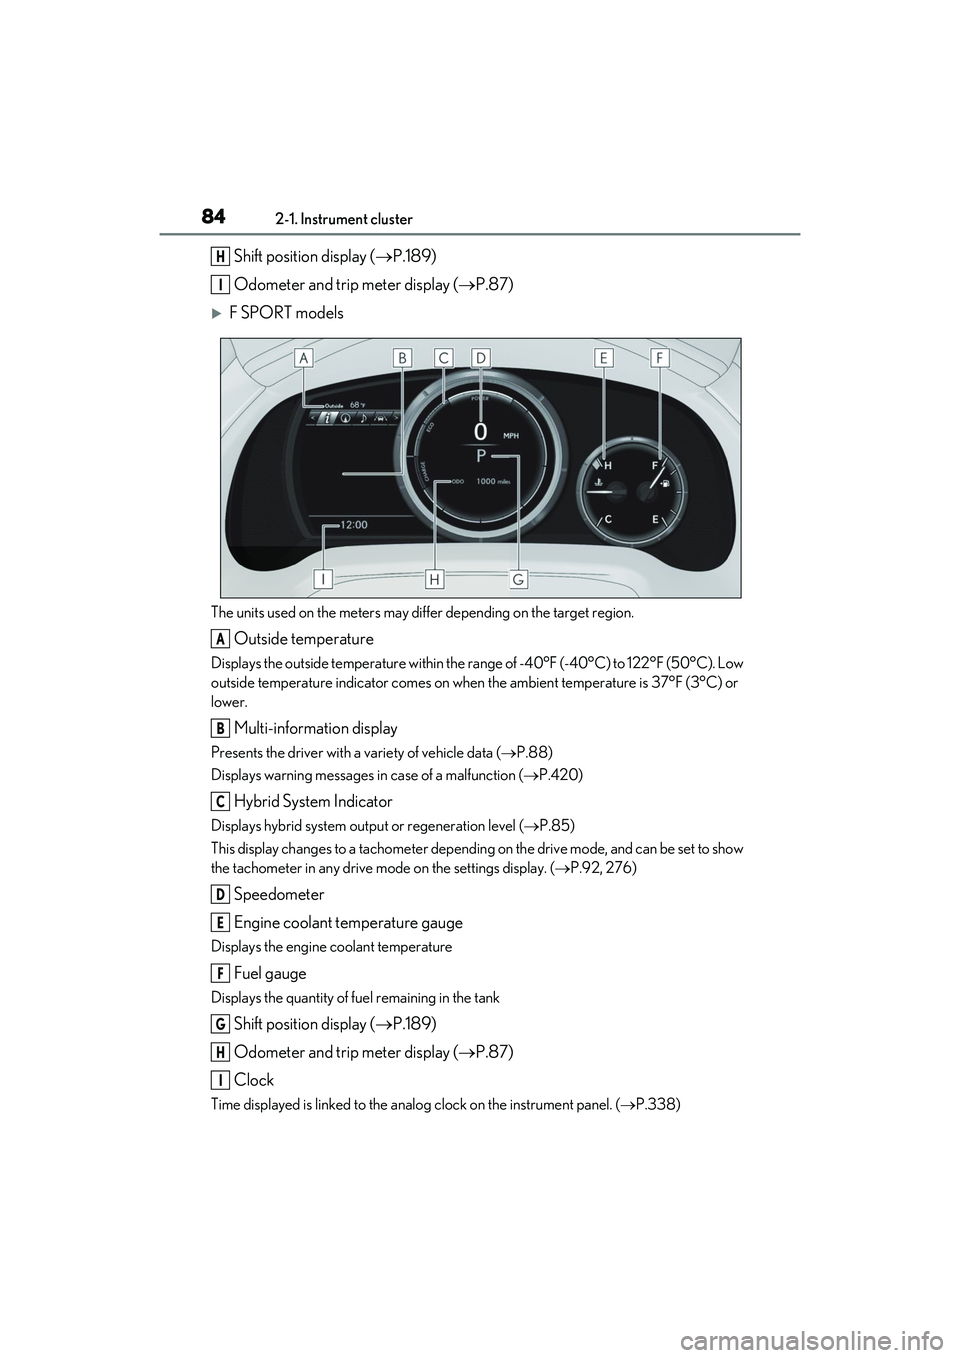
Shift position display (P.189)
Odometer and trip meter display ( P.87)
F SPORT models
The units used on the meters may differ depending on the target region.
Outside temperature
Displays the outside temperature within the range of -40°F (-40°C) to 122°F (50°C). Low
outside temperature indicator comes on when the ambient temperature is 37°F (3°C) or
lower.
Multi-information display
Presents the driver with a variety of vehicle data (P.88)
Displays warning messages in case of a malfunction (P.420)
Hybrid System Indicator
Displays hybrid system output or regeneration level ( P.85)
This display changes to a tachometer depending on the drive mode, and can be set to show
the tachometer in any drive mode on the settings display. (P.92, 276)
Speedometer
Engine coolant temperature gauge
Displays the engine coolant temperature
Fuel gauge
Displays the quantity of fuel remaining in the tank
Shift position display ( P.189)
Odometer and trip meter display ( P.87)
Clock
Time displayed is linked to the analog clock on the instrument panel. (P.338)
H
I
A
B
C
D
E
F
G
H
I
Page 94 of 532
922-1. Instrument cluster
switch is turned to ON mode. It may also
take a few minutes to display the tire infla-
tion pressure after inflation pressure has
been adjusted.
• “---” may be displayed if the tire position information cannot be determined due to
unfavorable radio wave conditions.
• Tire inflation pressu re changes with tem-
perature. The displayed values may also
be different from the values measured
using a tire pressure gauge.
Select to display the following naviga-
tion system-linked information.
Route guidance
Compass display (heading-up dis-
play)
Select to enable selection of an audio
source or track on the meter using the
meter control switches.
Select to display the operational status
of the following systems:
LTA (Lane Tracing Assist) ( P.225)
RSA (Road Sign Assist) (if
equipped) ( P.234)
Dynamic radar cruise control with
full-speed range ( P.236)
■Meter display settings that can be
changed
Clock
Select to switch between 12-hour display
and 24-hour display.
Language
Select to change t he language displayed.
Units
Select to change the units of measure dis-
played.
EV indicator ( P.187)
Select to enable/disab le the EV indicator.
Switch settings
Select to display how to change the top
screen.
Drive information 1/Drive informa-
tion 2/Drive information 3
Select to select up to 2 items ( P.90) that
will be displayed on each Drive information
screen (Drive information 1 screen, Drive
information 2 screen, and Drive informa-
tion 3 screen) respectively.
Pop-up display
Select to enable/dis able the pop-up dis-
play.
• Intersection guidance
• Incoming calls
• Brightness adjustment
Color (except F SPORT models)
Select to set the color of the cursor on the
multi-information display.
Tachometer setting
Select to set the tachometer or Hybrid
System Indicator to always be displayed or
Navigation system-linked dis-
play (if equipped)
Audio system-linked display
Driving assist system information
Settings display
Page 186 of 532

1844-2. Driving procedures
1Stop the vehicle completely.
2 Set the parking brake ( P.193),
and shift the shift lever to P.
3 Press the power switch.
4 Release the brake pedal and check
that the display on the meters is off.
■Automatic hybrid system shut off fea-
ture
●The vehicle is equipped with a feature
that automatically shuts off the hybrid sys-
tem when the shift lever is in P with the
hybrid system operating for an extended
period.
●The hybrid system will automatically shut
off after approximately 1 hour if it has
been left running while the shift lever is in
P.
●The timer for the automatic hybrid system
shut off feature will reset if the brake
pedal is depressed or if the shift lever is in
a position other than P.
●After the vehicle is parked, if the door is
locked with the door lock switch ( P.111)
from the inside or the mechanical key
from the outside, the automatic hybrid
system shut off feature will be disabled.
The timer for the automatic hybrid system
shut off feature will be re-enabled if the
driver’s door is opened.
■Locking the door from outside with the
hybrid system operating
1 With the driver’s d oor open, pull the
driver’s door handle and insert the
mechanical key.
2 Turn the mechanical key
counterclockwise.
3 Pull out the mechanical key and close
the door.
WARNING
■Caution while driving
If hybrid system failure occurs while the
vehicle is moving, do not lock or open the
doors until the vehicle reaches a safe and
complete stop. Activati on of the steering
lock in this circumstance may lead to an
accident, resulting in death or serious
injury.
NOTICE
■When starting the hybrid system
If the hybrid system becomes difficult to
start, have your vehicle checked by your
Lexus dealer immediately.
■Symptoms indicating a malfunction
with the power switch
If the power switch seems to be operat-
ing somewhat differently than usual, such
as the switch sticking slightly, there may
be a malfunction. Contact your Lexus
dealer immediately.
Stopping the hybrid system
Page 340 of 532
3385-6. Using the other interior features
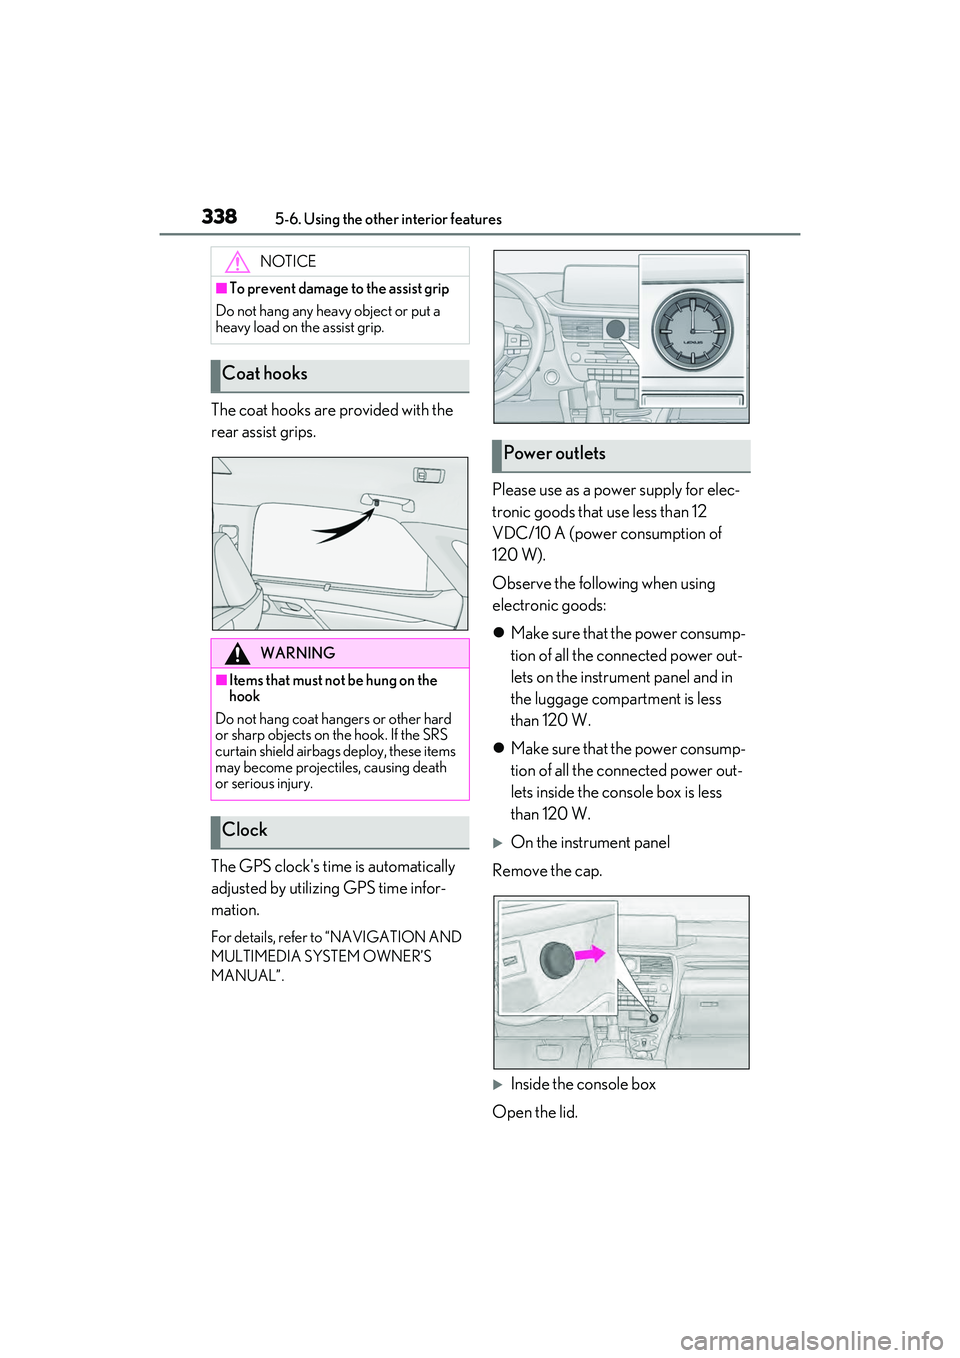
The coat hooks are provided with the
rear assist grips.
The GPS clock's time is automatically
adjusted by utilizing GPS time infor-
mation.
For details, refer to “NAVIGATION AND
MULTIMEDIA SYSTEM OWNER’S
MANUAL”.
Please use as a power supply for elec-
tronic goods that use less than 12
VDC/10 A (power consumption of
120 W).
Observe the following when using
electronic goods:
Make sure that the power consump-
tion of all the connected power out-
lets on the instrument panel and in
the luggage compartment is less
than 120 W.
Make sure that the power consump-
tion of all the connected power out-
lets inside the console box is less
than 120 W.
On the instrument panel
Remove the cap.
Inside the console box
Open the lid.
NOTICE
■To prevent damage to the assist grip
Do not hang any heavy object or put a
heavy load on the assist grip.
Coat hooks
WARNING
■Items that must not be hung on the
hook
Do not hang coat hangers or other hard
or sharp objects on the hook. If the SRS
curtain shield airbags deploy, these items
may become projectiles, causing death
or serious injury.
Clock
Power outlets
Page 368 of 532
3666-3. Do-it-yourself maintenance
on the dipstick.
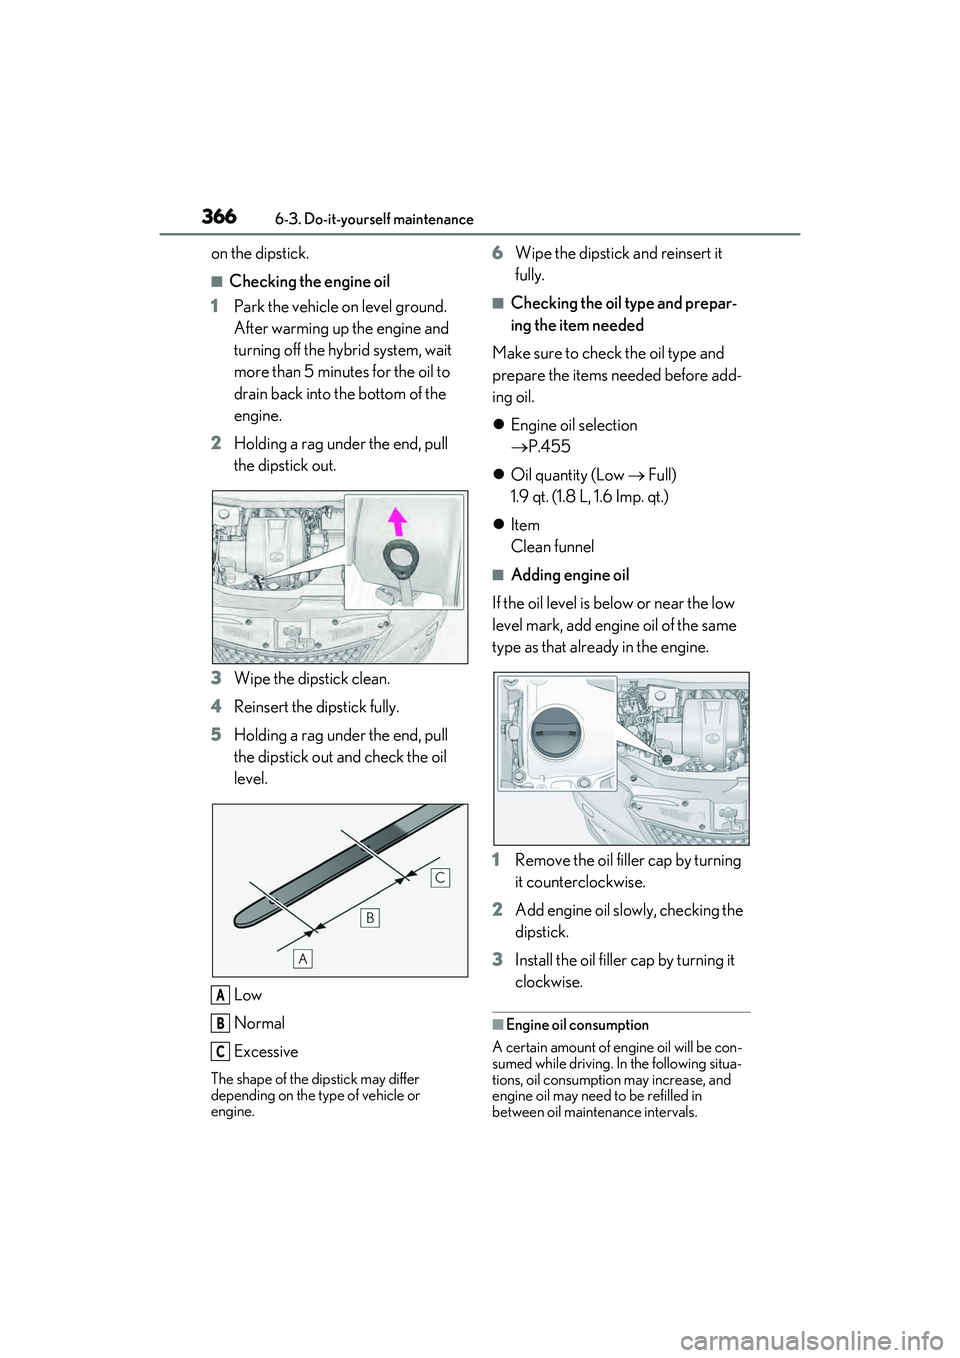
■Checking the engine oil
1 Park the vehicle on level ground.
After warming up the engine and
turning off the hybrid system, wait
more than 5 minutes for the oil to
drain back into the bottom of the
engine.
2 Holding a rag under the end, pull
the dipstick out.
3 Wipe the dipstick clean.
4 Reinsert the dipstick fully.
5 Holding a rag under the end, pull
the dipstick out and check the oil
level.
Low
Normal
Excessive
The shape of the dipstick may differ
depending on the type of vehicle or
engine.
6Wipe the dipstick and reinsert it
fully.
■Checking the oil type and prepar-
ing the item needed
Make sure to check the oil type and
prepare the items needed before add-
ing oil.
Engine oil selection
P.455
Oil quantity (Low Full)
1.9 qt. (1.8 L, 1.6 Imp. qt.)
Item
Clean funnel
■Adding engine oil
If the oil level is below or near the low
level mark, add engine oil of the same
type as that already in the engine.
1 Remove the oil filler cap by turning
it counterclockwise.
2 Add engine oil slowly, checking the
dipstick.
3 Install the oil filler cap by turning it
clockwise.
■Engine oil consumption
A certain amount of engine oil will be con-
sumed while driving. In the following situa-
tions, oil consumption may increase, and
engine oil may need to be refilled in
between oil maintenance intervals.
A
B
C
Page 396 of 532
3946-3. Do-it-yourself maintenance
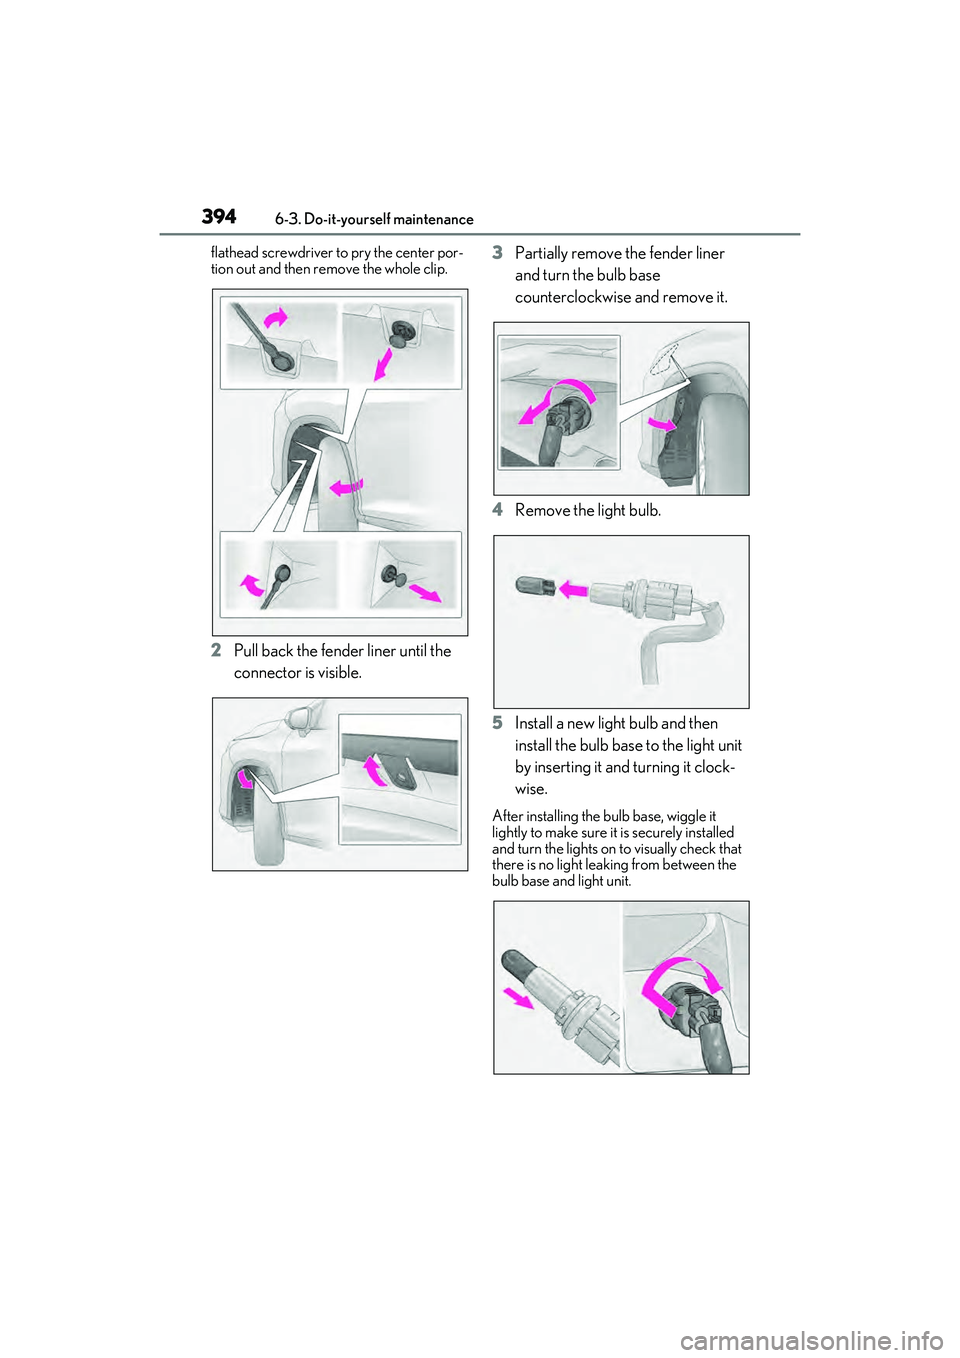
flathead screwdriver to pry the center por-
tion out and then re move the whole clip.
2Pull back the fender liner until the
connector is visible. 3
Partially remove the fender liner
and turn the bulb base
counterclockwise and remove it.
4 Remove the light bulb.
5 Install a new light bulb and then
install the bulb base to the light unit
by inserting it and turning it clock-
wise.
After installing the bulb base, wiggle it
lightly to make sure it is securely installed
and turn the lights on to visually check that
there is no light leaking from between the
bulb base and light unit.
Page 398 of 532
3966-3. Do-it-yourself maintenance
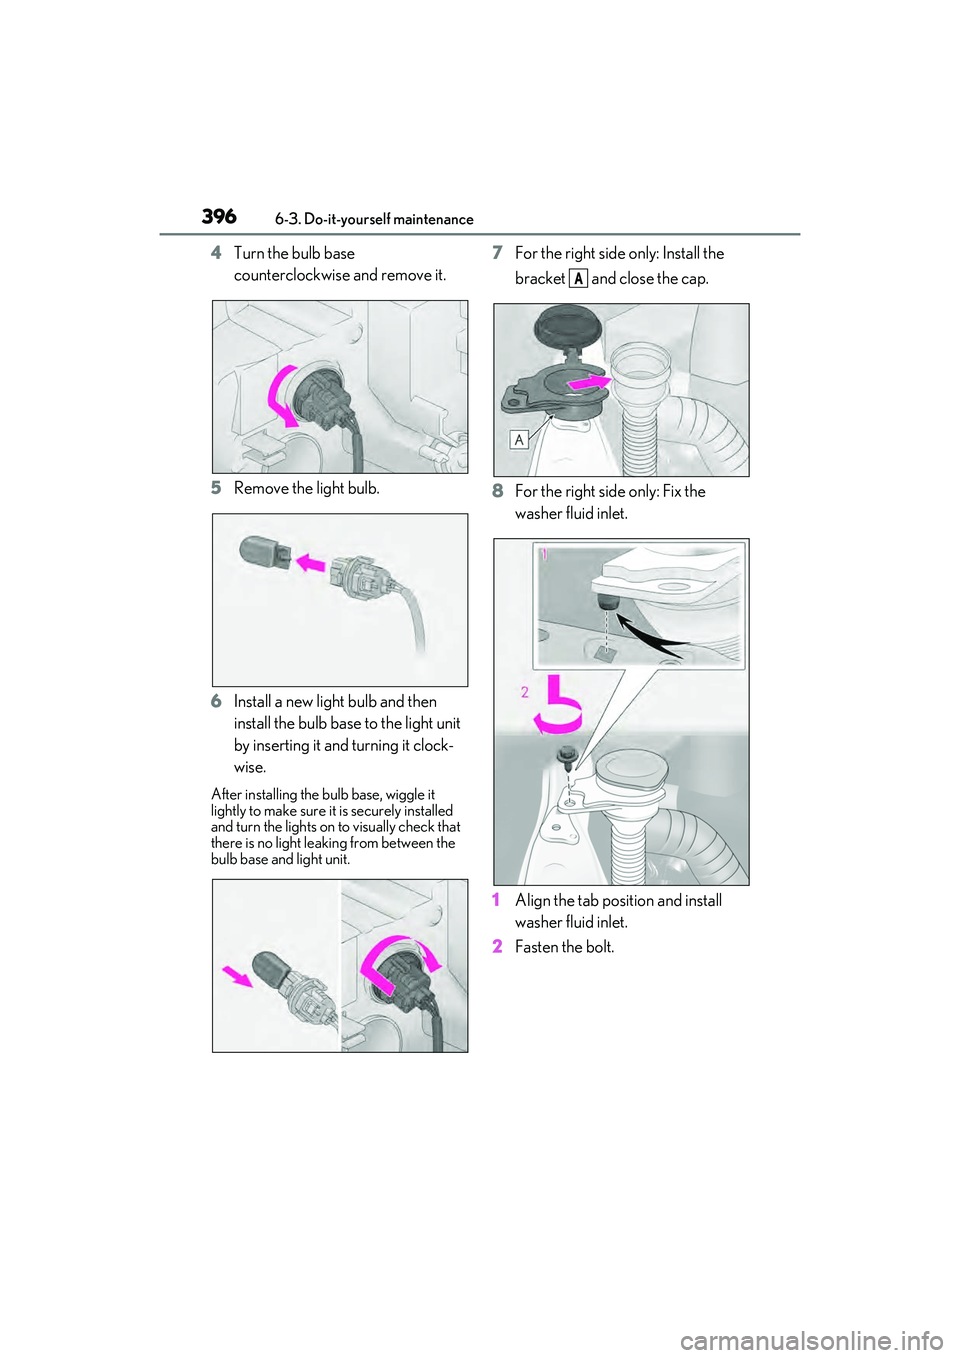
4Turn the bulb base
counterclockwise and remove it.
5 Remove the light bulb.
6 Install a new light bulb and then
install the bulb base to the light unit
by inserting it and turning it clock-
wise.
After installing the bu lb base, wiggle it
lightly to make sure it is securely installed
and turn the lights on to visually check that
there is no light leaking from between the
bulb base and light unit.
7 For the right side only: Install the
bracket and close the cap.
8 For the right side only: Fix the
washer fluid inlet.
1 Align the tab position and install
washer fluid inlet.
2 Fasten the bolt.
A
Page 400 of 532
3986-3. Do-it-yourself maintenance
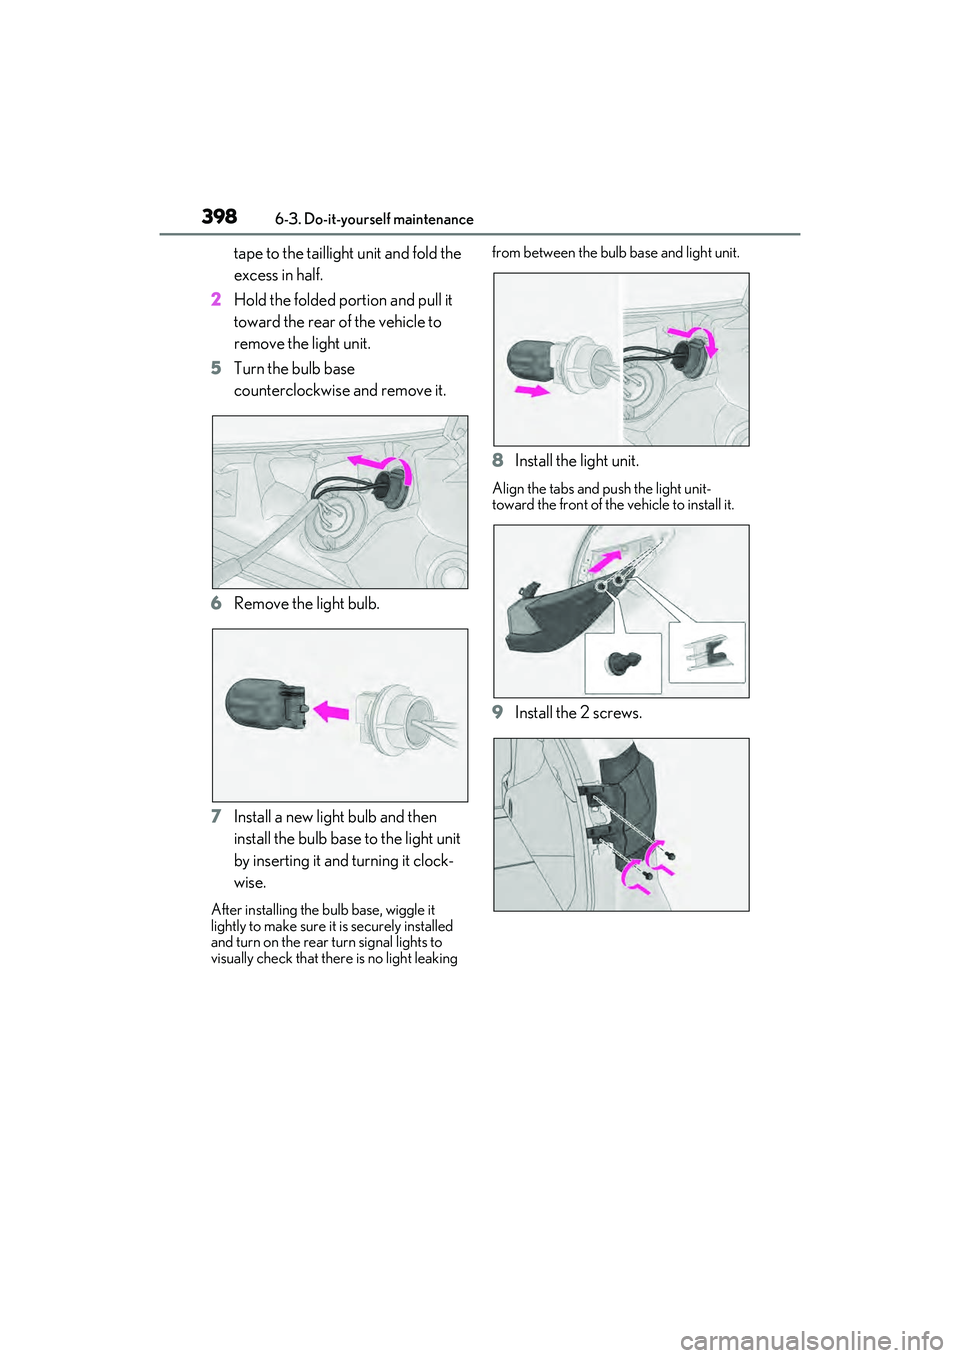
tape to the taillight unit and fold the
excess in half.
2 Hold the folded portion and pull it
toward the rear of the vehicle to
remove the light unit.
5 Turn the bulb base
counterclockwise and remove it.
6 Remove the light bulb.
7 Install a new light bulb and then
install the bulb base to the light unit
by inserting it and turning it clock-
wise.
After installing the bu lb base, wiggle it
lightly to make sure it is securely installed
and turn on the rear turn signal lights to
visually check that there is no light leaking from between the bulb
base and light unit.
8Install the light unit.
Align the tabs and push the light unit-
toward the front of the vehicle to install it.
9Install the 2 screws.
Page 401 of 532
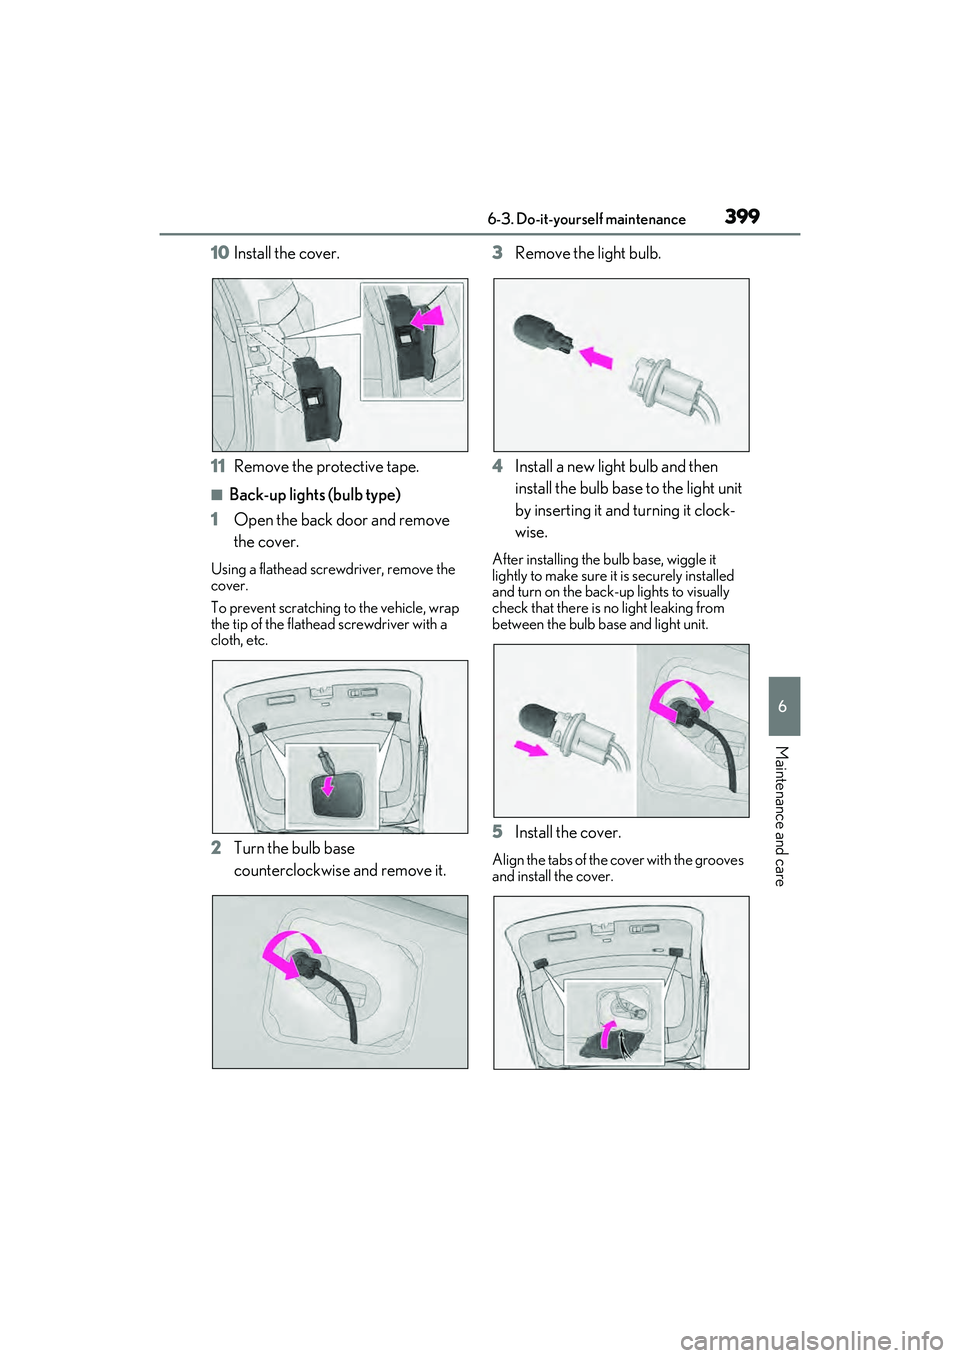
3996-3. Do-it-yourself maintenance
6
Maintenance and care
10Install the cover.
11 Remove the protective tape.
■Back-up lights (bulb type)
1 Open the back door and remove
the cover.
Using a flathead scre wdriver, remove the
cover.
To prevent scratching to the vehicle, wrap
the tip of the flathead screwdriver with a
cloth, etc.
2 Turn the bulb base
counterclockwise and remove it. 3
Remove the light bulb.
4 Install a new light bulb and then
install the bulb base to the light unit
by inserting it and turning it clock-
wise.
After installing the bulb base, wiggle it
lightly to make sure it is securely installed
and turn on the back-up lights to visually
check that there is no light leaking from
between the bulb ba se and light unit.
5Install the cover.
Align the tabs of the cover with the grooves
and install the cover.