tow LEXUS RX450h 2022 User Guide
[x] Cancel search | Manufacturer: LEXUS, Model Year: 2022, Model line: RX450h, Model: LEXUS RX450h 2022Pages: 532, PDF Size: 27.62 MB
Page 128 of 532

1263-2. Opening, closing and locking the doors
■If “Key Left inside Vehicle” is shown on
the multi-information display
An attempt was made to lock the doors
using the smart access system with
push-button start while the electronic key
was still inside the vehicle. Retrieve the elec-
tronic key from the vehicle and lock the
doors again.
■Battery-saving function
The battery-saving fu nction will be acti-
vated in order to prevent the electronic key
battery and the 12-volt battery from being
discharged while the vehicle is not in opera-
tion for a long time.
●In the following situations, the smart
access system with pu sh-button start may
take some time to unlock the doors.
• The electronic key has been left in an
area of approximately 6 ft. (2 m) of the
outside of the vehicle for 10 minutes or
longer.
• The smart access system with push-but- ton start has not been used for 5 days or
longer.
●If the smart access system with push-but-
ton start has not been used for 14 days or
longer, the doors cannot be unlocked at
any doors except the driver’s door. In this
case, take hold of the driver’s door han-
dle, or use the wirele ss remote control or
the mechanical key, to unlock the doors.
■Turning an electronic key to bat-
tery-saving mode
When battery-saving mode is set, battery
depletion is minimized by stopping the elec-
tronic key from re ceiving radio waves. Press twice while pressing and holding
. Confirm that the electronic key indica-
tor flashes 4 times.
While the battery-saving mode is set, the
smart access system with push-button start
cannot be used. To cancel the function,
press any of the electronic key buttons.
■Conditions affecting operation
The smart access system with push-button
start, wireless remote control and immobi-
lizer system use weak radio waves. In the
following situations, the communication
between the electronic key and the vehicle
may be affected, preventing the smart
access system with push-button start, wire-
less remote control and immobilizer system
from operating properly. (Ways of coping:
P.439)
●When the electronic key battery is
depleted
●Near a TV tower, electric power plant,
gas station, radio station, large display,
airport or other fac ility that generates
strong radio waves or electrical noise
●When the electronic key is in contact
with, or is covered by the following metal-
lic objects
• Cards to which aluminum foil is attached
• Cigarette boxes that have aluminum foil inside
• Metallic wallets or bags
•Coins
• Hand warmers made of metal
• Media such as CDs and DVDs
●When other wireless keys (that emit radio
waves) are being used nearby
●When carrying the electronic key
together with the following devices that
emit radio waves
• Portable radio, cell ular phone, cordless
phone or other wireless communication
SituationCorrection
procedure
The power switch was
turned to ACCESSORY
mode while the driver’s
door was open (The
driver’s door was opened
when the power switch
was in ACCESSORY
mode).
Turn the power
switch off and
close the
driver’s door.
Page 133 of 532
1313-3. Adjusting the seats
3
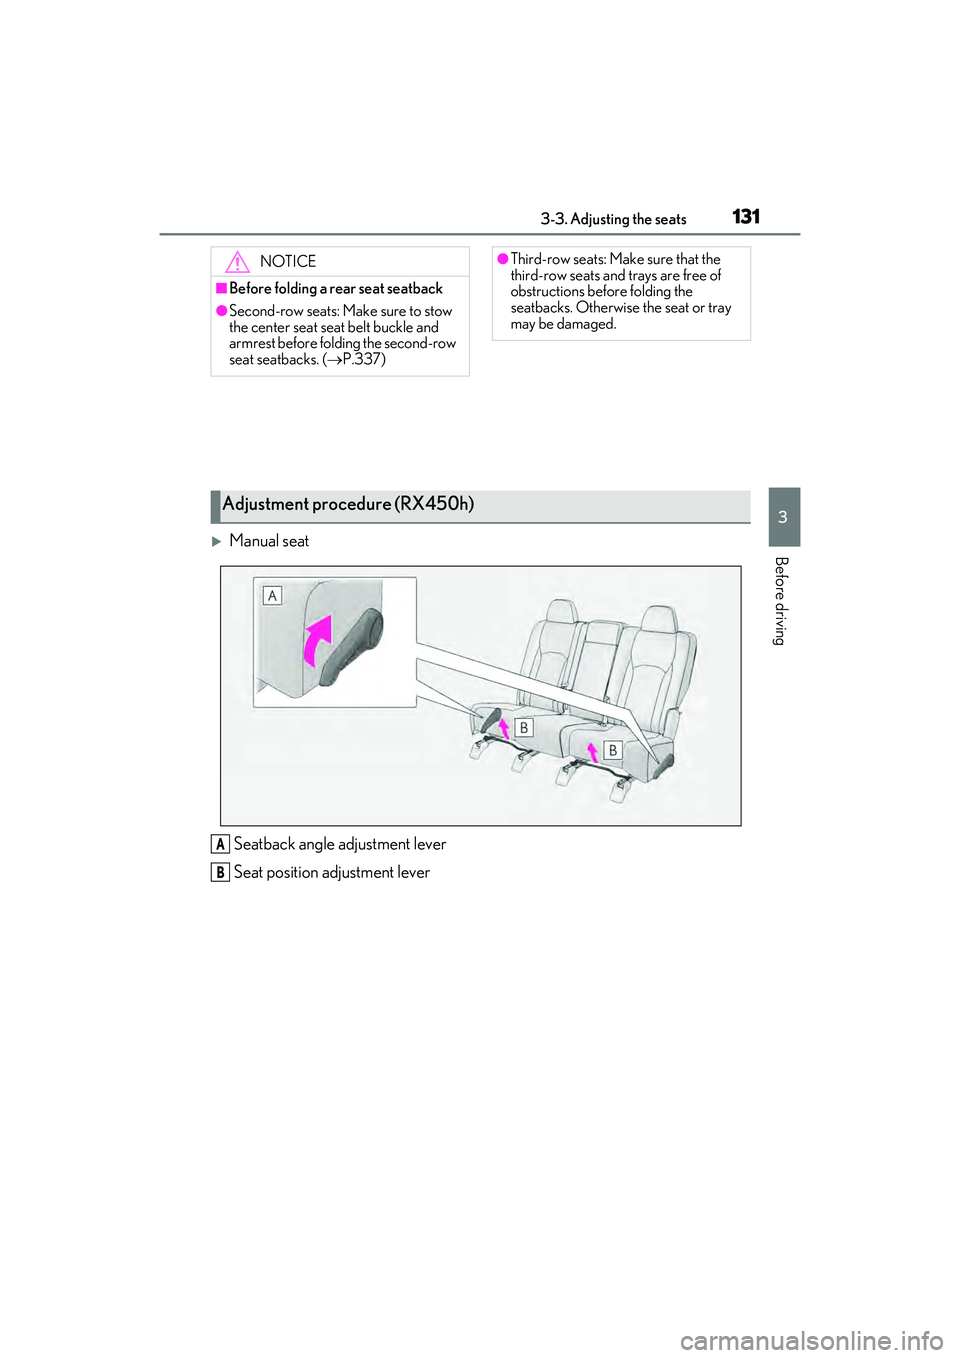
Before drivingManual seatSeatback angle adjustment lever
Seat position adjustment lever
NOTICE
■Before folding a rear seat seatback
●Second-row seats: Make sure to stow
the center seat seat belt buckle and
armrest before folding the second-row
seat seatbacks. ( P.337)
●Third-row seats: Ma ke sure that the
third-row seats and trays are free of
obstructions before folding the
seatbacks. Otherwise the seat or tray
may be damaged.
Adjustment procedure (RX450h)
A
B
Page 136 of 532

1343-3. Adjusting the seats
■Before folding the rear seatbacks
1 Stow the center seat seat belt
buckle.
2 Lower the rear seat head restraints
to the lowest position. ( P.143)
■Folding the rear seatbacks (manual
seat)
Using the seatback angle adjust-
ment lever
Pull the lever and fold the rear
seatback.
Using the lever in the luggage com-
partment
Pull the lever and fold the rear
seatback.
■Folding the rear seatbacks (power
seat)
Press and hold the fo ld switch until the
rear seatback begins to operate.
A buzzer will sound and then the operation
will start. When the operation is com-
pleted, the buzzer will sound again.
To stop the operation partway, press either
side of the switch for the operating seat.
Any rear seat operat ion switch for the
operating seat, regardle ss of location, can
be used to stop the operation. (A buzzer
may sound depending on the position that
the rear seatback is stopped.)
Using the seatback angle adjust-
ment switch
If the rear seatback is reclined, adjust it
to the most upright position and then
press the switch again.
Using the switch in the luggage
compartment
Folding the second-row seat
seatbacks (RX450h)
Page 139 of 532
1373-3. Adjusting the seats
3
Before driving
A buzzer will sound continuously when the
seatback stops and intermittently when
moving in the opposite direction.
■Before folding the second-row seat
seatbacks
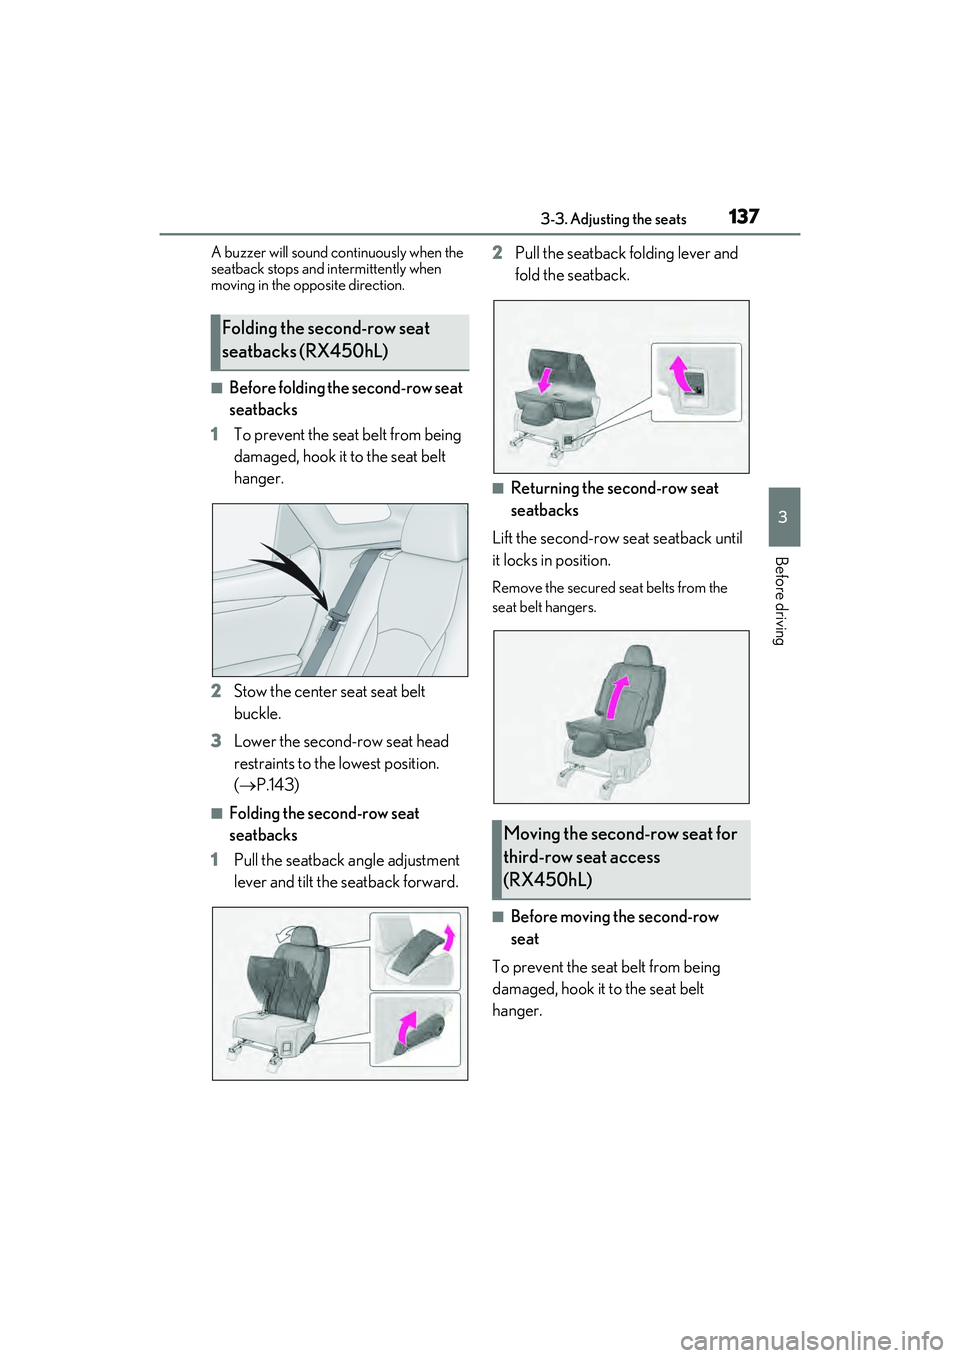
1 To prevent the seat belt from being
damaged, hook it to the seat belt
hanger.
2 Stow the center seat seat belt
buckle.
3 Lower the second-row seat head
restraints to the lowest position.
( P.143)
■Folding the second-row seat
seatbacks
1 Pull the seatback angle adjustment
lever and tilt the seatback forward. 2
Pull the seatback folding lever and
fold the seatback.
■Returning the second-row seat
seatbacks
Lift the second-row seat seatback until
it locks in position.
Remove the secured se at belts from the
seat belt hangers.
■Before moving the second-row
seat
To prevent the seat belt from being
damaged, hook it to the seat belt
hanger.
Folding the second-row seat
seatbacks (RX450hL)
Moving the second-row seat for
third-row seat access
(RX450hL)
Page 146 of 532
1443-3. Adjusting the seats
Make sure that the head restraints are
adjusted so that the center of the head
restraint is closest to the top of your ears.
■Adjusting the second-row center and
third-row seat head restraints
Always raise the head restraint one level
from the stowed position when using.
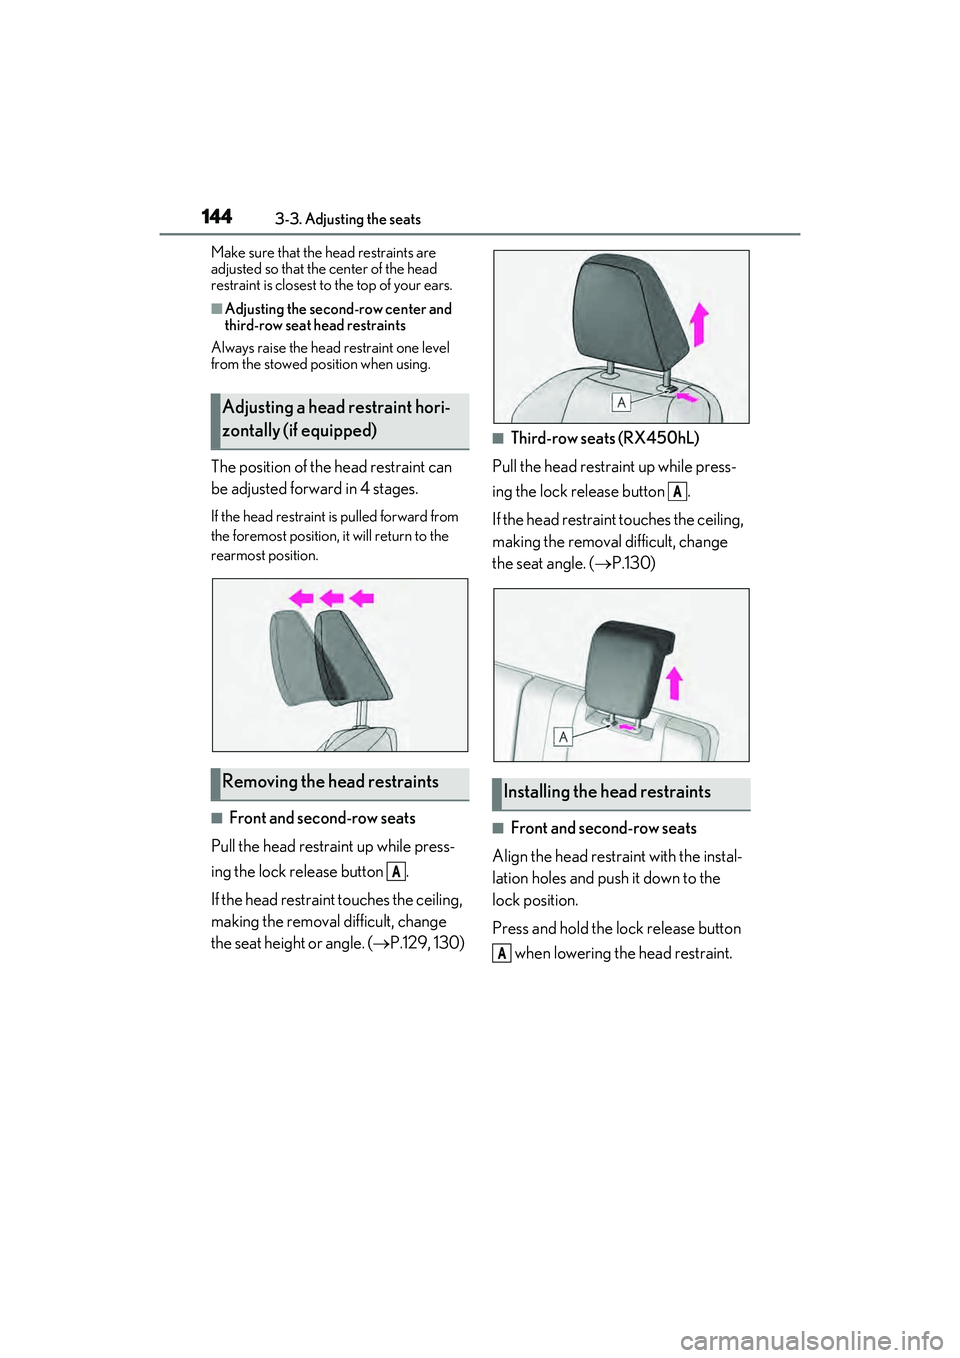
The position of the head restraint can
be adjusted forward in 4 stages.
If the head restraint is pulled forward from
the foremost position, it will return to the
rearmost position.
■Front and second-row seats
Pull the head restraint up while press-
ing the lock release button .
If the head restrain t touches the ceiling,
making the removal difficult, change
the seat height or angle. ( P.129, 130)
■Third-row seats (RX450hL)
Pull the head restraint up while press-
ing the lock release button .
If the head restraint touches the ceiling,
making the removal difficult, change
the seat angle. ( P.130)
■Front and second-row seats
Align the head restraint with the instal-
lation holes and push it down to the
lock position.
Press and hold the lock release button when lowering the head restraint.
Adjusting a head restraint hori-
zontally (if equipped)
Removing the head restraints
A
Installing the head restraints
A
A
Page 148 of 532
1463-4. Adjusting the steering wheel and mirrors
3-4.Adjusting the steering wheel and mirrors
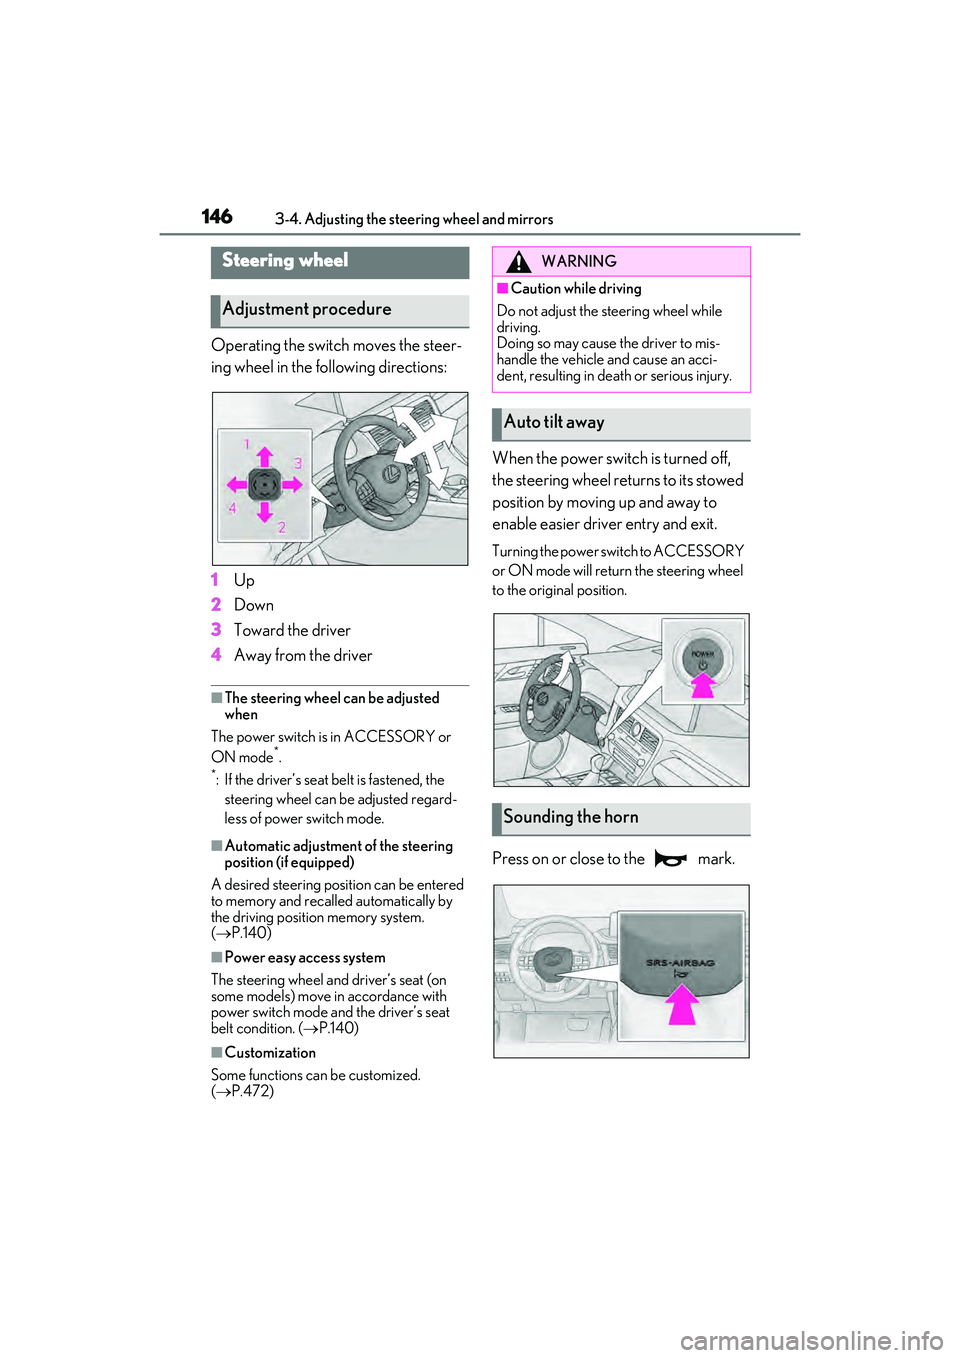
Operating the switch moves the steer-
ing wheel in the following directions:
1Up
2 Down
3 Toward the driver
4 Away from the driver
■The steering wheel can be adjusted
when
The power switch is in ACCESSORY or
ON mode
*.
*: If the driver’s seat belt is fastened, the steering wheel can be adjusted regard-
less of power switch mode.
■Automatic adjustment of the steering
position (if equipped)
A desired steering position can be entered
to memory and recalled automatically by
the driving position memory system.
( P.140)
■Power easy access system
The steering wheel and driver’s seat (on
some models) move in accordance with
power switch mode and the driver’s seat
belt condition. ( P.140)
■Customization
Some functions can be customized.
( P.472)
When the power switch is turned off,
the steering wheel returns to its stowed
position by moving up and away to
enable easier driver entry and exit.
Turning the power switch to ACCESSORY
or ON mode will return the steering wheel
to the original position.
Press on or close to the mark.
Steering wheel
Adjustment procedure
WARNING
■Caution while driving
Do not adjust the steering wheel while
driving.
Doing so may cause the driver to mis-
handle the vehicle and cause an acci-
dent, resulting in death or serious injury.
Auto tilt away
Sounding the horn
Page 151 of 532
1493-4. Adjusting the steering wheel and mirrors
3
Before driving
nor “R”.
To set the mirror angle used when the vehi-
cle is reversing, adjust the mirror angle at a
desired position with the shift lever in R.
The adjusted angle will be memorized and
the mirror will automatically tilt to the mem-
orized angle whenever the shift lever is
shifted to R from next time.
The memorized downward tilt position of
the mirror is linked to the normal position
(angle adjusted with th e shift lever in other
than R). Therefore, if the normal position is
changed after adjustment, the tilt position
will also change.
When the normal position is changed, read-
just the angle in reversing.
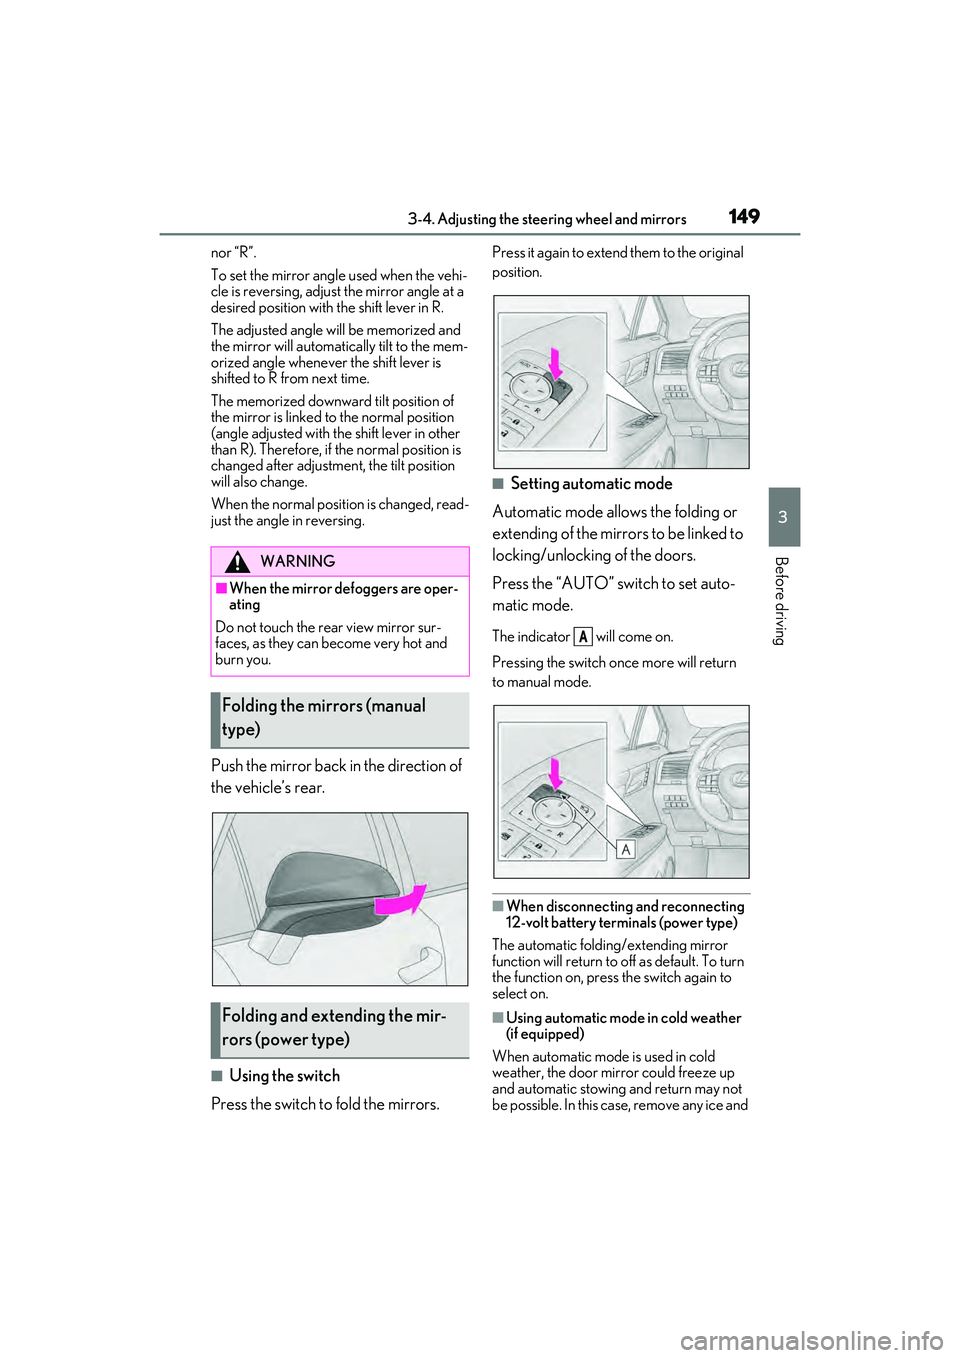
Push the mirror back in the direction of
the vehicle’s rear.
■Using the switch
Press the switch to fold the mirrors.
Press it again to extend them to the original
position.
■Setting automatic mode
Automatic mode allows the folding or
extending of the mirrors to be linked to
locking/unlocking of the doors.
Press the “AUTO” switch to set auto-
matic mode.
The indicator will come on.
Pressing the switch on ce more will return
to manual mode.
■When disconnecting and reconnecting
12-volt battery terminals (power type)
The automatic folding/extending mirror
function will return to o ff as default. To turn
the function on, press the switch again to
select on.
■Using automatic mode in cold weather
(if equipped)
When automatic mode is used in cold
weather, the door mirror could freeze up
and automatic stowing and return may not
be possible. In this ca se, remove any ice and
WARNING
■When the mirror defoggers are oper-
ating
Do not touch the rear view mirror sur-
faces, as they can become very hot and
burn you.
Folding the mirrors (manual
type)
Folding and extending the mir-
rors (power type)
A
Page 163 of 532
161
4
4
Driving
Driving
.4-1. Before drivingDriving the vehicle ..................... 162
Cargo and luggage ................... 167
Vehicle load limits ...................... 170
Trailer towing (vehicles without towing package) ....................... 171
Trailer towing (vehicles with tow- ing package)............................... 171
Dinghy towing .............................. 181
4-2. Driving procedures Power (ignition) switch ............ 182
EV drive mode ............................ 187
Hybrid transmission .................. 189
Turn signal lever.......................... 192
Parking brake .............................. 193
Brake Hold.................................... 196
4-3. Operating the lights and wipers Headlight switch ......................... 198
AHB (Automatic High Beam) ......................................................... 201
Fog light switch .......................... 204
Windshield wipers and washer ........................................................ 204
Rear window wiper and washer ........................................................ 208
4-4. Refueling Opening the fuel tank cap..... 209
4-5. Using the driving support sys- tems
Lexus Safety System + 2.0 ..... 212PCS (Pre-Collision System)
........................................................ 218
LTA (Lane Tracing Assist) .... 225
RSA (Road Sign Assist).......... 234
Dynamic radar cruise control with full-speed range...................... 236
BSM (Blind Spot Monitor) .... 246
PKSA (Parking Support Alert) ....................................................... 250
Intuitive parking assist ............. 252
RCTA (Rear cross traffic alert) function....................................... 259
PKSB (Parking Support Brake) ....................................................... 265
Parking Support Brake function (static objects) ........................... 271
Parking Support Brake function (rear-crossing vehicles) ...... 274
Driving mode select switch .. 276
Driving assist systems.............. 278
4-6. Driving tips Hybrid vehicle driving tips .... 284
Winter driving tips .................... 286
Utility vehicle precautions..... 288
Page 165 of 532

1634-1. Before driving
4
Driving
hybrid system output may be restrained.
●A warning message is displayed on the
multi-information display and head-up
display (if equipped) while the system is
operating.
■Restraining sudden start (Drive-Start
Control)
●When the following unusual operation is
performed, the hybrid system output may
be restrained.
• When the shift lever is shifted from R to D,
D to R, N to R, P to D, or P to R (D
includes S) with the accelerator pedal
depressed, a warning message appears
on the multi-information display and
head-up display (if equipped). If a warn-
ing message is shown on the multi-infor-
mation display and head-up display (if
equipped), read the message and follow
the instructions.
• When the accelerator pedal is depressed
too much while the vehicle is in reverse.
●While Drive-Start Control is being acti-
vated, your vehicle may have trouble
escaping from the mud or fresh snow. In
such case, deactivate TRAC ( P.280)
to cancel Drive-Start Control so that the
vehicle may become able to escape from
the mud or fresh snow.
■Breaking in your new Lexus
To extend the life of the vehicle, observing
the following precautions is recommended:
●For the first 200 miles (300 km):
Avoid sudden stops.
●For the first 500 miles (800 km):
Do not tow a trailer.
●For the first 1000 miles (1600 km):
• Do not drive at extremely high speeds.
• Avoid sudden acceleration.
• Do not drive continuously in low gears.
• Do not drive at a constant speed for extended periods.
■Operating your vehicle in a foreign
country
Comply with the relevant vehicle registra-
tion laws and confirm the availability of the
correct fuel. ( P.454)
■Eco-friendly driving
P.85
WARNING
Observe the following precautions.
Failure to do so may result in death or
serious injury.
■When starting the vehicle
Always keep your foot on the brake
pedal while stopped with the “READY”
indicator is illuminated. This prevents the
vehicle from creeping.
■When driving the vehicle
●Do not drive if you are unfamiliar with
the location of the brake and accelera-
tor pedals to avoid depressing the
wrong pedal.
• Accidentally depressing the accelera- tor pedal instead of the brake pedal
will result in sudden acceleration that
may lead to an accident.
• When backing up, you may twist your body around, leading to a difficulty in
operating the pedals. Make sure to
operate the pedals properly.
• Make sure to keep a correct driving posture even when moving the vehicle
only slightly. This allows you to depress
the brake and accelerator pedals
properly.
• Depress the brake pedal using your right foot. Depressing the brake pedal
using your left foot may delay
response in an emer gency, resulting in
an accident.
●The driver should pay extra attention
to pedestrians when the vehicle is
powered only by the electric motor
(traction motor). As there is no engine
noise, the pedestrians may misjudge
the vehicle’s movement. Even though
the vehicle is equipped with the
Acoustic Vehicle Alerting System,
drive with care as pedestrians in the
vicinity may still not notice the vehicle if
the surrounding area is noisy.
Page 170 of 532
1684-1. Before driving
gage load capacity calculated in Step
4.
(6) If your vehicle will be towing a
trailer, load from your trailer will be
transferred to your vehicle. Consult
this manual to determine how this
reduces the available cargo and lug-
gage load capacity of your vehicle.
( P.170)
Vehicles without towing package: Lexus
does not recommend towing a trailer with
your vehicle. Your vehicle is not designed
for trailer towing.
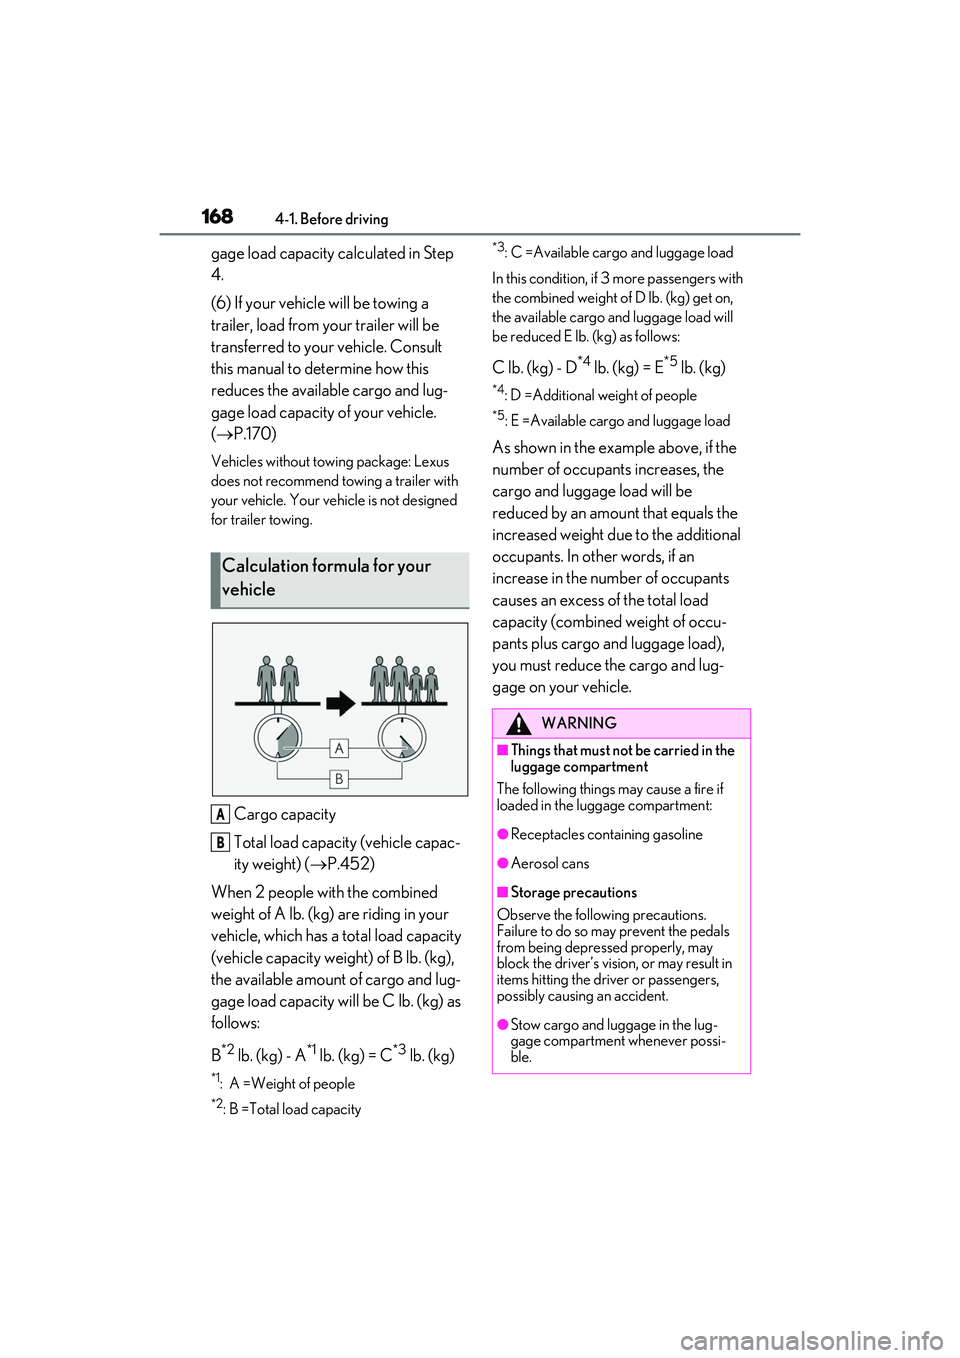
Cargo capacity
Total load capacity (vehicle capac-
ity weight) ( P.452)
When 2 people with the combined
weight of A lb. (kg) are riding in your
vehicle, which has a total load capacity
(vehicle capacity weight) of B lb. (kg),
the available amount of cargo and lug-
gage load capacity will be C lb. (kg) as
follows:
B
*2 lb. (kg) - A*1 lb. (kg) = C*3 lb. (kg)
*1: A =Weight of people
*2: B =Total load capacity
*3:C =Available carg o and luggage load
In this condition, if 3 more passengers with
the combined weight of D lb. (kg) get on,
the available cargo and luggage load will
be reduced E lb. (kg) as follows:
C lb. (kg) - D*4 lb. (kg) = E*5 lb. (kg)
*4: D =Additional weight of people
*5: E =Available cargo and luggage load
As shown in the example above, if the
number of occupant s increases, the
cargo and luggage load will be
reduced by an amount that equals the
increased weight due to the additional
occupants. In other words, if an
increase in the number of occupants
causes an excess of the total load
capacity (combined weight of occu-
pants plus cargo and luggage load),
you must reduce the cargo and lug-
gage on your vehicle.
Calculation formula for your
vehicle
A
B
WARNING
■Things that must not be carried in the
luggage compartment
The following things may cause a fire if
loaded in the luggage compartment:
●Receptacles containing gasoline
●Aerosol cans
■Storage precautions
Observe the following precautions.
Failure to do so may prevent the pedals
from being depressed properly, may
block the driver’s visi on, or may result in
items hitting the driver or passengers,
possibly causing an accident.
●Stow cargo and luggage in the lug-
gage compartment whenever possi-
ble.