light LEXUS RX450h 2022 Manual PDF
[x] Cancel search | Manufacturer: LEXUS, Model Year: 2022, Model line: RX450h, Model: LEXUS RX450h 2022Pages: 532, PDF Size: 27.62 MB
Page 176 of 532
1744-1. Before driving
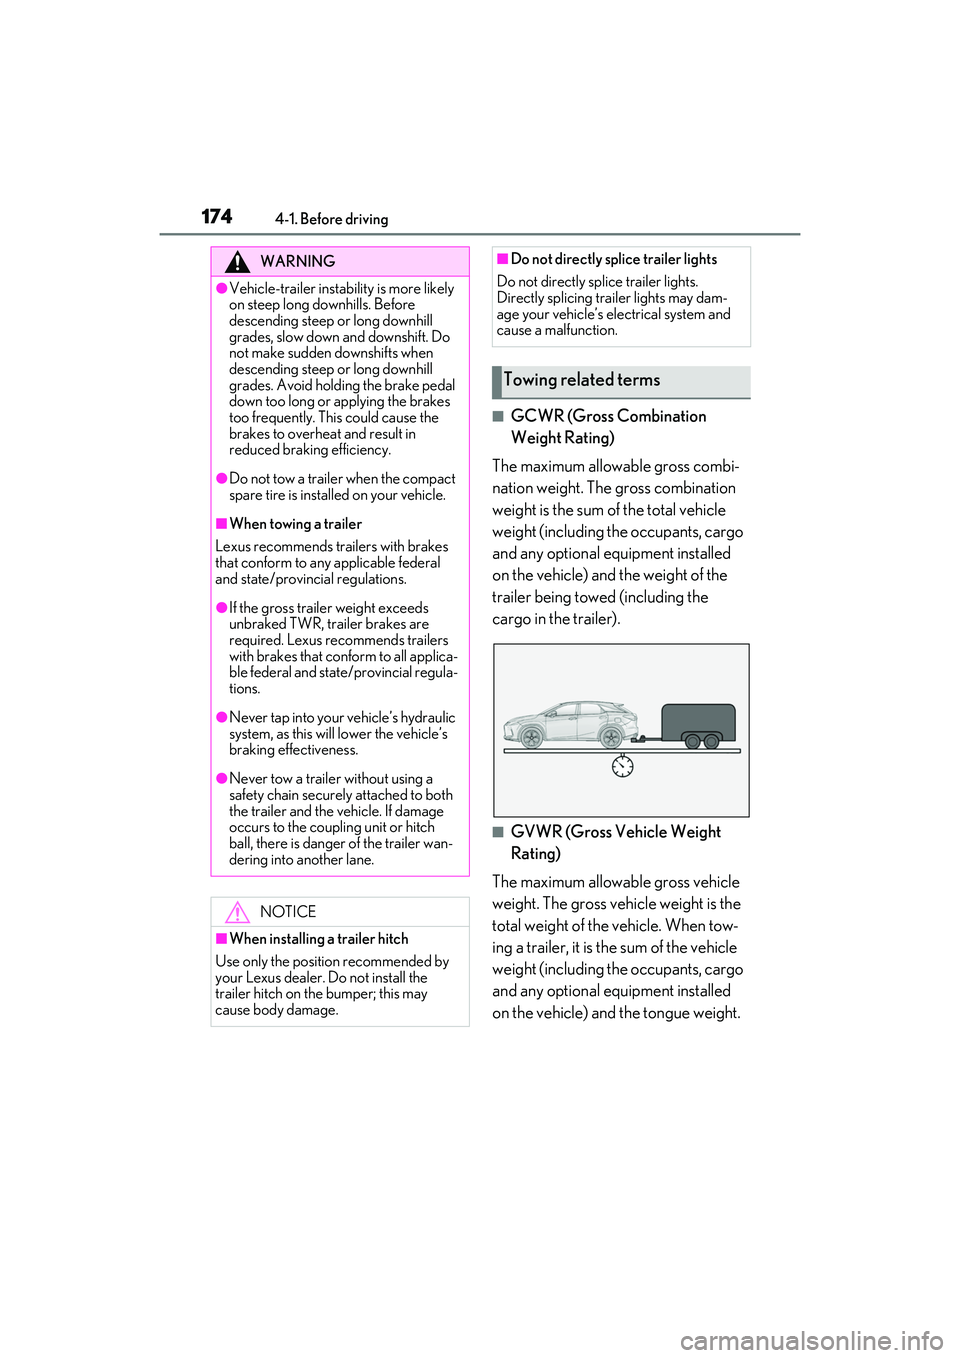
■GCWR (Gross Combination
Weight Rating)
The maximum allowable gross combi-
nation weight. The gross combination
weight is the sum of the total vehicle
weight (including the occupants, cargo
and any optional equipment installed
on the vehicle) and the weight of the
trailer being towed (including the
cargo in the trailer).
■GVWR (Gross Vehicle Weight
Rating)
The maximum allowable gross vehicle
weight. The gross vehicle weight is the
total weight of the vehicle. When tow-
ing a trailer, it is the sum of the vehicle
weight (including the occupants, cargo
and any optional equipment installed
on the vehicle) and the tongue weight.
WARNING
●Vehicle-trailer instabil ity is more likely
on steep long downhills. Before
descending steep or long downhill
grades, slow down and downshift. Do
not make sudden downshifts when
descending steep or long downhill
grades. Avoid holding the brake pedal
down too long or applying the brakes
too frequently. This could cause the
brakes to overheat and result in
reduced braking efficiency.
●Do not tow a trailer when the compact
spare tire is installed on your vehicle.
■When towing a trailer
Lexus recommends trailers with brakes
that conform to any applicable federal
and state/provincial regulations.
●If the gross trailer weight exceeds
unbraked TWR, trailer brakes are
required. Lexus recommends trailers
with brakes that conform to all applica-
ble federal and state/provincial regula-
tions.
●Never tap into your vehicle’s hydraulic
system, as this will lower the vehicle’s
braking effectiveness.
●Never tow a trailer without using a
safety chain securely attached to both
the trailer and the vehicle. If damage
occurs to the coupling unit or hitch
ball, there is danger of the trailer wan-
dering into another lane.
NOTICE
■When installing a trailer hitch
Use only the position recommended by
your Lexus dealer. Do not install the
trailer hitch on the bumper; this may
cause body damage.
■Do not directly splice trailer lights
Do not directly splice trailer lights.
Directly splicing trailer lights may dam-
age your vehicle’s electrical system and
cause a malfunction.
Towing related terms
Page 179 of 532
1774-1. Before driving
4
Driving
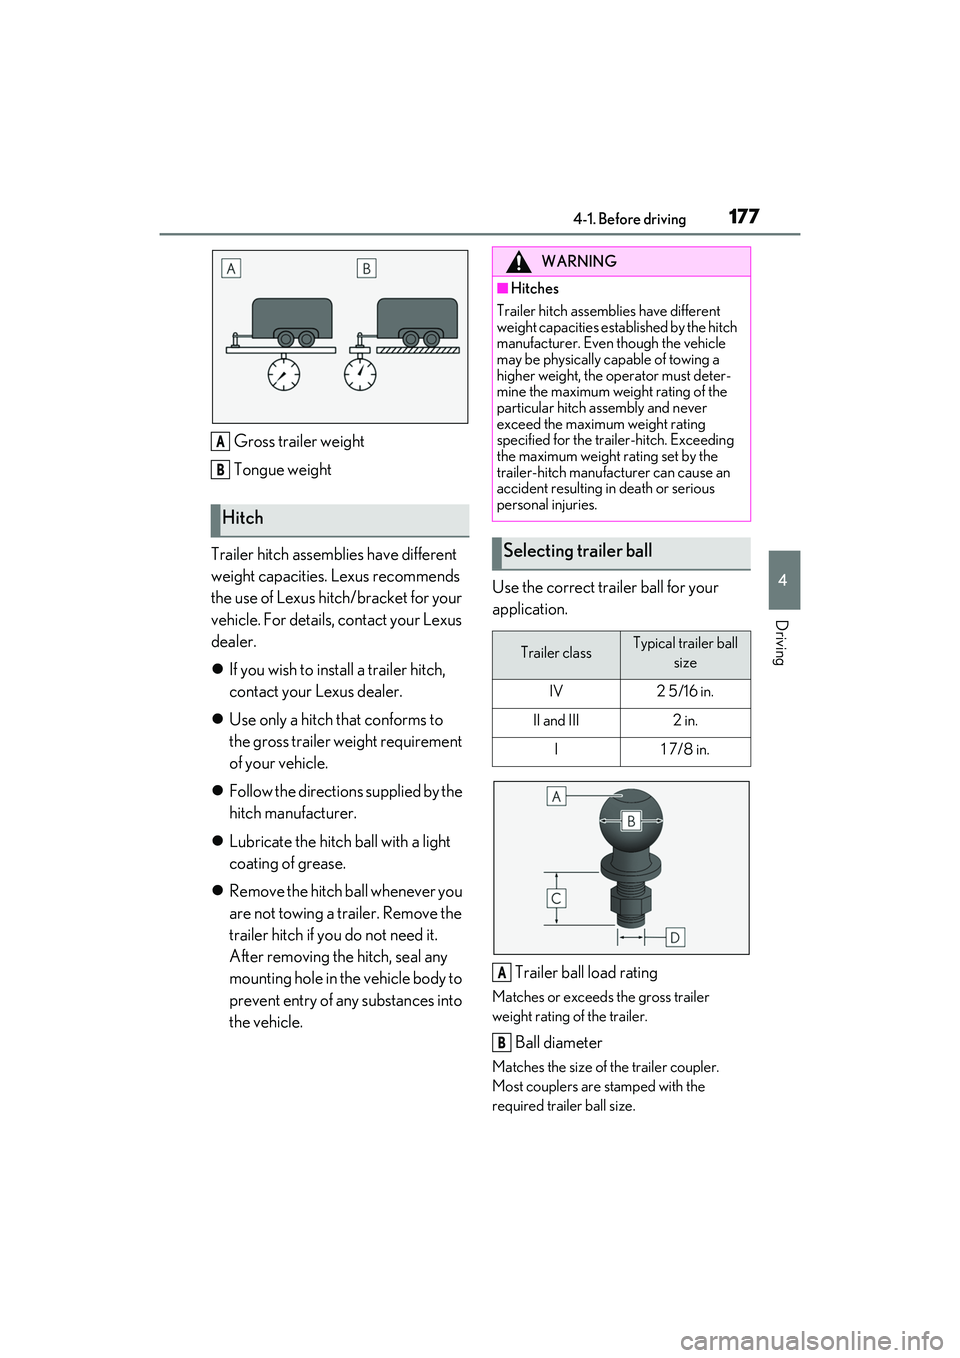
Gross trailer weight
Tongue weight
Trailer hitch assemblies have different
weight capacities. Lexus recommends
the use of Lexus hitch/bracket for your
vehicle. For details, contact your Lexus
dealer.
If you wish to install a trailer hitch,
contact your Lexus dealer.
Use only a hitch that conforms to
the gross trailer weight requirement
of your vehicle.
Follow the directions supplied by the
hitch manufacturer.
Lubricate the hitch ball with a light
coating of grease.
Remove the hitch ball whenever you
are not towing a trailer. Remove the
trailer hitch if you do not need it.
After removing the hitch, seal any
mounting hole in the vehicle body to
prevent entry of any substances into
the vehicle. Use the correct trailer ball for your
application.
Trailer ball load rating
Matches or exceeds the gross trailer
weight rating of the trailer.
Ball diameter
Matches the size of the trailer coupler.
Most couplers are stamped with the
required trailer ball size.
Hitch
A
B
WARNING
■Hitches
Trailer hitch assemblies have different
weight capacities established by the hitch
manufacturer. Even though the vehicle
may be physically capable of towing a
higher weight, the operator must deter-
mine the maximum weight rating of the
particular hitch assembly and never
exceed the maximum weight rating
specified for the trailer-hitch. Exceeding
the maximum weight rating set by the
trailer-hitch manufacturer can cause an
accident resulting in death or serious
personal injuries.
Selecting trailer ball
Trailer classTypical trailer ball size
IV2 5/16 in.
II and III2 in.
I1 7/8 in.
A
B
Page 180 of 532
1784-1. Before driving
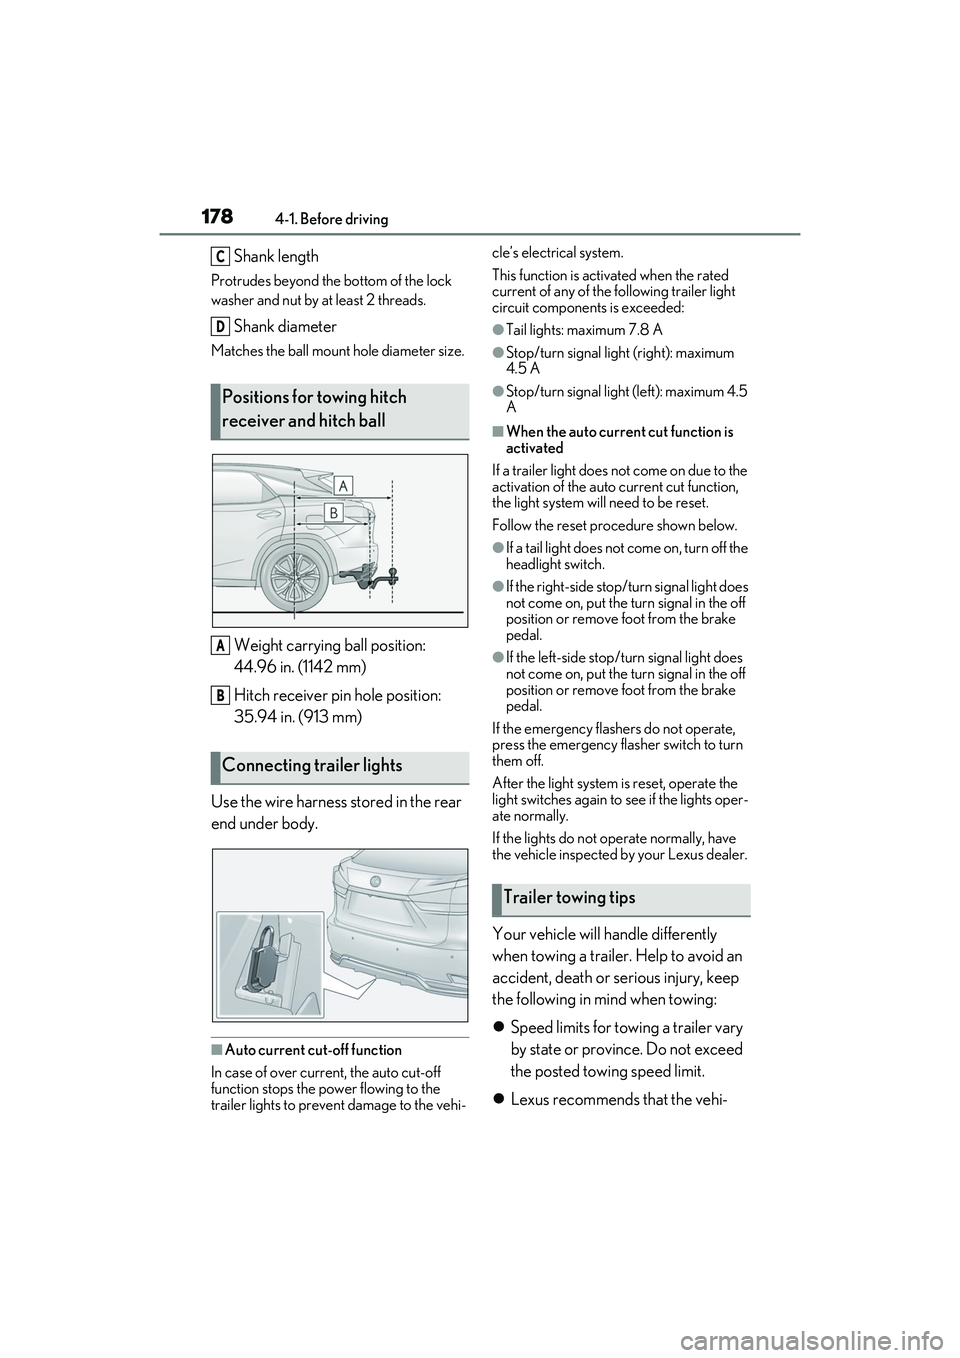
Shank length
Protrudes beyond the bottom of the lock
washer and nut by at least 2 threads.
Shank diameter
Matches the ball mount hole diameter size.
Weight carrying ball position:
44.96 in. (1142 mm)
Hitch receiver pin hole position:
35.94 in. (913 mm)
Use the wire harness stored in the rear
end under body.
■Auto current cut-off function
In case of over current, the auto cut-off
function stops the power flowing to the
trailer lights to prevent damage to the vehi- cle’s electrical system.
This function is activ
ated when the rated
current of any of the following trailer light
circuit components is exceeded:
●Tail lights: maximum 7.8 A
●Stop/turn signal light (right): maximum
4.5 A
●Stop/turn signal light (left): maximum 4.5
A
■When the auto current cut function is
activated
If a trailer light does not come on due to the
activation of the auto current cut function,
the light system will need to be reset.
Follow the reset procedure shown below.
●If a tail light does not come on, turn off the
headlight switch.
●If the right-side stop/turn signal light does
not come on, put the turn signal in the off
position or remove foot from the brake
pedal.
●If the left-side stop/t urn signal light does
not come on, put the turn signal in the off
position or remove foot from the brake
pedal.
If the emergency flashers do not operate,
press the emergency flasher switch to turn
them off.
After the light system is reset, operate the
light switches again to see if the lights oper-
ate normally.
If the lights do not operate normally, have
the vehicle inspected by your Lexus dealer.
Your vehicle will handle differently
when towing a trailer. Help to avoid an
accident, death or se rious injury, keep
the following in mind when towing:
Speed limits for towing a trailer vary
by state or province. Do not exceed
the posted towing speed limit.
Lexus recommends that the vehi-
Positions for towing hitch
receiver and hitch ball
Connecting trailer lights
C
D
A
B
Trailer towing tips
Page 181 of 532

1794-1. Before driving
4
Driving
cle-trailer speed limit is 65 mph
(104 km/h) on a flat, straight, dry
road. Do not exceed this limit, the
posted towing speed limit or the
speed limit for your trailer as set
forth in your trailer owner’s manual,
whichever is lowest. Instability of the
towing vehicle-trailer combination
(trailer sway) increases as speed
increases. Exceeding speed limits
may cause loss of control.
Before starting out, check the trailer
lights, tires and the vehicle-trailer
connections. Recheck after driving
a short distance.
Practice turning, stopping and
reversing with the trailer attached in
an area away from traffic until you
become accustomed to the feel of
the vehicle-trailer combination.
Reversing with a tr ailer attached is
difficult and requires practice. Grip
the bottom of the steering wheel
and move your hand to the left to
move the trailer to the left. Move
your hand to the right to move the
trailer to right. (This is generally
opposite to reversing without a
trailer attached.) Avoid sharp or
prolonged turning. Have someone
guide you when reversing to reduce
the risk of an accident.
As stopping distance is increased
when towing a trailer, vehicle-to
vehicle distance should be
increased. For each 10 mph (16
km/h) of speed, allow at least one
vehicle and trailer length.
Avoid sudden braking as you may skid, resulting in the trailer jackknif-
ing and a loss of vehicle control. This
is especially true on wet or slippery
surfaces.
Avoid jerky starts or sudden accel-
eration.
Avoid jerky steering and sharp
turns, and slow down before making
turn.
Note that when making a turn, the
trailer wheels will be closer than the
vehicle wheels to the inside of the
turn. Compensate by making a
wider than normal turning radius.
Slow down before making a turn, in
cross winds, on wet or slippery sur-
faces, etc. Increasing vehicle speed
can destabilize the trailer.
Take care when passing other vehi-
cles. Passing requires considerable
distance. After pass ing a vehicle, do
not forget the length of your trailer,
and be sure you have plenty of room
before changing lanes.
To maintain engine braking effi-
ciency and charging system perfor-
mance when using engine braking,
do not put the transmission in D.
( P.189)
Instability happens more frequently
when descending steep or long
downhill grades. Before descend-
ing, slow down and downshift. Do
not make sudden downshifts while
descending steep or long downhill
grades.
Avoid holding the brake pedal down
too long or applying the brakes too
Page 186 of 532

1844-2. Driving procedures
1Stop the vehicle completely.
2 Set the parking brake ( P.193),
and shift the shift lever to P.
3 Press the power switch.
4 Release the brake pedal and check
that the display on the meters is off.
■Automatic hybrid system shut off fea-
ture
●The vehicle is equipped with a feature
that automatically shuts off the hybrid sys-
tem when the shift lever is in P with the
hybrid system operating for an extended
period.
●The hybrid system will automatically shut
off after approximately 1 hour if it has
been left running while the shift lever is in
P.
●The timer for the automatic hybrid system
shut off feature will reset if the brake
pedal is depressed or if the shift lever is in
a position other than P.
●After the vehicle is parked, if the door is
locked with the door lock switch ( P.111)
from the inside or the mechanical key
from the outside, the automatic hybrid
system shut off feature will be disabled.
The timer for the automatic hybrid system
shut off feature will be re-enabled if the
driver’s door is opened.
■Locking the door from outside with the
hybrid system operating
1 With the driver’s d oor open, pull the
driver’s door handle and insert the
mechanical key.
2 Turn the mechanical key
counterclockwise.
3 Pull out the mechanical key and close
the door.
WARNING
■Caution while driving
If hybrid system failure occurs while the
vehicle is moving, do not lock or open the
doors until the vehicle reaches a safe and
complete stop. Activati on of the steering
lock in this circumstance may lead to an
accident, resulting in death or serious
injury.
NOTICE
■When starting the hybrid system
If the hybrid system becomes difficult to
start, have your vehicle checked by your
Lexus dealer immediately.
■Symptoms indicating a malfunction
with the power switch
If the power switch seems to be operat-
ing somewhat differently than usual, such
as the switch sticking slightly, there may
be a malfunction. Contact your Lexus
dealer immediately.
Stopping the hybrid system
Page 187 of 532
1854-2. Driving procedures
4
Driving
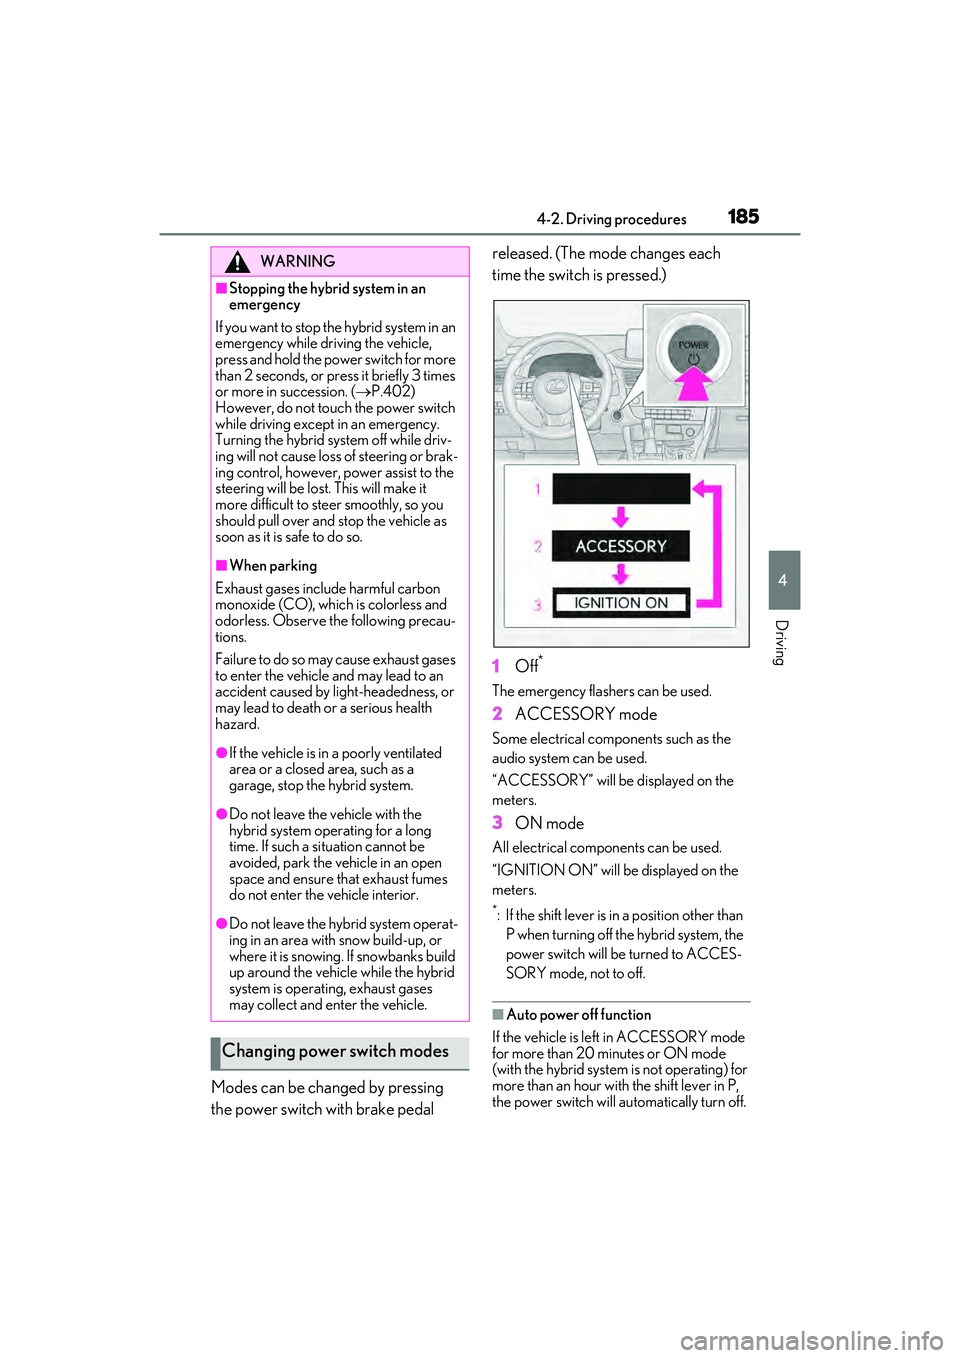
Modes can be changed by pressing
the power switch with brake pedal released. (The mode changes each
time the switch is pressed.)
1
Off
*
The emergency flashers can be used.
2ACCESSORY mode
Some electrical components such as the
audio system can be used.
“ACCESSORY” will be displayed on the
meters.
3ON mode
All electrical components can be used.
“IGNITION ON” will be displayed on the
meters.
*: If the shift lever is in a position other than
P when turning off the hybrid system, the
power switch will be turned to ACCES-
SORY mode, not to off.
■Auto power off function
If the vehicle is left in ACCESSORY mode
for more than 20 minutes or ON mode
(with the hybrid system is not operating) for
more than an hour with the shift lever in P,
the power switch will automatically turn off.
WARNING
■Stopping the hybrid system in an
emergency
If you want to stop the hybrid system in an
emergency while driving the vehicle,
press and hold the power switch for more
than 2 seconds, or press it briefly 3 times
or more in succession. ( P.402)
However, do not touch the power switch
while driving except in an emergency.
Turning the hybrid system off while driv-
ing will not cause loss of steering or brak-
ing control, however, power assist to the
steering will be lost. This will make it
more difficult to st eer smoothly, so you
should pull over and stop the vehicle as
soon as it is safe to do so.
■When parking
Exhaust gases include harmful carbon
monoxide (CO), which is colorless and
odorless. Observe the following precau-
tions.
Failure to do so may cause exhaust gases
to enter the vehicle and may lead to an
accident caused by light-headedness, or
may lead to death or a serious health
hazard.
●If the vehicle is in a poorly ventilated
area or a closed area, such as a
garage, stop the hybrid system.
●Do not leave the vehicle with the
hybrid system operating for a long
time. If such a situation cannot be
avoided, park the vehicle in an open
space and ensure that exhaust fumes
do not enter the vehicle interior.
●Do not leave the hybrid system operat-
ing in an area with snow build-up, or
where it is snowing. If snowbanks build
up around the vehicle while the hybrid
system is operating, exhaust gases
may collect and enter the vehicle.
Changing power switch modes
Page 194 of 532
1924-2. Driving procedures
ically set to S4 or S5 according to the vehi-
cle speed.
■Shift ranges and their functions
You can choose from 6 levels of
accelerating force and engine brak-
ing force.
A lower shift range will provide
greater accelerating force and
engine braking force than a higher
shift range, and the engine revolu-
tions will also increase.
If you accelerate while in ranges 1 to
4, the shift range may automatically
increase in accordance with the
vehicle speed.
■S mode
●When the shift range is S4 or lower, hold-
ing the shift lever towa rd “+” sets the shift
range to S6.
●Automatically selects a higher shift range
before the engine speed becomes too
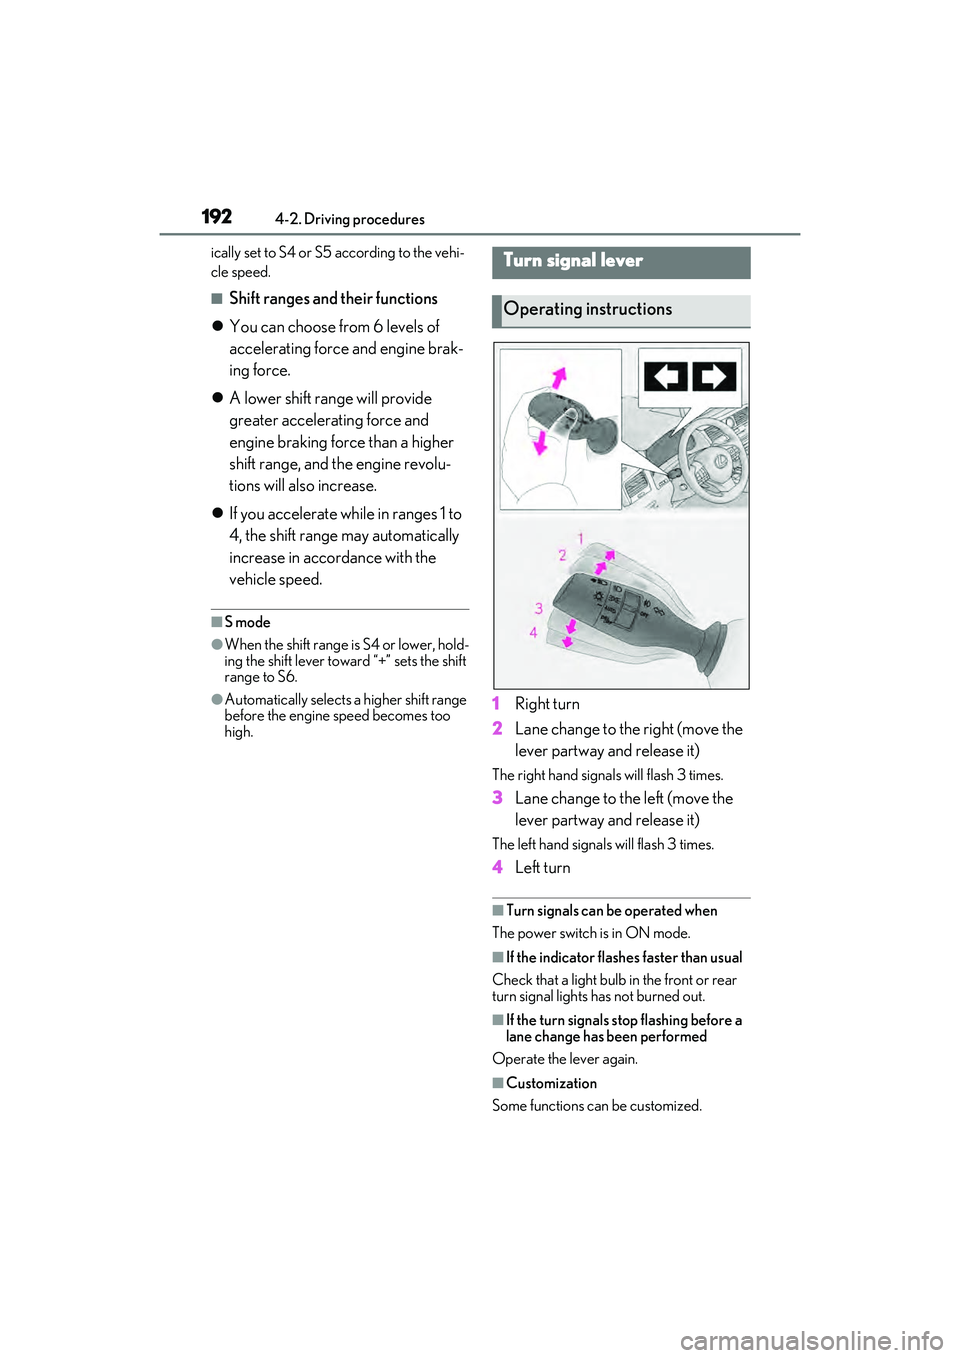
high.1 Right turn
2 Lane change to the right (move the
lever partway and release it)
The right hand signals will flash 3 times.
3Lane change to the left (move the
lever partway and release it)
The left hand signals will flash 3 times.
4Left turn
■Turn signals can be operated when
The power switch is in ON mode.
■If the indicator flashes faster than usual
Check that a light bulb in the front or rear
turn signal lights has not burned out.
■If the turn signals stop flashing before a
lane change has been performed
Operate the lever again.
■Customization
Some functions can be customized.
Turn signal lever
Operating instructions
Page 195 of 532
1934-2. Driving procedures
4
Driving
( P.472)
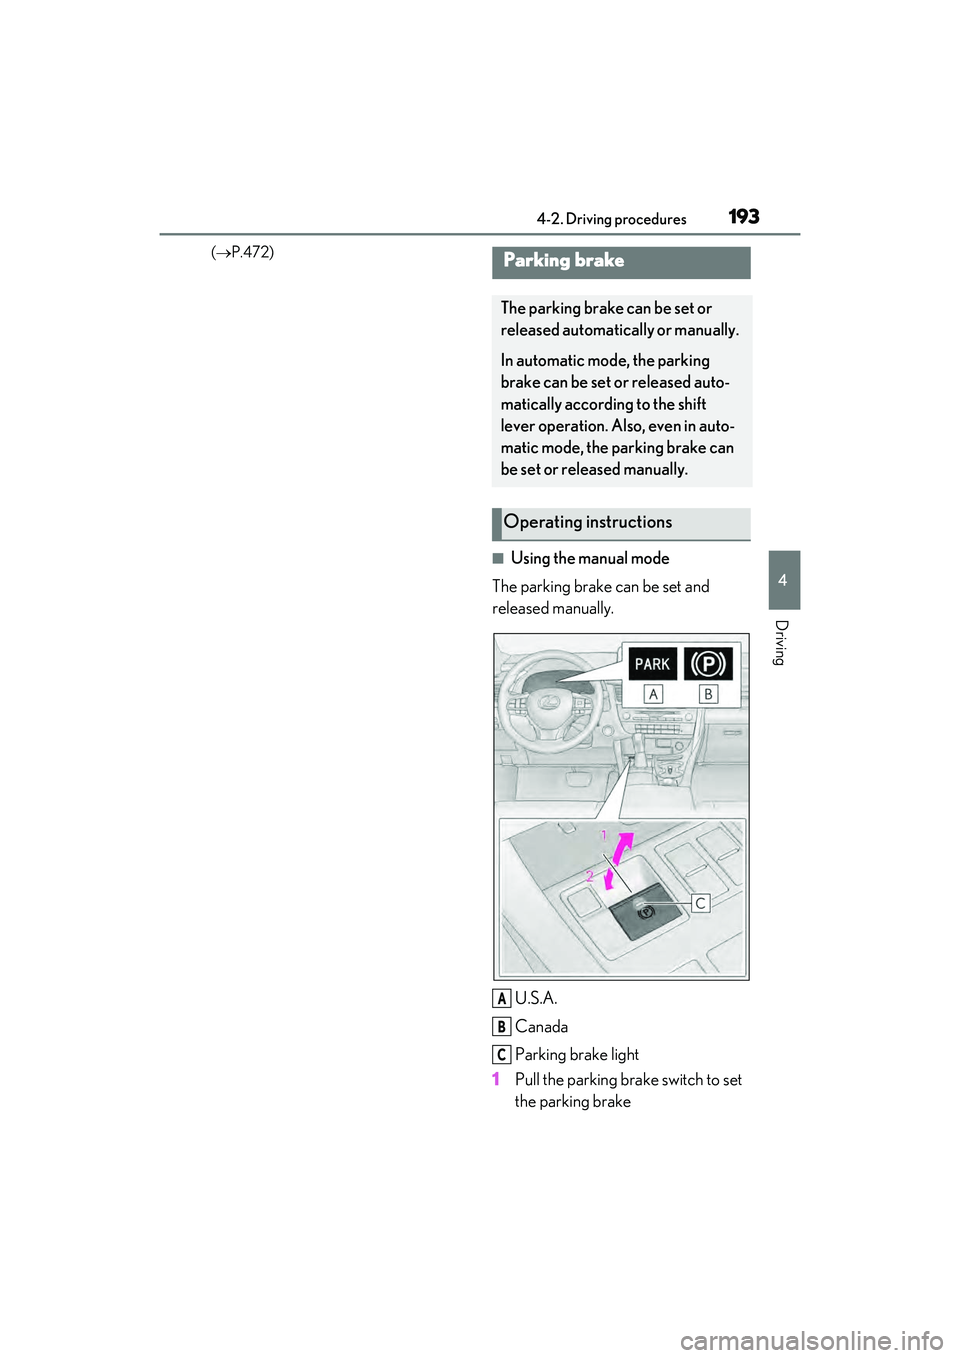
■Using the manual mode
The parking brake can be set and
released manually.
U.S.A.
Canada
Parking brake light
1 Pull the parking brake switch to set
the parking brake
Parking brake
The parking brake can be set or
released automatically or manually.
In automatic mode, the parking
brake can be set or released auto-
matically according to the shift
lever operation. Also, even in auto-
matic mode, the parking brake can
be set or released manually.
Operating instructions
A
B
C
Page 196 of 532
1944-2. Driving procedures
The parking brake indicator light and park-
ing brake light will turn on.
Pull and hold the parking brake switch if an
emergency occurs and it is necessary to
operate the parking brake while driving.
2 Push the parking brake switch to
release the parking brake
Operate the switch while depressing the
brake pedal or slowly depressing the
accelerator pedal.
Make sure that the parking brake indicator
light and parking brake light turn off.
If the parking brake indicator light and
parking brake light flashes, operate the
switch again. ( P.416)
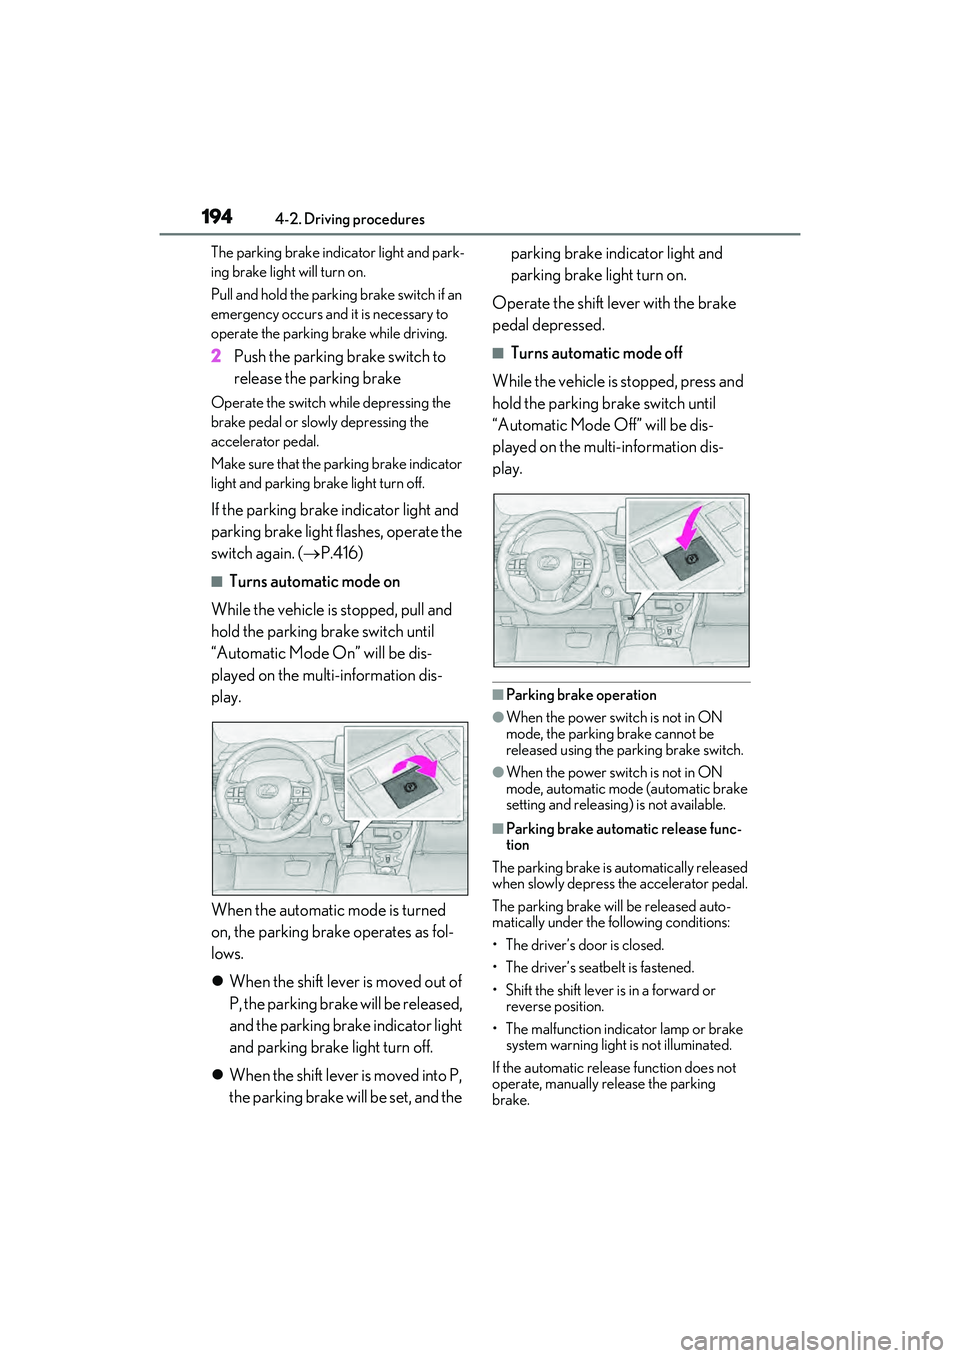
■Turns automatic mode on
While the vehicle is stopped, pull and
hold the parking brake switch until
“Automatic Mode On” will be dis-
played on the multi-information dis-
play.
When the automatic mode is turned
on, the parking brake operates as fol-
lows.
When the shift lever is moved out of
P, the parking brake will be released,
and the parking brake indicator light
and parking brake light turn off.
When the shift lever is moved into P,
the parking brake will be set, and the parking brake indicator light and
parking brake light turn on.
Operate the shift lever with the brake
pedal depressed.
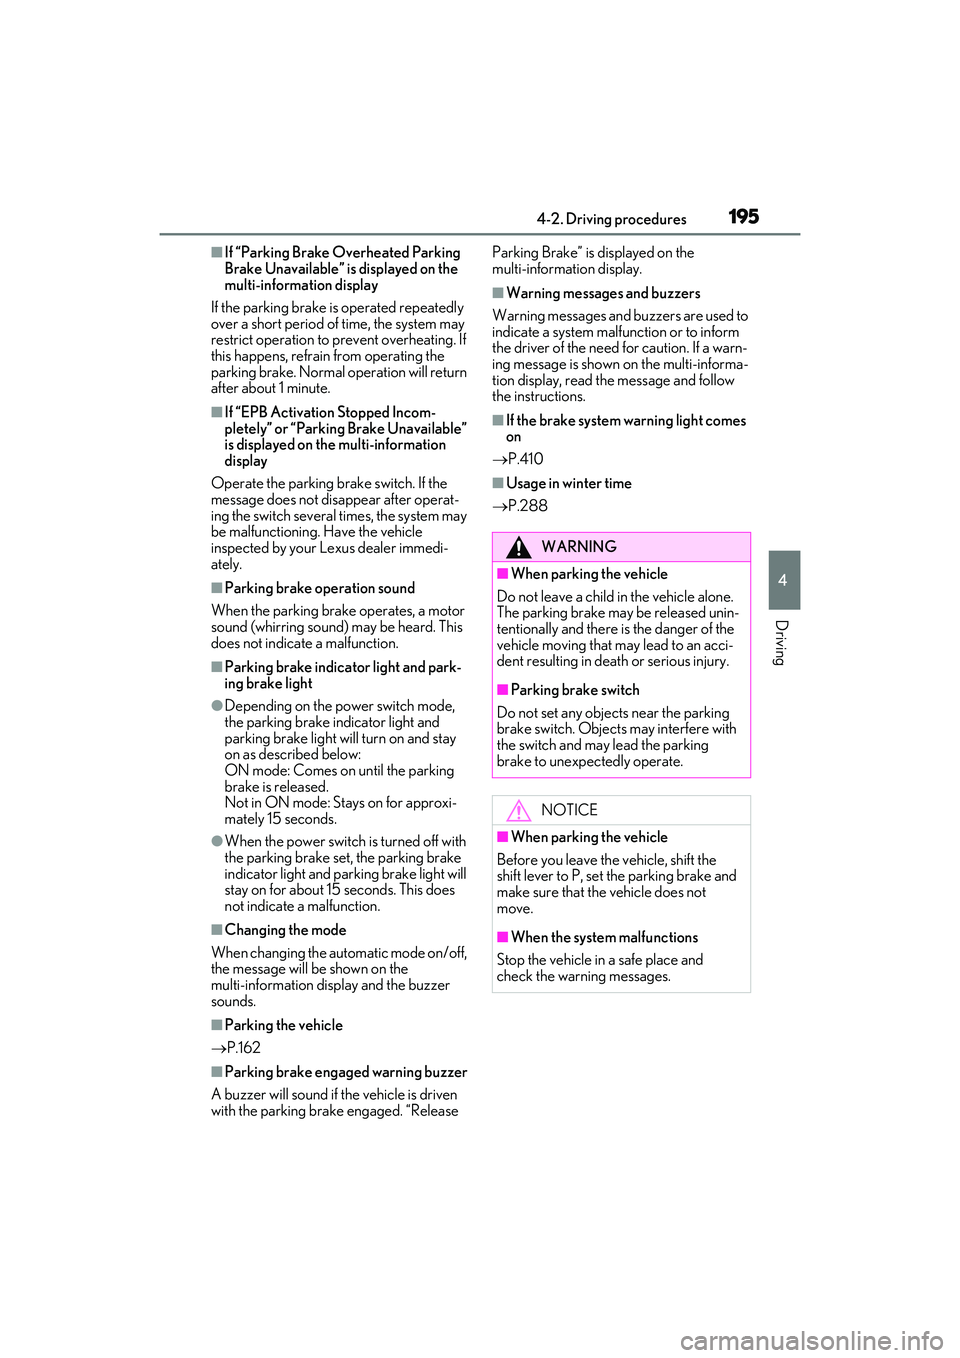
■Turns automatic mode off
While the vehicle is stopped, press and
hold the parking brake switch until
“Automatic Mode Off” will be dis-
played on the multi-information dis-
play.
■Parking brake operation
●When the power switch is not in ON
mode, the parking brake cannot be
released using the parking brake switch.
●When the power switch is not in ON
mode, automatic mode (automatic brake
setting and releasing) is not available.
■Parking brake automatic release func-
tion
The parking brake is automatically released
when slowly depress the accelerator pedal.
The parking brake will be released auto-
matically under the following conditions:
• The driver’s door is closed.
• The driver’s seat belt is fastened.
• Shift the shift lever is in a forward or reverse position.
• The malfunction indicator lamp or brake system warning light is not illuminated.
If the automatic release function does not
operate, manually release the parking
brake.
Page 197 of 532
1954-2. Driving procedures
4
Driving
■If “Parking Brake Overheated Parking
Brake Unavailable” is displayed on the
multi-information display
If the parking brake is operated repeatedly
over a short period of time, the system may
restrict operation to pr event overheating. If
this happens, refrain from operating the
parking brake. Normal operation will return
after about 1 minute.
■If “EPB Activation Stopped Incom-
pletely” or “Parking Brake Unavailable”
is displayed on th e multi-information
display
Operate the parking brake switch. If the
message does not disappear after operat-
ing the switch several times, the system may
be malfunctioning. Have the vehicle
inspected by your Lexus dealer immedi-
ately.
■Parking brake operation sound
When the parking brake operates, a motor
sound (whirring sound) may be heard. This
does not indicate a malfunction.
■Parking brake indicator light and park-
ing brake light
●Depending on the power switch mode,
the parking brake indicator light and
parking brake light will turn on and stay
on as described below:
ON mode: Comes on until the parking
brake is released.
Not in ON mode: Stays on for approxi-
mately 15 seconds.
●When the power switch is turned off with
the parking brake set, the parking brake
indicator light and parking brake light will
stay on for about 15 seconds. This does
not indicate a malfunction.
■Changing the mode
When changing the automatic mode on/off,
the message will be shown on the
multi-information display and the buzzer
sounds.
■Parking the vehicle
P.162
■Parking brake engaged warning buzzer
A buzzer will sound if the vehicle is driven
with the parking brake engaged. “Release Parking Brake” is displayed on the
multi-information display.
■Warning messages and buzzers
Warning messages and buzzers are used to
indicate a system malfunction or to inform
the driver of the need for caution. If a warn-
ing message is shown on the multi-informa-
tion display, read the message and follow
the instructions.
■If the brake system warning light comes
on
P.410
■Usage in winter time
P.288
WARNING
■When parking the vehicle
Do not leave a child in the vehicle alone.
The parking brake may be released unin-
tentionally and there is the danger of the
vehicle moving that may lead to an acci-
dent resulting in death or serious injury.
■Parking brake switch
Do not set any objects near the parking
brake switch. Objects may interfere with
the switch and may lead the parking
brake to unexpectedly operate.
NOTICE
■When parking the vehicle
Before you leave the vehicle, shift the
shift lever to P, set the parking brake and
make sure that the vehicle does not
move.
■When the system malfunctions
Stop the vehicle in a safe place and
check the warning messages.