check engine LEXUS SC400 1991 Service Repair Manual
[x] Cancel search | Manufacturer: LEXUS, Model Year: 1991, Model line: SC400, Model: LEXUS SC400 1991Pages: 4087, PDF Size: 75.75 MB
Page 2305 of 4087
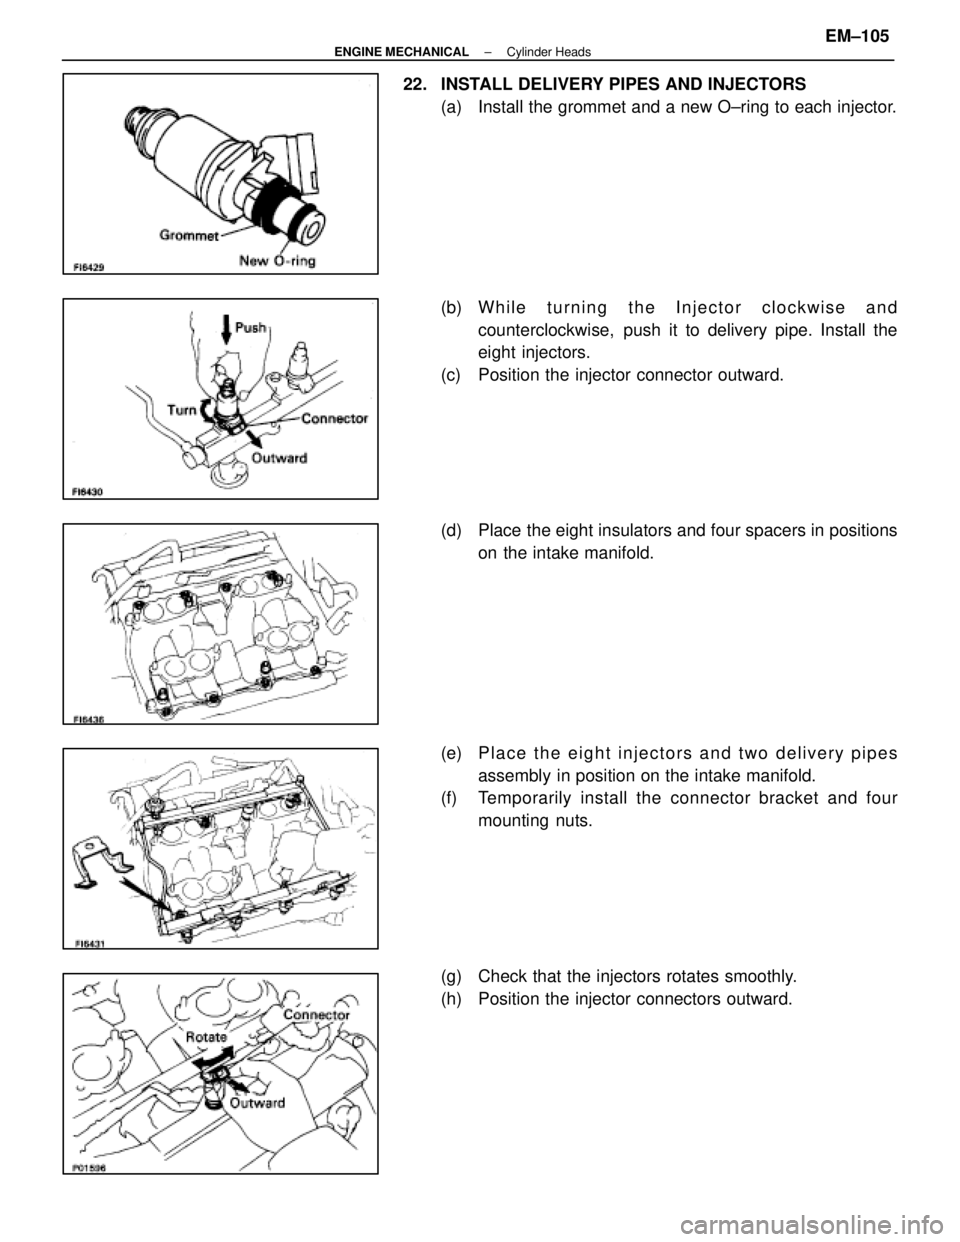
22. INSTALL DELIVERY PIPES AND INJECTORS(a) Install the grommet and a new O±ring to each injector.
(b) W h i l e t u r n i n g t h e I n j e c t o r c l o c k w i s e a n dcounterclockwise, push it to delivery pipe. Install the
eight injectors.
(c) Position the injector connector outward.
(d) Place the eight insulators and four spacers in positions on the intake manifold.
(e) P l a c e t h e e i g h t i n j e c t o r s a n d t w o d e l i v e r y p i p e s assembly in position on the intake manifold.
(f) Temporarily install the c onnector bracket and four
mounting nuts.
(g) Check that the injectors rotates smoothly.
(h) Position the injector connectors outward.
±
ENGINE MECHANICAL Cylinder HeadsEM±105
WhereEverybodyKnowsYourName
Page 2308 of 4087
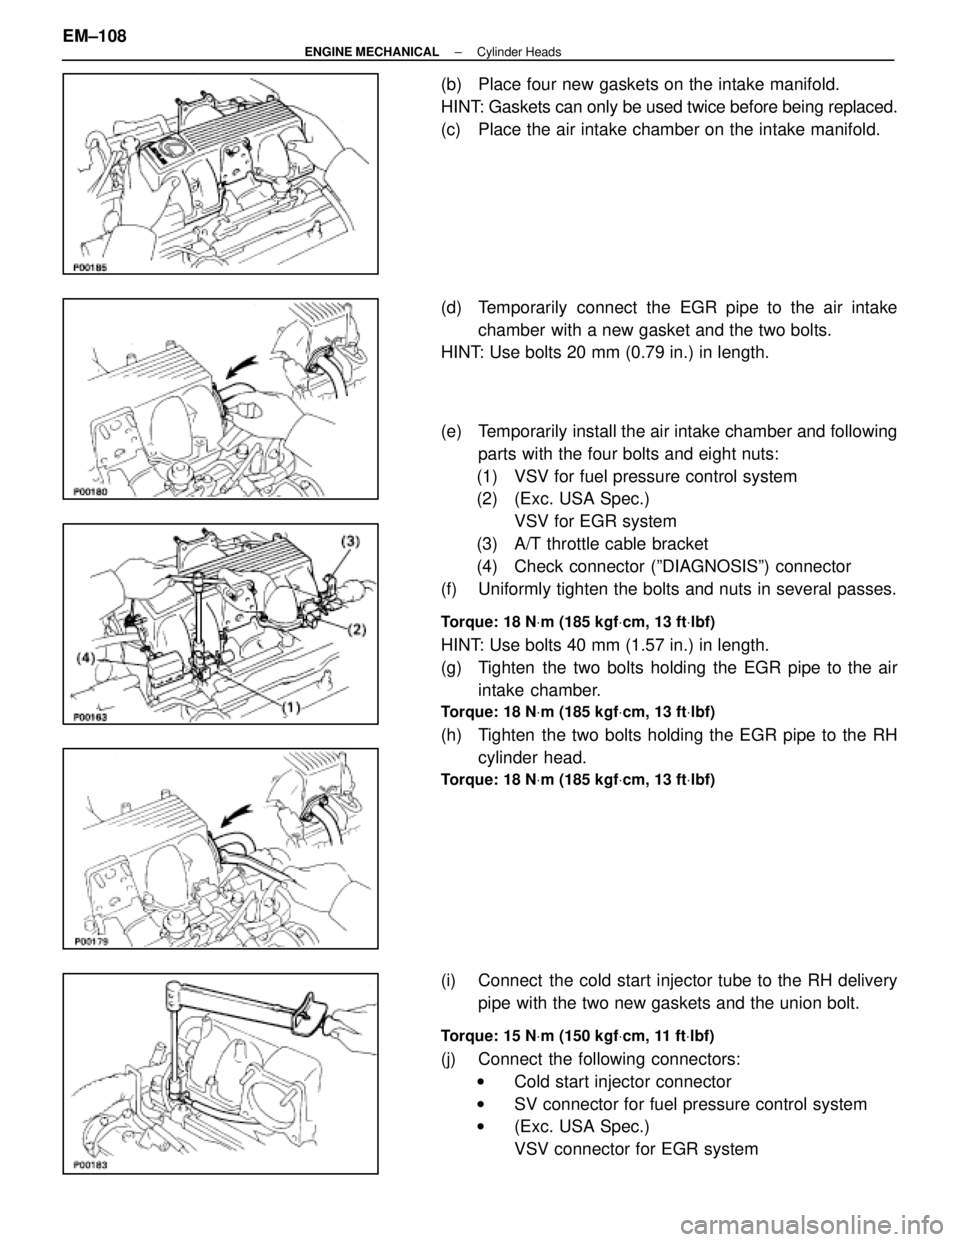
(b) Place four new gaskets on the intake manifold.
HINT: Gaskets can only be used twice before being replaced.
(c) Place the air intake chamber on the intake manifold.
(d) Temporarily connect the EGR pipe to the air intakechamber with a new gasket and the two bolts.
HINT: Use bolts 20 mm (0.79 in.) in length.
(e) Temporarily install the air intake chamber and following
parts with the four bolts and eight nuts:
(1) VSV for fuel pressure control system
(2) (Exc. USA Spec.) VSV for EGR system
(3) A/T throttle cable bracket
(4) Check connector (ºDIAGNOSISº) connector
(f) Uniformly tighten the bolts and nuts in several passes.
Torque: 18 N Vm (185 kgf Vcm, 13 ft Vlbf)
HINT: Use bolts 40 mm (1.57 in.) in length.
(g) Tighten the two bolts holding the EGR pipe to the air
intake chamber.
Torque: 18 N Vm (185 kgf Vcm, 13 ft Vlbf)
(h) Tighten the two bolts holding the EGR pipe to the RH
cylinder head.
Torque: 18 N Vm (185 kgf Vcm, 13 ft Vlbf)
(i) Connect the cold start injector tube to the RH delivery
pipe with the two new gaskets and the union bolt.
Torque: 15 N Vm (150 kgf Vcm, 11 ft Vlbf)
(j) Connect the following connectors:
w Cold start injector connector
w SV connector for fuel pressure control system
w (Exc. USA Spec.)
VSV connector for EGR system
EM±108
±
ENGINE MECHANICAL Cylinder Heads
WhereEverybodyKnowsYourName
Page 2315 of 4087
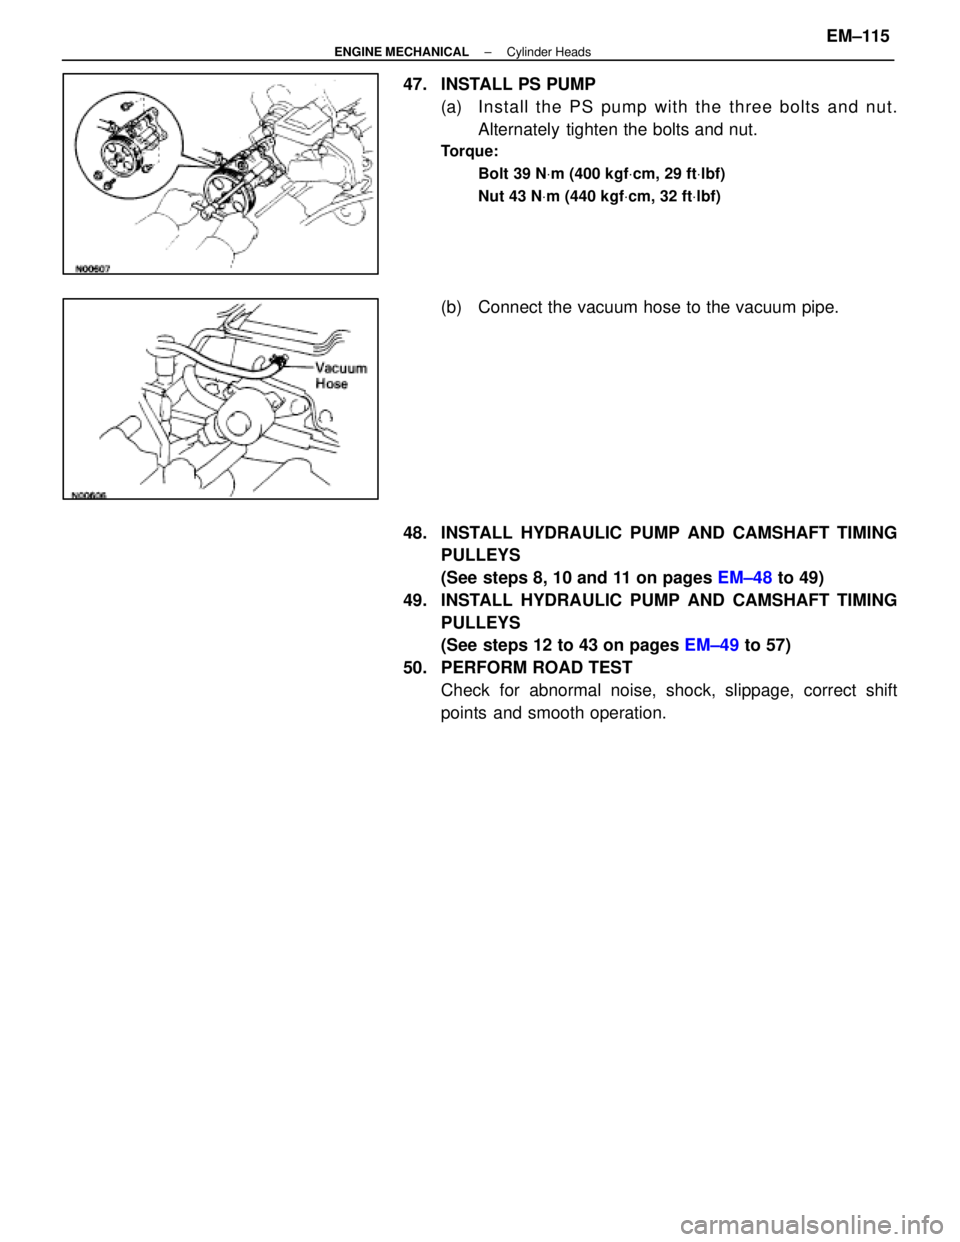
47. INSTALL PS PUMP(a) In sta ll th e PS pu mp with th e th re e bo lts an d nu t.Alternately tighten the bolts and nut.
Torque:
Bolt 39 N Vm (400 kgf Vcm, 29 ft Vlbf)
Nut 43 N Vm (440 kgf Vcm, 32 ft Vlbf)
(b) Connect the vacuum hose to the vacuum pipe.
48. INSTALL HYDRAULIC PUMP AND CAMSHAFT TIMING PULLEYS
(See steps 8, 10 and 11 on pages EM±48 to 49)
49. INSTALL HYDRAULIC PUMP AND CAMSHAFT TIMING PULLEYS
(See steps 12 to 43 on pages EM±49 to 57)
50. PERFORM ROAD TEST Check for abnormal noise, shock, slippage, correct shift
points and smooth operation.
±
ENGINE MECHANICAL Cylinder HeadsEM±115
WhereEverybodyKnowsYourName
Page 2335 of 4087
DISASSEMBLY OF CYLINDER BLOCK
(See Components on page EM±131)
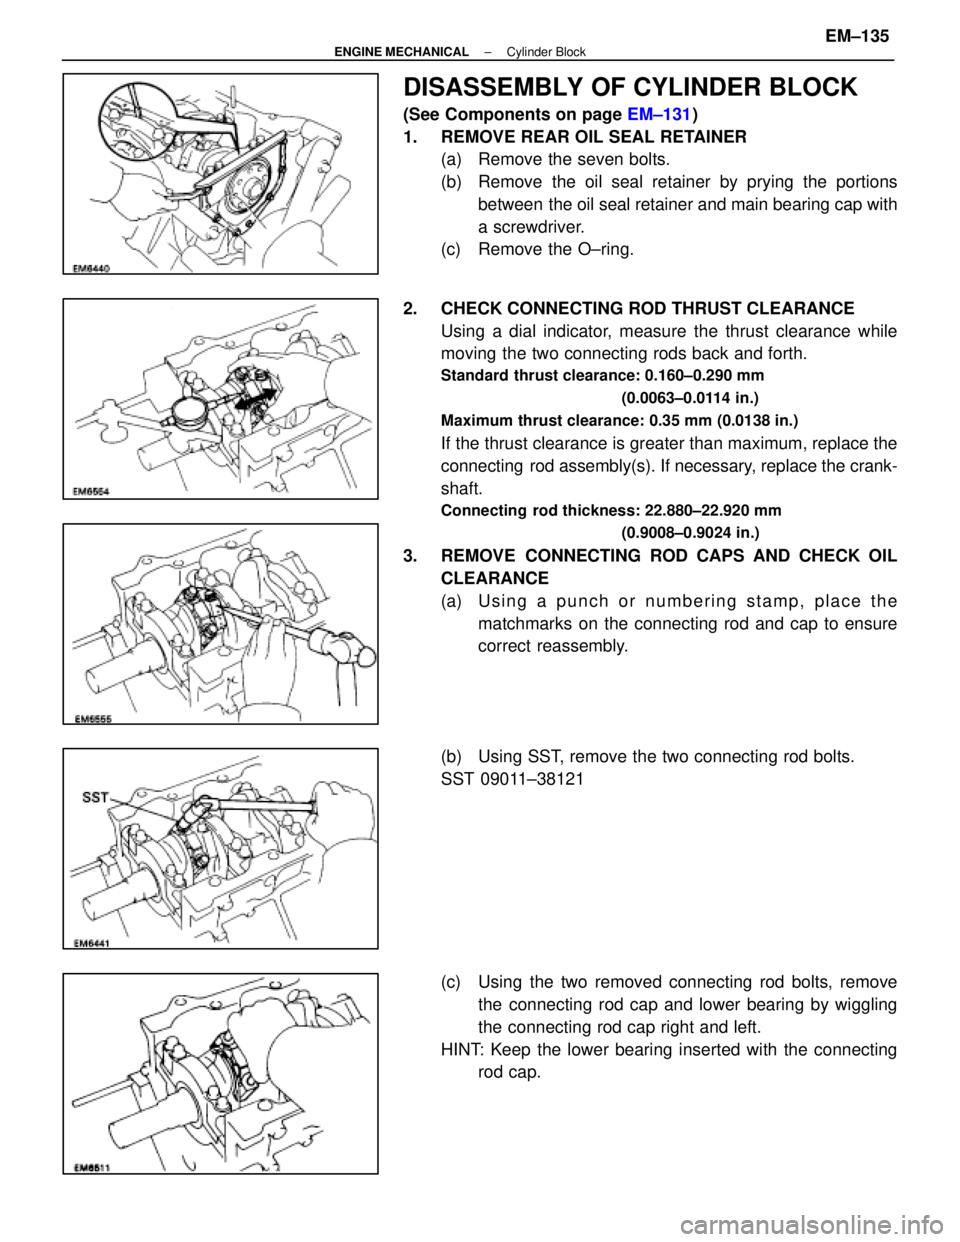
1. REMOVE REAR OIL SEAL RETAINER (a) Remove the seven bolts.
(b) Remove the oil seal retainer by prying the portions
between the oil seal retainer and main bearing cap with
a screwdriver.
(c) Remove the O±ring.
2. CHECK CONNECTING ROD THRUST CLEARANCE Using a dial indicator, measure the thrust clearance while
moving the two connecting rods back and forth.
Standard thrust clearance: 0.160±0.290 mm
(0.0063±0.0114 in.)
Maximum thrust clearance: 0.35 mm (0.0138 in.)
If the thrust clearance is greater than maximum, replace the
connecting rod assembly(s). If necessary, replace the crank-
shaft.
Connecting rod thickness: 22.880±22.920 mm (0.9008±0.9024 in.)
3. REMOVE CONNECTING ROD CAPS AND CHECK OILCLEARANCE
(a) Using a punch or numbering stamp, place thematchmarks on the connecting rod and cap to ensure
correct reassembly.
(b) Using SST, remove the two connecting rod bolts.
SST 09011±38121
(c) Using the two removed connecting rod bolts, remove the connecting rod cap and lower bearing by wiggling
the connecting rod cap right and left.
HINT: Keep the lower bearing inserted with the connecting rod cap.
±
ENGINE MECHANICAL Cylinder BlockEM±135
WhereEverybodyKnowsYourName
Page 2338 of 4087
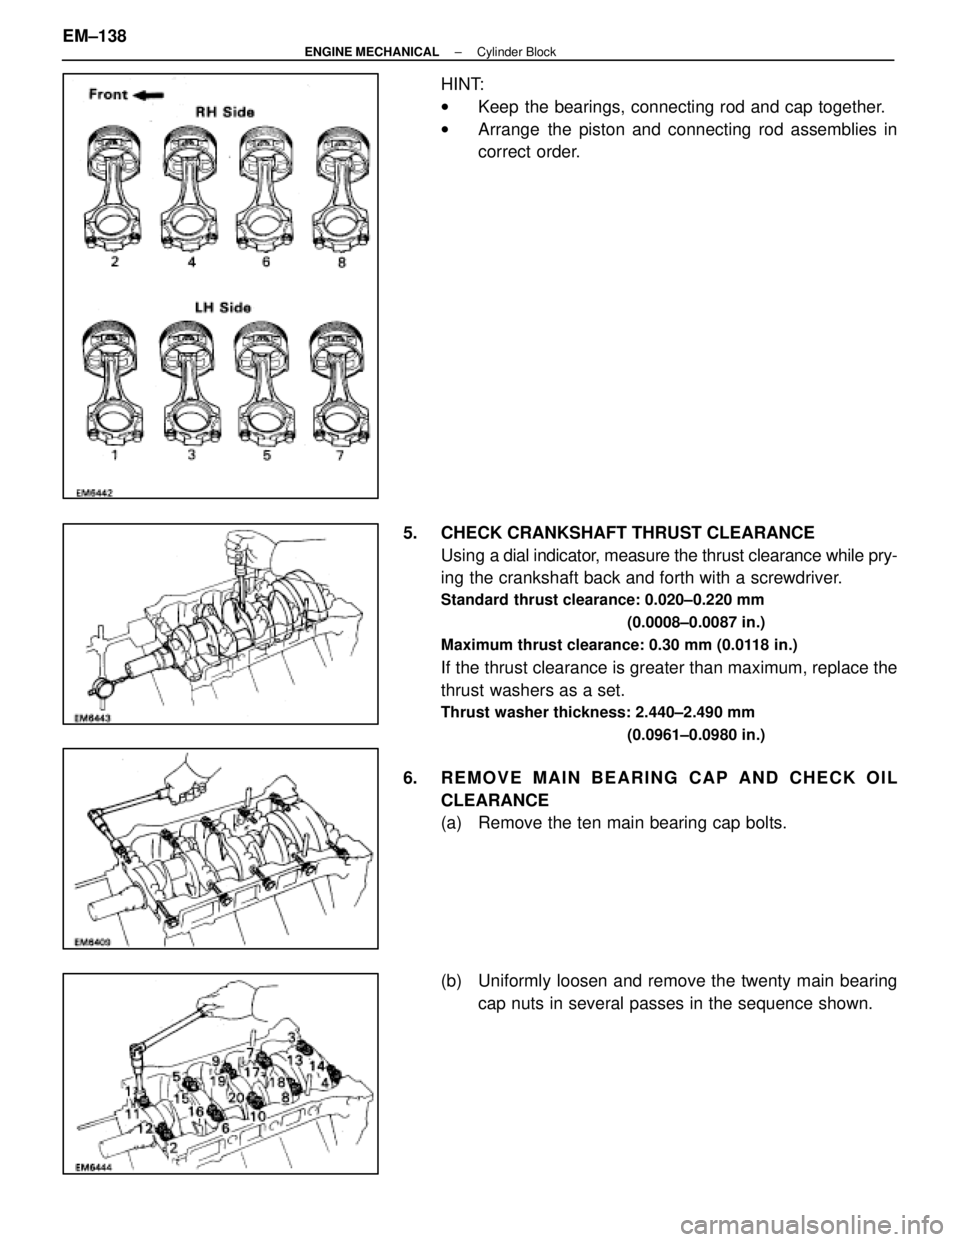
HINT:
wKeep the bearings, connecting rod and cap together.
w Arrange the piston and connecting rod assemblies in
correct order.
5. CHECK CRANKSHAFT THRUST CLEARANCE Using a dial indi cator, measure the thrust clearance while pry-
ing the crankshaft back and forth with a screwdriver.
Standard thrust clearance: 0.020±0.220 mm
(0.0008±0.0087 in.)
Maximum thrust clearance: 0.30 mm (0.0118 in.)
If the thrust clearance is greater than maximum, replace the
thrust washers as a set.
Thrust washer thickness: 2.440±2.490 mm (0.0961±0.0980 in.)
6. REMOVE MAIN BEARING CAP AND CHECK OILCLEARANCE
(a) Remove the ten main bearing cap bolts.
(b) Uniformly loosen and remove the twenty main bearingcap nuts in several passes in the sequence shown.
EM±138
±
ENGINE MECHANICAL Cylinder Block
WhereEverybodyKnowsYourName
Page 2339 of 4087
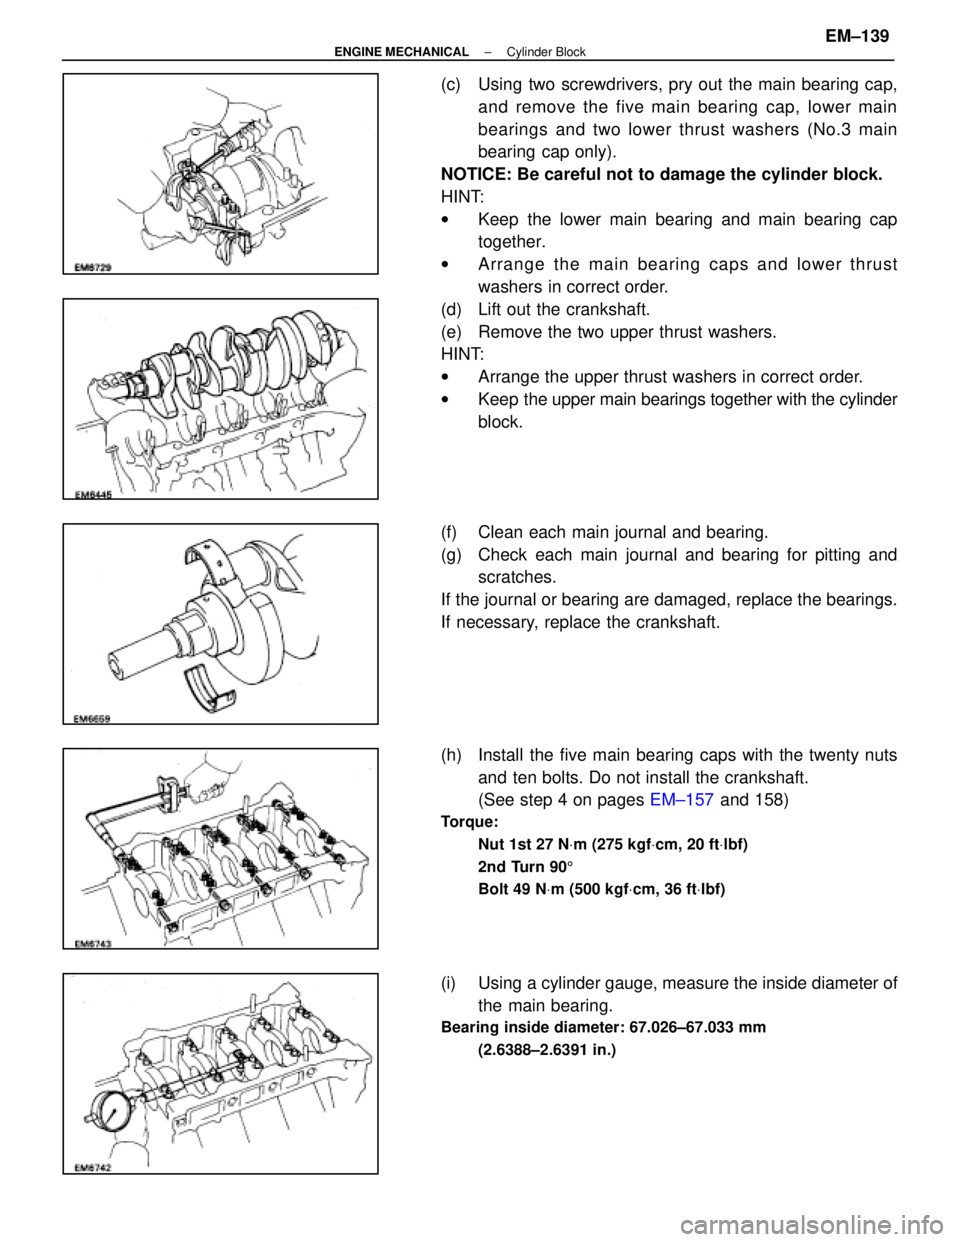
(c) Using two screwdrivers, pry out the main bearing cap,and remove the five main bearing cap, lower main
bearings and two lower thrust washers (No.3 main
bearing cap only).
NOTICE: Be careful not to damage the cylinder block.
HINT:
w Keep the lower main bearing and main bearing cap
together.
w Arrange the main bearing caps and lower thrust
washers in correct order.
(d) Lift out the crankshaft.
(e) Remove the two upper thrust washers.
HINT:
w Arrange the upper thrust washers in correct order.
w Keep the upper main bearings together with the cylinder
block.
(f) Clean each main journal and bearing.
(g) Check each main journal and bearing for pitting and scratches.
If the journal or bearing are damaged, replace the bearings.
If necessary, replace the crankshaft.
(h) Install the five main bearing caps with the twenty nuts and ten bolts. Do not install the crankshaft.
(See step 4 on pages EM±157 and 158)
Torque:
Nut 1st 27 N Vm (275 kgf Vcm, 20 ft Vlbf)
2nd Turn 90 5
Bolt 49 N Vm (500 kgf Vcm, 36 ft Vlbf)
(i) Using a cylinder gauge, measure the inside diameter of
the main bearing.
Bearing inside diameter: 67.026±67.033 mm
(2.6388±2.6391 in.)
±
ENGINE MECHANICAL Cylinder BlockEM±139
WhereEverybodyKnowsYourName
Page 2343 of 4087
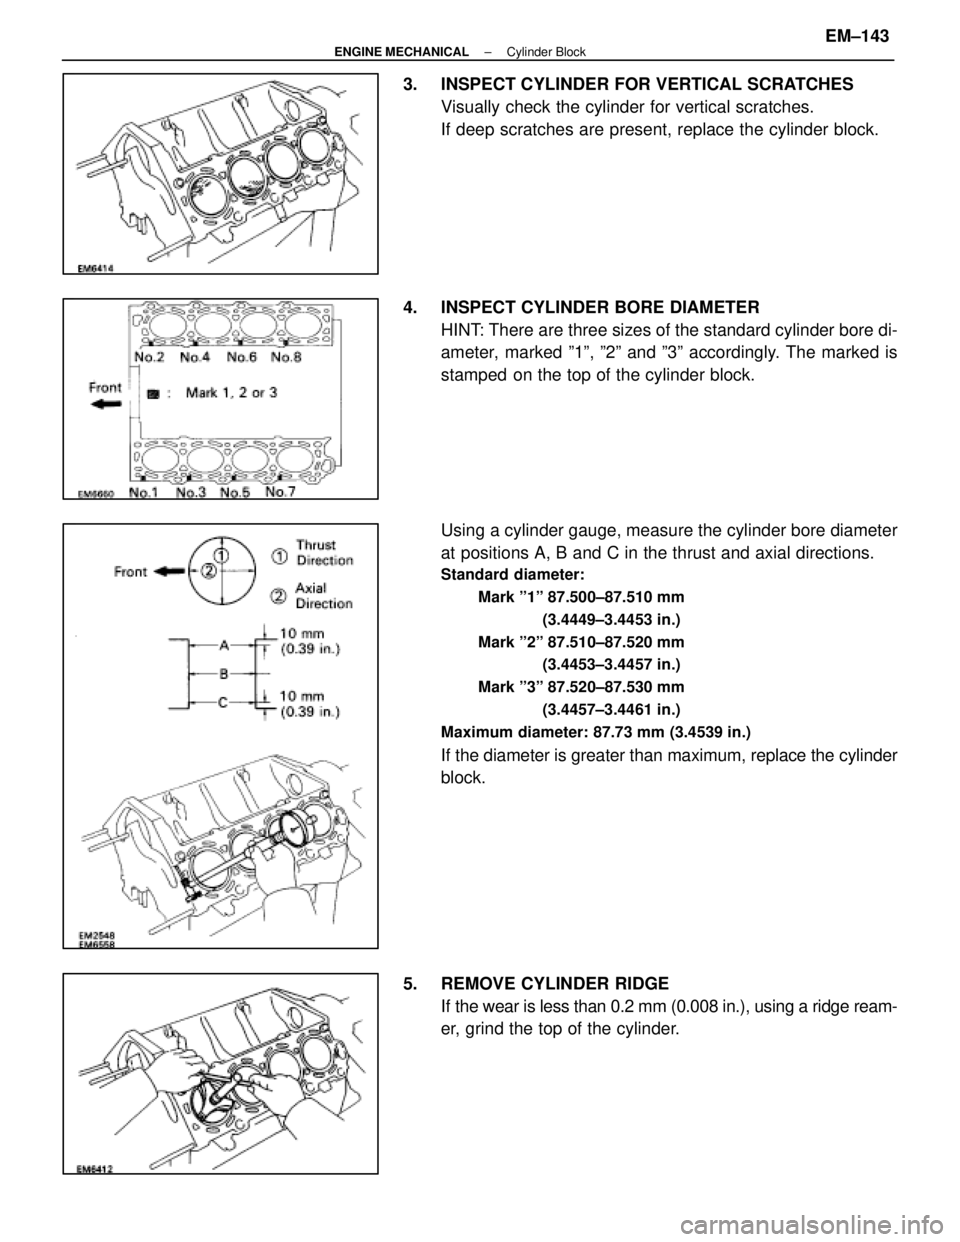
3. INSPECT CYLINDER FOR VERTICAL SCRATCHESVisually check the cylinder for vertical scratches.
If deep scratches are present, replace the cylinder block.
4. INSPECT CYLINDER BORE DIAMETER HINT: There are three sizes of the standard cylinder bore di-
ameter, marked º1º, º2º and º3º accordingly. The marked is
stamped on the top of the cylinder block.
Using a cylinder gauge, measure the cylinder bore diameter
at positions A, B and C in the thrust and axial directions.
Standard diameter:
Mark º1º 87.500±87.510 mm (3.4449±3.4453 in.)
Mark º2º 87.510±87.520 mm (3.4453±3.4457 in.)
Mark º3º 87.520±87.530 mm (3.4457±3.4461 in.)
Maximum diameter: 87.73 mm (3.4539 in.)
If the diameter is greater than maximum, replace the cylinder
block.
5. REMOVE CYLINDER RIDGE If the wear is less than 0.2 mm (0.008 in.), using a ridge ream-
er, grind the top of the cylinder.
±
ENGINE MECHANICAL Cylinder BlockEM±143
WhereEverybodyKnowsYourName
Page 2344 of 4087
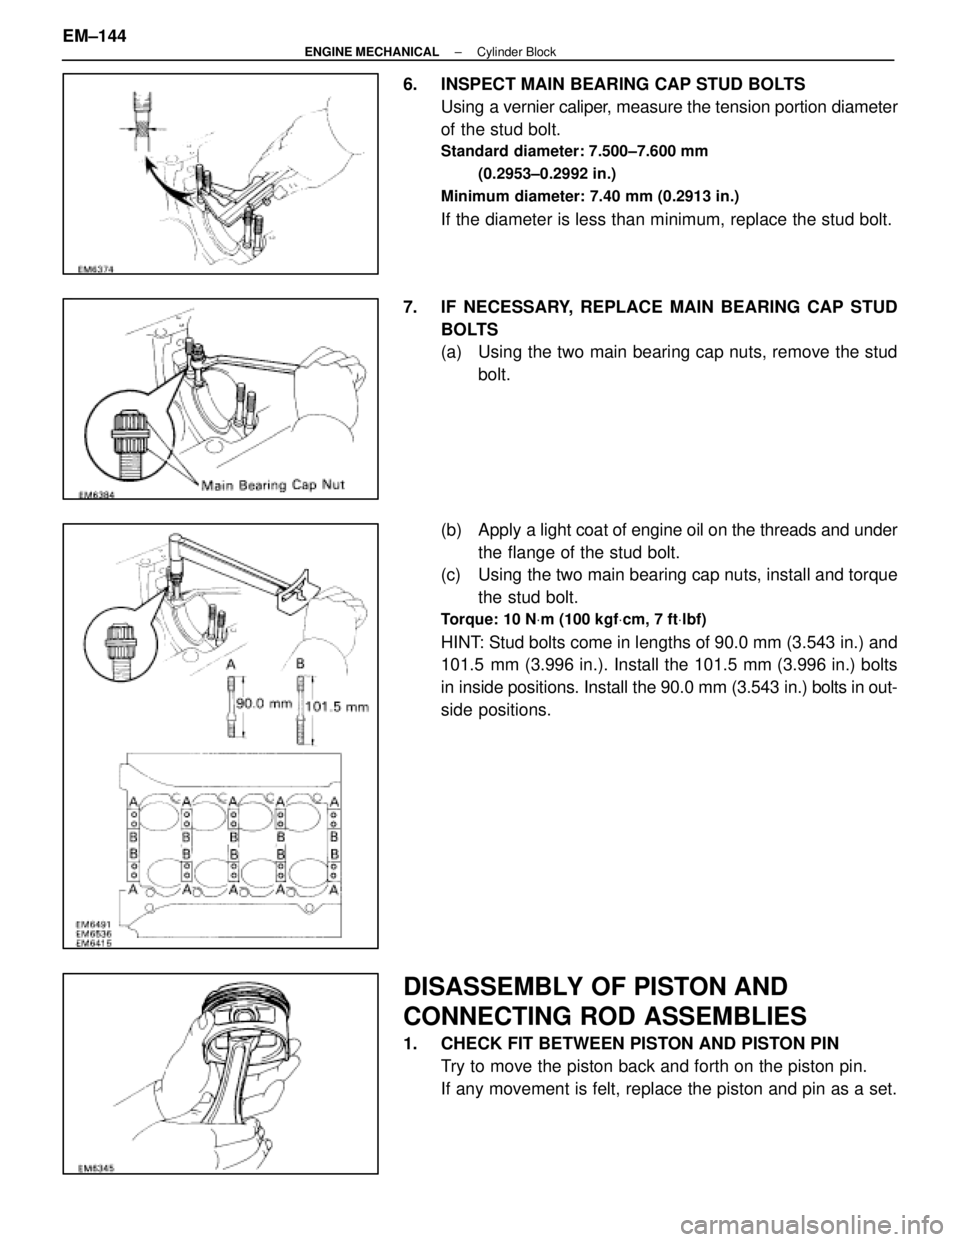
6. INSPECT MAIN BEARING CAP STUD BOLTSUsing a vernier caliper, measure the tension portion diameter
of the stud bolt.
Standard diameter: 7.500±7.600 mm
(0.2953±0.2992 in.)
Minimum diameter: 7.40 mm (0.2913 in.)
If the diameter is less than minimum, replace the stud bolt.
7. IF NECESSARY, REPLACE MAIN BEARING CAP STUD BOLTS
(a) Using the two main bearing cap nuts, remove the studbolt.
(b) Apply a light coat of engine oil on the threads and under
the flange of the stud bolt.
(c) Using the two main bearing cap nuts, install and torque
the stud bolt.
Torque: 10 N Vm (100 kgf Vcm, 7 ft Vlbf)
HINT: Stud bolts come in lengths of 90.0 mm (3.543 in.) and
101.5 mm (3.996 in.). Install the 101.5 mm (3.996 in.) bolts
in inside positions. Install the 90.0 mm (3.543 in.) bolts in out-
side positions.
DISASSEMBLY OF PISTON AND
CONNECTING ROD ASSEMBLIES
1. CHECK FIT BETWEEN PISTON AND PISTON PIN
Try to move the piston back and forth on the piston pin.
If any movement is felt, replace the piston and pin as a set.
EM±144
±
ENGINE MECHANICAL Cylinder Block
WhereEverybodyKnowsYourName
Page 2349 of 4087
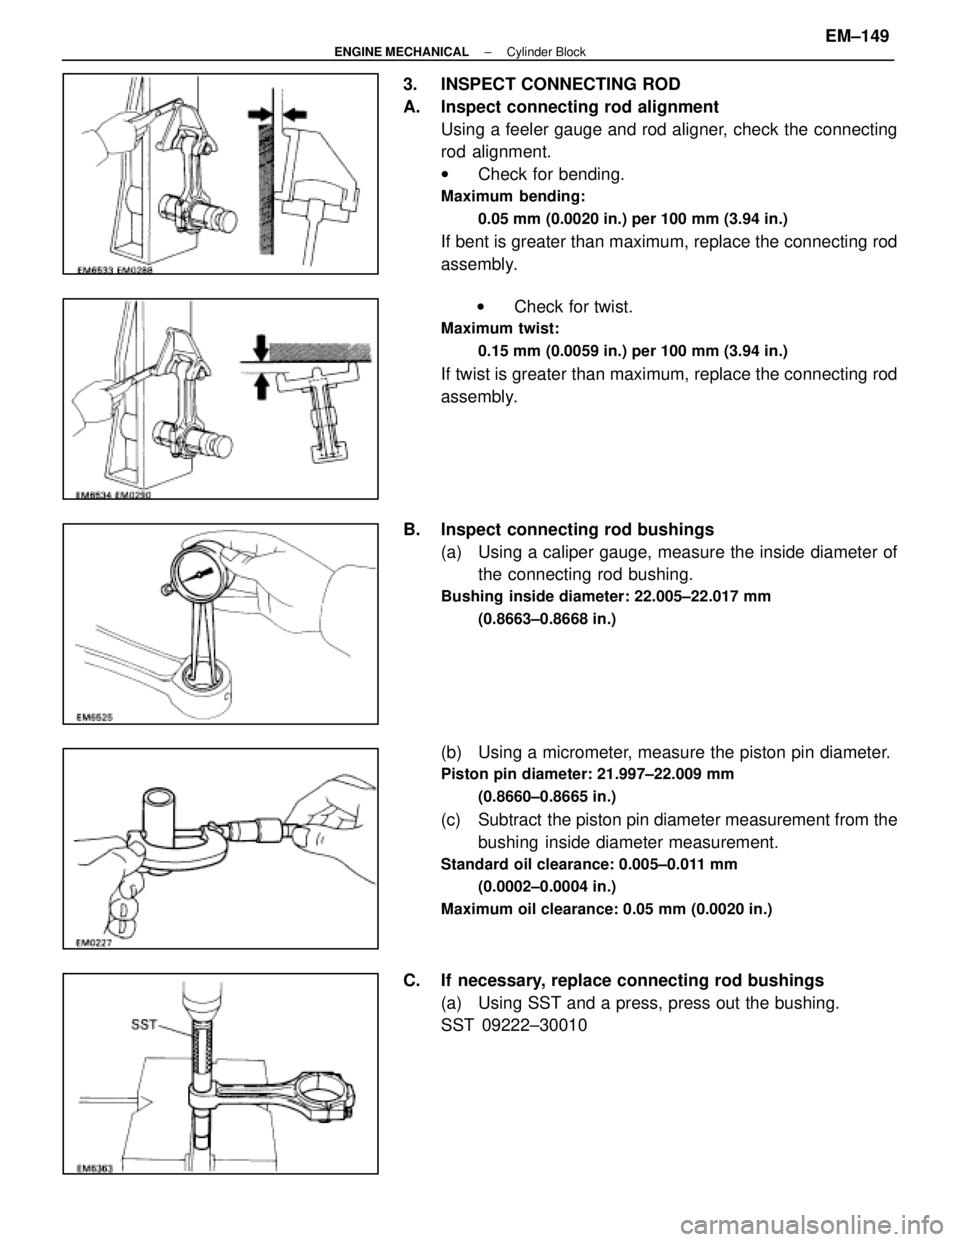
3. INSPECT CONNECTING ROD
A. Inspect connecting rod alignmentUsing a feeler gauge and rod aligner, check the connecting
rod alignment.
wCheck for bending.
Maximum bending:
0.05 mm (0.0020 in.) per 100 mm (3.94 in.)
If bent is greater than maximum, replace the connecting rod
assembly.
w Check for twist.
Maximum twist:
0.15 mm (0.0059 in.) per 100 mm (3.94 in.)
If twist is greater than maximum, replace the connecting rod
assembly.
B. Inspect connecting rod bushings (a) Using a caliper gauge, measure the inside diameter ofthe connecting rod bushing.
Bushing inside diameter: 22.005±22.017 mm
(0.8663±0.8668 in.)
(b) Using a micrometer, measure the piston pin diameter.
Piston pin diameter: 21.997±22.009 mm(0.8660±0.8665 in.)
(c) Subtract the piston pin diameter measurement from thebushing inside diameter measurement.
Standard oil clearance: 0.005±0.011 mm
(0.0002±0.0004 in.)
Maximum oil clearance: 0.05 mm (0.0020 in.)
C. If necessary, replace connecting rod bushings (a) Using SST and a press, press out the bushing.
SST 09222±30010
±
ENGINE MECHANICAL Cylinder BlockEM±149
WhereEverybodyKnowsYourName
Page 2350 of 4087
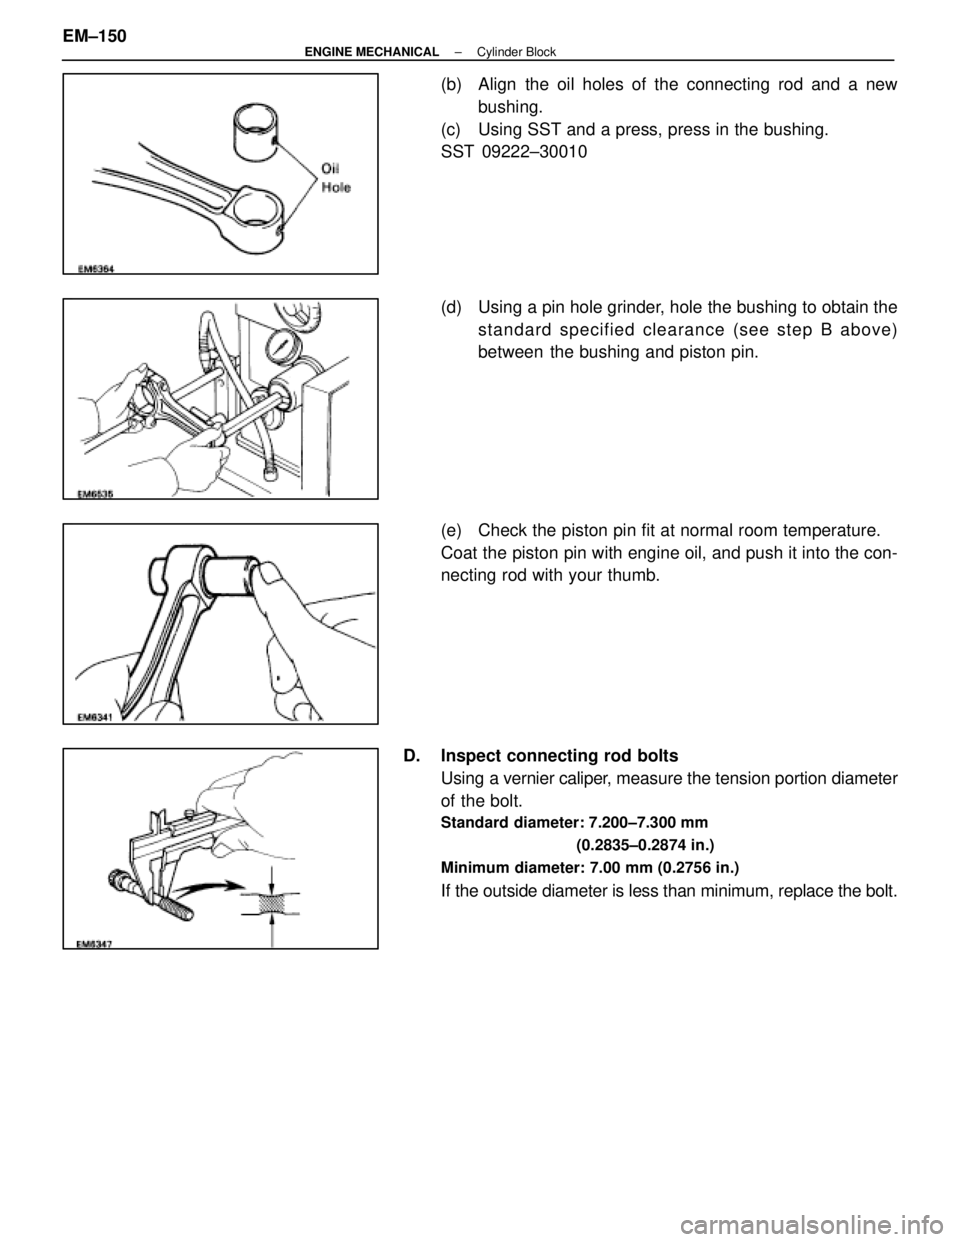
(b) Align the oil holes of the connecting rod and a newbushing.
(c) Using SST and a press, press in the bushing.
SST 09222±30010
(d) Using a pin hole grinder, hole the bushing to obtain the standard specified clearance (see step B above)
between the bushing and piston pin.
(e) Check the piston pin fit at normal room temperature.
Coat the piston pin with engine oil, and push it into the con-
necting rod with your thumb.
D. Inspect connecting rod bolts Using a vernier caliper, measure the tension portion diameter
of the bolt.
Standard diameter: 7.200±7.300 mm
(0.2835±0.2874 in.)
Minimum diameter: 7.00 mm (0.2756 in.)
If the outside diameter is less than minimum, replace the bolt.
EM±150
±
ENGINE MECHANICAL Cylinder Block
WhereEverybodyKnowsYourName