LEXUS SC400 1991 Service Repair Manual
Manufacturer: LEXUS, Model Year: 1991,
Model line: SC400,
Model: LEXUS SC400 1991
Pages: 4087, PDF Size: 75.75 MB
LEXUS SC400 1991 Service Repair Manual
SC400 1991
LEXUS
LEXUS
https://www.carmanualsonline.info/img/36/57051/w960_57051-0.png
LEXUS SC400 1991 Service Repair Manual
Trending: cruise control, AUX, ABS, tire size, weight, air suspension, reset
Page 871 of 4087
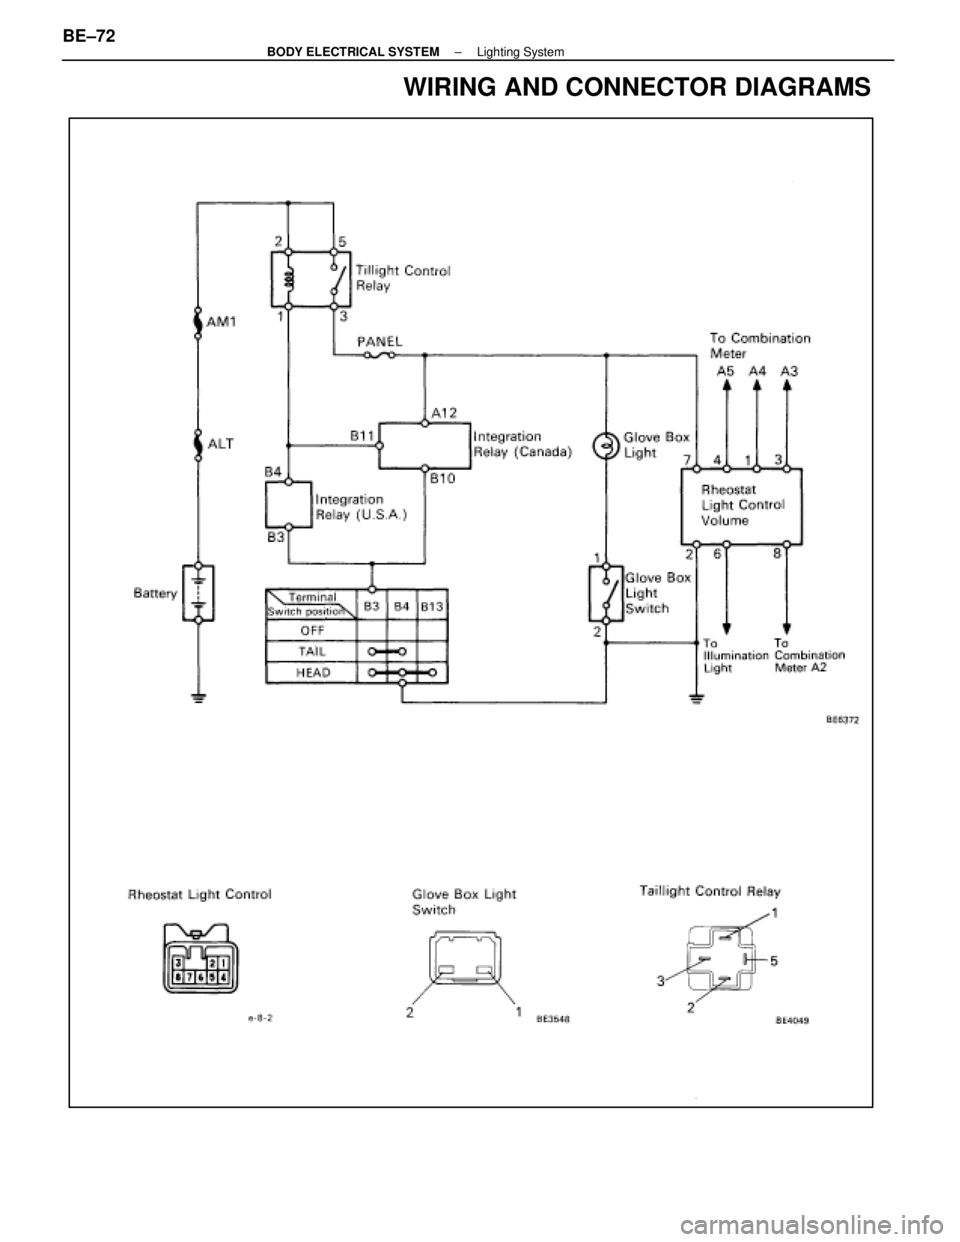
WIRING AND CONNECTOR DIAGRAMS
BE±72±
BODY ELECTRICAL SYSTEM Lighting System
WhereEverybodyKnowsYourName
Page 872 of 4087
Parts Inspection ± ILLUMINATION
LIGHT SYSTEM
(Rheostat Light Control Volume)
REMOVAL AND INSTALLATION OF
RHEOSTAT LIGHT CONTROL VOLUME
(See page BE±103 )
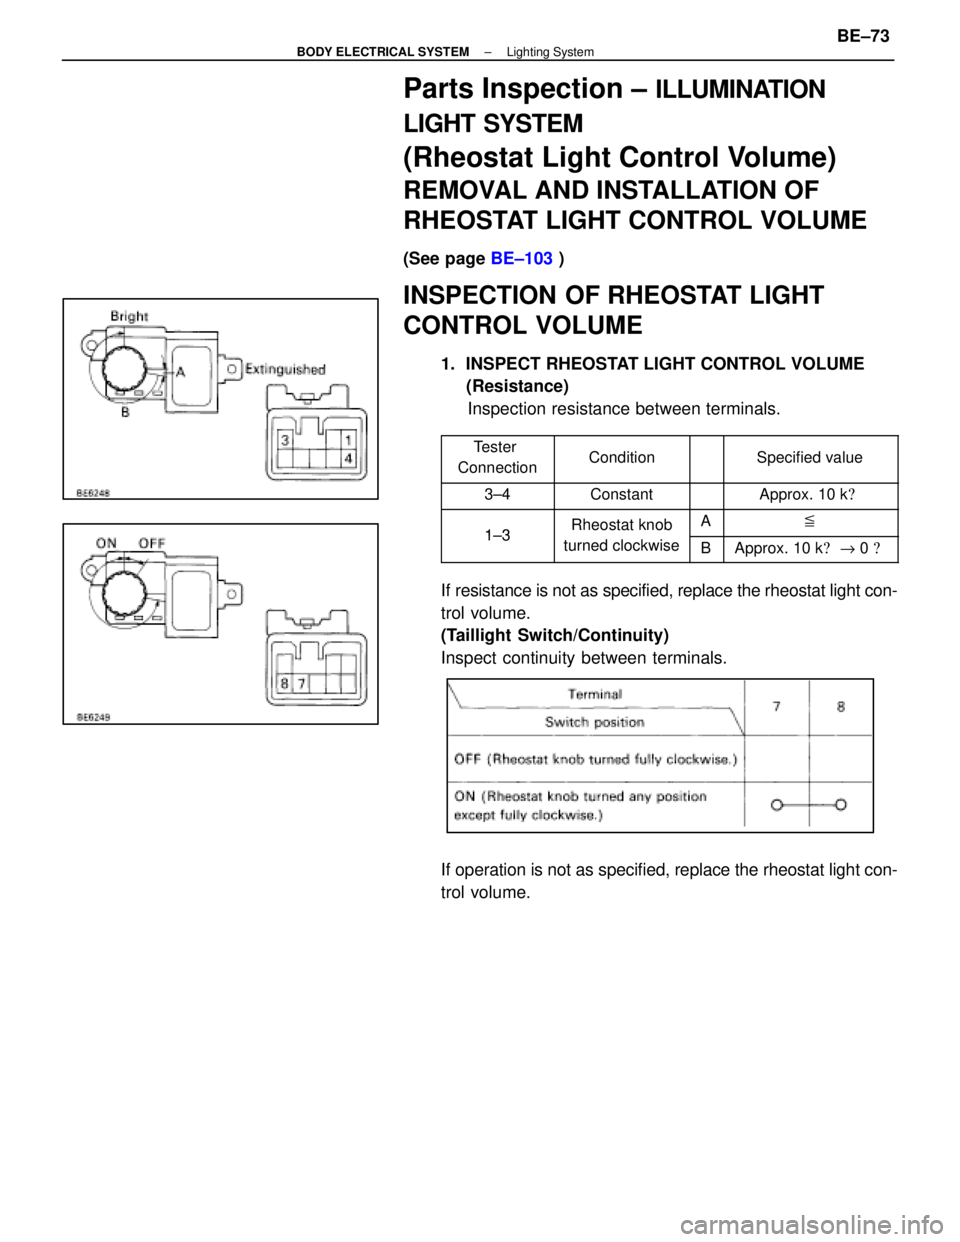
INSPECTION OF RHEOSTAT LIGHT
CONTROL VOLUME
1. INSPECT RHEOSTAT LIGHT CONTROL VOLUME
(Resistance)
Inspection resistance between terminals.
Tester
ConnectionConditionSpecified value
3±4ConstantApprox. 10 k �
1±3Rheostat knobA�1±3turned clockwiseBApprox. 10 k� " 0 �
If resistance is not as specified, replace the rheostat light con-
trol volume.
(Taillight Switch/Continuity)
Inspect continuity between terminals.
If operation is not as specified, replace the rheostat light con-
trol volume.
±
BODY ELECTRICAL SYSTEM Lighting SystemBE±73
WhereEverybodyKnowsYourName
Page 873 of 4087
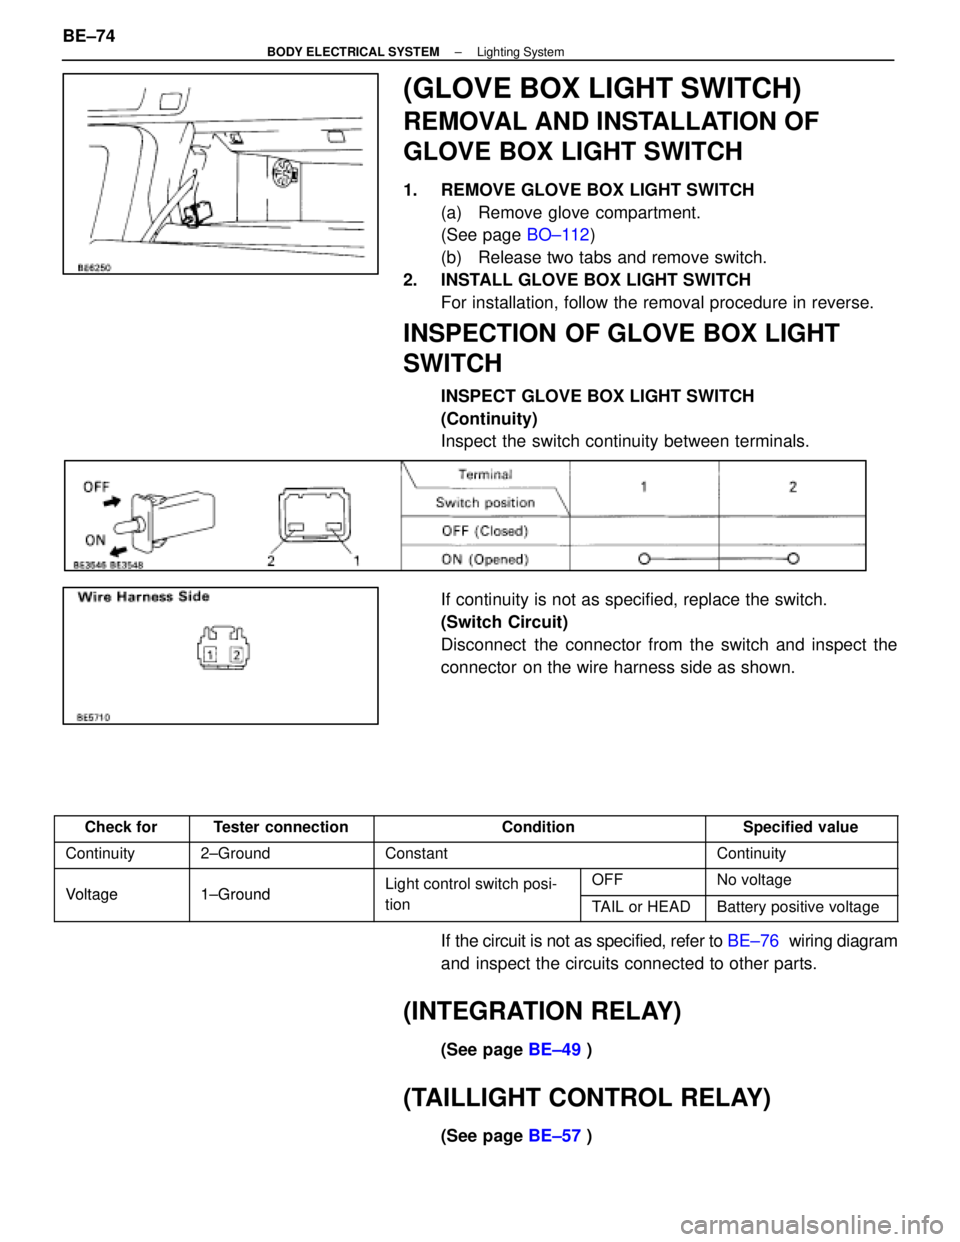
(GLOVE BOX LIGHT SWITCH)
REMOVAL AND INSTALLATION OF
GLOVE BOX LIGHT SWITCH
1. REMOVE GLOVE BOX LIGHT SWITCH(a) Remove glove compartment.
(See page BO±112)
(b) Release two tabs and remove switch.
2. INSTALL GLOVE BOX LIGHT SWITCH For installation, follow the removal procedure in reverse.
INSPECTION OF GLOVE BOX LIGHT
SWITCH
INSPECT GLOVE BOX LIGHT SWITCH
(Continuity)
Inspect the switch continuity between terminals.
If continuity is not as specified, replace the switch.
(Switch Circuit)
Disconnect the connector from the switch and inspect the
connector on the wire harness side as shown.
Check forTester connectionConditionSpecified value
Continuity2±GroundConstantContinuity
Voltage1±GroundLight control switch posi-OFFNo voltageVoltage1±Groundg
tionTAIL or HEADBattery positive voltage
If the circuit is not as specified, refer to BE±76 wiring diagram
and inspect the circuits connected to other parts.
(INTEGRATION RELAY)
(See page BE±49 )
(TAILLIGHT CONTROL RELAY)
(See page BE±57 )
BE±74
±
BODY ELECTRICAL SYSTEM Lighting System
WhereEverybodyKnowsYourName
Page 874 of 4087
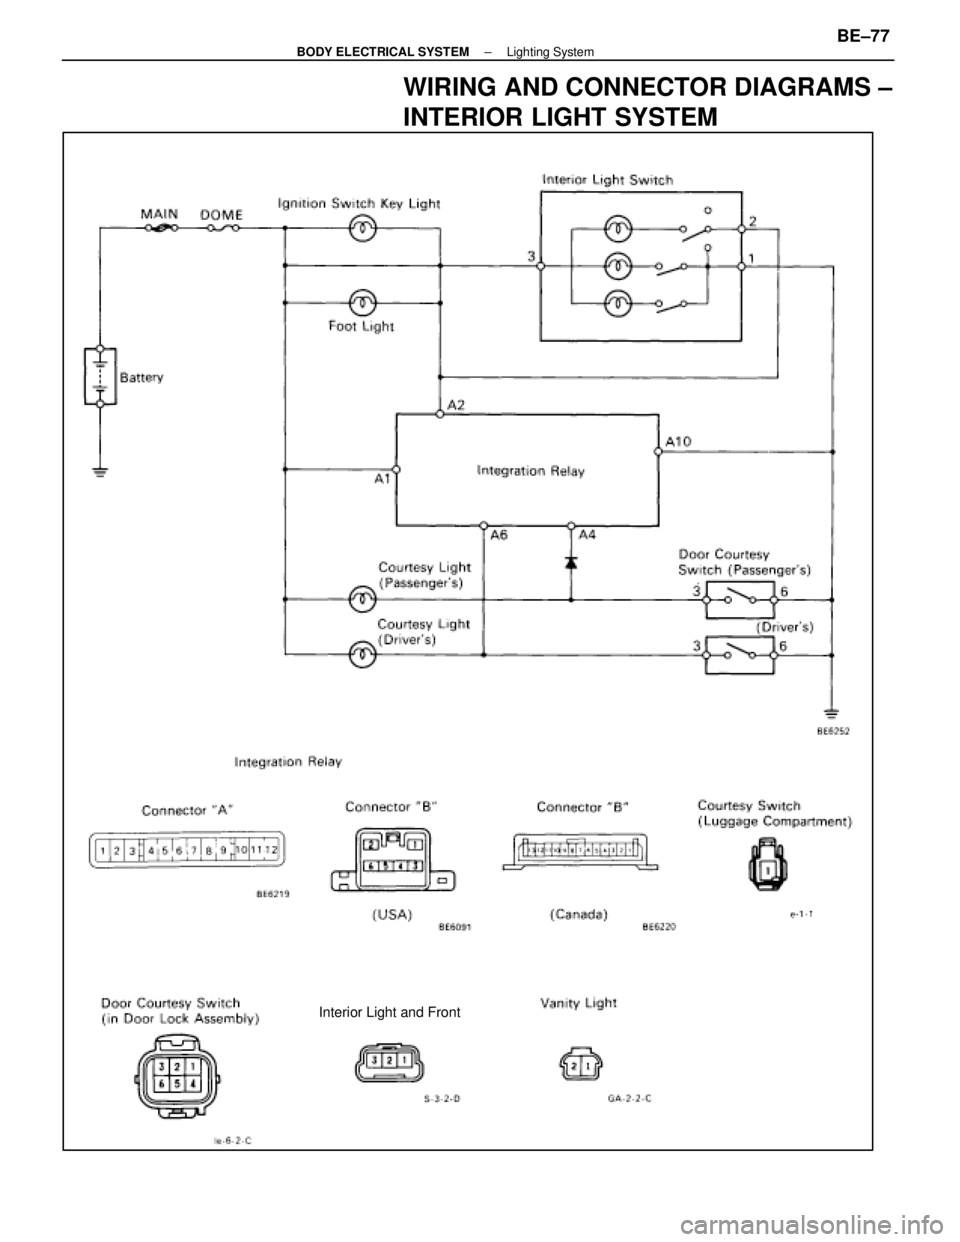
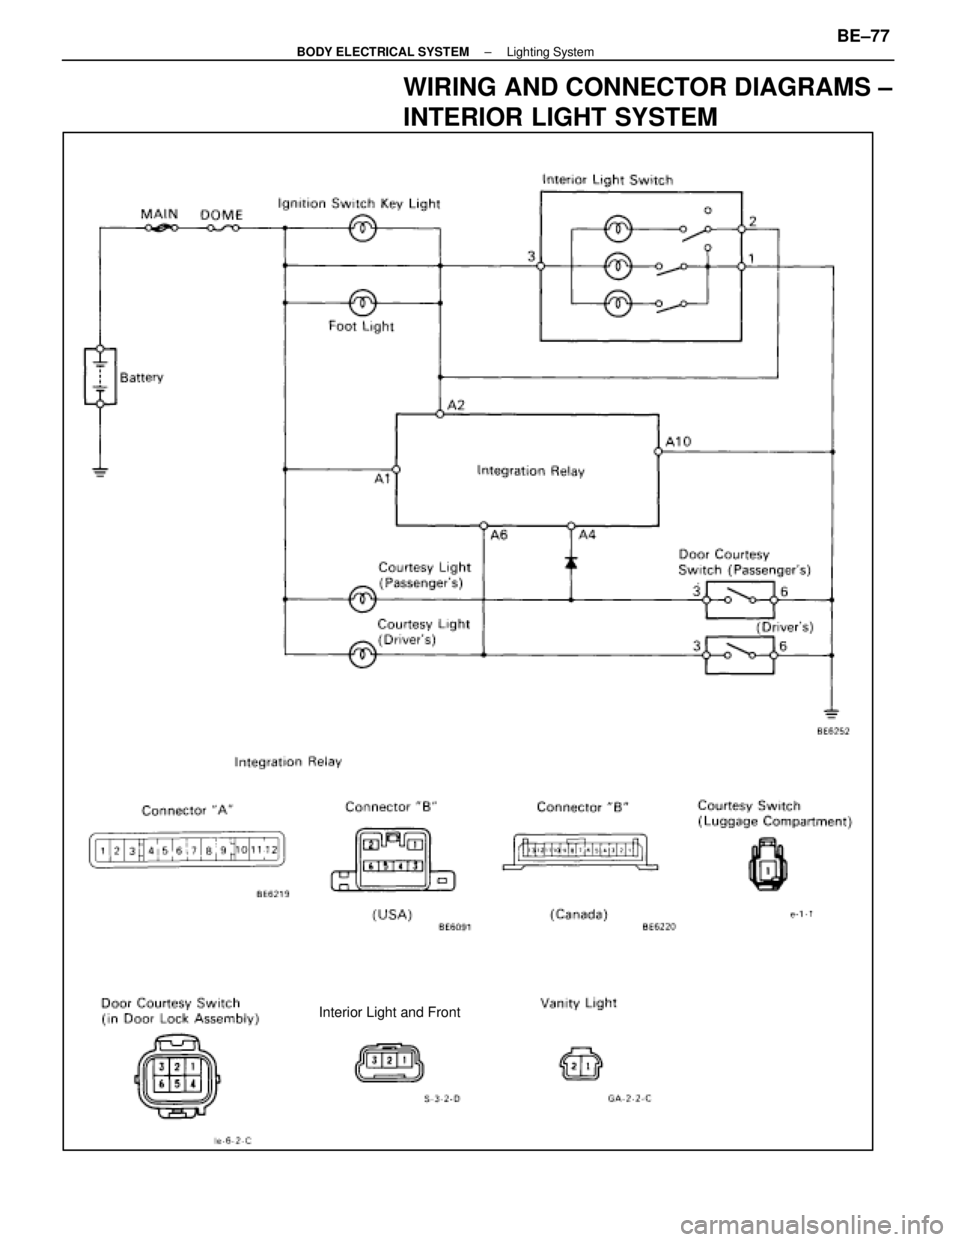
Interior Light and Front
WIRING AND CONNECTOR DIAGRAMS ±
INTERIOR LIGHT SYSTEM
±
BODY ELECTRICAL SYSTEM Lighting SystemBE±77
WhereEverybodyKnowsYourName
Page 875 of 4087
(INTERIOR LIGHT SYSTEM)
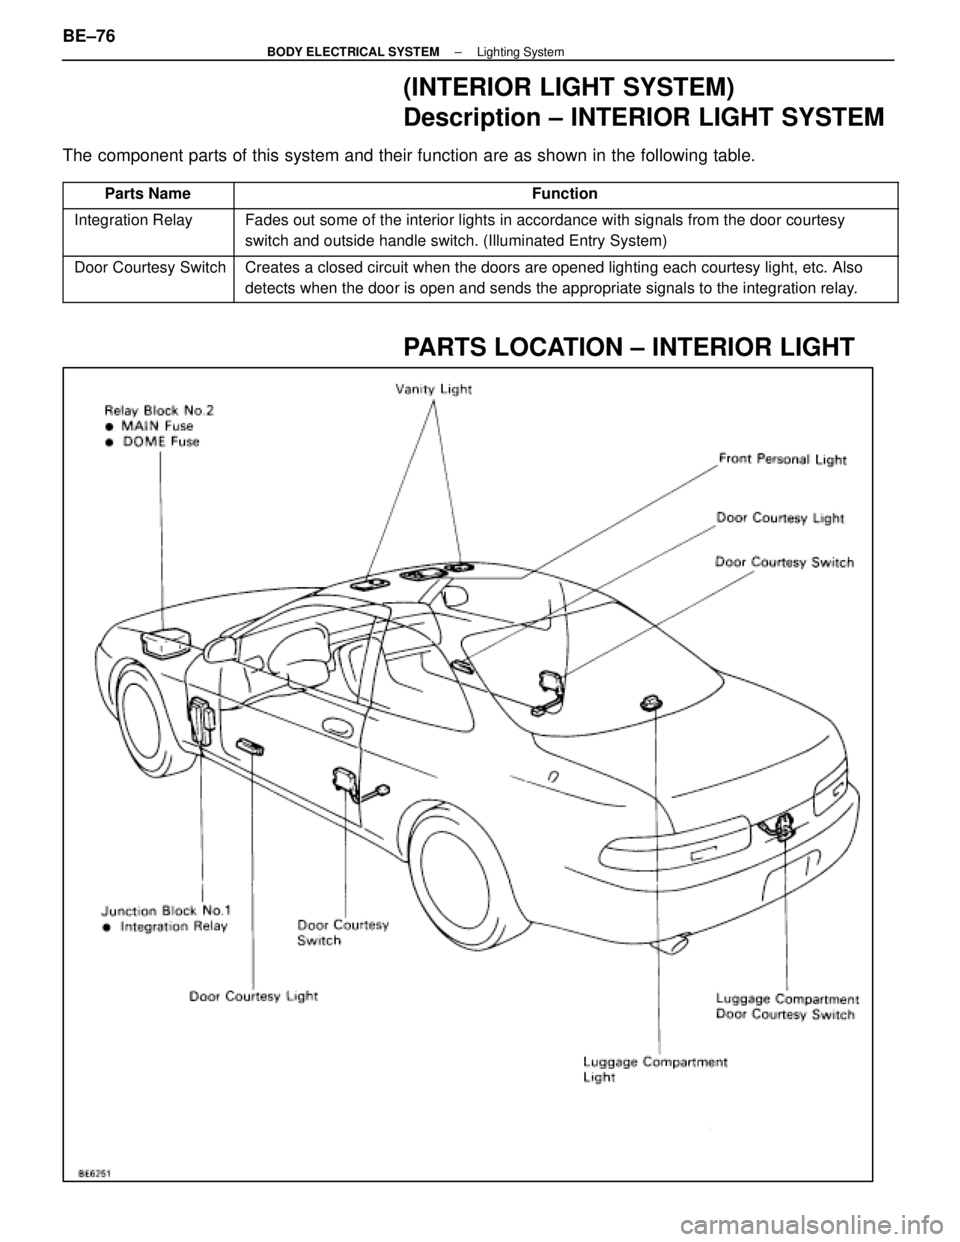
Description ± INTERIOR LIGHT SYSTEM
The component parts of this system and their function are as shown in the f\
ollowing table.
Parts NameFunction
Integration RelayFades out some of the interior lights in accordance with signals from th\
e door courtesy
switch and outside handle switch. (Illuminated Entry System)
Door Courtesy SwitchCreates a closed circuit when the doors are opened lighting each courtes\
y light, etc. Also
detects when the door is open and sends the appropriate signals to the i\
ntegration relay.
PARTS LOCATION ± INTERIOR LIGHT
BE±76±
BODY ELECTRICAL SYSTEM Lighting System
WhereEverybodyKnowsYourName
Page 876 of 4087
Interior Light and Front
WIRING AND CONNECTOR DIAGRAMS ±
INTERIOR LIGHT SYSTEM
±
BODY ELECTRICAL SYSTEM Lighting SystemBE±77
WhereEverybodyKnowsYourName
Page 877 of 4087
Parts Inspection ± Interior Lights
(Integration Relay)
REMOVAL AND INSTALLATION OF
INTEGRATION RELAY
(See page BE±49 )
INSPECTION OF INTEGRATION RELAY
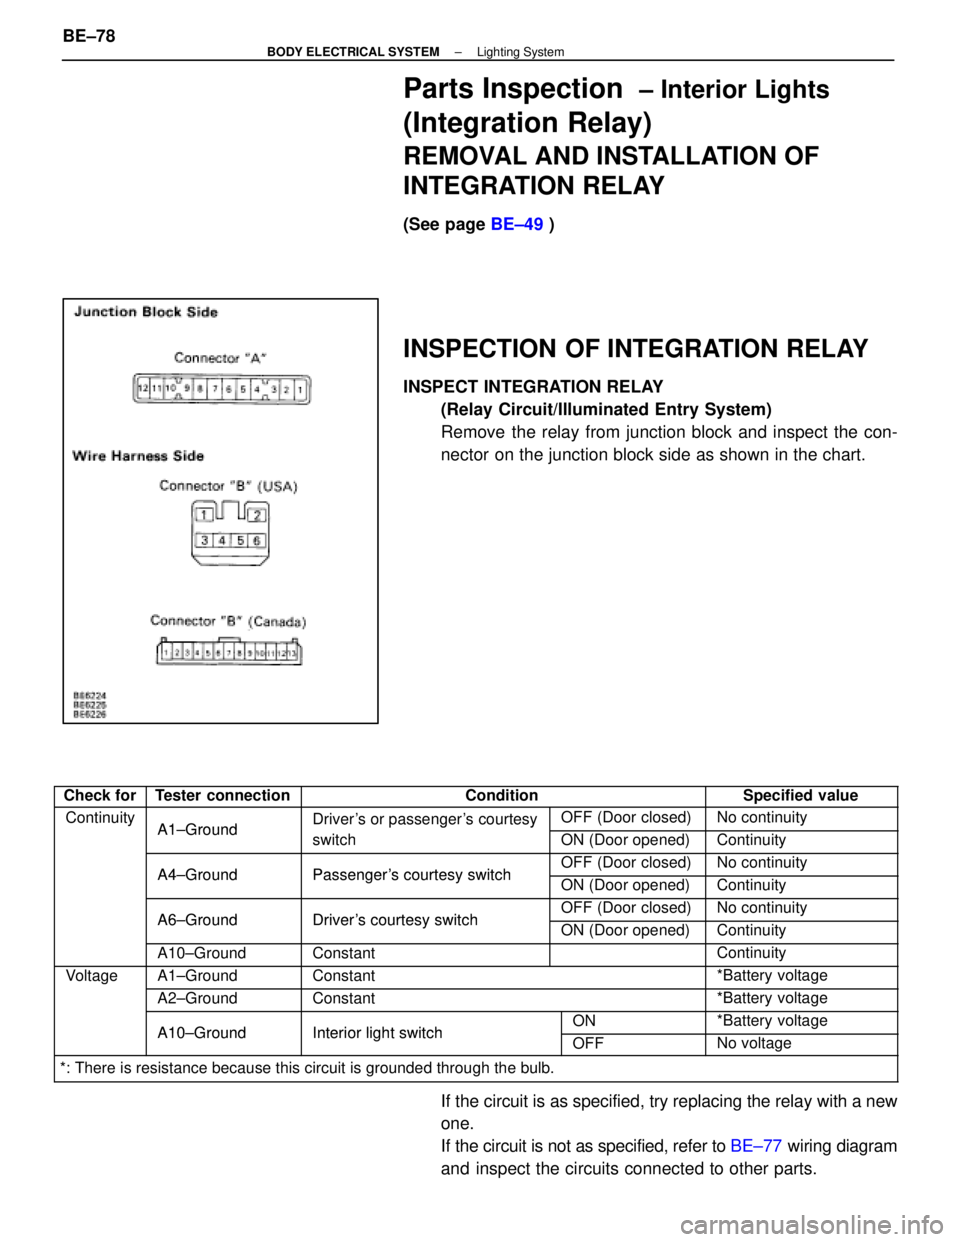
INSPECT INTEGRATION RELAY
(Relay Circuit/Illuminated Entry System)
Remove the relay from junction block and inspect the con-
nector on the junction block side as shown in the chart.
Check forTester connectionConditionSpecified value
ContinuityA1±GroundDriver's or passenger's courtesyOFF (Door closed)No continuityyA1±Groundgy
switchON (Door opened)Continuity
A4±GroundPassenger's courtesy switchOFF (Door closed)No continuityA4±GroundPassenger's courtesy switchON (Door opened)Continuity
A6±GroundDriver's courtesy switchOFF (Door closed)No continuityA6±GroundDriver's courtesy switchON (Door opened)Continuity
A10±GroundConstantContinuity
VoltageA1±GroundConstant*Battery voltageg
A2±GroundConstant*Battery voltage
A10±GroundInterior light switchON*Battery voltageA10±GroundInterior light switchOFFNo voltage
*: There is resistance because this circuit is grounded through the bulb\
.
If the circuit is as specified, try replacing the relay with a new
one.
If the circuit is not as specified, refer to BE±77 wiring diagram
and inspect the circuits connected to other parts.
BE±78
±
BODY ELECTRICAL SYSTEM Lighting System
WhereEverybodyKnowsYourName
Page 878 of 4087
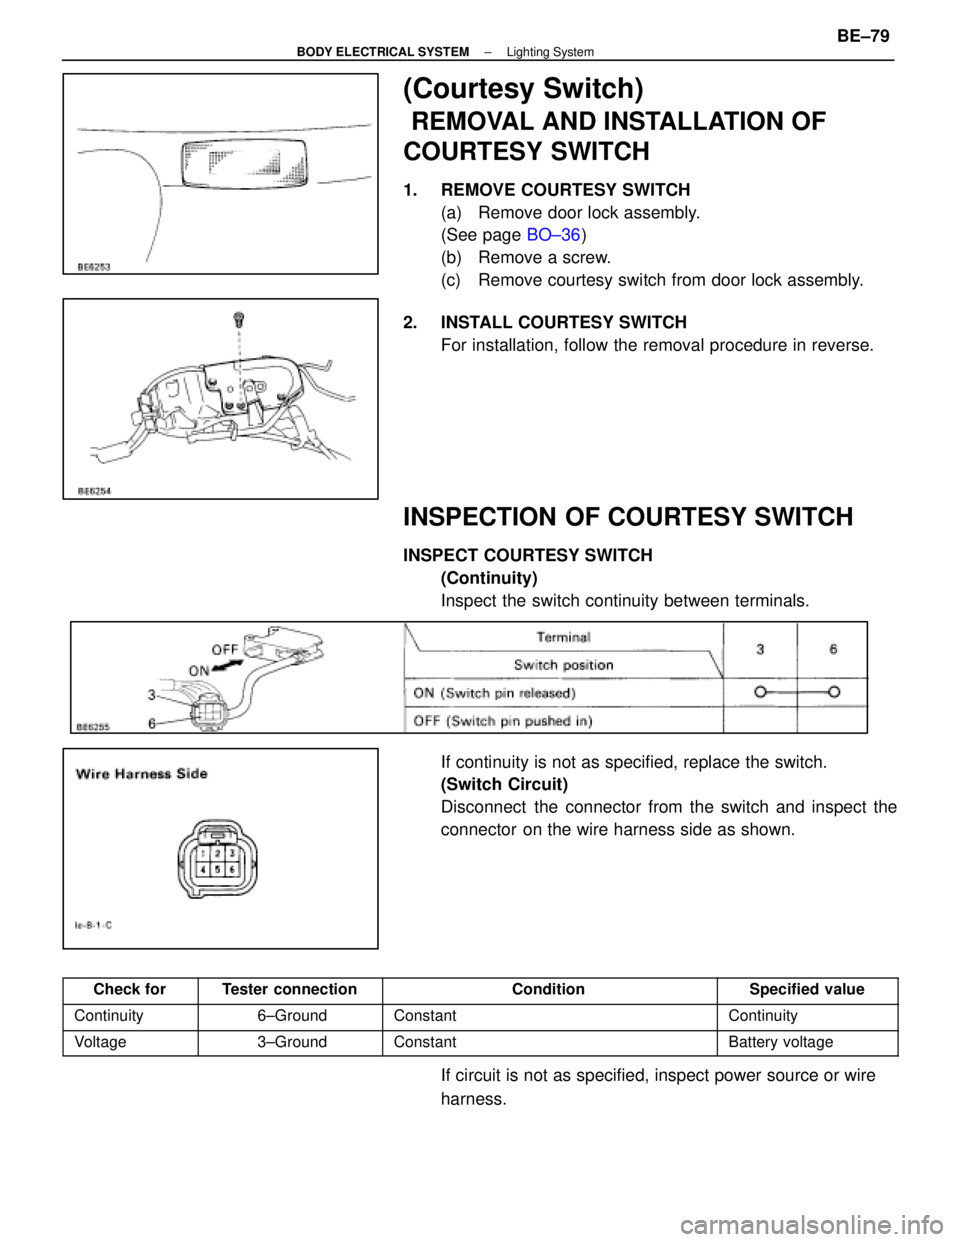
(Courtesy Switch)
REMOVAL AND INSTALLATION OF
COURTESY SWITCH
1. REMOVE COURTESY SWITCH(a) Remove door lock assembly.
(See page BO±36)
(b) Remove a screw.
(c) Remove courtesy switch from door lock assembly.
2. INSTALL COURTESY SWITCH For installation, follow the removal procedure in reverse.
INSPECTION OF COURTESY SWITCH
INSPECT COURTESY SWITCH(Continuity)
Inspect the switch continuity between terminals.
If continuity is not as specified, replace the switch.
(Switch Circuit)
Disconnect the connector from the switch and inspect the
connector on the wire harness side as shown.
Check forTester connectionConditionSpecified value
Continuity6±GroundConstantContinuity
Voltage3±GroundConstantBattery voltage
If circuit is not as specified, inspect power source or wire
harness.
±
BODY ELECTRICAL SYSTEM Lighting SystemBE±79
WhereEverybodyKnowsYourName
Page 879 of 4087
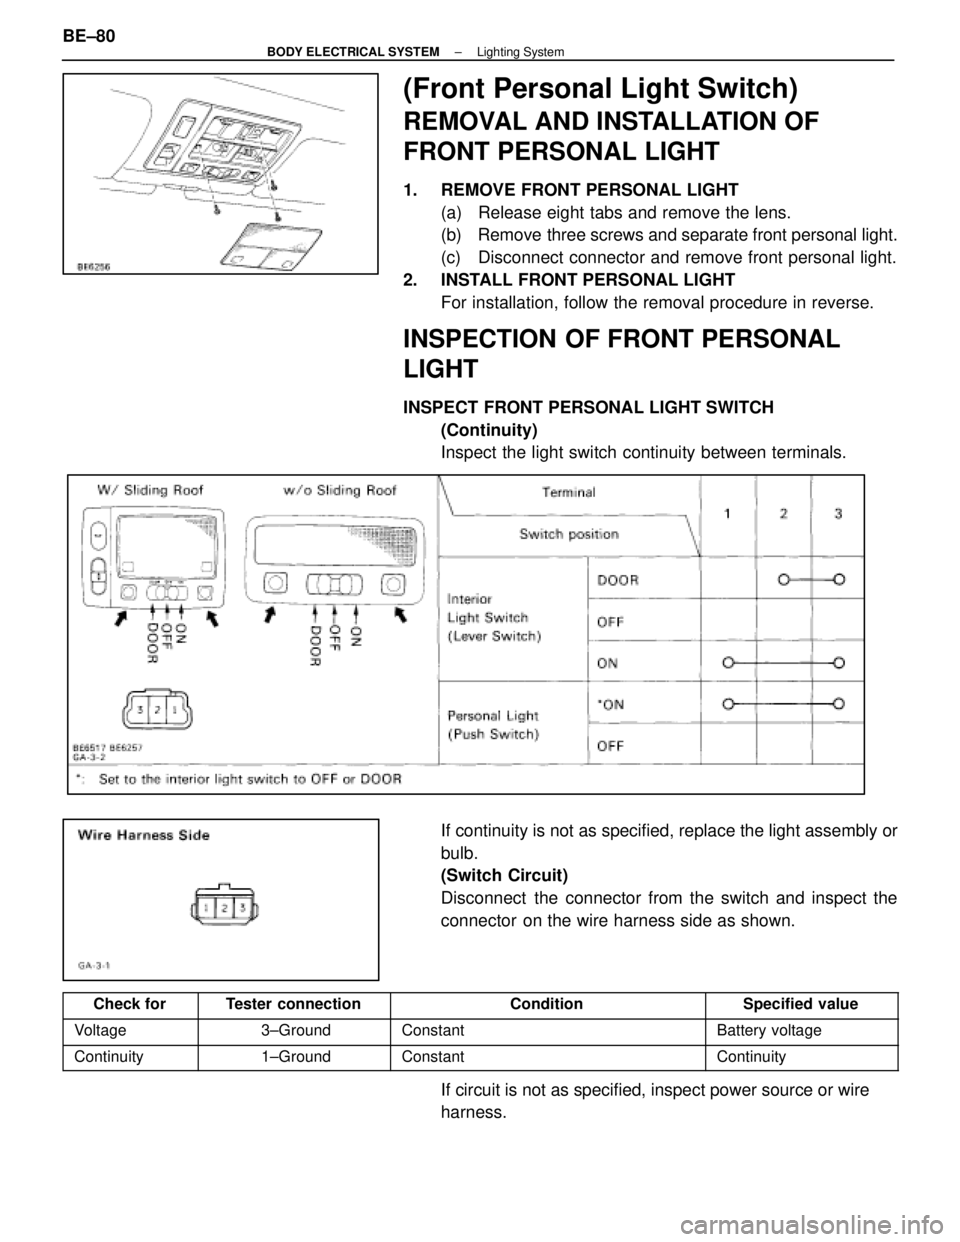
(Front Personal Light Switch)
REMOVAL AND INSTALLATION OF
FRONT PERSONAL LIGHT
1. REMOVE FRONT PERSONAL LIGHT(a) Release eight tabs and remove the lens.
(b) Remove three screws and separate front personal light.
(c) Disconnect connector and remove front personal light.
2. INSTALL FRONT PERSONAL LIGHT For installation, follow the removal procedure in reverse.
INSPECTION OF FRONT PERSONAL
LIGHT
INSPECT FRONT PERSONAL LIGHT SWITCH(Continuity)
Inspect the light switch continuity between terminals.
If continuity is not as specified, replace the light assembly or
bulb.
(Switch Circuit)
Disconnect the connector from the switch and inspect the
connector on the wire harness side as shown.
Check forTester connectionConditionSpecified value
Voltage3±GroundConstantBattery voltage
Continuity1±GroundConstantContinuity
If circuit is not as specified, inspect power source or wire
harness.
BE±80
±
BODY ELECTRICAL SYSTEM Lighting System
WhereEverybodyKnowsYourName
Page 880 of 4087
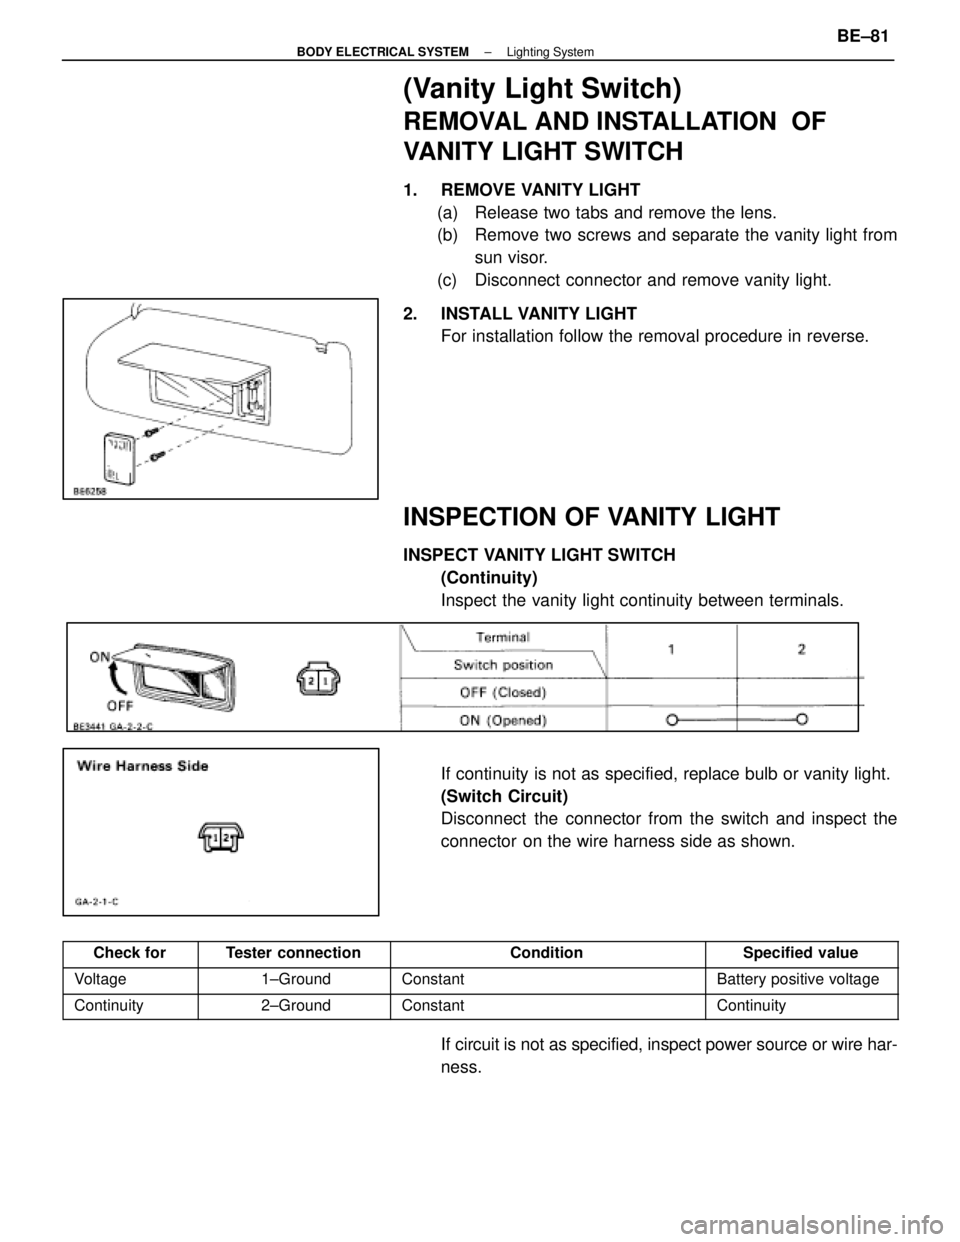
(Vanity Light Switch)
REMOVAL AND INSTALLATION OF
VANITY LIGHT SWITCH
1. REMOVE VANITY LIGHT(a) Release two tabs and remove the lens.
(b) Remove two screws and separate the vanity light from sun visor.
(c) Disconnect connector and remove vanity light.
2. INSTALL VANITY LIGHT For installation follow the removal procedure in reverse.
INSPECTION OF VANITY LIGHT
INSPECT VANITY LIGHT SWITCH
(Continuity)
Inspect the vanity light continuity between terminals.
If continuity is not as specified, replace bulb or vanity light.
(Switch Circuit)
Disconnect the connector from the switch and inspect the
connector on the wire harness side as shown.
Check forTester connectionConditionSpecified value
Voltage1±GroundConstantBattery positive voltage
Continuity2±GroundConstantContinuity
If circuit is not as specified, inspect power source or wire har-
ness.
±
BODY ELECTRICAL SYSTEM Lighting SystemBE±81
WhereEverybodyKnowsYourName
Trending: light, headrest, ECO mode, AUX, battery replacement, CD player, trip computer
