light LEXUS UX 2022 User Guide
[x] Cancel search | Manufacturer: LEXUS, Model Year: 2022, Model line: UX, Model: LEXUS UX 2022Pages: 100, PDF Size: 6.15 MB
Page 38 of 100

37
UX250h_QG_OM76572U_(U)
1Press the Automatic High Beam
switch.
2Turn the headlight switch to the
or position.
The Automatic High Beam indicator
will come on when the system is oper-
ating.
AHB (Automatic High Beam)
The Automatic High Beam uses a front camera located behind the upper portion of the
windshield to assess the bright ness of the lights of vehicles ahead, streetlights, etc., and
automatically turns the high beams on or off as necessary.
Activating the Automatic High Beam
Page 40 of 100

39
UX250h_QG_OM76572U_(U)
1*1 or *2 Turns the fog
lights off
2
Turns the fog lights on
*1:For the U.S.A.
*2:For Canada
Fog Light Switch (if equipped)
When in difficult driving conditions, such as in rain and fog, turn on the fog lights to secure
front visibility.
Turning on the fog light
Page 41 of 100
40
UX250h_QG_OM76572U_(U)
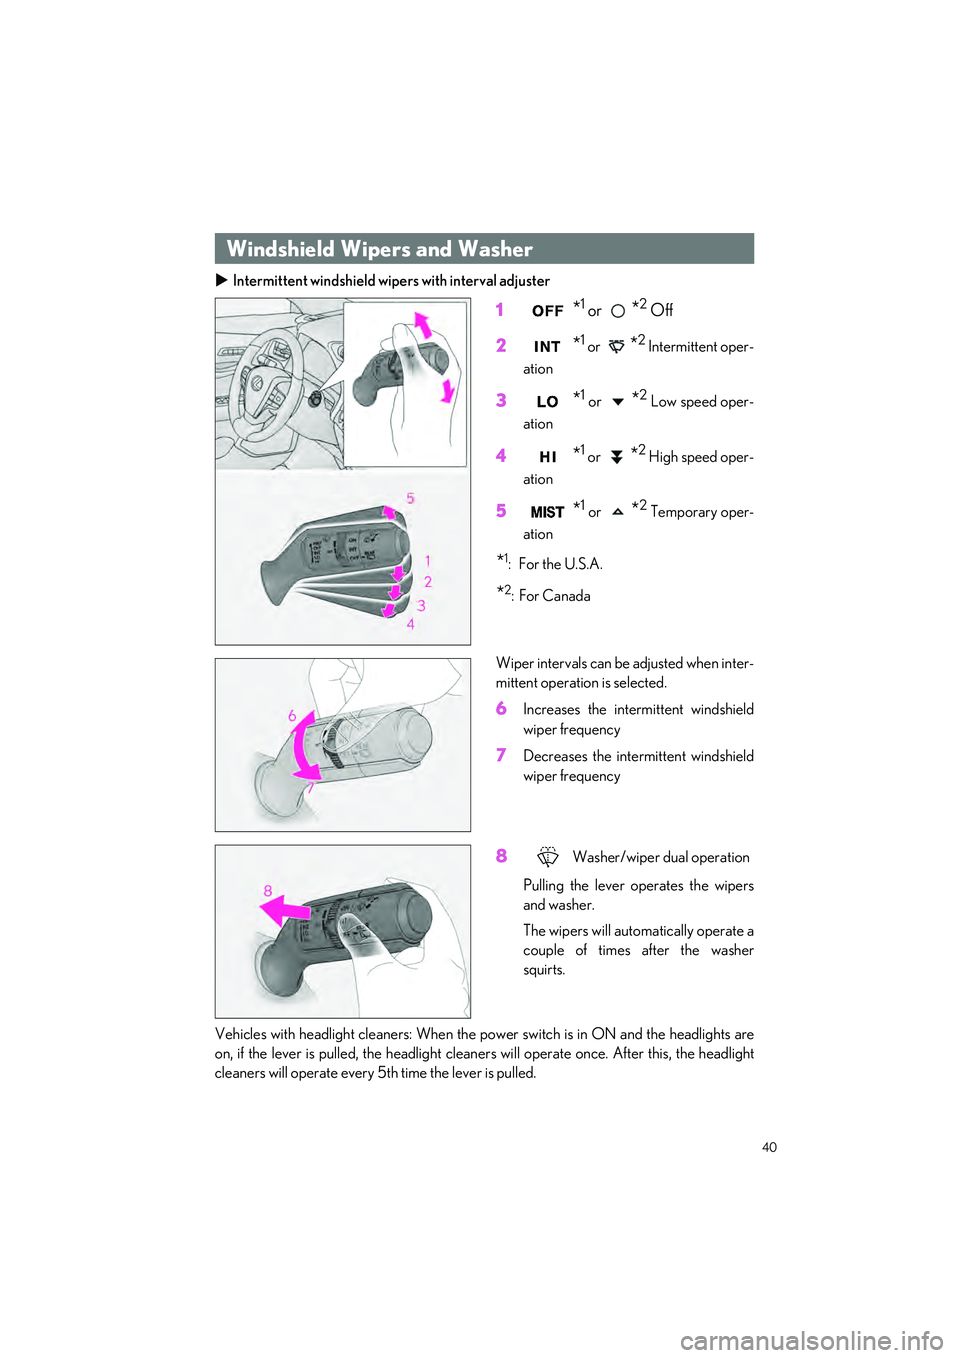
Intermittent windshield wipers with interval adjuster
1*1 or *2 Off
2
*1 or *2 Intermittent oper-
ation
3*1 or *2 Low speed oper-
ation
4*1 or *2 High speed oper-
ation
5*1 or *2 Temporary oper-
ation
*1:For the U.S.A.
*2:For Canada
Wiper intervals can be adjusted when inter-
mittent operation is selected.
6Increases the intermittent windshield
wiper frequency
7Decreases the intermittent windshield
wiper frequency
8Washer/wiper dual operation
Pulling the lever operates the wipers
and washer.
The wipers will automatically operate a
couple of times after the washer
squirts.
Vehicles with headlight cleaners: When the po wer switch is in ON and the headlights are
on, if the lever is pulled, the headlight clea ners will operate once. After this, the headlight
cleaners will operate every 5th time the lever is pulled.
Windshield Wipers and Washer
Page 42 of 100
41
UX250h_QG_OM76572U_(U)
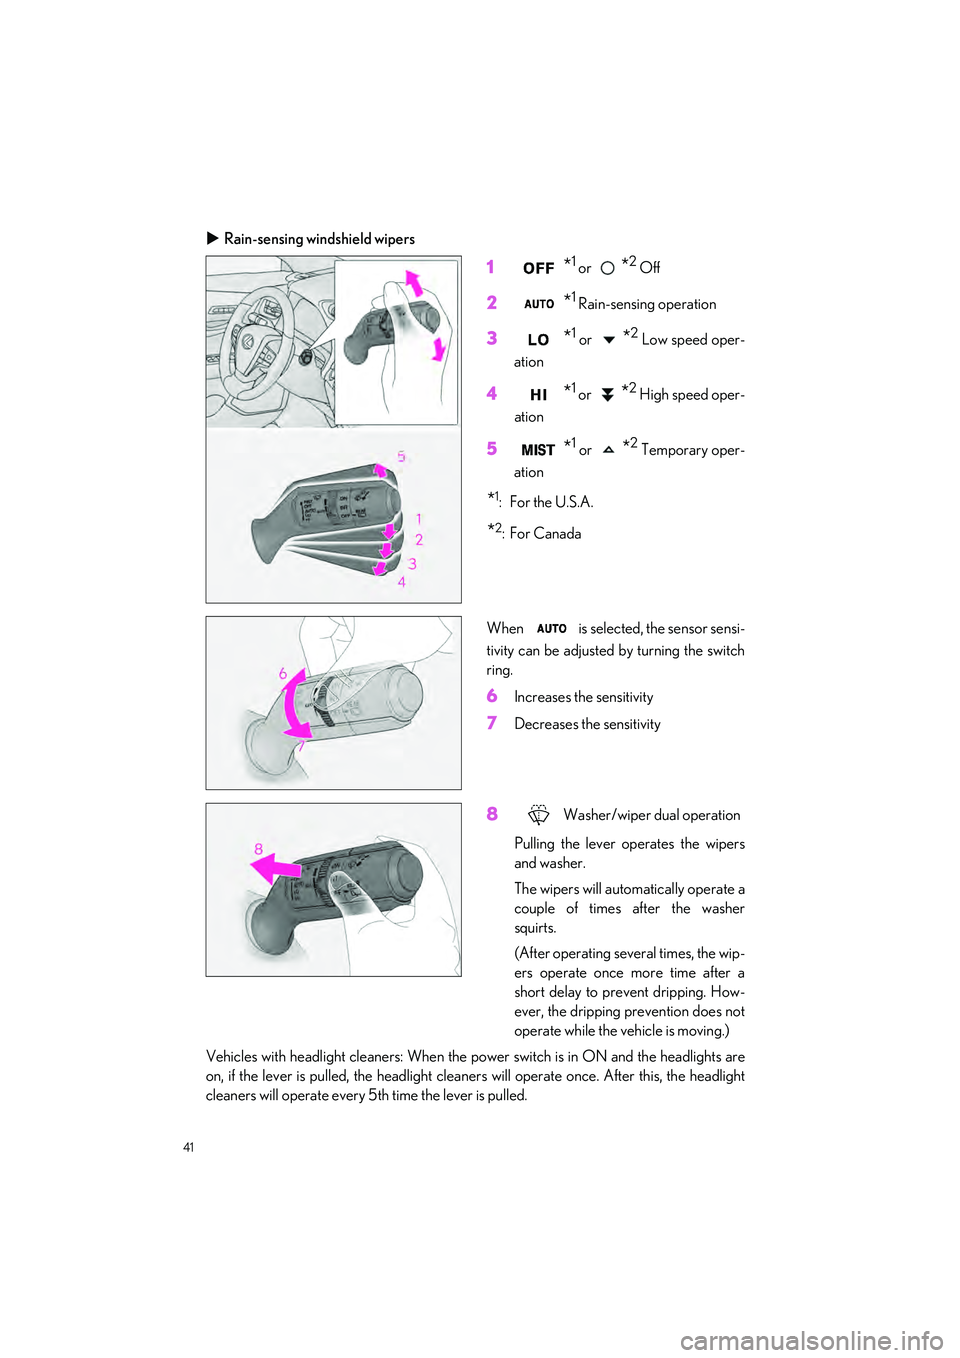
Rain-sensing windshield wipers
1*1 or *2 Off
2*1 Rain-sensing operation
3*1 or *2 Low speed oper-
ation
4*1 or *2 High speed oper-
ation
5*1 or *2 Temporary oper-
ation
*1:For the U.S.A.
*2:For Canada
When is selected, the sensor sensi-
tivity can be adjusted by turning the switch
ring.
6Increases the sensitivity
7Decreases the sensitivity
8Washer/wiper dual operation
Pulling the lever operates the wipers
and washer.
The wipers will automatically operate a
couple of times after the washer
squirts.
(After operating several times, the wip-
ers operate once more time after a
short delay to prevent dripping. How-
ever, the dripping prevention does not
operate while the vehicle is moving.)
Vehicles with headlight cleaners: When the po wer switch is in ON and the headlights are
on, if the lever is pulled, the headlight clea ners will operate once. After this, the headlight
cleaners will operate every 5th time the lever is pulled.
Page 49 of 100
48
UX250h_QG_OM76572U_(U)
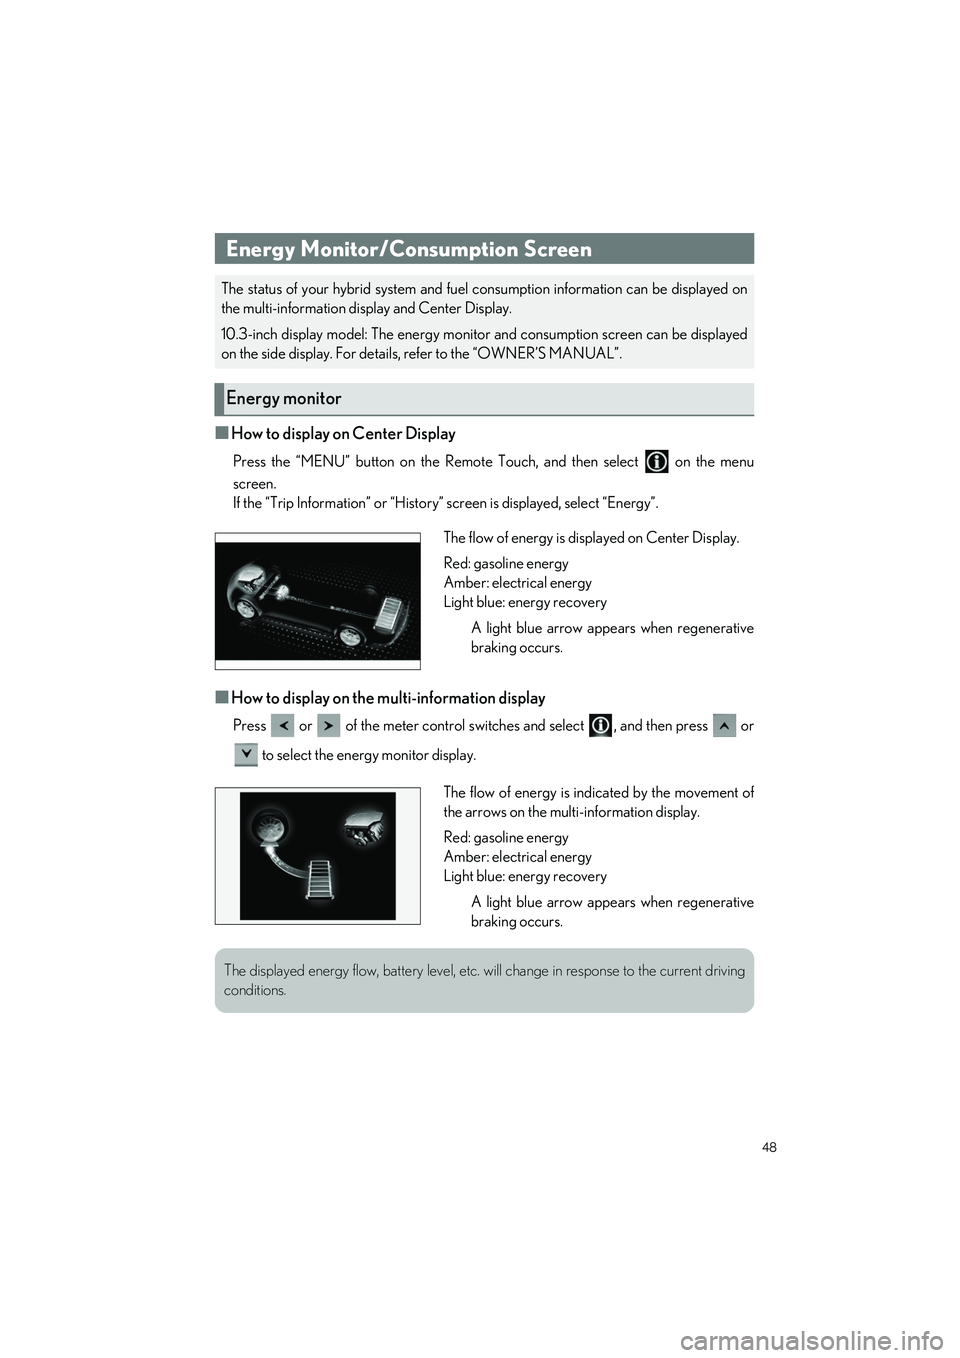
■How to display on Center Display
Press the “MENU” button on the Remote Touch, and then select on the menu
screen.
If the “Trip Information” or “History” screen is displayed, select “Energy”.
■How to display on the multi-information display
Press or of the meter control switches and select , and then press or
to select the energy monitor display.
Energy Monitor/Consumption Screen
The status of your hybrid system and fuel consumption information can be displayed on
the multi-information display and Center Display.
10.3-inch display model: The energy monito r and consumption screen can be displayed
on the side display. For details, refer to the “OWNER’S MANUAL”.
Energy monitor
The flow of energy is displayed on Center Display.
Red: gasoline energy
Amber: electrical energy
Light blue: energy recovery
A light blue arrow appears when regenerative
braking occurs.
The flow of energy is indicated by the movement of
the arrows on the multi-information display.
Red: gasoline energy
Amber: electrical energy
Light blue: energy recoveryA light blue arrow appears when regenerative
braking occurs.
The displayed energy flow, battery level, etc. will change in response to the current driving
conditions.
Page 78 of 100
77
UX250h_QG_OM76572U_(U)
The HomeLink® wireless control system in your vehicle has 3 buttons which can be pro-
grammed to operate 3 different devices. Refer to the programming methods on the follow-
ing pages to determine the method which is appropriate for the device.
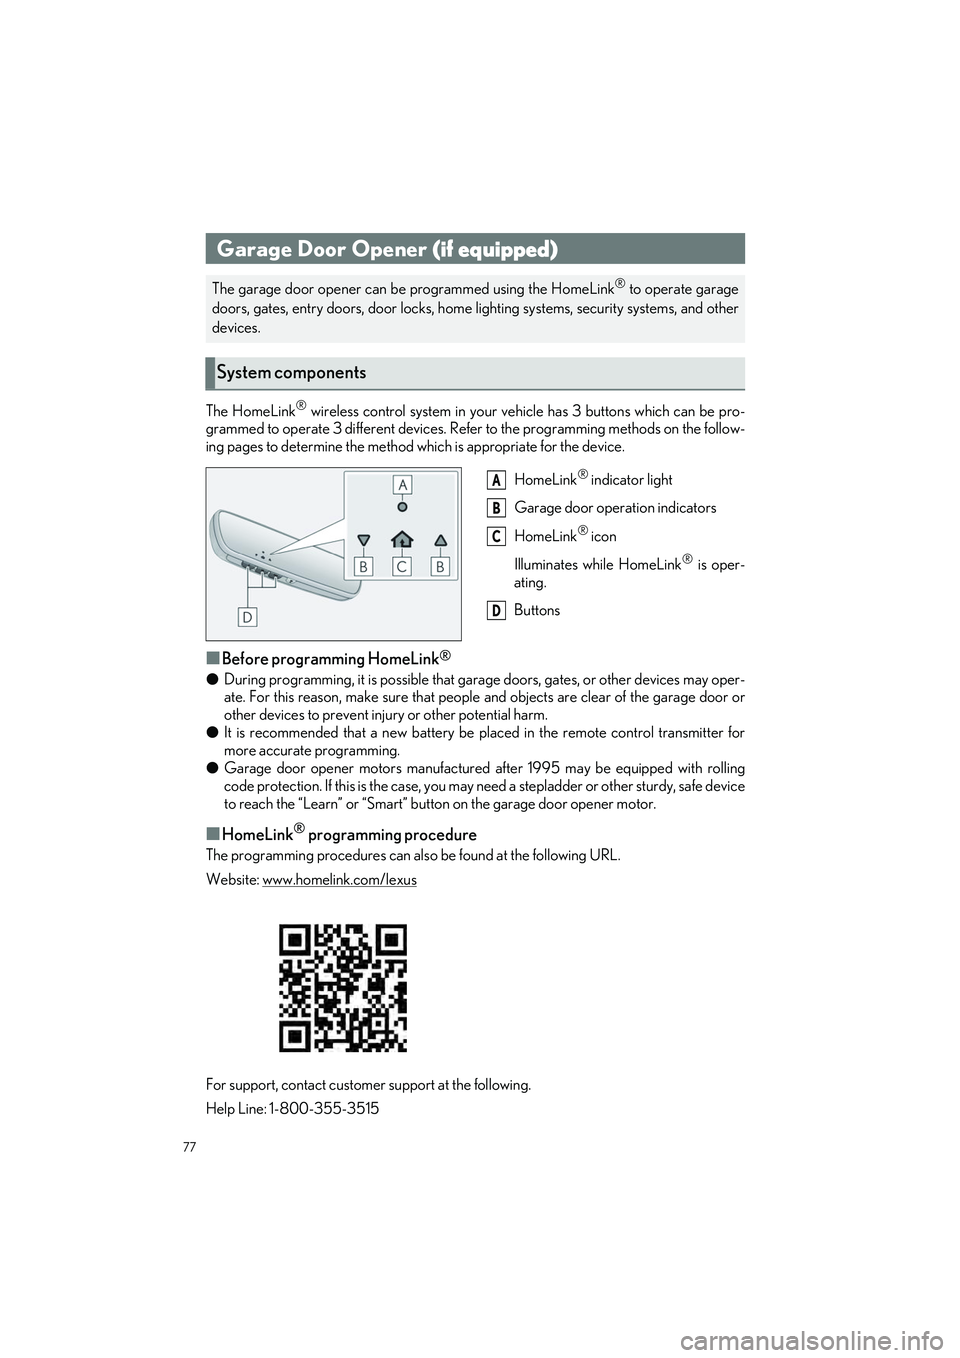
HomeLink
® indicator light
Garage door operation indicators
HomeLink
® icon
Illuminates while HomeLink
® is oper-
ating.
Buttons
■Before programming HomeLink®
● During programming, it is possible that garage doors, gates, or other devices may oper-
ate. For this reason, make sure that people and objects are clear of the garage door or
other devices to prevent inju ry or other potential harm.
● It is recommended that a new battery be placed in the remote control transmitter for
more accurate programming.
● Garage door opener motors manufactured after 1995 may be equipped with rolling
code protection. If this is the case, you may need a stepladder or other sturdy, safe device
to reach the “Learn” or “Smart” button on the garage door opener motor.
■HomeLink® programming procedure
The programming procedures can also be found at the following URL.
Website: www.homelink.com/lexus
For support, contact customer support at the following.
Help Line: 1-800-355-3515
Garage Door Opener (if equipped)
The garage door opener can be programmed using the HomeLink® to operate garage
doors, gates, entry doors, door locks, home lighting systems, security systems, and other
devices.
System components
A
B
C
D
Page 79 of 100
78
UX250h_QG_OM76572U_(U)
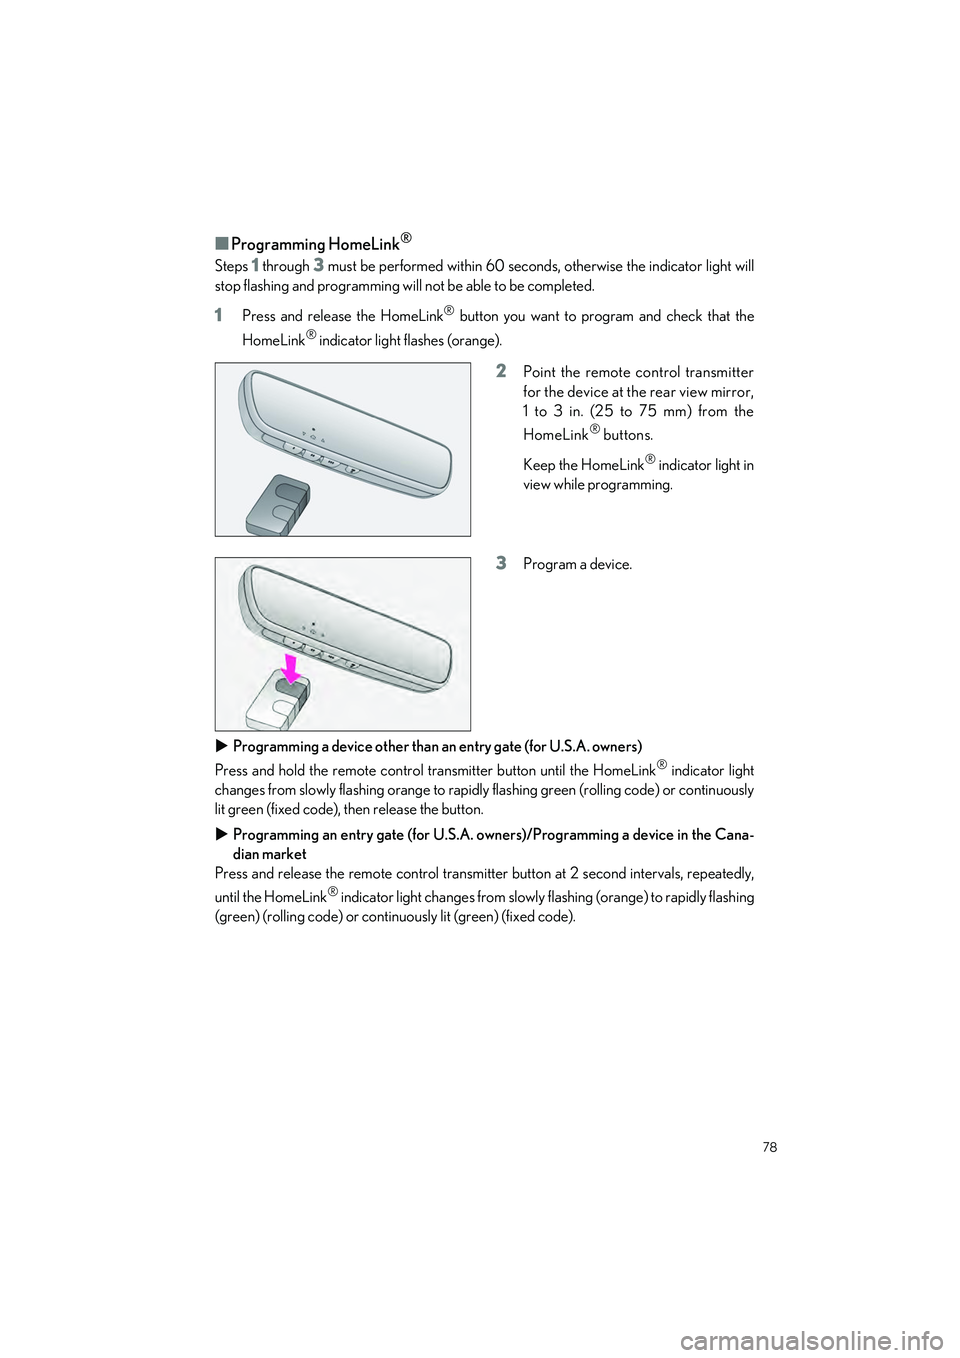
■Programming HomeLink®
Steps 1 through 3 must be performed within 60 seconds, otherwise the indicator light will
stop flashing and programming will not be able to be completed.
1Press and release the HomeLink® button you want to program and check that the
HomeLink
® indicator light flashes (orange).
2Point the remote control transmitter
for the device at the rear view mirror,
1 to 3 in. (25 to 75 mm) from the
HomeLink
® buttons.
Keep the HomeLink
® indicator light in
view while programming.
3Program a device.
Programming a device other than an entry gate (for U.S.A. owners)
Press and hold the remote control transmitter button until the HomeLink
® indicator light
changes from slowly flashing orange to rapidly flashing green (rolling code) or continuously
lit green (fixed code), then release the button.
Programming an entry gate (for U.S.A. owners)/Programming a device in the Cana-
dian market
Press and release the remote control transmitte r button at 2 second intervals, repeatedly,
until the HomeLink
® indicator light changes from slowly flashing (orange) to rapidly flashing
(green) (rolling code) or continuously lit (green) (fixed code).
Page 80 of 100
79
UX250h_QG_OM76572U_(U)
4Test the HomeLink® operation by pressing the newly programmed button and observ-
ing the indicator light:
● Indicator light illuminates: Programming of a fixed code device has completed. The
garage door or other device should operate when a HomeLink
® button is pressed
and released.
● Indicator light flashes rapidly: The garage door opener motor or other device is
equipped with a rolling code. To complete programming, firmly press and hold the
HomeLink
® button for 2 seconds then release it.
● If the garage door or other device does not operate, proceed to “Programming a
rolling code system”.
5Repeat the steps above to program anot her device for any of the remaining
HomeLink
® buttons.
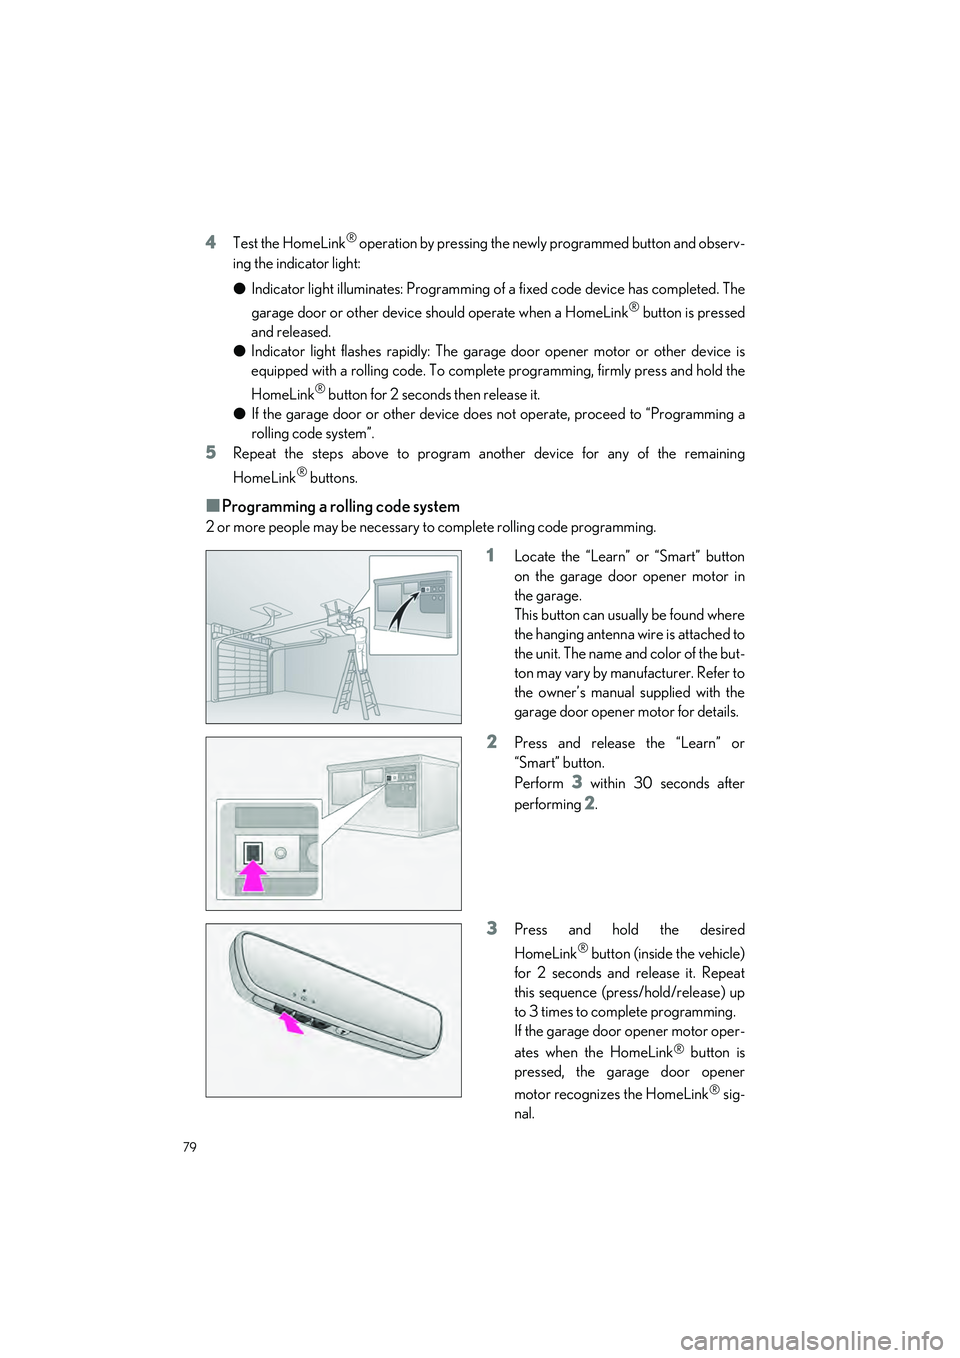
■Programming a rolling code system
2 or more people may be necessary to complete rolling code programming.
1Locate the “Learn” or “Smart” button
on the garage door opener motor in
the garage.
This button can usually be found where
the hanging antenna wire is attached to
the unit. The name and color of the but-
ton may vary by manufacturer. Refer to
the owner’s manual supplied with the
garage door opener motor for details.
2Press and release the “Learn” or
“Smart” button.
Perform
3 within 30 seconds after
performing
2.
3Press and hold the desired
HomeLink
® button (inside the vehicle)
for 2 seconds and release it. Repeat
this sequence (press/hold/release) up
to 3 times to complete programming.
If the garage door opener motor oper-
ates when the HomeLink
® button is
pressed, the garage door opener
motor recognizes the HomeLink
® sig-
nal.
Page 81 of 100

80
UX250h_QG_OM76572U_(U)
■Enabling 2-way communication with a garage door (only available for compat-
ible devices)
When enabled, 2-way communication allows you to check the status of the opening and
closing of a garage door through indicators in your vehicle.
2-way communication is only available if the garage door opener motor used is a compati-
ble device. (To check device compat ibility, refer to www.homelink.com.)
1Within 5 seconds after programming the garage door opener has been completed, if
the garage door opener motor is trained to HomeLink
®, both garage door operation
indicators will flash rapidly (green) and the light on the garage door opener motor will
blink twice, indicating that 2-way communication is enabled.
If the indicators do not flash, perform
2 and 3 within the first 10 presses of the HomeLink®
button after programming has been completed.
2Press a programmed HomeLink® button to operate a garage door.
3Within 1 minute of pressing the HomeLink® button, after the garage door operation
has stopped, press the “Learn” or “Smart” button on the garage door opener motor.
Within 5 seconds of the establishment of 2-way communication with the garage door
opener, both garage door operation indicator s in the vehicle will flash rapidly (green)
and the light on the garage d oor opener motor will blink tw ice, indicating that 2-way
communication is enabled.
■Reprogramming a single HomeLink® button
When the following procedure is performed, buttons which already have devices registered
to them can be overwritten:
1With one hand, press and hold the desired HomeLink® button.
2When the HomeLink® indicator starts flashing (orange), continue to hold the
HomeLink
® button and perform “Programming HomeLink®” 1 (it takes 20 seconds
for the HomeLink
® indicator to start flashing).
Press the appropriate HomeLink
® button. The HomeLink® indicator light should turn on.
Operating HomeLink®
Page 82 of 100

81
UX250h_QG_OM76572U_(U)
Microphone
“SOS” button
LED light indicators
Subscribers have the following Safety Connect services available:
● Automatic Collision Notification
In case of either airbag deployment or seve re rear-end collision, the system is designed
to automatically call the response center. The responding agent receives the vehicle’s
location and attempts to speak with the vehicle occupants to assess the level of emer-
gency. If the occupants are unable to communicate, the agent automatically treats the
call as an emergency, contacts the nearest emergency services provider to describe the
situation, and requests that assistance be sent to the location.
Lexus Enform Safety Connect (if equipped)
Safety Connect is a subscription-based telematics service that uses Global Positioning
System (GPS) data and embedded cellular technology to provide safety and security fea-
tures to subscribers. Safety Connect is suppo rted by Lexus’ designated response center,
which operates 24 hours per day, 7 days per week.
Safety Connect service is available by subscription on select, telematics hardware-
equipped vehicles.
System components
A
B
C
Services