fuse LEXUS UX250H 2019 Owners Manual
[x] Cancel search | Manufacturer: LEXUS, Model Year: 2019, Model line: UX250H, Model: LEXUS UX250H 2019Pages: 476, PDF Size: 10.51 MB
Page 4 of 476
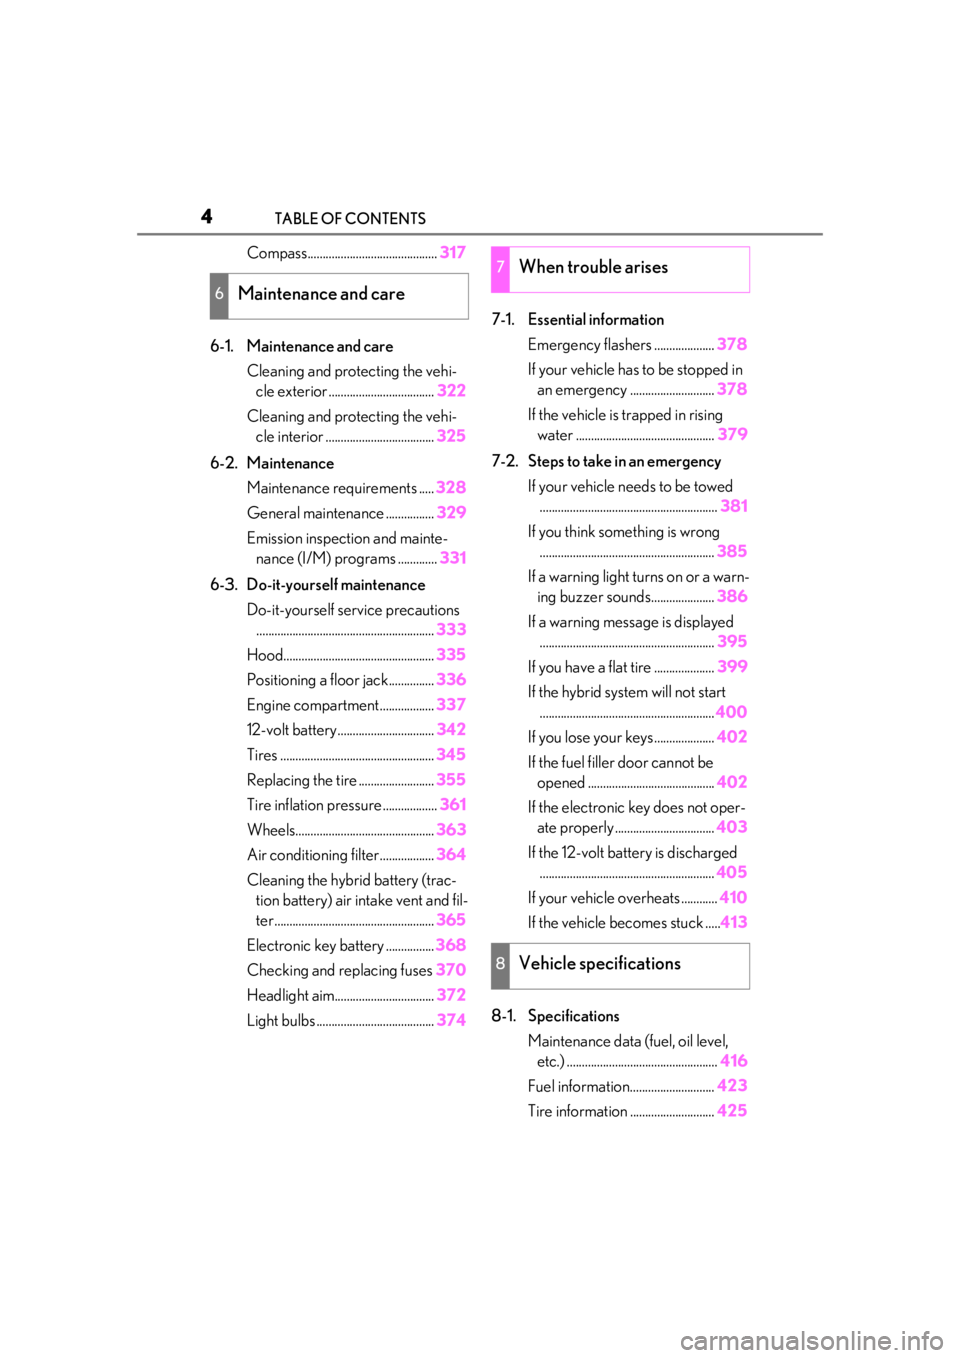
4TABLE OF CONTENTS
Compass...........................................317
6-1. Maintenance and care Cleaning and protecting the vehi-cle exterior ................................... 322
Cleaning and protecting the vehi- cle interior .................................... 325
6-2. Maintenance Maintenance requirements ..... 328
General maintenance ................ 329
Emission inspection and mainte- nance (I/M) programs ............. 331
6-3. Do-it-yourself maintenance Do-it-yourself service precautions........................................................... 333
Hood.................................................. 335
Positioning a floor jack............... 336
Engine compartment.................. 337
12-volt battery................................ 342
Tires ................................................... 345
Replacing the tire ......................... 355
Tire inflation pressure .................. 361
Wheels.............................................. 363
Air conditioning filter..................364
Cleaning the hybrid battery (trac- tion battery) air intake vent and fil-
ter..................................................... 365
Electronic key battery ................ 368
Checking and replacing fuses 370
Headlight aim................................. 372
Light bulbs ....................................... 3747-1. Essential information
Emergency flashers .................... 378
If your vehicle has to be stopped in an emergency ............................ 378
If the vehicle is trapped in rising water .............................................. 379
7-2. Steps to take in an emergency If your vehicle needs to be towed........................................................... 381
If you think something is wrong .......................................................... 385
If a warning light turns on or a warn- ing buzzer sounds..................... 386
If a warning messa ge is displayed
.......................................................... 395
If you have a flat tire .................... 399
If the hybrid syst em will not start
.......................................................... 400
If you lose your keys.................... 402
If the fuel filler door cannot be opened .......................................... 402
If the electronic key does not oper- ate properly ................................. 403
If the 12-volt battery is discharged .......................................................... 405
If your vehicle overheats ............ 410
If the vehicle becomes stuck ..... 413
8-1. Specifications Maintenance data (fuel, oil level, etc.) .................................................. 416
Fuel information............................ 423
Tire inform
ation ............................ 425
6Maintenance and care
7When trouble arises
8Vehicle specifications
Page 321 of 476
321
6
6
Maintenance and care
Maintenance and care
6-1. Maintenance and careCleaning and protecting the vehi-cle exterior ................................ 322
Cleaning and protecting the vehi- cle interior ................................. 325
6-2. Maintenance Maintenance requirements .. 328
General maintenance ............. 329
Emission inspection and mainte- nance (I/M) programs .......... 331
6-3. Do-it-yourself maintenance Do-it-yourself service precautions........................................................ 333
Hood............................................... 335
Positioning a floor jack............ 336
Engine compartment............... 337
12-volt battery............................. 342
Tires ................................................ 345
Replacing the tire ...................... 355
Tire inflation pressure ............... 361
Wheels........................................... 363
Air conditioning filter...............364
Cleaning the hybrid battery (trac- tion battery) air intake vent and
filter .............................................. 365
Electronic key battery ............. 368
Checking and replacing fuses ........................................................ 370
Headlight aim.............................. 372
Light bulbs .................................... 374
Page 333 of 476
3336-3. Do-it-yourself maintenance
6
Maintenance and care
6-3.Do-it-yourself maintenance
Do-it-yourself service pre-
cautions
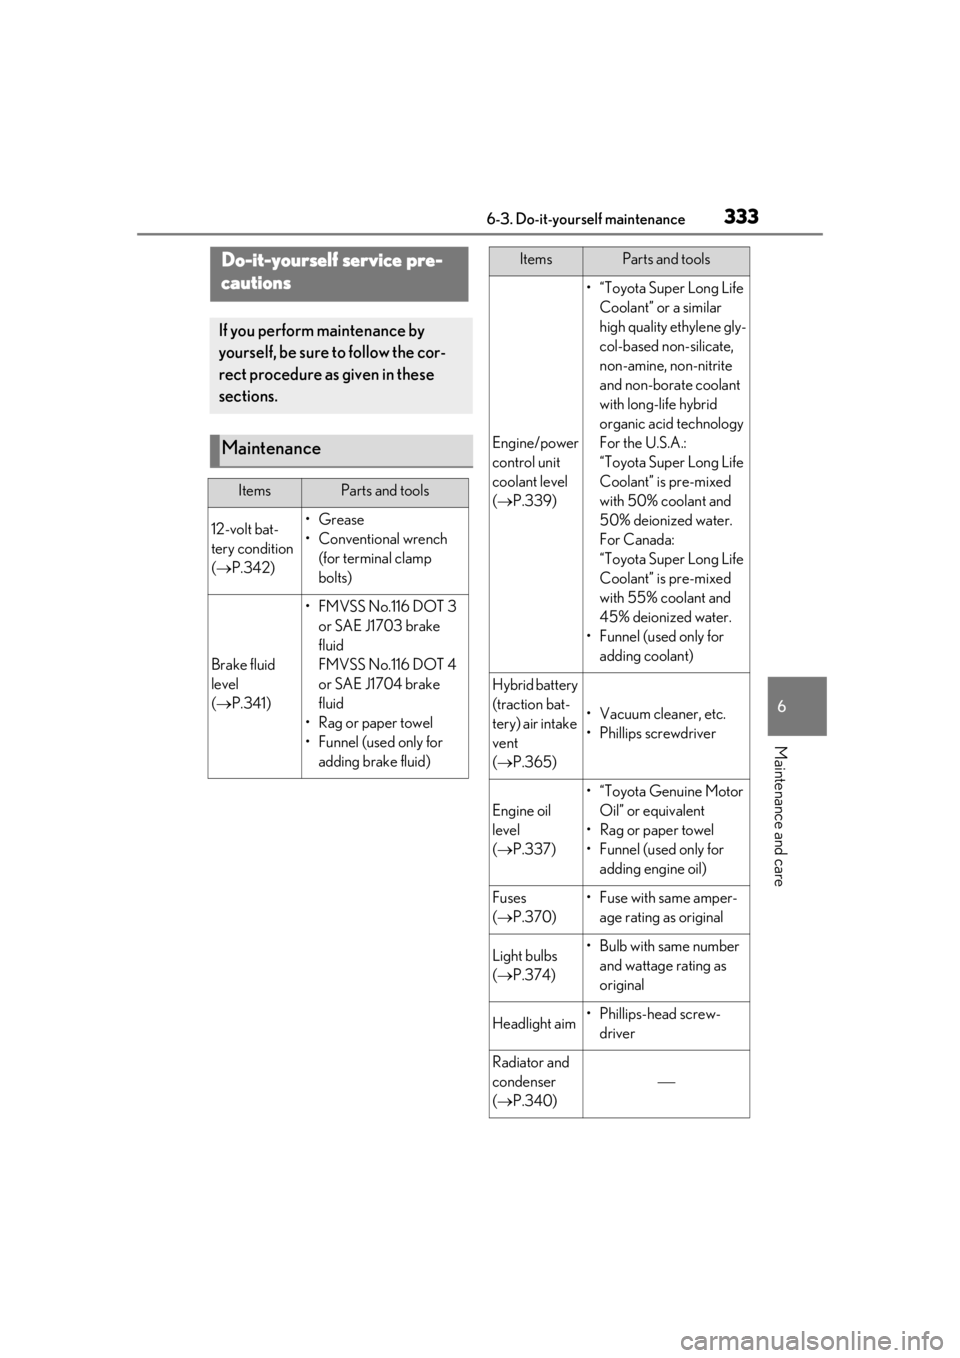
If you perform maintenance by
yourself, be sure to follow the cor-
rect procedure as given in these
sections.
Maintenance
ItemsParts and tools
12-volt bat-
tery condition
( P.342)•Grease
•Conventional wrench
(for terminal clamp
bolts)
Brake fluid
level
( P.341)
• FMVSS No.116 DOT 3
or SAE J1703 brake
fluid
FMVSS No.116 DOT 4
or SAE J1704 brake
fluid
• Rag or paper towel
• Funnel (used only for adding brake fluid)
Engine/power
control unit
coolant level
( P.339)
•“Toyota Super Long Life
Coolant” or a similar
high quality ethylene gly-
col-based non-silicate,
non-amine, non-nitrite
and non-borate coolant
with long-life hybrid
organic acid technology
For the U.S.A.:
“Toyota Super Long Life
Coolant” is pre-mixed
with 50% coolant and
50% deionized water.
For Canada:
“Toyota Super Long Life
Coolant” is pre-mixed
with 55% coolant and
45% deionized water.
• Funnel (used only for adding coolant)
Hybrid battery
(traction bat-
tery) air intake
vent
( P.365)
• Vacuum cleaner, etc.
• Phillips screwdriver
Engine oil
level
( P.337)
•“Toyota Genuine Motor
Oil” or equivalent
• Rag or paper towel
• Funnel (used only for adding engine oil)
Fuses
( P.370)• Fuse with same amper-
age rating as original
Light bulbs
( P.374)•Bulb with same number
and wattage rating as
original
Headlight aim• Phillips-head screw-driver
Radiator and
condenser
( P.340)
ItemsParts and tools
Page 337 of 476
3376-3. Do-it-yourself maintenance
6
Maintenance and care
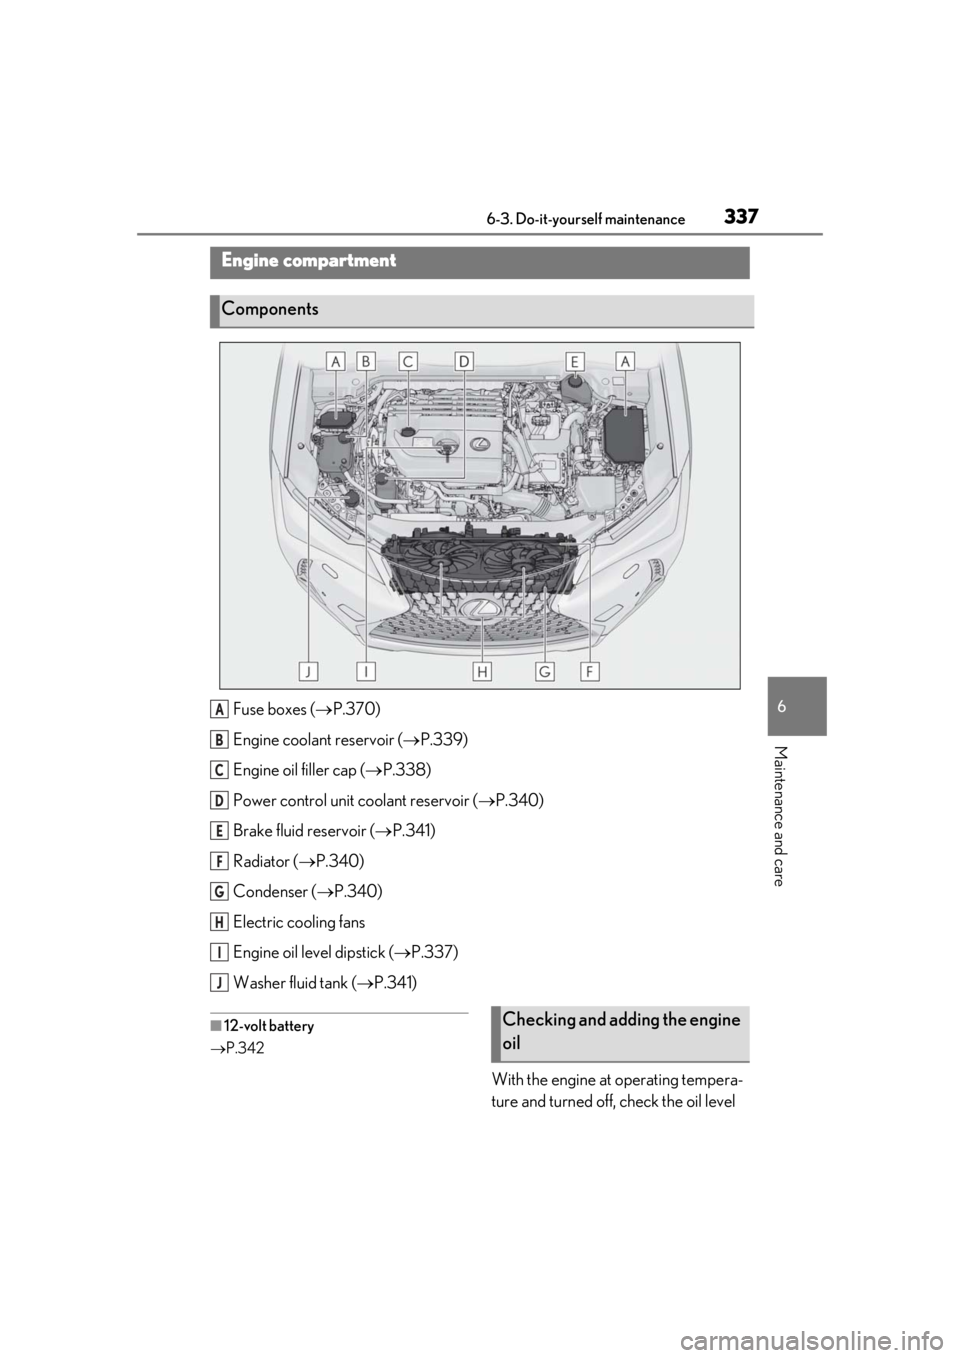
Fuse boxes (P.370)
Engine coolant reservoir ( P.339)
Engine oil filler cap ( P.338)
Power control unit coolant reservoir ( P.340)
Brake fluid reservoir ( P.341)
Radiator ( P.340)
Condenser ( P.340)
Electric cooling fans
Engine oil level dipstick ( P.337)
Washer fluid tank ( P.341)
■12-volt battery
P.342
With the engine at operating tempera-
ture and turned off, check the oil level
Engine compartment
Components
A
B
C
D
E
F
G
H
I
J
Checking and adding the engine
oil
Page 370 of 476
3706-3. Do-it-yourself maintenance
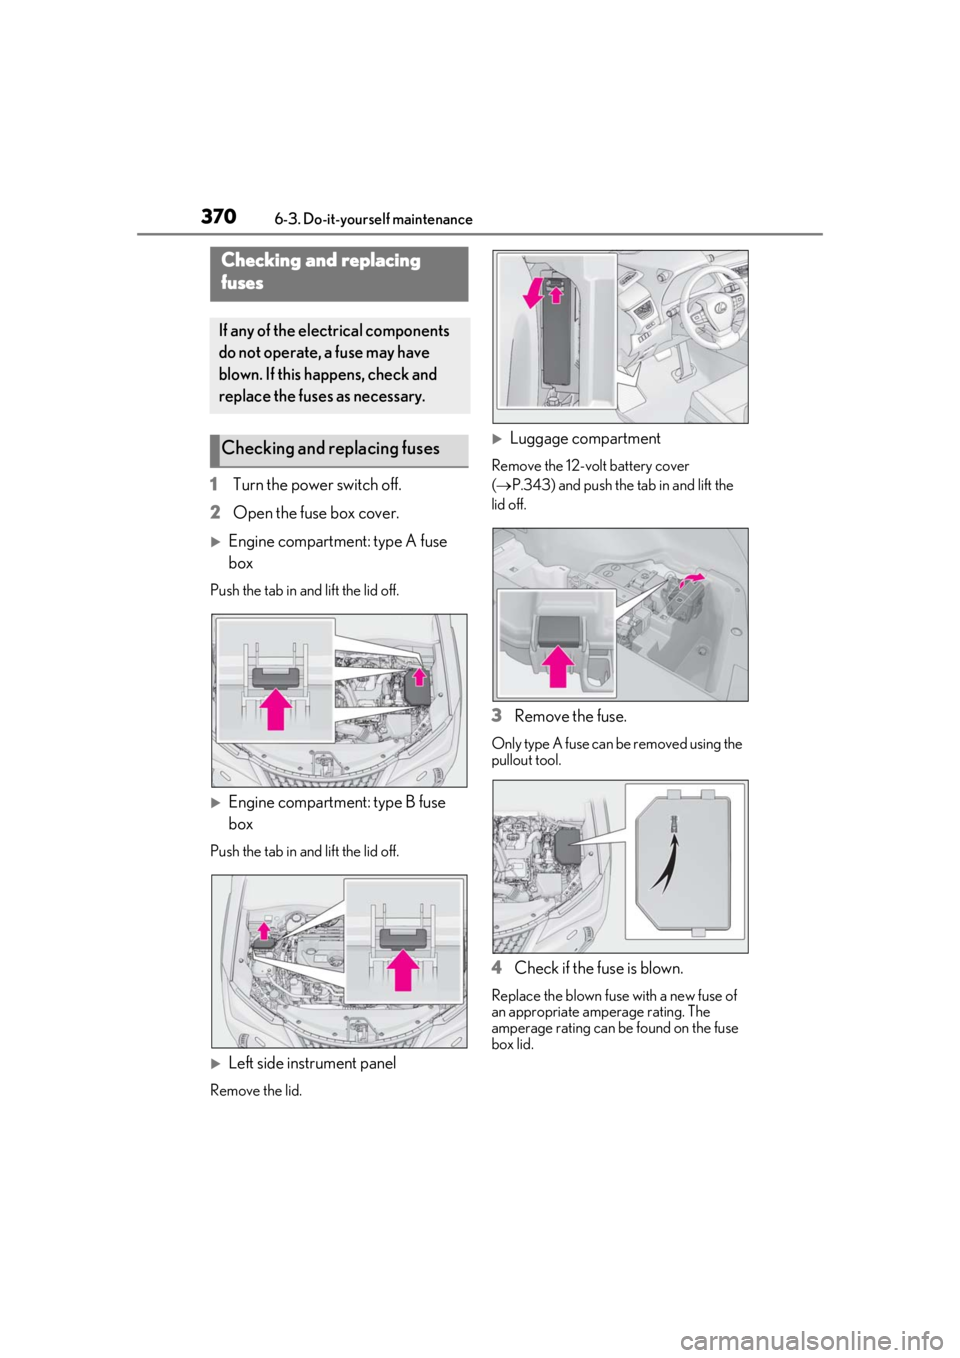
1Turn the power switch off.
2 Open the fuse box cover.
Engine compartment: type A fuse
box
Push the tab in and lift the lid off.
Engine compartment: type B fuse
box
Push the tab in and lift the lid off.
Left side instrument panel
Remove the lid.
Luggage compartment
Remove the 12-volt battery cover
( P.343) and push the tab in and lift the
lid off.
3 Remove the fuse.
Only type A fuse can be removed using the
pullout tool.
4Check if the fuse is blown.
Replace the blown fuse with a new fuse of
an appropriate amperage rating. The
amperage rating can be found on the fuse
box lid.
Checking and replacing
fuses
If any of the electrical components
do not operate, a fuse may have
blown. If this happens, check and
replace the fuses as necessary.
Checking and replacing fuses
Page 371 of 476
3716-3. Do-it-yourself maintenance
6
Maintenance and care
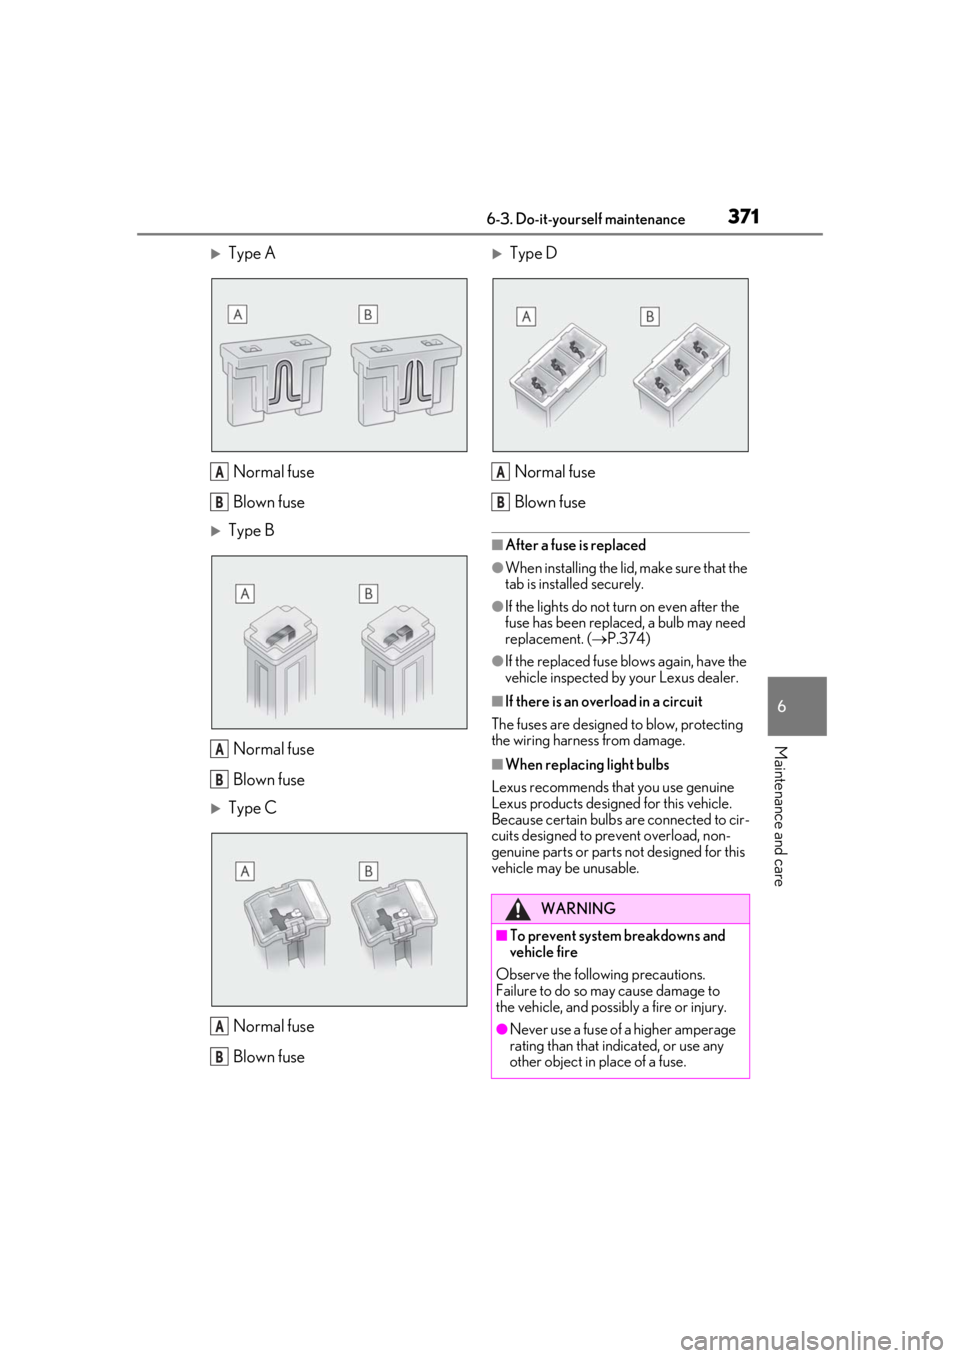
Type ANormal fuse
Blown fuse
Type BNormal fuse
Blown fuse
Type CNormal fuse
Blown fuse
Type DNormal fuse
Blown fuse
■After a fuse is replaced
●When installing the lid, make sure that the
tab is installed securely.
●If the lights do not turn on even after the
fuse has been replaced, a bulb may need
replacement. ( P.374)
●If the replaced fuse blows again, have the
vehicle inspected by your Lexus dealer.
■If there is an overload in a circuit
The fuses are designed to blow, protecting
the wiring harness from damage.
■When replacing light bulbs
Lexus recommends that you use genuine
Lexus products designed for this vehicle.
Because certain bulbs are connected to cir-
cuits designed to prevent overload, non-
genuine parts or parts not designed for this
vehicle may be unusable.
A
B
A
B
A
B
WARNING
■To prevent system breakdowns and
vehicle fire
Observe the following precautions.
Failure to do so may cause damage to
the vehicle, and possibly a fire or injury.
●Never use a fuse of a higher amperage
rating than that indicated, or use any
other object in place of a fuse.
A
B
Page 372 of 476
3726-3. Do-it-yourself maintenance
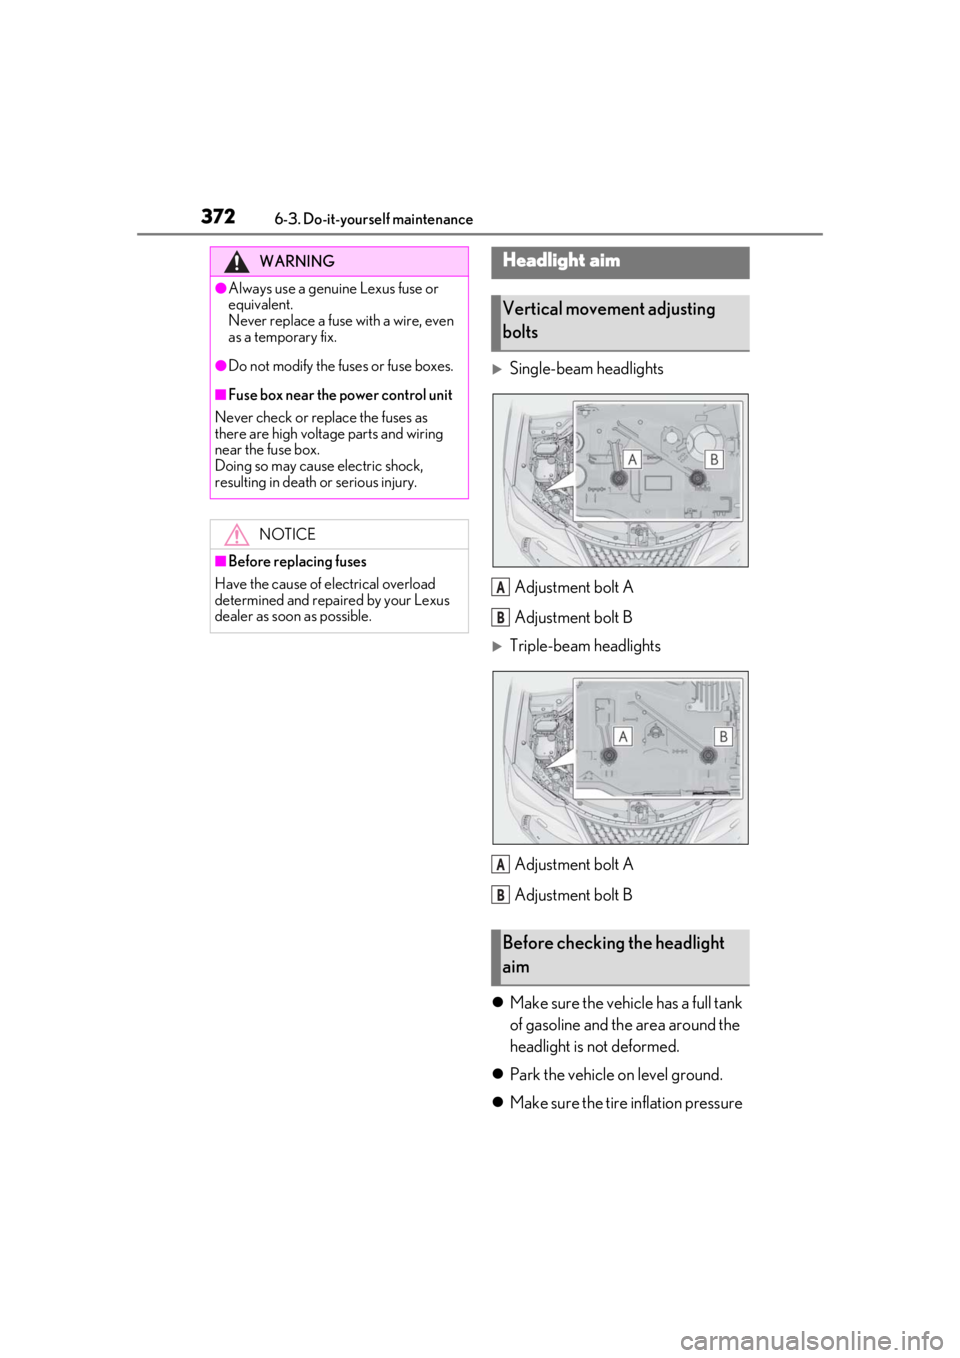
Single-beam headlightsAdjustment bolt A
Adjustment bolt B
Triple-beam headlightsAdjustment bolt A
Adjustment bolt B
Make sure the vehicle has a full tank
of gasoline and the area around the
headlight is not deformed.
Park the vehicle on level ground.
Make sure the tire inflation pressure
WARNING
●Always use a genuine Lexus fuse or
equivalent.
Never replace a fuse with a wire, even
as a temporary fix.
●Do not modify the fuses or fuse boxes.
■Fuse box near the power control unit
Never check or replace the fuses as
there are high voltage parts and wiring
near the fuse box.
Doing so may cause electric shock,
resulting in death or serious injury.
NOTICE
■Before replacing fuses
Have the cause of electrical overload
determined and repaired by your Lexus
dealer as soon as possible.
Headlight aim
Vertical movement adjusting
bolts
Before checking the headlight
aim
A
B
A
B
Page 400 of 476
4007-2. Steps to take in an emergency
One of the following may be the cause
of the problem:
The electronic key may not be func-
tioning properly. ( P.403)
There may not be sufficient fuel in
the vehicle’s tank.
Refuel the vehicle. ( P.190)
There may be a malfunction in the
immobilizer system. ( P.69)
There may be a malfunction in the
steering lock system.
The hybrid system may be malfunc-
tioning due to an electrical problem
such as electronic key battery
depletion or a blown fuse. However,
depending on the type of malfunc-
tion, an interim measure is available
to start the hybrid system.
One of the following may be the cause
NOTICE
■When replacing the tires
When removing or fitting the wheels,
tires or the tire pressure warning valve
and transmitter, contact your Lexus
dealer as the tire pr essure warning valve
and transmitter may be damaged if not
handled correctly.
■When driving over bumps
If a vehicle has a flat tire, the vehicle
height will be lower than usual. Ensure
that nothing strikes the bottom of the
vehicle.
■To avoid damaging the tire pressure
warning valves and transmitters
When a tire is repaired with liquid seal-
ants, the tire pressure warning valve and
transmitter may not operate properly. If a
liquid sealant is used , contact your Lexus
dealer or other qualified service shop as
soon as possible. Make sure to replace
the tire pressure warning valve and trans-
mitter when replacing the tire. ( P.350)
If the hybrid system will not
s
tart
Reasons for the hybrid system not
starting vary depending on the situ-
ation. Check the following and per-
form the appropriate procedure:
The hybrid system will not start
even though the correct starting
procedure is being followed.
( P.162)
The interior lights and head-
lights are dim, or the horn does
not sound or sounds at a low vol-
ume.
Page 405 of 476
4057-2. Steps to take in an emergency
7
When trouble arises
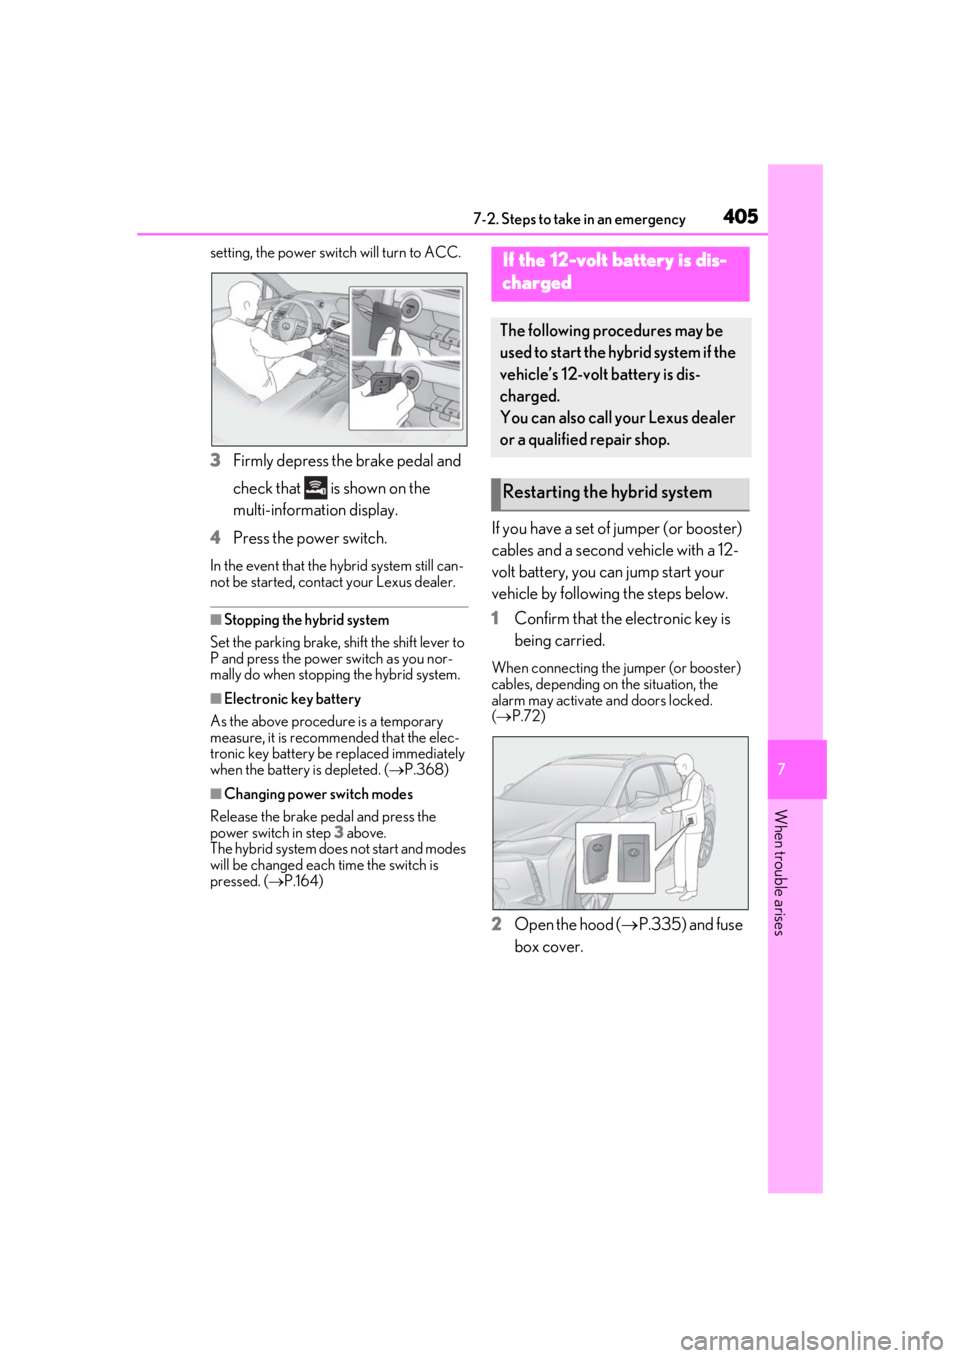
setting, the power switch will turn to ACC.
3Firmly depress the brake pedal and
check that is shown on the
multi-information display.
4 Press the power switch.
In the event that the hybrid system still can-
not be started, contact your Lexus dealer.
■Stopping the hybrid system
Set the parking brake, shift the shift lever to
P and press the power switch as you nor-
mally do when stopping the hybrid system.
■Electronic key battery
As the above procedure is a temporary
measure, it is recomme nded that the elec-
tronic key battery be replaced immediately
when the battery is depleted. ( P.368)
■Changing power switch modes
Release the brake pedal and press the
power switch in step 3 above.
The hybrid system does not start and modes
will be changed each time the switch is
pressed. ( P.164)
If you have a set of jumper (or booster)
cables and a second vehicle with a 12-
volt battery, you can jump start your
vehicle by following the steps below.
1 Confirm that the electronic key is
being carried.
When connecting the jumper (or booster)
cables, depending on the situation, the
alarm may activate and doors locked.
( P.72)
2 Open the hood ( P.335) and fuse
box cover.
If the 12-volt battery is dis-
charged
The following procedures may be
used to start the hybrid system if the
vehicle’s 12-volt battery is dis-
charged.
You can also call your Lexus dealer
or a qualified repair shop.
Restarting the hybrid system
Page 407 of 476
4077-2. Steps to take in an emergency
7
When trouble arises
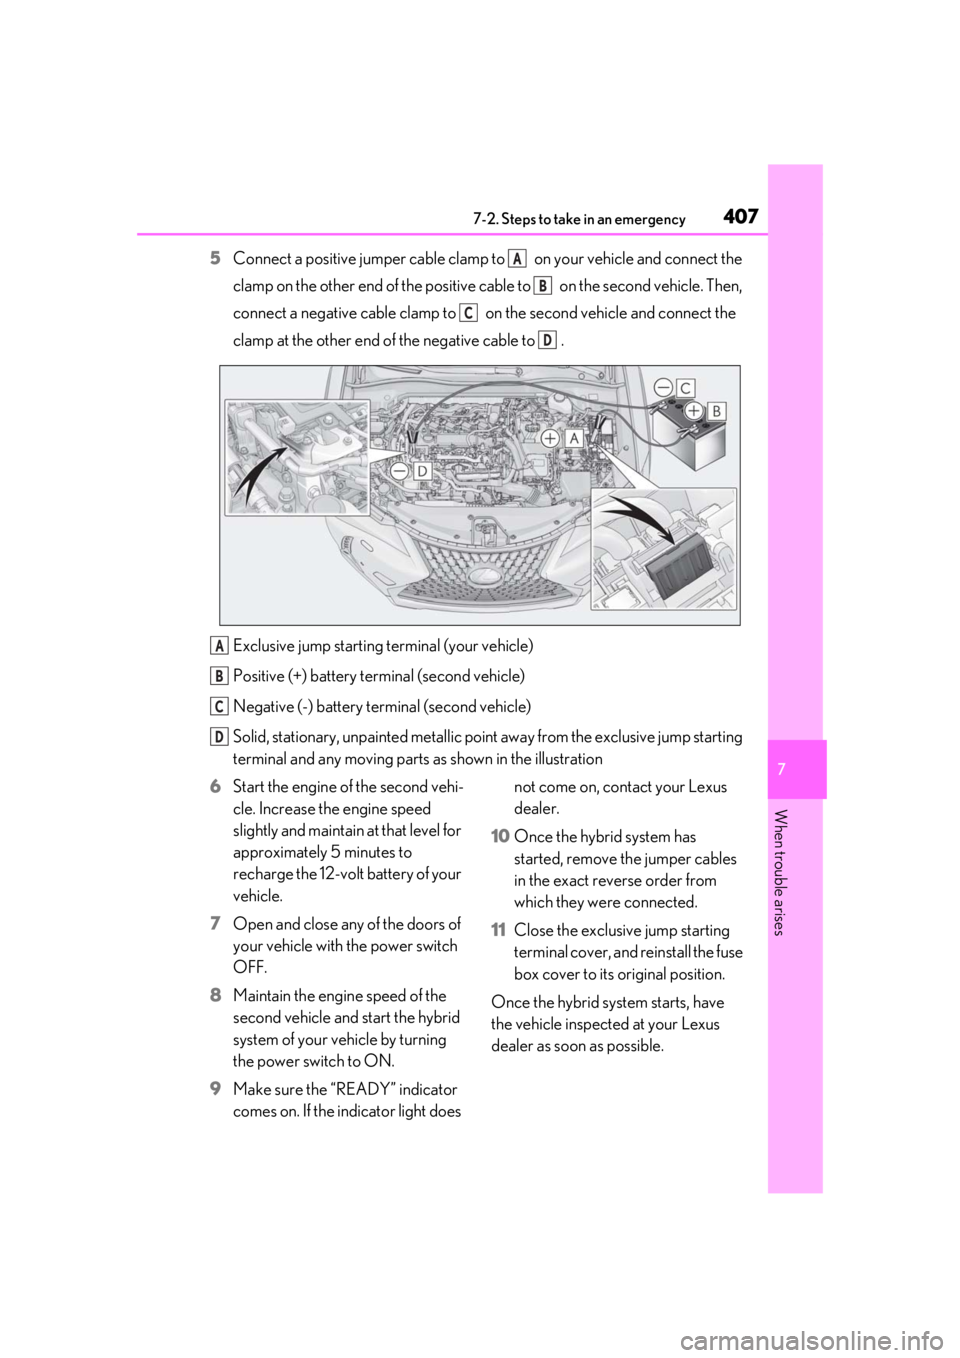
5Connect a positive jumper cable clamp to on your vehicle and connect the
clamp on the other end of the positive cab le to on the second vehicle. Then,
connect a negative cable clamp to on the second vehicle and connect the
clamp at the other end of the negative cable to .
Exclusive jump starting terminal (your vehicle)
Positive (+) battery terminal (second vehicle)
Negative (-) battery terminal (second vehicle)
Solid, stationary, unpainted metallic point away from the exclusive jump starting
terminal and any mo ving parts as shown in the illustration
6 Start the engine of the second vehi-
cle. Increase the engine speed
slightly and maintain at that level for
approximately 5 minutes to
recharge the 12-volt battery of your
vehicle.
7 Open and close any of the doors of
your vehicle with the power switch
OFF.
8 Maintain the engine speed of the
second vehicle and start the hybrid
system of your vehicle by turning
the power switch to ON.
9 Make sure the “READY” indicator
comes on. If the indicator light does not come on, contact your Lexus
dealer.
10 Once the hybrid system has
started, remove the jumper cables
in the exact reverse order from
which they were connected.
11 Close the exclusive jump starting
terminal cover, and reinstall the fuse
box cover to its original position.
Once the hybrid system starts, have
the vehicle inspected at your Lexus
dealer as soon as possible.A
B
C
D
A
B
C
D