headlamp LINCOLN AVIATOR 2004 User Guide
[x] Cancel search | Manufacturer: LINCOLN, Model Year: 2004, Model line: AVIATOR, Model: LINCOLN AVIATOR 2004Pages: 336, PDF Size: 3.69 MB
Page 92 of 336
Replacing HID headlamp bulbs (if equipped)
The low beam headlamps on your vehicle use a ªhigh intensity dischargeº
source. These lamps operate at a high voltage. The bulb is NOT
replaceable. When the bulb is burned out, the bulb assembly must be
replaced by your dealer or a qualified technician.
Replacing front parking lamp/turn signal/sidemarker bulbs
To remove the headlamps from the vehicle and to change the front turn
signal lamp bulbs:
1. Make sure the headlamp switch is
in the OFF position, then open the
hood.
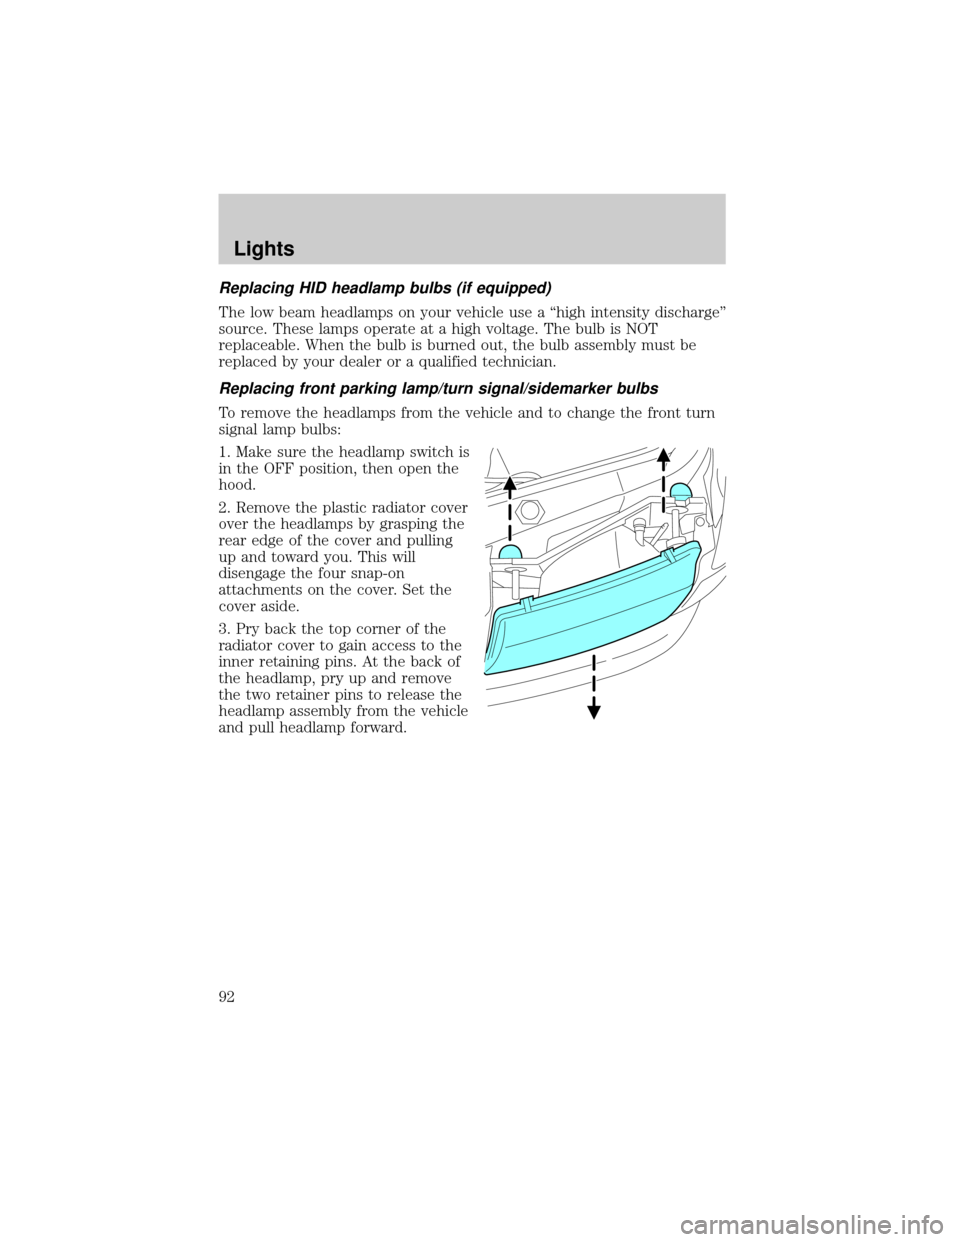
2. Remove the plastic radiator cover
over the headlamps by grasping the
rear edge of the cover and pulling
up and toward you. This will
disengage the four snap-on
attachments on the cover. Set the
cover aside.
3. Pry back the top corner of the
radiator cover to gain access to the
inner retaining pins. At the back of
the headlamp, pry up and remove
the two retainer pins to release the
headlamp assembly from the vehicle
and pull headlamp forward.
Lights
92
Page 93 of 336
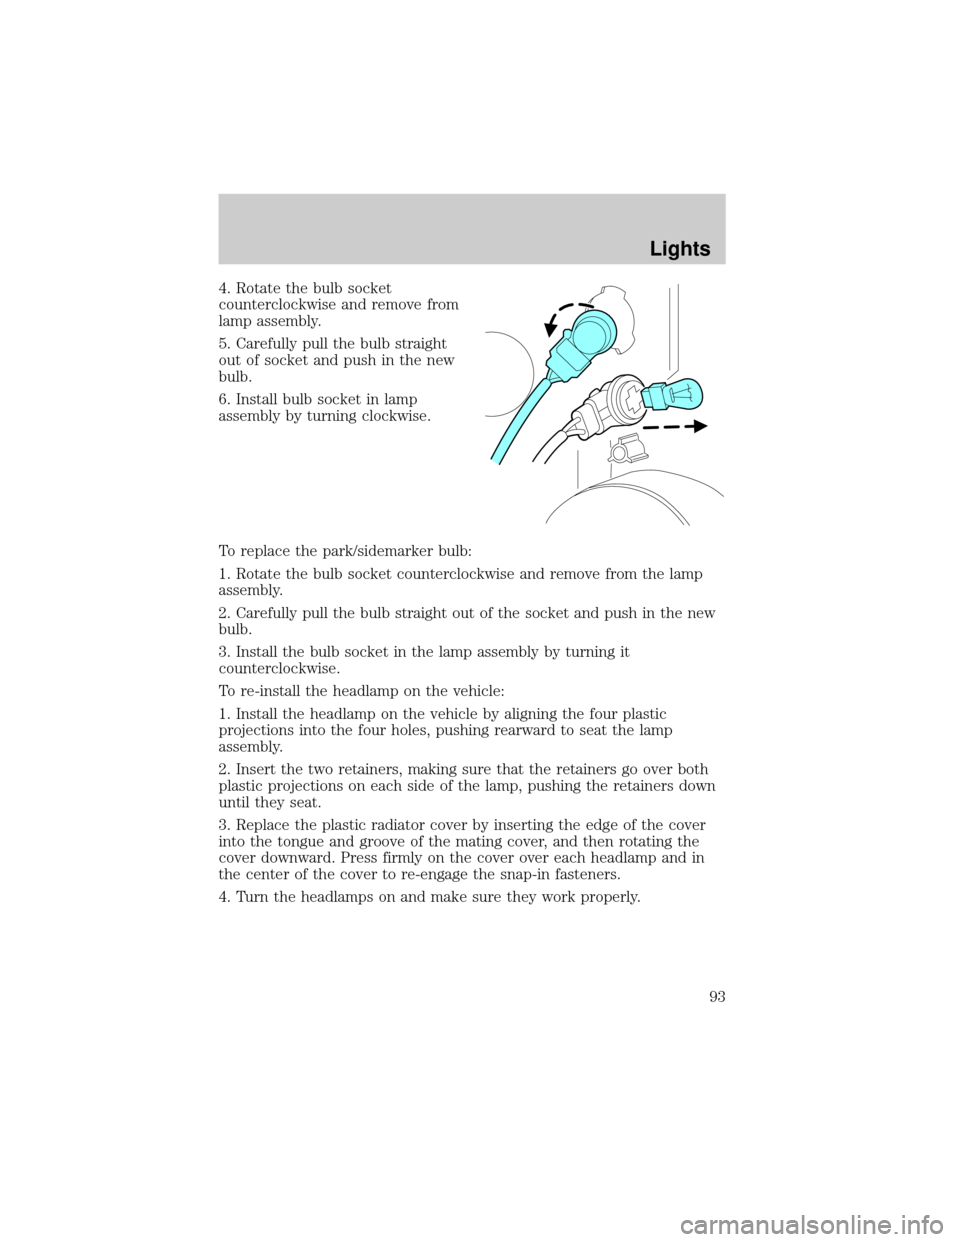
4. Rotate the bulb socket
counterclockwise and remove from
lamp assembly.
5. Carefully pull the bulb straight
out of socket and push in the new
bulb.
6. Install bulb socket in lamp
assembly by turning clockwise.
To replace the park/sidemarker bulb:
1. Rotate the bulb socket counterclockwise and remove from the lamp
assembly.
2. Carefully pull the bulb straight out of the socket and push in the new
bulb.
3. Install the bulb socket in the lamp assembly by turning it
counterclockwise.
To re-install the headlamp on the vehicle:
1. Install the headlamp on the vehicle by aligning the four plastic
projections into the four holes, pushing rearward to seat the lamp
assembly.
2. Insert the two retainers, making sure that the retainers go over both
plastic projections on each side of the lamp, pushing the retainers down
until they seat.
3. Replace the plastic radiator cover by inserting the edge of the cover
into the tongue and groove of the mating cover, and then rotating the
cover downward. Press firmly on the cover over each headlamp and in
the center of the cover to re-engage the snap-in fasteners.
4. Turn the headlamps on and make sure they work properly.
Lights
93
Page 94 of 336
Replacing tail/brake/turn/sidemarker/backup lamp bulbs
The tail/brake/turn/sidemarker/backup bulbs are located in the tail lamp
assembly, one just below the other. Follow the same steps to replace
each bulb:
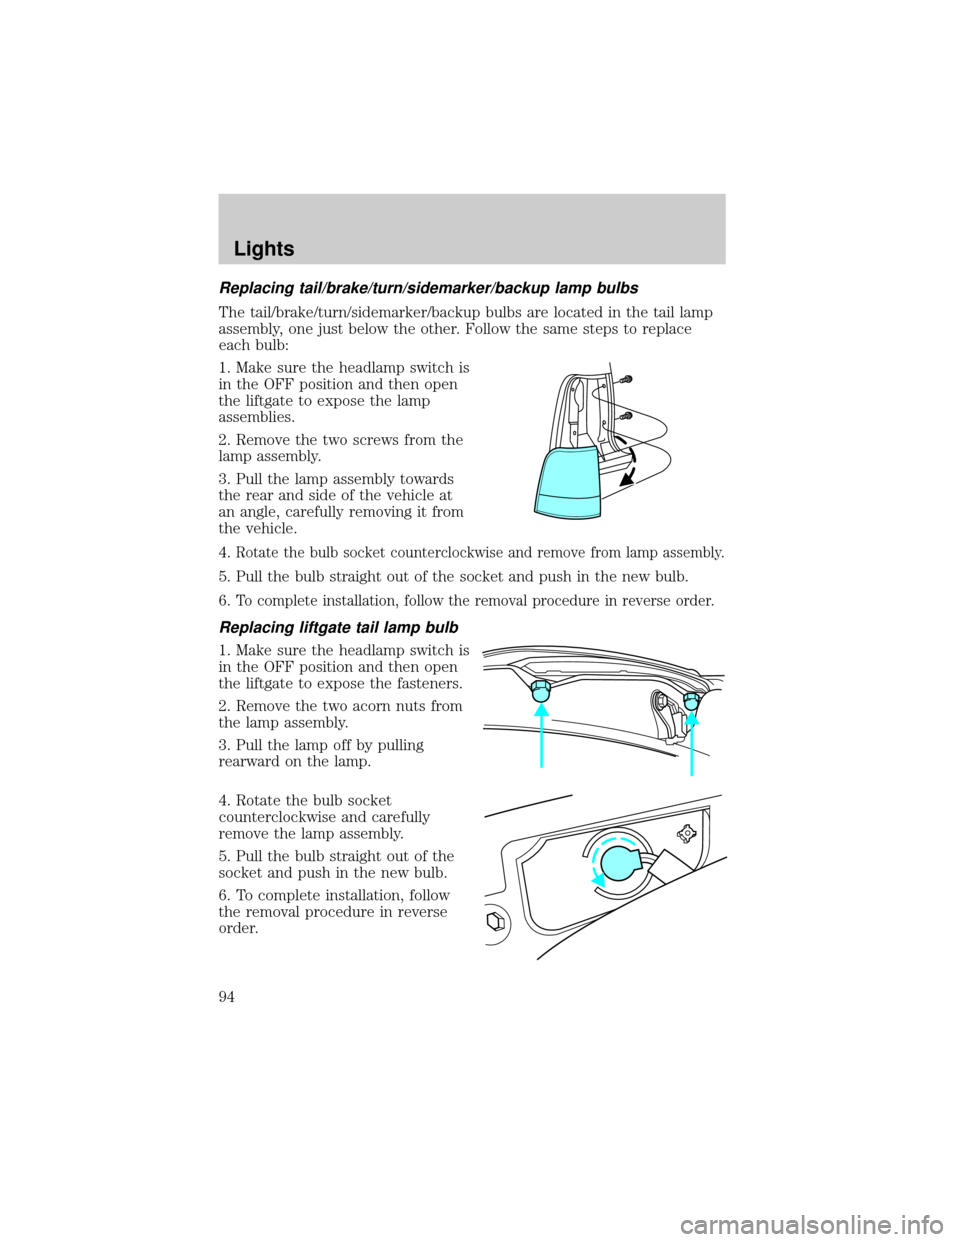
1. Make sure the headlamp switch is
in the OFF position and then open
the liftgate to expose the lamp
assemblies.
2. Remove the two screws from the
lamp assembly.
3. Pull the lamp assembly towards
the rear and side of the vehicle at
an angle, carefully removing it from
the vehicle.
4.
Rotate the bulb socket counterclockwise and remove from lamp assembly.
5. Pull the bulb straight out of the socket and push in the new bulb.
6.
To complete installation, follow the removal procedure in reverse order.
Replacing liftgate tail lamp bulb
1. Make sure the headlamp switch is
in the OFF position and then open
the liftgate to expose the fasteners.
2. Remove the two acorn nuts from
the lamp assembly.
3. Pull the lamp off by pulling
rearward on the lamp.
4. Rotate the bulb socket
counterclockwise and carefully
remove the lamp assembly.
5. Pull the bulb straight out of the
socket and push in the new bulb.
6. To complete installation, follow
the removal procedure in reverse
order.
Lights
94
Page 95 of 336
Replacing foglamp bulbs
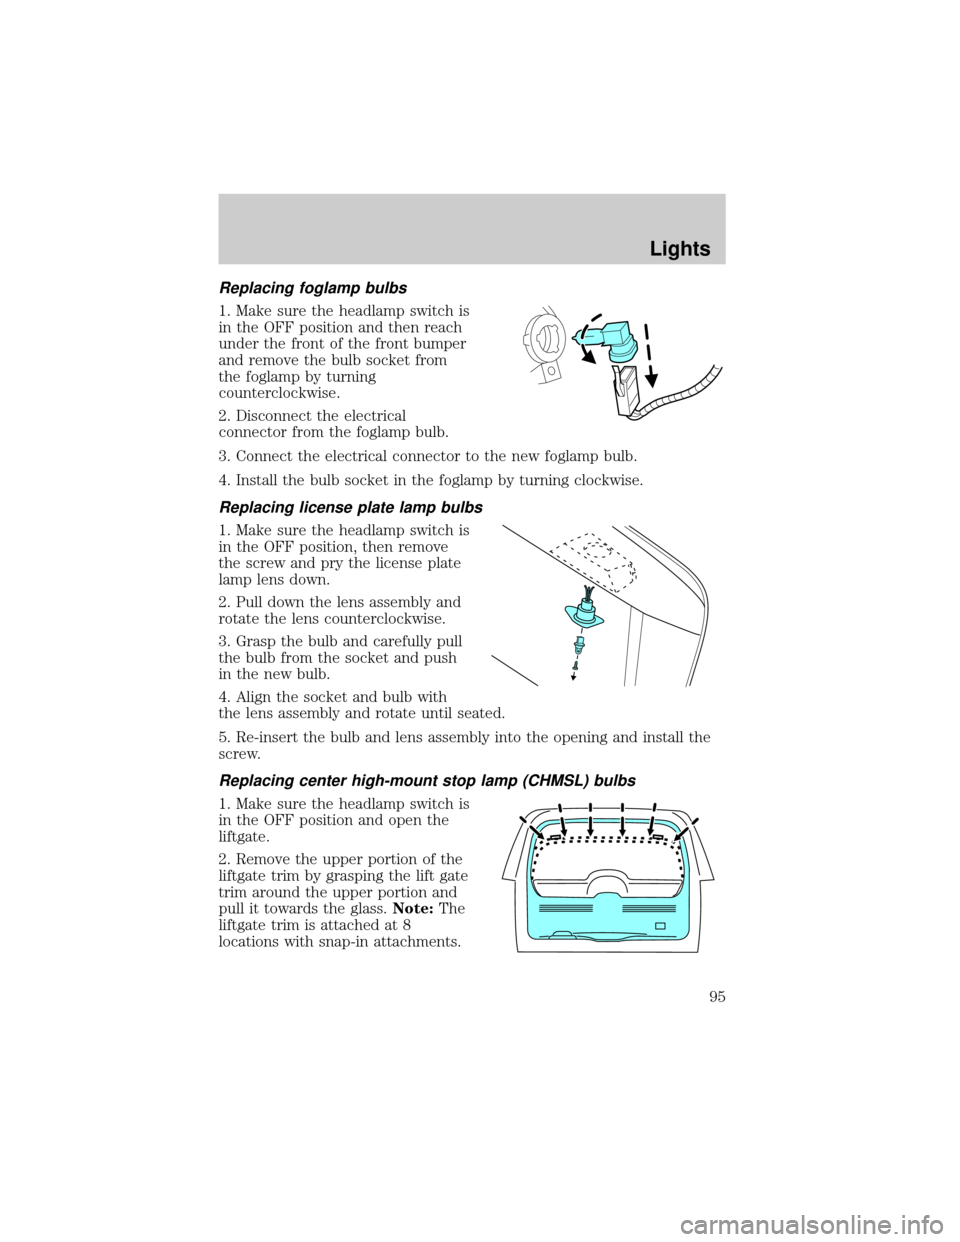
1. Make sure the headlamp switch is
in the OFF position and then reach
under the front of the front bumper
and remove the bulb socket from
the foglamp by turning
counterclockwise.
2. Disconnect the electrical
connector from the foglamp bulb.
3. Connect the electrical connector to the new foglamp bulb.
4. Install the bulb socket in the foglamp by turning clockwise.
Replacing license plate lamp bulbs
1. Make sure the headlamp switch is
in the OFF position, then remove
the screw and pry the license plate
lamp lens down.
2. Pull down the lens assembly and
rotate the lens counterclockwise.
3. Grasp the bulb and carefully pull
the bulb from the socket and push
in the new bulb.
4. Align the socket and bulb with
the lens assembly and rotate until seated.
5. Re-insert the bulb and lens assembly into the opening and install the
screw.
Replacing center high-mount stop lamp (CHMSL) bulbs
1. Make sure the headlamp switch is
in the OFF position and open the
liftgate.
2. Remove the upper portion of the
liftgate trim by grasping the lift gate
trim around the upper portion and
pull it towards the glass.Note:The
liftgate trim is attached at 8
locations with snap-in attachments.
Lights
95
Page 96 of 336
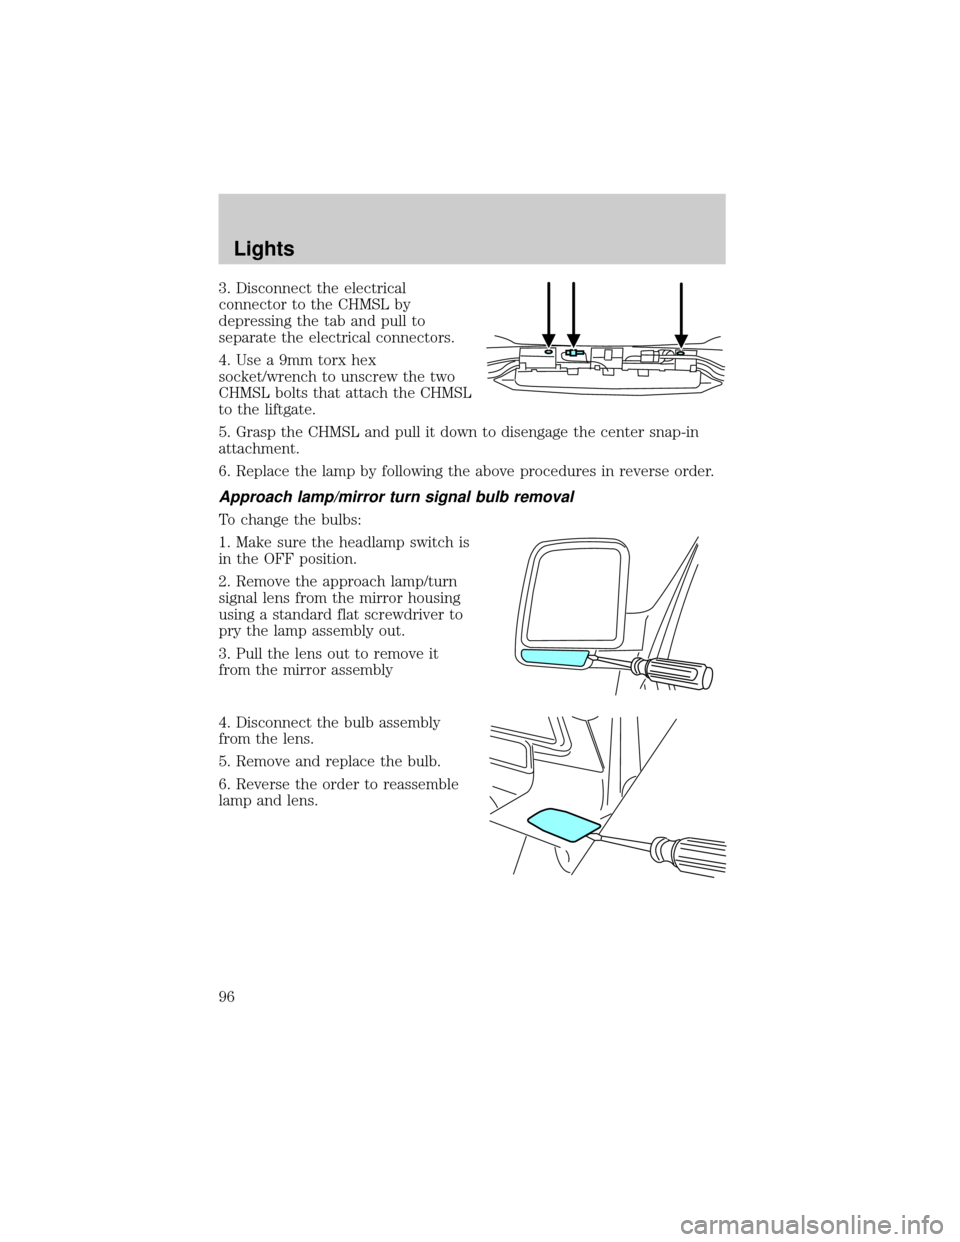
3. Disconnect the electrical
connector to the CHMSL by
depressing the tab and pull to
separate the electrical connectors.
4. Use a 9mm torx hex
socket/wrench to unscrew the two
CHMSL bolts that attach the CHMSL
to the liftgate.
5. Grasp the CHMSL and pull it down to disengage the center snap-in
attachment.
6. Replace the lamp by following the above procedures in reverse order.
Approach lamp/mirror turn signal bulb removal
To change the bulbs:
1. Make sure the headlamp switch is
in the OFF position.
2. Remove the approach lamp/turn
signal lens from the mirror housing
using a standard flat screwdriver to
pry the lamp assembly out.
3. Pull the lens out to remove it
from the mirror assembly
4. Disconnect the bulb assembly
from the lens.
5. Remove and replace the bulb.
6. Reverse the order to reassemble
lamp and lens.
Lights
96
Page 150 of 336
Arming the system
When armed, this system will help protect your vehicle from
unauthorized entry. When unauthorized entry occurs, the system will
flash the headlamps and/or parking lamps, and will chirp the horn.
The system is ready to arm whenever the key is removed from the
ignition. Any of the following actions will prearm the alarm system:
²Open any door, liftgate or liftgate
window and press the power door
lock control to lock the doors.
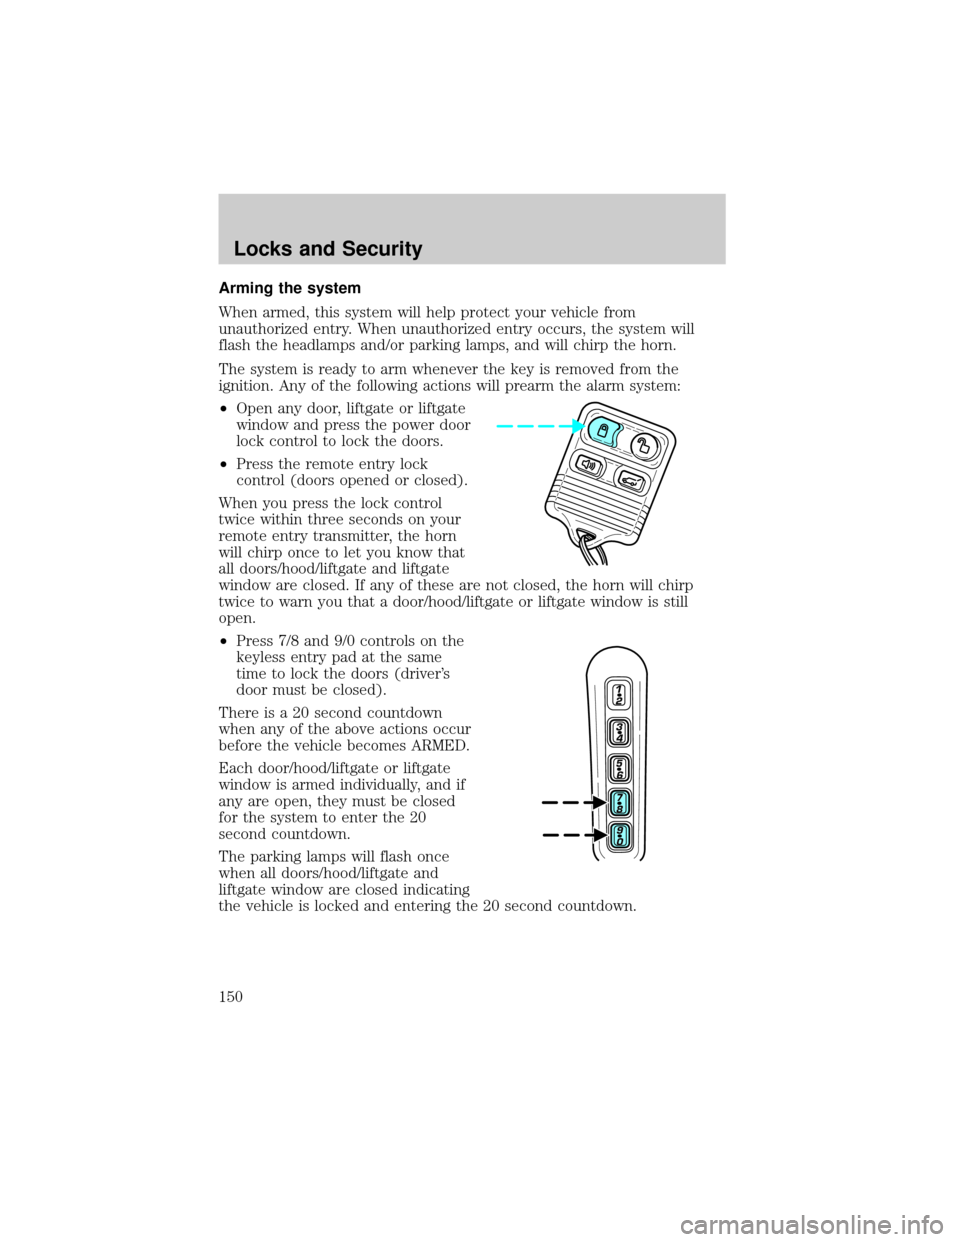
²Press the remote entry lock
control (doors opened or closed).
When you press the lock control
twice within three seconds on your
remote entry transmitter, the horn
will chirp once to let you know that
all doors/hood/liftgate and liftgate
window are closed. If any of these are not closed, the horn will chirp
twice to warn you that a door/hood/liftgate or liftgate window is still
open.
²Press 7/8 and 9/0 controls on the
keyless entry pad at the same
time to lock the doors (driver's
door must be closed).
There is a 20 second countdown
when any of the above actions occur
before the vehicle becomes ARMED.
Each door/hood/liftgate or liftgate
window is armed individually, and if
any are open, they must be closed
for the system to enter the 20
second countdown.
The parking lamps will flash once
when all doors/hood/liftgate and
liftgate window are closed indicating
the vehicle is locked and entering the 20 second countdown.
Locks and Security
150
Page 172 of 336
Do not sit on top of a buckled safety belt to avoid the Belt
Minder chime. Sitting on the safety belt will increase the risk of
injury in an accident. To disable (one-time) or deactivate the Belt
Minder feature please follow the directions stated below.
One time disable
Any time the safety belt is buckled and then unbuckled during an
ignition ON cycle, the BeltMinder will be disabled for that ignition cycle
only.
Deactivating/activating the BeltMinder feature
Read steps1-9thoroughly before proceeding with the
deactivation/activation programming procedure.
The BeltMinder feature can be deactivated/activated by performing the
following procedure:
Before following the procedure, make sure that:
²The parking brake is set
²The gearshift is in P (Park)
²The ignition switch is in the OFF position
²All vehicle doors are closed
²The driver's safety belt is unbuckled
²The parklamps/headlamps are in OFF position (If vehicle is equipped
with Autolamps, this will not affect the procedure.)
To reduce the risk of injury, do not deactivate/activate the Belt
Minder feature while driving the vehicle.
1. Turn the ignition switch to the RUN (or ON) position. (DO NOT
START THE ENGINE)
2. Wait until the safety belt warning light turns off. (Approximately 1±2
minutes)
²Steps 3±5 must be completed within 60 seconds or the procedure will
have to be repeated.
3. Buckle then unbuckle the safety belt three times, ending with the
safety belt unbuckled. This can be done before or during BeltMinder
warning activation.
4. Turn on the parklamps/headlamps, turn off the parklamps/headlamps.
Seating and Safety Restraints
172
Page 239 of 336
The high-current fuses are coded as follows:
Fuse/Relay
LocationFuse Amp
RatingPower Distribution Box
Description
1 60A** Power Junction Box (PJB)
2 30A** Door locks (BSM)
3 Ð Not used
4 40A** Heated backlight/mirrors
5 40A** Anti-lock Brake System (ABS)
module (pump)
6 60A** Delayed accessory
7 20A** Daytime Running Lamps (DRL)
module
8 20A** Electric cooling fan
9 20A** Headlamp switch
10 30A** ABS module (valves)
11 40A** PTEC relay contacts
12 50A** Ignition/Starter relay
13 40A** Trailer tow relays
14 15A* Brake lamp feed
15 10A* Keep alive power
(PTEC/cluster/DEATC)
16 20A* Power point #3
17 20A* Rear wiper module
18 20A* 4x4 module
19 30A** Driver window motor
20 30A** Electric trailer brakes
21 30A** Memory seat module
22 20A** Main exterior lamps (low beam
headlamps, high beam headlamps,
fog lamps)
23 30A** Ignition switch
24 20A* Horn relay
25 20A* Power point #1
26 20A* Fuel pump relay contacts
27 20A* Trailer tow lamps
Roadside Emergencies
239
Page 321 of 336

LINCOLN ACCESSORIES FOR YOUR VEHICLE
A wide selection of genuine Lincoln accessories are available for your
vehicle through your local authorized Lincoln or Ford of Canada dealer.
These quality accessories have been specifically engineered to fulfill your
automotive needs; they are custom designed to complement the style
and aerodynamic appearance of your vehicle. In addition, each accessory
is made from high quality materials and meets or exceeds Lincoln's
rigorous engineering and safety specifications. Ford Motor Company will
repair or replace any properly dealer-installed Lincoln accessory found to
be defective in factory-supplied materials or workmanship during the
warranty period, as well as any component damaged by the defective
accessory. The accessory will be warranted for whichever provides you
the greatest benefit:
²12 months or 20,000 km (12,000 miles) (whichever occurs first), or
²the remainder of your new vehicle limited warranty.
This means that genuine Lincoln accessories purchased along with your
new vehicle and installed by the dealer are covered for the full length of
your New Vehicle's Limited Warranty Ð 3 years or 60,000 km (36,000
miles) (whichever occurs first). Contact your dealer for details and a
copy of the warranty.
Not all accessories are available for all models.
Following is a list of several Lincoln Genuine Accessory products. Not all
accessories are available for all models. To find out what accessories are
available for your vehicle, please contact your dealer or visit our online
store at: www.lincolnaccessories.com.
Exterior style
Bug shields
Deflectors
Fender flares
Front end covers
Grille inserts
Headlamps, fog lights and Daytime Running Lamps (DRLS)
Running boards
Splash guards
Step Bars
Wheels
Accessories
Accessories
321
Page 326 of 336

change oil soon warning,
message center .......................276
checking and adding ..............276
dipstick ....................................276
filter, specifications ........278, 311
recommendations ...................278
refill capacities ........................312
specifications ..................314, 316
Exhaust fumes ..........................196
F
Fail safe cooling ........................284
Floor mats .................................133
Fluid capacities .........................312
Foglamps .....................................82
Four-Wheel Drive vehicles
driving off road .......................213
preparing to drive your
vehicle .....................................203
Fuel ............................................285
calculating fuel
economy ..........................121, 289
cap ...........................................287
capacity ...................................312
choosing the right fuel ...........288
comparisons with EPA fuel
economy estimates .................292
detergent in fuel .....................289
filling your vehicle with
fuel ...........................285, 287, 289
filter, specifications ........289, 311
fuel pump shut-off switch .....232
improving fuel economy ........289
octane rating ...................288, 316
quality ......................................288
running out of fuel .................289
safety information relating to
automotive fuels .....................285
Fuses ..................................233±234G
Garage Door Opener (see
Homelink wireless control
system) ......................................114
Gas cap (see Fuel cap) ............287
Gas mileage
(see Fuel economy) .................289
Gauges .........................................14
GAWR (Gross Axle Weight
Rating)
calculating ...............................224
GVWR
(Gross Vehicle Weight Rating)
calculating ...............................224
H
Hazard flashers .........................232
Head restraints .........................153
Headlamps ...................................82
aiming ........................................85
autolamp system .......................82
bulb specifications ....................88
daytime running lights .............84
flash to pass ..............................85
high beam .................................84
replacing bulbs .........................90
turning on and off ....................82
HomeLink universal
transceiver
(see Garage door opener) .......118
Homelink wireless control
system ........................................114
I
Ignition ...............................193, 316
Index
326