reset LINCOLN AVIATOR 2020 User Guide
[x] Cancel search | Manufacturer: LINCOLN, Model Year: 2020, Model line: AVIATOR, Model: LINCOLN AVIATOR 2020Pages: 609, PDF Size: 5.4 MB
Page 101 of 609
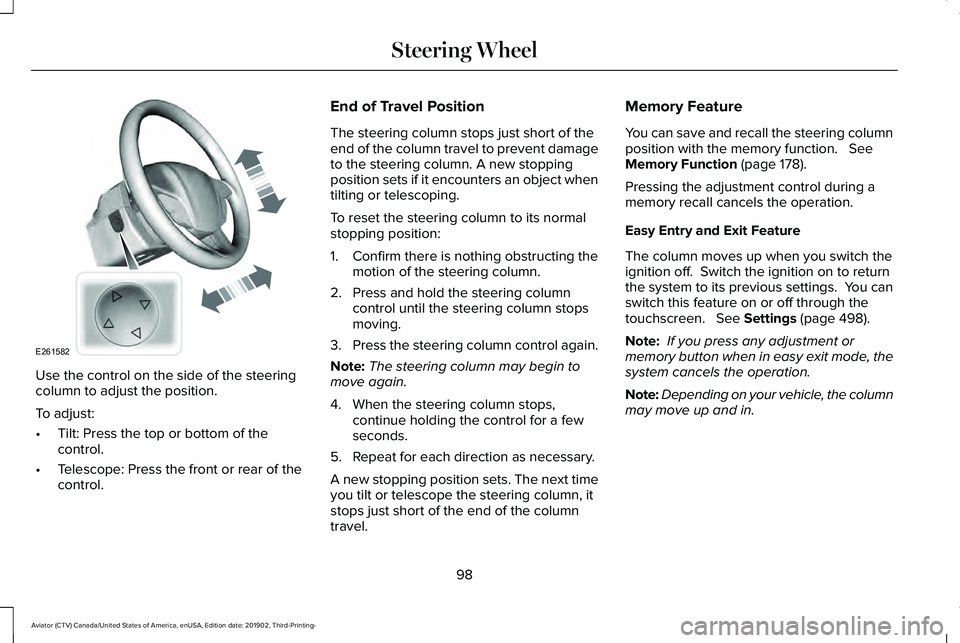
Use the control on the side of the steering
column to adjust the position.
To adjust:
•
Tilt: Press the top or bottom of the
control.
• Telescope: Press the front or rear of the
control. End of Travel Position
The steering column stops just short of the
end of the column travel to prevent damage
to the steering column. A new stopping
position sets if it encounters an object when
tilting or telescoping.
To reset the steering column to its normal
stopping position:
1. Confirm there is nothing obstructing the
motion of the steering column.
2. Press and hold the steering column control until the steering column stops
moving.
3. Press the steering column control again.
Note: The steering column may begin to
move again.
4. When the steering column stops, continue holding the control for a few
seconds.
5. Repeat for each direction as necessary.
A new stopping position sets. The next time
you tilt or telescope the steering column, it
stops just short of the end of the column
travel. Memory Feature
You can save and recall the steering column
position with the memory function. See
Memory Function (page 178).
Pressing the adjustment control during a
memory recall cancels the operation.
Easy Entry and Exit Feature
The column moves up when you switch the
ignition off. Switch the ignition on to return
the system to its previous settings. You can
switch this feature on or off through the
touchscreen.
See Settings (page 498).
Note: If you press any adjustment or
memory button when in easy exit mode, the
system cancels the operation.
Note: Depending on your vehicle, the column
may move up and in.
98
Aviator (CTV) Canada/United States of America, enUSA, Edition date: 201902, Third-Printing- Steering WheelE261582
Page 119 of 609
POWER WINDOWS
WARNING: Do not leave children
unattended in your vehicle and do not let
them play with the power windows. Failure
to follow this instruction could result in
personal injury. WARNING:
When closing the power
windows, verify they are free of obstruction
and make sure that children and pets are
not in the proximity of the window
openings. Note:
You may hear a pulsing noise when
just one of the windows is open. Lower the
opposite window slightly to reduce this
noise.
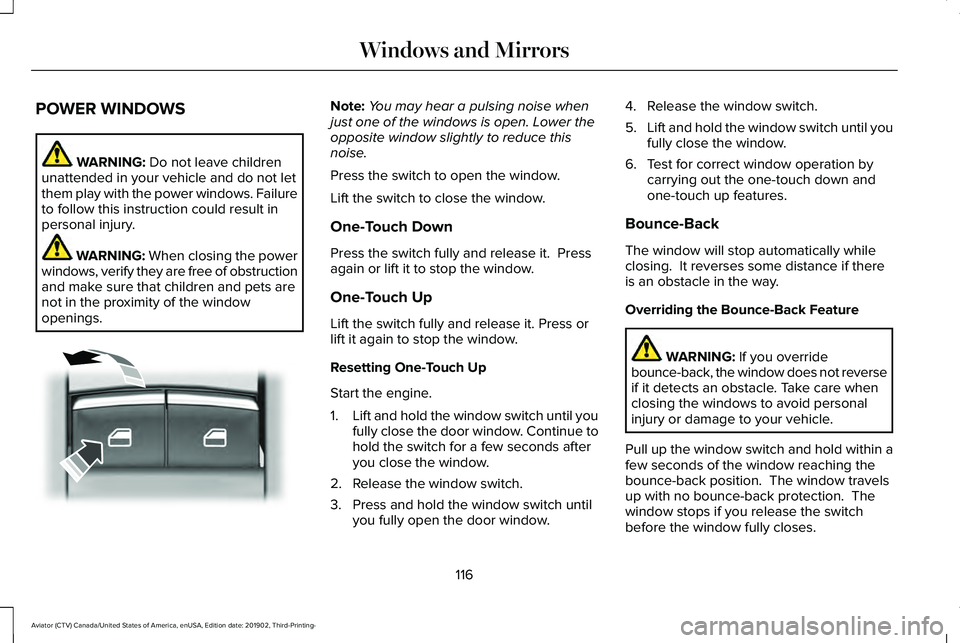
Press the switch to open the window.
Lift the switch to close the window.
One-Touch Down
Press the switch fully and release it. Press
again or lift it to stop the window.
One-Touch Up
Lift the switch fully and release it. Press or
lift it again to stop the window.
Resetting One-Touch Up
Start the engine.
1. Lift and hold the window switch until you
fully close the door window. Continue to
hold the switch for a few seconds after
you close the window.
2. Release the window switch.
3. Press and hold the window switch until you fully open the door window. 4. Release the window switch.
5.
Lift and hold the window switch until you
fully close the window.
6. Test for correct window operation by carrying out the one-touch down and
one-touch up features.
Bounce-Back
The window will stop automatically while
closing. It reverses some distance if there
is an obstacle in the way.
Overriding the Bounce-Back Feature WARNING:
If you override
bounce-back, the window does not reverse
if it detects an obstacle. Take care when
closing the windows to avoid personal
injury or damage to your vehicle.
Pull up the window switch and hold within a
few seconds of the window reaching the
bounce-back position. The window travels
up with no bounce-back protection. The
window stops if you release the switch
before the window fully closes.
116
Aviator (CTV) Canada/United States of America, enUSA, Edition date: 201902, Third-Printing- Windows and MirrorsE295317
Page 121 of 609
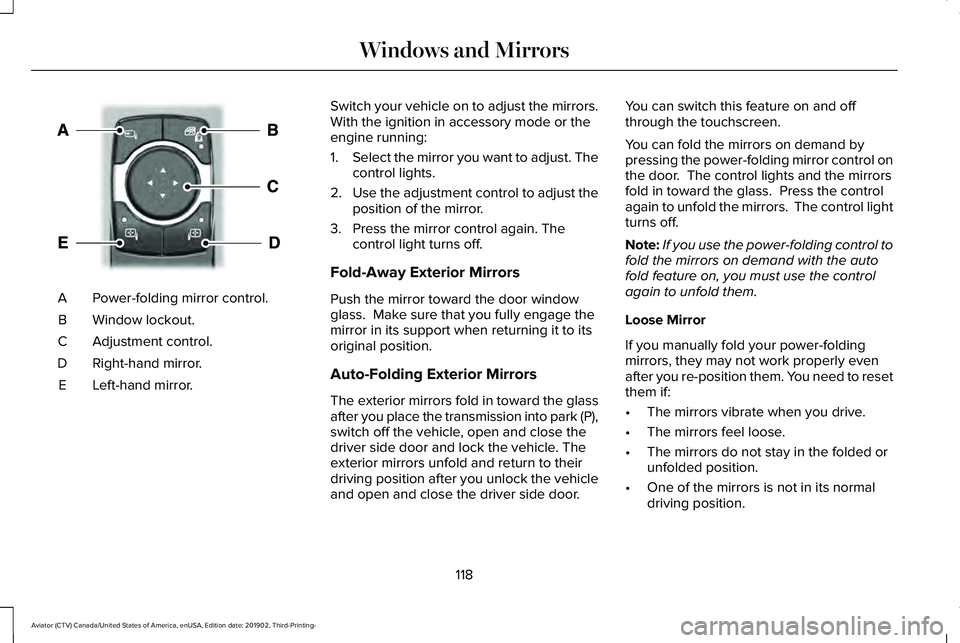
Power-folding mirror control.
A
Window lockout.
B
Adjustment control.
C
Right-hand mirror.
D
Left-hand mirror.
E Switch your vehicle on to adjust the mirrors.
With the ignition in accessory mode or the
engine running:
1.
Select the mirror you want to adjust. The
control lights.
2. Use the adjustment control to adjust the
position of the mirror.
3. Press the mirror control again. The control light turns off.
Fold-Away Exterior Mirrors
Push the mirror toward the door window
glass. Make sure that you fully engage the
mirror in its support when returning it to its
original position.
Auto-Folding Exterior Mirrors
The exterior mirrors fold in toward the glass
after you place the transmission into park (P),
switch off the vehicle, open and close the
driver side door and lock the vehicle. The
exterior mirrors unfold and return to their
driving position after you unlock the vehicle
and open and close the driver side door. You can switch this feature on and off
through the touchscreen.
You can fold the mirrors on demand by
pressing the power-folding mirror control on
the door. The control lights and the mirrors
fold in toward the glass. Press the control
again to unfold the mirrors. The control light
turns off.
Note:
If you use the power-folding control to
fold the mirrors on demand with the auto
fold feature on, you must use the control
again to unfold them.
Loose Mirror
If you manually fold your power-folding
mirrors, they may not work properly even
after you re-position them. You need to reset
them if:
• The mirrors vibrate when you drive.
• The mirrors feel loose.
• The mirrors do not stay in the folded or
unfolded position.
• One of the mirrors is not in its normal
driving position.
118
Aviator (CTV) Canada/United States of America, enUSA, Edition date: 201902, Third-Printing- Windows and MirrorsE295322
Page 122 of 609
To reset the power-fold feature, use the
power-folding mirror control to fold and
unfold the mirrors. You may hear a loud noise
as you reset the power-folding mirrors. This
sound is normal. Repeat this process as
needed each time you manually fold the
mirrors.
Heated Exterior Mirrors
See Heated Exterior Mirrors (page 167).
Memory Mirrors
You can save and recall the mirror positions
through the memory function. See Memory
Function
(page 178).
Auto-dimming Feature
The driver exterior mirror dims when the
interior auto-dimming mirror turns on.
Direction Indicator Mirrors
When the vehicle is running, the
forward-facing portion of the appropriate
mirror housing blinks when you switch on
the direction indicator. Lincoln Welcome Mat Projection Lamp
The lamps on the bottom part of the exterior
mirror lower housing light when you use your
transmitter to unlock the doors or when you
open a door.
360-Degree Camera
(If Equipped)
See
360 Degree Camera (page 264).
Blind Spot Information System (If Equipped)
See
Blind Spot Information System (page
289).
INTERIOR MIRROR WARNING: Do not adjust the mirrors
when your vehicle is moving. This could
result in the loss of control of your vehicle,
serious personal injury or death.
Note: Do not clean the housing or glass of
any mirror with harsh abrasives, fuel or other
petroleum or ammonia-based cleaning
products. You can adjust the interior mirror to your
preference. Some mirrors also have a second
pivot point. This lets you move the mirror
head up or down and from side to side.
Auto-Dimming Mirror
Note:
Do not block the sensors on the front
and back of the mirror. A rear center
passenger or raised rear center head
restraint may also block light from reaching
the sensor.
The mirror dims to reduce the effect of bright
light from behind. It returns to normal when
the bright light from behind is no longer
present or if you shift into reverse (R).
119
Aviator (CTV) Canada/United States of America, enUSA, Edition date: 201902, Third-Printing- Windows and Mirrors
Page 134 of 609
Move the selector switch to the left
to exit a submenu.
Move the selector switch to the
right to choose and confirm
settings or messages.
Menu This icon shows the features on or
off status. A check in the box
indicates the feature is on, and
unchecked indicates the feature is off. Note:
Some menu items are regional specific
or optional and may appear slightly different
or not at all.
Settings Settings
See Personalized Settings (page 133).
Information Screens
Display Setup
Speedometer km/h
Speedometer MPH
Add Tachometer to View Enter the submenu and select your setting
Border Crossing
Displays your oil life status
Oil Life
Hold OK to Reset
Hold OK to Reset
Tire Monitor
With the engine off, hold OK to Initialize
Neutral Tow
Note: Additional vehicle settings are
available through your touchscreen.
See
Settings (page 498).
131
Aviator (CTV) Canada/United States of America, enUSA, Edition date: 201902, Third-Printing- Information DisplaysE281480 E265041 E204495
Page 137 of 609
Trip 1 and 2
Provides trip timer, trip average fuel economy
and total trip distance traveled.
Press and hold the folder button to reset.
Fuel Economy
An Instant Fuel Economy gauge is provided
along with Average Fuel Economy. Average
fuel economy is continuously averaged since
the last reset.
While viewing this screen you can reset your
average fuel economy by pressing and
holding the folder button.
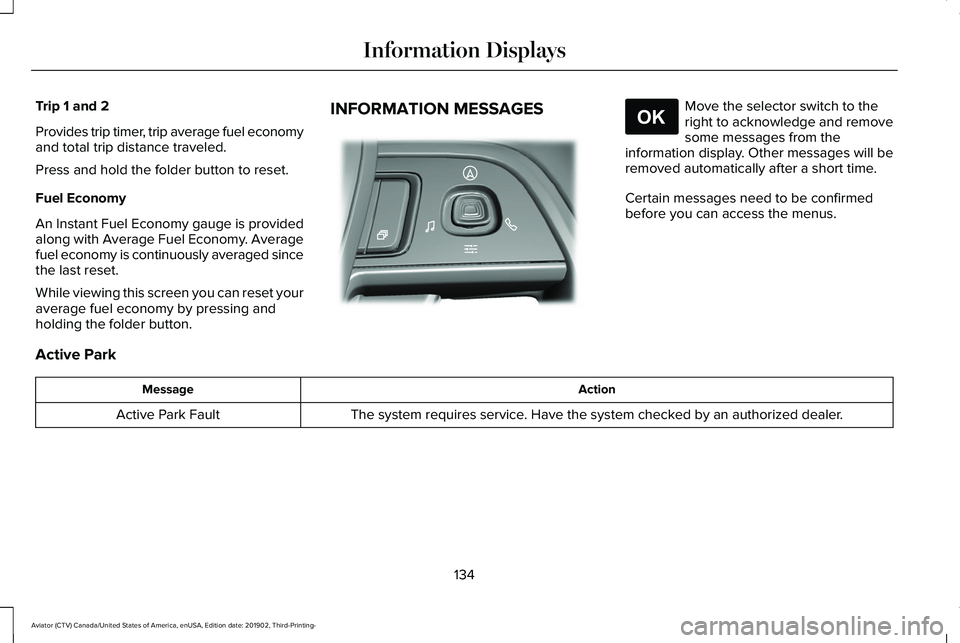
INFORMATION MESSAGES Move the selector switch to the
right to acknowledge and remove
some messages from the
information display. Other messages will be
removed automatically after a short time.
Certain messages need to be confirmed
before you can access the menus.
Active Park Action
Message
The system requires service. Have the system checked by an authorized dealer.
Active Park Fault
134
Aviator (CTV) Canada/United States of America, enUSA, Edition date: 201902, Third-Printing- Information DisplaysE281220 E265041
Page 141 of 609
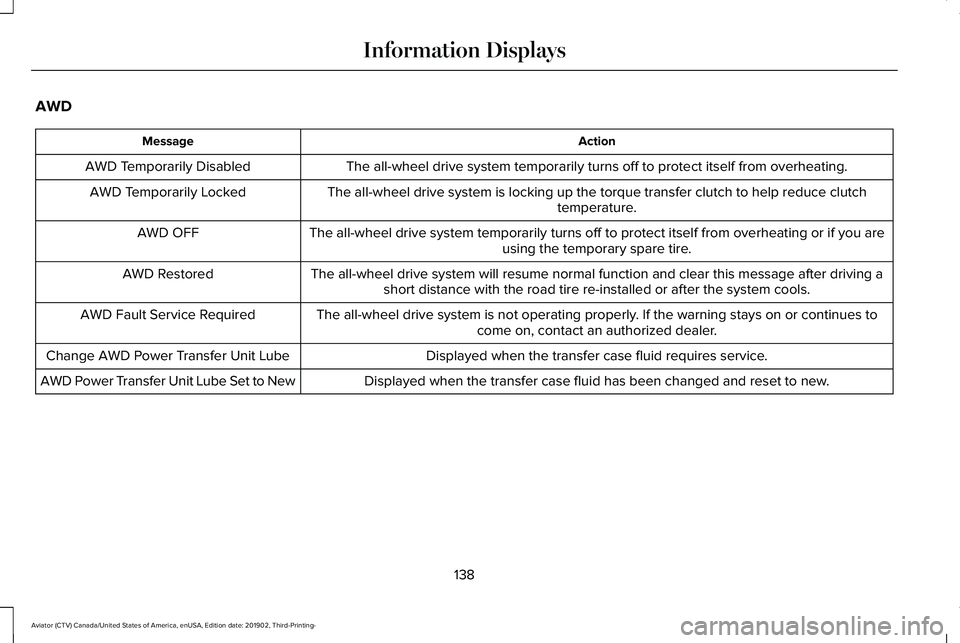
AWD
Action
Message
The all-wheel drive system temporarily turns off to protect itself from \
overheating.
AWD Temporarily Disabled
The all-wheel drive system is locking up the torque transfer clutch to h\
elp reduce clutchtemperature.
AWD Temporarily Locked
The all-wheel drive system temporarily turns off to protect itself from \
overheating or if you areusing the temporary spare tire.
AWD OFF
The all-wheel drive system will resume normal function and clear this me\
ssage after driving ashort distance with the road tire re-installed or after the system cools\
.
AWD Restored
The all-wheel drive system is not operating properly. If the warning stays on or continues tocome on, contact an authorized dealer.
AWD Fault Service Required
Displayed when the transfer case fluid requires service.
Change AWD Power Transfer Unit Lube
Displayed when the transfer case fluid has been changed and reset to new\
.
AWD Power Transfer Unit Lube Set to New
138
Aviator (CTV) Canada/United States of America, enUSA, Edition date: 201902, Third-Printing- Information Displays
Page 145 of 609
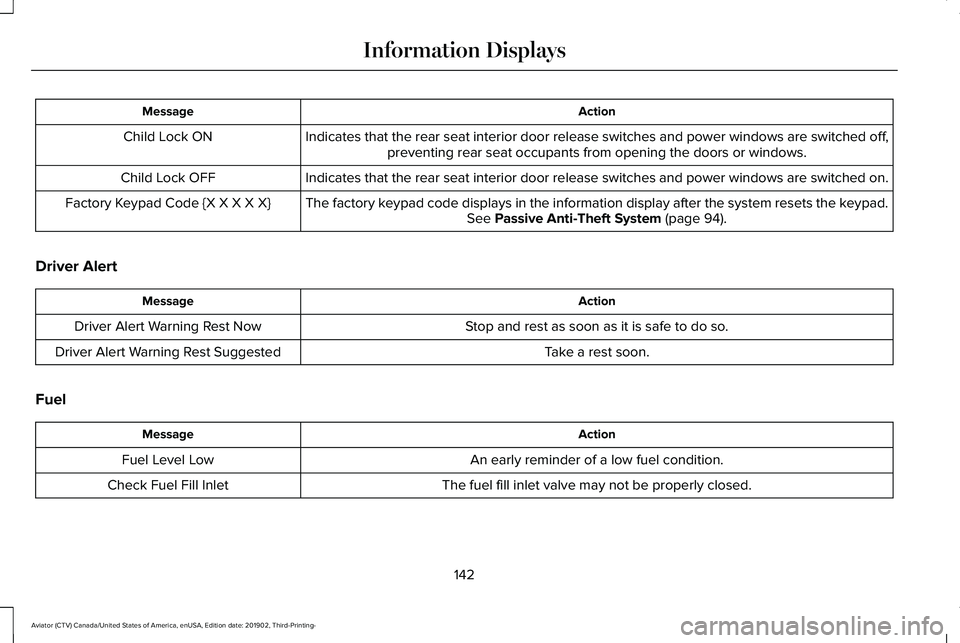
Action
Message
Indicates that the rear seat interior door release switches and power wi\
ndows are switched off,preventing rear seat occupants from opening the doors or windows.
Child Lock ON
Indicates that the rear seat interior door release switches and power wi\
ndows are switched on.
Child Lock OFF
The factory keypad code displays in the information display after the system resets t\
he keypad.See Passive Anti-Theft System (page 94).
Factory Keypad Code {X X X X X}
Driver Alert Action
Message
Stop and rest as soon as it is safe to do so.
Driver Alert Warning Rest Now
Take a rest soon.
Driver Alert Warning Rest Suggested
Fuel Action
Message
An early reminder of a low fuel condition.
Fuel Level Low
The fuel fill inlet valve may not be properly closed.
Check Fuel Fill Inlet
142
Aviator (CTV) Canada/United States of America, enUSA, Edition date: 201902, Third-Printing- Information Displays
Page 160 of 609
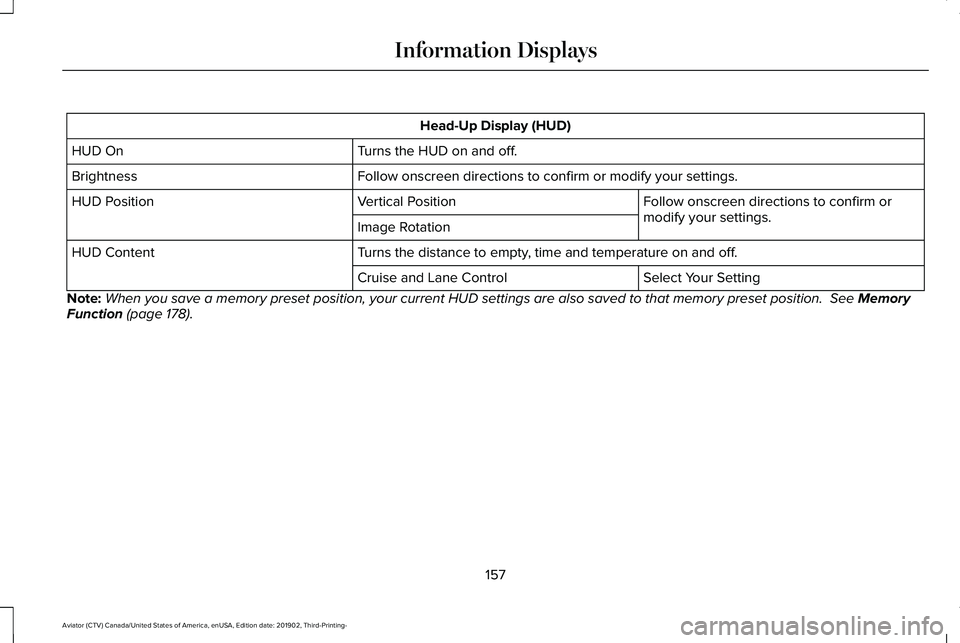
Head-Up Display (HUD)
Turns the HUD on and off.
HUD On
Follow onscreen directions to confirm or modify your settings.
Brightness
Follow onscreen directions to confirm or
modify your settings.
Vertical Position
HUD Position
Image Rotation
Turns the distance to empty, time and temperature on and off.
HUD Content
Select Your Setting
Cruise and Lane Control
Note: When you save a memory preset position, your current HUD settings are al\
so saved to that memory preset position. See Memory
Function (page 178).
157
Aviator (CTV) Canada/United States of America, enUSA, Edition date: 201902, Third-Printing- Information Displays
Page 175 of 609
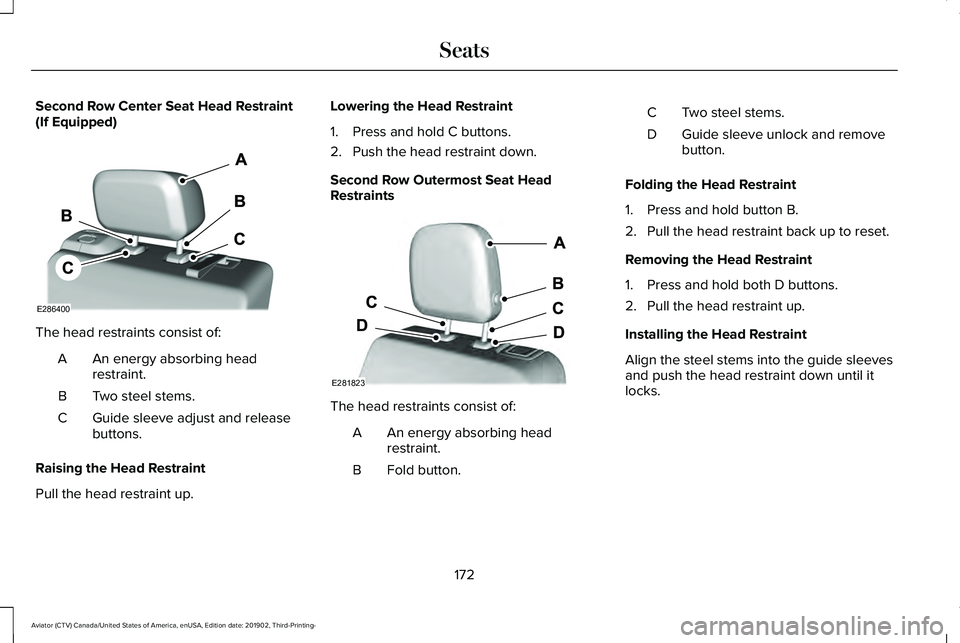
Second Row Center Seat Head Restraint
(If Equipped)
The head restraints consist of:
An energy absorbing head
restraint.
A
Two steel stems.
B
Guide sleeve adjust and release
buttons.
C
Raising the Head Restraint
Pull the head restraint up. Lowering the Head Restraint
1. Press and hold C buttons.
2. Push the head restraint down.
Second Row Outermost Seat Head
Restraints
The head restraints consist of:
An energy absorbing head
restraint.
A
Fold button.
B Two steel stems.
C
Guide sleeve unlock and remove
button.
D
Folding the Head Restraint
1. Press and hold button B.
2. Pull the head restraint back up to reset.
Removing the Head Restraint
1. Press and hold both D buttons.
2. Pull the head restraint up.
Installing the Head Restraint
Align the steel stems into the guide sleeves
and push the head restraint down until it
locks.
172
Aviator (CTV) Canada/United States of America, enUSA, Edition date: 201902, Third-Printing- SeatsE286400 E281823