key LINCOLN AVIATOR 2020 Workshop Manual
[x] Cancel search | Manufacturer: LINCOLN, Model Year: 2020, Model line: AVIATOR, Model: LINCOLN AVIATOR 2020Pages: 609, PDF Size: 5.4 MB
Page 229 of 609
Manual Park Release (MPR)
WARNING: When doing this
procedure, you need to take the
transmission out of park (P) which means
your vehicle can roll freely. To avoid
unwanted vehicle movement, always fully
apply the parking brake prior to doing this
procedure. Use wheels chocks if
appropriate. WARNING:
If the parking brake is
fully released, but the brake warning lamp
remains illuminated, the brakes may not
be working properly. Have your vehicle
checked as soon as possible. WARNING: Do not drive your vehicle
until you verify that the stoplamps are
working.
Use the manual park release to move your
transmission from the park (P) position in the
event of an electrical malfunction or
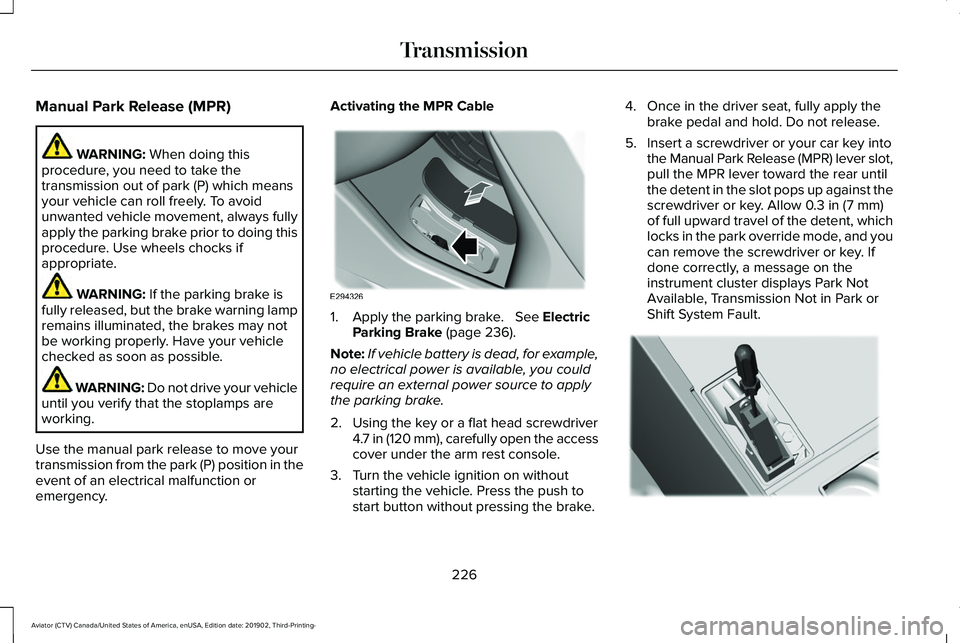
emergency. Activating the MPR Cable
1. Apply the parking brake.
See Electric
Parking Brake (page 236).
Note: If vehicle battery is dead, for example,
no electrical power is available, you could
require an external power source to apply
the parking brake.
2. Using the key or a flat head screwdriver 4.7 in (120 mm), carefully open the access
cover under the arm rest console.
3. Turn the vehicle ignition on without starting the vehicle. Press the push to
start button without pressing the brake. 4. Once in the driver seat, fully apply the
brake pedal and hold. Do not release.
5. Insert a screwdriver or your car key into the Manual Park Release (MPR) lever slot,
pull the MPR lever toward the rear until
the detent in the slot pops up against the
screwdriver or key. Allow
0.3 in (7 mm)
of full upward travel of the detent, which
locks in the park override mode, and you
can remove the screwdriver or key. If
done correctly, a message on the
instrument cluster displays Park Not
Available, Transmission Not in Park or
Shift System Fault. 226
Aviator (CTV) Canada/United States of America, enUSA, Edition date: 201902, Third-Printing- TransmissionE294326 E297270
Page 230 of 609
Note:
A screwdriver tool longer than 4.7 in
(120 mm) could hit the underside of the
armrest console before you achieve full
travel of the detent.
6. With your foot still fully applied on the brake pedal, disengage the parking
brake. See Electric Parking Brake (page
236
).
7. Your vehicle remains in neutral (N) for emergency towing purposes.
8. Switch off the ignition.
9. Once it is safe to do so, and there is no risk of your vehicle rolling, disconnect
the negative, black, battery cable from
the battery.
Returning Your Vehicle to Normal Mode
1. Once it is safe to do so, reconnect the negative, black, battery cable to the
battery.
2. Apply the parking brake.
See Electric
Parking Brake (page 236).
Note: If the vehicle battery is dead, you
could require an external power source to
apply the parking brake. 3.
Fully apply the brake pedal and hold, do
not release.
4. Insert the screwdriver or car key fully into
the MPR lever slot. Push the tool
downwards. The system detent releases
and the MPR lever moves forward,
allowing the vehicle to go back into the
park (P) position. Remove the screwdriver
or car key.
5. Install the access cover.
6. With your foot fully applied on the brake
pedal, start your vehicle. Confirm that
your vehicle is in the park (P) position and
that the instrument cluster indicates park
(P).
7. If the instrument cluster does not display
the park (P) position or there is a
message stating Park Not Available,
Transmission Not In Park or Shift System
Fault, apply the parking brake before
exiting your vehicle. Contact an
authorized dealer. If Your Vehicle Gets Stuck in Mud or
Snow
Note:
Do not rock the vehicle if the engine
is not at normal operating temperature or
damage to the transmission could occur.
Note: Do not rock the vehicle for more than
a minute or damage to the transmission and
tires could occur, or the engine could
overheat.
If your vehicle gets stuck in the mud or snow,
you can rock it out by shifting between
forward and reverse gears, stopping
between shifts in a steady pattern. Press
lightly on the accelerator in each gear.
227
Aviator (CTV) Canada/United States of America, enUSA, Edition date: 201902, Third-Printing- Transmission
Page 233 of 609
Driving in Special Conditions With All-
Wheel Drive (AWD)
Note:
Use of the AWD system in slippery,
deep snow and sand drive modes on dry
surfaces could produce some vibration and
driveline bind up and, or excessive tire wear,
as the intent of these drive modes are for
slippery and loose surfaces.
Note: You can use AWD vehicles for driving
on sand, snow, mud and rough roads and
have operating characteristics that are
somewhat different from conventional
vehicles, both on and off the highway.
Basic Operating Principles in Special
Conditions
• Drive slower in strong crosswinds which
can affect the normal steering
characteristics of your vehicle.
• Be extremely careful when driving on
pavement made slippery by loose sand,
water, gravel, snow or ice. If Your Vehicle Goes Off the Edge of the
Pavement
•
If your vehicle goes off the edge of the
pavement, slow down, but avoid severe
brake application, ease the vehicle back
onto the pavement only after reducing
your speed. Do not turn the steering
wheel too sharply while returning to the
road surface.
• It could be safer to stay on the apron or
shoulder of the road and slow down
gradually before returning to the
pavement. You could lose control if you
do not slow down or if you turn the
steering wheel too sharply or abruptly.
• It often could be less risky to strike small
objects, such as highway reflectors, with
minor damage to your vehicle rather than
attempt a sudden return to the pavement
which could cause the vehicle to slide
sideways out of control or rollover.
Remember, your safety and the safety of
others should be your primary concern. If Your Vehicle Gets Stuck WARNING: Apply the parking brake,
shift into park (P), switch the ignition off
and remove the key before you leave your
vehicle. Failure to follow this instruction
could result in personal injury or death. WARNING: If the parking brake is
fully released, but the brake warning lamp
remains illuminated, the brakes may not
be working properly. Have your vehicle
checked as soon as possible. WARNING:
Do not spin the wheels
at over 34 mph (55 km/h). The tires may
fail and injure a passenger or bystander.
If your vehicle gets stuck in mud or snow it
could be rocked out by shifting between
forward and reverse gears, stopping
between shifts, in a steady pattern. Press
lightly on the accelerator in each gear.
230
Aviator (CTV) Canada/United States of America, enUSA, Edition date: 201902, Third-Printing- All-Wheel Drive
(If Equipped)
Page 253 of 609
PRINCIPLE OF OPERATION
WARNING: To help avoid personal
injury, always use caution when in reverse
(R) and when using the sensing system. WARNING:
The system may not
detect objects with surfaces that absorb
reflection. Always drive with due care and
attention. Failure to take care may result
in a crash. WARNING:
Traffic control systems,
inclement weather, air brakes, external
motors and fans may affect the correct
operation of the sensing system. This may
cause reduced performance or false alerts. WARNING:
The system may not
detect small or moving objects, particularly
those close to the ground.
Note: If your vehicle has MyKey™, the sensing
system cannot be switched off when a
MyKey™ is present.
See Principle of
Operation (page 73). Note:
Keep the sensors on the bumper or
fascia free from snow, ice and large
accumulations of dirt. If the sensors are
covered, the system’ s accuracy can be
affected. Do not clean the sensors with sharp
objects.
Note: If your vehicle sustains damage to the
bumper or fascia, leaving it misaligned or
bent, the sensing zone may be altered
causing inaccurate measurement of
obstacles or false alerts.
Note: Certain add-on devices installed
around the bumper or fascia may create
false alerts. For example, large trailer
hitches, bike or surfboard racks, license plate
brackets, bumper covers or any other device
that may block the normal detection zone
of the system. Remove the add-on device to
prevent false alerts.
Note: When you connect a trailer to your
vehicle, the rear parking aid may detect the
trailer and therefore provide an alert. Disable
the rear parking aid when you connect a
trailer to prevent the alert. The sensing system warns the driver of
obstacles within a certain range of your
vehicle. The system turns on automatically
whenever you switch the ignition on.
You can switch the system off through the
touchscreen, information display or from the
pop-up message that appears once you shift
the transmission into reverse (R). If your
vehicle has a parking aid button, you can
switch the system off by pressing the button.
If a fault is present in the system, a warning
message appears in the information display.
See
Information Messages (page 134).
REAR PARKING AID WARNING:
The system may not
detect objects with surfaces that absorb
reflection. Always drive with due care and
attention. Failure to take care may result
in a crash. WARNING:
The system may not
detect small or moving objects, particularly
those close to the ground.
250
Aviator (CTV) Canada/United States of America, enUSA, Edition date: 201902, Third-Printing- Parking Aids
Page 260 of 609
Using Active Park Assist
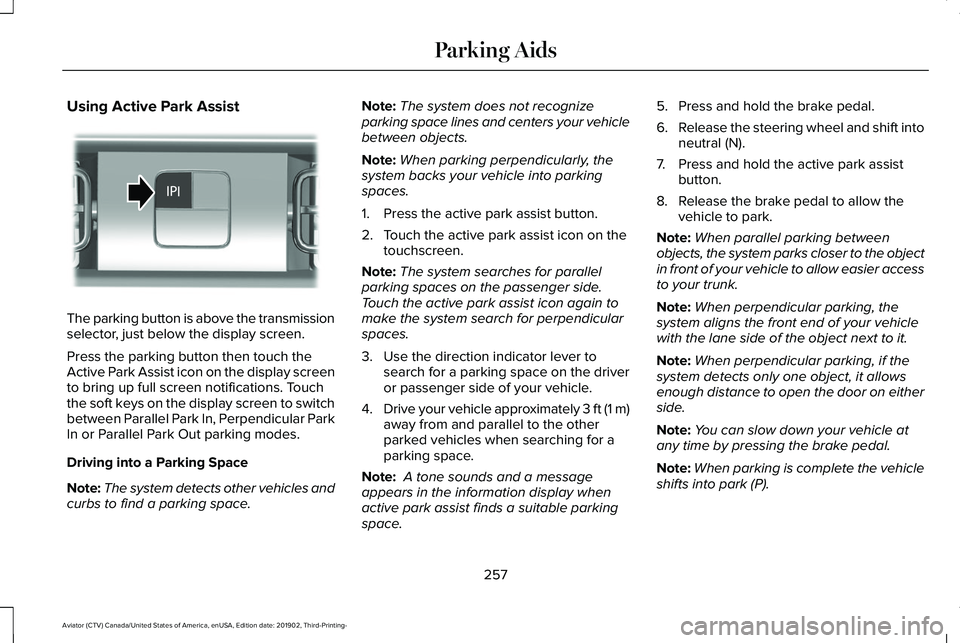
The parking button is above the transmission
selector, just below the display screen.
Press the parking button then touch the
Active Park Assist icon on the display screen
to bring up full screen notifications. Touch
the soft keys on the display screen to switch
between Parallel Park In, Perpendicular Park
In or Parallel Park Out parking modes.
Driving into a Parking Space
Note:
The system detects other vehicles and
curbs to find a parking space. Note:
The system does not recognize
parking space lines and centers your vehicle
between objects.
Note: When parking perpendicularly, the
system backs your vehicle into parking
spaces.
1. Press the active park assist button.
2. Touch the active park assist icon on the touchscreen.
Note: The system searches for parallel
parking spaces on the passenger side.
Touch the active park assist icon again to
make the system search for perpendicular
spaces.
3. Use the direction indicator lever to search for a parking space on the driver
or passenger side of your vehicle.
4. Drive your vehicle approximately 3 ft (1 m)
away from and parallel to the other
parked vehicles when searching for a
parking space.
Note: A tone sounds and a message
appears in the information display when
active park assist finds a suitable parking
space. 5. Press and hold the brake pedal.
6.
Release the steering wheel and shift into
neutral (N).
7. Press and hold the active park assist button.
8. Release the brake pedal to allow the vehicle to park.
Note: When parallel parking between
objects, the system parks closer to the object
in front of your vehicle to allow easier access
to your trunk.
Note: When perpendicular parking, the
system aligns the front end of your vehicle
with the lane side of the object next to it.
Note: When perpendicular parking, if the
system detects only one object, it allows
enough distance to open the door on either
side.
Note: You can slow down your vehicle at
any time by pressing the brake pedal.
Note: When parking is complete the vehicle
shifts into park (P).
257
Aviator (CTV) Canada/United States of America, enUSA, Edition date: 201902, Third-Printing- Parking AidsE301112
Page 287 of 609
WARNING: The system may not
correctly operate if your vehicle is fitted
with a suspension kit not approved by us.
Note: The system works above
40 mph
(64 km/h).
Note: The system works as long as the
camera can detect one lane marking.
Note: When you select Aid or Alert and Aid
mode and the system detects no steering
activity for a short period, the system alerts
you to put your hands on the steering wheel.
The system may detect a light grip or touch
on the steering wheel as hands off driving.
Note: The system may not function if the
camera is blocked, or if the windshield is
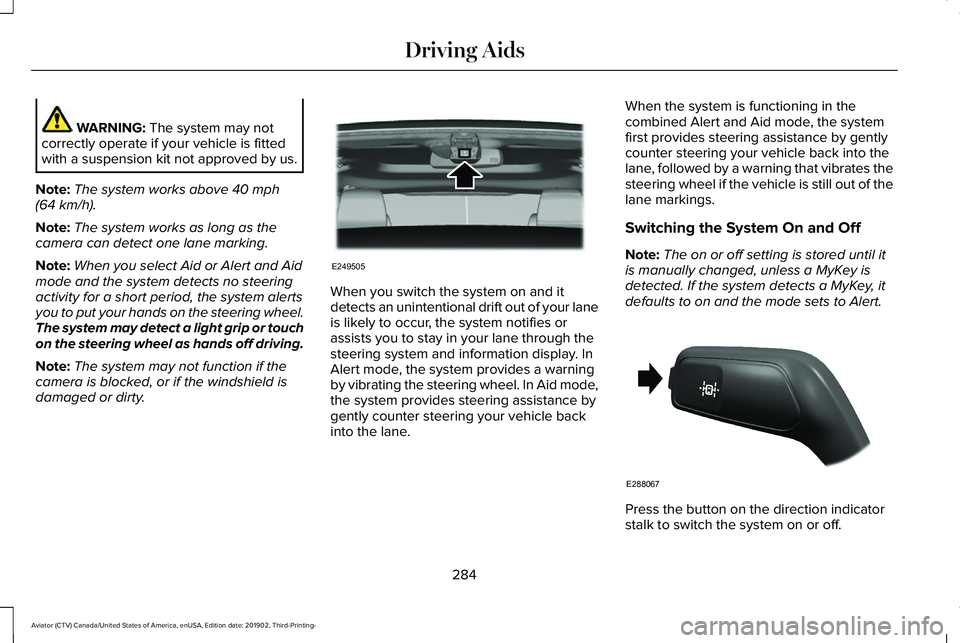
damaged or dirty. When you switch the system on and it
detects an unintentional drift out of your lane
is likely to occur, the system notifies or
assists you to stay in your lane through the
steering system and information display. In
Alert mode, the system provides a warning
by vibrating the steering wheel. In Aid mode,
the system provides steering assistance by
gently counter steering your vehicle back
into the lane.When the system is functioning in the
combined Alert and Aid mode, the system
first provides steering assistance by gently
counter steering your vehicle back into the
lane, followed by a warning that vibrates the
steering wheel if the vehicle is still out of the
lane markings.
Switching the System On and Off
Note:
The on or off setting is stored until it
is manually changed, unless a MyKey is
detected. If the system detects a MyKey, it
defaults to on and the mode sets to Alert. Press the button on the direction indicator
stalk to switch the system on or off.
284
Aviator (CTV) Canada/United States of America, enUSA, Edition date: 201902, Third-Printing- Driving AidsE249505 E288067
Page 296 of 609
•
Box trailers that have a width greater than
8.2 ft (2.5 m) could cause early alerts
when you pass a vehicle.
• Clam shell or V-Nose box trailers with a
width greater than
8.2 ft (2.5 m) could
cause delayed alerts when a vehicle
traveling the same speed as your vehicle
merges lanes.
System Errors
If the system detects a fault, a warning lamp
illuminates and a message displays.
See
Information Messages (page 134).
Switching the System On and Off
You can switch the blind spot information
system with trailer tow off by not selecting a
trailer the information display.
See General
Information (page 130). In this case, the
system turns off as long as a trailer is
attached to your vehicle. As soon as you
disconnect the trailer, the blind spot
information system becomes active. When you switch the system off, a warning
lamp illuminates and the alert indicators flash
twice.
Note:
The system remembers the last trailer
setting when you start your vehicle.
You cannot switch off the blind spot
information system with trailer tow when
using MyKey, but you can still change the
trailer settings.
See MyKey™ (page 73).
To permanently switch the system off,
contact an authorized dealer.
CROSS TRAFFIC ALERT WARNING:
Do not use the cross
traffic alert system as a replacement for
using the interior and exterior mirrors or
looking over your shoulder before
reversing out of a parking space. The cross
traffic alert system is not a replacement for
careful driving. WARNING:
The system may not
operate properly during severe weather
conditions, for example snow, ice, heavy
rain and spray. Always drive with due care
and attention. Failure to take care may
result in a crash.
The system alerts you of vehicles
approaching from the sides behind your
vehicle when you shift into reverse (R).
Using Cross Traffic Alert
The system detects vehicles that approach
at a speed between
4 mph (6 km/h) and
37 mph (60 km/h). Coverage decreases when
the sensors are partially, mostly or fully
obstructed. Slowly reversing helps increase
the coverage area and effectiveness.
The system turns on when you start the
engine and you shift into reverse (R). The
system turns off when you shift out of reverse
(R).
293
Aviator (CTV) Canada/United States of America, enUSA, Edition date: 201902, Third-Printing- Driving Aids
Page 317 of 609
Special Loading Instructions for
Owners of Pick-up Trucks and Utility-
type Vehicles
WARNING: When loading the
roof racks, we recommend you evenly
distribute the load, as well as maintain
a low center of gravity. Loaded
vehicles, with higher centers of gravity,
may handle differently than unloaded
vehicles. Take extra precautions, such
as slower speeds and increased
stopping distance, when driving a
heavily loaded vehicle.
AIR SUSPENSION
(IF EQUIPPED) WARNING:
If your vehicle has
self-leveling air suspension, you must
switch the system off before carrying out
any maintenance or repair. Failure to follow
this warning could result in serious
personal injury or death. The air suspension system automatically
adjusts to maintain a constant frame height,
allows for ease of vehicle loading, provides
improved vehicle ride, and increased driver
comfort.
You can adjust different ride settings through
the selectable drive modes.
See Selecting
a Drive Mode (page 306).
Note: The air suspension system may not
operate properly if you exceed the load limit.
See
Load Limit (page 310).
Note: When your vehicle is off, the air
compressor may run for a short time. This is
normal.
Switching the systems on or off
You can access the air suspension, liftgate
and easy entry features through the
information display menu settings.
See
General Information (page 130).
Using the Service Mode
When the service mode is active, the air
suspension does not make any adjustments
while your vehicle is stationary. Note:
Always switch the air suspension
service mode to on before servicing your
vehicle.
Using Cargo Loading
The air suspension cargo loading feature
lowers your vehicle for easier access when
the system detects the liftgate is opening.
When the liftgate is closed your vehicle
returns to its normal height after a short time.
Note: To preserve your vehicle battery, your
vehicle may only lower for cargo mode one
to two times per ignition cycle.
Using Easy Entry
The air suspension can lower your vehicle
to an easier access entry height when the
system detects the intelligent access key,
you press the unlock button, use the remote
start, or use Phone as a Key.
The leveling process stops when you open
a door or the target level is achieved.
Note: To stop the leveling process, press the
lock button on the intelligent access key.
314
Aviator (CTV) Canada/United States of America, enUSA, Edition date: 201902, Third-Printing- Load Carrying
Page 330 of 609
ROADSIDE ASSISTANCE
Vehicles sold in the United States:
Getting Roadside Assistance
To fully assist you should you have a vehicle
concern, Lincoln Motor Company offers a
complimentary roadside assistance program.
This program is separate from the New
Vehicle Limited Warranty.
The service is available:
•
Throughout the life of the vehicle for
original owners.
• For six years or 70,000 mi (110,000 km)
(whichever comes first) for subsequent
owners.
Roadside Assistance covers:
• A flat tire change with a good spare
(except vehicles supplied with a tire
inflation kit).
• Battery jump start.
• Lock-out assistance (key replacement
cost is the client's responsibility). •
Fuel delivery — independent service
contractors, if not prohibited by state,
local or municipal law shall deliver up to
2 gal (8 L)
of gasoline fuel to a disabled
vehicle. Roadside Assistance limits fuel
delivery service to two no-charge
occurrences within a 12-month period.
• Winch out — available within 100 ft (30 m)
of a paved or county maintained road,
no recoveries. •
Towing — independent service
contractors, if not prohibited by state,
local or municipal law shall tow Lincoln
eligible vehicles to the client's selling or
preferred dealer within 100 mi (160 km)
of the disablement location or to the
nearest Lincoln dealer. If a client requests
a tow to a selling or preferred dealer that
is more than
100 mi (160 km) from the
disablement location, the client is
responsible for any mileage costs in
excess of
100 mi (160 km).
• Roadside Assistance includes up to $200
for a towed trailer if the disabled eligible
vehicle requires service at the nearest
authorized dealer. If the towing vehicle
is operational but the trailer is not, then
the trailer does not qualify for any
roadside services.
Vehicles Sold in the United States:
Using Roadside Assistance
United States clients who require roadside
assistance, call 1-800-521-4140 or contact
Roadside Assistance using the Lincoln Way
mobile app.
327
Aviator (CTV) Canada/United States of America, enUSA, Edition date: 201902, Third-Printing- Roadside Emergencies
Page 331 of 609
If you need to arrange roadside assistance
for yourself, Lincoln Motor Company
reimburses a reasonable amount for towing
to the nearest Lincoln dealership within
100 mi (160 km). To obtain reimbursement
information, United States clients, call
1-800-521-4140. Clients need to submit their
original receipts.
Vehicles Sold in Canada: Getting
Roadside Assistance
To fully assist you should you have a vehicle
concern, Lincoln Motor Company offers a
complimentary roadside assistance program.
This program is eligible within Canada or the
continental United States.
The service is available 24 hours a day,
seven days a week.
This program is separate from the New
Vehicle Limited Warranty, beginning from
the original warranty start date and lasts the
life of the vehicle for the original owner.
Subsequent owners receive coverage that
is concurrent with the 6 years or
70,000 mi
(110,000 km) (whichever occurs first)
powertrain warranty coverage period. Note:
Canadian roadside coverage and
benefits may differ from the U.S. coverage.
For complete program coverage details,
review your warranty guide, contact your
dealer, call us in Canada at 1-800-387-9333,
or visit our website at
www.lincolncanada.com.
If you purchased your vehicle in Canada and
require roadside assistance, please call
1-800-387-9333 or contact Roadside
Assistance using the Lincoln Way mobile
app.
Note: For quick reference, complete the
roadside assistance identification card found
in the glove compartment of your vehicle
and place it in your wallet.
HAZARD FLASHERS
Note: The hazard flashers operate when the
ignition is in any position, or if the key is not
in the ignition. If used when the vehicle is not
running, the battery loses charge. As a result,
there may be insufficient power to restart
your vehicle. The flasher control is on the
instrument panel. Use your hazard
flashers when your vehicle is
creating a safety hazard for other motorists.
• Press the flasher control and all front and
rear direction indicators flash.
• Press the button again to switch them off.
FUEL SHUTOFF WARNING:
If your vehicle has been
involved in a crash, have the fuel system
checked. Failure to follow this instruction
could result in fire, personal injury or death.
Note: When you try to restart your vehicle
after a fuel shutoff, the vehicle makes sure
that various systems are safe to restart.
Once the vehicle determines the systems
are safe, then the vehicle allows you to
restart.
Note: In the event that your vehicle does not
restart after your third attempt, contact a
qualified technician.
328
Aviator (CTV) Canada/United States of America, enUSA, Edition date: 201902, Third-Printing- Roadside Emergencies