Power point LINCOLN AVIATOR 2020 Owners Manual
[x] Cancel search | Manufacturer: LINCOLN, Model Year: 2020, Model line: AVIATOR, Model: LINCOLN AVIATOR 2020Pages: 609, PDF Size: 5.4 MB
Page 7 of 609
Garage Door Opener
Universal Garage Door Opener
................191
Auxiliary Power Points
Auxiliary Power Points ................................
197
Wireless Accessory Charger .....................
198
Storage Compartments
Center Console ............................................
201
Overhead Console ......................................
201
Starting and Stopping the Engine
General Information ...................................
202
Keyless Starting ...........................................
202
Starting a Gasoline Engine .......................
203
Engine Block Heater ..................................
206
Unique Driving Characteristics
Auto-Start-Stop ............................................
208
Fuel and Refueling
Safety Precautions ........................................
211Fuel Quality
...................................................
212
Fuel Filler Funnel Location ........................
212
Running Out of Fuel ....................................
213
Refueling ........................................................
214
Fuel Consumption ........................................
217
Engine Emission Control
Emission Law .................................................
219
Catalytic Converter .....................................
220
Transmission
Automatic Transmission ............................
223
All-Wheel Drive
Using All-Wheel Drive ................................
228
Brakes
General Information ....................................
235
Hints on Driving With Anti-Lock Brakes ......................................................................
236
Electric Parking Brake ................................
236
Hill Start Assist .............................................
238
Auto Hold ......................................................
239Reverse Braking Assist
What Is Reverse Braking Assist
................
241
Reverse Braking Assist Precautions .......
241
Switching Reverse Braking Assist On and Off ...............................................................
242
Overriding Reverse Braking Assist .........
242
Reverse Braking Assist Indicators ..........
242
Reverse Braking Assist – Troubleshooting ......................................................................
243
Traction Control
Principle of Operation ................................
245
Using Traction Control ...............................
245
Stability Control
Principle of Operation ................................
246
Using Stability Control ................................
247
Hill Descent Control
What Is Hill Descent Control ....................
248
Switching Hill Descent Control On and Off ......................................................................
248
Setting the Hill Descent Speed ...............
248
4
Aviator (CTV) Canada/United States of America, enUSA, Edition date: 201902, Third-Printing- Table of Contents
Page 122 of 609
To reset the power-fold feature, use the
power-folding mirror control to fold and
unfold the mirrors. You may hear a loud noise
as you reset the power-folding mirrors. This
sound is normal. Repeat this process as
needed each time you manually fold the
mirrors.
Heated Exterior Mirrors
See Heated Exterior Mirrors (page 167).
Memory Mirrors
You can save and recall the mirror positions
through the memory function. See Memory
Function
(page 178).
Auto-dimming Feature
The driver exterior mirror dims when the
interior auto-dimming mirror turns on.
Direction Indicator Mirrors
When the vehicle is running, the
forward-facing portion of the appropriate
mirror housing blinks when you switch on
the direction indicator. Lincoln Welcome Mat Projection Lamp
The lamps on the bottom part of the exterior
mirror lower housing light when you use your
transmitter to unlock the doors or when you
open a door.
360-Degree Camera
(If Equipped)
See
360 Degree Camera (page 264).
Blind Spot Information System (If Equipped)
See
Blind Spot Information System (page
289).
INTERIOR MIRROR WARNING: Do not adjust the mirrors
when your vehicle is moving. This could
result in the loss of control of your vehicle,
serious personal injury or death.
Note: Do not clean the housing or glass of
any mirror with harsh abrasives, fuel or other
petroleum or ammonia-based cleaning
products. You can adjust the interior mirror to your
preference. Some mirrors also have a second
pivot point. This lets you move the mirror
head up or down and from side to side.
Auto-Dimming Mirror
Note:
Do not block the sensors on the front
and back of the mirror. A rear center
passenger or raised rear center head
restraint may also block light from reaching
the sensor.
The mirror dims to reduce the effect of bright
light from behind. It returns to normal when
the bright light from behind is no longer
present or if you shift into reverse (R).
119
Aviator (CTV) Canada/United States of America, enUSA, Edition date: 201902, Third-Printing- Windows and Mirrors
Page 200 of 609
12 Volt DC Power Point
WARNING: Do not plug optional
electrical accessories into the cigar lighter
socket. Incorrect use of the cigar lighter
can cause damage not covered by the
vehicle warranty, and can result in fire or
serious injury.
Note: When you switch the ignition on, you
can use the socket to power 12 volt
appliances with a maximum current rating
of 15 amps.
Note: If the power supply does not work after
you switch the ignition off, switch the ignition
on.
Note: Do not hang any accessory from the
accessory plug.
Note: Do not use the power point over the
vehicle capacity of 12 volt DC 180 watts or
a fuse may blow.
Note: Always keep the power point caps
closed when not in use. Do not insert objects other than an accessory
plug into the power point. This damages the
power point and may blow the fuse.
Run the vehicle for full capacity use of the
power point.
To prevent the battery from running out of
charge:
•
Do not use the power point longer than
necessary when the vehicle is not
running.
• Do not leave devices plugged in
overnight or when you park your vehicle
for extended periods.
USB Port and Power Point Locations
USB Ports and Power Points may be in the
following locations:
• On the lower instrument panel.
• Inside the first row center console.
• Inside the second row center console.
• On the front of the center console.
• On the rear of the center console.
• In the cargo area. •
On the passenger side floor panel.
• 3rd row on the quarter trim panels.
Note: Some of the USB ports may not have
data transfer capabilities.
Note: Incorrect use of the USB ports can
cause damage not covered by the vehicle
warranty.
110 Volt AC Power Point WARNING:
Do not keep electrical
devices plugged in the power point
whenever the device is not in use. Do not
use any extension cord with the 110 volt
AC power point, since it will defeat the
safety protection design. Doing so may
cause the power point to overload due to
powering multiple devices that can reach
beyond the 150 watt load limit and could
result in fire or serious injury.
Note: The power point turns off when you
switch off the ignition, when the vehicle is
not in accessory mode or when the battery
voltage drops below 11 volts.
197
Aviator (CTV) Canada/United States of America, enUSA, Edition date: 201902, Third-Printing- Auxiliary Power Points
Page 201 of 609
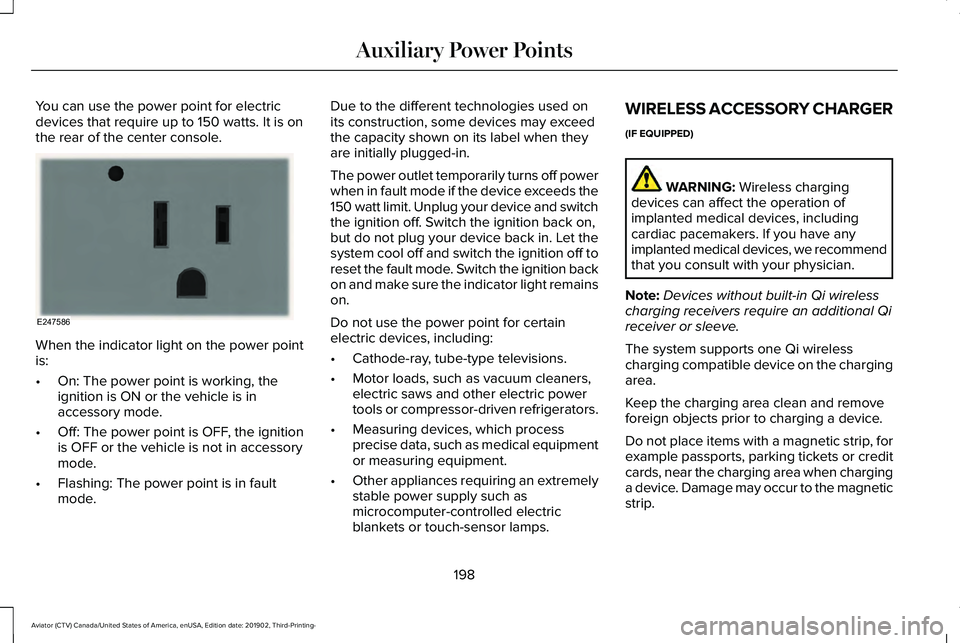
You can use the power point for electric
devices that require up to 150 watts. It is on
the rear of the center console.
When the indicator light on the power point
is:
•
On: The power point is working, the
ignition is ON or the vehicle is in
accessory mode.
• Off: The power point is OFF, the ignition
is OFF or the vehicle is not in accessory
mode.
• Flashing: The power point is in fault
mode. Due to the different technologies used on
its construction, some devices may exceed
the capacity shown on its label when they
are initially plugged-in.
The power outlet temporarily turns off power
when in fault mode if the device exceeds the
150 watt limit. Unplug your device and switch
the ignition off. Switch the ignition back on,
but do not plug your device back in. Let the
system cool off and switch the ignition off to
reset the fault mode. Switch the ignition back
on and make sure the indicator light remains
on.
Do not use the power point for certain
electric devices, including:
•
Cathode-ray, tube-type televisions.
• Motor loads, such as vacuum cleaners,
electric saws and other electric power
tools or compressor-driven refrigerators.
• Measuring devices, which process
precise data, such as medical equipment
or measuring equipment.
• Other appliances requiring an extremely
stable power supply such as
microcomputer-controlled electric
blankets or touch-sensor lamps. WIRELESS ACCESSORY CHARGER
(IF EQUIPPED)
WARNING: Wireless charging
devices can affect the operation of
implanted medical devices, including
cardiac pacemakers. If you have any
implanted medical devices, we recommend
that you consult with your physician.
Note: Devices without built-in Qi wireless
charging receivers require an additional Qi
receiver or sleeve.
The system supports one Qi wireless
charging compatible device on the charging
area.
Keep the charging area clean and remove
foreign objects prior to charging a device.
Do not place items with a magnetic strip, for
example passports, parking tickets or credit
cards, near the charging area when charging
a device. Damage may occur to the magnetic
strip.
198
Aviator (CTV) Canada/United States of America, enUSA, Edition date: 201902, Third-Printing- Auxiliary Power PointsE247586
Page 202 of 609
Do not place metal objects, for example
remote controls, coins and candy wrappers,
on or near the charging area when charging
a device. Metal objects may heat up and
degrade the charging performance.
Note:
The rate of charge, or charging power,
is controlled by the device. During charging,
the device and the charger may heat up, this
is normal. If the battery gets hotter than
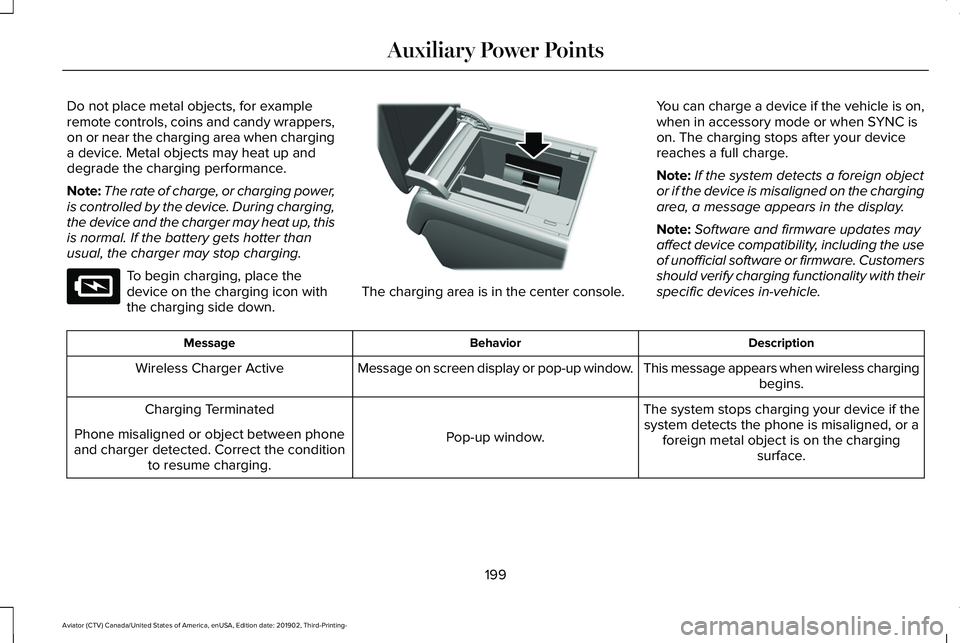
usual, the charger may stop charging. To begin charging, place the
device on the charging icon with
the charging side down.
The charging area is in the center console.
You can charge a device if the vehicle is on,
when in accessory mode or when SYNC is
on. The charging stops after your device
reaches a full charge.
Note:
If the system detects a foreign object
or if the device is misaligned on the charging
area, a message appears in the display.
Note: Software and firmware updates may
affect device compatibility, including the use
of unofficial software or firmware. Customers
should verify charging functionality with their
specific devices in-vehicle. Description
Behavior
Message
This message appears when wireless chargingbegins.
Message on screen display or pop-up window.
Wireless Charger Active
The system stops charging your device if thesystem detects the phone is misaligned, or a foreign metal object is on the charging surface.
Pop-up window.
Charging Terminated
Phone misaligned or object between phone
and charger detected. Correct the condition to resume charging.
199
Aviator (CTV) Canada/United States of America, enUSA, Edition date: 201902, Third-Printing- Auxiliary Power PointsE297549 E317944
Page 203 of 609
This equipment has been tested and found
to comply with Part 18 of the FCC Rules.
•
This equipment generates, uses, and can
radiate radio frequency energy and may
cause harmful interference to radio
communications. There is no guarantee
that interference will not occur in a
particular installation. If this equipment
does cause harmful interference to radio
or television reception, please consult
the dealer.
• This product is not end-user serviceable.
FCC ID: L2C0074TR
This device contains licence-exempt
transmitter(s)/receiver(s) that comply with
Innovation, Science and Economic
Development Canada ’s licence-exempt
RSS(s). Operation is subject to the following
two conditions:
• This device may not cause interference,
and
• This device must accept any interference,
including interference that may cause
undesired operation of the device.
IC ID: 3432A-0074TR
200
Aviator (CTV) Canada/United States of America, enUSA, Edition date: 201902, Third-Printing- Auxiliary Power Points
Page 204 of 609
CENTER CONSOLE
Carefully stow items in the center console
as items may become loose during hard
braking, acceleration or crashes.
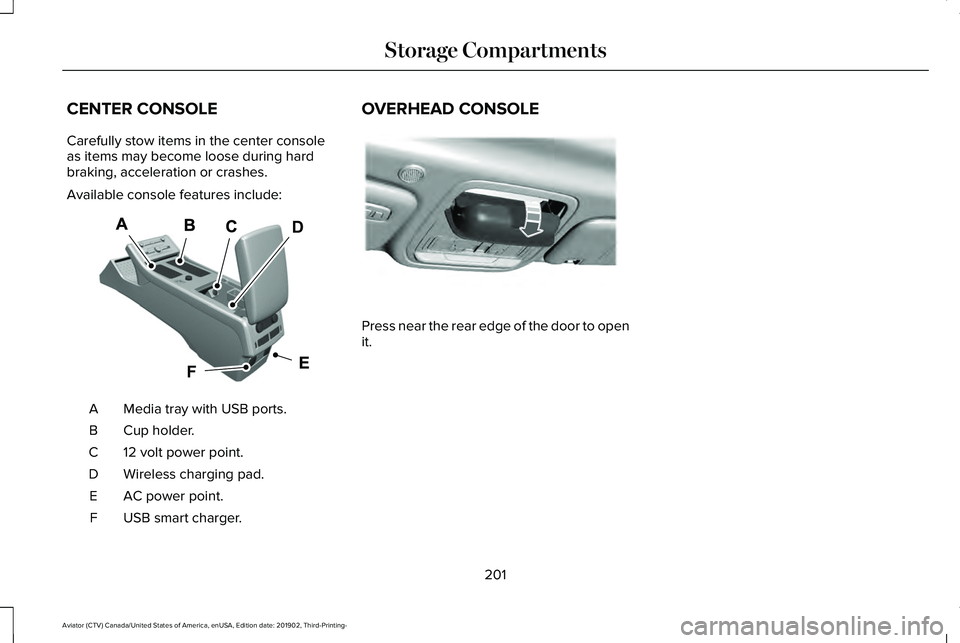
Available console features include:
Media tray with USB ports.
A
Cup holder.
B
12 volt power point.
C
Wireless charging pad.
D
AC power point.
E
USB smart charger.
F OVERHEAD CONSOLE
Press near the rear edge of the door to open
it.
201
Aviator (CTV) Canada/United States of America, enUSA, Edition date: 201902, Third-Printing- Storage CompartmentsD
FE292506 E307323
Page 208 of 609

3.
Using the SYNC display enter the backup
password and select Enter within 30
seconds.
4. SYNC displays messages to start the vehicle.
5. Fully depress the brake pedal and press
the start button within 20 seconds to start
the engine.
Automatic Engine Shutdown
This feature shuts down the engine if it has
been idling for an extended period. The
ignition also turns off in order to save battery
power. Before your vehicle shuts down, a
message appears in the information display
showing a timer counting down from 30
seconds. If you do not intervene within 30
seconds, your vehicle shuts down. Another
message appears in the information display
to inform you that your vehicle has shut down
to save fuel. Start your vehicle as you
normally do.
Note: Automatic Engine Shutdown may be
more frequent for hybrid vehicles. Automatic Engine Shutdown Override
Note:
You cannot permanently switch off
the automatic shutdown feature. When you
switch it off temporarily, it turns on at the
next ignition cycle.
You can stop the shutdown, or reset the
timer, at any point before the 30-second
countdown has expired by doing any of the
following:
• You can reset the timer by interacting
with your vehicle, for example pressing
the brake or accelerator pedal.
• You can temporarily switch off the
shutdown feature any time the ignition is
on using the information display. See
Information Displays (page 130). The
feature only remains off for the current
ignition cycle.
• During the 30-second countdown, the
system prompts you to press OK or
RESET to temporarily switch the feature
off for the current ignition cycle only. Stopping the Engine When Your
Vehicle is Stationary
1. Shift into park (P).
2. Press the push button ignition switch.
3. Apply the parking brake.
Note:
The ignition, all electrical circuits and
all warning lamps and indicators will be
turned off.
Note: If the engine is idling for 30 minutes,
the ignition and engine shut down.
Vehicles using Phone as a Key
1. Shift into park (P).
2. Press the push button ignition switch.
3. Apply the parking brake.
Note: The ignition, all electrical circuits and
all warning lamps and indicators will be
turned off.
Note: If the engine is idling for 30 minutes,
the ignition and engine shut down.
205
Aviator (CTV) Canada/United States of America, enUSA, Edition date: 201902, Third-Printing- Starting and Stopping the Engine
Page 334 of 609
2.
Connect the other end of the positive (+)
cable to the positive (+) terminal of the
booster vehicle battery
3. Connect the negative (-) cable to the negative (-) terminal of the booster
vehicle battery.
4. Make the final connection of the negative
(-) cable to an exposed metal part of the
stalled vehicle's engine, away from the
battery and the fuel injection system, or
connect the negative (-) cable to a ground
connection point if available.
Jump Starting
1. Start the engine of the booster vehicle and rev the engine moderately, or press
the accelerator gently to keep your
engine speed between 2000 and 3000
RPM, as shown in your tachometer.
2. Start the engine of the disabled vehicle.
3. Once the disabled vehicle has been started, run both vehicle engines for an
additional three minutes before
disconnecting the jumper cables. Removing the Jumper Cables
Remove the jumper cables in the reverse
order that they were connected.
1. Remove the negative (-) jumper cable
from the disabled vehicle.
2. Remove the jumper cable on the negative (-) terminal of the booster
vehicle battery.
3. Remove the jumper cable from the positive (+) terminal of the booster vehicle
battery.
4. Remove the jumper cable from the positive (+) terminal of the disabled
vehicle battery.
5. Allow the engine to idle for at least one minute.
POST-CRASH ALERT SYSTEM
The system flashes the direction indicators
and sounds the horn (intermittently) in the
event of a serious impact that deploys an
airbag (front, side, side curtain or Safety
Canopy) or the seatbelt pretensioners. The horn and indicators turn off when:
•
You press the hazard control button.
• You press the panic button on the remote
entry transmitter (if equipped).
• Your vehicle runs out of power.
• Sounding of the horn is only enabled in
specific markets.
331
Aviator (CTV) Canada/United States of America, enUSA, Edition date: 201902, Third-Printing- Roadside Emergencies
Page 349 of 609
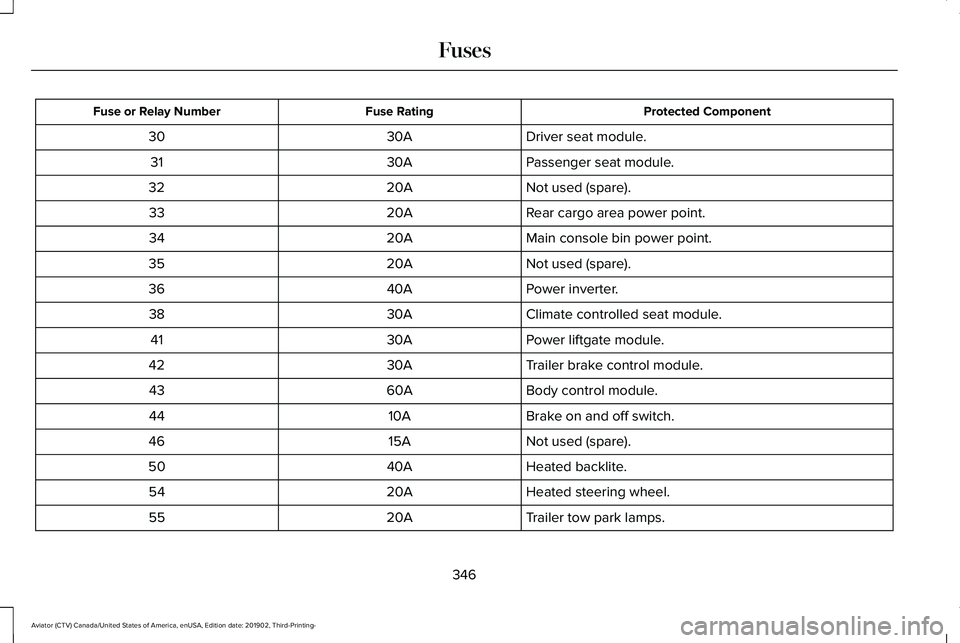
Protected Component
Fuse Rating
Fuse or Relay Number
Driver seat module.
30A
30
Passenger seat module.
30A
31
Not used (spare).
20A
32
Rear cargo area power point.
20A
33
Main console bin power point.
20A
34
Not used (spare).
20A
35
Power inverter.
40A
36
Climate controlled seat module.
30A
38
Power liftgate module.
30A
41
Trailer brake control module.
30A
42
Body control module.
60A
43
Brake on and off switch.
10A
44
Not used (spare).
15A
46
Heated backlite.
40A
50
Heated steering wheel.
20A
54
Trailer tow park lamps.
20A
55
346
Aviator (CTV) Canada/United States of America, enUSA, Edition date: 201902, Third-Printing- Fuses