charging LINCOLN AVIATOR 2020 Owners Manual
[x] Cancel search | Manufacturer: LINCOLN, Model Year: 2020, Model line: AVIATOR, Model: LINCOLN AVIATOR 2020Pages: 609, PDF Size: 5.4 MB
Page 142 of 609
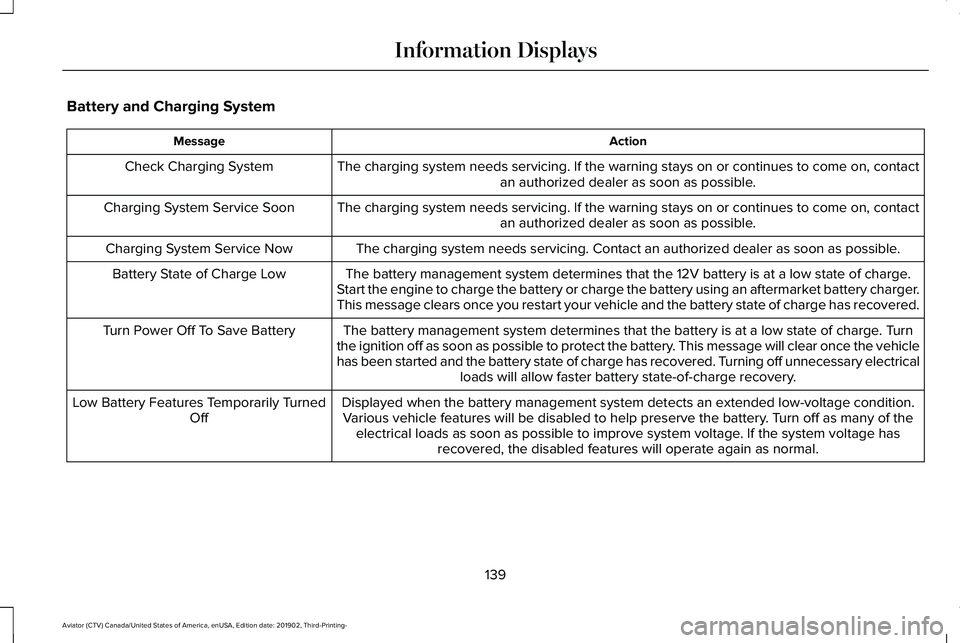
Battery and Charging System
Action
Message
The charging system needs servicing. If the warning stays on or continue\
s to come on, contactan authorized dealer as soon as possible.
Check Charging System
The charging system needs servicing. If the warning stays on or continue\
s to come on, contactan authorized dealer as soon as possible.
Charging System Service Soon
The charging system needs servicing. Contact an authorized dealer as soo\
n as possible.
Charging System Service Now
The battery management system determines that the 12V battery is at a lo\
w state of charge.
Start the engine to charge the battery or charge the battery using an aft\
ermarket battery charger.
This message clears once you restart your vehicle and the battery state \
of charge has recovered.
Battery State of Charge Low
The battery management system determines that the battery is at a low st\
ate of charge. Turn
the ignition off as soon as possible to protect the battery. This message will clear once the vehicle
has been started and the battery state of charge has recovered. Turning off unnecessary electrical loads will allow faster battery state-of-charge recovery.
Turn Power Off To Save Battery
Displayed when the battery management system detects an extended low-vol\
tage condition.Various vehicle features will be disabled to help preserve the battery. Turn off as many of the electrical loads as soon as possible to improve system voltage. If the system voltage has recovered, the disabled features will operate again as normal.
Low Battery Features Temporarily Turned
Off
139
Aviator (CTV) Canada/United States of America, enUSA, Edition date: 201902, Third-Printing- Information Displays
Page 156 of 609
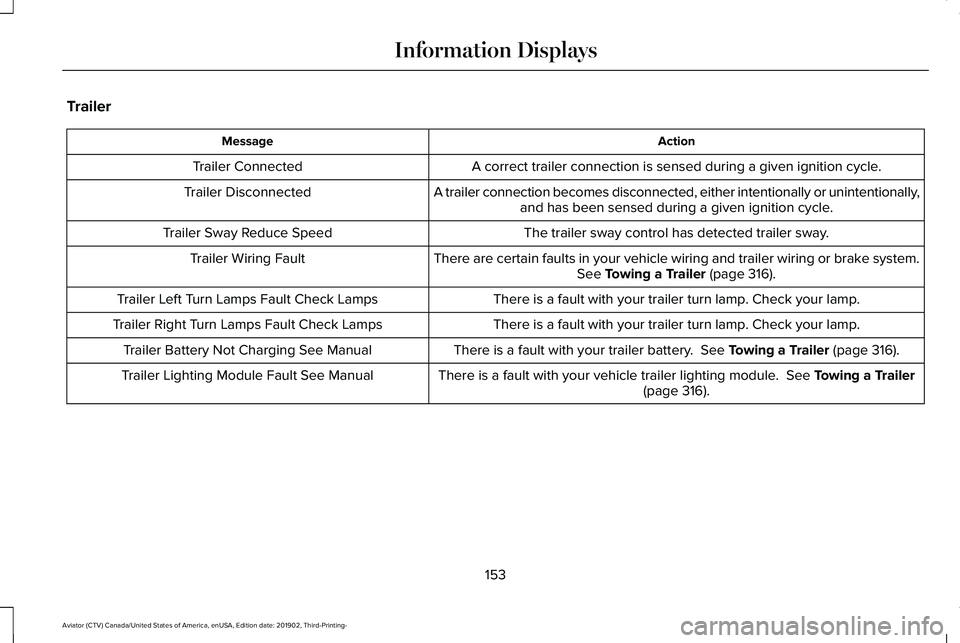
Trailer
Action
Message
A correct trailer connection is sensed during a given ignition cycle.
Trailer Connected
A trailer connection becomes disconnected, either intentionally or unint\
entionally,and has been sensed during a given ignition cycle.
Trailer Disconnected
The trailer sway control has detected trailer sway.
Trailer Sway Reduce Speed
There are certain faults in your vehicle wiring and trailer wiring or br\
ake system.See Towing a Trailer (page 316).
Trailer Wiring Fault
There is a fault with your trailer turn lamp. Check your lamp.
Trailer Left Turn Lamps Fault Check Lamps
There is a fault with your trailer turn lamp. Check your lamp.
Trailer Right Turn Lamps Fault Check Lamps
There is a fault with your trailer battery.
See Towing a Trailer (page 316).
Trailer Battery Not Charging See Manual
There is a fault with your vehicle trailer lighting module.
See Towing a Trailer
(page 316).
Trailer Lighting Module Fault See Manual
153
Aviator (CTV) Canada/United States of America, enUSA, Edition date: 201902, Third-Printing- Information Displays
Page 157 of 609
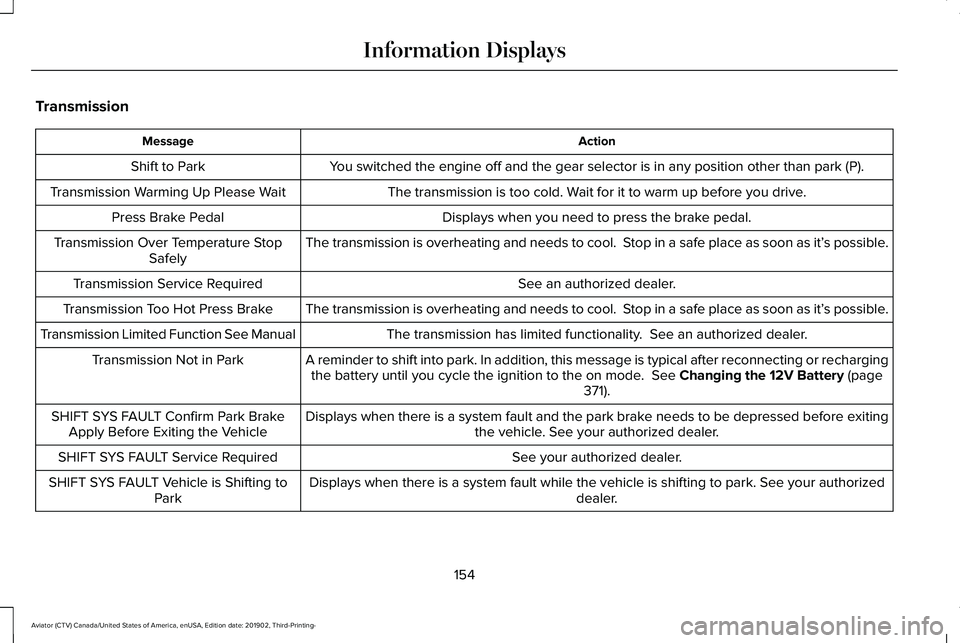
Transmission
Action
Message
You switched the engine off and the gear selector is in any position othe\
r than park (P).
Shift to Park
The transmission is too cold. Wait for it to warm up before you drive.
Transmission Warming Up Please Wait
Displays when you need to press the brake pedal.
Press Brake Pedal
The transmission is overheating and needs to cool. Stop in a safe place as soon as it’ s possible.
Transmission Over Temperature Stop
Safely
See an authorized dealer.
Transmission Service Required
The transmission is overheating and needs to cool. Stop in a safe place as soon as it’ s possible.
Transmission Too Hot Press Brake
The transmission has limited functionality. See an authorized dealer.
Transmission Limited Function See Manual
A reminder to shift into park. In addition, this message is typical afte\
r reconnecting or rechargingthe battery until you cycle the ignition to the on mode. See Changing the 12V Battery (page
371).
Transmission Not in Park
Displays when there is a system fault and the park brake needs to be depressed before exitingthe vehicle. See your authorized dealer.
SHIFT SYS FAULT Confirm Park Brake
Apply Before Exiting the Vehicle
See your authorized dealer.
SHIFT SYS FAULT Service Required
Displays when there is a system fault while the vehicle is shifting to p\
ark. See your authorized dealer.
SHIFT SYS FAULT Vehicle is Shifting to
Park
154
Aviator (CTV) Canada/United States of America, enUSA, Edition date: 201902, Third-Printing- Information Displays
Page 201 of 609
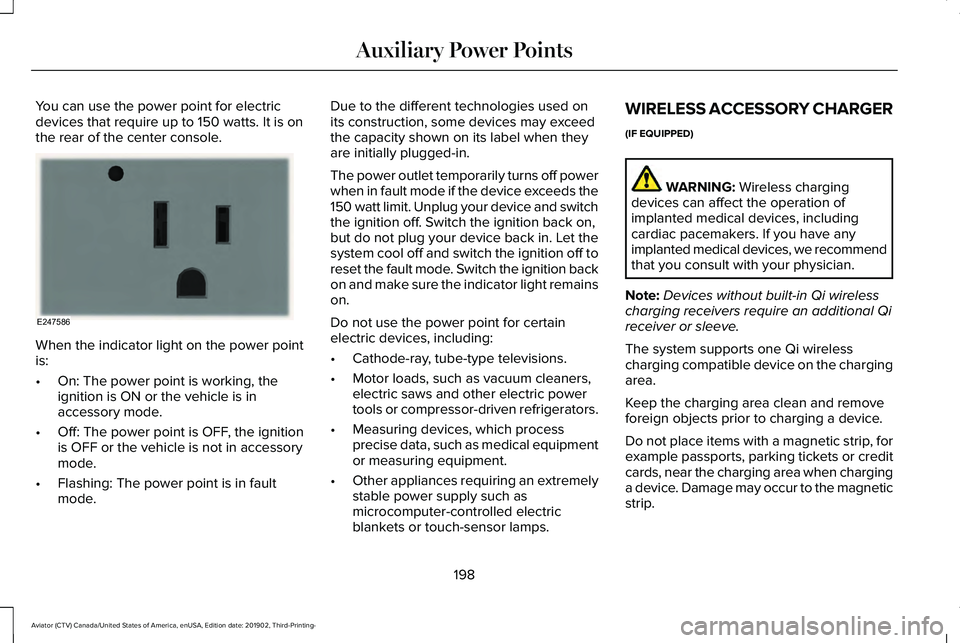
You can use the power point for electric
devices that require up to 150 watts. It is on
the rear of the center console.
When the indicator light on the power point
is:
•
On: The power point is working, the
ignition is ON or the vehicle is in
accessory mode.
• Off: The power point is OFF, the ignition
is OFF or the vehicle is not in accessory
mode.
• Flashing: The power point is in fault
mode. Due to the different technologies used on
its construction, some devices may exceed
the capacity shown on its label when they
are initially plugged-in.
The power outlet temporarily turns off power
when in fault mode if the device exceeds the
150 watt limit. Unplug your device and switch
the ignition off. Switch the ignition back on,
but do not plug your device back in. Let the
system cool off and switch the ignition off to
reset the fault mode. Switch the ignition back
on and make sure the indicator light remains
on.
Do not use the power point for certain
electric devices, including:
•
Cathode-ray, tube-type televisions.
• Motor loads, such as vacuum cleaners,
electric saws and other electric power
tools or compressor-driven refrigerators.
• Measuring devices, which process
precise data, such as medical equipment
or measuring equipment.
• Other appliances requiring an extremely
stable power supply such as
microcomputer-controlled electric
blankets or touch-sensor lamps. WIRELESS ACCESSORY CHARGER
(IF EQUIPPED)
WARNING: Wireless charging
devices can affect the operation of
implanted medical devices, including
cardiac pacemakers. If you have any
implanted medical devices, we recommend
that you consult with your physician.
Note: Devices without built-in Qi wireless
charging receivers require an additional Qi
receiver or sleeve.
The system supports one Qi wireless
charging compatible device on the charging
area.
Keep the charging area clean and remove
foreign objects prior to charging a device.
Do not place items with a magnetic strip, for
example passports, parking tickets or credit
cards, near the charging area when charging
a device. Damage may occur to the magnetic
strip.
198
Aviator (CTV) Canada/United States of America, enUSA, Edition date: 201902, Third-Printing- Auxiliary Power PointsE247586
Page 202 of 609
Do not place metal objects, for example
remote controls, coins and candy wrappers,
on or near the charging area when charging
a device. Metal objects may heat up and
degrade the charging performance.
Note:
The rate of charge, or charging power,
is controlled by the device. During charging,
the device and the charger may heat up, this
is normal. If the battery gets hotter than
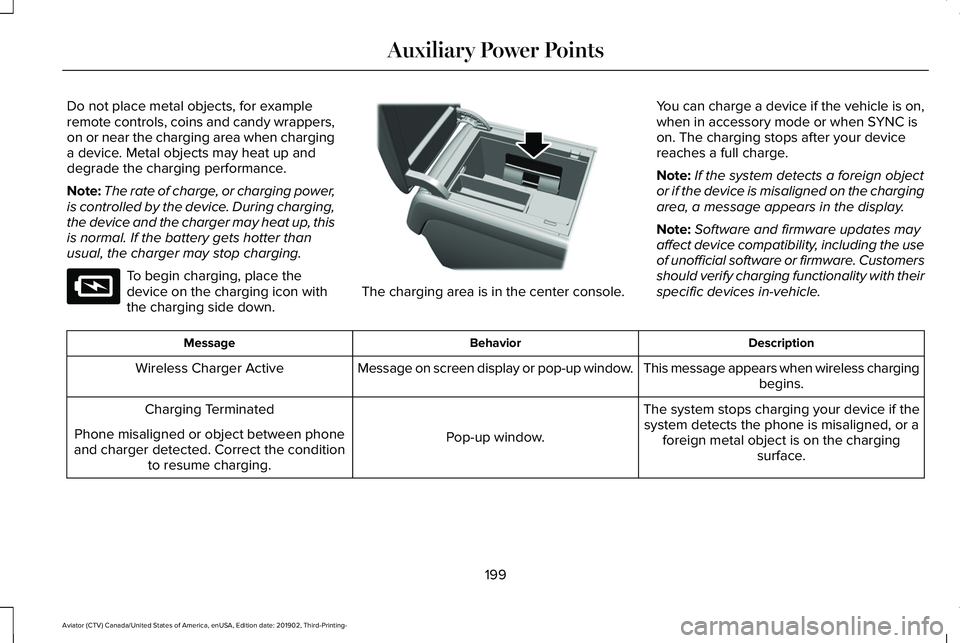
usual, the charger may stop charging. To begin charging, place the
device on the charging icon with
the charging side down.
The charging area is in the center console.
You can charge a device if the vehicle is on,
when in accessory mode or when SYNC is
on. The charging stops after your device
reaches a full charge.
Note:
If the system detects a foreign object
or if the device is misaligned on the charging
area, a message appears in the display.
Note: Software and firmware updates may
affect device compatibility, including the use
of unofficial software or firmware. Customers
should verify charging functionality with their
specific devices in-vehicle. Description
Behavior
Message
This message appears when wireless chargingbegins.
Message on screen display or pop-up window.
Wireless Charger Active
The system stops charging your device if thesystem detects the phone is misaligned, or a foreign metal object is on the charging surface.
Pop-up window.
Charging Terminated
Phone misaligned or object between phone
and charger detected. Correct the condition to resume charging.
199
Aviator (CTV) Canada/United States of America, enUSA, Edition date: 201902, Third-Printing- Auxiliary Power PointsE297549 E317944
Page 204 of 609
CENTER CONSOLE
Carefully stow items in the center console
as items may become loose during hard
braking, acceleration or crashes.
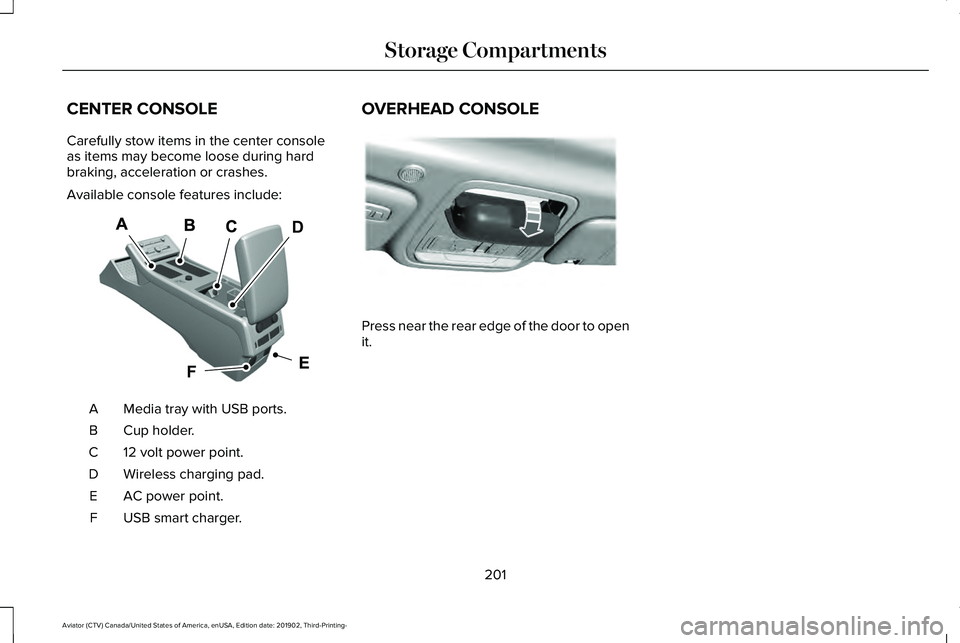
Available console features include:
Media tray with USB ports.
A
Cup holder.
B
12 volt power point.
C
Wireless charging pad.
D
AC power point.
E
USB smart charger.
F OVERHEAD CONSOLE
Press near the rear edge of the door to open
it.
201
Aviator (CTV) Canada/United States of America, enUSA, Edition date: 201902, Third-Printing- Storage CompartmentsD
FE292506 E307323
Page 224 of 609
The scheduled maintenance items listed in
scheduled maintenance information are
essential to the life and performance of your
vehicle and to its emissions system.
If you use anything other than Ford,
Motorcraft or Ford-authorized parts for
maintenance replacements or for service of
components affecting emission control, such
non-Ford parts should be equivalent to
genuine Ford Motor Company parts in
performance and durability.
Illumination of the service engine soon
indicator, charging system warning light or
the temperature warning light, fluid leaks,
strange odors, smoke or loss of engine
power could indicate that the emission
control system is not working properly.
An improperly operating or damaged exhaust
system may allow exhaust to enter the
vehicle. Have a damaged or improperly
operating exhaust system inspected and
repaired immediately.
Do not make any unauthorized changes to
your vehicle or engine. By law, vehicle
owners and anyone who manufactures,
repairs, services, sells, leases, trades
vehicles, or supervises a fleet of vehicles are
not permitted to intentionally remove an
emission control device or prevent it from
working. Information about your vehicle
’s
emission system is on the Vehicle Emission
Control Information Decal located on or near
the engine. This decal also lists engine
displacement.
Please consult your warranty information for
complete details.
On-Board Diagnostics (OBD-II)
Your vehicle has a computer known as the
on-board diagnostics system (OBD-II) that
monitors the engine ’s emission control
system. The system protects the environment
by making sure that your vehicle continues
to meet government emission standards. The
OBD-II system also assists a service
technician in properly servicing your vehicle. When the service engine soon
indicator illuminates, the OBD-II
system has detected a malfunction.
Temporary malfunctions may cause the
service engine soon indicator to illuminate.
Examples are:
1. Your vehicle has run out of fuel—the engine may misfire or run poorly.
2. Poor fuel quality or water in the fuel—the
engine may misfire or run poorly.
3. The fuel fill inlet may not have closed properly. See Refueling (page 214).
4. Driving through deep water—the electrical system may be wet.
You can correct these temporary
malfunctions by filling the fuel tank with good
quality fuel, properly closing the fuel fill inlet
or letting the electrical system dry out. After
three driving cycles without these or any
other temporary malfunctions present, the
service engine soon indicator should stay off
the next time you start the engine. A driving
cycle consists of a cold engine startup
followed by mixed city and highway driving.
No additional vehicle service is required.
221
Aviator (CTV) Canada/United States of America, enUSA, Edition date: 201902, Third-Printing- Engine Emission Control
Page 375 of 609
For longer, trouble-free operation, keep the
top of the battery clean and dry and the
battery cables tightly fastened to the battery
terminals. If any corrosion is present on the
battery or terminals, remove the cables from
the terminals and clean with a wire brush.
You can neutralize the acid with a solution
of baking soda and water.
We recommend that you disconnect the
negative battery cable terminal from the
battery if you plan to store your vehicle for
an extended period.
Note:
If you only disconnect the negative
battery cable terminal, make sure it is
isolated or placed away from the battery
terminal to avoid unintended connection or
arcing.
If you replace the battery make sure it
matches the electrical requirements of your
vehicle. If you disconnect or replace the battery and
your vehicle has an automatic transmission,
it must relearn its adaptive strategy. Because
of this, the transmission may shift firmly when
first driven. This is normal operation while
the transmission fully updates its operation
to optimum shift feel.
Battery Management System (If Equipped)
The battery management system monitors
battery conditions and takes actions to
extend battery life. If excessive battery drain
is detected, the system temporarily disables
some electrical systems to protect the
battery.
Systems included are:
• Heated rear window.
• Heated seats.
• Climate control.
• Heated steering wheel.
• Audio unit.
• Navigation system. A message may appear in the information
displays to alert you that battery protection
actions are active. These messages are only
for notification that an action is taking place,
and not intended to indicate an electrical
problem or that the battery requires
replacement.
After battery replacement, or in some cases
after charging the battery with an external
charger, the battery management system
requires eight hours of vehicle sleep time to
relearn the battery state of charge. During
this time your vehicle must remain fully
locked with the ignition switched off.
Note:
Prior to relearning the battery state of
charge, the battery management system
may temporarily disable some electrical
systems.
372
Aviator (CTV) Canada/United States of America, enUSA, Edition date: 201902, Third-Printing- Maintenance
Page 388 of 609
Body
•
Wash your vehicle thoroughly to remove
dirt, grease, oil, tar or mud from exterior
surfaces, rear-wheel housing and the
underside of front fenders.
• Periodically wash your vehicle if it is
stored in exposed locations.
• Touch-up exposed or primed metal to
prevent rust.
• Cover chrome and stainless steel parts
with a thick coat of auto wax to prevent
discoloration. Re-wax as necessary when
you wash your vehicle.
• Lubricate all hood, door and luggage
compartment hinges and latches with a
light grade oil.
• Cover interior trim to prevent fading.
• Keep all rubber parts free from oil and
solvents. Engine
•
Change the engine oil and filter prior to
storage because used engine oil contains
contaminates which may cause engine
damage.
• Start the engine every 15 days for a
minimum of 15 minutes. Run at fast idle
with the climate controls set to defrost
until the engine reaches normal
operating temperature.
• With your foot on the brake, shift through
all the gears while the engine is running.
• We recommend that you change the
engine oil before you use your vehicle
again.
Fuel system
• Fill the fuel tank with high-quality fuel
until the first automatic shutoff of the fuel
pump nozzle. Cooling system
•
Protect against freezing temperatures.
• When removing your vehicle from
storage, check coolant fluid level.
Confirm that there are no cooling system
leaks and that fluid is at the
recommended level.
Disconnecting Your 12 Volt Battery
• Check and recharge as necessary. Keep
connections clean.
• If storing your vehicle for more than 30
days without recharging the battery, we
recommend that you disconnect the
battery cables to maintain battery charge
for quick starting.
Note: It is necessary to reset memory
features if you disconnect the battery cables.
Brakes
• Make sure the brakes and parking brake
release fully.
Tires
• Maintain recommended air pressure.
385
Aviator (CTV) Canada/United States of America, enUSA, Edition date: 201902, Third-Printing- Vehicle Care
Page 601 of 609
Headrest
See: Head Restraints...........................................171
Head Restraints...............................................171
Adjusting the Head Restraint............................171
Tilting Head Restraints ......................................173
Head Up Display
...........................................156
Configuring The Head Up Display..................156
Head Up Display Overview..............................158
Maintaining Your Head Up Display.................159
Heated Exterior Mirrors
...............................167
Heated Rear Window...................................167
Heated Seats..................................................185 Front Seats............................................................185
Second Row Heated Seats...............................186
Heated Steering Wheel................................101
Heating See: Climate Control..........................................160
Hill Descent Control....................................248
Hill Descent Control Indicator...................249
Hill Start Assist..............................................238 Switching the System On and Off..................239
Using Hill Start Assist........................................238
Hints on Controlling the Interior Climate..........................................................163
Defogging the Side Windows in Cold Weather.............................................................164
General Hints........................................................163
Quickly Cooling the Interior..............................164 Quickly Heating the Interior.............................164
Recommended Settings for Cooling..............
164
Recommended Settings for Heating..............164
Hints on Driving With Anti-Lock Brakes..........................................................236
Hood Lock See: Opening and Closing the Hood............358
Horn...................................................................101
How Does Adaptive Cruise Control With Stop and Go Work.....................................269
How Does the Rear Occupant Alert System Work
...............................................................189
I
In California (U.S. Only)...............................334
Information Display Control.........................101
Information Displays.....................................130 General Information............................................130
Information Messages..................................134 Active Park............................................................134
Adaptive Cruise Control....................................135
Adaptive Headlamps..........................................135
Adaptive Steering................................................136
AdvanceTrac ™ and Traction Control................136
Alarm.......................................................................137
Automatic Engine Shutdown............................137
AWD........................................................................\
138 Battery and Charging System..........................139
Blind Spot Information and Cross Traffic Alert
System...............................................................140
Doors and Locks...................................................141
Driver Alert............................................................142
Fuel........................................................................\
.142
Hill Descent Control............................................143
Hill Start Assist.....................................................143
Keys and Intelligent Access..............................
144
Lane Keeping System........................................145
Maintenance.........................................................145
MyKey.....................................................................147
Park Aid..................................................................148
Park Brake.............................................................149
Power Steering....................................................150
Pre-Collision Assist..............................................151
Remote Start..........................................................151
Seats........................................................................\
151
Starting System ...................................................152
Tire Pressure Monitoring System....................152
Trailer
......................................................................153
Transmission.........................................................154
Installing Child Restraints.............................26 Child Seats.............................................................26
Using Lap and Shoulder Belts...........................26
Using Lower Anchors and Tethers for
CHildren (LATCH).............................................30
Using Tether Straps..............................................32
598
Aviator (CTV) Canada/United States of America, enUSA, Edition date: 201902, Third-Printing- Index