navigation system LINCOLN AVIATOR 2020 Owners Manual
[x] Cancel search | Manufacturer: LINCOLN, Model Year: 2020, Model line: AVIATOR, Model: LINCOLN AVIATOR 2020Pages: 609, PDF Size: 5.4 MB
Page 76 of 609
PRINCIPLE OF OPERATION
MyKey allows you to program keys with
restricted driving modes to promote good
driving habits. You can program the
restrictions to all keys except one. Any keys
that you did not program are administrator
keys or admin keys.
You can use admin keys to:
•
Create a MyKey with certain vehicle
restrictions.
• Program certain MyKey settings.
• Clear all MyKey restrictions.
After you program a MyKey, you can view
the following information through the
information display:
• The total number of admin keys and
MyKeys for your vehicle.
• The total distance a MyKey driver
traveled with your vehicle.
Note: Every MyKey receives the same
restrictions and settings. You cannot
program them individually. Note:
For vehicles equipped with a
push-button start switch: When both a MyKey
and an admin key are present when you
start your vehicle, the system recognizes the
admin key only.
Standard Settings
Not every vehicle includes the features listed
below. If your vehicle has this equipment,
then you cannot change the following
settings when using a MyKey:
• Seatbelt reminder or Belt-Minder™. MyKey
mutes the audio system until drivers, and
in some instances, passengers, fasten
their seatbelts. Note: If your vehicle
includes an AM/FM radio or a very basic
audio system, then the radio may not
mute.
• Earlier low-fuel warning. The low-fuel
warning activates earlier for MyKey
drivers, giving them more time to refuel. •
Certain driver alerts, stability systems or
parking aids turn on automatically when
you use the MyKey system. For example,
Blind Spot Information System (BLIS),
cross traffic alert, lane departure warning
or forward collision warning. Note: MyKey
drivers may be able to turn the lane
departure warning feature off, but this
feature turns back on automatically with
every new key cycle.
• Restricted touchscreen operation in some
markets. For example, MyKey may
prevent manual navigation destination
input while the vehicle is in any gear
other than park (P) or when the vehicle
reaches a certain rate of speed.
• Satellite radio adult content restrictions,
if this feature is available in your market.
Optional Settings
You can configure certain vehicle feature
settings when you first create a MyKey. You
can also change the settings afterward with
an admin key.
73
Aviator (CTV) Canada/United States of America, enUSA, Edition date: 201902, Third-Printing- MyKey™
Page 133 of 609
GENERAL INFORMATION
WARNING: Driving while distracted
can result in loss of vehicle control, crash
and injury. We strongly recommend that
you use extreme caution when using any
device that may take your focus off the
road. Your primary responsibility is the safe
operation of your vehicle. We recommend
against the use of any hand-held device
while driving and encourage the use of
voice-operated systems when possible.
Make sure you are aware of all applicable
local laws that may affect the use of
electronic devices while driving.
You can control various systems on your
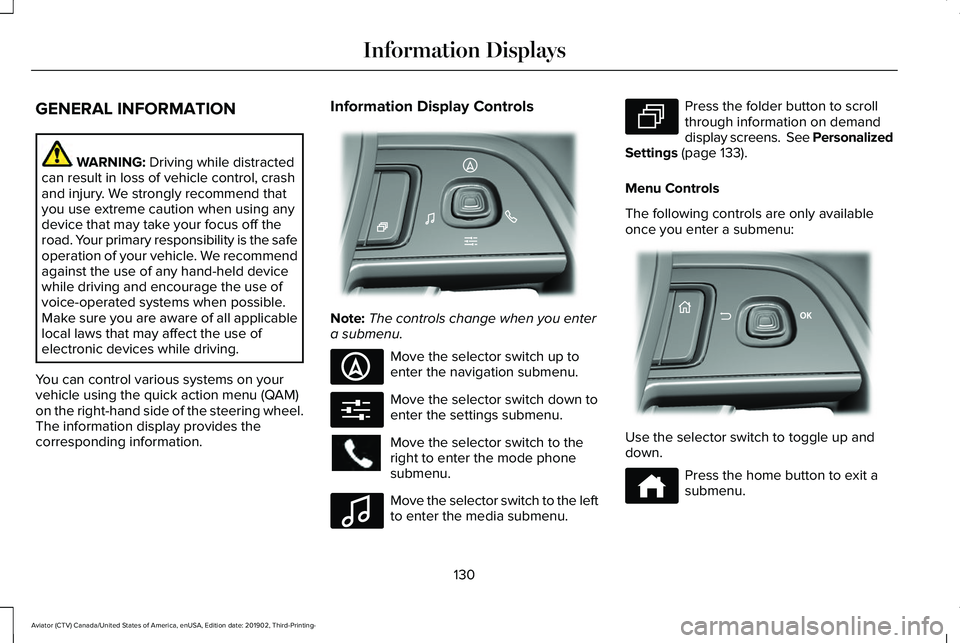
vehicle using the quick action menu (QAM)
on the right-hand side of the steering wheel.
The information display provides the
corresponding information. Information Display Controls
Note:
The controls change when you enter
a submenu. Move the selector switch up to
enter the navigation submenu.
Move the selector switch down to
enter the settings submenu.
Move the selector switch to the
right to enter the mode phone
submenu.
Move the selector switch to the left
to enter the media submenu. Press the folder button to scroll
through information on demand
display screens. See Personalized
Settings (page 133).
Menu Controls
The following controls are only available
once you enter a submenu: Use the selector switch to toggle up and
down.
Press the home button to exit a
submenu.
130
Aviator (CTV) Canada/United States of America, enUSA, Edition date: 201902, Third-Printing- Information DisplaysE281220 E281481 E280315 E100027 E281483 E299701 E272621
Page 159 of 609
Action
Message
Reminder to remove the park brake while in neutral tow.
Neutral Tow Remove Park Brake for
Towing
Displays when the neutral tow is off.
Neutral Tow Disengaged
Displays when neutral tow is on.
Neutral Tow Enabled Leave Transmission
in Neutral
HEAD UP DISPLAY (IF EQUIPPED)
This is a visual system that shows information
in your field of view as you drive. The
information comes from various vehicle
systems and includes vehicle speed, speed
limit, navigation, and advanced driver
assistance systems (ADAS), such as adaptive
cruise control (ACC) and the lane keeping
system. This system projects the information
off the windshield, and focuses the image near the end of the hood approximately
7 ft
(2 m) in front of the driver. Viewing this
information does not require you to
significantly move your head, allowing you
to keep your eyes on the road while having
quick and easy access to information.
Configuring The Head Up Display
You can control the system's options through
the information display by using the 4-way
toggle on the right-hand side of your steering
wheel. See General Information (page 130).
You can adjust the display according to your
height to make viewing the content easier.
You can also adjust what content displays
and the brightness of the content. The
system's options appear in the instrument
cluster while the updates happen in the HUD. Note:
If HUD On is unchecked, other options
of the system are hidden.
Note: The HUD menu automatically closes
after a certain period of inactivity.
Note: The HUD image brightness
automatically adjusts to the brightness of
the ambient environment. You have the
ability to adjust the brightness further
according to your preference.
Note: In some instances, sunlight can cause
some reflections in and around the HUD
image.
156
Aviator (CTV) Canada/United States of America, enUSA, Edition date: 201902, Third-Printing- Information Displays
Page 161 of 609
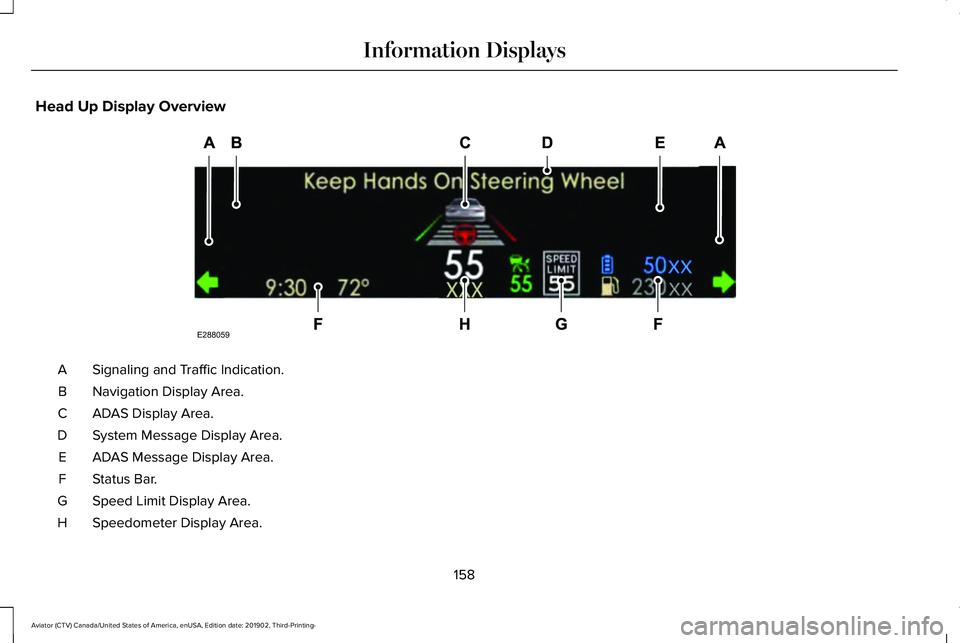
Head Up Display Overview
Signaling and Traffic Indication.
A
Navigation Display Area.
B
ADAS Display Area.
C
System Message Display Area.
D
ADAS Message Display Area.
E
Status Bar.
F
Speed Limit Display Area.
G
Speedometer Display Area.
H
158
Aviator (CTV) Canada/United States of America, enUSA, Edition date: 201902, Third-Printing- Information DisplaysE288059
Page 162 of 609
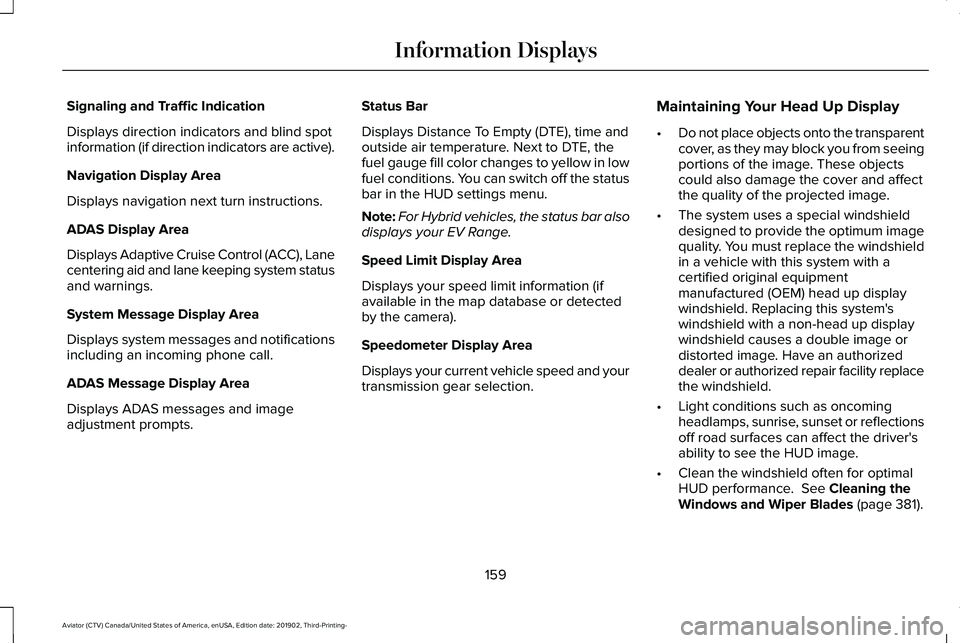
Signaling and Traffic Indication
Displays direction indicators and blind spot
information (if direction indicators are active).
Navigation Display Area
Displays navigation next turn instructions.
ADAS Display Area
Displays Adaptive Cruise Control (ACC), Lane
centering aid and lane keeping system status
and warnings.
System Message Display Area
Displays system messages and notifications
including an incoming phone call.
ADAS Message Display Area
Displays ADAS messages and image
adjustment prompts.
Status Bar
Displays Distance To Empty (DTE), time and
outside air temperature. Next to DTE, the
fuel gauge fill color changes to yellow in low
fuel conditions. You can switch off the status
bar in the HUD settings menu.
Note:
For Hybrid vehicles, the status bar also
displays your EV Range.
Speed Limit Display Area
Displays your speed limit information (if
available in the map database or detected
by the camera).
Speedometer Display Area
Displays your current vehicle speed and your
transmission gear selection. Maintaining Your Head Up Display
•
Do not place objects onto the transparent
cover, as they may block you from seeing
portions of the image. These objects
could also damage the cover and affect
the quality of the projected image.
• The system uses a special windshield
designed to provide the optimum image
quality. You must replace the windshield
in a vehicle with this system with a
certified original equipment
manufactured (OEM) head up display
windshield. Replacing this system's
windshield with a non-head up display
windshield causes a double image or
distorted image. Have an authorized
dealer or authorized repair facility replace
the windshield.
• Light conditions such as oncoming
headlamps, sunrise, sunset or reflections
off road surfaces can affect the driver's
ability to see the HUD image.
• Clean the windshield often for optimal
HUD performance. See Cleaning the
Windows and Wiper Blades (page 381).
159
Aviator (CTV) Canada/United States of America, enUSA, Edition date: 201902, Third-Printing- Information Displays
Page 183 of 609
Linking a Personal Profile to Your Remote
Control or Mobile Device
You can save preset memory positions for
up to three remote controls, by assigning a
remote control to a personal profile in your
SYNC 3. You can assign three additional
remote controls set up as Phone as a Key.
See Keys and Remote Controls (page 64).
Use the SYNC display to link a remote
control, mobile device or both to a personal
profile.
1. Switch the ignition on and leave the vehicle in park (P).
2. Select the Personal Profiles button under
Settings.
3. Touch the arrow for the profile you wish to link to a remote control or mobile
device.
4. Select the correct button to link a remote
control, mobile device, or both.
5. Follow the instructions on the display. Note:
To successfully link a mobile device,
the mobile device must be present in your
vehicle, and must have previously been
setup as a remote control for your vehicle.
Note: If more than one linked remote control
is in range, the memory function moves to
the settings of the first key to initiate a
memory recall.
Note: The guest profile consists of existing
settings when there is no driver profile
created. After you create a driver profile, the
guest profile serves as an additional driver
profile.
Note: You cannot link a personalized name,
a memory seat button or a remote control
to a guest profile.
Personal Settings
Personal Profiles allow you to personalize
positional settings such as seats and mirrors,
as well as non-positional settings such as
radio, navigation, driver assist and system
settings.
See SYNC™ 3 (page 456). You
cannot change the menu locations and
settings of those personalized features with
Personal Profiles. Note:
Non-positional settings are saved to
the active driver profile whenever you
change a setting.
Note: You can save positional settings if you
press and hold a memory seat button.
Recalling and Changing a Profile
You can recall a profile by:
• Using a remote control or mobile device
that has been linked to a driver profile to
access the remote start feature, press an
unlock button or open the door with the
exterior door handle.
• Pressing a memory seat button that has
been linked to a driver profile.
• Using the Personal Profiles menu on the
SYNC touchscreen.
Note: The recalled profile replaces the
previously active profile. If the active profile
is not your preferred profile, you can change
it using any of the three methods listed.
180
Aviator (CTV) Canada/United States of America, enUSA, Edition date: 201902, Third-Printing- Seats
Page 281 of 609
The cruise control indicator
replaces the adaptive cruise
control indicator if you select
normal cruise control. The gap setting does
not display, and the system does not respond
to lead vehicles. Automatic braking remains
active to maintain set speed. The system
remembers the last setting when you start
your vehicle.
SWITCHING INTELLIGENT MODE
ON AND OFF WARNING: You are responsible for
controlling your vehicle at all times. The
system is designed to be an aid and does
not relieve you of your responsibility to
drive with due care and attention. Failure
to follow this instruction could result in the
loss of control of your vehicle, personal
injury or death.
Use the touchscreen to select the following:
1. Select Settings. See Settings (page 498). 2. Select
Driver Assist..
3. Select
Cruise Control.
Changing the Set Speed with
Intelligent Adaptive Cruise Control
When intelligent mode is on, the system
adjusts the set speed to the speed limit
detected by the camera and the speed limit
information provided by the navigation
system.
Note: The set speed adjusts when the
system detects a different maximum speed
limit.
Note: The speed limit information provided
by the navigation map data may be
inaccurate or out of date.
See Navigation
(page 487).
Note: The system alerts you if the set speed
increases beyond the speed limit.
See
Adaptive Cruise Control Indicators (page
276).
If the system does not detect a speed limit,
the vehicle speed remains at the current set
speed. You can override the set speed at any time.
You may need to override or cancel the
system in certain situations such as inclement
weather or if an incorrect speed is set.
Note:
The system may not detect and read
speed limit signs with conditional
information, for example, when a sign is
flashing, during specific time ranges, or when
children are present.
Note: Under certain conditions, the system
may not adjust the vehicle speed until after
your vehicle passes the speed limit sign.
ADJUSTING THE SET SPEED
TOLERANCE
You can set a permanent speed tolerance
that is above or below the detected speed
limit.
Use the touchscreen to select the following:
1. Select Settings. See Settings (page 498).
2. Select
Driver Assist.
3. Select
Cruise Control.
4. Select
Tolerance.
278
Aviator (CTV) Canada/United States of America, enUSA, Edition date: 201902, Third-Printing- Adaptive Cruise Control
(If Equipped)E71340
Page 301 of 609
SPEED SIGN RECOGNITION (IF
EQUIPPED)
Principle of Operation WARNING:
You are responsible for
controlling your vehicle at all times. The
system is designed to be an aid and does
not relieve you of your responsibility to
drive with due care and attention. Failure
to follow this instruction could result in the
loss of control of your vehicle, personal
injury or death. WARNING: You must remain in your
vehicle when the system turns on. At all
times, you are responsible for controlling
your vehicle, supervising the system and
intervening, if required. Failure to take care
may result in the loss of control of your
vehicle, serious personal injury or death. WARNING:
The system may not
function if the sensor is blocked. The system detects recognizable traffic
signs, for example:
•
Speed limit signs.
• No overtaking signs.
• Speed limit cancellation signs.
• No overtaking cancellation signs.
It continuously monitors road signs to inform
you of the current maximum speed limit and
overtaking regulations. The sensor is behind
the interior rear view mirror.
Note: In cold and severe weather conditions
the system may not function. Rain, snow,
spray and large contrasts in lighting can all
prevent the sensor from functioning correctly.
Note: Do not carry out windshield repairs in
the immediate area surrounding the sensor.
Note: If your vehicle has a suspension kit
not approved by us, the system may not
correctly function.
Note: Always use original parts when
replacing headlamp bulbs. Other bulbs may
reduce system performance.
Note: The system may not detect all traffic
signs and may incorrectly read signs. Note:
Keep the windshield free from
obstructions, for example, bird droppings,
insects and snow or ice.
Note: If the system has navigation, traffic
sign data provided by the navigation system
contains information integrated to the data
carrier release.
Using Traffic Sign Recognition
Setting the System Speed Warning
The system has a number of speed warning
levels that you can set using the information
display. See General Information (page
130).
System Display
The system can display two traffic signs in
parallel.
You can view the status at any time using
the information display.
298
Aviator (CTV) Canada/United States of America, enUSA, Edition date: 201902, Third-Printing- Driving Aids
Page 302 of 609

The system displays recognizable traffic
signs in four stages as follows:
1.
All new traffic signs appear brighter than
the others in the display.
2. After a predetermined time they display normally.
3. After a predetermined distance they become greyed out.
4. After another predetermined distance, the system deletes them.
If the system detects a supplementary traffic
sign, it displays below the respective traffic
sign.
If your vehicle has speed sign recognition
with navigation, stored traffic sign data may
influence the indicated speed limit value.
Switching the System On and Off
You can switch the system on and off using
the information display. See General
Information (page 130).
Note: The system remembers the last setting
when you start your vehicle. STEERING
Electric Power Steering WARNING:
The electric power
steering system has diagnostic checks that
continuously monitor the system. If a fault
is detected, a message displays in the
information display. Stop your vehicle as
soon as it is safe to do so. Switch the
ignition off. After at least 10 seconds,
switch the ignition on and watch the
information display for a steering system
warning message. If a steering system
warning message returns, have the system
checked as soon as possible. WARNING:
If the system detects an
error, you may not feel a difference in the
steering, however a serious condition may
exist. Have your vehicle checked as soon
as possible. Failure to do so may result in
loss of steering control.
Your vehicle has an electric power steering
system. There is no fluid reservoir and
therefore requires no maintenance. If your vehicle loses electrical power when
you are driving, electric power steering
assistance is lost. The steering system still
operates and you can manually steer your
vehicle. Manually steering your vehicle
requires more effort.
Extreme continuous steering could increase
the effort you need to steer your vehicle. This
increased effort prevents overheating and
permanent damage to the steering system.
You do not lose the ability to manually steer
your vehicle. Typical steering and driving
maneuvers allow the system to cool and
operate as normal.
Steering Tips
If the steering wanders or pulls, check for:
•
Correct tire pressures.
• Uneven tire wear.
• Loose or worn suspension components.
• Loose or worn steering components.
• Improper vehicle alignment.
Note: A high crown in the road or high
crosswinds could also make the steering
seem to wander or pull.
299
Aviator (CTV) Canada/United States of America, enUSA, Edition date: 201902, Third-Printing- Driving Aids
Page 375 of 609
For longer, trouble-free operation, keep the
top of the battery clean and dry and the
battery cables tightly fastened to the battery
terminals. If any corrosion is present on the
battery or terminals, remove the cables from
the terminals and clean with a wire brush.
You can neutralize the acid with a solution
of baking soda and water.
We recommend that you disconnect the
negative battery cable terminal from the
battery if you plan to store your vehicle for
an extended period.
Note:
If you only disconnect the negative
battery cable terminal, make sure it is
isolated or placed away from the battery
terminal to avoid unintended connection or
arcing.
If you replace the battery make sure it
matches the electrical requirements of your
vehicle. If you disconnect or replace the battery and
your vehicle has an automatic transmission,
it must relearn its adaptive strategy. Because
of this, the transmission may shift firmly when
first driven. This is normal operation while
the transmission fully updates its operation
to optimum shift feel.
Battery Management System (If Equipped)
The battery management system monitors
battery conditions and takes actions to
extend battery life. If excessive battery drain
is detected, the system temporarily disables
some electrical systems to protect the
battery.
Systems included are:
• Heated rear window.
• Heated seats.
• Climate control.
• Heated steering wheel.
• Audio unit.
• Navigation system. A message may appear in the information
displays to alert you that battery protection
actions are active. These messages are only
for notification that an action is taking place,
and not intended to indicate an electrical
problem or that the battery requires
replacement.
After battery replacement, or in some cases
after charging the battery with an external
charger, the battery management system
requires eight hours of vehicle sleep time to
relearn the battery state of charge. During
this time your vehicle must remain fully
locked with the ignition switched off.
Note:
Prior to relearning the battery state of
charge, the battery management system
may temporarily disable some electrical
systems.
372
Aviator (CTV) Canada/United States of America, enUSA, Edition date: 201902, Third-Printing- Maintenance