parking brake LINCOLN AVIATOR 2021 Owners Manual
[x] Cancel search | Manufacturer: LINCOLN, Model Year: 2021, Model line: AVIATOR, Model: LINCOLN AVIATOR 2021Pages: 667, PDF Size: 7.01 MB
Page 8 of 667
Hints on Driving With Anti-Lock Brakes
......................................................................258
Electric Parking Brake ................................
258
Hill Start Assist .............................................
260
Auto Hold .......................................................
261
Reverse Braking Assist
What Is Reverse Braking Assist ...............
263
Reverse Braking Assist Precautions ......
263
Switching Reverse Braking Assist On and Off ...............................................................
264
Overriding Reverse Braking Assist .........
264
Reverse Braking Assist Indicators ..........
264
Reverse Braking Assist – Troubleshooting ......................................................................
265
Traction Control
Principle of Operation ................................
267
Using Traction Control ...............................
267
Stability Control
Principle of Operation ................................
268
Using Stability Control ...............................
269Hill Descent Control
What Is Hill Descent Control
....................
270
Switching Hill Descent Control On and Off ......................................................................
270
Setting the Hill Descent Speed ...............
270
Hill Descent Control Indicator ...................
271
Parking Aids
Principle of Operation ................................
272
Rear Parking Aid ..........................................
272
Front Parking Aid .........................................
274
Side Sensing System ..................................
276
Active Park Assist ........................................
278
Rear View Camera ......................................
283
360 Degree Camera ..................................
286
Cruise Control
What Is Cruise Control ...............................
289
Switching Cruise Control On and Off .....
289
Setting the Cruise Control Speed ..........
289
Canceling the Set Speed ..........................
290
Resuming the Set Speed ..........................
290
Cruise Control Indicators ..........................
290Adaptive Cruise Control
How Does Adaptive Cruise Control With
Stop and Go Work ...................................
291
What Is Adaptive Cruise Control With Lane Centering ...................................................
291
What Is Intelligent Adaptive Cruise Control .......................................................................
291
Adaptive Cruise Control Precautions - Vehicles With: Adaptive Cruise Control
With Lane Centering ...............................
291
Adaptive Cruise Control Precautions - Vehicles With: Adaptive Cruise Control
With Stop and Go ...................................
292
Adaptive Cruise Control Limitations - Vehicles With: Adaptive Cruise Control
With Lane Centering ..............................
293
Adaptive Cruise Control Limitations - Vehicles With: Adaptive Cruise Control
With Stop and Go ....................................
293
Switching Adaptive Cruise Control On and Off ...............................................................
295
Setting the Adaptive Cruise Control Speed ......................................................................
296
Setting the Adaptive Cruise Control Gap ......................................................................
297
Canceling the Set Speed ..........................
298
5
Aviator (CTV) Canada/United States of America, enUSA, Edition date: 202007, Second-Printing Table of Contents
Page 14 of 667

Windshield defrosting system
Interior luggage compartment
release
Jack
Keep out of reach of children
Lighting control
Low tire pressure warning
Maintain correct fluid level
Note operating instructions
Horn control Panic alarm
Parking aid
Parking brake
Power steering fluid
Power windows front/rear
Power window lockout
Requires registered technician
Safety alert
See Owner's Manual See Service Manual
Service engine soon
Passenger airbag activated
Passenger airbag deactivated
Side airbag
Shield the eyes
Stability control
Hill descent control
Trail control
Windshield wiping system
11
Aviator (CTV) Canada/United States of America, enUSA, Edition date: 202007, Second-Printing Introduction E161353 E270945 E139213 E231159 E231158 E270849 E270850 E167012 E138639 E163957 E272858 E270969
Page 53 of 667
Note:
The driver and front passenger
warnings switch on and off independently.
When you perform this procedure for one
seating position, do not buckle the other
position as this terminates the process.
Read Steps 1 - 4 before starting the
procedure.
Make sure that:
• You set the parking brake.
• The transmission is in park (P).
• The ignition is off.
• You close all vehicle doors.
• You unbuckle the driver and front
passenger seatbelts.
1. Switch the ignition on. Do not start the engine.
2. Wait until the seatbelt warning lamp turns
off (about one minute). After Step 2, wait
an additional five seconds before
proceeding with Step 3. Once you start
Step 3, you must complete the procedure
within 60 seconds. 3.
For the seating position you are switching
off, buckle then unbuckle the seatbelt
three times at a moderate speed, ending
in the unbuckled state. After Step 3, the
seatbelt warning lamp turns on.
4. When the seatbelt warning lamp is on, buckle then unbuckle the seatbelt. After
Step 4, the seatbelt warning lamp flashes
for confirmation.
• This switches the feature off if it is
currently on.
• This switches the feature on if it is
currently off.
CHILD RESTRAINT AND SEATBELT
MAINTENANCE
Inspect the vehicle seatbelts and child safety
seat systems periodically to make sure they
work properly and are not damaged. Inspect
the vehicle and child restraint seatbelts to
make sure there are no nicks, tears or cuts.
Replace if necessary. All vehicle seatbelt
assemblies, including retractors, buckles,
front seatbelt buckle assemblies, buckle
support assemblies (slide bar-if equipped), shoulder belt height adjusters (if equipped),
shoulder belt guide on seat backrest (if
equipped), child safety seat LATCH and
tether anchors, and attaching hardware,
should be inspected after a crash. Read the
child restraint manufacturer's instructions for
additional inspection and maintenance
information specific to the child restraint.
We recommend that all seatbelt assemblies
in use in vehicles involved in a crash be
replaced. However, if the crash was minor
and an authorized dealer finds that the belts
do not show damage and continue to
operate properly, they do not need to be
replaced. Seatbelt assemblies not in use
during a crash should also be inspected and
replaced if either damage or improper
operation is noted.
Properly care for seatbelts. See Vehicle
Care (page 404).
50
Aviator (CTV) Canada/United States of America, enUSA, Edition date: 202007, Second-Printing Seatbelts
Page 73 of 667
The remote start system does not work if any
of the following occur:
•
The ignition is on.
• The anti-theft alarm triggers.
• You switch the feature off through the
touchscreen.
• The hood is open.
• The transmission is not in park (P).
• The battery voltage is below the
minimum operating voltage.
Note: Do not use remote start if your fuel
level is low.
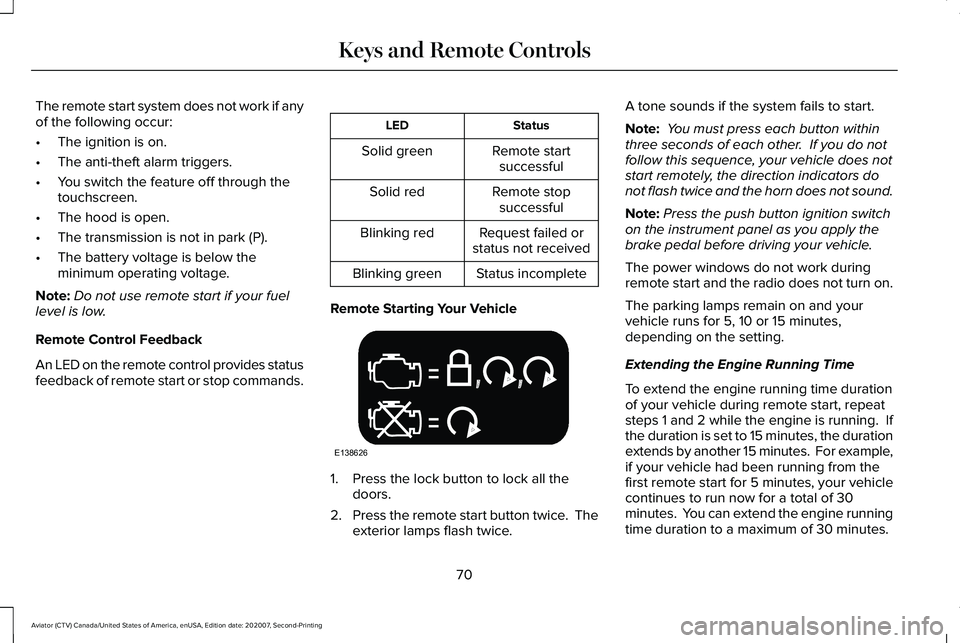
Remote Control Feedback
An LED on the remote control provides status
feedback of remote start or stop commands. Status
LED
Remote startsuccessful
Solid green
Remote stopsuccessful
Solid red
Request failed or
status not received
Blinking red
Status incomplete
Blinking green
Remote Starting Your Vehicle 1. Press the lock button to lock all the
doors.
2. Press the remote start button twice. The
exterior lamps flash twice. A tone sounds if the system fails to start.
Note:
You must press each button within
three seconds of each other. If you do not
follow this sequence, your vehicle does not
start remotely, the direction indicators do
not flash twice and the horn does not sound.
Note: Press the push button ignition switch
on the instrument panel as you apply the
brake pedal before driving your vehicle.
The power windows do not work during
remote start and the radio does not turn on.
The parking lamps remain on and your
vehicle runs for 5, 10 or 15 minutes,
depending on the setting.
Extending the Engine Running Time
To extend the engine running time duration
of your vehicle during remote start, repeat
steps 1 and 2 while the engine is running. If
the duration is set to 15 minutes, the duration
extends by another 15 minutes. For example,
if your vehicle had been running from the
first remote start for 5 minutes, your vehicle
continues to run now for a total of 30
minutes. You can extend the engine running
time duration to a maximum of 30 minutes.
70
Aviator (CTV) Canada/United States of America, enUSA, Edition date: 202007, Second-Printing Keys and Remote ControlsE138626
Page 114 of 667
HEADLAMP EXIT DELAY
After you switch the ignition off, you can
switch the headlamps on by pulling the
direction indicator lever toward you. You will
hear a short tone. The headlamps will switch
off automatically after three minutes with any
door open or 30 seconds after the last door
has been closed. You can cancel this feature
by pulling the direction indicator lever toward
you again or switching the ignition on.
DAYTIME RUNNING LAMPS -
VEHICLES WITH: CONFIGURABLE
DAYTIME RUNNING LAMPS
WARNING: The daytime running
lamps system does not activate the rear
lamps and may not provide adequate
lighting during low visibility driving
conditions. Make sure you switch the
headlamps on, as appropriate, during all
low visibility conditions. Failure to do so
may result in a crash. Switch the daytime running lamps on or off
using the touchscreen:
1.
Select Settings. See Settings (page 540).
2. Select
Vehicle.
3. Select
Lighting.
The daytime running lamps turn on when:
1. The lamps are on in the information display.
2. You switch the ignition on.
3. The transmission is not in park (P) for vehicles with automatic transmissions or
you release the parking brake for
vehicles with manual transmissions.
4. The lighting control is in the autolamps position.
5. The headlamps are off.
The other lighting control switch positions
do not turn on the daytime running lamps.
If the daytime running lamps are off in the
information display, the lamps stay off in all
switch positions. DAYTIME RUNNING LAMPS -
VEHICLES WITH: DAYTIME
RUNNING LAMPS (DRL) WARNING:
The daytime running
lamps system does not activate the rear
lamps and may not provide adequate
lighting during low visibility driving
conditions. Make sure you switch the
headlamps on, as appropriate, during all
low visibility conditions. Failure to do so
may result in a crash.
The system turns the lamps on in daylight
conditions.
To switch the system on, switch the lighting
control to any position except headlamps.
FRONT FOG LAMPS
(IF EQUIPPED)
Switching the Front Fog Lamps On or
Off
Only switch the front fog lamps on during
reduced visibility.
111
Aviator (CTV) Canada/United States of America, enUSA, Edition date: 202007, Second-Printing Lighting
Page 133 of 667
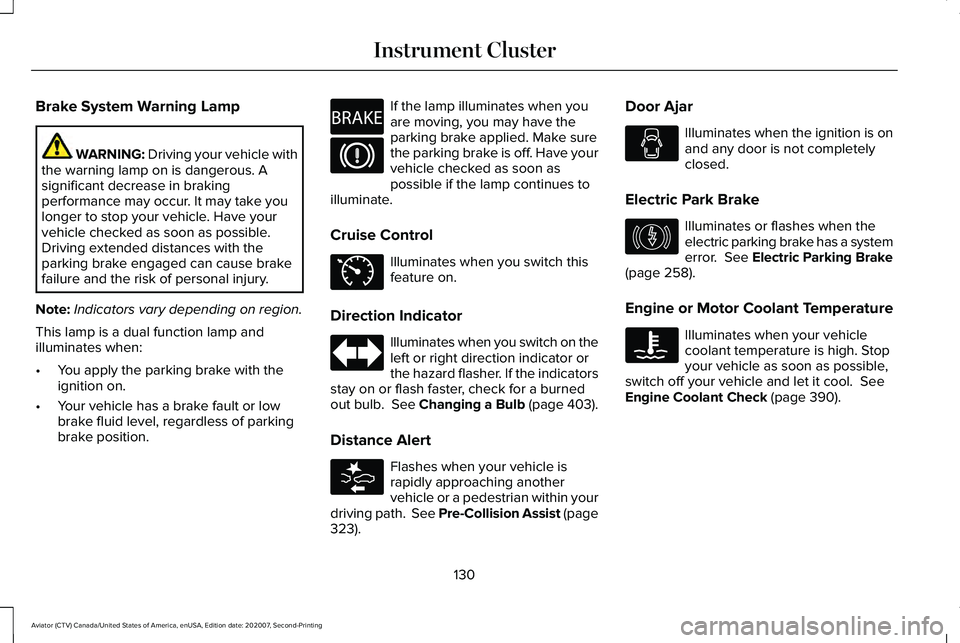
Brake System Warning Lamp
WARNING: Driving your vehicle with
the warning lamp on is dangerous. A
significant decrease in braking
performance may occur. It may take you
longer to stop your vehicle. Have your
vehicle checked as soon as possible.
Driving extended distances with the
parking brake engaged can cause brake
failure and the risk of personal injury.
Note: Indicators vary depending on region.
This lamp is a dual function lamp and
illuminates when:
• You apply the parking brake with the
ignition on.
• Your vehicle has a brake fault or low
brake fluid level, regardless of parking
brake position. If the lamp illuminates when you
are moving, you may have the
parking brake applied. Make sure
the parking brake is off. Have your
vehicle checked as soon as
possible if the lamp continues to
illuminate.
Cruise Control Illuminates when you switch this
feature on.
Direction Indicator Illuminates when you switch on the
left or right direction indicator or
the hazard flasher. If the indicators
stay on or flash faster, check for a burned
out bulb.
See Changing a Bulb (page 403).
Distance Alert Flashes when your vehicle is
rapidly approaching another
vehicle or a pedestrian within your
driving path. See Pre-Collision Assist (page
323
). Door Ajar Illuminates when the ignition is on
and any door is not completely
closed.
Electric Park Brake Illuminates or flashes when the
electric parking brake has a system
error.
See Electric Parking Brake
(page 258).
Engine or Motor Coolant Temperature Illuminates when your vehicle
coolant temperature is high. Stop
your vehicle as soon as possible,
switch off your vehicle and let it cool.
See
Engine Coolant Check (page 390).
130
Aviator (CTV) Canada/United States of America, enUSA, Edition date: 202007, Second-Printing Instrument ClusterE270480 E71340 E281485 E146190
Page 136 of 667
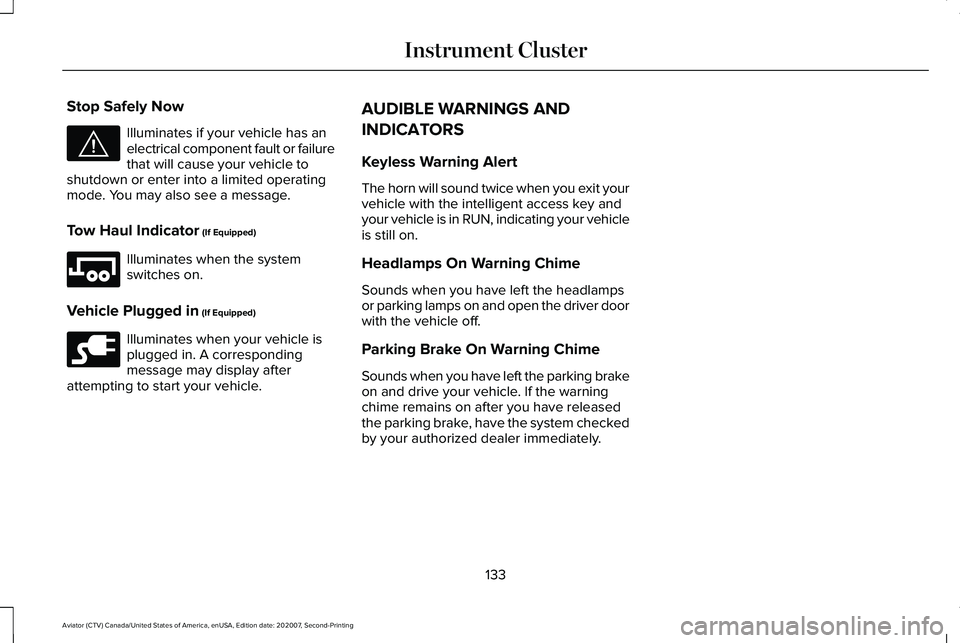
Stop Safely Now
Illuminates if your vehicle has an
electrical component fault or failure
that will cause your vehicle to
shutdown or enter into a limited operating
mode. You may also see a message.
Tow Haul Indicator (If Equipped) Illuminates when the system
switches on.
Vehicle Plugged in
(If Equipped) Illuminates when your vehicle is
plugged in. A corresponding
message may display after
attempting to start your vehicle. AUDIBLE WARNINGS AND
INDICATORS
Keyless Warning Alert
The horn will sound twice when you exit your
vehicle with the intelligent access key and
your vehicle is in RUN, indicating your vehicle
is still on.
Headlamps On Warning Chime
Sounds when you have left the headlamps
or parking lamps on and open the driver door
with the vehicle off.
Parking Brake On Warning Chime
Sounds when you have left the parking brake
on and drive your vehicle. If the warning
chime remains on after you have released
the parking brake, have the system checked
by your authorized dealer immediately.
133
Aviator (CTV) Canada/United States of America, enUSA, Edition date: 202007, Second-Printing Instrument ClusterE144693 E246592 E228962
Page 159 of 667
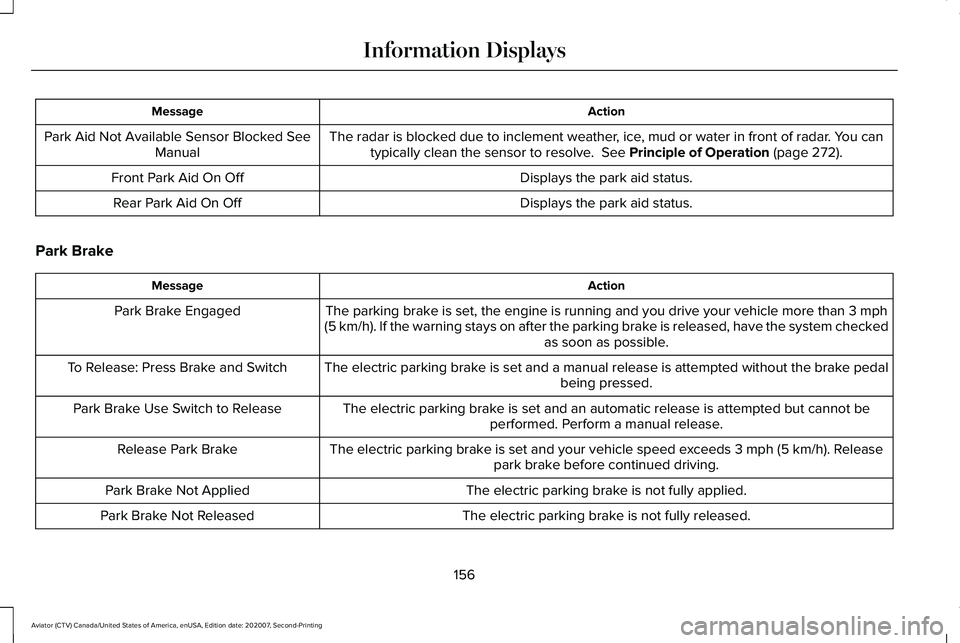
Action
Message
The radar is blocked due to inclement weather, ice, mud or water in front of radar. You cantypically clean the sensor to resolve. See Principle of Operation (page 272).
Park Aid Not Available Sensor Blocked See
Manual
Displays the park aid status.
Front Park Aid On Off
Displays the park aid status.
Rear Park Aid On Off
Park Brake Action
Message
The parking brake is set, the engine is running and you drive your vehicle more than
3 mph
(5 km/h). If the warning stays on after the parking brake is released, have the system checked as soon as possible.
Park Brake Engaged
The electric parking brake is set and a manual release is attempted without the brake pedal being pressed.
To Release: Press Brake and Switch
The electric parking brake is set and an automatic release is attempted but cannot beperformed. Perform a manual release.
Park Brake Use Switch to Release
The electric parking brake is set and your vehicle speed exceeds
3 mph (5 km/h). Release
park brake before continued driving.
Release Park Brake
The electric parking brake is not fully applied.
Park Brake Not Applied
The electric parking brake is not fully released.
Park Brake Not Released
156
Aviator (CTV) Canada/United States of America, enUSA, Edition date: 202007, Second-Printing Information Displays
Page 160 of 667
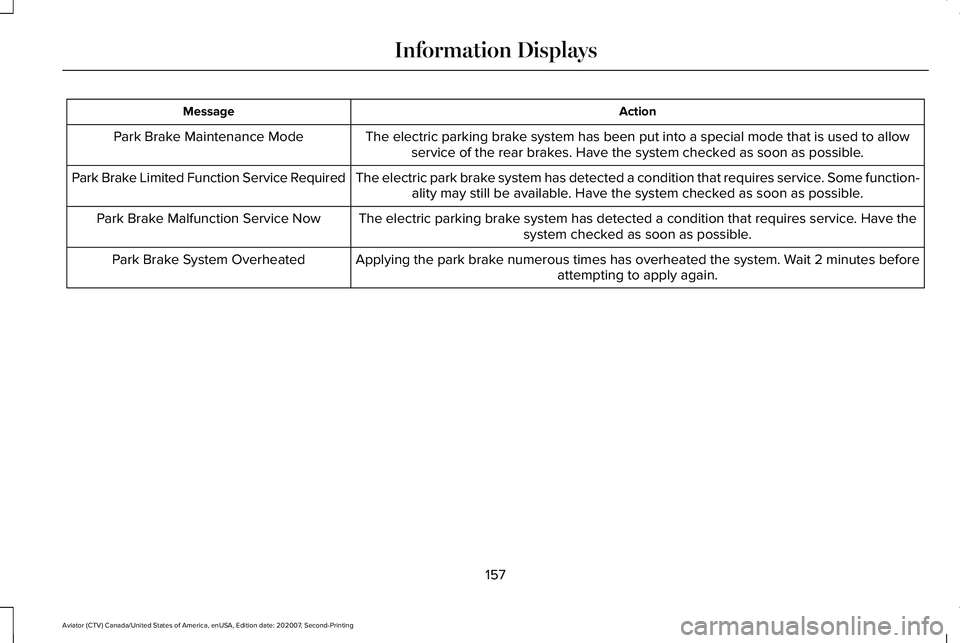
Action
Message
The electric parking brake system has been put into a special mode that is used to allowservice of the rear brakes. Have the system checked as soon as possible.
Park Brake Maintenance Mode
The electric park brake system has detected a condition that requires service. Some function-ality may still be available. Have the system checked as soon as possible.
Park Brake Limited Function Service Required
The electric parking brake system has detected a condition that requires service. Have thesystem checked as soon as possible.
Park Brake Malfunction Service Now
Applying the park brake numerous times has overheated the system. Wait 2 minutes beforeattempting to apply again.
Park Brake System Overheated
157
Aviator (CTV) Canada/United States of America, enUSA, Edition date: 202007, Second-Printing Information Displays
Page 212 of 667
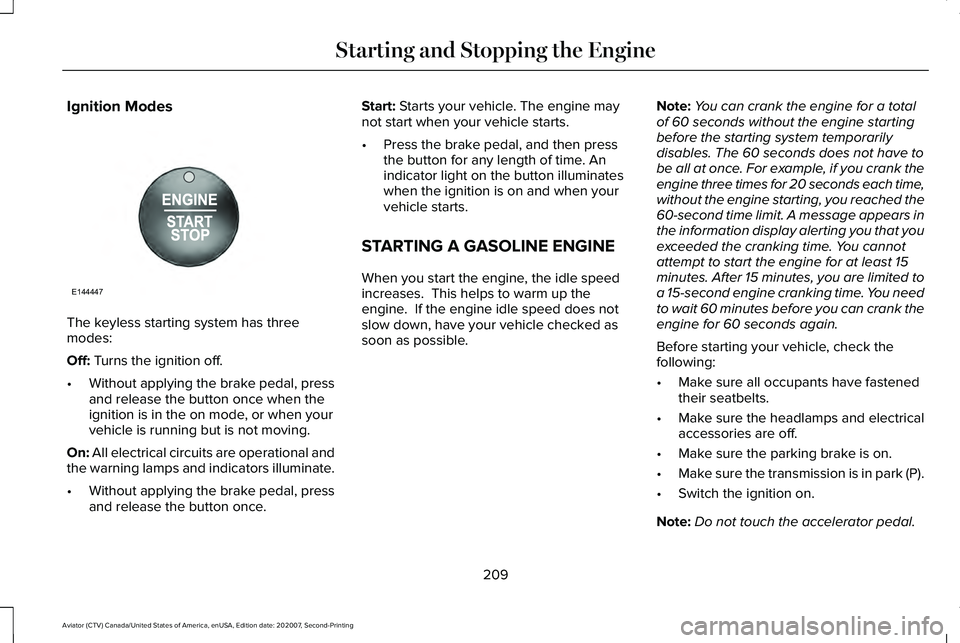
Ignition Modes
The keyless starting system has three
modes:
Off: Turns the ignition off.
• Without applying the brake pedal, press
and release the button once when the
ignition is in the on mode, or when your
vehicle is running but is not moving.
On:
All electrical circuits are operational and
the warning lamps and indicators illuminate.
• Without applying the brake pedal, press
and release the button once. Start:
Starts your vehicle. The engine may
not start when your vehicle starts.
• Press the brake pedal, and then press
the button for any length of time. An
indicator light on the button illuminates
when the ignition is on and when your
vehicle starts.
STARTING A GASOLINE ENGINE
When you start the engine, the idle speed
increases. This helps to warm up the
engine. If the engine idle speed does not
slow down, have your vehicle checked as
soon as possible. Note:
You can crank the engine for a total
of 60 seconds without the engine starting
before the starting system temporarily
disables. The 60 seconds does not have to
be all at once. For example, if you crank the
engine three times for 20 seconds each time,
without the engine starting, you reached the
60-second time limit. A message appears in
the information display alerting you that you
exceeded the cranking time. You cannot
attempt to start the engine for at least 15
minutes. After 15 minutes, you are limited to
a 15-second engine cranking time. You need
to wait 60 minutes before you can crank the
engine for 60 seconds again.
Before starting your vehicle, check the
following:
• Make sure all occupants have fastened
their seatbelts.
• Make sure the headlamps and electrical
accessories are off.
• Make sure the parking brake is on.
• Make sure the transmission is in park (P).
• Switch the ignition on.
Note: Do not touch the accelerator pedal.
209
Aviator (CTV) Canada/United States of America, enUSA, Edition date: 202007, Second-Printing Starting and Stopping the EngineE144447