display LINCOLN AVIATOR 2023 Owners Manual
[x] Cancel search | Manufacturer: LINCOLN, Model Year: 2023, Model line: AVIATOR, Model: LINCOLN AVIATOR 2023Pages: 681, PDF Size: 9.33 MB
Page 418 of 681
Battery Management System (If Equipped)
The system monitors battery conditions and
takes actions to extend battery life. If
excessive battery drain is detected, the
system temporarily disables some electrical
systems to protect the battery.
Systems included are:
• Heated rear window.
• Heated seats.
• Climate control.
• Heated steering wheel.
• Audio unit.
• Navigation system.
A message may appear in the information
display to alert you that battery protection
actions are active. This message is only for
notification that an action is taking place, and
not intended to indicate an electrical problem
or that the battery requires replacement.After battery replacement, or in some cases
after charging the battery with an external
charger, the battery management system
requires eight hours of vehicle sleep time to
relearn the battery state of charge. During
this time, your vehicle must remain fully
locked with the ignition switched off.
Note:Prior to relearning the battery state of
charge, the battery management system
may temporarily disable some electrical
systems.
Electrical Accessory Installation
To make sure the battery management
system works correctly, do not connect an
electrical device ground connection directly
to the battery negative post. This can cause
inaccurate measurements of the battery
condition and potential incorrect system
operation.
Note:If you add electrical accessories or
components to the vehicle, it may adversely
affect battery performance and durability.
This may also affect the performance of
other electrical systems in the vehicle.
Remove and Reinstall the Battery
Install a battery approved for use by our
specifications. See Capacities and
Specifications (page 460).
To disconnect or remove the battery, do the
following:
1. Apply the parking brake and switch the
ignition off.
2. Switch all electrical equipment off, for
example lights and radio.
3. Wait a minimum of two minutes before
disconnecting the battery.
Note:The engine management system has
a power hold function and remains powered
for a period of time after you switch the
ignition off. This is to allow the system to
store diagnostic and adaptive tables.
Disconnecting the battery without waiting
can cause damage not covered by the
vehicle warranty.
4. Disconnect the negative battery cable
terminal.
5. Disconnect the positive battery cable
terminal.
415
Maintenance
Page 433 of 681
GENERAL INFORMATION
The recommended tire inflation pressures
are found on the Tire Label which is located
on the B-pillar or the edge of the driver door.
This information can also be found on the
Safety Compliance Certification Label, affixed
to either the door hinge pillar, door-latch
post, or the door edge that meets the
door-latch post; next to the driver’s seating
position.
We strongly recommend maintaining these
tire pressures at all times. Failure to follow
the tire pressure recommendations can
cause uneven treadwear patterns, reduced
fuel economy, and adversely affect the way
your vehicle handles.
Note:Check and set the tire pressure at the
ambient temperature in which you are
intending to drive your vehicle and when the
tires are cold.
Note:Check your tire pressures at least once
per month.
If your vehicle has a spare tire, set the
pressure to the highest value given for your
vehicle and tire size combination.Use only approved wheels and tire sizes,
using other sizes could damage your vehicle.
If you change the diameter of the factory
installed tires, the speedometer may not
display the correct speed. This could effect
the functionality of the All Wheel Drive (AWD)
system, if equipped. Take your vehicle to an
authorized dealer and have the engine
management system reprogrammed.
If you intend to change the size of the factory
installed tires, check the suitability with an
authorized dealer.
Additional information related to the
functionality and maintenance of your tires
can be found in the Wheels and Tire section.
See Tire Care (page 432).
Notice to utility vehicle and truck
owners
WARNING: Vehicles with a higher
center of gravity (utility and four-wheel
drive vehicles) handle differently than
vehicles with a lower center of gravity
(passenger cars). Avoid sharp turns,
excessive speed and abrupt steering in
these vehicles. Failure to drive cautiously
increases the risk of losing control of your
vehicle, vehicle rollover, personal injury
and death.
WARNING: In a rollover crash, an
unbelted person is significantly more likely
to die than a person wearing a seatbelt.
Utility vehicles and trucks handle differently
than passenger cars in the various driving
conditions that are encountered on streets,
highways and off-road. Utility vehicles and
trucks are not designed for cornering at
speeds as high as passenger cars any more
than low-slung sports cars are designed to
perform satisfactorily under off-road
conditions.
430
Wheels and Tires
Page 451 of 681
functioning properly. Always check the TPMS
malfunction telltale after replacing one or
more tires or wheels on your vehicle to
ensure that the replacement or alternate tires
and wheels allow the TPMS to continue to
function properly.
This device complies with Part 15 of the FCC
Rules and with License exempt RSS
Standards of Industry Canada. Operation is
subject to the following two conditions:
1. This device may not cause harmful
interference, and
2. This device must accept any interference
received, including interference that may
cause undesired operation.
WARNING: Changes or modifications
not expressively approved by the party
responsible for compliance could void the
user's authority to operate the equipment.
The term "IC:" before the radio certification
number only signifies that Industry Canada
technical specifications were met.
Changing Tires With a Tire Pressure
Monitoring System
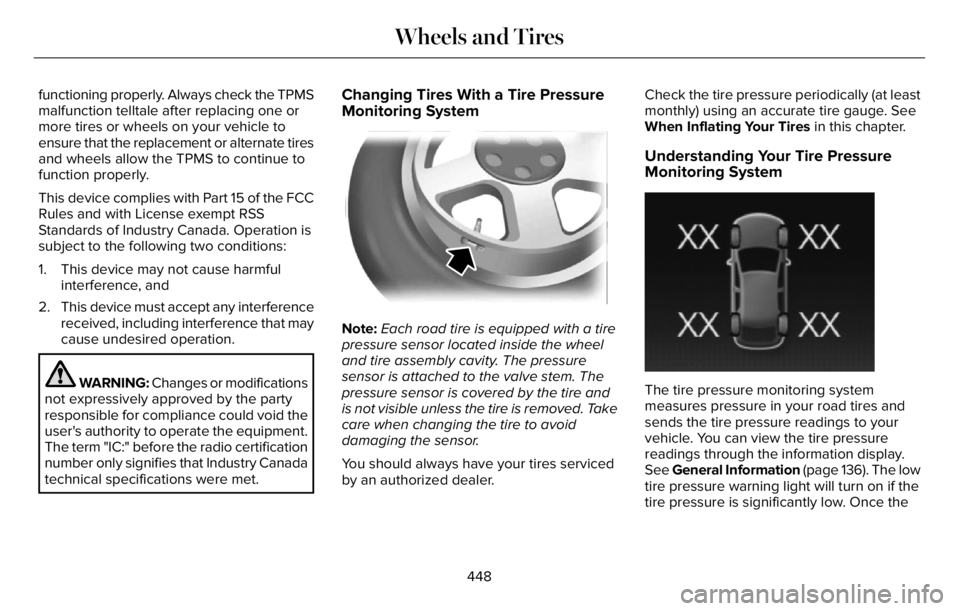
Note:Each road tire is equipped with a tire
pressure sensor located inside the wheel
and tire assembly cavity. The pressure
sensor is attached to the valve stem. The
pressure sensor is covered by the tire and
is not visible unless the tire is removed. Take
care when changing the tire to avoid
damaging the sensor.
You should always have your tires serviced
by an authorized dealer.Check the tire pressure periodically (at least
monthly) using an accurate tire gauge. See
When Inflating Your Tires in this chapter.
Understanding Your Tire Pressure
Monitoring System
E250820E250820
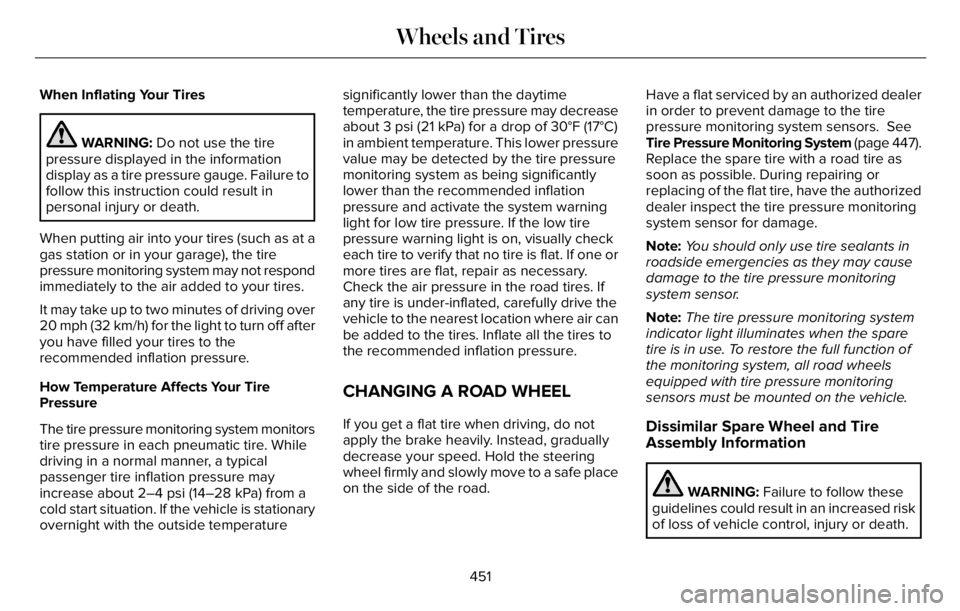
The tire pressure monitoring system
measures pressure in your road tires and
sends the tire pressure readings to your
vehicle. You can view the tire pressure
readings through the information display.
See General Information (page 136). The low
tire pressure warning light will turn on if the
tire pressure is significantly low. Once the
448
Wheels and Tires
Page 454 of 681
When Inflating Your Tires
WARNING: Do not use the tire
pressure displayed in the information
display as a tire pressure gauge. Failure to
follow this instruction could result in
personal injury or death.
When putting air into your tires (such as at a
gas station or in your garage), the tire
pressure monitoring system may not respond
immediately to the air added to your tires.
It may take up to two minutes of driving over
20 mph (32 km/h) for the light to turn off after
you have filled your tires to the
recommended inflation pressure.
How Temperature Affects Your Tire
Pressure
The tire pressure monitoring system monitors
tire pressure in each pneumatic tire. While
driving in a normal manner, a typical
passenger tire inflation pressure may
increase about 2–4 psi (14–28 kPa) from a
cold start situation. If the vehicle is stationary
overnight with the outside temperaturesignificantly lower than the daytime
temperature, the tire pressure may decrease
about 3 psi (21 kPa) for a drop of 30°F (17°C)
in ambient temperature. This lower pressure
value may be detected by the tire pressure
monitoring system as being significantly
lower than the recommended inflation
pressure and activate the system warning
light for low tire pressure. If the low tire
pressure warning light is on, visually check
each tire to verify that no tire is flat. If one or
more tires are flat, repair as necessary.
Check the air pressure in the road tires. If
any tire is under-inflated, carefully drive the
vehicle to the nearest location where air can
be added to the tires. Inflate all the tires to
the recommended inflation pressure.
CHANGING A ROAD WHEEL
If you get a flat tire when driving, do not
apply the brake heavily. Instead, gradually
decrease your speed. Hold the steering
wheel firmly and slowly move to a safe place
on the side of the road.Have a flat serviced by an authorized dealer
in order to prevent damage to the tire
pressure monitoring system sensors. See
Tire Pressure Monitoring System (page 447).
Replace the spare tire with a road tire as
soon as possible. During repairing or
replacing of the flat tire, have the authorized
dealer inspect the tire pressure monitoring
system sensor for damage.
Note:You should only use tire sealants in
roadside emergencies as they may cause
damage to the tire pressure monitoring
system sensor.
Note:The tire pressure monitoring system
indicator light illuminates when the spare
tire is in use. To restore the full function of
the monitoring system, all road wheels
equipped with tire pressure monitoring
sensors must be mounted on the vehicle.Dissimilar Spare Wheel and Tire
Assembly Information
WARNING: Failure to follow these
guidelines could result in an increased risk
of loss of vehicle control, injury or death.
451
Wheels and Tires
Page 472 of 681
Engine Oil
E142732
An oil that displays this symbol conforms to
current engine, emission system and fuel
economy performance standards of ILSAC.
We recommend Motorcraft® motor oil for
your vehicle. If Motorcraft® oil is not available,
use motor oils of the recommended viscosity
grade that display the API Certification Mark
for gasoline engines.
Do not use supplemental engine oil additives
because they are unnecessary and could
lead to engine damage that your vehicle
warranty does not cover.
Capacities
Including the Oil Filter Variant
6.0 qt (5.7 L) All.
469
Capacities and Specifications
Page 483 of 681
Materials
Specification Name
WSS-M97B57-A2 Motorcraft® Yellow Prediluted Antifreeze/Coolant(U.S.)
Motorcraft® Yellow Prediluted Antifreeze/Coolant / Antigel/liquide de refroidissement
prédilué jaune Motorcraft®(Canada)
VC-13DL-G(U.S.)
CVC-13DL-G(Canada)
Engine Oil
E142732
An oil that displays this symbol conforms to
current engine, emission system and fuel
economy performance standards of ILSAC.
We recommend Motorcraft® motor oil for
your vehicle. If Motorcraft® oil is not available,
use motor oils of the recommended viscosity
grade that display the API Certification Mark
for gasoline engines.
Do not use supplemental engine oil additives
because they are unnecessary and could
lead to engine damage that your vehicle
warranty does not cover.
480
Capacities and Specifications
Page 501 of 681
Locking the Rear Audio Controls (If
Equipped)
E270448
Press and release the button to
lock the rear passenger audio
controls.
Selecting the Audio Modes
E265276
Press and release the button to
access different audio modes such
as AM, FM and CD.
Switching the Audio Unit On and Off
Press and release the button.
Switching the Display On and Off (If
Equipped)
E272035
Press and release the button.
Using Seek, Fast Forward and Reverse
In radio mode, select a frequency band and
press and release either button. The system
stops at the first station it finds in that
direction.
In satellite radio mode, press and release to
select the next or previous satellite radio
station. If you select a specific category, such
as jazz, rock or news, press to find the next
or previous station in that category.
Rear Passenger Audio Controls
Use the rear passenger touchscreen to
select the following:
E100027
Touch the audio button on the
feature bar.
Note:Depending on the source selected,
some options may not be available.
Accessing the Source Menu
E287123
Touch the button to access the
source menu.
Selecting a Preset
Touch Presets to select a preset station.
Switching Repeat Mode On and Off
E287125
Touch the button to cycle through
the various repeat modes and off.
Switching Shuffle Mode On and Off
Touch the button to play music on
the selected source in random
order.
Playing or Pausing Media
Touch the button to either play or
pause the audio.
498
Audio System
Page 502 of 681

Switching the Audio Control On and
Off
Adjusting the Volume
Touch the arrow buttons to adjust the
volume.
Using Seek, Fast Forward and Reverse
In radio mode, select a frequency band and
touch either button. The system stops at the
first station it finds in that direction.
In satellite radio mode, touch to select the
next or previous satellite radio station. If you
select a specific category, such as jazz, rock
or news, touch to find the next or previous
station in that category.
Rear Audio Control Lock Message
A message displays when the controls are
locked through the front and you try to
operate them.
Note:The controls also lock when a voice
session or phone call is active.
DIGITAL RADIO
Note:HD Radio broadcasts are not available
in all markets.
HD Radio technology is the digital evolution
of analog AM/FM radio. Your system has a
special receiver that allows it to receive
digital broadcasts, where available, in
addition to the analog broadcasts, it already
receives. Digital broadcasts provide a better
sound quality than analog broadcasts with
free, crystal-clear audio and no static or
distortion. For more information, and a guide
to available stations and programming,
please visit www.hdradio.com.When HD Radio is on and you tune to a
station broadcasting HD Radio technology,
you may notice the HD Radio logo on your
screen. When this logo is available, you may
also see Title and Artist fields on-screen.
The multicast indicator appears in FM mode,
only, if the current station is broadcasting
multiple digital broadcasts. The highlighted
numbers signify available digital channels
where new or different content is available.
HD1 signifies the main programming status
and is available in analog and digital
broadcasts. Other multicast stations, HD2
through HD7, are only available digitally.
When HD Radio broadcasts are active, you
can access the following functions:
•Memory presets allow you to save an
active channel as a memory preset.
Touch and hold a memory preset slot
until the sound returns. There is a brief
mute while the radio saves the station.
Sound returns when finished. When
switching to an HD2 or HD3 memory
preset, the sound mutes before the
digital audio plays, because the system
has to reacquire the digital signal.
499
Audio System
Page 505 of 681
HD Radio Technology manufactured under
license from iBiquity Digital Corporation and
foreign patents. HD Radio and the HD and
HD Radio logos are proprietary trademarks
of DTS. Ford and DTS are not responsible
for the content sent using HD Radio
technology. Content may be changed, added
or deleted at any time at the station owner's
discretion.SATELLITE RADIO
SiriusXM® Satellite Radio broadcasts a
variety of music, news, sports, weather, traffic
and entertainment satellite radio channels.
For more information and a complete list of
SiriusXM satellite radio channels, visit
www.siriusxm.com in the United States,
www.siriusxm.ca in Canada, or call SiriusXM
at 1-888-539-7474.Note:This receiver includes the eCos
real-time operating system. eCos is
published under the eCos License.
Satellite Radio Reception Factors
Potential Satellite Radio Reception Issues
For optimal reception performance, keep the antenna clear of snow and ice build-up and keep luggage and
other material as far away from the antenna as possible.
Factory-installed and aftermarket vehicle structures including, but not limited to, roof racks and soft top roofs
in a partially open position could reduce reception performance. Antenna obstructions
Hills, mountains, tall buildings, bridges, tunnels, freeway overpasses, parking garages, dense tree foliage and
thunderstorms can interfere with your reception. Terrain
When you pass a ground-based broadcast-repeating tower, a stronger signal may overtake a weaker one and
the audio system could mute. Station overload
Your display may show ACQUIRING . . . to indicate the interference and the audio system could mute. Satellite radio signal interfer-
ence
502
Audio System
Page 519 of 681
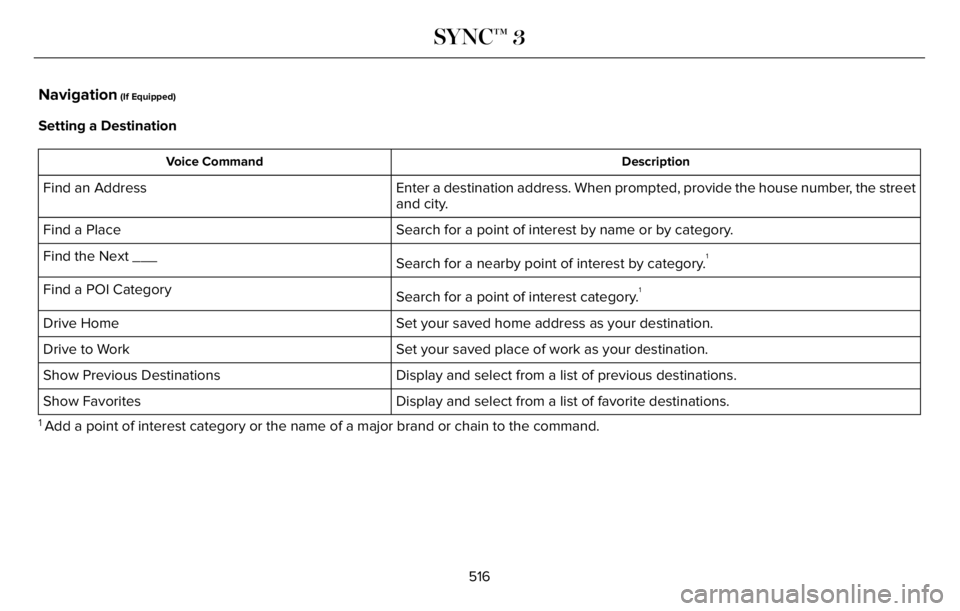
Navigation (If Equipped)
Setting a Destination
Description Voice Command
Enter a destination address. When prompted, provide the house number, the street
and city. Find an Address
Search for a point of interest by name or by category. Find a Place
Search for a nearby point of interest by category.
1Find the Next ___
Search for a point of interest category.
1Find a POI Category
Set your saved home address as your destination. Drive Home
Set your saved place of work as your destination. Drive to Work
Display and select from a list of previous destinations. Show Previous Destinations
Display and select from a list of favorite destinations. Show Favorites
1 Add a point of interest category or the name of a major brand or chain to the command.
516
SYNC™ 3