clock LINCOLN AVIATOR 2023 Owners Manual
[x] Cancel search | Manufacturer: LINCOLN, Model Year: 2023, Model line: AVIATOR, Model: LINCOLN AVIATOR 2023Pages: 681, PDF Size: 9.33 MB
Page 90 of 681
E316247E316247316247316247
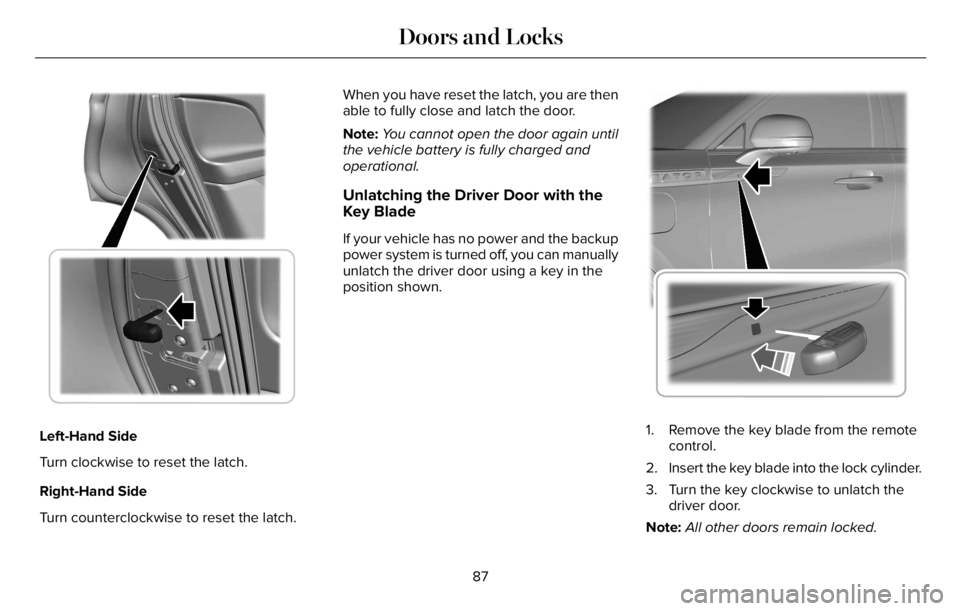
Left-Hand Side
Turn clockwise to reset the latch.
Right-Hand Side
Turn counterclockwise to reset the latch.When you have reset the latch, you are then
able to fully close and latch the door.
Note:You cannot open the door again until
the vehicle battery is fully charged and
operational.
Unlatching the Driver Door with the
Key Blade
If your vehicle has no power and the backup
power system is turned off, you can manually
unlatch the driver door using a key in the
position shown.
E295771
1. Remove the key blade from the remote
control.
2. Insert the key blade into the lock cylinder.
3. Turn the key clockwise to unlatch the
driver door.
Note:All other doors remain locked.
87
Doors and Locks
Page 405 of 681
Do not use supplemental engine oil
additives. They could cause engine damage
that the vehicle warranty may not cover.
1. Clean the area surrounding the engine
oil filler cap before you remove it.
2. Remove the engine oil filler cap.
3. Add engine oil that meets our
specifications. See Capacities and
Specifications (page 465).
4. Reinstall the engine oil filler cap. Turn it
clockwise until you feel a strong
resistance.
Note: Do not add oil further than the
maximum mark. Oil levels above the
maximum mark may cause engine damage.
Note:Soak up any spillage with an
absorbent cloth immediately.
OIL CHANGE INDICATOR RESET
Use the information display controls on the
steering wheel to reset the oil change
indicator.From the main menu scroll to:
Action and description Message
Press the right arrow button,
then from this menu scroll to
the following message. Settings
Press the right arrow button,
then from this menu scroll to
the following message. Vehicle
Press the right arrow button,
then from this menu scroll to
the following message. Oil Life
Press and hold the OK button
until the instrument cluster
displays the following
message. Hold OK to
Reset
Reset Successful
When the oil change indicator
resets the instrument cluster
displays 100%.
Remaining Life
{00}%
Action and description Message
If the instrument cluster
displays one of the following
messages, repeat the
process.
Not Reset
Reset Cancelled
CHANGING THE ENGINE AIR
FILTER
WARNING: To reduce the risk of
vehicle damage and personal burn injuries,
do not start your engine with the air
cleaner removed and do not remove it
while the engine is running.
When changing the engine air filter, do not
allow debris or foreign material to enter the
air induction system. Engine components
are susceptible to damage not covered by
the vehicle Warranty.
402
Maintenance
Page 408 of 681
Note:Automotive fluids are not
interchangeable.
It is very important to use prediluted coolant
approved to the correct specification in order
to avoid plugging the small passageways in
the engine cooling system. See Capacities
and Specifications (page 460). Do not mix
different colors or types of coolant in your
vehicle. Mixing of engine coolants or using
an incorrect coolant may harm the engine or
cooling system components and may not be
covered by the vehicle Warranty.
Note:If prediluted coolant is not available,
use the approved concentrated coolant
diluting it to 50/50 with distilled water. See
Capacities and Specifications (page 460).
Using water that has not been deionised
may contribute to deposit formation,
corrosion and plugging of the small cooling
system passageways.
Note: Coolants marketed for all makes and
models may not be approved to our
specifications and may cause damage to
the cooling system. Resulting component
damage may not be covered by the vehicle
Warranty.If the coolant level is at or below the
minimum mark, add prediluted coolant
immediately.
To top up the coolant level do the following:
1. Unscrew the cap slowly. Any pressure
escapes as you unscrew the cap.
2. Add prediluted coolant approved to the
correct specification. See Capacities and
Specifications (page 460).
3. Add enough prediluted coolant to reach
the correct level.
4. Replace the coolant reservoir cap. Turn
the cap clockwise until it contacts the
hard stop.
5. Check the coolant level in the coolant
reservoir the next few times you drive
your vehicle. If necessary, add enough
prediluted engine coolant to bring the
coolant level to the correct level.
If you have to add more than 1.1 qt (1 L) of
engine coolant per month, have your vehicle
checked as soon as possible. Operating an
engine with a low level of coolant can result
in engine overheating and possible engine
damage.In case of emergency, you can add a large
amount of water without engine coolant in
order to reach a vehicle service location. In
this instance, qualified personnel:
1. Must drain the cooling system.
2. Chemically clean the coolant system.
3. Refill with engine coolant as soon as
possible.
Water alone, without engine coolant, can
cause engine damage from corrosion,
overheating or freezing.
Do not use the following as a coolant
substitute:
• Alcohol.
• Methanol.
• Brine.
• Any coolant mixed with alcohol or
methanol antifreeze.
Alcohol and other liquids can cause engine
damage from overheating or freezing.
Do not add extra inhibitors or additives to
the coolant. These can be harmful and
compromise the corrosion protection of the
coolant.
405
Maintenance
Page 415 of 681
After battery replacement, or in some cases
after charging the battery with an external
charger, the battery management system
requires eight hours of vehicle sleep time to
relearn the battery state of charge. During
this time, your vehicle must remain fully
locked with the ignition switched off.
Note:Prior to relearning the battery state of
charge, the battery management system
may temporarily disable some electrical
systems.
Electrical Accessory Installation
To make sure the battery management
system works correctly, do not connect an
electrical device ground connection directly
to the battery negative post. This can cause
inaccurate measurements of the battery
condition and potential incorrect system
operation.
Note:If you add electrical accessories or
components to the vehicle, it may adversely
affect battery performance and durability.
This may also affect the performance of
other electrical systems in the vehicle.Remove and Reinstall the Battery
Install a battery approved for use by our
specifications. See Capacities and
Specifications (page 460).
To disconnect or remove the battery, do the
following:
1. Apply the parking brake and switch the
ignition off.
2. Switch all electrical equipment off, for
example lights and radio.
3. Wait a minimum of two minutes before
disconnecting the battery.
Note:The engine management system has
a power hold function and remains powered
for a period of time after you switch the
ignition off. This is to allow the system to
store diagnostic and adaptive tables.
Disconnecting the battery without waiting
can cause damage not covered by the
vehicle warranty.
4. Disconnect the negative battery cable
terminal.
5. Disconnect the positive battery cable
terminal.6. Remove the battery securing clamp.
7. Remove the battery.
8. To install, reverse the removal procedure.
Note:Before reconnecting the battery, make
sure the ignition remains switched off.
Note:Make sure to fully tighten the battery
cables.
If you disconnect or replace the vehicle
battery, you must reset the following
features:
• Window bounce-back. See Power
Windows (page 121).
• Clock Settings.
• Pre-set radio stations.
Battery Disposal
E107998
Make sure that you dispose of old
batteries in an environmentally
friendly way. Seek advice from
your local authority about recycling old
batteries.
412
Maintenance
Page 419 of 681
6. Remove the battery securing clamp.
7. Remove the battery.
8. To install, reverse the removal procedure.
Note:Before reconnecting the battery, make
sure the ignition remains switched off.
Note:Make sure to fully tighten the battery
cables.
If you disconnect or replace the vehicle
battery, you must reset the following
features:
• Window bounce-back. See Power
Windows (page 121).
• Clock Settings.
• Pre-set radio stations.
Battery Disposal
E107998
Make sure that you dispose of old
batteries in an environmentally
friendly way. Seek advice from
your local authority about recycling old
batteries.
ADJUSTING THE HEADLAMPS
Vertical Aim Adjustment
If your vehicle has been involved in a crash,
have the aim of the headlamp beam checked
by an authorized dealer.
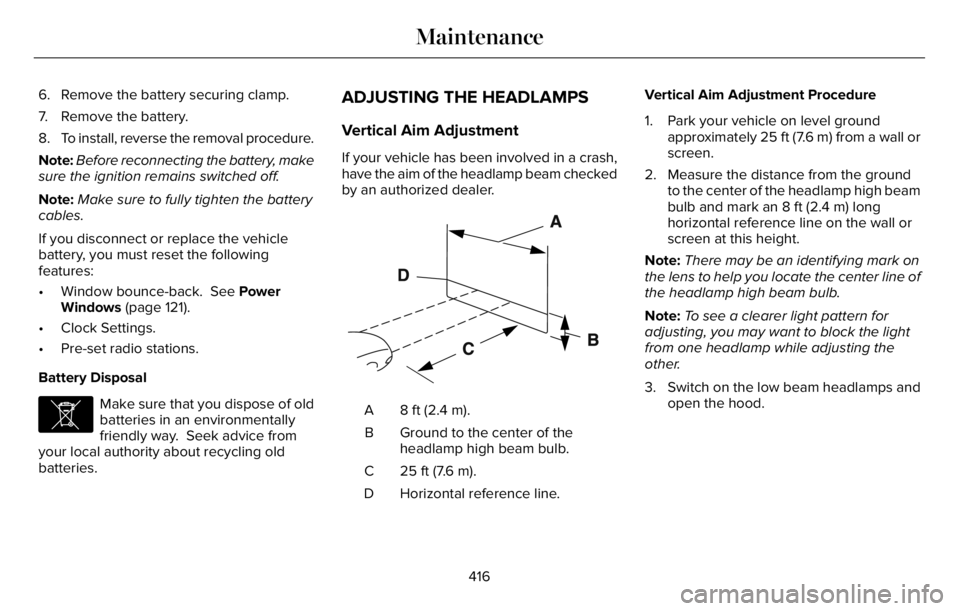
E142592
8 ft (2.4 m). A
Ground to the center of the
headlamp high beam bulb. B
25 ft (7.6 m). C
Horizontal reference line. DVertical Aim Adjustment Procedure
1. Park your vehicle on level ground
approximately 25 ft (7.6 m) from a wall or
screen.
2. Measure the distance from the ground
to the center of the headlamp high beam
bulb and mark an 8 ft (2.4 m) long
horizontal reference line on the wall or
screen at this height.
Note:There may be an identifying mark on
the lens to help you locate the center line of
the headlamp high beam bulb.
Note:To see a clearer light pattern for
adjusting, you may want to block the light
from one headlamp while adjusting the
other.
3. Switch on the low beam headlamps and
open the hood.
416
Maintenance
Page 420 of 681
E142465
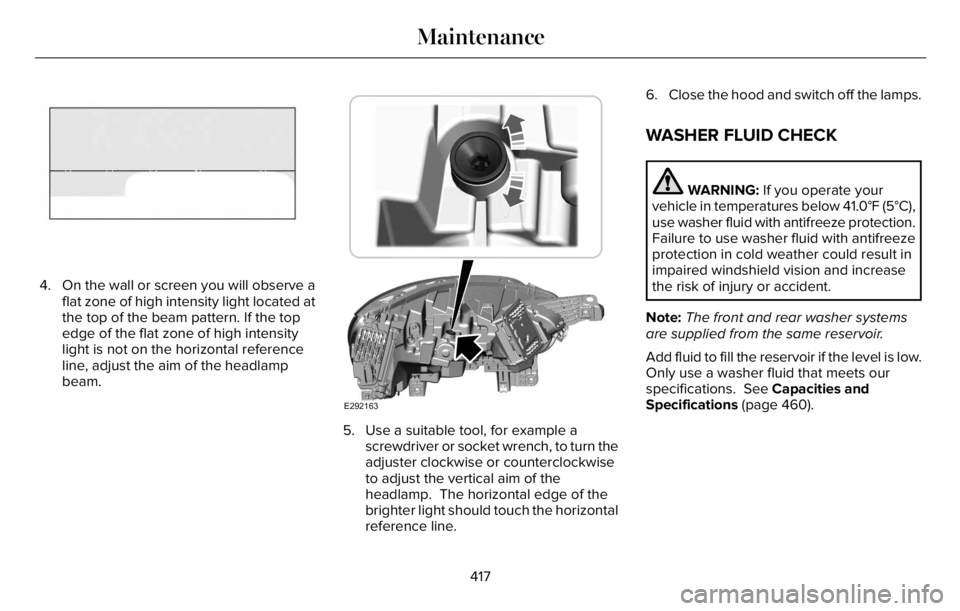
4. On the wall or screen you will observe a
flat zone of high intensity light located at
the top of the beam pattern. If the top
edge of the flat zone of high intensity
light is not on the horizontal reference
line, adjust the aim of the headlamp
beam.
E292163
5. Use a suitable tool, for example a
screwdriver or socket wrench, to turn the
adjuster clockwise or counterclockwise
to adjust the vertical aim of the
headlamp. The horizontal edge of the
brighter light should touch the horizontal
reference line.6. Close the hood and switch off the lamps.
WASHER FLUID CHECK
WARNING: If you operate your
vehicle in temperatures below 41.0°F (5°C),
use washer fluid with antifreeze protection.
Failure to use washer fluid with antifreeze
protection in cold weather could result in
impaired windshield vision and increase
the risk of injury or accident.
Note:The front and rear washer systems
are supplied from the same reservoir.
Add fluid to fill the reservoir if the level is low.
Only use a washer fluid that meets our
specifications. See Capacities and
Specifications (page 460).
417
Maintenance
Page 457 of 681
Note:No maintenance or additional
lubrication of your jack is required over the
service life of your vehicle.
1. Park on a level surface, set the parking
brake and switch on the hazard flashers.
2. Apply the parking brake, place the
transmission in park (P) and turn the
engine off.
3. If your vehicle has air suspension, use
the touch screen to switch on the Air
Suspension Service Mode prior to
jacking.
E142551
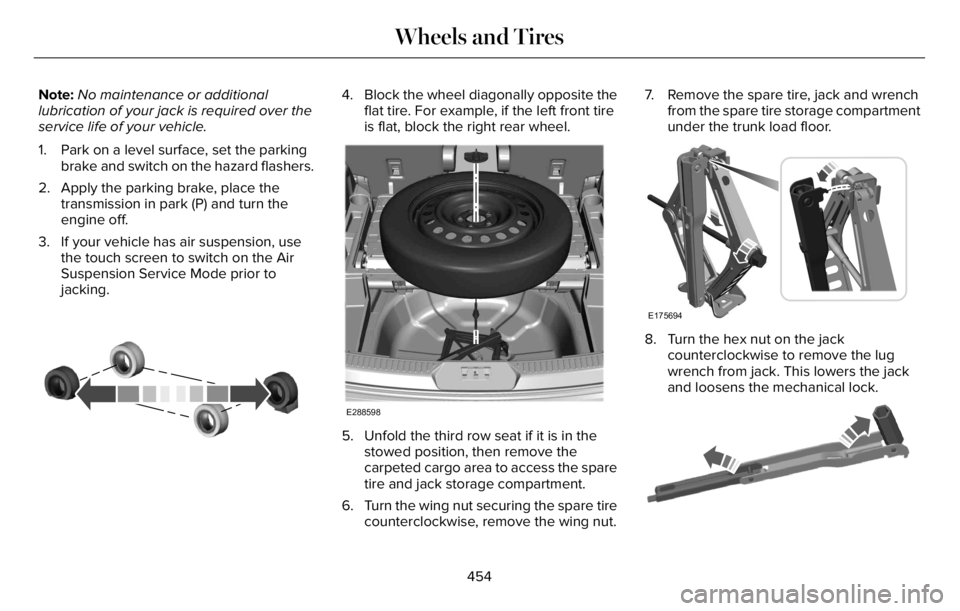
4. Block the wheel diagonally opposite the
flat tire. For example, if the left front tire
is flat, block the right rear wheel.
E288598
5. Unfold the third row seat if it is in the
stowed position, then remove the
carpeted cargo area to access the spare
tire and jack storage compartment.
6. Turn the wing nut securing the spare tire
counterclockwise, remove the wing nut.7. Remove the spare tire, jack and wrench
from the spare tire storage compartment
under the trunk load floor.
E175694
8. Turn the hex nut on the jack
counterclockwise to remove the lug
wrench from jack. This lowers the jack
and loosens the mechanical lock.
E181744E181744
454
Wheels and Tires
Page 458 of 681
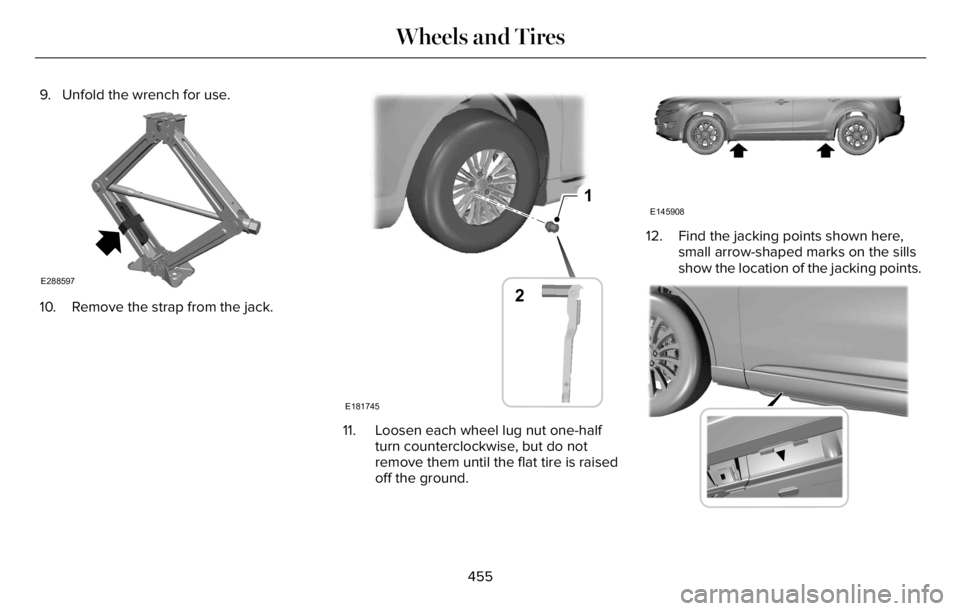
9. Unfold the wrench for use.
E288597
10. Remove the strap from the jack.
1
E181745
2
11. Loosen each wheel lug nut one-half
turn counterclockwise, but do not
remove them until the flat tire is raised
off the ground.
E145908
12. Find the jacking points shown here,
small arrow-shaped marks on the sills
show the location of the jacking points.
E307860E307860
455
Wheels and Tires
Page 459 of 681
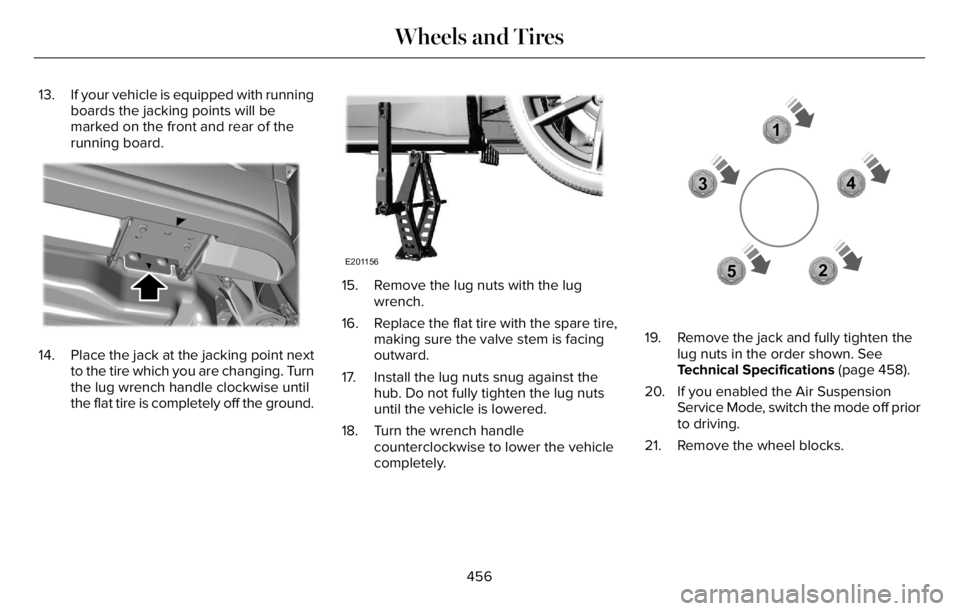
13. If your vehicle is equipped with running
boards the jacking points will be
marked on the front and rear of the
running board.
E310613E310613E310E310E310E31011100613613613613
14. Place the jack at the jacking point next
to the tire which you are changing. Turn
the lug wrench handle clockwise until
the flat tire is completely off the ground.
E201156
15. Remove the lug nuts with the lug
wrench.
16. Replace the flat tire with the spare tire,
making sure the valve stem is facing
outward.
17. Install the lug nuts snug against the
hub. Do not fully tighten the lug nuts
until the vehicle is lowered.
18. Turn the wrench handle
counterclockwise to lower the vehicle
completely.
1
2 34
5
E306781E306781
19. Remove the jack and fully tighten the
lug nuts in the order shown. See
Technical Specifications (page 458).
20. If you enabled the Air Suspension
Service Mode, switch the mode off prior
to driving.
21. Remove the wheel blocks.
456
Wheels and Tires
Page 460 of 681
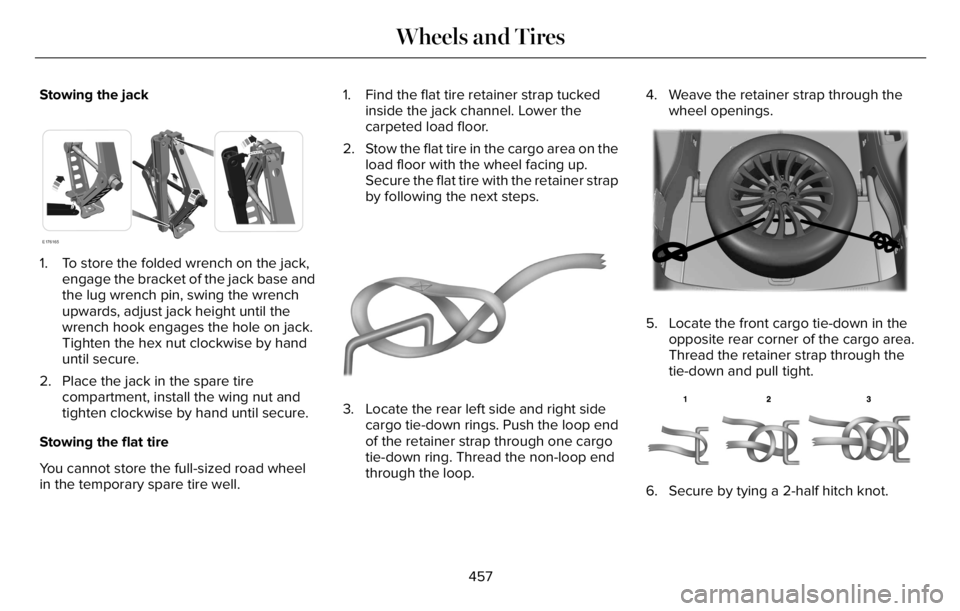
Stowing the jack
E176165
1. To store the folded wrench on the jack,
engage the bracket of the jack base and
the lug wrench pin, swing the wrench
upwards, adjust jack height until the
wrench hook engages the hole on jack.
Tighten the hex nut clockwise by hand
until secure.
2. Place the jack in the spare tire
compartment, install the wing nut and
tighten clockwise by hand until secure.
Stowing the flat tire
You cannot store the full-sized road wheel
in the temporary spare tire well.1. Find the flat tire retainer strap tucked
inside the jack channel. Lower the
carpeted load floor.
2. Stow the flat tire in the cargo area on the
load floor with the wheel facing up.
Secure the flat tire with the retainer strap
by following the next steps.
E142906
3. Locate the rear left side and right side
cargo tie-down rings. Push the loop end
of the retainer strap through one cargo
tie-down ring. Thread the non-loop end
through the loop.4. Weave the retainer strap through the
wheel openings.
E294325EE294E294EE294222929994432533325333222255555E294E294E2E294E294E2E294E294E294E294E294E2944E294E2944E294EE294EE29499994E9994994E2942423253253253253253253232532532532532532525325325323253253232525325355332533555
5. Locate the front cargo tie-down in the
opposite rear corner of the cargo area.
Thread the retainer strap through the
tie-down and pull tight.
E143746
6. Secure by tying a 2-half hitch knot.
457
Wheels and Tires