LINCOLN BLACKWOOD 2003 Owners Manual
Manufacturer: LINCOLN, Model Year: 2003, Model line: BLACKWOOD, Model: LINCOLN BLACKWOOD 2003Pages: 280, PDF Size: 4.2 MB
Page 181 of 280
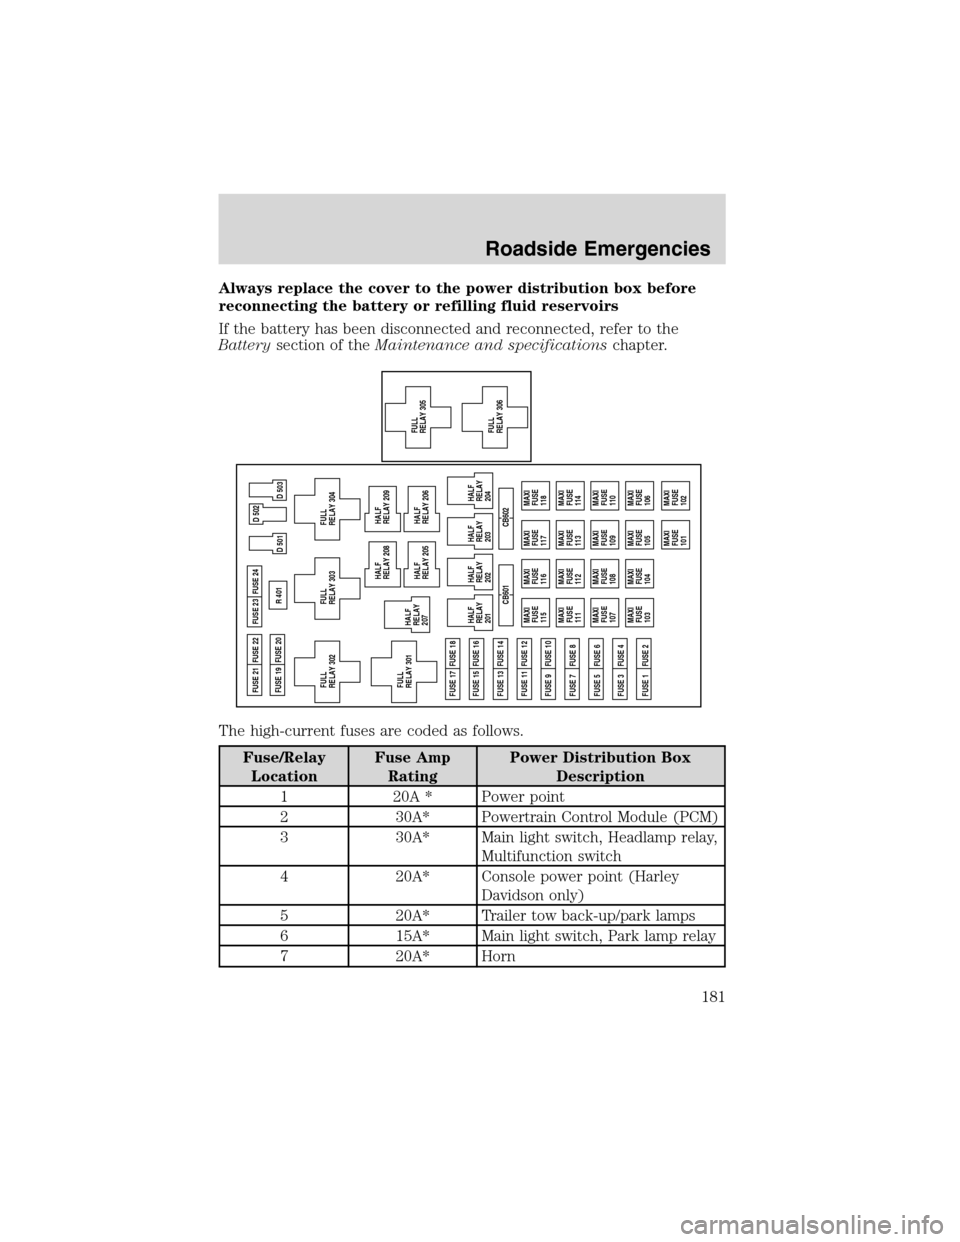
Always replace the cover to the power distribution box before
reconnecting the battery or refilling fluid reservoirs
If the battery has been disconnected and reconnected, refer to the
Batterysection of theMaintenance and specificationschapter.
The high-current fuses are coded as follows.
Fuse/Relay
LocationFuse Amp
RatingPower Distribution Box
Description
1 20A * Power point
2 30A* Powertrain Control Module (PCM)
3 30A* Main light switch, Headlamp relay,
Multifunction switch
4 20A* Console power point (Harley
Davidson only)
5 20A* Trailer tow back-up/park lamps
6 15A* Main light switch, Park lamp relay
7 20A* Horn
MAXI
FUSE
115MAXI
FUSE
116MAXI
FUSE
117
MAXI
FUSE
118
MAXI
FUSE
111MAXI
FUSE
112MAXI
FUSE
113
MAXI
FUSE
114
MAXI
FUSE
107MAXI
FUSE
108MAXI
FUSE
109
MAXI
FUSE
110
MAXI
FUSE
103MAXI
FUSE
104MAXI
FUSE
105
MAXI
FUSE
106
MAXI
FUSE
101MAXI
FUSE
102 CB601 CB602 FUSE 17 FUSE 18FUSE 21 FUSE 22
FUSE 19 FUSE 20FUSE 23
FULL
RELAY 302R 401
D 501 FUSE 24
FUSE 15 FUSE 16
FUSE 13 FUSE 14
FUSE 11 FUSE 12
FUSE 9 FUSE 10
FUSE 7 FUSE 8
FUSE 5 FUSE 6
FUSE 3 FUSE 4
FUSE 1 FUSE 2
D 503 D 502
FULL
RELAY 301HALF
RELAY
207
FULL
RELAY 305FULL
RELAY 306
FULL
RELAY 303
FULL
RELAY 304
HALF
RELAY
201
HALF
RELAY
202HALF
RELAY 208
HALF
RELAY 209
HALF
RELAY 205
HALF
RELAY 206
HALF
RELAY
203
HALF
RELAY
204
Roadside Emergencies
181
Page 182 of 280
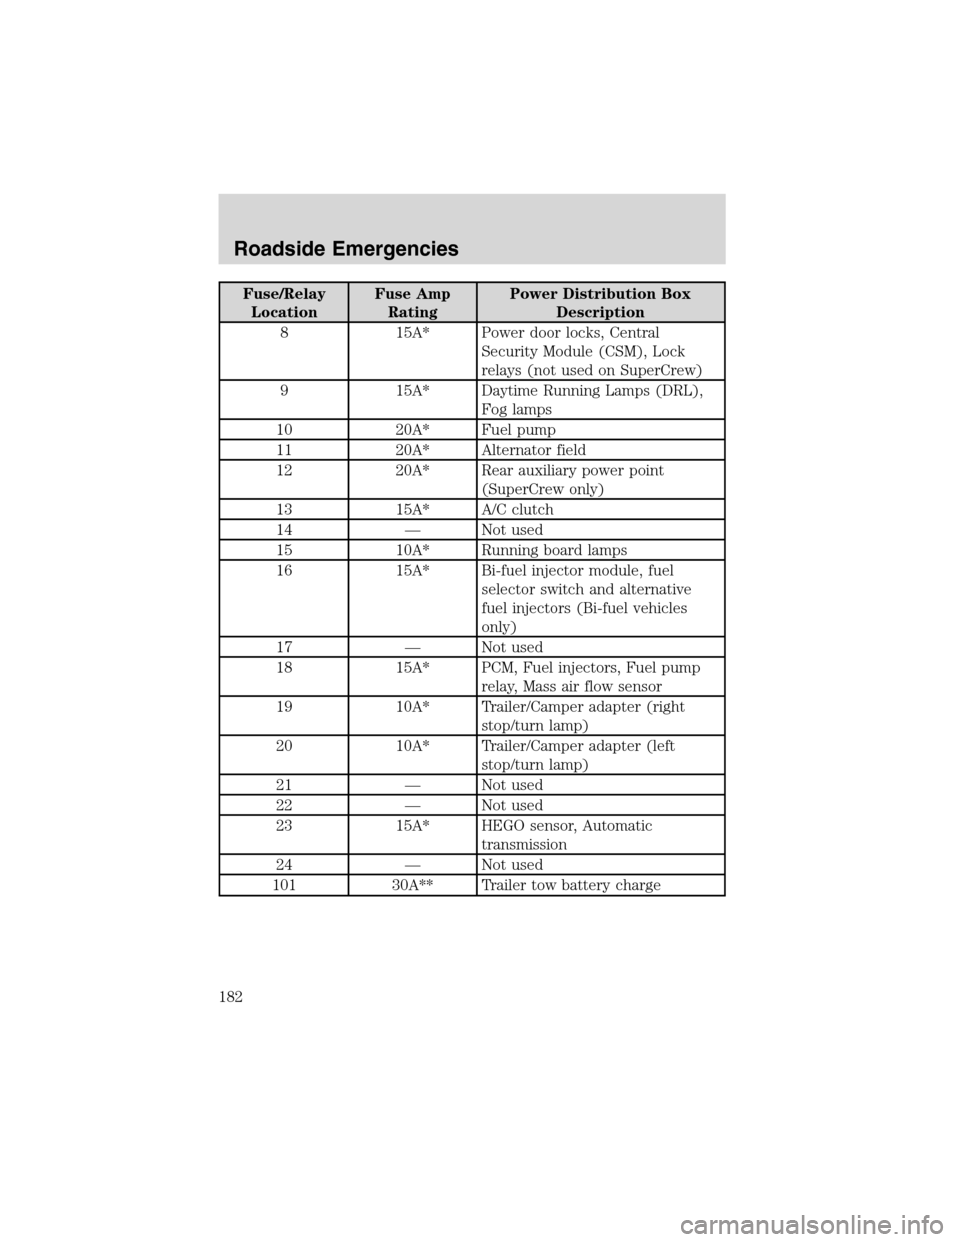
Fuse/Relay
LocationFuse Amp
RatingPower Distribution Box
Description
8 15A* Power door locks, Central
Security Module (CSM), Lock
relays (not used on SuperCrew)
9 15A* Daytime Running Lamps (DRL),
Fog lamps
10 20A* Fuel pump
11 20A* Alternator field
12 20A* Rear auxiliary power point
(SuperCrew only)
13 15A* A/C clutch
14—Not used
15 10A* Running board lamps
16 15A* Bi-fuel injector module, fuel
selector switch and alternative
fuel injectors (Bi-fuel vehicles
only)
17—Not used
18 15A* PCM, Fuel injectors, Fuel pump
relay, Mass air flow sensor
19 10A* Trailer/Camper adapter (right
stop/turn lamp)
20 10A* Trailer/Camper adapter (left
stop/turn lamp)
21—Not used
22—Not used
23 15A* HEGO sensor, Automatic
transmission
24—Not used
101 30A** Trailer tow battery charge
Roadside Emergencies
182
Page 183 of 280
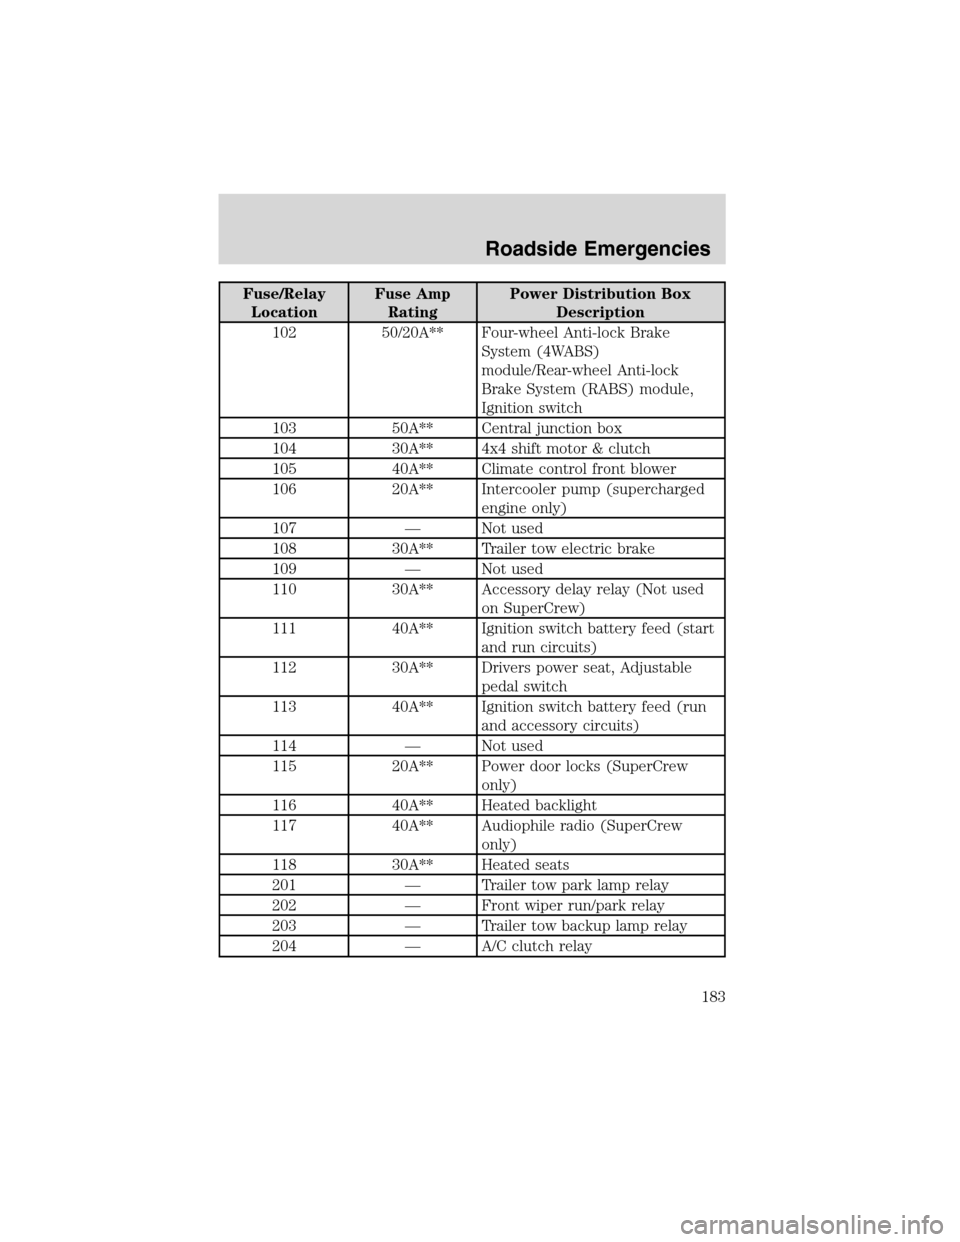
Fuse/Relay
LocationFuse Amp
RatingPower Distribution Box
Description
102 50/20A** Four-wheel Anti-lock Brake
System (4WABS)
module/Rear-wheel Anti-lock
Brake System (RABS) module,
Ignition switch
103 50A** Central junction box
104 30A** 4x4 shift motor & clutch
105 40A** Climate control front blower
106 20A** Intercooler pump (supercharged
engine only)
107—Not used
108 30A** Trailer tow electric brake
109—Not used
110 30A** Accessory delay relay (Not used
on SuperCrew)
111 40A** Ignition switch battery feed (start
and run circuits)
112 30A** Drivers power seat, Adjustable
pedal switch
113 40A** Ignition switch battery feed (run
and accessory circuits)
114—Not used
115 20A** Power door locks (SuperCrew
only)
116 40A** Heated backlight
117 40A** Audiophile radio (SuperCrew
only)
118 30A** Heated seats
201—Trailer tow park lamp relay
202—Front wiper run/park relay
203—Trailer tow backup lamp relay
204—A/C clutch relay
Roadside Emergencies
183
Page 184 of 280
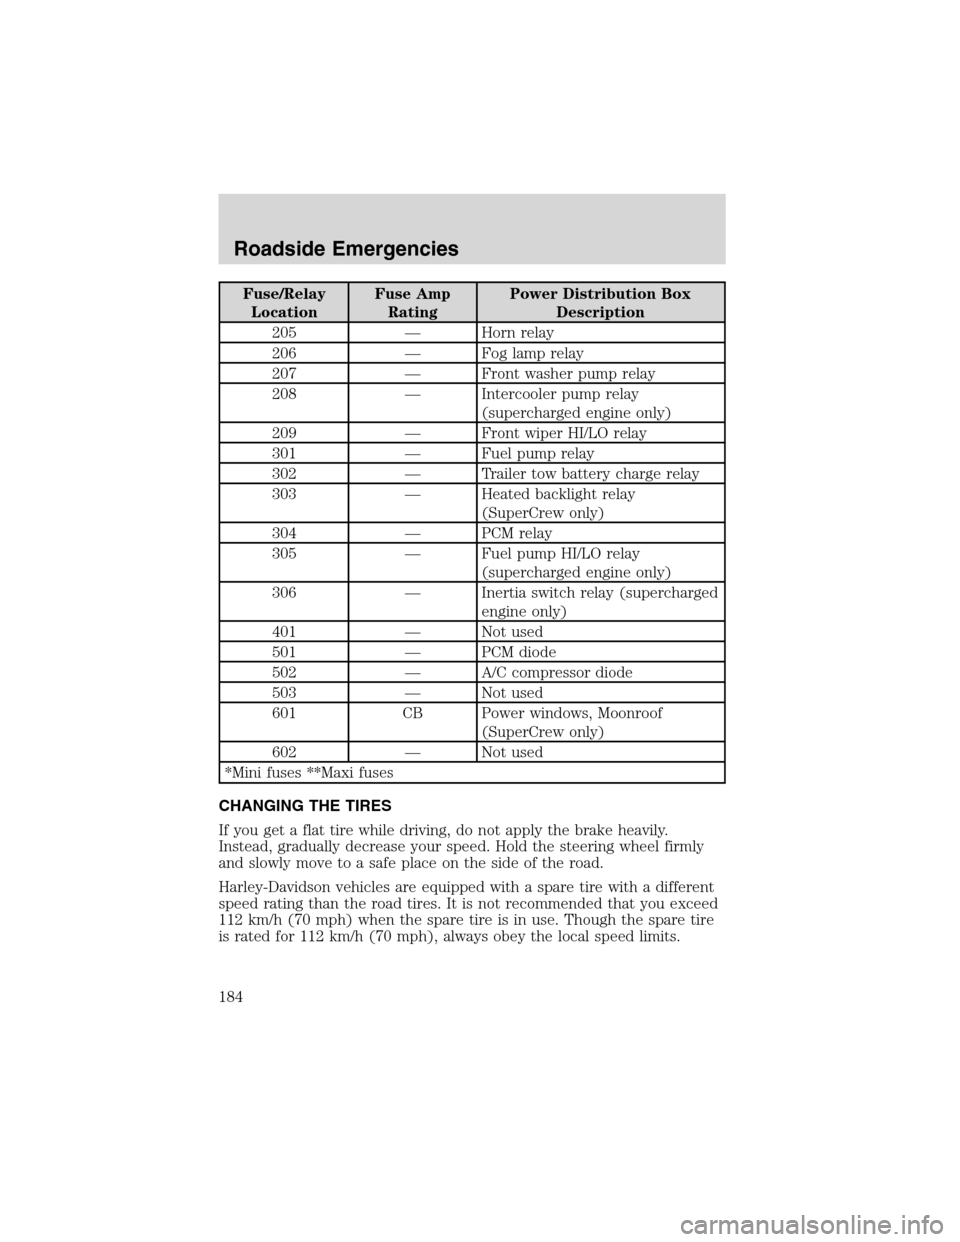
Fuse/Relay
LocationFuse Amp
RatingPower Distribution Box
Description
205—Horn relay
206—Fog lamp relay
207—Front washer pump relay
208—Intercooler pump relay
(supercharged engine only)
209—Front wiper HI/LO relay
301—Fuel pump relay
302—Trailer tow battery charge relay
303—Heated backlight relay
(SuperCrew only)
304—PCM relay
305—Fuel pump HI/LO relay
(supercharged engine only)
306—Inertia switch relay (supercharged
engine only)
401—Not used
501—PCM diode
502—A/C compressor diode
503—Not used
601 CB Power windows, Moonroof
(SuperCrew only)
602—Not used
*Mini fuses **Maxi fuses
CHANGING THE TIRES
If you get a flat tire while driving, do not apply the brake heavily.
Instead, gradually decrease your speed. Hold the steering wheel firmly
and slowly move to a safe place on the side of the road.
Harley-Davidson vehicles are equipped with a spare tire with a different
speed rating than the road tires. It is not recommended that you exceed
112 km/h (70 mph) when the spare tire is in use. Though the spare tire
is rated for 112 km/h (70 mph), always obey the local speed limits.
Roadside Emergencies
184
Page 185 of 280
The use of tire sealants is not recommended and may
compromise the integrity of your tires. The use of tire sealants
may also affect your tire pressure monitoring system (if equipped).
Spare tire information
Your vehicle is equipped with a spare tire that may be used as a spare or
a regular tire. The spare tire wheel may not match the road wheel, and is
not equipped with wheel trim. The wheel trim from the wheel/tire may
be used on the spare if the wheels match.
If your vehicle is equipped with 4WD, a spare tire of a different
size than the road tires should not be used. Use of such a tire
could result in damage to driveline components and an increased risk
of loss of vehicle control, vehicle rollover, personal injury or death.
If your vehicle is equipped with a tire pressure monitoring
system, refer to Tire Pressure Monitoring System (if equipped)
in the Maintenance and specifications section for important information
before changing your tires. If the tire pressure monitoring system
becomes damaged, it will no longer function.
Location of the spare tire and tools
The spare tire and tools for your vehicle are stowed in the following
locations:
Tool Location
Spare tire Under the vehicle, just forward of
the rear bumper
Jack, lug nut wrench Regular cab: Under the seat on the
passenger side
Super Cab: Under the front or rear
seat on the passenger side
Super Crew cab: In the passenger
side rear storage compartment
Roadside Emergencies
185
Page 186 of 280
Tool Location
Jack handle On top of the radiator support at
the front of the engine
compartment
Key, spare tire lock In the glove box
Removing the spare tire
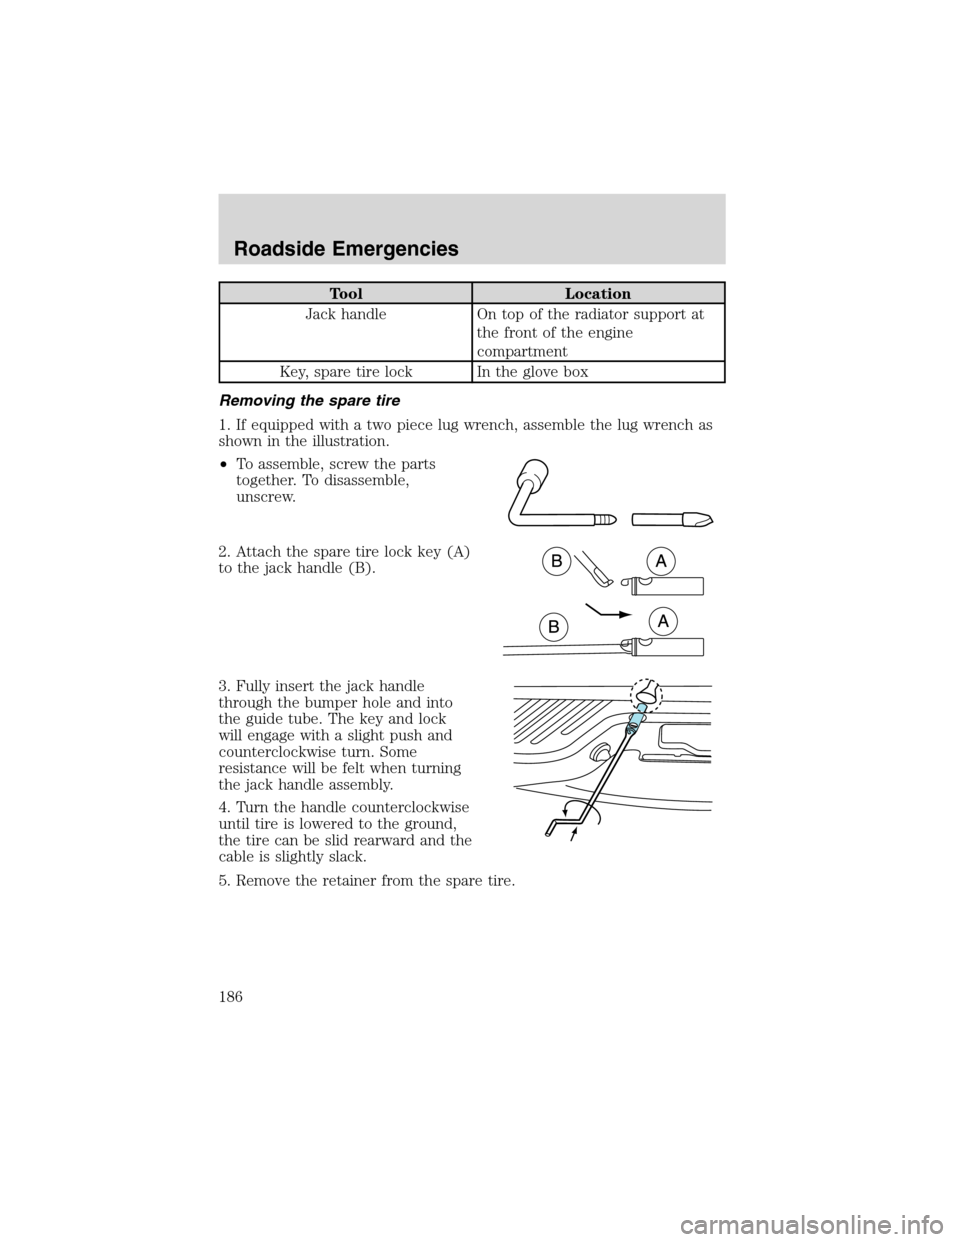
1. If equipped with a two piece lug wrench, assemble the lug wrench as
shown in the illustration.
•To assemble, screw the parts
together. To disassemble,
unscrew.
2. Attach the spare tire lock key (A)
to the jack handle (B).
3. Fully insert the jack handle
through the bumper hole and into
the guide tube. The key and lock
will engage with a slight push and
counterclockwise turn. Some
resistance will be felt when turning
the jack handle assembly.
4. Turn the handle counterclockwise
until tire is lowered to the ground,
the tire can be slid rearward and the
cable is slightly slack.
5. Remove the retainer from the spare tire.
Roadside Emergencies
186
Page 187 of 280
Tire change procedure
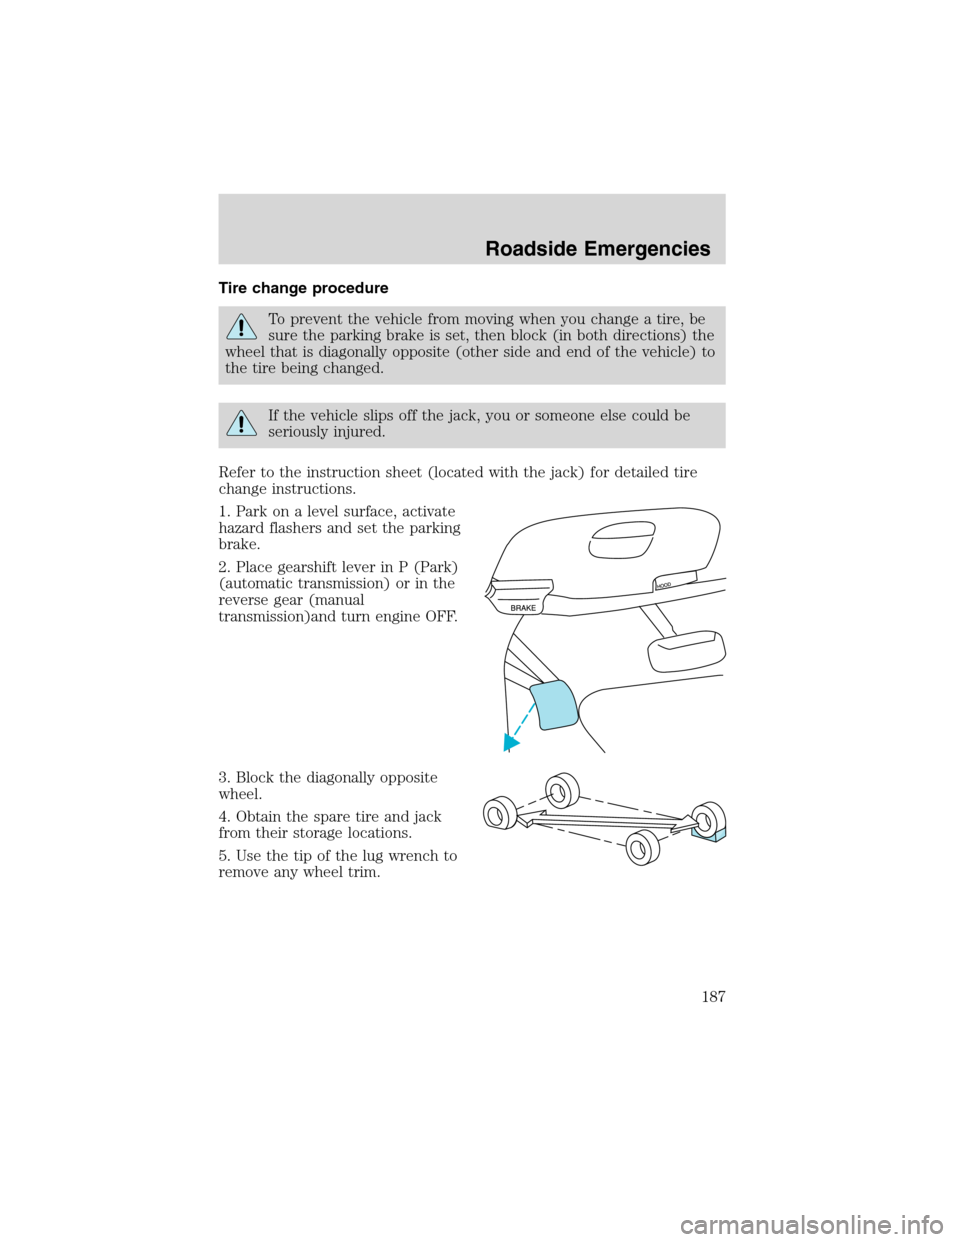
To prevent the vehicle from moving when you change a tire, be
sure the parking brake is set, then block (in both directions) the
wheel that is diagonally opposite (other side and end of the vehicle) to
the tire being changed.
If the vehicle slips off the jack, you or someone else could be
seriously injured.
Refer to the instruction sheet (located with the jack) for detailed tire
change instructions.
1. Park on a level surface, activate
hazard flashers and set the parking
brake.
2. Place gearshift lever in P (Park)
(automatic transmission) or in the
reverse gear (manual
transmission)and turn engine OFF.
3. Block the diagonally opposite
wheel.
4. Obtain the spare tire and jack
from their storage locations.
5. Use the tip of the lug wrench to
remove any wheel trim.
Roadside Emergencies
187
Page 188 of 280
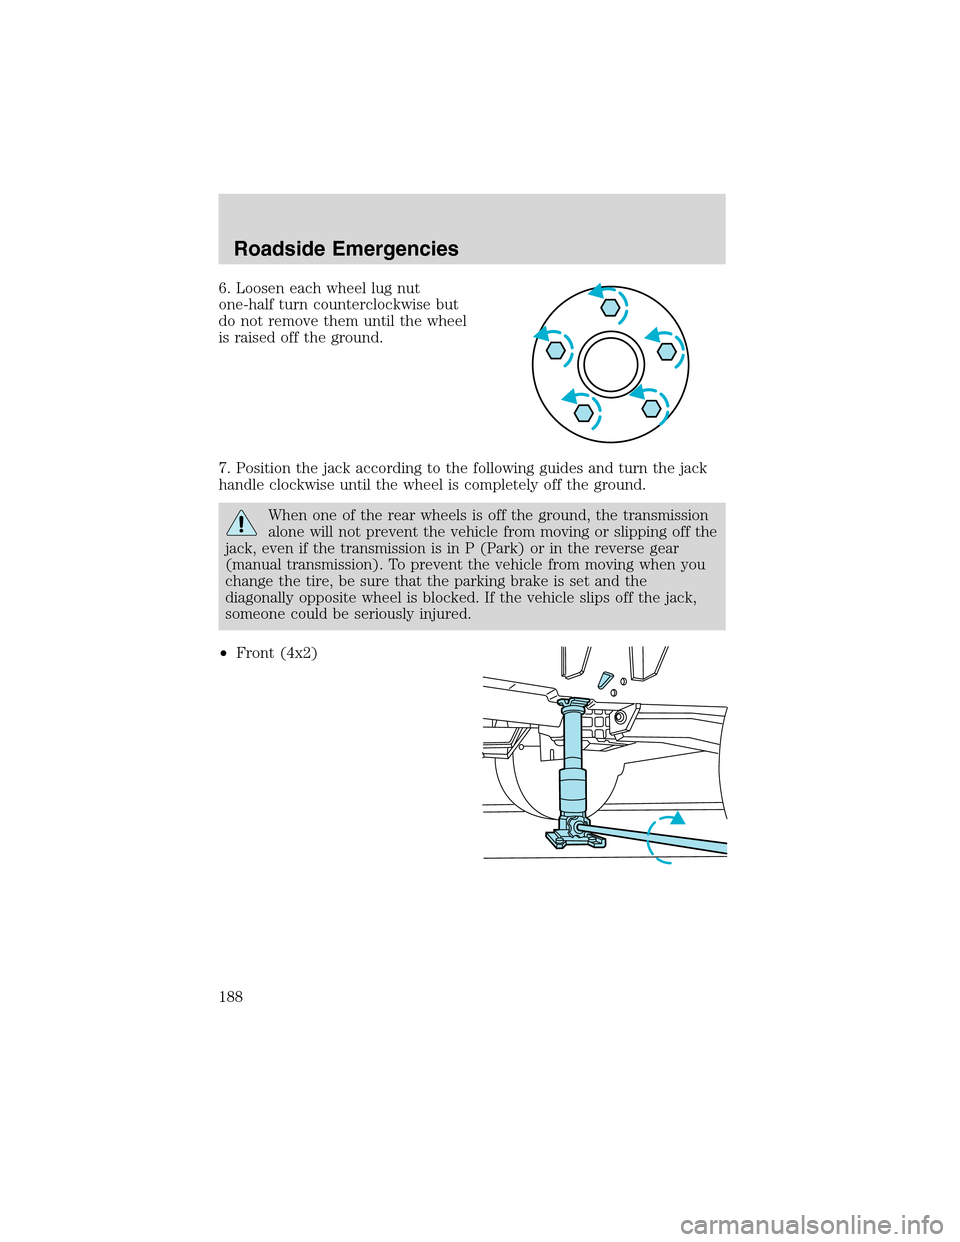
6. Loosen each wheel lug nut
one-half turn counterclockwise but
do not remove them until the wheel
is raised off the ground.
7. Position the jack according to the following guides and turn the jack
handle clockwise until the wheel is completely off the ground.
When one of the rear wheels is off the ground, the transmission
alone will not prevent the vehicle from moving or slipping off the
jack, even if the transmission is in P (Park) or in the reverse gear
(manual transmission). To prevent the vehicle from moving when you
change the tire, be sure that the parking brake is set and the
diagonally opposite wheel is blocked. If the vehicle slips off the jack,
someone could be seriously injured.
•Front (4x2)
Roadside Emergencies
188
Page 189 of 280
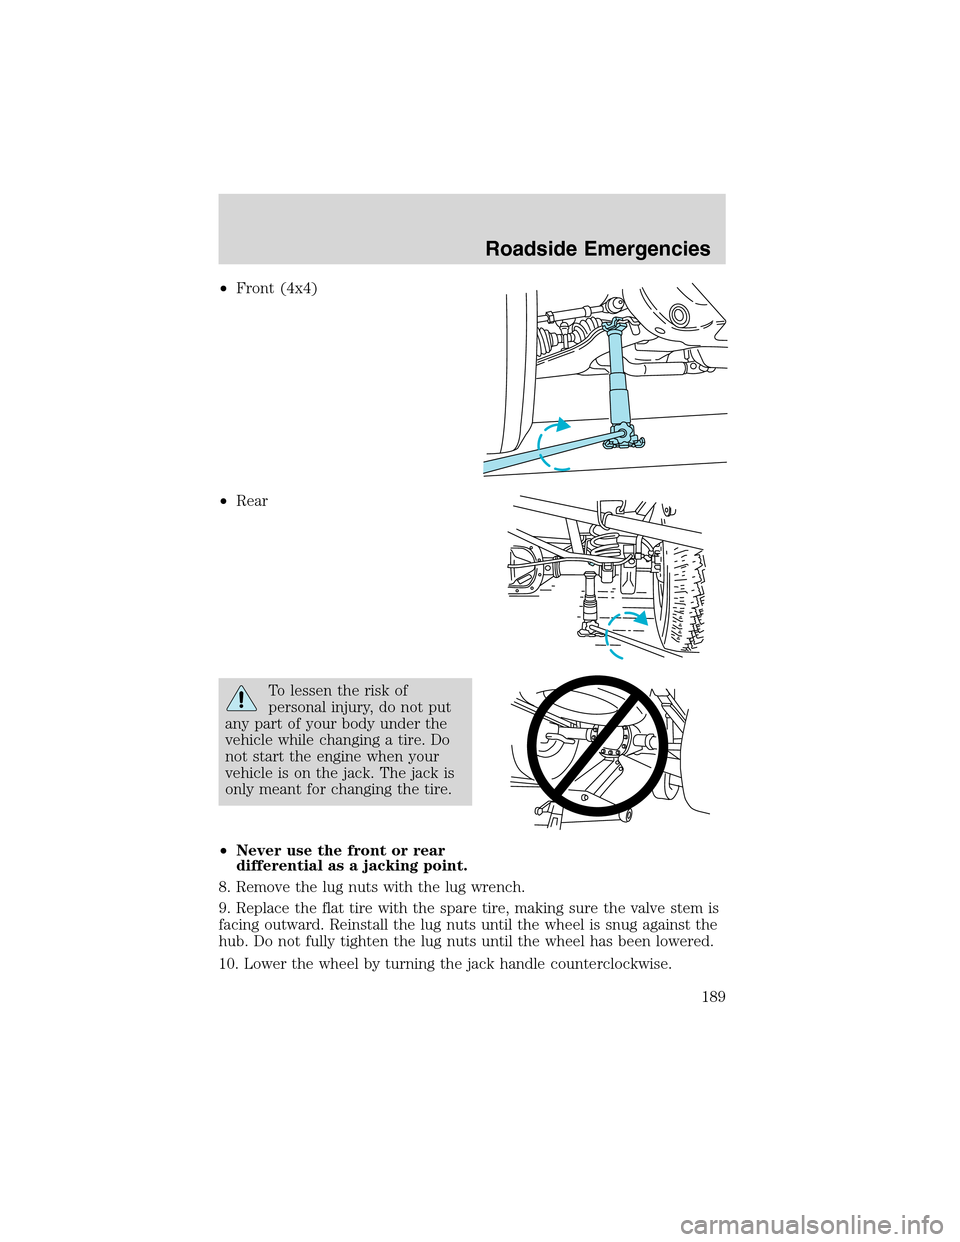
•Front (4x4)
•Rear
To lessen the risk of
personal injury, do not put
any part of your body under the
vehicle while changing a tire. Do
not start the engine when your
vehicle is on the jack. The jack is
only meant for changing the tire.
•Never use the front or rear
differential as a jacking point.
8. Remove the lug nuts with the lug wrench.
9. Replace the flat tire with the spare tire, making sure the valve stem is
facing outward. Reinstall the lug nuts until the wheel is snug against the
hub. Do not fully tighten the lug nuts until the wheel has been lowered.
10. Lower the wheel by turning the jack handle counterclockwise.
Roadside Emergencies
189
Page 190 of 280
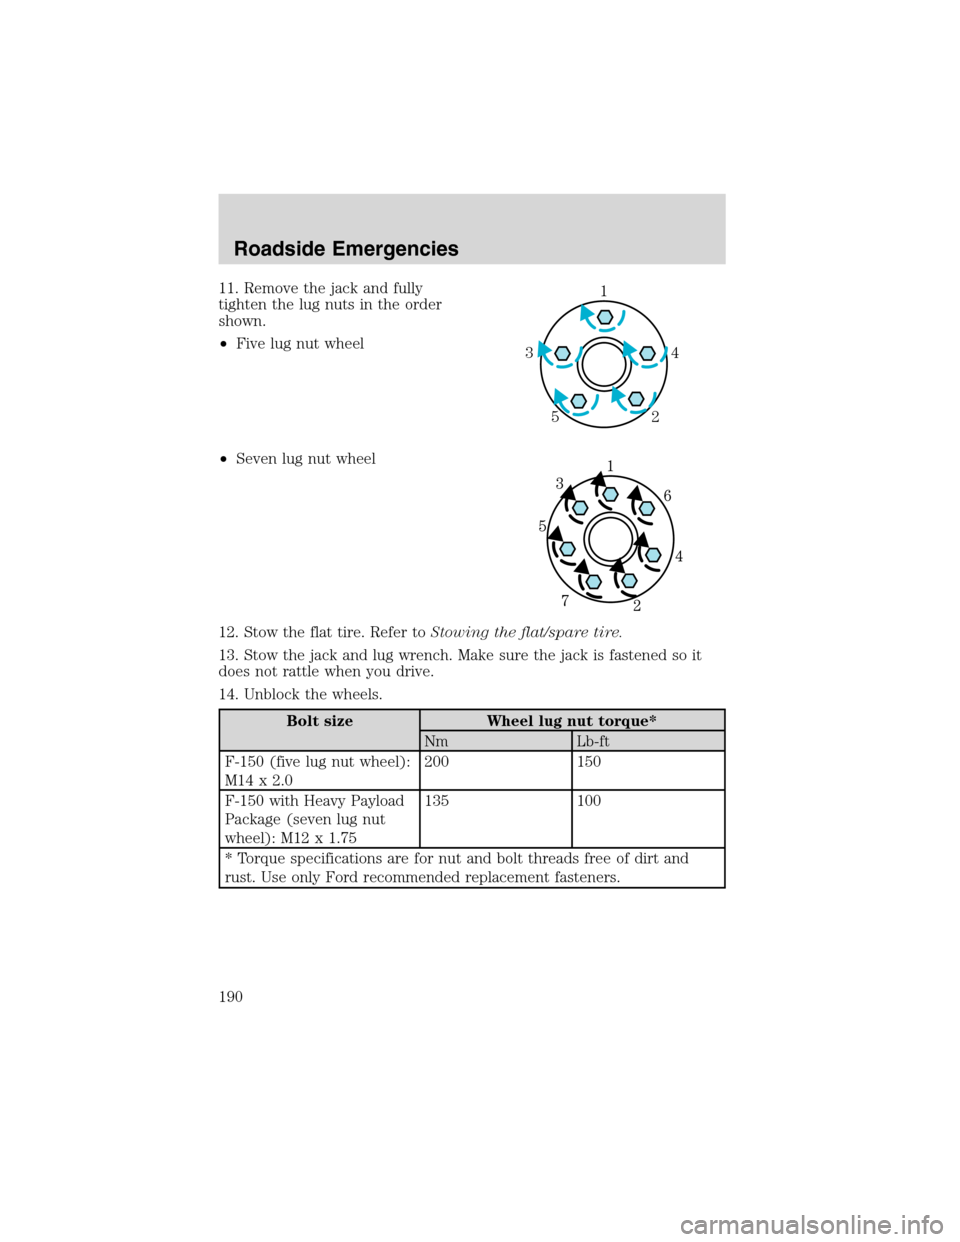
11. Remove the jack and fully
tighten the lug nuts in the order
shown.
•Five lug nut wheel
•Seven lug nut wheel
12. Stow the flat tire. Refer toStowing the flat/spare tire.
13. Stow the jack and lug wrench. Make sure the jack is fastened so it
does not rattle when you drive.
14. Unblock the wheels.
Bolt size Wheel lug nut torque*
Nm Lb-ft
F-150 (five lug nut wheel):
M14 x 2.0200 150
F-150 with Heavy Payload
Package (seven lug nut
wheel): M12 x 1.75135 100
* Torque specifications are for nut and bolt threads free of dirt and
rust. Use only Ford recommended replacement fasteners.
1
4 3
2 5
Roadside Emergencies
190