LINCOLN CONTINENTAL 1996 Customer Assistance Guide
Manufacturer: LINCOLN, Model Year: 1996, Model line: CONTINENTAL, Model: LINCOLN CONTINENTAL 1996Pages: 320, PDF Size: 1.8 MB
Page 121 of 320

2. Rotate the thumbwheel from "0" to " 1 " (the
lowest heat level). Allow five minutes for the
heat level to stabilize.
3. If the heat level is not high enough for comfort,
select increased heat levels "2' through "5" (the
maximum level). Allow at least two minutes
for the heat level to stabilize at any new level
selected.
4. If the heated seat switch is not turned off ("0"
on the thumbwheel), the seat will heat up to the
selected temperature level each time the car is
started.
NOTE: Cooling the seat down takes considerably
longer than increasing its heat level.
118Cleaning the Seats
Leather
For routine cleaning, wipe the surface with a
soft, damp cloth. For more thorough cleaning,
wipe the surface with a leather and vinyl cleaner
or a mild soap.
Wipe the surface with a damp, soft cloth, then
dry and buff with a dry, soft cloth.
Fabric
Remove dust and loose dirt with a whisk broom
or a vacuum cleaner. Remove fresh spots
immediately. Follow the directions that come
with the cleaner.
NOTE: Before using any cleaner, test it on a
small, hidden area of fabric. If the fabric's color
or texture is adversely affected by a particular
cleaner, do not use it.
Page 122 of 320

Memory Profile System
The Personality Memory Feature customizes your
Continental for up to two (2) drivers. The
following features are automatically recalled when
unlocking the doors using the remote entry
transmitter, keyless entry keypad, or by pressing
the Memory 1 or Memory 2 switches on the
driver's door: All driver's seat positions except power lumbar
and head restraint. Both left and right outside mirror settings. Radio station presets including the last selected
station and band and 0 preset preferences on
FMI, FM2, and AM. Instrument panel dimming setting. Autolamp delay time-out setting. Ride/Steering menu setting. Feature Menu settingsThe Ride/Steering menu is located in the
Message Center. The RIDE display allows you
to adjust the suspension feel to FIRM,
NORMAL, or PLUSH.
Pressing the Ride/Steering menu switch again
brings the STEERING display. This allows you
to adjust steering effort to LOW, NORMAL, or
HIGH.
For more information on ride/steering options,
see Road Calibrated Suspension later in this
chapter.
Personality Memory also allows you to
customize settings from the Feature menu
located in the Message Center. The Feature
menu contains five (5) features that you can
enable or disable. The features are listed in the
order they appear in the Feature menu. EXPRESS WINDOW - for one tap down
operation of the driver's window.
119
Page 123 of 320

AUTO DOOR LOCKS - automatically locks all
doors when the driver shifts out of PARK, all
doors are closed, and the vehicle speed is at
least three mph (five km/h). HORN CHIRP - sounds an audible "chirp"
when you press the LOCK button on the remote
entry transmitter to verify that the doors have
been locked and the vehicle's anti-theft system
has been armed (if equipped). SEAT ACCESS - moves the driver's seat back
two (2) inches or to the end of the seat track
when the vehicle is turned off and the ignition
key is removed. Upon the driver entering the
vehicle and closing the door, the seat will move
forward to its previous position. REVERSE MIRROR - when the vehicle is
shifted to REVERSE, the outside rearview
mirrors tilt down. This provides an improved
view of the side of the vehicle and curb area
when backing up. When you shift out of
REVERSE, the mirrors return to their previous
positions.
120Recalling Personality Memory
All of these settings are automatically recalled
when the driver unlocks the door using the
remote entry transmitter, keyless entry keypad or
presses either Memory I or Memory 2 switch
inside the driver's door. The vehicle must be in
PARK or NEUTRAL to recall Personality
Memory settings.
Remote Entry
Pressing the UNLOCK button on the remote
entry transmitter unlocks the driver's door and
recalls all of the Personality Memory settings.
Two transmitters are delivered with the vehicle.
One is programmed to always recall Memory I
and the other will always recall Memory 2.
Personality Memory 1 or 2 is indicated on the
back of the transmitter.
Personality Memory recall from the remote
transmitter can be disabled. This is done by sliding
the switch on the back of the transmitter to OFF.
Personality Memory can still be recalled using
Page 124 of 320

keyless entry code or the Memory I or Memory 2
switches.
Keyless Entry
Up to three unique keyless entry codes can be
programmed by the customer. Two of the codes
can be assigned to recall Personality Memory I or
Memory 2. Each time the 5-digit code is entered on
the keypad, the driver's door will unlock and
Personality Memory 1 or Memory 2 will be
recalled.
NOTE: Please note that even though the driver's
Personality Memory may be recalled using remote
or keyless entry, the seats and mirrors will not
move to the driver's set positions until the driver's
door is opened.
Memory Switches
Pressing either the Memory I or Memory 2 switch
on the driver's door will also recall the Personality
Memory settings as selected, providing your
vehicle is in P (Park) or N (Neutral).Auto Save
Any change made by the driver to one of the
above Personality Memory settings will be
updated and saved automatically. The display,
SAVED TO DRIVER I or SAVED TO
DRIVER 2, will appear on the Message Center
for five (5) seconds as a confirmation of the
update to Personality Memory. If a radio preset
is changed the radio display will also show
SAVED.
If the driver does not use the remote entry
transmitter, or keyless entry keypad to unlock the
doors upon entering or does not press the
Memory I or Memory 2 switch, then any change
to one of the Personality Memory settings
(except radio presets) will not be automatically
saved. Instead the driver will be prompted by the
Message Center whether to save the settings to
Driver 1 or Driver 2.
121
Page 125 of 320

Pressing the SELECT switch will toggle between
1, 2 or no choice. If DRIVER I or DRIVER 2 is
selected, the display, SAVED TO DRIVER I or
SAVED TO DRIVER 2, will appear on the
Message Center to confirm the change has been
automatically saved with the Personality Memory.
If no choice is made by the driver, then the change
will not be automatically saved and there is no
effect on the Personality Memory.
Once this screen has been displayed, the driver will
not be asked again for the remainder of the drive.
Turning Personality OFF
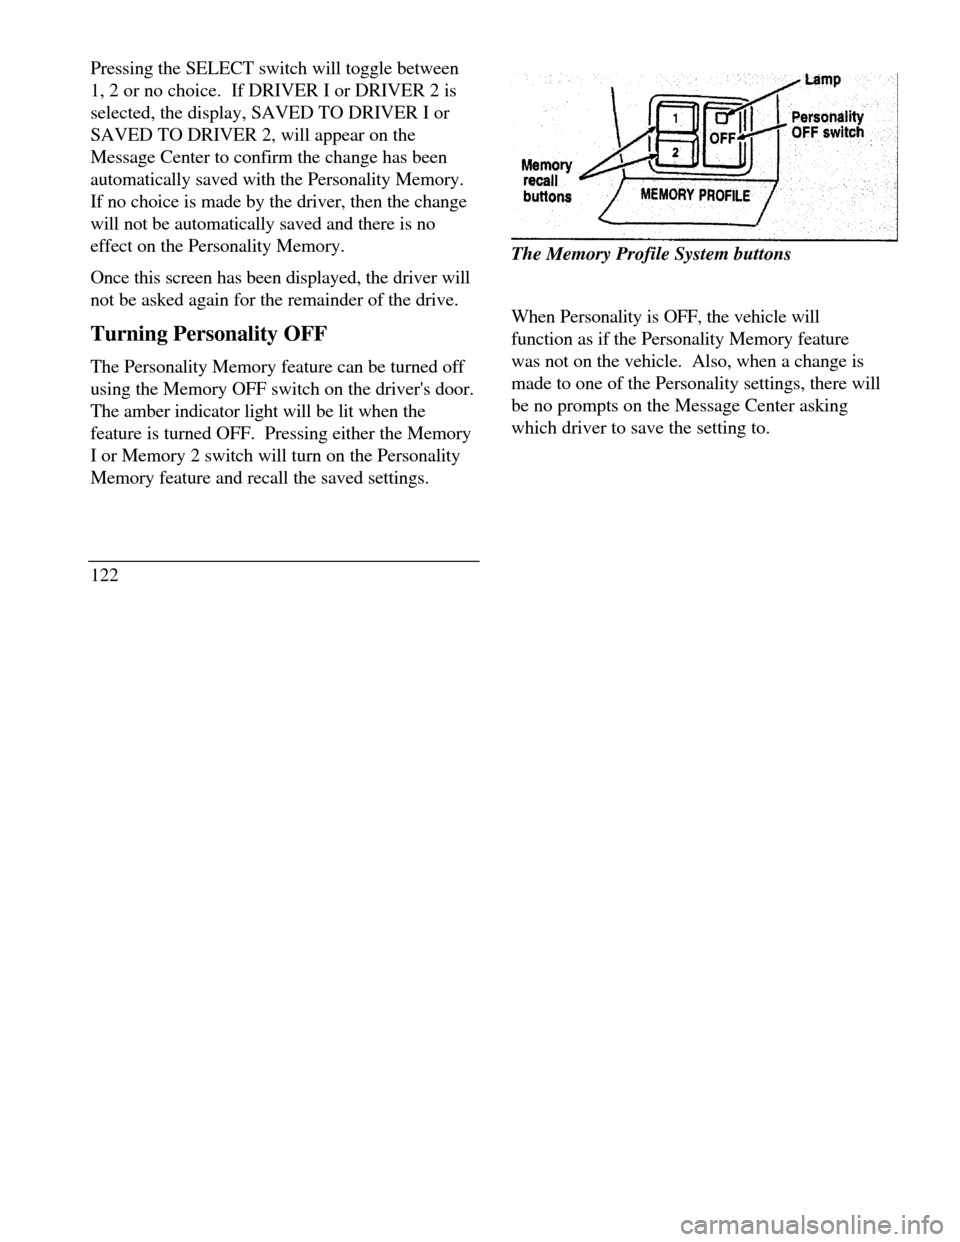
The Personality Memory feature can be turned off
using the Memory OFF switch on the driver's door.
The amber indicator light will be lit when the
feature is turned OFF. Pressing either the Memory
I or Memory 2 switch will turn on the Personality
Memory feature and recall the saved settings.
122Memory recall buttonsThe Memory Profile System buttons
When Personality is OFF, the vehicle will
function as if the Personality Memory feature
was not on the vehicle. Also, when a change is
made to one of the Personality settings, there will
be no prompts on the Message Center asking
which driver to save the setting to.
Page 126 of 320

Road Calibrated Suspension
Your Continental is equipped with a ride control
system that is designed to read disturbances in the
road surface every six inches at 60 mph (100 km/h)
to provide you with optimal driving response.
Ride control allows you to chose both a ride feel
and steering effort that best flts your personal
driving style. These options may be selected by
using the RIDE/STEER Message Center button.Pressing this button once will allow you to adjust
your RIDE CONTROL settings, between
NORMAL, PLUSH and FIRM. The settings are
changed by pressing the SELECT button while
RIDE CONTROL is displayed.
Pressing the RIDE/STEER button a second time
will allow you to adjust the STEERING
EFFORT settings between NORMAL, LOW,
and HIGH. The settings are changed by pressing
the SELECT button while STEERING EFFORT
is displayed.
123
Page 127 of 320

Steering
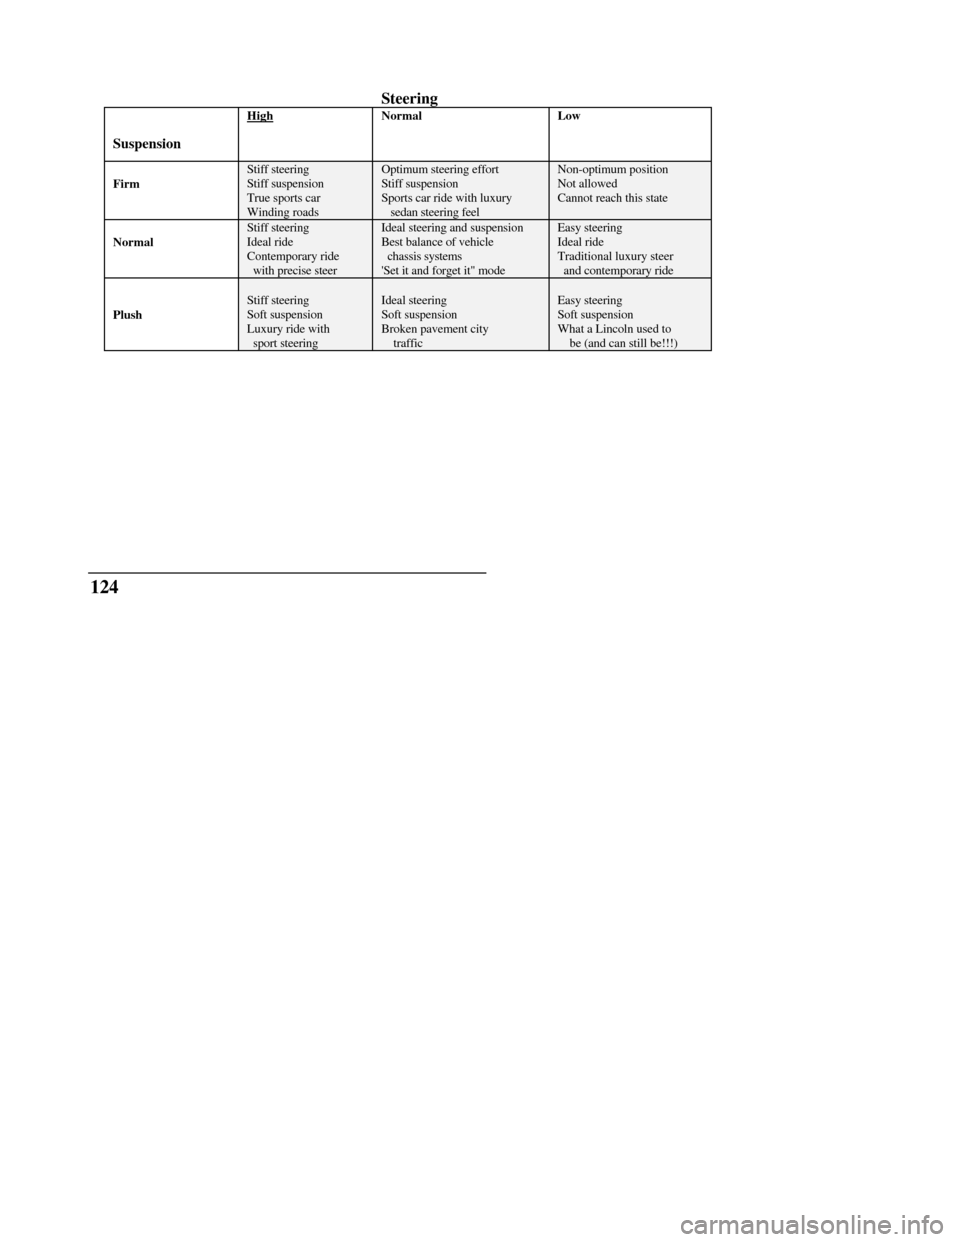
SuspensionHighNormalLowFirmStiff steeringStiff suspensionTrue sports carWinding roadsOptimum steering effortStiff suspensionSports car ride with luxury sedan steering feelNon-optimum positionNot allowedCannot reach this stateNormalStiff steeringIdeal rideContemporary ride with precise steerIdeal steering and suspensionBest balance of vehicle chassis systems'Set it and forget it" modeEasy steeringIdeal rideTraditional luxury steer and contemporary ridePlushStiff steeringSoft suspensionLuxury ride with sport steeringIdeal steeringSoft suspensionBroken pavement city trafficEasy steeringSoft suspensionWhat a Lincoln used to be (and can still be!!!)124
Page 128 of 320

NOTE: The combination of FIRM RIDE
CONTROL and LOW STEERING EFFORT is
undesirable and cannot be selected.
Mirrors
Automatic Dimming Inside Rearview
Mirror (If equipped)
Some vehicles are equipped with an inside rearview
mirror and an outside driver's side mirror which have
an Auto-Dimming function. These electronic
day/night mirrors will change from the normal state
to the non-glare state when bright lights (glare)
reach the mirrors. These mirrors function at night,
and have a limited function at dusk or dawn. From
the non-glare state, the mirrors will return to the
normal state after a short delay. The delay starts
when glare goes away. The delay prevents
excessive changing of the mirrors as traffic moves
behind and around the vehicle, or on rolling hills and
curves.The automatic dimming inside rearview
mirror (optional)
The sensitivity level of the mirrors can be adjusted
by moving the switch on the inside rearview mirror
between the OFF and MAX positions. MAX is the
most sensitive setting and bright headlamps far
away will cause the mirrors to automatically darken,
At the setting nearest OFF, bright headlamps will
have to be closer to darken the mirrors. The outside
125
Page 129 of 320

side mirrors are controlled by the setting on the
inside mirror.
There are two light sensors (photocells) in this
mirror. The sensor that detects rear glare is located
next to the switch. The second light sensor which
determines outside light level is located on the
backside of the mirror case.
One important safety feature is that the mirror
automatically returns to the normal position
whenever the vehicle is placed in R (Reverse) (when
the mirror is in the ON position). This feature
ensures a bright clear view in the mirror when
backing up.
Do not clean the housing or glass of any mirror with
harsh abrasives, fuel or other petroleum-based
cleaning products.
126Side View Mirrors
Your vehicle comes with electric side mirrors.
The side view mirror on the right is a convex
mirror. This mirror gives you a wider view of
the lanes on your right and behind you.
NOTE: When putting your vehicle in reverse,
both outside mirrors will tilt downward and
return to the adjusted position when taken out
of reverse. This feature can be disabled by
using the Menu Select button on the cluster. To
disable, press the menu button repeatedly until
"Reverse Mirrors" appears in the display, then
select OFF. To enable the reverse mirrors,
select ON./!\ WARNINGThe side view mirror on the right makesobjects appear smaller and farther awaythan they actually are.
Page 130 of 320

power mirror switch selector switch
The electric remote control mirror switch
To adjust the side mirrors:
1. Find the control switch in the driver's door
panel.
2. Select the right or left mirror by moving the
selector switch to R or L.
3. Press any of the arrows for the direction
you want to move the mirror.
4. Return the selector switch to the middle
position to keep the mirror in place.
Do not clean the housing or glass of any mirror
with harsh abrasives, fuel or other petroleum-
based cleaning products.
Heated Mirror Feature
Both mirrors are heated whenever the Electric
Rear Window Defroster is turned on. Do not
remove ice from the mirrors with a scraper or
you could damage them. If the outside mirror
glass is frozen in place, do not attempt to
readjust or move the mirror glass or damage
may result.
127