tire pressure LINCOLN CONTINENTAL 2020 User Guide
[x] Cancel search | Manufacturer: LINCOLN, Model Year: 2020, Model line: CONTINENTAL, Model: LINCOLN CONTINENTAL 2020Pages: 609, PDF Size: 6.24 MB
Page 211 of 609
Once through water, always try the brakes.
Wet brakes do not stop the vehicle as
effectively as dry brakes. Drying can be
improved by moving your vehicle slowly
while applying light pressure on the brake
pedal.
Be cautious of sudden changes in vehicle
speed or direction when you are driving in
mud. Even AWD vehicles can lose traction
in slick mud. As when you are driving over
sand, apply the accelerator slowly and avoid
spinning your wheels. If the vehicle does
slide, steer in the direction of the slide until
you regain control of the vehicle.
After driving through mud, clean off residue
stuck to rotating driveshafts and tires. Excess
mud stuck on tires and rotating driveshafts
causes an imbalance that could damage
drive components.
Note:
Driving through deep water may
damage the transmission.
If the front or rear axle is submerged in water,
have the power transfer unit (PTU) or rear
axle serviced by an authorized dealer. Driving on Hilly or Sloping Terrain
Note:
Avoid driving crosswise or turning on
steep slopes or hills. A danger lies in losing
traction, slipping sideways and possibly
rolling over. Whenever driving on a hill,
determine beforehand the route you will use.
Do not drive over the crest of a hill without
seeing what conditions are on the other side.
Do not drive in reverse over a hill without
the aid of an observer.
Although natural obstacles may make it
necessary to travel diagonally up or down a
hill or steep incline, you should always try to
drive straight up or straight down.
When climbing a steep slope or hill, start in
a lower gear rather than downshifting to a
lower gear from a higher gear once the
ascent has started. This reduces strain on
the engine and the possibility of stalling.
If you do stall out, do not try to turnaround
because you might roll over. It is better to
back down to a safe location. Apply just enough power to the wheels to
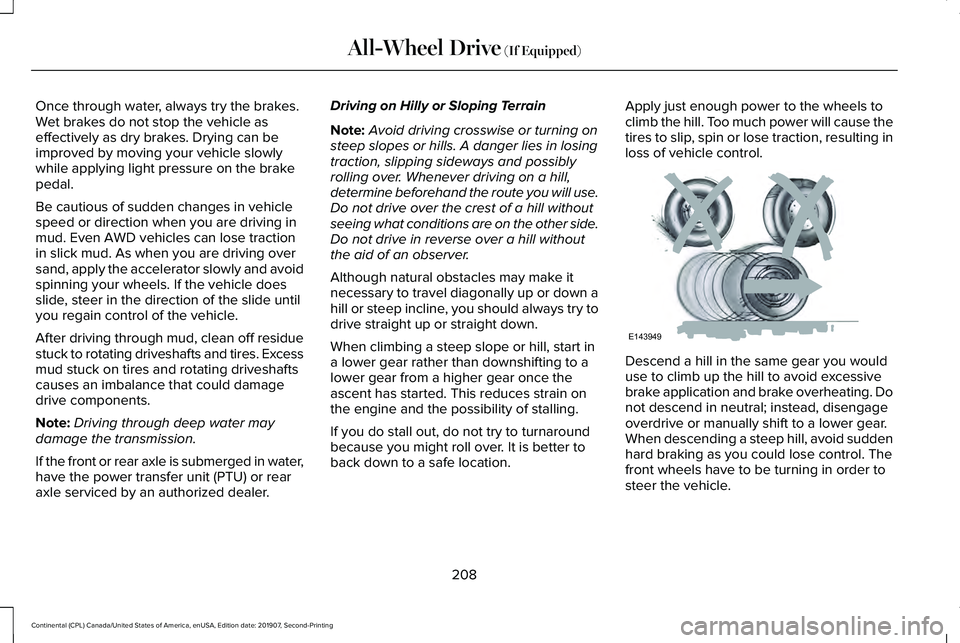
climb the hill. Too much power will cause the
tires to slip, spin or lose traction, resulting in
loss of vehicle control.
Descend a hill in the same gear you would
use to climb up the hill to avoid excessive
brake application and brake overheating. Do
not descend in neutral; instead, disengage
overdrive or manually shift to a lower gear.
When descending a steep hill, avoid sudden
hard braking as you could lose control. The
front wheels have to be turning in order to
steer the vehicle.
208
Continental (CPL) Canada/United States of America, enUSA, Edition date: 201907, Second-Printing All-Wheel Drive (If Equipped)E143949
Page 259 of 609
 when I can s\
ee the lane markings on the road?
Transitioning between no lane markings to lane markings or vice versa.
There is standing water")
Why is the feature not available (line markings are gray) when I can s\
ee the lane markings on the road?
Transitioning between no lane markings to lane markings or vice versa.
There is standing water on the road.
Faint lane markings, for example partial yellow lane markings on concret\
e roads.
Lane width is too narrow or too wide.
The camera has not been calibrated after a windshield replacement.
Driving on tight roads or on uneven roads. Why does the vehicle not come back toward the middle of the lane, as expected, in the Aid or Aid + Alert mode?
High cross winds are present.
There is a large road crown.
Rough roads, grooves or shoulder drop-offs.
Heavy uneven loading of the vehicle or improper tire inflation pressure.
The tires have been changed, or the suspension has been modified.
256
Continental (CPL) Canada/United States of America, enUSA, Edition date: 201907, Second-Printing Driving Aids
Page 267 of 609
STEERING
Electric Power Steering
WARNING: If the system detects an
error, you may not feel a difference in the
steering, however a serious condition may
exist. Have your vehicle checked as soon
as possible. Failure to do so may result in
loss of steering control. WARNING:
The electric power
steering system has diagnostic checks that
continuously monitor the system. If a fault
is detected, a message displays in the
information display. Stop your vehicle as
soon as it is safe to do so. Switch the
ignition off. After at least 10 seconds,
switch the ignition on and watch the
information display for a steering system
warning message. If a steering system
warning message returns, have the system
checked as soon as possible.
Your vehicle has an electric power steering
system. There is no fluid reservoir. No
maintenance is required. If your vehicle loses electrical power while
you are driving, electric power steering
assistance is lost. The steering system still
operates and you can steer your vehicle
manually. Manually steering your vehicle
requires more effort.
Extreme continuous steering may increase
the effort required for you to steer your
vehicle. This increased effort prevents
overheating and permanent damage to the
steering system. You do not lose the ability
to steer your vehicle manually. Typical
steering and driving maneuvers allow the
system to cool and return to normal
operation.
Steering Tips
Steering wander or pull could be caused by
any of the following:
•
Incorrect tire pressures.
• Uneven tire wear.
• Crowned road surface.
• High crosswind.
If the problem persists, have your vehicle
checked as soon as possible. Adaptive Learning
The electronic power steering system
adaptive learning helps correct road
irregularities and improves overall handling
and steering feel. It communicates with the
brake system to help operate advanced
stability control and accident avoidance
systems. Additionally, whenever the battery
is disconnected or a new battery installed,
you must drive your vehicle a short distance
before the system relearns the strategy and
reactivates all systems.
Adaptive Steering
Note:
The adaptive steering system has
diagnostic checks that continuously monitor
the system. If a fault is detected a message
displays in the information display. If a red
warning message displays, stop your vehicle
as soon as it is safe to do so. The message
may clear if the fault is no longer present. If
an adaptive steering system warning
message appears each time you start your
vehicle, have the system checked as soon
as possible.
264
Continental (CPL) Canada/United States of America, enUSA, Edition date: 201907, Second-Printing Driving Aids
Page 346 of 609
Exterior Chrome Parts
•
Apply a high quality-cleaning product to
bumpers and other chrome parts. Follow
the manufacturer’ s instructions. We
recommend Motorcraft Custom Bright
Metal Cleaner.
• Do not apply the cleaning product to hot
surfaces. Do not leave the cleaning
product on chrome surfaces longer than
the time recommended.
• Using non-recommended cleaners can
result in severe and permanent cosmetic
damage.
Note: Never use abrasive materials, for
example steel wool or plastic pads as they
can scratch the chrome surface.
Note: Do not use chrome cleaner, metal
cleaner or polish on wheels or wheel covers.
Exterior Plastic Parts
For routine cleaning we recommend
Motorcraft Detail Wash. If tar or grease spots
are present, we recommend Motorcraft Bug
and Tar Remover. Stripes or Graphics (If Equipped)
Hand washing your vehicle is preferred
however, pressure washing may be used
under the following conditions:
• Do not use water pressure higher than
2,000 psi (14,000 kPa)
.
• Do not use water hotter than 179°F (82°C).
• Use a spray with a 40° wide spray angle
pattern.
• Keep the nozzle at a
12 in (305 mm)
distance and 90° angle to your vehicle's
surface.
Note: Holding the pressure washer nozzle
at an angle to the vehicle's surface may
damage graphics and cause the edges to
peel away from the vehicle's surface.
Underbody
Regularly clean the underside of your vehicle
using water. Keep body and door drain holes
free of debris or foreign material. Under Hood
For removing black rubber marks from under
the hood we recommend Motorcraft Wheel
and Tire Cleaner or Motorcraft Bug and Tar
Remover.
WAXING
Regular waxing is necessary to protect your
car's paint from the elements. We
recommend that you wash and wax the
painted surface once or twice a year.
When washing and waxing, park your vehicle
in a shaded area out of direct sunlight.
Always wash your vehicle before applying
wax.
•
Use a quality wax that does not contain
abrasives.
• Follow the manufacturer’ s instructions to
apply and remove the wax.
• Apply a small amount of wax in a
back-and-forth motion, not in circles.
343
Continental (CPL) Canada/United States of America, enUSA, Edition date: 201907, Second-Printing Vehicle Care
Page 347 of 609
•
Do not allow wax to come in contact with
any non-body (low-gloss black) colored
trim. The wax will discolor or stain the
parts over time.
•Roof racks.
• Bumpers.
• Grained door handles.
• Side moldings.
• Mirror housings.
• Windshield cowl area.
• Do not apply wax to glass areas.
• After waxing, your car's paint should feel
smooth, and be free of streaks and
smudges.
CLEANING THE ENGINE
Engines are more efficient when they are
clean because grease and dirt buildup keep
the engine warmer than normal. When washing:
•
Take care when using a power washer
to clean the engine. The high-pressure
fluid could penetrate the sealed parts
and cause damage.
• Do not spray a hot engine with cold water
to avoid cracking the engine block or
other engine components.
• Spray Motorcraft Engine Shampoo and
Degreaser on all parts that require
cleaning and pressure rinse clean. In
Canada, use Motorcraft Engine Shampoo.
Note: If your vehicle has an engine cover
remove the cover before application of
Motorcraft Engine Shampoo and Degreaser.
Immediately rinse away any over spray.
• Never wash or rinse the engine while it
is hot or running; water in the running
engine may cause internal damage.
• Never wash or rinse any ignition coil,
spark plug wire or spark plug well, or the
area in and around these locations.
• Cover the battery, power distribution box,
and air filter assembly to prevent water
damage when cleaning the engine. CLEANING THE WINDOWS AND
WIPER BLADES
Car wash chemicals and environmental
fallout can result in windshield and wiper
blade contamination. Dirty windshield and
wipers will result in poor windshield wiper
operation. Keep the windshield and wiper
blades clean to maintain windshield wiper
performance.
To clean the windshield and wiper blades:
•
Clean the windshield with a non-abrasive
glass cleaner. When cleaning the interior
of the windshield, avoid getting any glass
cleaner on the instrument panel or door
panels. Wipe any glass cleaner off these
surfaces immediately.
• For windshields contaminated with tree
sap, chemicals, wax or bugs, clean the
entire windshield using steel wool (no
greater than 0000 grade) in a circular
motion and rinse with water.
• Clean the wiper blades with isopropyl
rubbing alcohol or windshield washer
concentrate.
344
Continental (CPL) Canada/United States of America, enUSA, Edition date: 201907, Second-Printing Vehicle Care
Page 353 of 609
Fuel system
•
Fill the fuel tank with high-quality fuel
until the first automatic shutoff of the fuel
pump nozzle.
Cooling system
• Protect against freezing temperatures.
• When removing your vehicle from
storage, check coolant fluid level.
Confirm that there are no cooling system
leaks and that fluid is at the
recommended level.
Disconnecting Your 12 Volt Battery
• Check and recharge as necessary. Keep
connections clean.
• If storing your vehicle for more than 30
days without recharging the battery, we
recommend that you disconnect the
battery cables to maintain battery charge
for quick starting.
Note: It is necessary to reset memory
features if you disconnect the battery cables. Brakes
•
Make sure the brakes and parking brake
release fully.
Tires
• Maintain recommended air pressure.
Miscellaneous
• Make sure all linkages, cables, levers and
pins under your vehicle are covered with
grease to prevent rust.
• Move vehicles at least 25 ft (7.5 m) every
15 days to lubricate working parts and
prevent corrosion.
Removing Vehicle From Storage
When your vehicle is ready to come out of
storage, do the following:
• Wash your vehicle to remove any dirt or
grease film build-up on window surfaces.
• Check windshield wipers for any
deterioration. •
Check under the hood for any foreign
material that may have collected during
storage such as mice or squirrel nests.
• Check the exhaust for any foreign
material that may have collected during
storage.
• Check tire pressures and set tire inflation
per the Tire Label.
• Check brake pedal operation. Drive your
vehicle 15 ft (4.5 m) back and forth to
remove rust build-up.
• Check fluid levels (including coolant, oil
and gas) to make sure there are no leaks,
and fluids are at recommended levels.
• If you remove the battery, clean the
battery cable ends and check for
damage.
Contact an authorized dealer if you have any
concerns or issues.
350
Continental (CPL) Canada/United States of America, enUSA, Edition date: 201907, Second-Printing Vehicle Care
Page 355 of 609

GENERAL INFORMATION
The recommended tire inflation pressures
are on the tire information label on the driver
side B-pillar.
Check and set the tire pressure at the
ambient temperature in which you are
intending to drive your vehicle and when the
tires are cold. See Technical Specifications
(page 379).
Note: Check your tire pressures regularly to
optimize fuel economy.
Only use approved wheel and tire sizes.
Using other sizes could damage your vehicle
and could make the National Type Approval
invalid.
Installation of any tires that are not the
original equipment tire size can cause the
speedometer to display incorrect vehicle
speed. TIRE CARE
Important Information About Low-
Profile Tires
If your vehicle is equipped with
245/40R20 tires, they are low-profile
tires. These tires and wheels are
designed to give your vehicle a sport
appearance. With low-profile tires, you
may notice an increase in road noise
and faster tire wear, depending on road
conditions and driving styles. Due to
their design, low-profile tires and wheels
are more prone to road damage from
potholes, rough or unpaved roads, car
wash rails and curb contact than
standard tires and wheels.
Note:
Your vehicle's warranty does not
cover these types of damages. Extra
caution should be taken when operating
on rough roads to avoid impacts that
could cause wheel and tire damage. Information About Uniform Tire Quality
Grading
Tire Quality Grades apply to new
pneumatic passenger car tires. The
Quality grades can be found where
applicable on the tire sidewall between
tread shoulder and maximum section
width. For example:
Treadwear 200
Traction AA Temperature A.
These Tire Quality Grades are
determined by standards that the United
States Department of Transportation has
set.
352
Continental (CPL) Canada/United States of America, enUSA, Edition date: 201907, Second-Printing Wheels and TiresE142542
Page 357 of 609

passenger car tires must meet under the
Federal Motor Vehicle Safety Standard
No. 139. Grades B and A represent
higher levels of performance on the
laboratory test wheel than the minimum
required by law.
Glossary of Tire Terminology
•
Tire label: A label showing the
original equipment tire sizes,
recommended inflation pressure and
the maximum weight the vehicle can
carry.
• Tire Identification Number:
A
number on the sidewall of each tire
providing information about the tire
brand and manufacturing plant, tire
size and date of manufacture. Also
referred to as DOT code.
• Inflation pressure: A measure of the
amount of air in a tire. •
Standard load:
A class of P-metric or
Metric tires designed to carry a
maximum load at set pressure. For
example: For P-metric tires
35 psi
(2.4 bar) and for Metric tires 36 psi
(2.5 bar). Increasing the inflation
pressure beyond this pressure will
not increase the tire ’s load carrying
capability.
• Extra load:
A class of P-metric or
Metric tires designed to carry a
heavier maximum load at
42 psi
(2.9 bar). Increasing the inflation
pressure beyond this pressure will
not increase the tire ’s load carrying
capability.
• kPa:
Kilopascal, a metric unit of air
pressure.
• PSI:
Pounds per square inch, a
standard unit of air pressure.
• Cold tire pressure:
The tire pressure
when the vehicle has been stationary
and out of direct sunlight for an hour
or more and prior to the vehicle
being driven for 1 mile (1.6 km). •
Recommended inflation pressure:
The cold inflation pressure found on
the Safety Compliance Certification
Label (affixed to either the door
hinge pillar, door-latch post, or the
door edge that meets the door-latch
post, next to the driver's seating
position), or Tire Label located on the
B-Pillar or the edge of the driver’ s
door.
• B-pillar:
The structural member at
the side of the vehicle behind the
front door
• Bead area of the tire: Area of the tire
next to the rim.
• Sidewall of the tire:
Area between
the bead area and the tread.
• Tread area of the tire:
Area of the
perimeter of the tire that contacts the
road when mounted on the vehicle.
• Rim:
The metal support (wheel) for a
tire or a tire and tube assembly upon
which the tire beads are seated.
354
Continental (CPL) Canada/United States of America, enUSA, Edition date: 201907, Second-Printing Wheels and Tires
Page 359 of 609

F. 95: Indicates the tire's load index. It
is an index that relates to how much
weight a tire can carry. You may find this
information in your owner’ s manual. If
not, contact a local tire dealer.
Note: You may not find this information
on all tires because it is not required by
federal law.
G.
H: Indicates the tire's speed rating.
The speed rating denotes the speed at
which a tire is designed to be driven for
extended periods of time under a
standard condition of load and inflation
pressure. The tires on your vehicle may
operate at different conditions for load
and inflation pressure. These speed
ratings may need to be adjusted for the
difference in conditions. The ratings
range from 81 mph (130 km/h) to 186
mph (299 km/h). These ratings are listed
in the following chart.
Note: You may not find this information
on all tires because it is not required by
federal law. mph ( km/h)
Letter rating
81 mph (130 km/h)
M
87 mph (140 km/h)
N
99 mph (159 km/h)
Q
106 mph (171 km/h)
R
112 mph (180 km/h)
S
118 mph (190 km/h)
T
124 mph (200 km/h)
U
130 mph (210 km/h)
H
149 mph (240 km/h)
V mph ( km/h)
Letter rating
168 mph (270 km/h)
W
186 mph (299 km/h)
Y
Note: For tires with a maximum speed
capability over 149 mph (240 km/h), tire
manufacturers sometimes use the letters
ZR. For those with a maximum speed
capability over 186 mph (299 km/h), tire
manufacturers always use the letters
ZR.
H. U.S. DOT Tire Identification Number:
This begins with the letters DOT and
indicates that the tire meets all federal
standards. The next two numbers or
letters are the plant code designating
where it was manufactured, the next two
are the tire size code and the last four
numbers represent the week and year
the tire was built. For example, the
numbers 317 mean the 31st week of
1997. After 2000 the numbers go to four
356
Continental (CPL) Canada/United States of America, enUSA, Edition date: 201907, Second-Printing Wheels and Tires
Page 360 of 609
digits. For example, 2501 means the
25th week of 2001. The numbers in
between are identification codes used
for traceability. This information is used
to contact customers if a tire defect
requires a recall.
I. M+S or M/S: Mud and Snow, or
AT:
All Terrain, or
AS:
All Season.
J.
Tire Ply Composition and Material
Used: Indicates the number of plies or
the number of layers of rubber-coated
fabric in the tire tread and sidewall. Tire
manufacturers also must indicate the ply
materials in the tire and the sidewall,
which include steel, nylon, polyester,
and others. K.
Maximum Load: Indicates the
maximum load in kilograms and pounds
that can be carried by the tire. See the
Safety Compliance Certification Label
(affixed to either the door hinge pillar,
door-latch post, or the door edge that
meets the door-latch post, next to the
driver's seating position), for the correct
tire pressure for your vehicle.
L.
Treadwear, Traction and
Temperature Grades: •
Treadwear
The treadwear grade is
a comparative rating based on the
wear rate of the tire when tested
under controlled conditions on a
specified government test course.
For example, a tire graded 150 would
wear one and one-half times as well
on the government course as a tire
graded 100.
• Traction:
The traction grades, from
highest to lowest are AA, A, B, and
C. The grades represent the tire's
ability to stop on wet pavement as
measured under controlled
conditions on specified government
test surfaces of asphalt and concrete.
A tire marked C may have poor
traction performance.
• Temperature:
The temperature
grades are A (the highest), B and C,
representing the tire's resistance to
the generation of heat and its ability
to dissipate heat when tested under
controlled conditions on a specified
indoor laboratory test wheel.
357
Continental (CPL) Canada/United States of America, enUSA, Edition date: 201907, Second-Printing Wheels and Tires