change time LINCOLN CORSAIR 2020 User Guide
[x] Cancel search | Manufacturer: LINCOLN, Model Year: 2020, Model line: CORSAIR, Model: LINCOLN CORSAIR 2020Pages: 591, PDF Size: 6 MB
Page 159 of 591
Note:
Do not remove ice from the mirrors
with a scraper or adjust the mirror glass
when it is frozen in place.
Note: Do not clean the mirror housing or
glass with harsh abrasives, fuel or other
petroleum-based cleaning products. The
vehicle warranty may not cover damage
caused to the mirror housing or glass.
CABIN AIR FILTER
The cabin air filter is under the instrument
panel in the passenger footwell area or
under the center console on the passenger
side.
The system filters airborne particles such as
dust, spores and pollen in the air supplied to
and recirculated in the interior of your
vehicle.
Make sure you have a cabin air filter installed
at all times. Running the system without a
filter in place could degrade or damage the
system. Your vehicle cabin air filter gives you and
your passengers the following benefits:
•
It improves your driving comfort by
reducing particle concentration.
• It improves the interior compartment
cleanliness.
• It protects the climate control
components from particle deposits.
Change the air filter element at the proper
intervals. See Scheduled Maintenance
(page 502).
For additional cabin air filter information, or
to replace the filter, see an authorized dealer.
REMOTE START
(IF EQUIPPED)
The system adjusts the interior temperature
depending on your chosen settings during
remote start.
You cannot adjust the climate control setting
during remote start operation. When you
switch the ignition on, the climate control
system returns to the previous settings. You
can now make adjustments. Some features may remain on if they turn on
during remote start:
•
Driver heated seat.
• Driver ventilated seat.
• Heated steering wheel.
• Heated mirrors.
• Heated rear window.
• Windshield wiper de-icer.
Note: If the passenger heated or ventilated
seats are on when you switch the vehicle
off, they default to the driver setting when
you switch the vehicle on.
You can adjust the default remote start
settings using the information display
controls. See Information Displays (page
123).
Automatic Settings
In hot weather, the system sets to
72°F
(22°C). The ventilated seats set to high (if
available, and if you select AUTO in the
information display).
156
Corsair (CTF) Canada/United States of America, enUSA, Edition date: 201906, Second-Printing Climate Control
Page 179 of 591
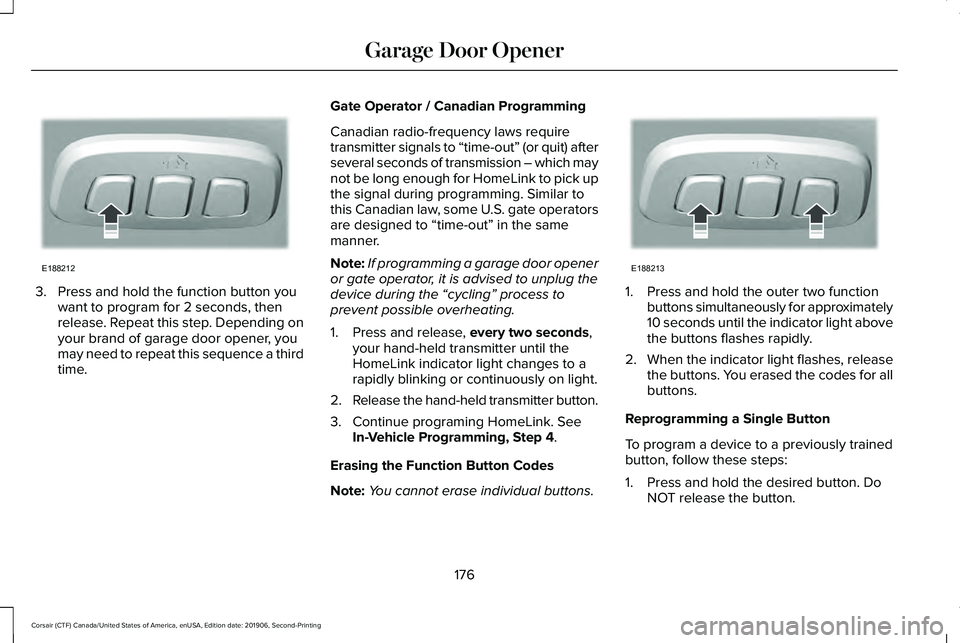
3. Press and hold the function button you
want to program for 2 seconds, then
release. Repeat this step. Depending on
your brand of garage door opener, you
may need to repeat this sequence a third
time. Gate Operator / Canadian Programming
Canadian radio-frequency laws require
transmitter signals to “time-out” (or quit) after
several seconds of transmission – which may
not be long enough for HomeLink to pick up
the signal during programming. Similar to
this Canadian law, some U.S. gate operators
are designed to “time-out” in the same
manner.
Note:
If programming a garage door opener
or gate operator, it is advised to unplug the
device during the “cycling” process to
prevent possible overheating.
1. Press and release, every two seconds,
your hand-held transmitter until the
HomeLink indicator light changes to a
rapidly blinking or continuously on light.
2. Release the hand-held transmitter button.
3. Continue programing HomeLink. See In-Vehicle Programming, Step 4
.
Erasing the Function Button Codes
Note: You cannot erase individual buttons. 1. Press and hold the outer two function
buttons simultaneously for approximately
10 seconds until the indicator light above
the buttons flashes rapidly.
2. When the indicator light flashes, release
the buttons. You erased the codes for all
buttons.
Reprogramming a Single Button
To program a device to a previously trained
button, follow these steps:
1. Press and hold the desired button. Do NOT release the button.
176
Corsair (CTF) Canada/United States of America, enUSA, Edition date: 201906, Second-Printing Garage Door OpenerE188212 E188213
Page 193 of 591
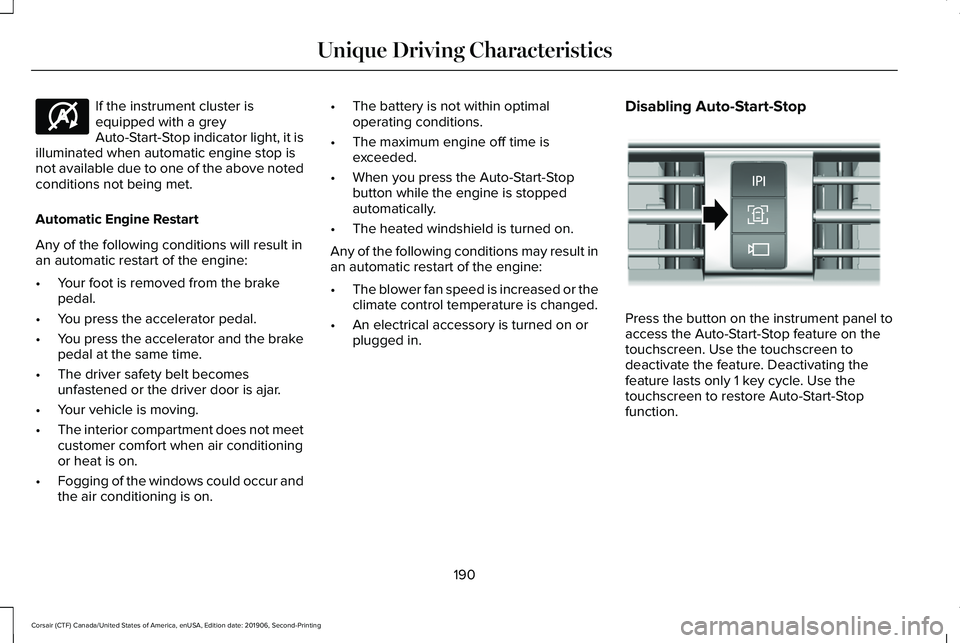
If the instrument cluster is
equipped with a grey
Auto-Start-Stop indicator light, it is
illuminated when automatic engine stop is
not available due to one of the above noted
conditions not being met.
Automatic Engine Restart
Any of the following conditions will result in
an automatic restart of the engine:
• Your foot is removed from the brake
pedal.
• You press the accelerator pedal.
• You press the accelerator and the brake
pedal at the same time.
• The driver safety belt becomes
unfastened or the driver door is ajar.
• Your vehicle is moving.
• The interior compartment does not meet
customer comfort when air conditioning
or heat is on.
• Fogging of the windows could occur and
the air conditioning is on. •
The battery is not within optimal
operating conditions.
• The maximum engine off time is
exceeded.
• When you press the Auto-Start-Stop
button while the engine is stopped
automatically.
• The heated windshield is turned on.
Any of the following conditions may result in
an automatic restart of the engine:
• The blower fan speed is increased or the
climate control temperature is changed.
• An electrical accessory is turned on or
plugged in. Disabling Auto-Start-Stop Press the button on the instrument panel to
access the Auto-Start-Stop feature on the
touchscreen. Use the touchscreen to
deactivate the feature. Deactivating the
feature lasts only 1 key cycle. Use the
touchscreen to restore Auto-Start-Stop
function.
190
Corsair (CTF) Canada/United States of America, enUSA, Edition date: 201906, Second-Printing Unique Driving CharacteristicsE146361 E307324
Page 204 of 591
The scheduled maintenance items listed in
scheduled maintenance information are
essential to the life and performance of your
vehicle and to its emissions system.
If you use anything other than Ford,
Motorcraft or Ford-authorized parts for
maintenance replacements or for service of
components affecting emission control, such
non-Ford parts should be equivalent to
genuine Ford Motor Company parts in
performance and durability.
Illumination of the service engine soon
indicator, charging system warning light or
the temperature warning light, fluid leaks,
strange odors, smoke or loss of engine
power could indicate that the emission
control system is not working properly.
An improperly operating or damaged exhaust
system may allow exhaust to enter the
vehicle. Have a damaged or improperly
operating exhaust system inspected and
repaired immediately.
Do not make any unauthorized changes to
your vehicle or engine. By law, vehicle
owners and anyone who manufactures,
repairs, services, sells, leases, trades
vehicles, or supervises a fleet of vehicles are
not permitted to intentionally remove an
emission control device or prevent it from
working. Information about your vehicle
’s
emission system is on the Vehicle Emission
Control Information Decal located on or near
the engine. This decal also lists engine
displacement.
Please consult your warranty information for
complete details.
On-Board Diagnostics (OBD-II)
Your vehicle has a computer known as the
on-board diagnostics system (OBD-II) that
monitors the engine ’s emission control
system. The system protects the environment
by making sure that your vehicle continues
to meet government emission standards. The
OBD-II system also assists a service
technician in properly servicing your vehicle. When the service engine soon
indicator illuminates, the OBD-II
system has detected a malfunction.
Temporary malfunctions may cause the
service engine soon indicator to illuminate.
Examples are:
1. Your vehicle has run out of fuel—the engine may misfire or run poorly.
2. Poor fuel quality or water in the fuel—the
engine may misfire or run poorly.
3. The fuel fill inlet may not have closed properly. See Refueling (page 194).
4. Driving through deep water—the electrical system may be wet.
You can correct these temporary
malfunctions by filling the fuel tank with good
quality fuel, properly closing the fuel fill inlet
or letting the electrical system dry out. After
three driving cycles without these or any
other temporary malfunctions present, the
service engine soon indicator should stay off
the next time you start the engine. A driving
cycle consists of a cold engine startup
followed by mixed city and highway driving.
No additional vehicle service is required.
201
Corsair (CTF) Canada/United States of America, enUSA, Edition date: 201906, Second-Printing Engine Emission Control
Page 208 of 591
A message appears in your information
display screen when your vehicle has
entered Stay in Neutral mode.
To exit Stay in Neutral mode, apply the brake
and select a different gear.
Drive (D)
Drive (D) is the normal driving position for
the best fuel economy. The overdrive
function allows automatic upshifts and
downshifts through gears one through ten.
SelectShift™ Automatic Transmission
Your vehicle is equipped with a SelectShift
Automatic transmission. The SelectShift
Automatic transmission gives you the ability
to change gears up or down, without a
clutch, as desired.
In order to prevent the engine from running
at too low of an RPM, which may cause it to
stall, SelectShift still automatically makes
some downshifts if it has determined that
you have not downshifted in time. Although
SelectShift makes some downshifts for you,
it still allows you to downshift at any time as
long as the SelectShift determines that
damage to the engine does not occur from
over-revving.
Note:
Engine damage may occur if you
maintain excessive engine revving without
shifting.
SelectShift does not automatically upshift,
even if the engine is approaching the RPM
limit. It must be shifted manually by pressing
the (+) paddle.
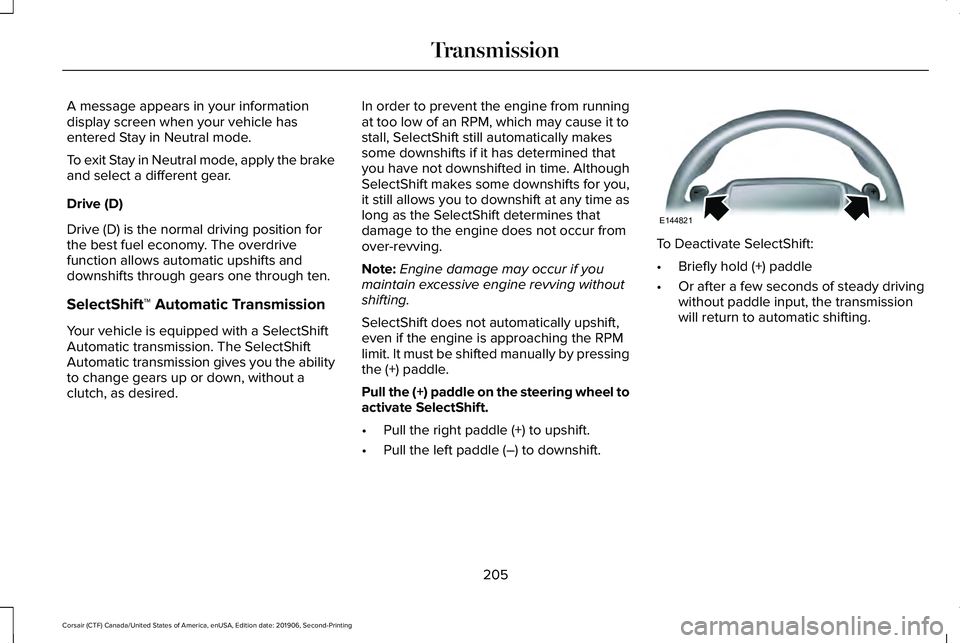
Pull the (+) paddle on the steering wheel to
activate SelectShift.
• Pull the right paddle (+) to upshift.
• Pull the left paddle (–) to downshift. To Deactivate SelectShift:
•
Briefly hold (+) paddle
• Or after a few seconds of steady driving
without paddle input, the transmission
will return to automatic shifting.
205
Corsair (CTF) Canada/United States of America, enUSA, Edition date: 201906, Second-Printing TransmissionE144821
Page 224 of 591
Note:
Certain add-on devices around the
bumper or fascia may create false alerts. For
example, large trailer hitches, bike or
surfboard racks, license plate brackets,
bumper covers or any other device that may
block the normal detection zone of the
system. Remove the add-on device to
prevent false alerts.
Note: The system does not react to small or
moving objects, particularly those close to
the ground.
Note: The system does not operate during
hard acceleration or steering.
The system only applies the brakes for a
short period of time when an event occurs.
The driver should take action as soon as they
notice the brakes automatically apply in
order to remain in control of the vehicle.
Note: If your vehicle sustains damage to the
bumper or fascia leaving it misaligned or
bent, the sensing zone may be altered
causing inaccurate measurement of
obstacles or false alerts. Note:
Vehicle loading and suspension
changes can impact the angle of the sensors
and may change the normal detection zone
of the system resulting in inaccurate
measurement of obstacles or false alerts.
Note: When you connect a trailer, the system
may detect the trailer and provide an alert
or the system automatically turns off. If the
system does not automatically turn off,
switch the system off manually after you
connect the trailer.
Note: You may experience reduced system
performance on road surfaces that limit
deceleration. For example, roads with ice,
loose gravel, mud or sand.
SWITCHING REVERSE BRAKING
ASSIST ON AND OFF
You can switch the system on or off through
the touchscreen. See Settings (page 478). Note:
The system is unavailable when rear
parking aid or cross traffic alert is off.
OVERRIDING REVERSE BRAKING
ASSIST
There could be instances when unexpected
or unwanted braking occurs. Firmly pressing
the accelerator pedal or switching the feature
off, overrides the system.
REVERSE BRAKING ASSIST
INDICATORS
If the system determines that a collision with
an obstacle may occur, full braking may
automatically apply. Bring your vehicle to a
stop a safe distance away from the obstacle. A message and warning indicator
appear when the system
automatically applies the brakes.
221
Corsair (CTF) Canada/United States of America, enUSA, Edition date: 201906, Second-Printing Reverse Braking Assist
(If Equipped)E293490
Page 228 of 591
PRINCIPLE OF OPERATION
WARNING: Vehicle modifications
involving braking system, aftermarket roof
racks, suspension, steering system, tire
construction and wheel and tire size may
change the handling characteristics of your
vehicle and may adversely affect the
performance of the electronic stability
control system. In addition, installing any
stereo loudspeakers may interfere with
and adversely affect the electronic stability
control system. Install any aftermarket
stereo loudspeaker as far as possible from
the front center console, the tunnel, and
the front seats in order to minimize the risk
of interfering with the electronic stability
control sensors. Reducing the
effectiveness of the electronic stability
control system could lead to an increased
risk of loss of vehicle control, vehicle
rollover, personal injury and death. WARNING:
Remember that even
advanced technology cannot defy the laws
of physics. It’ s always possible to lose
control of a vehicle due to inappropriate
driver input for the conditions. Aggressive
driving on any road condition can cause
you to lose control of your vehicle
increasing the risk of personal injury or
property damage. Activation of the
electronic stability control system is an
indication that at least some of the tires
have exceeded their ability to grip the
road; this could reduce the operator’ s
ability to control the vehicle potentially
resulting in a loss of vehicle control, vehicle
rollover, personal injury and death. If your
electronic stability control system activates,
SLOW DOWN.
The system automatically turns on each time
you switch the ignition on.
If a fault occurs in either the stability control
or the traction control system, you may
experience the following conditions: •
The stability and traction control light
illuminates steadily.
• The stability control and traction control
systems do not enhance your vehicle's
ability to maintain traction of the wheels.
If a driving condition activates either the
stability control or the traction control system
you may experience the following conditions:
• The stability and traction control light
flashes.
• Your vehicle slows down.
• Reduced engine power.
• A vibration in the brake pedal.
• The brake pedal is stiffer than usual.
• If the driving condition is severe and your
foot is not on the brake, the brake pedal
may move as the system applies higher
brake force.
The stability control system has several
features built into it to help you maintain
control of your vehicle:
225
Corsair (CTF) Canada/United States of America, enUSA, Edition date: 201906, Second-Printing Stability Control
Page 229 of 591
Electronic Stability Control
The system enhances your vehicle
’s ability
to prevent skids or lateral slides by applying
brakes to one or more of the wheels
individually and, if necessary, reducing
engine power.
Roll Stability Control
The system enhances your vehicle ’s ability
to prevent rollovers by detecting your
vehicle ’s roll motion and the rate at which it
changes by applying the brakes to one or
more wheels individually.
Traction Control
The system enhances your vehicle ’s ability
to maintain traction of the wheels by
detecting and controlling wheel spin. See
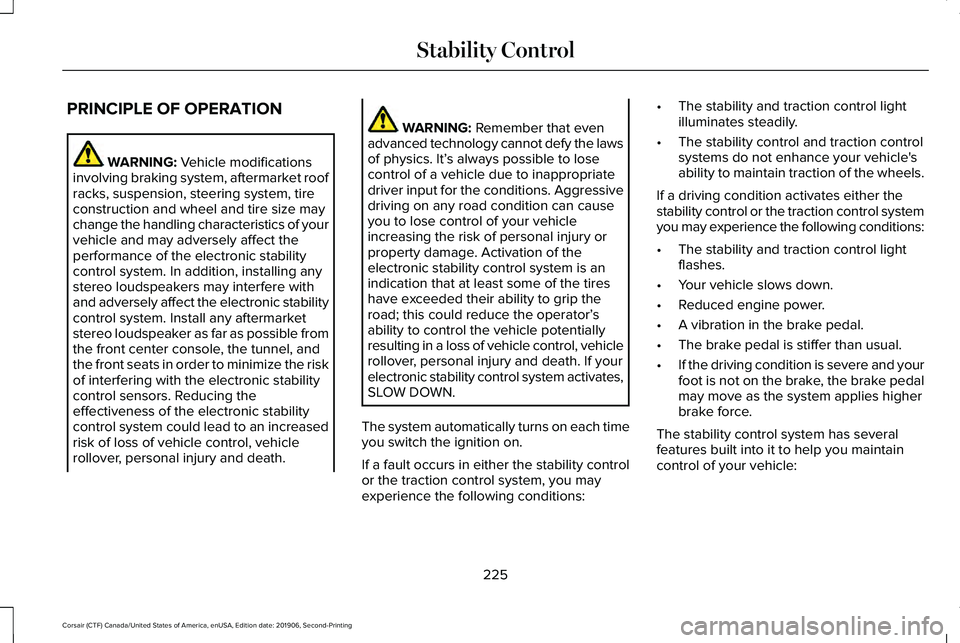
Using Traction Control (page 224). Vehicle without stability control
skidding off its intended route.
A
Vehicle with stability control
maintaining control on a slippery
surface.
B USING STABILITY CONTROL
The system automatically turns on each time
you switch the ignition on.
You cannot switch the stability control and
roll stability control systems off, but when
you shift into reverse (R), the systems
deactivate.
You can switch the traction control system
off or on.
See Using Traction Control (page
224).
226
Corsair (CTF) Canada/United States of America, enUSA, Edition date: 201906, Second-Printing Stability ControlE72903A
AA
B
BB
B
Page 239 of 591
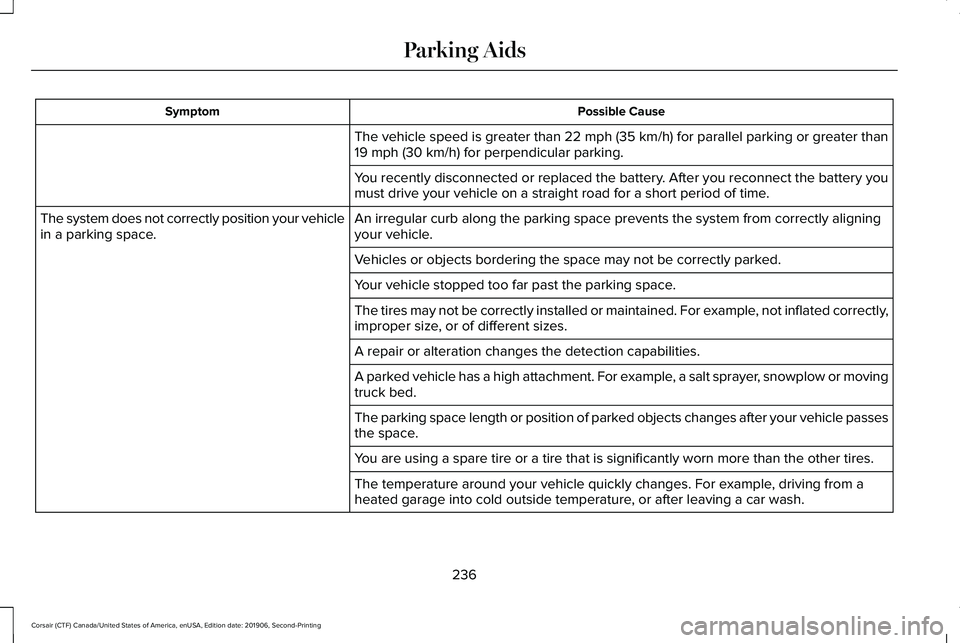
Possible Cause
Symptom
The vehicle speed is greater than 22 mph (35 km/h) for parallel parkin\
g or greater than
19 mph (30 km/h) for perpendicular parking.
You recently disconnected or replaced the battery. After you reconnect the battery you
must drive your vehicle on a straight road for a short period of time.
An irregular curb along the parking space prevents the system from corre\
ctly aligning
your vehicle.
The system does not correctly position your vehicle
in a parking space.
Vehicles or objects bordering the space may not be correctly parked.
Your vehicle stopped too far past the parking space.
The tires may not be correctly installed or maintained. For example, not inflated correctly,
improper size, or of different sizes.
A repair or alteration changes the detection capabilities.
A parked vehicle has a high attachment. For example, a salt sprayer, snowplow or moving
truck bed.
The parking space length or position of parked objects changes after your vehicle passes
the space.
You are using a spare tire or a tire that is significantly worn more than\
the other tires.
The temperature around your vehicle quickly changes. For example, driving from a
heated garage into cold outside temperature, or after leaving a car wash.
236
Corsair (CTF) Canada/United States of America, enUSA, Edition date: 201906, Second-Printing Parking Aids
Page 257 of 591
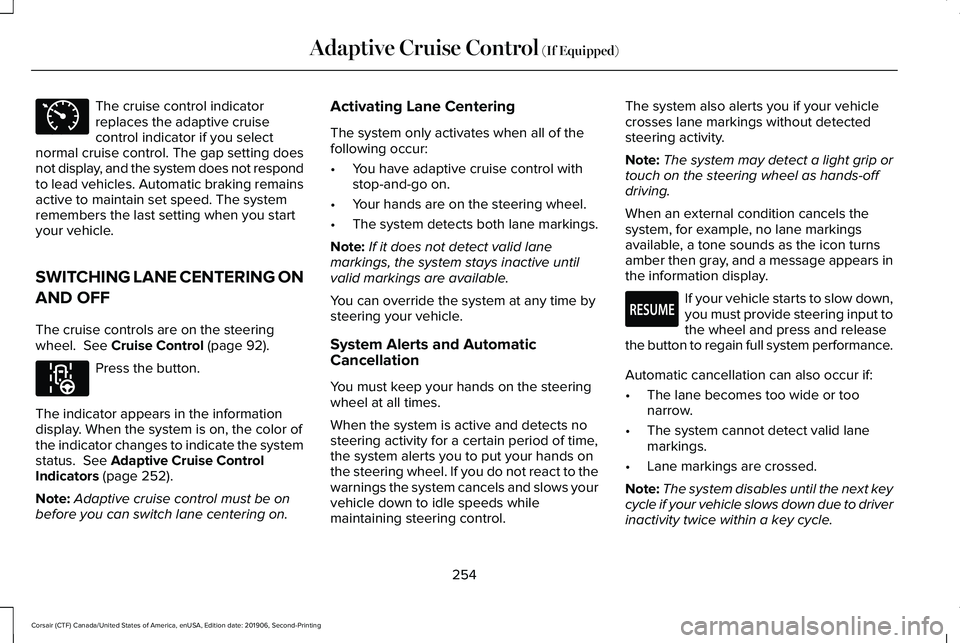
The cruise control indicator
replaces the adaptive cruise
control indicator if you select
normal cruise control. The gap setting does
not display, and the system does not respond
to lead vehicles. Automatic braking remains
active to maintain set speed. The system
remembers the last setting when you start
your vehicle.
SWITCHING LANE CENTERING ON
AND OFF
The cruise controls are on the steering
wheel. See Cruise Control (page 92). Press the button.
The indicator appears in the information
display. When the system is on, the color of
the indicator changes to indicate the system
status.
See Adaptive Cruise Control
Indicators (page 252).
Note: Adaptive cruise control must be on
before you can switch lane centering on. Activating Lane Centering
The system only activates when all of the
following occur:
•
You have adaptive cruise control with
stop-and-go on.
• Your hands are on the steering wheel.
• The system detects both lane markings.
Note: If it does not detect valid lane
markings, the system stays inactive until
valid markings are available.
You can override the system at any time by
steering your vehicle.
System Alerts and Automatic
Cancellation
You must keep your hands on the steering
wheel at all times.
When the system is active and detects no
steering activity for a certain period of time,
the system alerts you to put your hands on
the steering wheel. If you do not react to the
warnings the system cancels and slows your
vehicle down to idle speeds while
maintaining steering control. The system also alerts you if your vehicle
crosses lane markings without detected
steering activity.
Note:
The system may detect a light grip or
touch on the steering wheel as hands-off
driving.
When an external condition cancels the
system, for example, no lane markings
available, a tone sounds as the icon turns
amber then gray, and a message appears in
the information display. If your vehicle starts to slow down,
you must provide steering input to
the wheel and press and release
the button to regain full system performance.
Automatic cancellation can also occur if:
• The lane becomes too wide or too
narrow.
• The system cannot detect valid lane
markings.
• Lane markings are crossed.
Note: The system disables until the next key
cycle if your vehicle slows down due to driver
inactivity twice within a key cycle.
254
Corsair (CTF) Canada/United States of America, enUSA, Edition date: 201906, Second-Printing Adaptive Cruise Control
(If Equipped)E71340 E297977 E281472