Rear end LINCOLN CORSAIR 2021 Owners Manual
[x] Cancel search | Manufacturer: LINCOLN, Model Year: 2021, Model line: CORSAIR, Model: LINCOLN CORSAIR 2021Pages: 638, PDF Size: 5.7 MB
Page 6 of 638
Daytime Running Lamps - Vehicles With:
Daytime Running Lamps (DRL) .............104
Front Fog Lamps ..........................................
104
Adaptive Headlamps ..................................
105
Direction Indicators ......................................
107
Welcome Lighting ........................................
107
Interior Lamps ...............................................
108
Ambient Lighting ..........................................
108
Automatic High Beam Control
What Is Automatic High Beam Control ........................................................................\
110
Switching Automatic High Beam Control On and Off ..................................................
110
Automatic High Beam Control Indicators ........................................................................\
.
111
Overriding Automatic High Beam Control ........................................................................\
.
111
Windows and Mirrors
Power Windows .............................................
112
Global Opening and Closing ......................
113
Exterior Mirrors ..............................................
113
Interior Mirror .................................................
115Sun Visors
.......................................................
115
Moonroof .........................................................
116
Instrument Cluster
Gauges - Plug-In Hybrid Electric Vehicle (PHEV), Vehicles With: 12.3 Inch
Instrument Cluster Display Screen .......
118
Gauges - Vehicles With: 6.5 Inch Instrument Cluster Display Screen ......
122
Gauges - Vehicles With: 12.3 Inch Instrument Cluster Display Screen ......
124
Warning Lamps and Indicators .................
126
Audible Warnings and Indicators .............
130
Information Displays
General Information ......................................
131
Personalized Settings .................................
135
Information Messages .................................
137
Head Up Display ..........................................
157
Remote Start
What Is Remote Start ....................................
161
Remote Start Limitations .............................
161
Enabling Remote Start .................................
161Remotely Starting the Engine
....................
161
Extending the Remote Start Duration ........................................................................\
161
Remotely Stopping the Engine .................
162
Remote Start Remote Control Indicators .......................................................................
162
Remote Start Settings .................................
162
Climate Control
Automatic Climate Control ........................
164
Hints on Controlling the Interior Climate .......................................................................
166
Heated Windshield ......................................
167
Heated Rear Window ..................................
167
Heated Exterior Mirrors ..............................
168
Interior Air Quality
What Is the Cabin Air Filter ........................
169
Locating the Cabin Air Filter .....................
169
Replacing the Cabin Air Filter ...................
169
Seats
Sitting in the Correct Position ...................
170
Head Restraints .............................................
171
3
Corsair (CTF) Canada/United States of America, enUSA, Edition date: 202007, First-Printing Table of Contents
Page 10 of 638
Drive Mode Control
What Is Drive Mode Control
......................312
Selecting a Drive Mode ..............................
312
Drive Modes ..................................................
312
Speed Sign Recognition
What Is Speed Sign Recognition ..............
315
How Does Speed Sign Recognition Work .......................................................................
315
Speed Sign Recognition Precautions ......
315
Speed Sign Recognition Limitations .......
315
Speed Sign Recognition Indicators .........
316
Setting the Speed Sign Recognition Speed Warning ......................................................
316
Setting the Speed Sign Recognition Speed Tolerance ...................................................
316
Speed Sign Recognition – Troubleshooting .......................................................................
316
Load Carrying
Rear Under Floor Storage ..........................
318
Luggage Covers ...........................................
318
Roof Racks and Load Carriers ..................
318
Load Limit ......................................................
320Towing
Towing a Trailer
............................................
325
Trailer Sway Control ...................................
326
Recommended Towing Weights .............
326
Essential Towing Checks ..........................
328
Towing the Vehicle on Four Wheels - Gasoline, 8-Speed Automatic
Transmission – 8F35/8F40 ..................
330
Towing the Vehicle on Four Wheels - Plug-In Hybrid Electric Vehicle (PHEV),
Automatic Transmission – HF45 ..........
331
Driving Hints
Economical Driving .....................................
333
Breaking-In ....................................................
333
Driving Through Water ...............................
333
Floor Mats ......................................................
334
Roadside Emergencies
Roadside Assistance ..................................
336
Hazard Flashers ...........................................
337
Fuel Shutoff ...................................................
337
Jump Starting the Vehicle .........................
338
Post-Crash Alert System .............................
341Transporting the Vehicle
............................
341
Customer Assistance
Getting the Services You Need ...............
343
In California (U.S. Only) ..............................
344
The Better Business Bureau (BBB) Auto Line Program (U.S. Only) .......................
345
Utilizing the Mediation/Arbitration Program (Canada Only) ..........................................
346
Getting Assistance Outside the U.S. and Canada .......................................................
347
Ordering Additional Owner's Literature ......................................................................
349
Reporting Safety Defects (U.S. Only) ......
350
Reporting Safety Defects (Canada Only) ......................................................................
350
Fuses
Fuse Specification Chart ...........................
352
Changing a Fuse .........................................
363
Maintenance
General Information ...................................
365
Opening and Closing the Hood ..............
365
7
Corsair (CTF) Canada/United States of America, enUSA, Edition date: 202007, First-Printing Table of Contents
Page 23 of 638
WARNING: NEVER use a rearward
facing child restraint on a seat protected
by an ACTIVE AIRBAG in front of it, DEATH
or SERIOUS INJURY to the CHILD can
occur.
On Board Diagnostics Data Link
Connector WARNING: Do not connect wireless
plug-in devices to the data link connector.
Unauthorized third parties could gain
access to vehicle data and impair the
performance of safety related systems.
Only allow repair facilities that follow our
service and repair instructions to connect
their equipment to the data link connector.
Your vehicle has an OBD Data Link
Connector (DLC) that is used in conjunction
with a diagnostic scan tool for vehicle
diagnostics, repairs and reprogramming
services. Installing an aftermarket device that
uses the DLC during normal driving for
purposes such as remote insurance company monitoring, transmission of vehicle data to
other devices or entities, or altering the
performance of the vehicle, may cause
interference with or even damage to vehicle
systems. We do not recommend or endorse
the use of unapproved aftermarket plug-in
devices. The vehicle Warranty will not cover
damage caused by an aftermarket plug-in
device.
Notice to Owners of Pickup Trucks and
Utility Type Vehicles
WARNING:
Utility vehicles have a
significantly higher rollover rate than other
types of vehicles.
Before you drive your vehicle, please read
this Owner’ s Guide carefully. Your vehicle is
not a passenger car. As with other vehicles
of this type, failure to operate this vehicle
correctly may result in loss of vehicle control,
vehicle rollover, personal injury or death.
Using Your Vehicle With a Snowplow
Do not use this vehicle for snowplowing. Your vehicle does not have a snowplowing
package.
Using Your Vehicle as an Ambulance
Do not use this vehicle as an ambulance.
Your vehicle does not have the Ambulance
Preparation Package.
MOBILE COMMUNICATIONS
EQUIPMENT
WARNING: Driving while distracted
can result in loss of vehicle control, crash
and injury. We strongly recommend that
you use extreme caution when using any
device that may take your focus off the
road. Your primary responsibility is the safe
operation of your vehicle. We recommend
against the use of any hand-held device
while driving and encourage the use of
voice-operated systems when possible.
Make sure you are aware of all applicable
local laws that may affect the use of
electronic devices while driving.
20
Corsair (CTF) Canada/United States of America, enUSA, Edition date: 202007, First-Printing Introduction
Page 32 of 638
WARNING: Depending on where you
secure a child restraint, and depending on
the child restraint design, you may block
access to certain seatbelt buckle
assemblies and LATCH lower anchors,
rendering those features potentially
unusable. To avoid risk of injury, make sure
occupants only use seating positions
where they are able to be properly
restrained.
When installing a child restraint with
combination lap and shoulder belts:
• Use the correct seatbelt buckle for that
seating position.
• Insert the belt tongue into the proper
buckle until you hear a snap and feel it
latch. Make sure the tongue is securely
fastened in the buckle.
• Keep the buckle release button pointing
up and away from the child restraint, with
the tongue between the child restraint
and the release button, to prevent
accidental unbuckling. •
Place the vehicle seat in the upright
position before you install the child
restraint.
• Put the seatbelt in the automatic locking
mode. See Step 5. This vehicle does not
require the use of a locking clip.
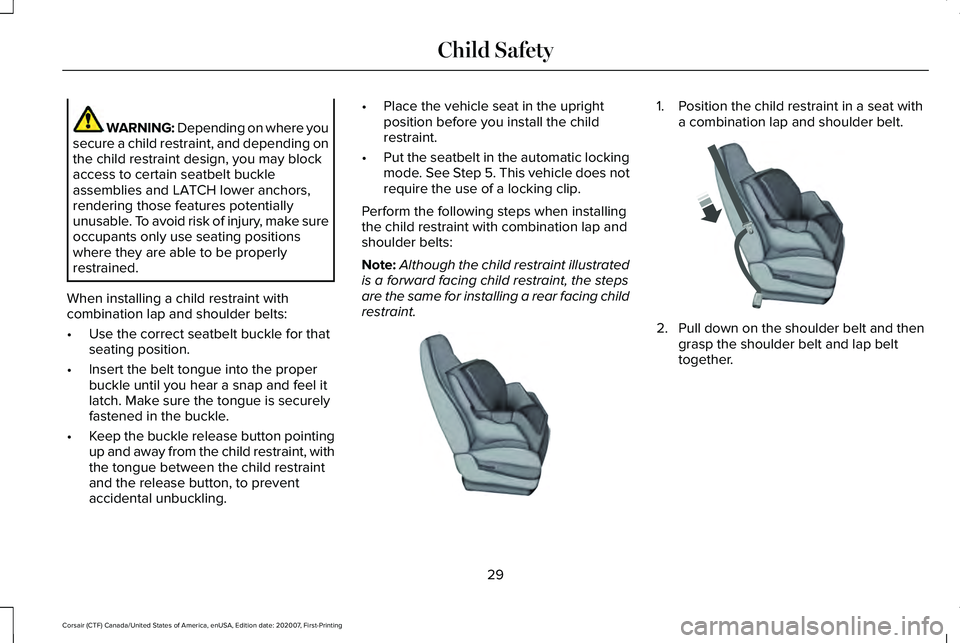
Perform the following steps when installing
the child restraint with combination lap and
shoulder belts:
Note: Although the child restraint illustrated
is a forward facing child restraint, the steps
are the same for installing a rear facing child
restraint. 1. Position the child restraint in a seat with
a combination lap and shoulder belt. 2.
Pull down on the shoulder belt and then
grasp the shoulder belt and lap belt
together.
29
Corsair (CTF) Canada/United States of America, enUSA, Edition date: 202007, First-Printing Child SafetyE142528 E142529
Page 35 of 638
WARNING: Depending on where you
secure a child restraint, and depending on
the child restraint design, you may block
access to certain seatbelt buckle
assemblies and LATCH lower anchors,
rendering those features potentially
unusable. To avoid risk of injury, make sure
occupants only use seating positions
where they are able to be properly
restrained.
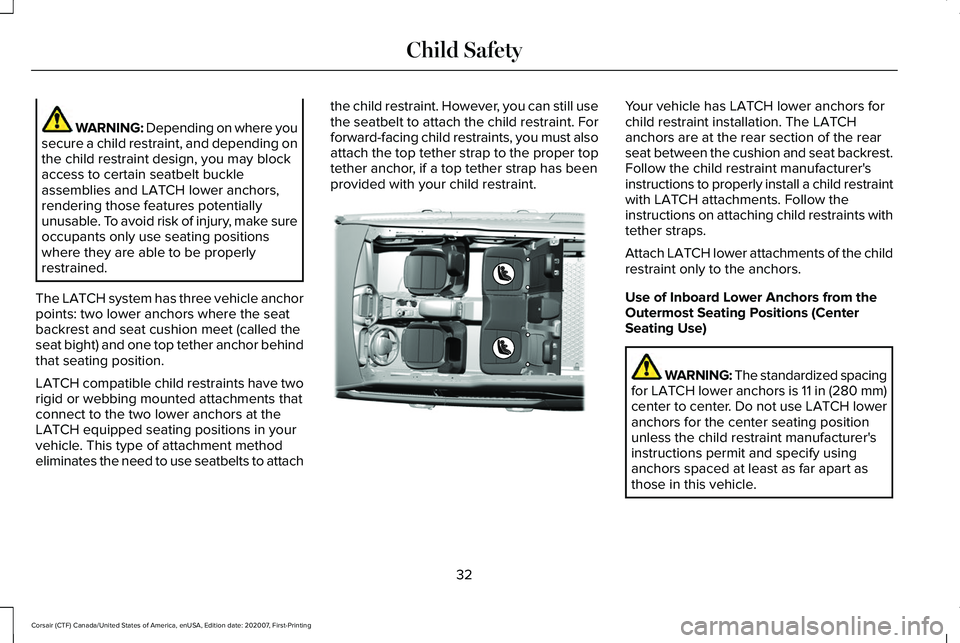
The LATCH system has three vehicle anchor
points: two lower anchors where the seat
backrest and seat cushion meet (called the
seat bight) and one top tether anchor behind
that seating position.
LATCH compatible child restraints have two
rigid or webbing mounted attachments that
connect to the two lower anchors at the
LATCH equipped seating positions in your
vehicle. This type of attachment method
eliminates the need to use seatbelts to attach the child restraint. However, you can still use
the seatbelt to attach the child restraint. For
forward-facing child restraints, you must also
attach the top tether strap to the proper top
tether anchor, if a top tether strap has been
provided with your child restraint. Your vehicle has LATCH lower anchors for
child restraint installation. The LATCH
anchors are at the rear section of the rear
seat between the cushion and seat backrest.
Follow the child restraint manufacturer's
instructions to properly install a child restraint
with LATCH attachments. Follow the
instructions on attaching child restraints with
tether straps.
Attach LATCH lower attachments of the child
restraint only to the anchors.
Use of Inboard Lower Anchors from the
Outermost Seating Positions (Center
Seating Use)
WARNING: The standardized spacing
for LATCH lower anchors is 11 in (280 mm)
center to center. Do not use LATCH lower
anchors for the center seating position
unless the child restraint manufacturer's
instructions permit and specify using
anchors spaced at least as far apart as
those in this vehicle.
32
Corsair (CTF) Canada/United States of America, enUSA, Edition date: 202007, First-Printing Child SafetyE316405
Page 36 of 638

The lower anchors at the center of the
second row rear seat are spaced 18 in
(46 cm) apart. You cannot install a child
restraint with rigid LATCH attachments at the
center seating position. LATCH compatible
child restraints (with attachments on belt
webbing) can only be used at this seating
position provided that the child restraint
manufacturer's instructions permit use with
the anchor spacing stated. Do not attach a
child restraint to any lower anchor if an
adjacent child restraint is attached to that
anchor.
Each time you use the child restraint, check
that the seat is properly attached to the lower
anchors and tether anchor, if applicable. Tug
the child restraint from side to side and
forward and back where it is secured to your
vehicle. The seat should move less than 1 in
(2.5 cm)
when you do this for a proper
installation.
If the child restraint is not anchored properly,
the risk of a child being injured in a crash
greatly increases. Combining Seatbelt and LATCH Lower
Anchors for Attaching Child Restraints
When used in combination, either the
seatbelt or the LATCH lower anchors may
be attached first, provided a proper
installation is achieved. Attach the tether
strap afterward, if included with the child
restraint.
Using Tether Straps
Many forward-facing child
restraints include a tether strap
which extends from the back of the
child restraints and hooks to an anchoring
point called the top tether anchor. Tether
straps are available as an accessory for many
older child restraints.
Contact the manufacturer of your child
restraint for information about ordering a
tether strap, or to obtain a longer tether strap
if the tether strap on your child restraint does
not reach the appropriate top tether anchor
in your vehicle. Once you install the child restraint using
either the seatbelt, the lower anchors of the
LATCH system, or both, you can attach the
top tether strap.
The tether strap anchors in your vehicle are
in the following positions (shown from top
view):
Perform the following steps to install a child
restraint with tether anchors:
33
Corsair (CTF) Canada/United States of America, enUSA, Edition date: 202007, First-Printing Child Safety E316413
Page 37 of 638

Note:
If you install a child restraint with rigid
LATCH attachments, do not tighten the
tether strap enough to lift the child restraint
off your vehicle seat cushion when the child
is seated in it. Keep the tether strap just snug
without lifting the front of the child restraint.
Keeping the child restraint just touching your
vehicle seat gives the best protection in a
severe crash.
1. Route the child restraint tether strap over
the back of the seat. For the outermost
seating positions, route the tether strap
under the head restraint and between
the head restraint posts. For the center
seating positions, route the tether strap
over the top of the head restraint. If
needed, you can also remove the head
restraints. 2. Locate the correct anchor on the back
panel of the rear seat for the selected
seating position. The anchors are labeled
with the tether strap symbol. 3. Clip the tether strap to the anchor as
shown.
4. Tighten the child restraint tether strap according to the manufacturer's
instructions. If your child restraint system
is equipped with a tether strap, and the
child restraint manufacturer recommends
its use, we also recommend its use.
BOOSTER SEATS WARNING: Do not put the shoulder
section of the seatbelt or allow the child to
put the shoulder section of the seatbelt
under their arm or behind their back.
Failure to follow this instruction could
reduce the effectiveness of the seatbelt
and increase the risk of injury or death in
a crash.
Use a belt-positioning booster seat for
children who have outgrown or no longer
properly fit in a child safety restraint
(generally children who are less than
57 in
(1.45 m) tall, are greater than age 4 and less
than age 12, and between 40 lb (18 kg) and
34
Corsair (CTF) Canada/United States of America, enUSA, Edition date: 202007, First-Printing Child SafetyE305488 E142539
Page 42 of 638
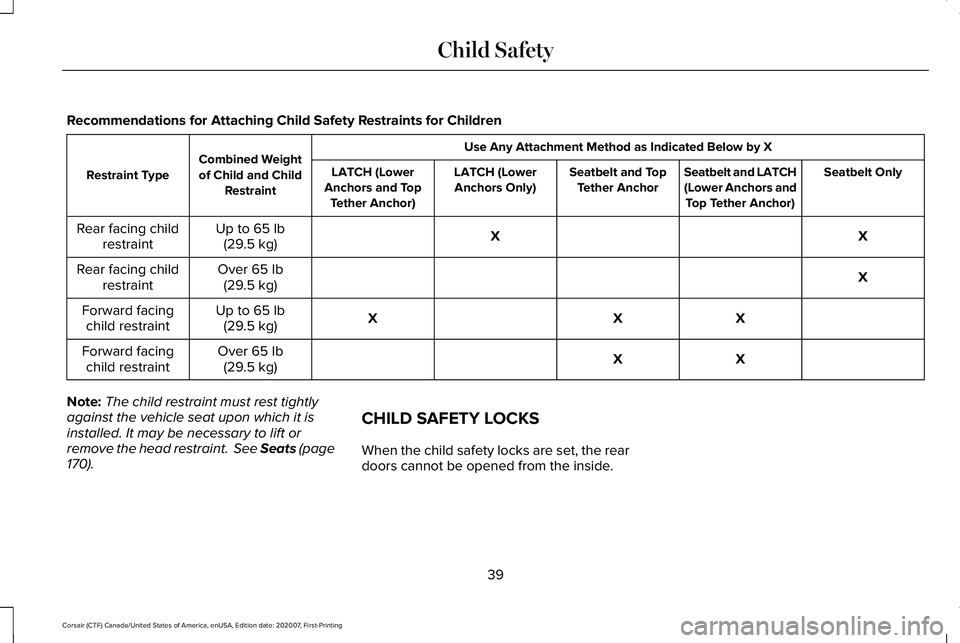
Recommendations for Attaching Child Safety Restraints for Children
Use Any Attachment Method as Indicated Below by X
Combined Weight
of Child and Child Restraint
Restraint Type
Seatbelt Only
Seatbelt and LATCH
(Lower Anchors and
Top Tether Anchor)
Seatbelt and Top
Tether Anchor
LATCH (Lower
Anchors Only)
LATCH (Lower
Anchors and Top Tether Anchor)
X
X
Up to 65 lb
(29.5 kg)
Rear facing child
restraint
X
Over
65 lb
(29.5 kg)
Rear facing child
restraint
X
X
X
Up to
65 lb
(29.5 kg)
Forward facing
child restraint
X
X
Over
65 lb
(29.5 kg)
Forward facing
child restraint
Note: The child restraint must rest tightly
against the vehicle seat upon which it is
installed. It may be necessary to lift or
remove the head restraint. See Seats (page
170
). CHILD SAFETY LOCKS
When the child safety locks are set, the rear
doors cannot be opened from the inside.
39
Corsair (CTF) Canada/United States of America, enUSA, Edition date: 202007, First-Printing Child Safety
Page 50 of 638
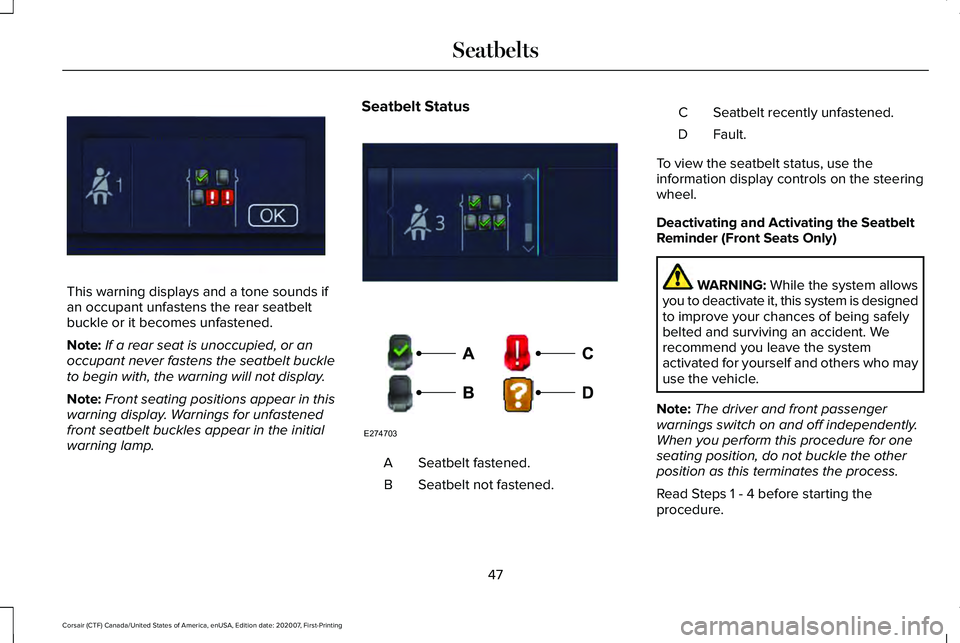
This warning displays and a tone sounds if
an occupant unfastens the rear seatbelt
buckle or it becomes unfastened.
Note:
If a rear seat is unoccupied, or an
occupant never fastens the seatbelt buckle
to begin with, the warning will not display.
Note: Front seating positions appear in this
warning display. Warnings for unfastened
front seatbelt buckles appear in the initial
warning lamp. Seatbelt Status
Seatbelt fastened.
A
Seatbelt not fastened.
B Seatbelt recently unfastened.
C
Fault.D
To view the seatbelt status, use the
information display controls on the steering
wheel.
Deactivating and Activating the Seatbelt
Reminder (Front Seats Only) WARNING: While the system allows
you to deactivate it, this system is designed
to improve your chances of being safely
belted and surviving an accident. We
recommend you leave the system
activated for yourself and others who may
use the vehicle.
Note: The driver and front passenger
warnings switch on and off independently.
When you perform this procedure for one
seating position, do not buckle the other
position as this terminates the process.
Read Steps 1 - 4 before starting the
procedure.
47
Corsair (CTF) Canada/United States of America, enUSA, Edition date: 202007, First-Printing SeatbeltsE331448 E281361 E274703
Page 56 of 638
The driver and passenger front airbag system
consists of:
•
Driver and passenger airbag modules.
• Front passenger sensing system. · Crash sensors and monitoring
system with readiness indicator.
See Crash Sensors and Airbag
Indicator (page 59).
Proper Driver and Front Passenger
Seating Adjustment WARNING:
National Highway Traffic
Safety Administration (NHTSA)
recommends a minimum distance of at
least
10 in (25 cm) between an occupant's
chest and the driver airbag module.
To properly position yourself away from the
airbag:
• Move your seat to the rear as far as you
can while still reaching the pedals
comfortably.
• Recline the seat slightly (one or two
degrees) from the upright position. After all occupants have adjusted their seats
and put on seatbelts, it is very important that
they continue to sit properly. A properly
seated occupant sits upright, leaning against
the seatback, and centered on the seat
cushion, with their feet comfortably extended
on the floor. Sitting improperly can increase
the chance of injury in a crash event. For
example, if an occupant slouches, lies down,
turns sideways, sits forward, leans forward
or sideways, or puts one or both feet up, the
chance of injury during a crash is greatly
increased.
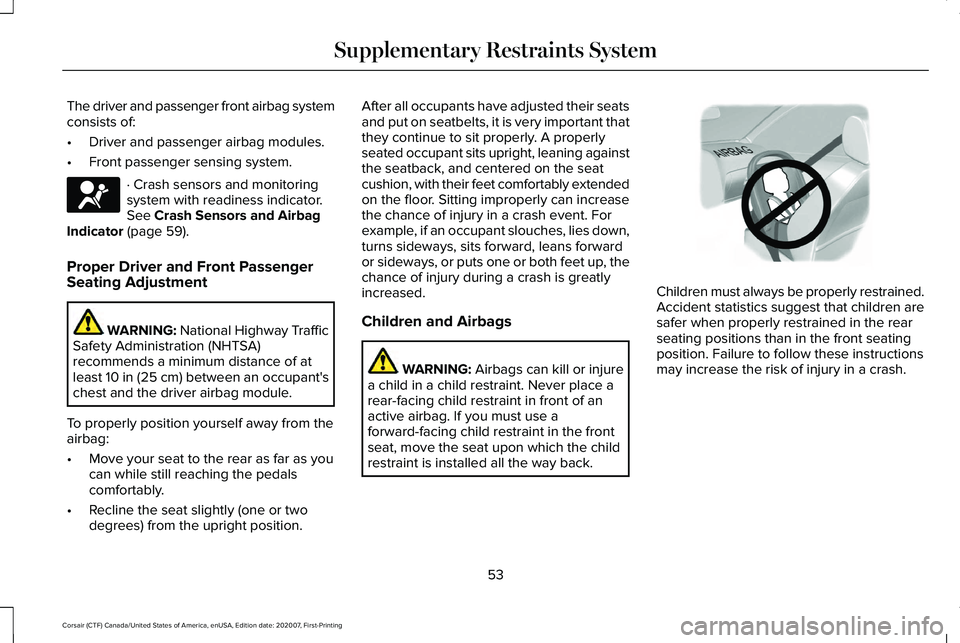
Children and Airbags
WARNING: Airbags can kill or injure
a child in a child restraint. Never place a
rear-facing child restraint in front of an
active airbag. If you must use a
forward-facing child restraint in the front
seat, move the seat upon which the child
restraint is installed all the way back. Children must always be properly restrained.
Accident statistics suggest that children are
safer when properly restrained in the rear
seating positions than in the front seating
position. Failure to follow these instructions
may increase the risk of injury in a crash.
53
Corsair (CTF) Canada/United States of America, enUSA, Edition date: 202007, First-Printing Supplementary Restraints SystemE67017 E142846