tire type LINCOLN CORSAIR 2021 Owners Manual
[x] Cancel search | Manufacturer: LINCOLN, Model Year: 2021, Model line: CORSAIR, Model: LINCOLN CORSAIR 2021Pages: 638, PDF Size: 5.7 MB
Page 17 of 638
Windshield wash and wipe
DATA RECORDING WARNING: Do not connect wireless
plug-in devices to the data link connector.
Unauthorized third parties could gain
access to vehicle data and impair the
performance of safety related systems.
Only allow repair facilities that follow our
service and repair instructions to connect
their equipment to the data link connector.
We respect your privacy and are committed
to protecting it. The information contained
in this publication was correct at the time of
going to print but as technology rapidly
changes, we recommend that you visit the
regional Lincoln website for the latest
information. Your vehicle has electronic control units that
have data recording functionality and the
ability to permanently or temporarily store
data. This data could include information on
the condition and status of your vehicle,
vehicle maintenance requirements, events
and malfunctions. The types of data that can
be recorded are described in this section.
Some of the data recorded is stored in event
logs or error logs.
Note:
Error logs are reset following a service
or repair.
Note: We may provide information in
response to requests from law enforcement,
other government authorities and third
parties acting with lawful authority or through
a legal process. Such information could be
used by them in legal proceedings.
Data recorded includes, for example:
• Operating states of system components,
for example, fuel level, tire pressure and
battery charge level.
• Vehicle and component status, for
example, wheel speed, deceleration,
lateral acceleration and seatbelt status. •
Events or errors in essential systems, for
example, headlamps and brakes.
• System responses to driving situations,
for example, airbag deployment and
stability control.
• Environmental conditions, for example,
temperature.
Some of this data, when used in combination
with other information, for example, an
accident report, damage to a vehicle or
eyewitness statements, could be associated
with a specific person.
Service Data
Service data recorders in your vehicle are
capable of collecting and storing diagnostic
information about your vehicle. This
potentially includes information about the
performance or status of various systems
and modules in the vehicle, such as engine,
throttle, steering or brake systems. In order
to properly diagnose and service your
vehicle, Lincoln Motor Company (Lincoln of
Canada, in Canada), and service and repair
facilities may access or share among them
vehicle diagnostic information received
14
Corsair (CTF) Canada/United States of America, enUSA, Edition date: 202007, First-Printing Introduction
Page 331 of 638
ESSENTIAL TOWING CHECKS
Follow these guidelines for safe towing:
•
Do not tow a trailer until you drive your
vehicle at least 1,000 mi (1,600 km).
• Consult your local motor vehicle laws for
towing a trailer.
• See the instructions included with towing
accessories for the proper installation
and adjustment specifications.
• Service your vehicle more frequently if
you tow a trailer. See your scheduled
maintenance information.
• If you use a rental trailer, follow the
instructions the rental agency gives you.
You can find information on load
specification terms found on the tire label
and Safety Compliance label as well as
instructions on calculating your vehicle's load
in the Load Carrying chapter. See Load Limit
(page
320).
Remember to account for the trailer tongue
weight as part of your vehicle load when
calculating the total vehicle weight. Hitches
Do not use a hitch that either clamps onto
the bumper or attaches to the axle.
Distribute the trailer load so 10-15% of the
total trailer weight is on the tongue.
Safety Chains
Note:
Never attach safety chains to the
bumper.
Always connect the safety chains to the hook
retainers of your vehicle hitch.
To connect the safety chains, cross them
under the trailer tongue and allow enough
slack for turning tight corners. Do not allow
the chains to drag on the ground.
Trailer Brakes WARNING: Do not connect a trailer's
hydraulic brake system directly to your
vehicle's brake system. Your vehicle may
not have enough braking power and your
chances of having a collision greatly
increase. WARNING:
Do not tow a trailer fitted
with electric trailer brakes unless your
vehicle is fitted with a compatible
aftermarket electronic trailer brake
controller. Failure to follow this instruction
could result in the loss of control of your
vehicle, personal injury or death. For
additional information and assistance, we
recommend that you contact an authorized
dealer.
Electric brakes and manual, automatic or
surge-type trailer brakes are safe if you install
them properly and adjust them to the
manufacturer's specifications. The trailer
brakes must meet local and federal
regulations.
The rating for the tow vehicle's braking
system operation is at the gross vehicle
weight rating, not the gross combined
weight rating.
Separate functioning brake systems are
required for safe control of towed vehicles
and trailers weighing more than 1500 lb
(680 kg) when load.
328
Corsair (CTF) Canada/United States of America, enUSA, Edition date: 202007, First-Printing Towing
Page 408 of 638
These Tire Quality Grades are
determined by standards that the United
States Department of Transportation has
set.
Tire Quality Grades apply to new
pneumatic passenger car tires. They do
not apply to deep tread, winter-type
snow tires, space-saver or temporary
use spare tires, light truck or LT type
tires, tires with nominal rim diameters of
10 to 12 inches or limited production tires
as defined in Title 49 Code of Federal
Regulations Part 575.104 (c)(2).
U.S. Department of Transportation Tire
quality grades: The U.S. Department of
Transportation requires us to give you
the following information about tire
grades exactly as the government has
written it.
Treadwear
The treadwear grade is a comparative
rating based on the wear rate of the tire
when tested under controlled conditions
on a specified government test course.
For example, a tire graded 150 would
wear 1½ times as well on the
government course as a tire graded 100.
The relative performance of tires
depends upon the actual conditions of
their use, however, and may depart
significantly from the norm due to
variations in driving habits, service
practices, and differences in road
characteristics and climate.
Traction AA A B C
WARNING: The traction grade
assigned to this tire is based on
straight-ahead braking traction tests,
and does not include acceleration,
cornering, hydroplaning or peak
traction characteristics. The traction grades, from highest to
lowest are AA, A, B, and C. The grades
represent the tire
’s ability to stop on wet
pavement as measured under controlled
conditions on specified government test
surfaces of asphalt and concrete. A tire
marked C may have poor traction
performance.
Temperature A B C WARNING:
The temperature
grade for this tire is established for a
tire that is properly inflated and not
overloaded. Excessive speed,
underinflation, or excessive loading,
either separately or in combination,
can cause heat buildup and possible
tire failure.
The temperature grades are A (the
highest), B and C, representing the tire ’s
resistance to the generation of heat and
its ability to dissipate heat when tested
under controlled conditions on a
specified indoor laboratory test wheel.
Sustained high temperature can cause
405
Corsair (CTF) Canada/United States of America, enUSA, Edition date: 202007, First-Printing Wheels and Tires
Page 410 of 638
Information Contained on the Tire
Sidewall
Both United States and Canada Federal
regulations require tire manufacturers
to place standardized information on the
sidewall of all tires. This information
identifies and describes the fundamental
characteristics of the tire and also
provides a U.S. DOT Tire Identification
Number for safety standard certification
and in case of a recall.
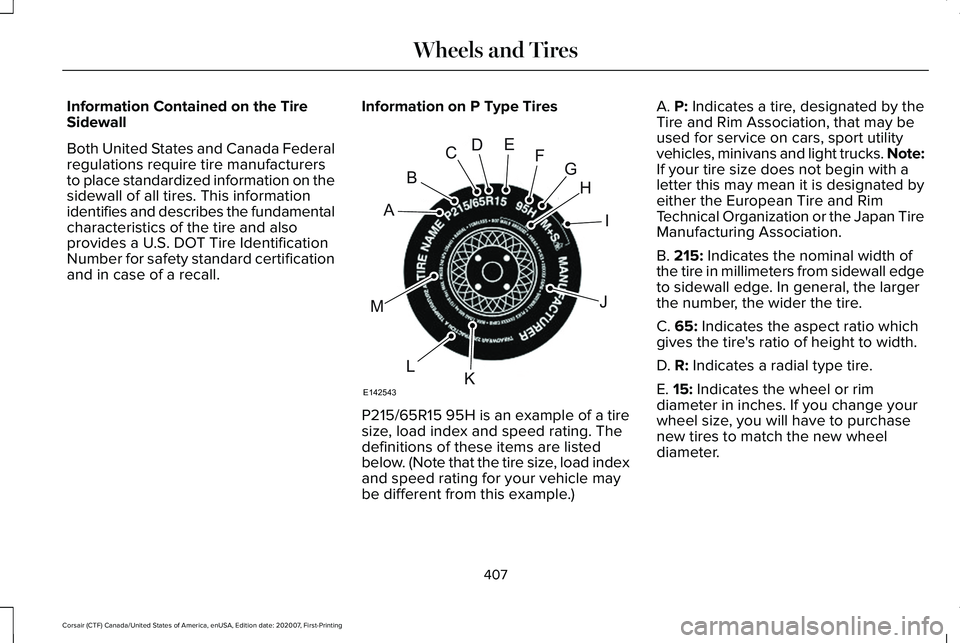
Information on P Type Tires P215/65R15 95H is an example of a tire
size, load index and speed rating. The
definitions of these items are listed
below. (Note that the tire size, load index
and speed rating for your vehicle may
be different from this example.)A. P: Indicates a tire, designated by the
Tire and Rim Association, that may be
used for service on cars, sport utility
vehicles, minivans and light trucks.
Note:
If your tire size does not begin with a
letter this may mean it is designated by
either the European Tire and Rim
Technical Organization or the Japan Tire
Manufacturing Association.
B.
215: Indicates the nominal width of
the tire in millimeters from sidewall edge
to sidewall edge. In general, the larger
the number, the wider the tire.
C.
65: Indicates the aspect ratio which
gives the tire's ratio of height to width.
D.
R: Indicates a radial type tire.
E.
15: Indicates the wheel or rim
diameter in inches. If you change your
wheel size, you will have to purchase
new tires to match the new wheel
diameter.
407
Corsair (CTF) Canada/United States of America, enUSA, Edition date: 202007, First-Printing Wheels and TiresH
I
J
KL
M
A
B
CDEFG
E142543
Page 413 of 638
the driver's seating position), or Tire
Label which is located on the B-Pillar or
the edge of the driver’
s door. The cold
inflation pressure should never be set
lower than the recommended pressure
on the vehicle label.
The tire suppliers may have additional
markings, notes or warnings such as
standard load or radial tubeless.
Additional Information Contained on
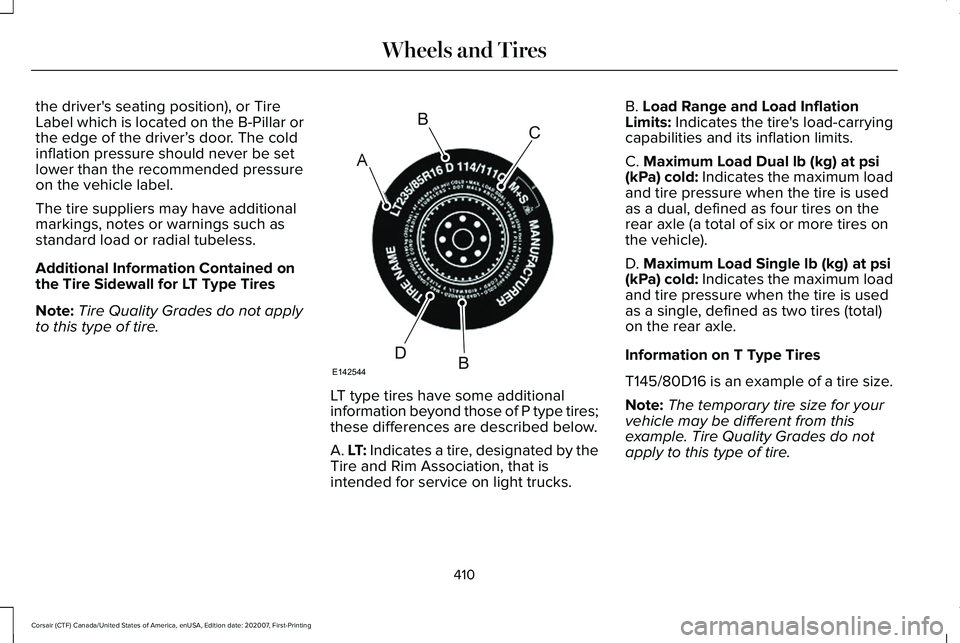
the Tire Sidewall for LT Type Tires
Note: Tire Quality Grades do not apply
to this type of tire. LT type tires have some additional
information beyond those of P type tires;
these differences are described below.
A. LT: Indicates a tire, designated by the
Tire and Rim Association, that is
intended for service on light trucks.B. Load Range and Load Inflation
Limits: Indicates the tire's load-carrying
capabilities and its inflation limits.
C.
Maximum Load Dual lb (kg) at psi
(kPa) cold: Indicates the maximum load
and tire pressure when the tire is used
as a dual, defined as four tires on the
rear axle (a total of six or more tires on
the vehicle).
D.
Maximum Load Single lb (kg) at psi
(kPa) cold: Indicates the maximum load
and tire pressure when the tire is used
as a single, defined as two tires (total)
on the rear axle.
Information on T Type Tires
T145/80D16 is an example of a tire size.
Note: The temporary tire size for your
vehicle may be different from this
example. Tire Quality Grades do not
apply to this type of tire.
410
Corsair (CTF) Canada/United States of America, enUSA, Edition date: 202007, First-Printing Wheels and TiresA
BC
BDE142544
Page 414 of 638
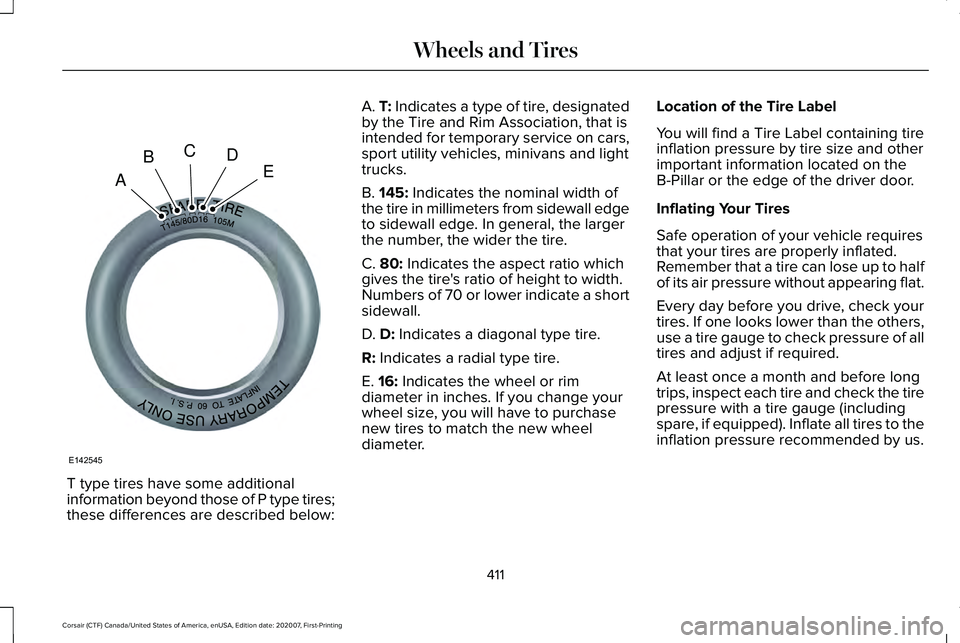
T type tires have some additional
information beyond those of P type tires;
these differences are described below: A. T: Indicates a type of tire, designated
by the Tire and Rim Association, that is
intended for temporary service on cars,
sport utility vehicles, minivans and light
trucks.
B.
145: Indicates the nominal width of
the tire in millimeters from sidewall edge
to sidewall edge. In general, the larger
the number, the wider the tire.
C.
80: Indicates the aspect ratio which
gives the tire's ratio of height to width.
Numbers of 70 or lower indicate a short
sidewall.
D.
D: Indicates a diagonal type tire.
R:
Indicates a radial type tire.
E.
16: Indicates the wheel or rim
diameter in inches. If you change your
wheel size, you will have to purchase
new tires to match the new wheel
diameter. Location of the Tire Label
You will find a Tire Label containing tire
inflation pressure by tire size and other
important information located on the
B-Pillar or the edge of the driver door.
Inflating Your Tires
Safe operation of your vehicle requires
that your tires are properly inflated.
Remember that a tire can lose up to half
of its air pressure without appearing flat.
Every day before you drive, check your
tires. If one looks lower than the others,
use a tire gauge to check pressure of all
tires and adjust if required.
At least once a month and before long
trips, inspect each tire and check the tire
pressure with a tire gauge (including
spare, if equipped). Inflate all tires to the
inflation pressure recommended by us.
411
Corsair (CTF) Canada/United States of America, enUSA, Edition date: 202007, First-Printing Wheels and TiresA
BCDE
E142545
Page 415 of 638
You are strongly urged to buy a reliable
tire pressure gauge, as automatic
service station gauges may be
inaccurate. We recommend the use of
a digital or dial-type tire pressure gauge
rather than a stick-type tire pressure
gauge.
Use the recommended cold inflation
pressure for optimum tire performance
and wear. Under-inflation or
over-inflation may cause uneven
treadwear patterns.
WARNING: Under-inflation is the
most common cause of tire failures
and may result in severe tire cracking,
tread separation or blowout, with
unexpected loss of vehicle control and
increased risk of injury. Under-inflation
increases sidewall flexing and rolling
resistance, resulting in heat buildup and internal damage to the tire. It also
may result in unnecessary tire stress,
irregular wear, loss of vehicle control
and accidents. A tire can lose up to
half of its air pressure and not appear
to be flat!
Always inflate your tires to the
recommended inflation pressure even
if it is less than the maximum inflation
pressure information found on the tire.
Our recommended tire inflation pressure
is found on the Safety Compliance
Certification Label (affixed to either the
door hinge pillar, door-latch post, or the
door edge that meets the door-latch
post, next to the driver's seating
position), or Tire Label which is located
on the B-Pillar or the edge of the driver’ s
door. Failure to follow the tire pressure
recommendations can cause uneven
treadwear patterns and adversely affect
the way your vehicle handles. Maximum Inflation Pressure is the tire
manufacturer's maximum permissible
pressure and the pressure at which the
maximum load can be carried by the tire.
This pressure is normally higher than the
manufacturer’ s recommended cold
inflation pressure which can be found
on the Safety Compliance Certification
Label (affixed to either the door hinge
pillar, door-latch post, or the door edge
that meets the door-latch post, next to
the driver's seating position), or Tire
Label which is located on the B-Pillar or
the edge of the driver’ s door. The cold
inflation pressure should never be set
lower than the recommended pressure
on the Safety Compliance Certification
Label or Tire Label.
When weather temperature changes
occur, tire inflation pressures also
change. A 11°F (6°C) temperature drop
can cause a corresponding drop of 1 psi
(7 kPa)
in inflation pressure. Check your
tire pressures frequently and adjust
them to the proper pressure which can
be found on the Safety Compliance
Certification Label or Tire Label.
412
Corsair (CTF) Canada/United States of America, enUSA, Edition date: 202007, First-Printing Wheels and Tires
Page 416 of 638
To check the pressure in your tire(s):
1. Make sure the tires are cool,
meaning they are not hot from
driving even a mile.
Note: If you are checking tire pressure
when the tire is hot, (for example, driven
more than 1 mi (1.6 km), never bleed or
reduce air pressure. The tires are hot
from driving and it is normal for
pressures to increase above
recommended cold pressures. A hot tire
at or below recommended cold inflation
pressure could be significantly
under-inflated.
Note: If you have to drive a distance to
get air for your tire(s), check and record
the tire pressure first and add the
appropriate air pressure when you get
to the pump. It is normal for tires to heat
up and the air pressure inside to go up
as you drive.
2. Remove the cap from the valve on
one tire, then firmly press the tire
gauge onto the valve and measure
the pressure. 3. Add enough air to reach the
recommended air pressure.
Note: If you overfill the tire, release air
by pressing on the metal stem in the
center of the valve. Then recheck the
pressure with your tire gauge.
4. Replace the valve cap.
5. Repeat this procedure for each tire,
including the spare.
Note: Some spare tires operate at a
higher inflation pressure than the other
tires. For T type mini-spare tires, see the
Dissimilar spare wheel and tire
assembly information for a description.
Store and maintain at
60 psi (4.15 bar).
For full-size and dissimilar spare tires,
see the Dissimilar spare wheel and tire
assembly information for a description.
Store and maintain at the higher of the
front and rear inflation pressure as
shown on the Tire Label. 6.
Visually inspect the tires to make
sure there are no nails or other
objects embedded that could poke
a hole in the tire and cause an air
leak.
7. Check the sidewalls to make sure there are no gouges, cuts or bulges.
Inspecting Your Tires and Wheel Valve
Stems
Periodically inspect the tire treads for
uneven or excessive wear and remove
objects such as stones, nails or glass
that may be wedged in the tread
grooves. Check the tire and valve stems
for holes, cracks, or cuts that may permit
air leakage and repair or replace the tire
and replace the valve stem. Inspect the
tire sidewalls for cracking, cuts, bruises
and other signs of damage or excessive
wear. If internal damage to the tire is
suspected, have the tire demounted and
inspected in case it needs to be repaired
or replaced. For your safety, tires that
are damaged or show signs of excessive
wear should not be used because they
are more likely to blow out or fail.
413
Corsair (CTF) Canada/United States of America, enUSA, Edition date: 202007, First-Printing Wheels and Tires
Page 427 of 638
If you get a flat tire when driving, do not
apply the brake heavily. Instead, gradually
decrease your speed. Hold the steering
wheel firmly and slowly move to a safe place
on the side of the road.
Have a flat serviced by an authorized dealer
in order to prevent damage to the tire
pressure monitoring system sensors. See
Tire Pressure Monitoring System (page 419).
Replace the spare tire with a road tire as
soon as possible. During repairing or
replacing of the flat tire, have the authorized
dealer inspect the tire pressure monitoring
system sensor for damage.
Dissimilar Spare Wheel and Tire
Assembly Information WARNING:
Failure to follow these
guidelines could result in an increased risk
of loss of vehicle control, injury or death. If you have a dissimilar spare wheel and tire,
then it is intended for temporary use only.
This means that if you need to use it, you
should replace it as soon as possible with a
road wheel and tire assembly that is the
same size and type as the road tires and
wheels that we provided with the vehicle. If
the dissimilar spare tire or wheel is damaged,
replace it instead of repairing it.
A dissimilar spare wheel and tire assembly
is defined as a spare wheel and tire assembly
that is different in brand, size or appearance
from the road tires and wheels and can be
one of three types:
1.
T-type mini-spare: This spare tire begins
with the letter T for tire size and may have
Temporary Use Only molded in the sidewall.
2.
Full-size dissimilar spare with label on
wheel: This spare tire has a label on the
wheel that states: THIS WHEEL AND TIRE
ASSEMBLY FOR TEMPORARY USE ONLY.
When driving with one of the dissimilar spare
tires listed above, do not: •
Exceed
50 mph (80 km/h).
• Load the vehicle beyond maximum
vehicle load rating listed on the Safety
Compliance Label.
• Tow a trailer.
• Use snow chains on the end of the
vehicle with the dissimilar spare tire.
• Use more than one dissimilar spare tire
at a time.
• Use commercial car washing equipment.
• Try to repair the dissimilar spare tire.
Use of one of the dissimilar spare tires listed
above at any one wheel location can lead to
impairment of the following:
• Handling, stability and braking
performance.
• Comfort and noise.
• Ground clearance and parking at curbs.
• Winter weather driving capability.
• Wet weather driving capability.
• All-wheel driving capability
3.
Full-size dissimilar spare without label
on wheel
424
Corsair (CTF) Canada/United States of America, enUSA, Edition date: 202007, First-Printing Wheels and Tires
Page 623 of 638
Locks......................................................................453
Washer Reservoir...............................................453
Capacities and Specifications - 2.5L, Plug-In Hybrid Electric Vehicle
(PHEV)...........................................................454
Air Conditioning System...................................454
Engine Coolant...................................................455
Engine Oil.............................................................456
Fuel Tank..............................................................457
Grease...................................................................457
Hydraulic Brake System...................................458
Locks.....................................................................459
Washer Reservoir...............................................459
Capacities and Specifications...................433
Car Wash See: Cleaning the Exterior...............................387
Catalytic Converter
......................................222
On-Board Diagnostics (OBD-II).......................223
Readiness for Inspection and Maintenance (I/M) Testing.....................................................224
Changing a Bulb
...........................................385
Changing a Fuse..........................................363
Engine Compartment Fuse Box......................363
Fuse Types...........................................................364
General Information...........................................363
Changing a Road Wheel.............................423 Dissimilar Spare Wheel and Tire Assembly
Information.......................................................424 Tire Change Procedure....................................425
Changing the 12V Battery..........................380 Remove and Reinstall the Battery..................382
Changing the Engine Air Filter - 2.0L/ 2.3L................................................................372
Gas Engines.........................................................372
Changing the Engine Air Filter - 2.5L, Plug-In Hybrid Electric Vehicle
(PHEV)...........................................................373
Changing the Vehicle Wi-Fi Hotspot Name or Password
................................................466
Changing the Wiper Blades......................384 Front Wiper Blades............................................384
Rear Window Wiper Blade...............................385
Charging the High Voltage Battery.........225 IMPORTANT SAFETY INSTRUCTIONS.........
225
Checking MyKey System Status.................74
Checking the Wiper Blades.......................384
Child Restraint and Seatbelt Maintenance..................................................48
Child Restraint Positioning............................37
Child Safety......................................................26 General Information.............................................26
Child Safety Locks..........................................39 Left-Hand Side.......................................................40
Right-Hand Side....................................................40
Cleaning Leather Seats...............................391 Cleaning Products........................................386
Materials...............................................................386
Cleaning the Engine
....................................389
Cleaning the Exterior...................................387 Cleaning the Headlamps..................................387
Exterior Chrome Parts.......................................388
Exterior Plastic Parts..........................................388
Stripes or Graphics............................................388
Underbody...........................................................388
Under Hood.........................................................388
Cleaning the Instrument Panel and Instrument Cluster Lens...........................390
Cleaning the Interior...................................390
Cleaning the Wheels...................................392
Cleaning the Windows and Wiper Blades...........................................................389
Clearing All MyKeys........................................73
Clearing the Garage Door Opener
...........190
Climate............................................................504
Accessing Rear Climate Controls...................507
Accessing the Climate Control Menu...........
504
Directing the Airflow..........................................504
Rear Climate Control Lock Indicator.............
507
Setting the Blower Motor Speed...................505
Setting the Temperature..................................505
Switching Auto Mode On and Off..................505
Switching Dual Zone Mode On and Off.......505
620
Corsair (CTF) Canada/United States of America, enUSA, Edition date: 202007, First-Printing Index