oil LINCOLN CORSAIR 2023 User Guide
[x] Cancel search | Manufacturer: LINCOLN, Model Year: 2023, Model line: CORSAIR, Model: LINCOLN CORSAIR 2023Pages: 690, PDF Size: 15.04 MB
Page 433 of 690
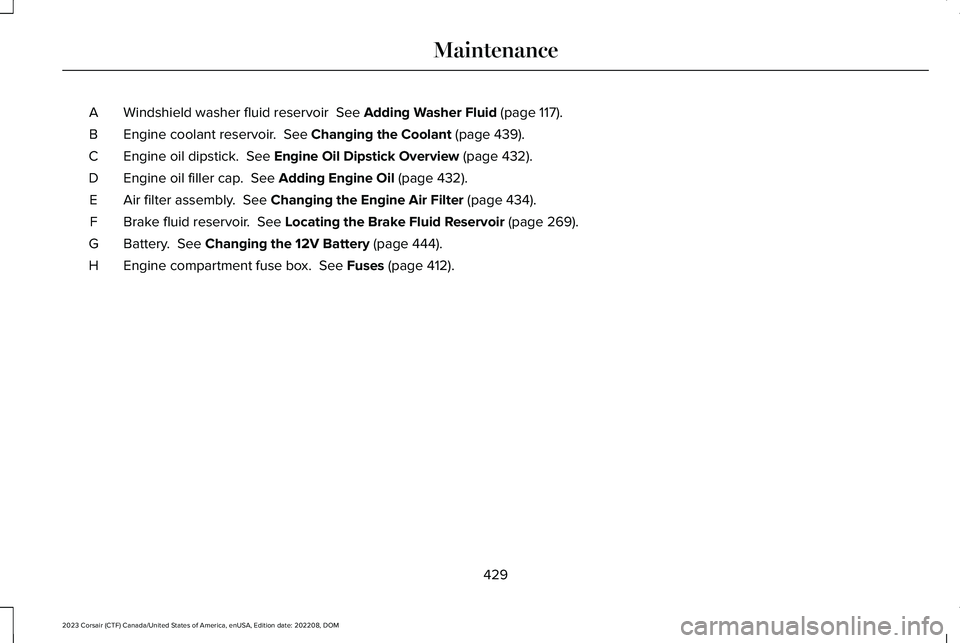
Windshield washer fluid reservoir See Adding Washer Fluid (page 117).A
Engine coolant reservoir. See Changing the Coolant (page 439).B
Engine oil dipstick. See Engine Oil Dipstick Overview (page 432).C
Engine oil filler cap. See Adding Engine Oil (page 432).D
Air filter assembly. See Changing the Engine Air Filter (page 434).E
Brake fluid reservoir. See Locating the Brake Fluid Reservoir (page 269).F
Battery. See Changing the 12V Battery (page 444).G
Engine compartment fuse box. See Fuses (page 412).H
429
2023 Corsair (CTF) Canada/United States of America, enUSA, Edition date: 202208, DOMMaintenance
Page 435 of 690
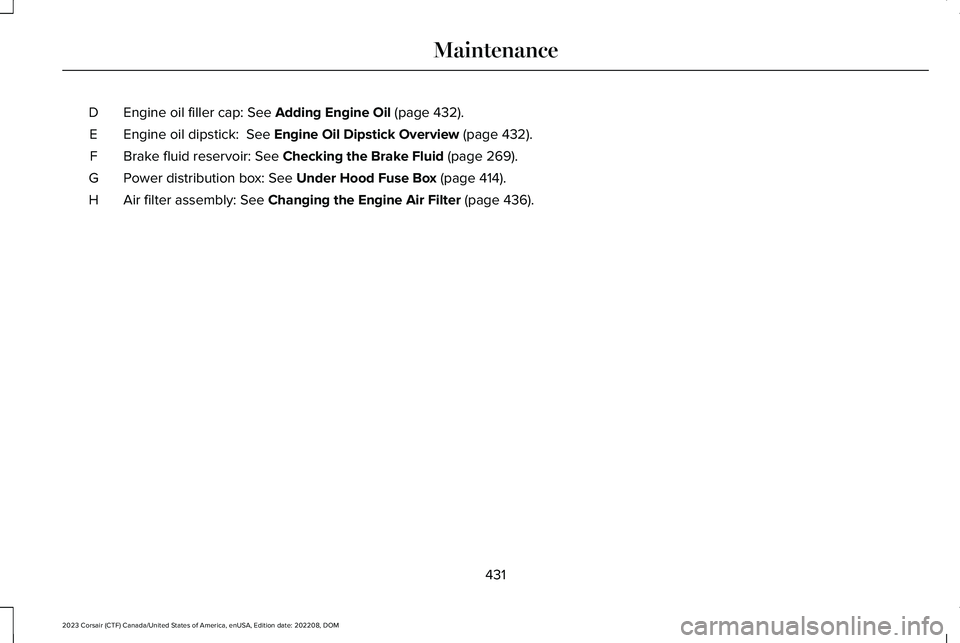
Engine oil filler cap: See Adding Engine Oil (page 432).D
Engine oil dipstick: See Engine Oil Dipstick Overview (page 432).E
Brake fluid reservoir: See Checking the Brake Fluid (page 269).F
Power distribution box: See Under Hood Fuse Box (page 414).G
Air filter assembly: See Changing the Engine Air Filter (page 436).H
431
2023 Corsair (CTF) Canada/United States of America, enUSA, Edition date: 202208, DOMMaintenance
Page 436 of 690
ENGINE OIL
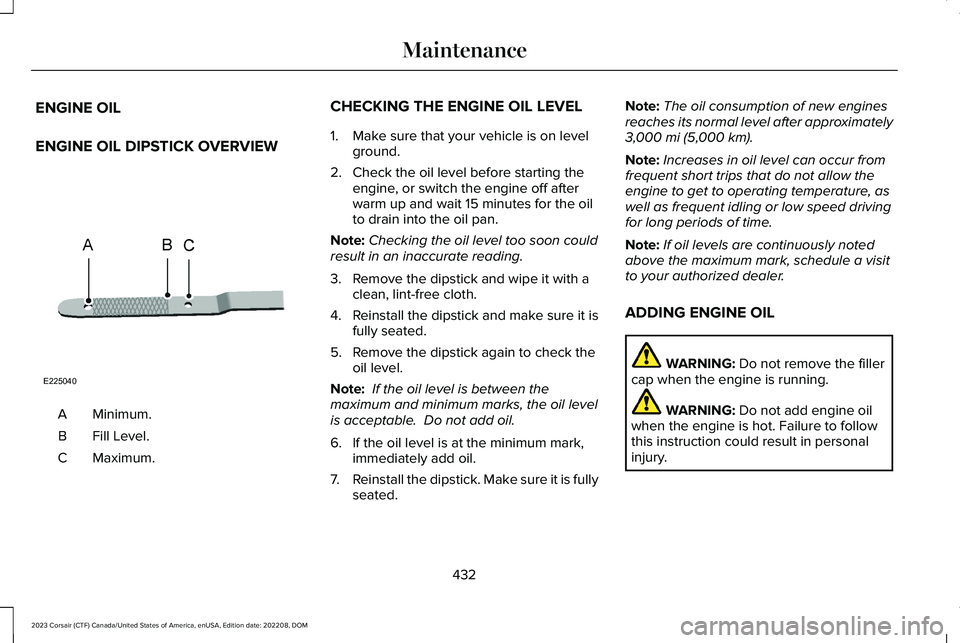
ENGINE OIL DIPSTICK OVERVIEW
Minimum.A
Fill Level.B
Maximum.C
CHECKING THE ENGINE OIL LEVEL
1.Make sure that your vehicle is on levelground.
2.Check the oil level before starting theengine, or switch the engine off afterwarm up and wait 15 minutes for the oilto drain into the oil pan.
Note:Checking the oil level too soon couldresult in an inaccurate reading.
3.Remove the dipstick and wipe it with aclean, lint-free cloth.
4.Reinstall the dipstick and make sure it isfully seated.
5.Remove the dipstick again to check theoil level.
Note: If the oil level is between themaximum and minimum marks, the oil levelis acceptable. Do not add oil.
6.If the oil level is at the minimum mark,immediately add oil.
7.Reinstall the dipstick. Make sure it is fullyseated.
Note:The oil consumption of new enginesreaches its normal level after approximately3,000 mi (5,000 km).
Note:Increases in oil level can occur fromfrequent short trips that do not allow theengine to get to operating temperature, aswell as frequent idling or low speed drivingfor long periods of time.
Note:If oil levels are continuously notedabove the maximum mark, schedule a visitto your authorized dealer.
ADDING ENGINE OIL
WARNING: Do not remove the fillercap when the engine is running.
WARNING: Do not add engine oilwhen the engine is hot. Failure to followthis instruction could result in personalinjury.
432
2023 Corsair (CTF) Canada/United States of America, enUSA, Edition date: 202208, DOMMaintenanceE225040
Page 437 of 690
Do not use supplemental engine oil additivesbecause they are unnecessary and couldlead to engine damage that the vehiclewarranty may not cover.
1.Clean the area surrounding the engineoil filler cap before you remove it.
2.Remove the engine oil filler cap.
3.Add engine oil that meets ourspecifications. See Capacities andSpecifications (page 495).
4.Reinstall the engine oil filler cap. Turn itclockwise until you feel a strongresistance.
Note: Do not add oil further than themaximum mark. Oil levels above themaximum mark may cause engine damage.
Note:Immediately soak up any oil spillagewith an absorbent cloth.
INTELLIGENT OIL LIFE MONITOR
Under certain conditions the vehicle’sintelligent oil life monitor may determine youroil requires replacement prior to your generalservice. Should this occur it is recommendedyou replace your oil within two weeks or500 mi (800 km) of being alerted.
Your authorized dealer will be able to adviseyou whether only an engine oil and filterchange is recommended or whether youshould complete your general serviceinclusive of oil and oil Filter.
RESETTING THE INTELLIGENT OIL LIFEMONITOR
Use the information display controls on thesteering wheel to reset the oil changeindicator.
From the main menu scroll to:
Action and descriptionMessage
Press the right arrow button,then from this menu scroll tothe following message.
Settings
Press the right arrow button,then from this menu scroll tothe following message.
Vehicle
Press the right arrow button,then from this menu scroll tothe following message.
Oil Life
Press and hold the OK buttonuntil the instrument clusterdisplays the followingmessage.
Hold OK toReset
Reset Successful
When the oil change indicatorresets the instrument clusterdisplays 100%.
Remaining Life
{00}%
433
2023 Corsair (CTF) Canada/United States of America, enUSA, Edition date: 202208, DOMMaintenance
Page 438 of 690

Action and descriptionMessage
If the instrument clusterdisplays one of the followingmessages, repeat theprocess.
Not Reset
Reset Cancelled
ENGINE OIL CAPACITY ANDSPECIFICATION
For filling information, please refer to theCapacities and Specifications section of yourowner's manual. See Engine Oil Capacityand Specification (page 434).
ENGINE AIR FILTER
CHANGING THE ENGINE AIR FILTER -2.0L ECOBOOST™
WARNING: To reduce the risk ofvehicle damage and personal burn injuries,do not start your engine with the aircleaner removed and do not remove itwhile the engine is running.
Change the air filter element at the properintervals.
When changing the air filter element, useonly the air filter element listed. SeeMotorcraft Parts (page 497).
Note:Failure to use the correct air filterelement could result in severe enginedamage that the vehicle warranty may notcover.
Note: When servicing the air filter, do notallow foreign material to enter the airinduction system. The engine is susceptibleto damage from even small particles.
434
2023 Corsair (CTF) Canada/United States of America, enUSA, Edition date: 202208, DOMMaintenance
Page 453 of 690
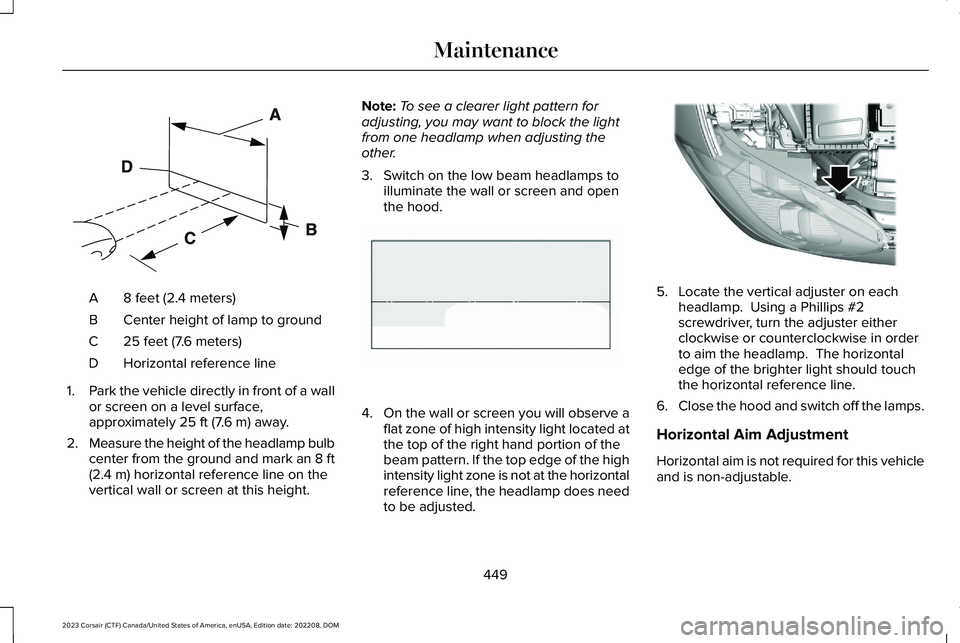
8 feet (2.4 meters)A
Center height of lamp to groundB
25 feet (7.6 meters)C
Horizontal reference lineD
1.Park the vehicle directly in front of a wallor screen on a level surface,approximately 25 ft (7.6 m) away.
2.Measure the height of the headlamp bulbcenter from the ground and mark an 8 ft(2.4 m) horizontal reference line on thevertical wall or screen at this height.
Note:To see a clearer light pattern foradjusting, you may want to block the lightfrom one headlamp when adjusting theother.
3.Switch on the low beam headlamps toilluminate the wall or screen and openthe hood.
4.On the wall or screen you will observe aflat zone of high intensity light located atthe top of the right hand portion of thebeam pattern. If the top edge of the highintensity light zone is not at the horizontalreference line, the headlamp does needto be adjusted.
5.Locate the vertical adjuster on eachheadlamp. Using a Phillips #2screwdriver, turn the adjuster eitherclockwise or counterclockwise in orderto aim the headlamp. The horizontaledge of the brighter light should touchthe horizontal reference line.
6.Close the hood and switch off the lamps.
Horizontal Aim Adjustment
Horizontal aim is not required for this vehicleand is non-adjustable.
449
2023 Corsair (CTF) Canada/United States of America, enUSA, Edition date: 202208, DOMMaintenanceE142592 E142465 E307889
Page 457 of 690
CLEANING CHROME, ALUMINIUM ORSTAINLESS STEEL
We recommend that you only use a carshampoo, a soft cloth and water on bumpersand other chrome, aluminium or stainlesssteel parts.
Note:For additional information andassistance, we recommend that you contactan authorized dealer.
Note:Rinse the area well after cleaning.
Note:Do not use abrasive materials, forexample steel wool or plastic pads, as theycan scratch these surfaces.
Note:Do not use chrome cleaner, metalcleaner or polish on wheels or wheel covers.
CLEANING WHEELS
Only use a recommended wheel and tirecleaner to clean the wheels weekly. Foradditional information and assistance, werecommend that you contact an authorizeddealer.
1.Use a sponge to remove heavy depositsof dirt and brake dust.
2.Rinse well after cleaning.
Note:Do not apply a cleaning chemical towarm or hot wheel rims and covers.
If you intend on parking your vehicle for anextended period after cleaning the wheelswith a wheel cleaner, drive your vehicle fora few minutes before parking your vehicle.This reduces the risk of corrosion of thebrake discs, brake pads and linings.
Do not clean the wheels when they are hot.
Note: Some car washes could damagewheel rims and covers.
Note: Using non-recommended cleaners,harsh cleaning products, chrome wheelcleaners or abrasive materials coulddamage wheel rims and covers.
CLEANING THE ENGINECOMPARTMENT
Use a vacuum cleaner to remove debris fromthe screen area below windshield.
Note:If you are not familiar with the partsaround the engine do not wash the enginecompartment. Avoid frequent enginewashes.
When washing the engine compartment:
•Never wash or rinse the engine while itis hot or running.
•Never wash or rinse any ignition coil,spark plug wire or spark plug well.
•Cover the battery, power distribution box,and air filter assembly to prevent waterdamage.
Note:If your vehicle has an engine coverremove the cover before application ofshampoo and degreaser.
•Spray an approved engine shampoo anddegreaser on all parts that requirecleaning and rinse with water.
CLEANING STRIPES OR GRAPHICS
It is recommended to wash your vehicle byhand however, pressure washing may beused under the following conditions:
453
2023 Corsair (CTF) Canada/United States of America, enUSA, Edition date: 202208, DOMVehicle Care
Page 462 of 690
PREPARING YOUR VEHICLE FOR
STORAGE
If you plan on storing your vehicle for 30days or more, the following maintenancerecommendations ensures your vehicle staysin good operating condition.
Under various conditions, long-term storagemay lead to degraded engine performanceor failure unless you use specific precautionsto preserve your vehicle.
General
•Store all vehicles in a dry, ventilatedplace.
•If vehicles are stored outside, theyrequire regular maintenance to protectagainst rust and weather damage.
•Make sure all linkages, cables, levers andpins under your vehicle are covered withgrease to prevent rust.
•Move vehicles at least 25 ft (7.5 m) every15 days to lubricate working parts andprevent corrosion.
•Fill the fuel tank with high-quality fueluntil the first automatic shutoff of the fuelpump nozzle.
Engine
•Change the engine oil and filter prior tostorage because used engine oil containscontaminants which may cause enginedamage.
•Start the engine every 15 days for aminimum of 15 minutes. Run at fast idlewith the climate controls set to defrostuntil the engine reaches normaloperating temperature.
•With your foot on the brake, shift throughall the gears while the engine is running.
Body
•Wash your vehicle thoroughly to removedirt, grease, oil, tar or mud from exteriorsurfaces, rear wheel housings and theunderside of front fenders.
•Periodically wash your vehicle if it isstored in exposed locations.
•Touch-up exposed or primed metal toprevent rust.
•Cover chrome and stainless steel partswith a thick coat of auto wax to preventdiscoloration. Rewax as necessary whenyou wash your vehicle.
•Lubricate all hood, door and luggagecompartment hinges and latches with alight grade oil.
•Cover interior trim to prevent fading.
•Keep all rubber parts free from oil andsolvents.
458
2023 Corsair (CTF) Canada/United States of America, enUSA, Edition date: 202208, DOMStoring Your Vehicle
Page 463 of 690
12 Volt Battery
•When storing your vehicle for greaterthan 30 days the state of charge shouldbe approximately 50%. Additionally, werecommend disconnecting the 12vbattery which will reduce system loadson the battery.
•Check and recharge as necessary. Keepconnections clean.
Note:It is necessary to reset memoryfeatures if you disconnect the battery cables.
Brakes
Make sure the brakes and parking brakerelease fully.
Note:If you intend on parking your vehiclefor an extended period after cleaning thewheels with a wheel cleaner, drive yourvehicle for a few minutes before doing so toreduce the risk of increased corrosion of thebrake discs, brake pads and linings.
Tires
Maintain recommended air pressure.
Note:If you intend on parking your vehiclefor an extended period after cleaning thewheels with a wheel cleaner, drive yourvehicle for a few minutes before doing so.This reduces the risk of corrosion of thebrake discs, brake pads and linings.
REMOVING YOUR VEHICLE FROM
STORAGE
When your vehicle is ready to come out ofstorage, do the following:
•We recommend that you change theengine oil before you use your vehicleagain.
•Wash your vehicle to remove any dirt orgrease film build-up on window surfaces.
•Check windshield wipers for anydeterioration.
•Check the underhood for any foreignmaterials such as mice or squirrel nests.
•Check the exhaust for any foreignmaterials.
•Check tire pressures and set tire inflationper the Tire Label.
•Check brake pedal operation. Corrodedbrake rotors could cause brake noise.Drive your vehicle and gently apply andrelease the brakes repeatedly over a10-minute drive to reduce the corrosionfrom the brakes.
•Check fluid levels (including coolant, oiland gas) to make sure there are no leaks,and fluids are at recommended levels.
•If you remove the battery, clean thebattery cable ends and check fordamage.
Contact an authorized dealer if you have anyconcerns or issues.
459
2023 Corsair (CTF) Canada/United States of America, enUSA, Edition date: 202208, DOMStoring Your Vehicle
Page 494 of 690
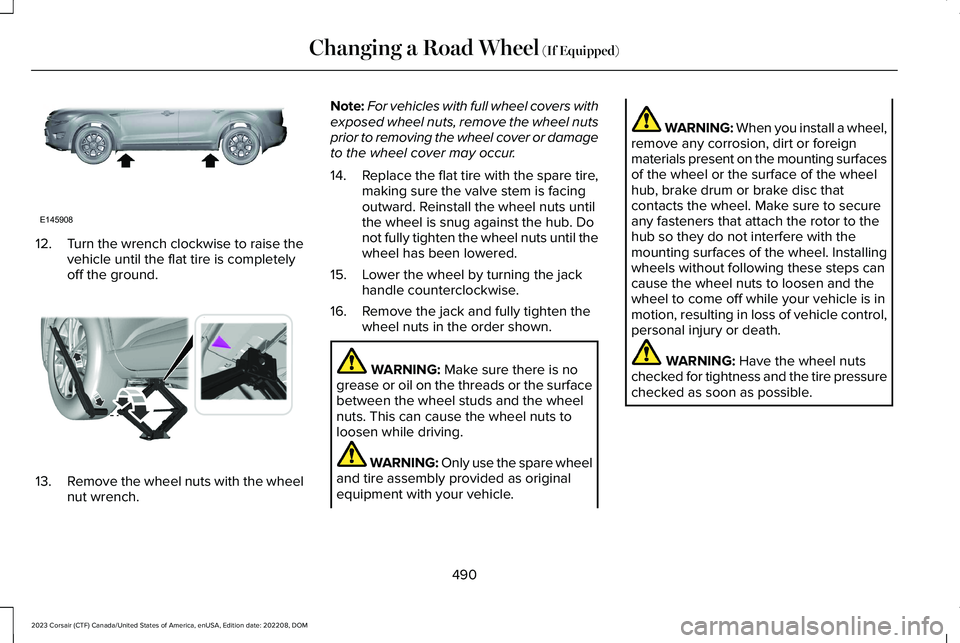
12.Turn the wrench clockwise to raise thevehicle until the flat tire is completelyoff the ground.
13.Remove the wheel nuts with the wheelnut wrench.
Note:For vehicles with full wheel covers withexposed wheel nuts, remove the wheel nutsprior to removing the wheel cover or damageto the wheel cover may occur.
14.Replace the flat tire with the spare tire,making sure the valve stem is facingoutward. Reinstall the wheel nuts untilthe wheel is snug against the hub. Donot fully tighten the wheel nuts until thewheel has been lowered.
15.Lower the wheel by turning the jackhandle counterclockwise.
16.Remove the jack and fully tighten thewheel nuts in the order shown.
WARNING: Make sure there is nogrease or oil on the threads or the surfacebetween the wheel studs and the wheelnuts. This can cause the wheel nuts toloosen while driving.
WARNING: Only use the spare wheeland tire assembly provided as originalequipment with your vehicle.
WARNING: When you install a wheel,remove any corrosion, dirt or foreignmaterials present on the mounting surfacesof the wheel or the surface of the wheelhub, brake drum or brake disc thatcontacts the wheel. Make sure to secureany fasteners that attach the rotor to thehub so they do not interfere with themounting surfaces of the wheel. Installingwheels without following these steps cancause the wheel nuts to loosen and thewheel to come off while your vehicle is inmotion, resulting in loss of vehicle control,personal injury or death.
WARNING: Have the wheel nutschecked for tightness and the tire pressurechecked as soon as possible.
490
2023 Corsair (CTF) Canada/United States of America, enUSA, Edition date: 202208, DOMChanging a Road Wheel (If Equipped)E145908 E338668