LINCOLN LS 2002 Repair Manual
Manufacturer: LINCOLN, Model Year: 2002, Model line: LS, Model: LINCOLN LS 2002Pages: 288, PDF Size: 2.44 MB
Page 61 of 288
Foglamp control
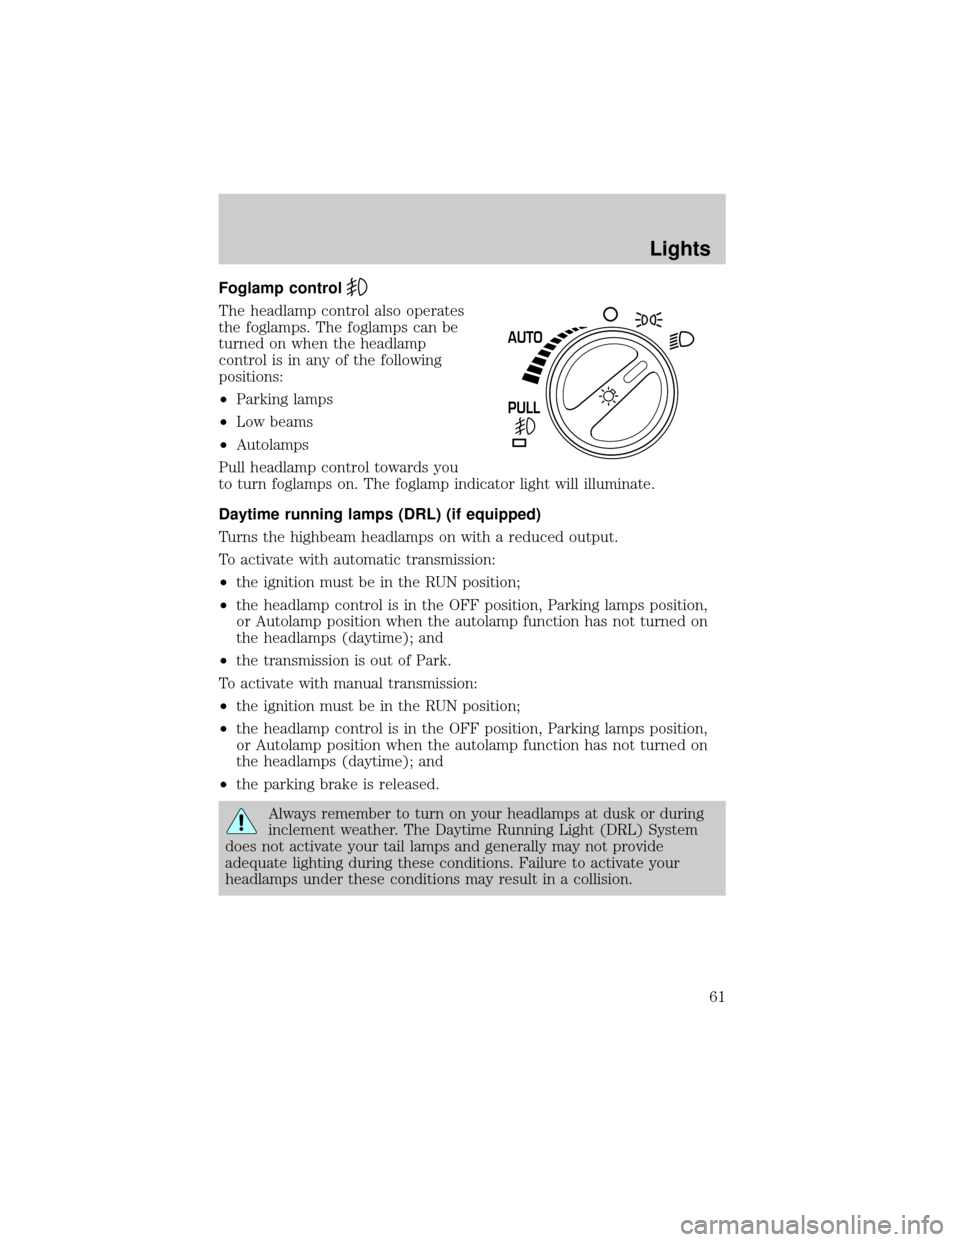
The headlamp control also operates
the foglamps. The foglamps can be
turned on when the headlamp
control is in any of the following
positions:
┬▓Parking lamps
┬▓Low beams
┬▓Autolamps
Pull headlamp control towards you
to turn foglamps on. The foglamp indicator light will illuminate.
Daytime running lamps (DRL) (if equipped)
Turns the highbeam headlamps on with a reduced output.
To activate with automatic transmission:
┬▓the ignition must be in the RUN position;
┬▓the headlamp control is in the OFF position, Parking lamps position,
or Autolamp position when the autolamp function has not turned on
the headlamps (daytime); and
┬▓the transmission is out of Park.
To activate with manual transmission:
┬▓the ignition must be in the RUN position;
┬▓the headlamp control is in the OFF position, Parking lamps position,
or Autolamp position when the autolamp function has not turned on
the headlamps (daytime); and
┬▓the parking brake is released.
Always remember to turn on your headlamps at dusk or during
inclement weather. The Daytime Running Light (DRL) System
does not activate your tail lamps and generally may not provide
adequate lighting during these conditions. Failure to activate your
headlamps under these conditions may result in a collision.
PULL AUTO
Lights
61
Page 62 of 288
High beams
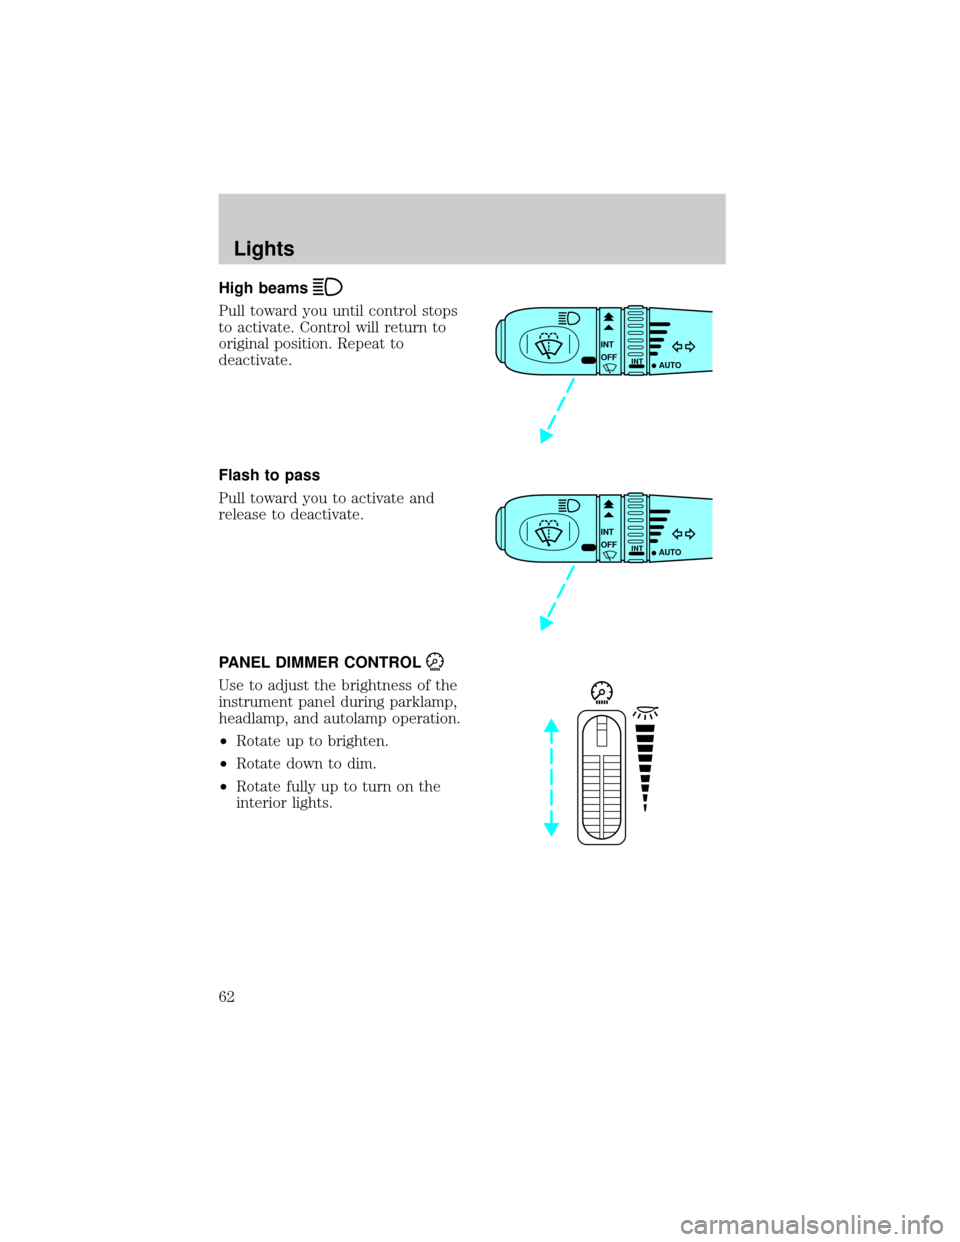
Pull toward you until control stops
to activate. Control will return to
original position. Repeat to
deactivate.
Flash to pass
Pull toward you to activate and
release to deactivate.
PANEL DIMMER CONTROL
Use to adjust the brightness of the
instrument panel during parklamp,
headlamp, and autolamp operation.
┬▓Rotate up to brighten.
┬▓Rotate down to dim.
┬▓Rotate fully up to turn on the
interior lights.
INT
INTOFF
AUTO
INT
INTOFF
AUTO
Lights
62
Page 63 of 288
AIMING THE HEADLAMPS
Your vehicle is equipped with a Vehicle Headlamp Aim Device (VHAD)
on each headlamp body. Each headlamp may be properly aimed in the
horizontal direction (left/right) and the vertical position (up/down).
A non-zero bubble reading does not necessarily indicate out-of-aim
headlamps. If your vehicle is not positioned on a level surface, the slope
will be included in the level indicator. Therefore, vertical headlamp
adjustment should be performed only when beam direction appears to be
incorrect.
The horizontal aim must be adjusted first. You will need one 4 mm
wrench or socket to make the adjustments.
If the vehicle has been in an accident, the vehicle's front structure
should be properly aligned before aiming the headlamps.
Horizontal aim adjustment
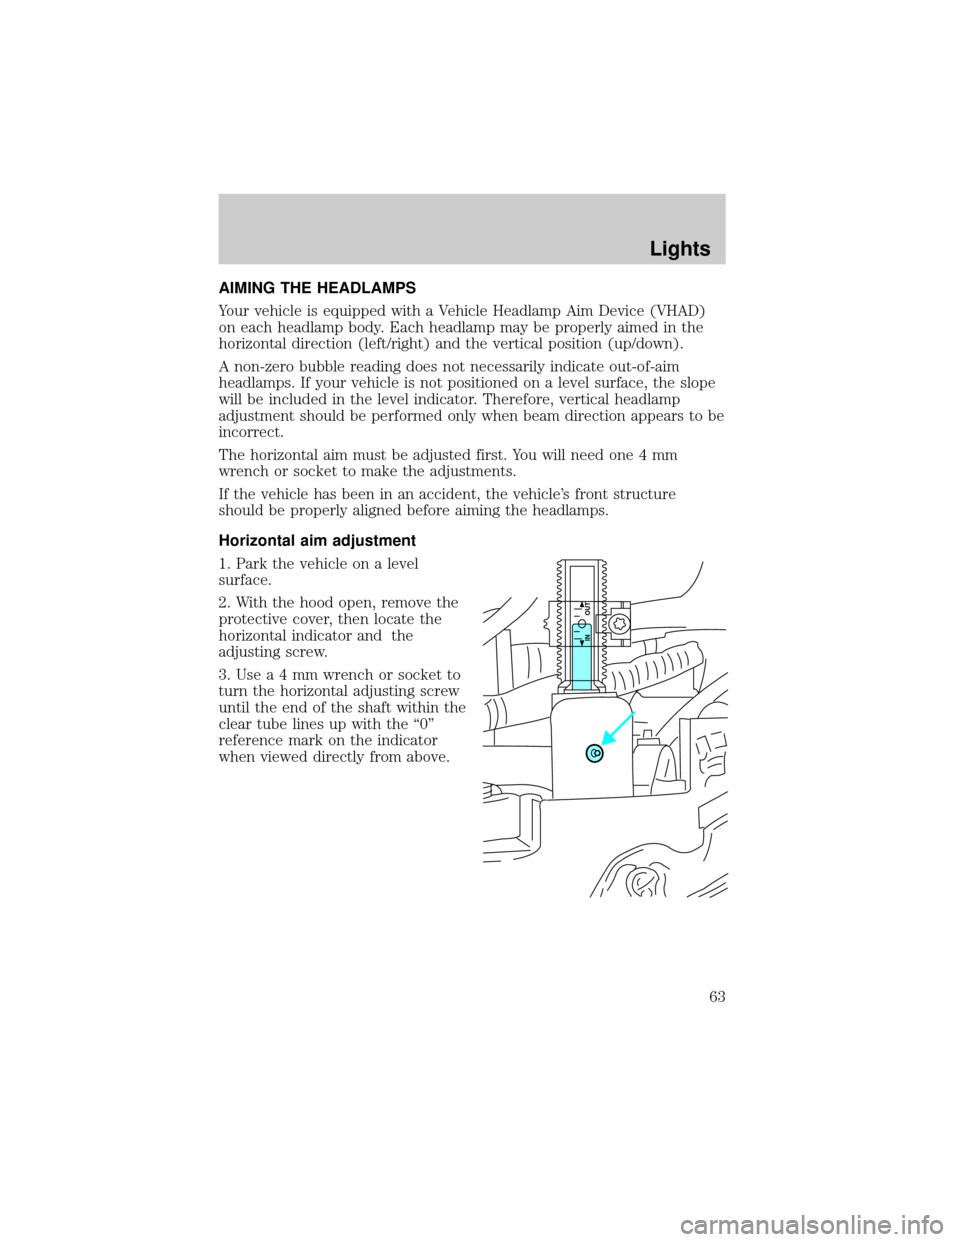
1. Park the vehicle on a level
surface.
2. With the hood open, remove the
protective cover, then locate the
horizontal indicator and the
adjusting screw.
3.Usea4mmwrench or socket to
turn the horizontal adjusting screw
until the end of the shaft within the
clear tube lines up with the ª0º
reference mark on the indicator
when viewed directly from above.
IN OUT
Lights
63
Page 64 of 288
Vertical aim adjustment
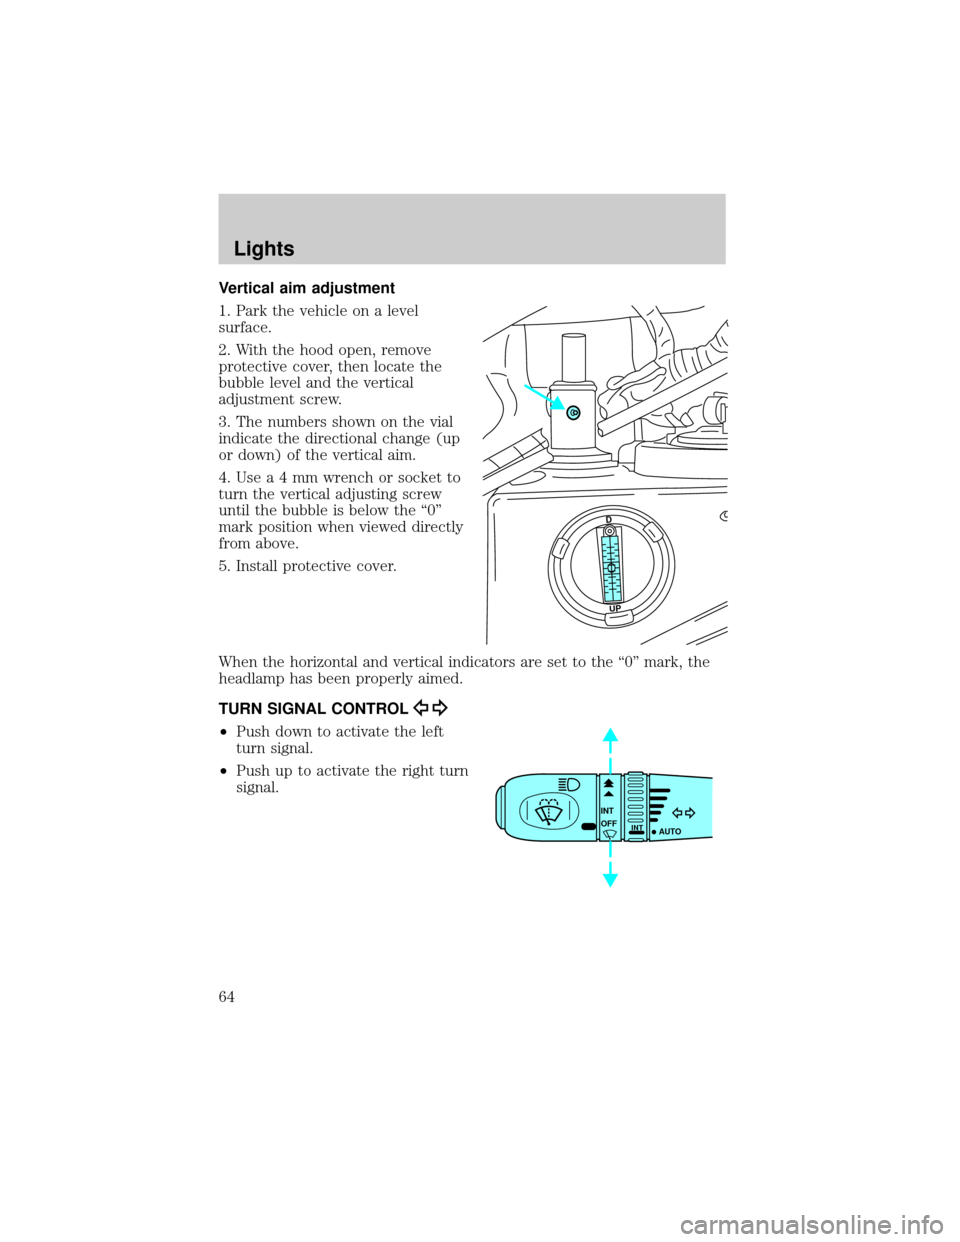
1. Park the vehicle on a level
surface.
2. With the hood open, remove
protective cover, then locate the
bubble level and the vertical
adjustment screw.
3. The numbers shown on the vial
indicate the directional change (up
or down) of the vertical aim.
4.Usea4mmwrench or socket to
turn the vertical adjusting screw
until the bubble is below the ª0º
mark position when viewed directly
from above.
5. Install protective cover.
When the horizontal and vertical indicators are set to the ª0º mark, the
headlamp has been properly aimed.
TURN SIGNAL CONTROL
┬▓Push down to activate the left
turn signal.
┬▓Push up to activate the right turn
signal.
UPD
INT
INTOFF
AUTO
Lights
64
Page 65 of 288
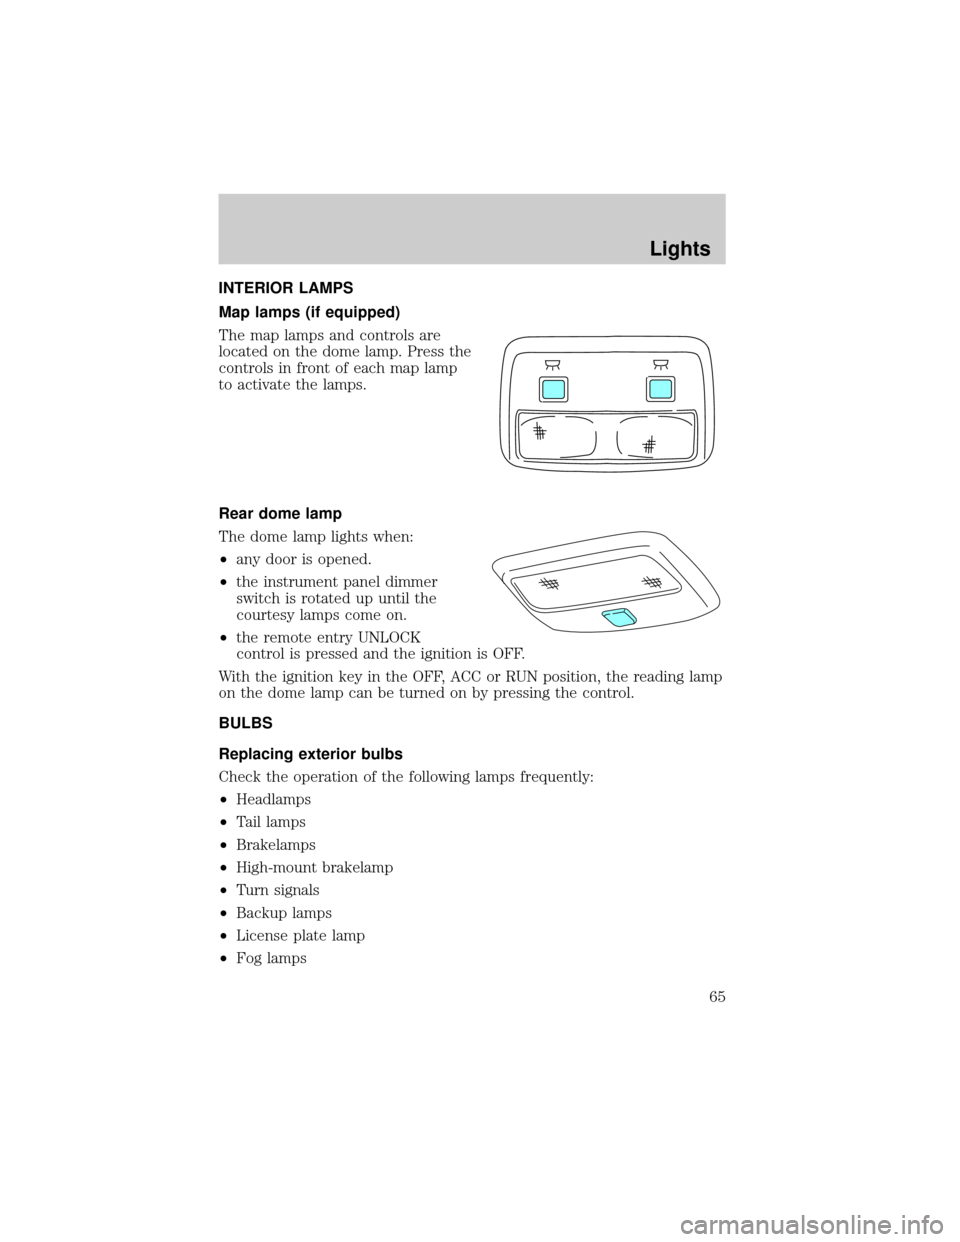
INTERIOR LAMPS
Map lamps (if equipped)
The map lamps and controls are
located on the dome lamp. Press the
controls in front of each map lamp
to activate the lamps.
Rear dome lamp
The dome lamp lights when:
┬▓any door is opened.
┬▓the instrument panel dimmer
switch is rotated up until the
courtesy lamps come on.
┬▓the remote entry UNLOCK
control is pressed and the ignition is OFF.
With the ignition key in the OFF, ACC or RUN position, the reading lamp
on the dome lamp can be turned on by pressing the control.
BULBS
Replacing exterior bulbs
Check the operation of the following lamps frequently:
┬▓Headlamps
┬▓Tail lamps
┬▓Brakelamps
┬▓High-mount brakelamp
┬▓Turn signals
┬▓Backup lamps
┬▓License plate lamp
┬▓Fog lamps
Lights
65
Page 66 of 288
Do not remove lamp bulbs unless they will be replaced immediately. If a
bulb is removed for an extended period of time, contaminants may enter
the lamp housings and affect performance.
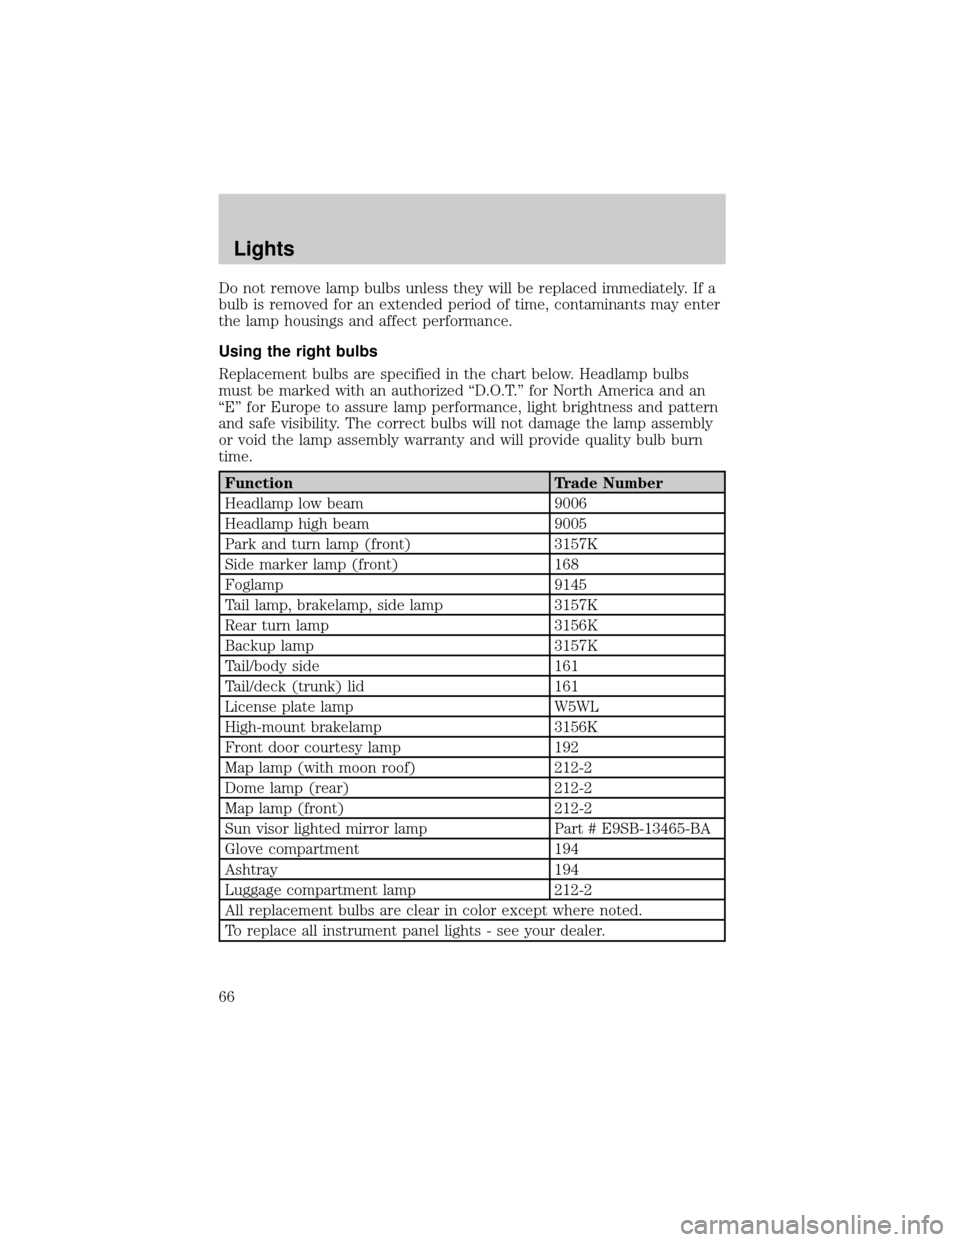
Using the right bulbs
Replacement bulbs are specified in the chart below. Headlamp bulbs
must be marked with an authorized ªD.O.T.º for North America and an
ªEº for Europe to assure lamp performance, light brightness and pattern
and safe visibility. The correct bulbs will not damage the lamp assembly
or void the lamp assembly warranty and will provide quality bulb burn
time.
Function Trade Number
Headlamp low beam 9006
Headlamp high beam 9005
Park and turn lamp (front) 3157K
Side marker lamp (front) 168
Foglamp 9145
Tail lamp, brakelamp, side lamp 3157K
Rear turn lamp 3156K
Backup lamp 3157K
Tail/body side 161
Tail/deck (trunk) lid 161
License plate lamp W5WL
High-mount brakelamp 3156K
Front door courtesy lamp 192
Map lamp (with moon roof) 212-2
Dome lamp (rear) 212-2
Map lamp (front) 212-2
Sun visor lighted mirror lamp Part # E9SB-13465-BA
Glove compartment 194
Ashtray 194
Luggage compartment lamp 212-2
All replacement bulbs are clear in color except where noted.
To replace all instrument panel lights - see your dealer.
Lights
66
Page 67 of 288
Interior bulbs
Check the operation of the following interior bulbs frequently:
┬▓front map lamps
┬▓Rear dome/reading lamp
For bulb replacement, see a dealer or qualified technician.
Map lamps
For bulb replacement, see a qualified service technician or your dealer.
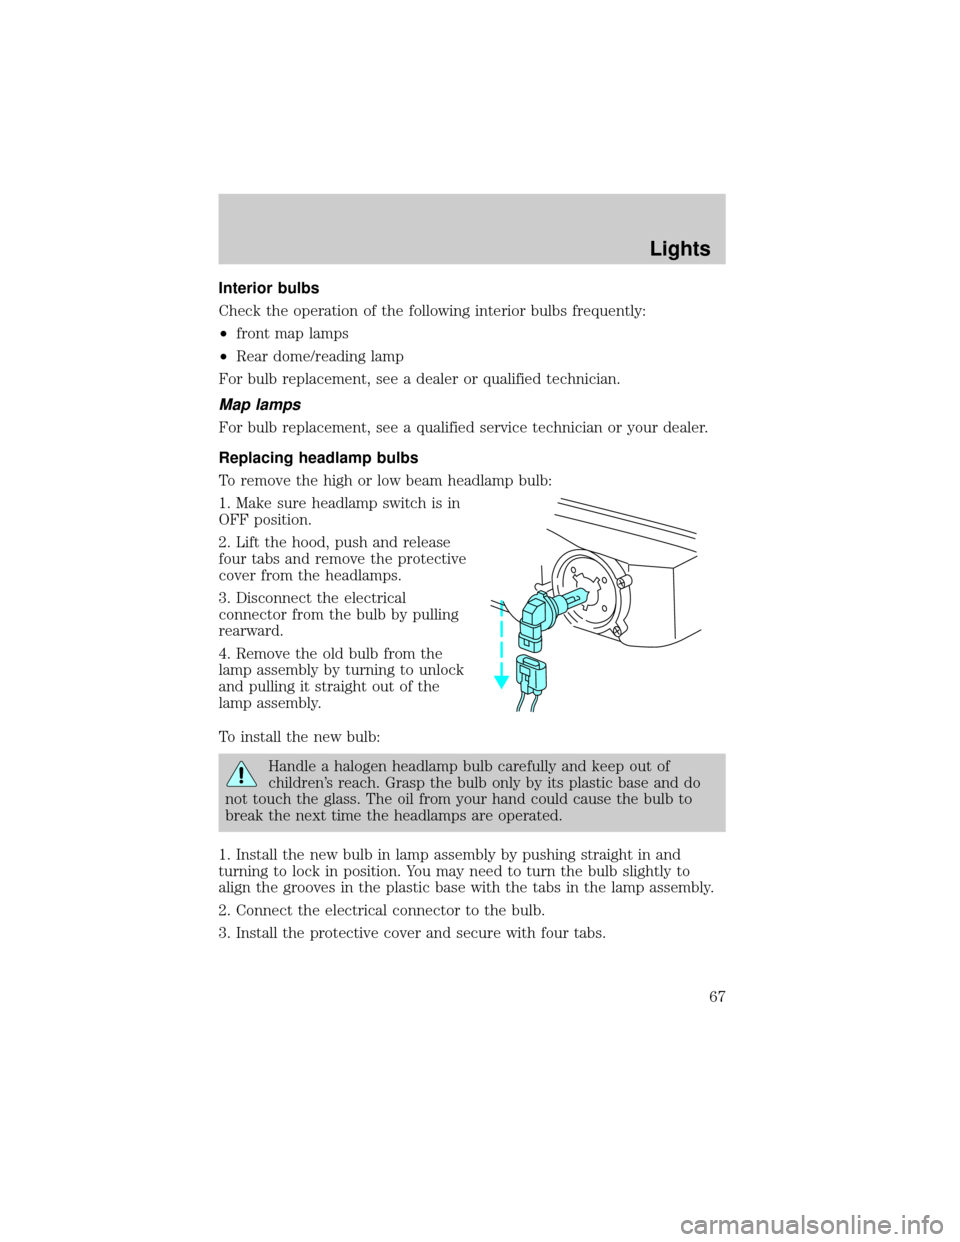
Replacing headlamp bulbs
To remove the high or low beam headlamp bulb:
1. Make sure headlamp switch is in
OFF position.
2. Lift the hood, push and release
four tabs and remove the protective
cover from the headlamps.
3. Disconnect the electrical
connector from the bulb by pulling
rearward.
4. Remove the old bulb from the
lamp assembly by turning to unlock
and pulling it straight out of the
lamp assembly.
To install the new bulb:
Handle a halogen headlamp bulb carefully and keep out of
children's reach. Grasp the bulb only by its plastic base and do
not touch the glass. The oil from your hand could cause the bulb to
break the next time the headlamps are operated.
1. Install the new bulb in lamp assembly by pushing straight in and
turning to lock in position. You may need to turn the bulb slightly to
align the grooves in the plastic base with the tabs in the lamp assembly.
2. Connect the electrical connector to the bulb.
3. Install the protective cover and secure with four tabs.
Lights
67
Page 68 of 288
4. Turn the headlamps on and make sure they work properly. If the
headlamp was correctly aligned before you changed the bulb, you should
not need to align it again.
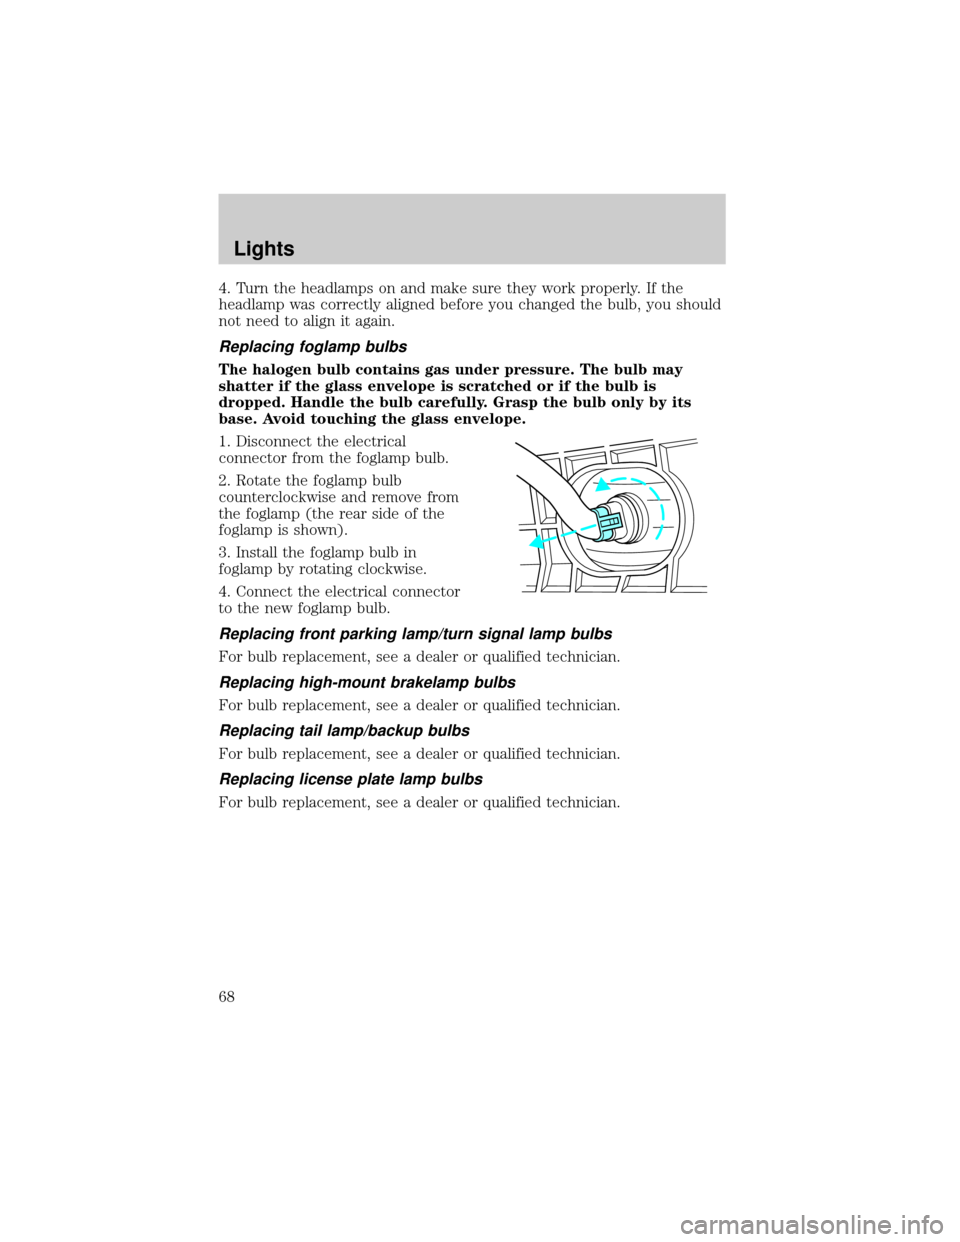
Replacing foglamp bulbs
The halogen bulb contains gas under pressure. The bulb may
shatter if the glass envelope is scratched or if the bulb is
dropped. Handle the bulb carefully. Grasp the bulb only by its
base. Avoid touching the glass envelope.
1. Disconnect the electrical
connector from the foglamp bulb.
2. Rotate the foglamp bulb
counterclockwise and remove from
the foglamp (the rear side of the
foglamp is shown).
3. Install the foglamp bulb in
foglamp by rotating clockwise.
4. Connect the electrical connector
to the new foglamp bulb.
Replacing front parking lamp/turn signal lamp bulbs
For bulb replacement, see a dealer or qualified technician.
Replacing high-mount brakelamp bulbs
For bulb replacement, see a dealer or qualified technician.
Replacing tail lamp/backup bulbs
For bulb replacement, see a dealer or qualified technician.
Replacing license plate lamp bulbs
For bulb replacement, see a dealer or qualified technician.
Lights
68
Page 69 of 288
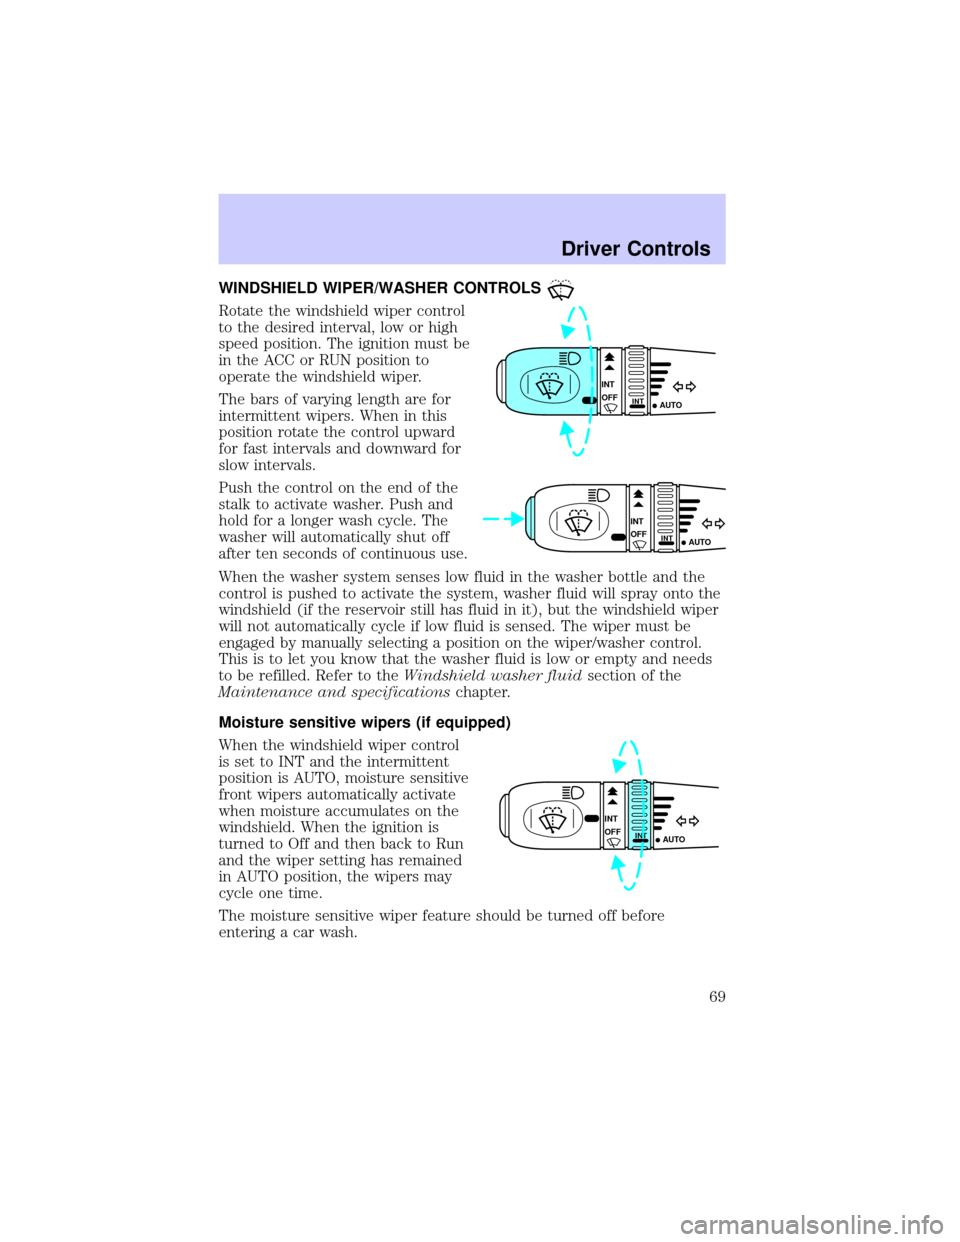
WINDSHIELD WIPER/WASHER CONTROLS
Rotate the windshield wiper control
to the desired interval, low or high
speed position. The ignition must be
in the ACC or RUN position to
operate the windshield wiper.
The bars of varying length are for
intermittent wipers. When in this
position rotate the control upward
for fast intervals and downward for
slow intervals.
Push the control on the end of the
stalk to activate washer. Push and
hold for a longer wash cycle. The
washer will automatically shut off
after ten seconds of continuous use.
When the washer system senses low fluid in the washer bottle and the
control is pushed to activate the system, washer fluid will spray onto the
windshield (if the reservoir still has fluid in it), but the windshield wiper
will not automatically cycle if low fluid is sensed. The wiper must be
engaged by manually selecting a position on the wiper/washer control.
This is to let you know that the washer fluid is low or empty and needs
to be refilled. Refer to theWindshield washer fluidsection of the
Maintenance and specificationschapter.
Moisture sensitive wipers (if equipped)
When the windshield wiper control
is set to INT and the intermittent
position is AUTO, moisture sensitive
front wipers automatically activate
when moisture accumulates on the
windshield. When the ignition is
turned to Off and then back to Run
and the wiper setting has remained
in AUTO position, the wipers may
cycle one time.
The moisture sensitive wiper feature should be turned off before
entering a car wash.
INT
INTOFF
AUTO
INT
INTOFF
AUTO
INT
INTOFF
AUTO
Driver Controls
69
Page 70 of 288
WINDSHIELD WIPER BLADES
Check the wiper blades at least twice a year or when they seem less
effective. Substances such as tree sap and some hot wax treatments used
by commercial car washes reduce the effectiveness of wiper blades.
In cold weather conditions, the wiper blades need to be thawed before
operating in order to prevent premature wear to the wiper blades. Before
operating the wiper blades in cold weather, refer to theElectric window
heatersin this chapter.
Checking the wiper blades
If the wiper blades do not wipe properly, clean both the windshield and
wiper blades using undiluted windshield wiper solution or a mild
detergent. Rinse thoroughly with clean water. To avoid damaging the
blades, do not use fuel, kerosene, paint thinner or other solvents.
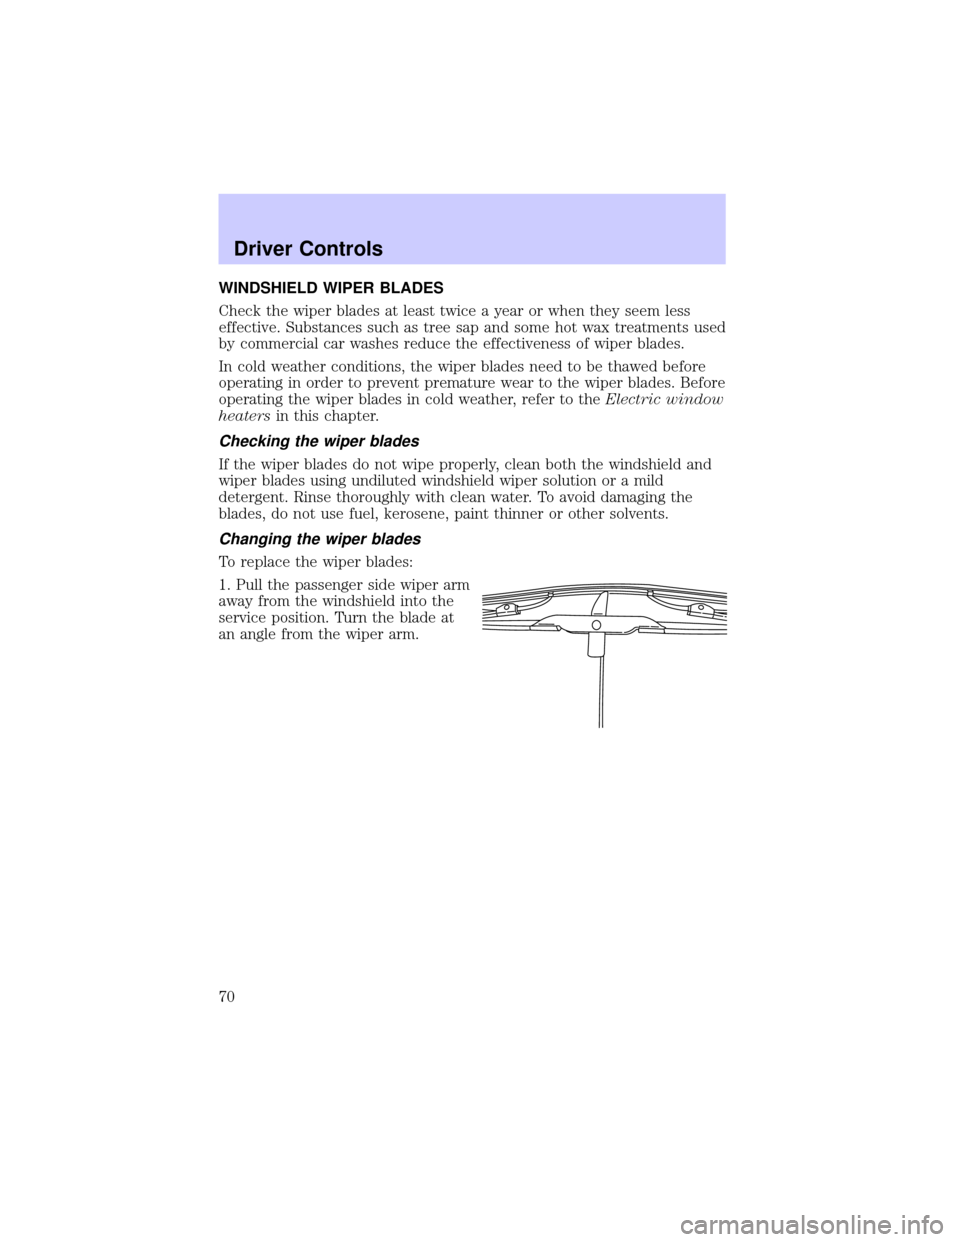
Changing the wiper blades
To replace the wiper blades:
1. Pull the passenger side wiper arm
away from the windshield into the
service position. Turn the blade at
an angle from the wiper arm.
Driver Controls
70