key LINCOLN LS 2003 Owner's Guide
[x] Cancel search | Manufacturer: LINCOLN, Model Year: 2003, Model line: LS, Model: LINCOLN LS 2003Pages: 288, PDF Size: 3.19 MB
Page 183 of 288
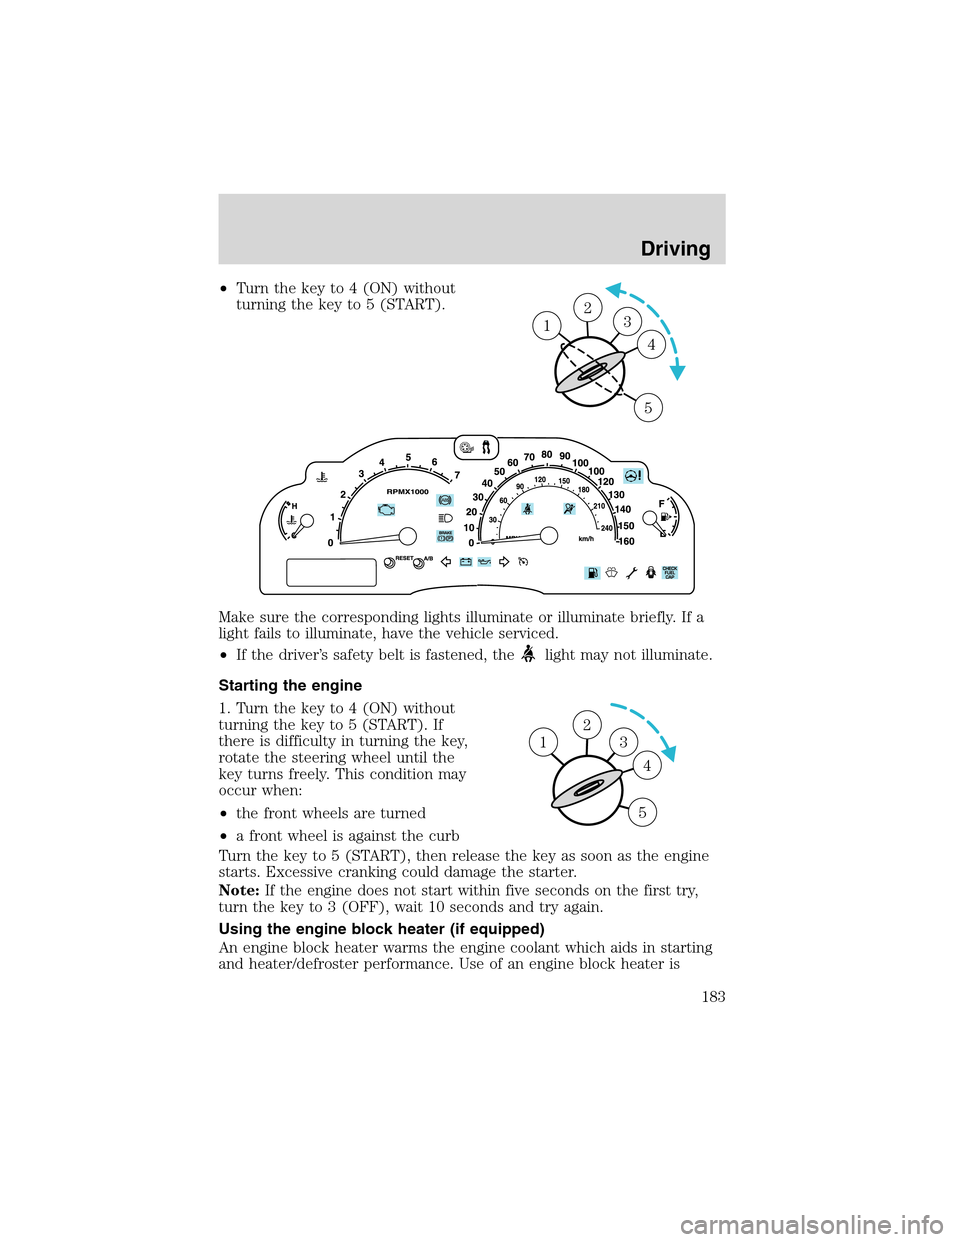
•Turnthekey to 4 (ON) without
turning the key to 5 (START).
Make sure the corresponding lights illuminate or illuminate briefly. If a
light fails to illuminate, have the vehicle serviced.
•If the driver’s safety belt is fastened, the
light may not illuminate.
Starting the engine
1. Turn the key to 4 (ON) without
turning the key to 5 (START). If
there is difficulty in turning the key,
rotate the steering wheel until the
key turns freely. This condition may
occur when:
•the front wheels are turned
•a front wheel is against the curb
Turn the key to 5 (START), then release the key as soon as the engine
starts. Excessive cranking could damage the starter.
Note:If the engine does not start within five seconds on the first try,
turn the key to 3 (OFF), wait 10 seconds and try again.
Using the engine block heater (if equipped)
An engine block heater warms the engine coolant which aids in starting
and heater/defroster performance. Use of an engine block heater is
23 1
4
5
2
3
4
5
1
Driving
183
Page 190 of 288
AUTOMATIC TRANSMISSION OPERATION
Brake-shift interlock
This vehicle is equipped with a brake-shift interlock feature that prevents
the gearshift lever from being moved from P (Park) when the ignition is
in the RUN position unless brake pedal is depressed.
If you cannot move the gearshift lever out of P (Park) with ignition in
the RUN position and the brake pedal depressed:
1. Apply the parking brake, turn ignition key to LOCK, then remove the
key.
2. Insert the key and turn it to OFF.Apply the brake pedal and shift
to N (Neutral).
When the key is in the ignition OFF position, the automatic
transmission shift lever can be moved from the P (Park) position
without the brake pedal depressed. To avoid unwanted vehicle
movement, always set the parking brake.
3. Start the vehicle.
If it is necessary to use the above procedure to move the gearshift lever,
it is possible that a fuse has blown or the vehicle’s brakelamps are not
operating properly. Refer toFuses and relaysin theRoadside
emergencieschapter.
Do not drive your vehicle until you verify that the brakelamps
are working.
Always set the parking brake fully and make sure the gearshift is
latched in P (Park). Turn the ignition to the LOCK position and
remove the key whenever you leave your vehicle.
If the parking brake is fully released, but the brake warning lamp
remains illuminated, the brakes may not be working properly.
See your dealer or a qualified service technician.
Driving
190
Page 191 of 288
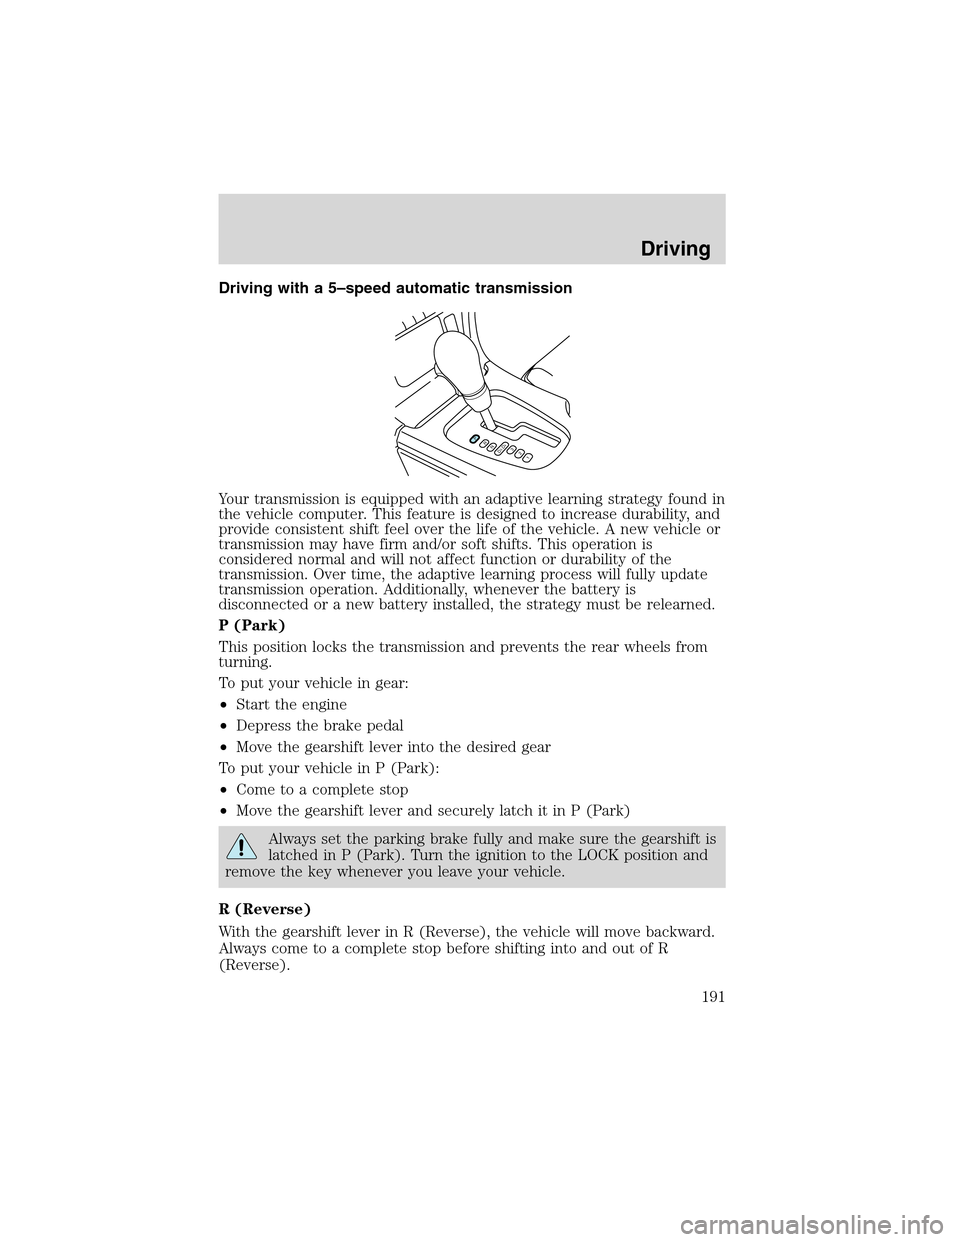
Driving with a 5–speed automatic transmission
Your transmission is equipped with an adaptive learning strategy found in
the vehicle computer. This feature is designed to increase durability, and
provide consistent shift feel over the life of the vehicle. A new vehicle or
transmission may have firm and/or soft shifts. This operation is
considered normal and will not affect function or durability of the
transmission. Over time, the adaptive learning process will fully update
transmission operation. Additionally, whenever the battery is
disconnected or a new battery installed, the strategy must be relearned.
P (Park)
This position locks the transmission and prevents the rear wheels from
turning.
To put your vehicle in gear:
•Start the engine
•Depress the brake pedal
•Move the gearshift lever into the desired gear
To put your vehicle in P (Park):
•Come to a complete stop
•Move the gearshift lever and securely latch it in P (Park)
Always set the parking brake fully and make sure the gearshift is
latched in P (Park). Turn the ignition to the LOCK position and
remove the key whenever you leave your vehicle.
R (Reverse)
With the gearshift lever in R (Reverse), the vehicle will move backward.
Always come to a complete stop before shifting into and out of R
(Reverse).
PRND5D4321
Driving
191
Page 202 of 288
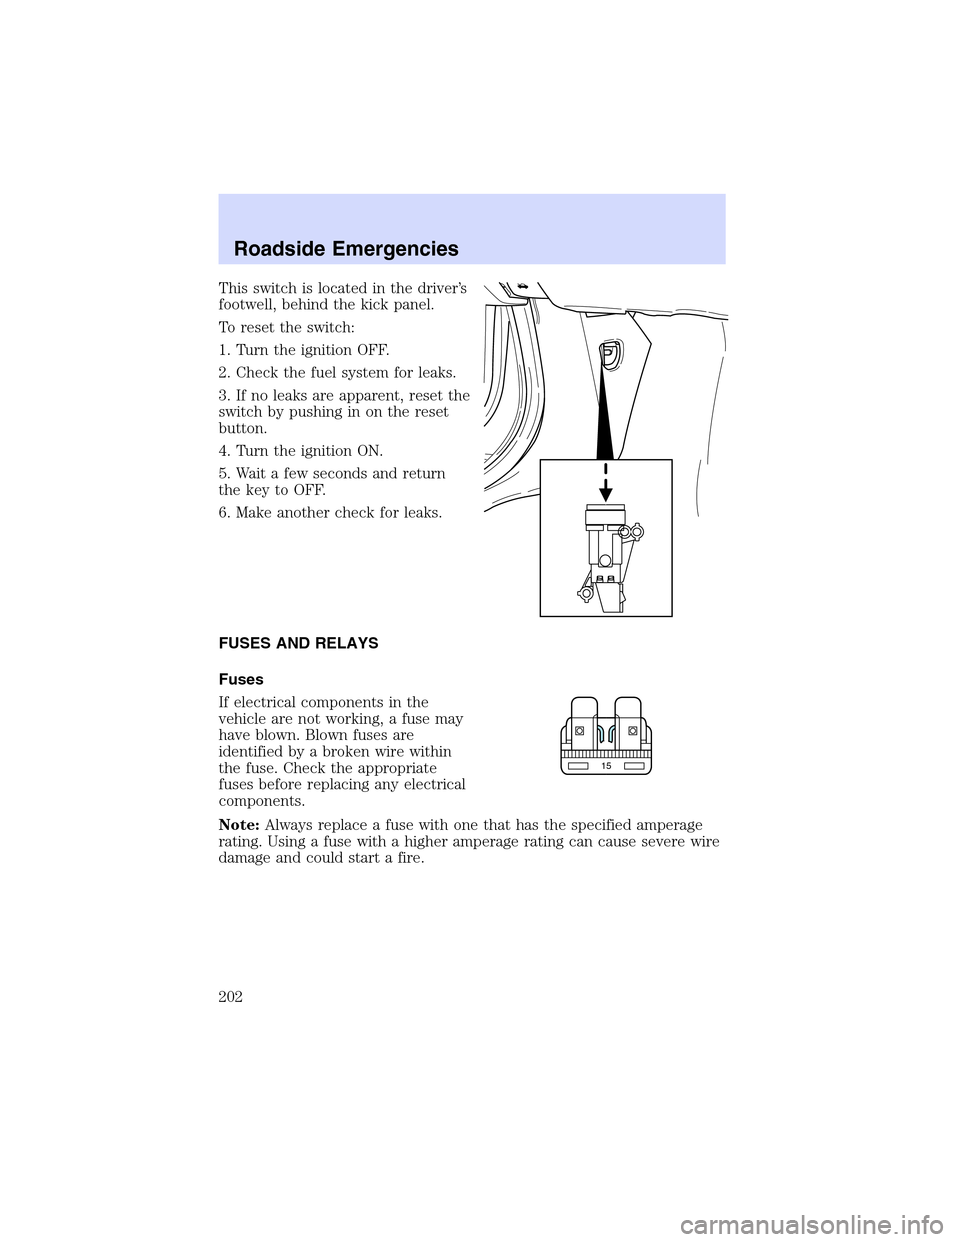
Thisswitch is located in the driver’s
footwell, behind the kick panel.
To reset the switch:
1. Turn the ignition OFF.
2. Check the fuel system for leaks.
3. If no leaks are apparent, reset the
switch by pushing in on the reset
button.
4. Turn the ignition ON.
5. Wait a few seconds and return
the key to OFF.
6. Make another check for leaks.
FUSES AND RELAYS
Fuses
If electrical components in the
vehicle are not working, a fuse may
have blown. Blown fuses are
identified by a broken wire within
the fuse. Check the appropriate
fuses before replacing any electrical
components.
Note:Always replace a fuse with one that has the specified amperage
rating. Using a fuse with a higher amperage rating can cause severe wire
damage and could start a fire.
15
Roadside Emergencies
202
Page 215 of 288
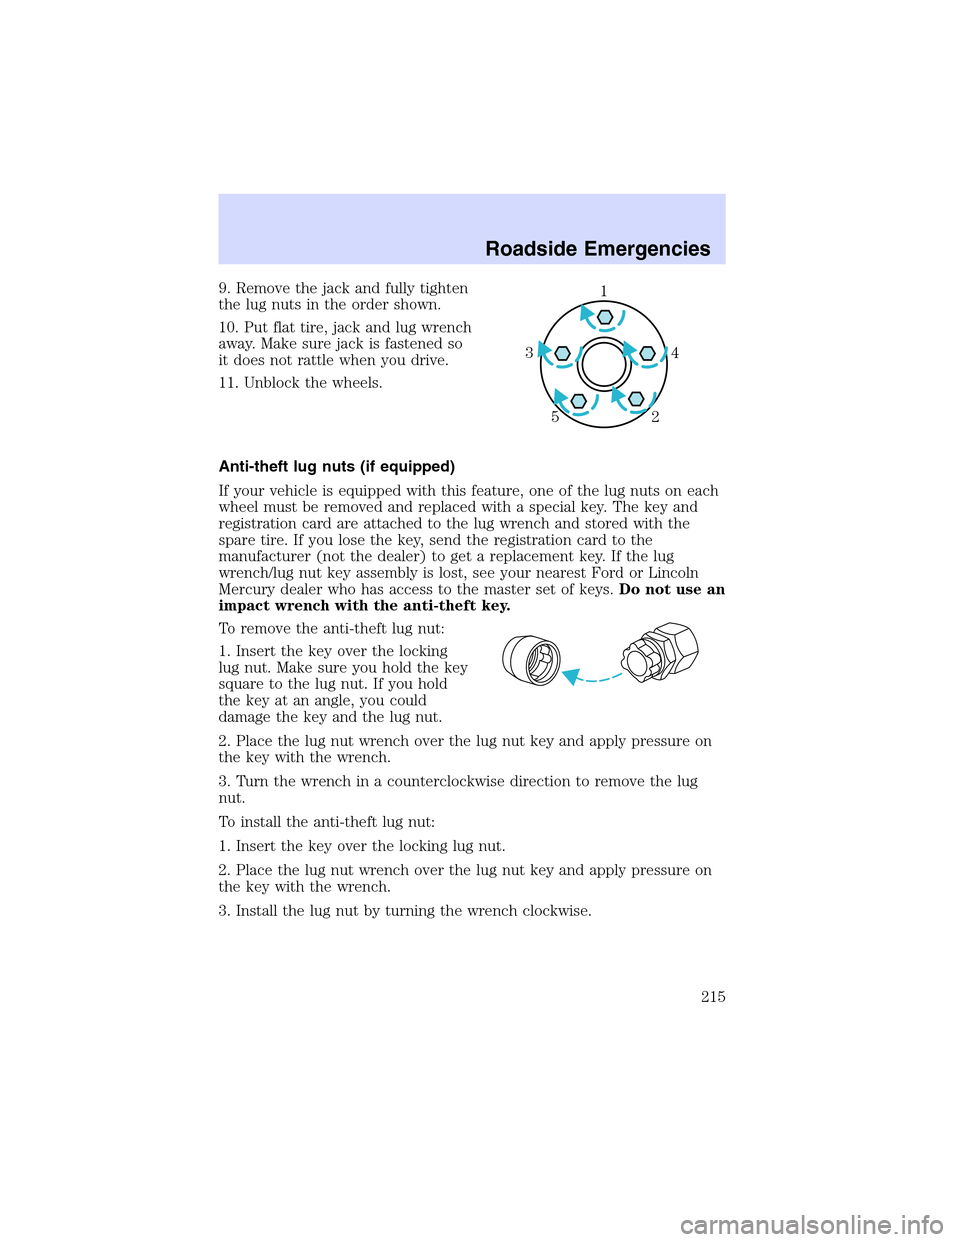
9. Remove the jack and fully tighten
the lug nuts in the order shown.
10. Put flat tire, jack and lug wrench
away. Make sure jack is fastened so
it does not rattle when you drive.
11. Unblock the wheels.
Anti-theft lug nuts (if equipped)
If your vehicle is equipped with this feature, one of the lug nuts on each
wheel must be removed and replaced with a special key. The key and
registration card are attached to the lug wrench and stored with the
spare tire. If you lose the key, send the registration card to the
manufacturer (not the dealer) to get a replacement key. If the lug
wrench/lug nut key assembly is lost, see your nearest Ford or Lincoln
Mercury dealer who has access to the master set of keys.Do not use an
impact wrench with the anti-theft key.
To remove the anti-theft lug nut:
1. Insert the key over the locking
lug nut. Make sure you hold the key
square to the lug nut. If you hold
the key at an angle, you could
damage the key and the lug nut.
2. Place the lug nut wrench over the lug nut key and apply pressure on
the key with the wrench.
3. Turn the wrench in a counterclockwise direction to remove the lug
nut.
To install the anti-theft lug nut:
1. Insert the key over the locking lug nut.
2. Place the lug nut wrench over the lug nut key and apply pressure on
the key with the wrench.
3. Install the lug nut by turning the wrench clockwise.1
4 3
2 5
Roadside Emergencies
215
Page 216 of 288
JUMP STARTING YOUR VEHICLE
The gases around the battery can explode if exposed to flames,
sparks, or lit cigarettes. An explosion could result in injury or
vehicle damage.
Batteries contain sulfuric acid which can burn skin, eyes and
clothing, if contacted.
Do not attempt to push-start your vehicle. Automatic
transmissions do not have push-start capability; also, the
catalytic converter may become damaged.
In the event of battery failure, you can open the trunk by using your
master key on the key cylinderlocated behind the driver’s seat.
Preparing your vehicle
Your battery is located in the trunk of your vehicle.
When the battery is disconnected or a new battery is installed, the
transmission must relearn its shift strategy. As a result, the transmission
may have firm and/or soft shifts. This operation is considered normal and
will not affect function or durability of the transmission. Over time, the
adaptive learning process will fully update transmission operation.
1.Use only a 12–volt supply to start your vehicle.
2. Do not disconnect the battery of your disabled vehicle as this could
damage the vehicle’s electrical system. Keep the battery vent hose
attached at all times.
3. Park the booster vehicle close to the trunk of your disabled vehicle
making sure the two vehiclesdo nottouch. Set the parking brake on
both vehicles and stay clear of the engine cooling fan and other moving
parts.
4. Check all battery terminals and remove any excessive corrosion before
you attach the battery cables. Ensure the vent caps are tight and level.
5. Turn the heater fan on in both vehicles to protect any electrical
surges. Turn all other accessories off.
Roadside Emergencies
216
Page 239 of 288
SERVICE RECOMMENDATIONS
To help you service your vehicle:
•We highlight do-it-yourself items in the engine compartment for easy
location.
•We provide a scheduled maintenance guide which makes tracking
routine service easy.
If your vehicle requires professional service, your dealership can provide
the necessary parts and service. Check yourWarranty Guide/Owner
Information Guideto find out which parts and services are covered.
Use only recommended fuels, lubricants, fluids and service parts
conforming to specifications. Motorcraft parts are designed and built to
provide the best performance in your vehicle.
PRECAUTIONS WHEN SERVICING YOUR VEHICLE
•Do not work on a hot engine.
•Make sure that nothing gets caught in moving parts.
•Do not work on a vehicle with the engine running in an enclosed
space, unless you are sure you have enough ventilation.
•Keep all open flames and other lit material away from the battery and
all fuel related parts.
Working with the engine off
1. Set the parking brake and ensure the gearshift is securely latched in P
(Park).
2. Turn off the engine and remove the key.
3. Block the wheels to prevent the vehicle from moving unexpectedly.
Working with the engine on
1. Set the parking brake and shift to P (Park).
2. Block the wheels.
Note:Do not start your engine with the air cleaner removed and do not
remove it while the engine is running.
Maintenance and Specifications
239
Page 284 of 288
J
Jack ............................................211
positioning ...............................211
storage .....................................211
Jump-starting your vehicle ......216
K
Keyless entry system ...............129
autolock ...................................128
Keys ...........................................120
positions of the ignition .........181
valet key ..................................120
L
Lamps
autolamp system .......................77
bulb replacement
specifications chart ..................81
cargo lamps ...............................79
daytime running light ...............78
fog lamps ...................................78
headlamps .................................77
headlamps, flash to pass ..........79
instrument panel, dimming .....79
interior lamps .....................81–82
replacing bulbs ...................81–85
Lane change indicator
(see Turn signal) ........................81
Lights, warning and indicator ....10
anti-lock brakes (ABS) ..........184
Load limits .................................198
GAWR ......................................198
GVWR ......................................198
trailer towing ..........................198
Locks
autolock ...................................128
childproof ................................122doors ........................................120
Lubricant specifications ...274–275
Lug nuts, anti-theft ...................215
Lumbar support, seats .............136
M
Message center .................106, 108
select button ...........................106
warning messages ...................110
Mirrors ...................................89, 92
automatic dimming
rearview mirror .........................92
fold away ...................................95
heated ........................................94
programmable memory ..........128
side view mirrors (power) .......94
Moon roof ..................................101
Motorcraft parts ................258, 271
N
Navigation system .......................24
cd functions ..............................35
destination mode ......................48
map mode .................................39
quick start .................................27
radio functions ..........................29
O
Octane rating ............................257
Oil (see Engine oil) ..................243
P
Parking brake ............................185
Parts (see Motorcraft parts) ....271
Index
284