clock LINCOLN MARK VIII 1997 Owners Manual
[x] Cancel search | Manufacturer: LINCOLN, Model Year: 1997, Model line: MARK VIII, Model: LINCOLN MARK VIII 1997Pages: 315, PDF Size: 2.18 MB
Page 12 of 315

7
InstrumentationThe instrument panel (dashboard) on your vehicle is
divided into several different sections. The
illustrations on the following pages show the major
parts of the instrument panel that are described in
this chapter. Some items shown may not be on all
vehicles.
The main controls for the climate control system,
clock, and radio are on the instrument panel.
If you have radio transmitting equipment in your
vehicle, be aware that it can interfere with your
vehicle's electrical system and may cause the
instrumentation and/or convenience products to
have temporary, abnormal operation.NOTE:Any cleaner or polish that increases the
gloss (shine) of the upper part of the instrument
panel should be avoided. The dull finish in this area
is to help protect the driver from undesirable
windshield reflection.
File:03fnis8.ex
Update:Thu Jun 27 10:00:37 1996
Page 31 of 315

26ResetA press of the RESET control will allow you to
reset the current feature being displayed. Warnings,
Average Fuel Economy, Clock Set, Compass
Adjustment, Vehicle Settings, and Driver Settings
are the only features which respond to the RESET
control. Range and Instantaneous Fuel Economy
cannot be reset. That is, these features are
unaffected by pushing the RESET control.
Date/TimeA press of the DATE/TIME control allows you to
display and set/adjust the Day & Date, Time only,
and Elapsed Time features on the Message Center.q
Day & Date DisplayÐ A press of the
DATE/TIME control displays the Day & Date
Display. From this display the Day & Date can
be set/adjusted if desired. The display will give
instruction to help aid with the process. If the
set/adjustment procedure is started and nothing
is pressed for a minute, the Message Center will
exit the procedure automatically with the
currently selected Day & Date.
OTo set/adjust the Day & Date, press the
RESET control.
OPress DATE/TIME repeatedly to select the
correct day of the week.
OThen press RESET to proceed to the month
adjustment display.
File:03fnis8.ex
Update:Thu Jun 27 10:00:37 1996
Page 86 of 315

81
3. Rotate the headlamp control counterclockwise
from the OFF position.
NOTE:The Message Center will display the
amount of time that has been set for the autolamp
to turn off the headlamps after turning the key to
off.
4. The autolamp will automatically turn the lamps
on and off for you.
Do not put any articles on top of the photocell that
is located in the top right corner of the instrument
panel. This photocell controls the autolamp. If you
cover it, the photocell reacts as if it is nighttime,
and the lamps turn on.
To turn the autolamp off, rotate the headlamp
control clockwise to the OFF position.
To turn the autolamp off, rotate the headlamp
control clockwise to the OFF position. The message
center will display ªAUTOLAMP OFFº message.
q
The further you rotate the headlamp switch
counterclockwise, the longer the lamps will stay
on after you leave your vehicle. Similarly, if you
rotate the control only slightly, the headlamps
stay on for only a short time after you turn
your vehicle off.
Turning On Interior Lights/Instrument
Panel IlluminationWith the light control in the parking lamps or the
headlamps position, you can brighten or dim the
lights in the instrument panel. To do this, use the
thumbwheel to the left of the steering wheel. This
wheel also turns on the interior lights with the light
control on or off.
File:05fncf8.ex
Update:Thu Jun 27 10:02:20 1996
Page 87 of 315

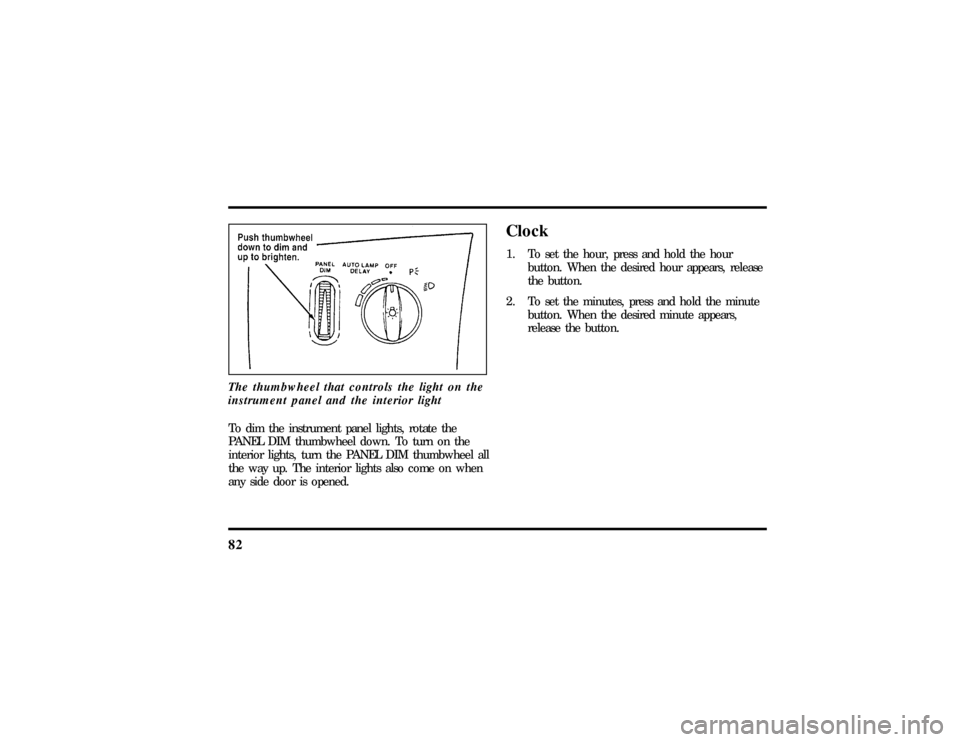
82The thumbwheel that controls the light on the
instrument panel and the interior lightTo dim the instrument panel lights, rotate the
PANEL DIM thumbwheel down. To turn on the
interior lights, turn the PANEL DIM thumbwheel all
the way up. The interior lights also come on when
any side door is opened.
Clock1. To set the hour, press and hold the hour
button. When the desired hour appears, release
the button.
2. To set the minutes, press and hold the minute
button. When the desired minute appears,
release the button.
File:05fncf8.ex
Update:Thu Jun 27 10:02:20 1996
Page 183 of 315

178To move the shifter out of P (Park), the ignition
key must be turned to the ON position. This
vehicle is also equipped with the brake shift
interlock safety feature which prevents shifting the
transmission out of the P (Park) position without
the brake pedal being depressed if the key is in the
ON position.
To operate:
1. Start the engine.
2. Depress and hold the brake pedal.
3. Move the gearshift lever out of P (Park).
Your vehicle is equipped with a Brake Shift
Interlock safety feature. This feature prevents the
gearshift from being moved from the P (Park)
position until the brake pedal is depressed. Thisfeature is active when the ignition is in the ON
position. If the gearshift lever CANNOT be moved
from P (Park) with the brake pedal depressed:
1. Turn the engine off and remove the ignition
key.
2. Apply parking brake.
3. Reinsert the ignition key and turn clockwise to
the first position.
4. Depress the brake pedal, move the gearshift
lever to N (Neutral) and start the engine.
If you need to shift out of P (Park) by using the
alternate procedure described above, it is possible
that a fuse has blown and that your brakelamps
may also not be functional. Please refer to the
Servicing Your Mark VIIIchapter for instructions on
checking and replacing fuses.
File:09fngf8.ex
Update:Wed Jun 19 10:45:23 1996
Page 212 of 315

207
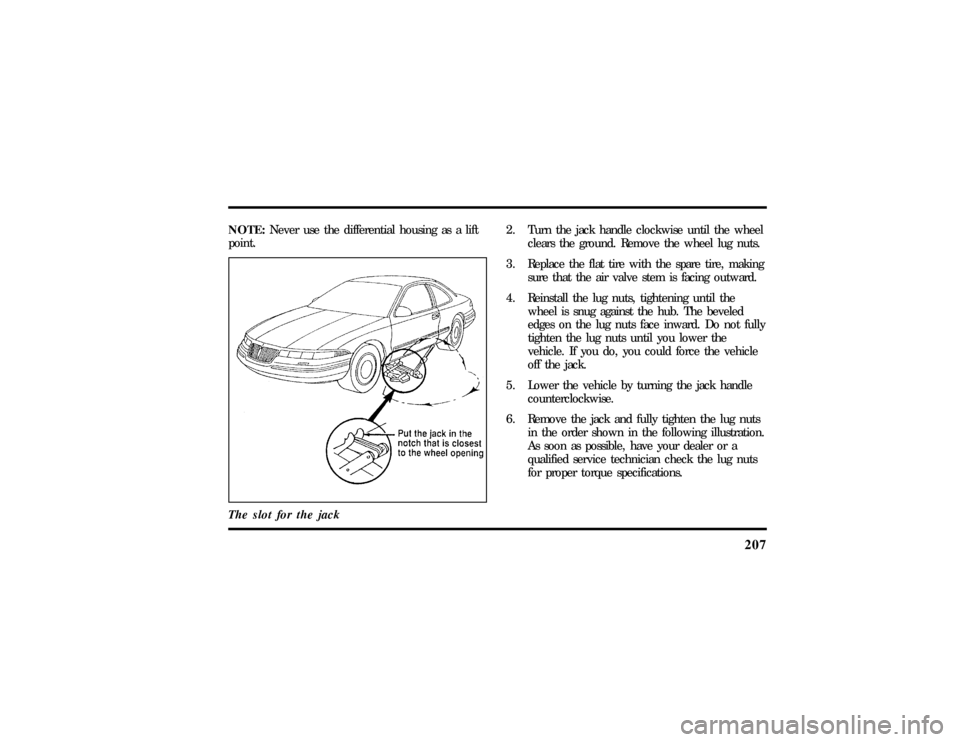
NOTE:Never use the differential housing as a lift
point.
The slot for the jack
2. Turn the jack handle clockwise until the wheel
clears the ground. Remove the wheel lug nuts.
3. Replace the flat tire with the spare tire, making
sure that the air valve stem is facing outward.
4. Reinstall the lug nuts, tightening until the
wheel is snug against the hub. The beveled
edges on the lug nuts face inward. Do not fully
tighten the lug nuts until you lower the
vehicle. If you do, you could force the vehicle
off the jack.
5. Lower the vehicle by turning the jack handle
counterclockwise.
6. Remove the jack and fully tighten the lug nuts
in the order shown in the following illustration.
As soon as possible, have your dealer or a
qualified service technician check the lug nuts
for proper torque specifications.
File:10fner8.ex
Update:Thu Jun 20 14:27:22 1996
Page 260 of 315

255
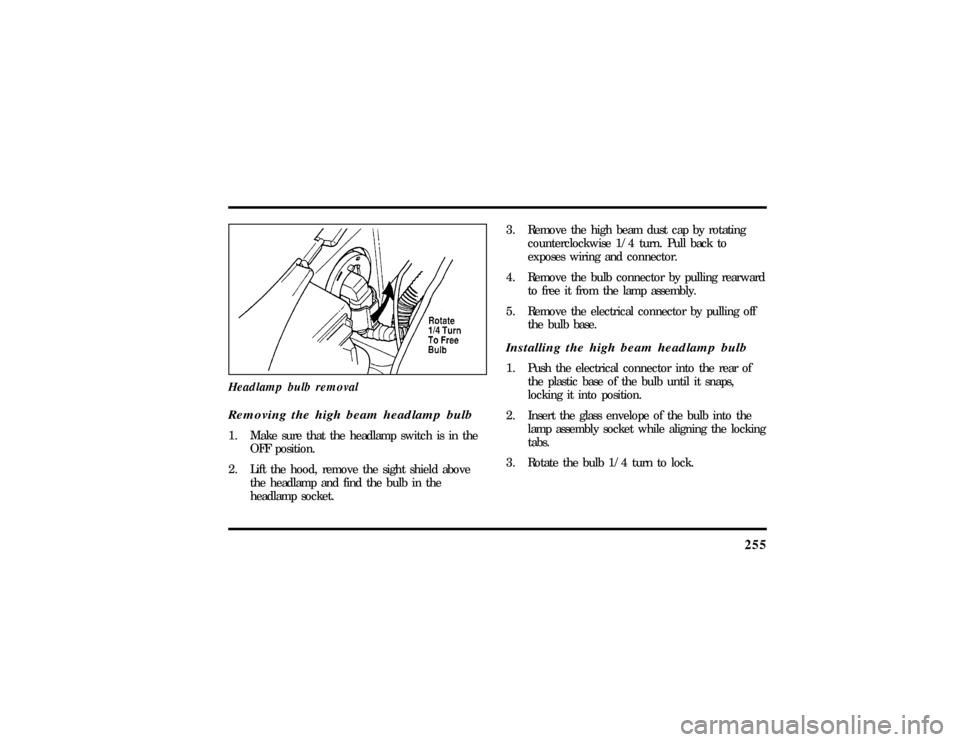
Headlamp bulb removalRemoving the high beam headlamp bulb1. Make sure that the headlamp switch is in the
OFF position.
2. Lift the hood, remove the sight shield above
the headlamp and find the bulb in the
headlamp socket.3. Remove the high beam dust cap by rotating
counterclockwise 1/4 turn. Pull back to
exposes wiring and connector.
4. Remove the bulb connector by pulling rearward
to free it from the lamp assembly.
5. Remove the electrical connector by pulling off
the bulb base.
Installing the high beam headlamp bulb1. Push the electrical connector into the rear of
the plastic base of the bulb until it snaps,
locking it into position.
2. Insert the glass envelope of the bulb into the
lamp assembly socket while aligning the locking
tabs.
3. Rotate the bulb 1/4 turn to lock.
File:11fnmc8.ex
Update:Thu Jun 20 14:28:32 1996
Page 261 of 315

2564. Replace the high beam dust cap by aligning
tabs and rotating clockwise 1/4 turn.
5. Replace the sight shield.Aiming HeadlampsYour vehicle is equipped with a Vehicle Headlamp
Aim Device (VHAD) on each headlamp body. Each
headlamp may be properly aimed in the horizontal
direction (left/right) and the vertical position
(up/down).
NOTE:A non-zero bubble reading does not
necessarily indicate out-of-aim headlamps. If your
vehicle is not positioned on a level surface, the
slope will be included in the level indicator.
Therefore, vertical headlamp adjustment should be
performed only when beam direction appears to be
incorrect or a level surface can be verified.Tools required: One 6mm socket and ratchet.
The Horizontal aim must be adjusted first.
NOTE:The following procedure assumes that the
vehicle's front structure is in factory alignment
condition. If the vehicle has been in an accident
requiring the front end of the vehicle to be
repaired, the horizontal indicator should be
recalibrated by the servicing facility.
File:11fnmc8.ex
Update:Thu Jun 20 14:28:32 1996
Page 300 of 315

299
Climate control system
air conditioning........... 69
electronic automatic temperature
control.............. 69
heating............... 69
Clock................. 82
Clutch
fluid reservoir............ 225
specifications............ 265
Combination lap and shoulder belts.... 138
Console, description.......... 115
Controls, mirrors............ 99
Convenience kit in cargo area...... 202
Coolant (see Engine coolant)....... 228
checking and adding......... 228
preparing for storage......... 267
refill capacities............ 264specifications............ 265
temperature gauge.......... 17
warnings.............. 228
Cooling fan.............. 217
Crankcase emission filter........ 263
Cruise control indicator light....... 13
Customer Assistance Centre,
Ford of Canada............ 276
D
Daytime running light system...... 78
Defects, reporting............ 269
Dipstick................ 223
automatic transmission fluid...... 234
engine oil.............. 223
power steering fluid......... 233
Disabled vehicle (see Towing)...... 213
Dispute Settlement Board........ 272
Doors................. 106
lubricant specifications........ 265
File:fnix8.ex
Update:Thu Jun 27 10:02:38 1996