parking brake LINCOLN MARK VIII 1997 Owners Manual
[x] Cancel search | Manufacturer: LINCOLN, Model Year: 1997, Model line: MARK VIII, Model: LINCOLN MARK VIII 1997Pages: 315, PDF Size: 2.18 MB
Page 83 of 315

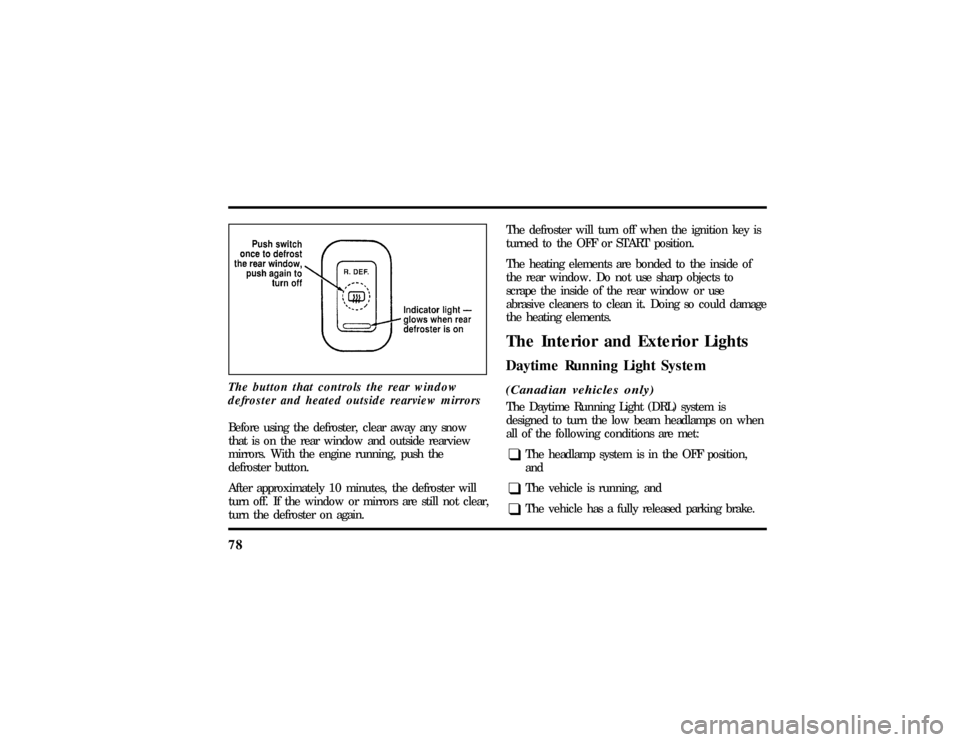
78The button that controls the rear window
defroster and heated outside rearview mirrorsBefore using the defroster, clear away any snow
that is on the rear window and outside rearview
mirrors. With the engine running, push the
defroster button.
After approximately 10 minutes, the defroster will
turn off. If the window or mirrors are still not clear,
turn the defroster on again.The defroster will turn off when the ignition key is
turned to the OFF or START position.
The heating elements are bonded to the inside of
the rear window. Do not use sharp objects to
scrape the inside of the rear window or use
abrasive cleaners to clean it. Doing so could damage
the heating elements.
The Interior and Exterior LightsDaytime Running Light System(Canadian vehicles only)The Daytime Running Light (DRL) system is
designed to turn the low beam headlamps on when
all of the following conditions are met:q
The headlamp system is in the OFF position,
and
q
The vehicle is running, and
q
The vehicle has a fully released parking brake.
File:05fncf8.ex
Update:Thu Jun 27 10:02:20 1996
Page 171 of 315

1663. Make sure that the gearshift is in P (Park) and
the parking brake is set before you turn the
key.
Before you start your vehicle, you should test the
warning lights on the instrument panel to make
sure that they work. Refer to theInstrumentation
chapter.Starting Your EngineTo start your engine:
1. Follow the steps underPreparing to Start Your
Vehicleat the beginning of this section.
2. Turn the ignition key to the ON position.
3. DO NOT depress the accelerator pedal when
starting your engine. DO NOT use the
accelerator while the vehicle is parked.
4. Turn the key to the START position (cranking)
until the engine starts. Allow the key to return
to the ON position after the engine has started.For a cold engine:
q
At temperatures10ÊF(-12ÊC) andbelow:If
the engine does not start infifteen (15)
secondson the first try, turn the key to OFF,
wait approximately ten (10) seconds so you do
not flood the engine, then try again.
q
At temperaturesabove10ÊF(-12ÊC):If the
engine does not start infive (5) secondson
the first try, turn the key to OFF, wait
approximately ten (10) seconds so you do not
flood the engine, then try again.
For a warm engine:
q
Do not hold the key in the START position for
more thanfive (5) secondsat a time. If the
engine does not start within five (5) seconds on
the first try, turn the key to the OFF position.
Wait a few seconds after the starter stops, then
try again.
File:08fnto8.ex
Update:Wed Jun 19 15:04:46 1996
Page 172 of 315

167
Whenever you start your vehicle, release the key as
soon as the engine starts. Excessive cranking could
damage the starter.
After you start the engine, let it idle for a few
seconds. Keep your foot on the brake pedal and put
the gearshift lever in gear. Release the parking
brake. Slowly release the brake pedal and drive
away in the normal manner.
NOTE:Your vehicle has an interlock that prevents
you from shifting out of P (Park) unless your foot is
on the brake pedal.
If the engine does not start after two attempts:
1. Turn the ignition key to the OFF position.
2. Press the accelerator all the way to the floor
and hold it.
3. Turn the ignition key to the START position.4. Release the ignition key when the engine starts.
5. Release the accelerator gradually as the engine
speeds up.
If the engine still does not start, the fuel pump
shut-off switch may have been activated. For
directions on how to reset the switch seeFuel
Pump Shut-Off Switchin the index.
A computer system controls the engine's idle speed.
When you start your vehicle, the engine's idle
speed normally runs higher than when it is warmed
up. These faster engine speeds will make your
vehicle move slightly faster than its normal idle
speed. It should, however, slow down after a short
time. If it does not, have the idle speed checked.
If the engine idle speed does not slow down
automatically, do not allow your vehicle to idle for
more than 10 minutes. Have the vehicle checked.
File:08fnto8.ex
Update:Wed Jun 19 15:04:46 1996
Page 179 of 315

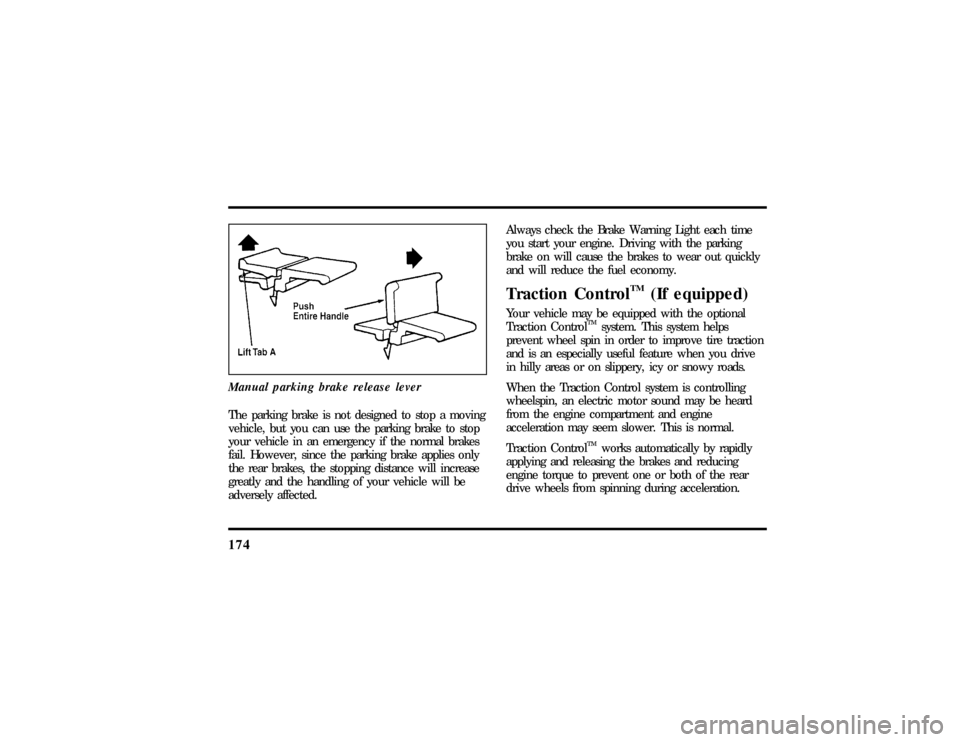
174Manual parking brake release leverThe parking brake is not designed to stop a moving
vehicle, but you can use the parking brake to stop
your vehicle in an emergency if the normal brakes
fail. However, since the parking brake applies only
the rear brakes, the stopping distance will increase
greatly and the handling of your vehicle will be
adversely affected.Always check the Brake Warning Light each time
you start your engine. Driving with the parking
brake on will cause the brakes to wear out quickly
and will reduce the fuel economy.
Traction Control
TM
(If equipped)
Your vehicle may be equipped with the optional
Traction Control
TM
system. This system helps
prevent wheel spin in order to improve tire traction
and is an especially useful feature when you drive
in hilly areas or on slippery, icy or snowy roads.
When the Traction Control system is controlling
wheelspin, an electric motor sound may be heard
from the engine compartment and engine
acceleration may seem slower. This is normal.
Traction Control
TM
works automatically by rapidly
applying and releasing the brakes and reducing
engine torque to prevent one or both of the rear
drive wheels from spinning during acceleration.
File:09fngf8.ex
Update:Wed Jun 19 10:45:23 1996
Page 183 of 315

178To move the shifter out of P (Park), the ignition
key must be turned to the ON position. This
vehicle is also equipped with the brake shift
interlock safety feature which prevents shifting the
transmission out of the P (Park) position without
the brake pedal being depressed if the key is in the
ON position.
To operate:
1. Start the engine.
2. Depress and hold the brake pedal.
3. Move the gearshift lever out of P (Park).
Your vehicle is equipped with a Brake Shift
Interlock safety feature. This feature prevents the
gearshift from being moved from the P (Park)
position until the brake pedal is depressed. Thisfeature is active when the ignition is in the ON
position. If the gearshift lever CANNOT be moved
from P (Park) with the brake pedal depressed:
1. Turn the engine off and remove the ignition
key.
2. Apply parking brake.
3. Reinsert the ignition key and turn clockwise to
the first position.
4. Depress the brake pedal, move the gearshift
lever to N (Neutral) and start the engine.
If you need to shift out of P (Park) by using the
alternate procedure described above, it is possible
that a fuse has blown and that your brakelamps
may also not be functional. Please refer to the
Servicing Your Mark VIIIchapter for instructions on
checking and replacing fuses.
File:09fngf8.ex
Update:Wed Jun 19 10:45:23 1996
Page 186 of 315

181
When to use D (Overdrive)Overdrive is the usual driving position for an
automatic overdrive transmission. It works the same
way Drive works, automatically upshifting or
downshifting as the vehicle speeds or slows.
However, Overdrive also shifts into a fourth gear Ð
an overdrive gear Ð when your vehicle cruises at
an appropriate consistent speed for any length of
time. This fourth gear will increase your fuel
economy when you travel at cruising speeds.When to use Drive (D Ð with
Transmission Control Switch activated)Overdrive may not be appropriate for certain
terrain. If the transmission shifts back and forth
between Third and Fourth gears while you are
driving on hilly roads or if your vehicle does not
have adequate power for climbing hills, depress the
TCS.
You can depress the TCS at any speed.
When to use 2 (Second)Use 2 (Second) for start-up on slippery roads or to
give you more engine braking to slow your vehicle
on downgrades.When to use 1 (Low)Use 1 (Low) when driving down steep grades. It
gives more engine braking to slow your vehicle than
2 (Second) on the downgrades. You can upshift
from 1 (Low) to 2 (Second) or from 1 (Low) to
Overdrive at any speed.P (Park)Always come to a complete stop before you shift
into P (Park). Make sure that the gearshift is
securely latched in P (Park). This locks the
transmission and prevents the rear wheels from
rotating.
Always set the parking brake fully and make sure
the gearshift is latched in P (Park). Turn off the
ignition whenever you leave your vehicle.
File:09fngf8.ex
Update:Wed Jun 19 10:45:23 1996
Page 208 of 315

203
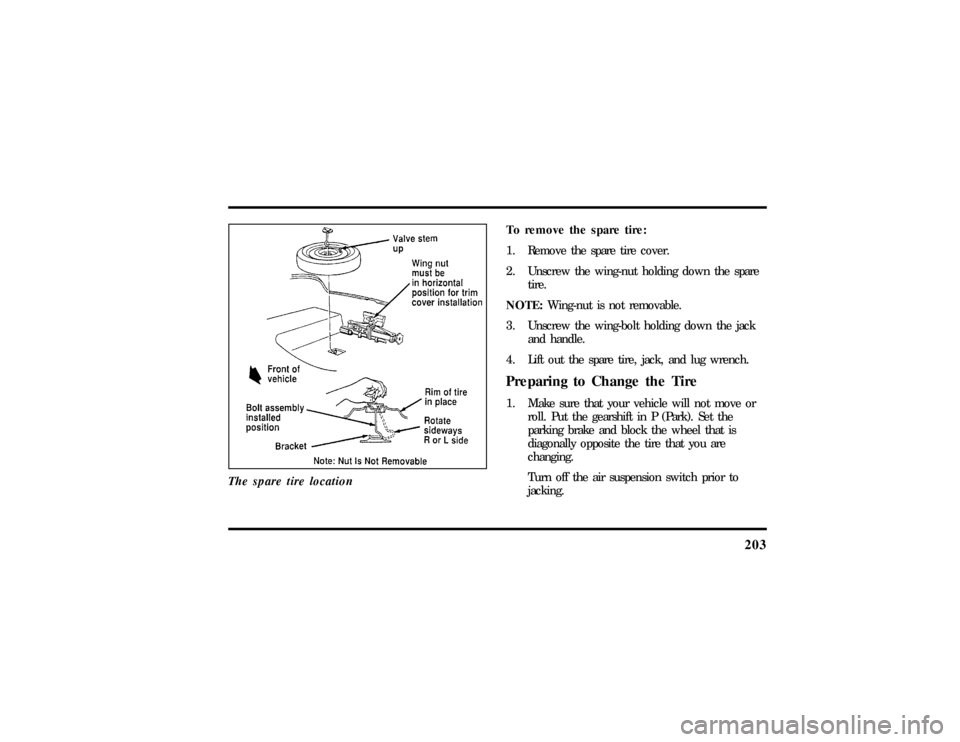
The spare tire location
To remove the spare tire:
1. Remove the spare tire cover.
2. Unscrew the wing-nut holding down the spare
tire.
NOTE:Wing-nut is not removable.
3. Unscrew the wing-bolt holding down the jack
and handle.
4. Lift out the spare tire, jack, and lug wrench.Preparing to Change the Tire1. Make sure that your vehicle will not move or
roll. Put the gearshift in P (Park). Set the
parking brake and block the wheel that is
diagonally opposite the tire that you are
changing.
Turn off the air suspension switch prior to
jacking.
File:10fner8.ex
Update:Thu Jun 20 14:27:22 1996
Page 216 of 315

211
2. Do not disconnect the battery of the disabled
vehicle. You could damage the vehicle's
electrical system.
3. Park the booster vehicle close to the hood of
the disabled vehicle.Make sure the vehicles
do not touch each other.Set the parking
brake on both vehicles and stay clear of the
engine cooling fan and other moving parts.
4. Check all battery terminals and remove any
excessive corrosion before you attach the
jumper cables.
5. Turn on the heater fan in both vehicles. Press
the DEFROST button. Turn off all other
switches and gauges.
Connecting the jumper cables1. Connect one end of the first jumper cable to
the positive (+) terminal of the discharged
battery. (You can connect either jumper cable
to the positive (+) terminal, as long as you use
the same cable for both positive terminals.)
Most jumper cables have a red cable and a
black cable. The red cable is generally used for
the positive terminals and the black for the
negative ones.
2. Connect the other end of the first cable to the
positive (+) terminal of the booster battery.
3. Connect one end of the second cable to the
negative (s) terminal of the booster battery Ð
NOT to the discharged battery.
4. Connect the other end of the second cable to a
good metallic surface on the engine or frame of
the disabled vehicle.
File:10fner8.ex
Update:Thu Jun 20 14:27:22 1996
Page 228 of 315

223
Checking and Adding Engine OilSince the proper amount of engine oil is important
for safe engine operation, check the oil using the
dipstick each time you put fuel in your vehicle.
Remember the engine must be off, the oil must be
warm and the vehicle must be parked on level
ground.
Checking the engine oil level:
1. Turn the engine off after it has warmed up and
allow a few minutes for the engine oil to drain
back into the oil pan.
2. Set the parking brake, making sure the gearshift
is securely latched in P (Park).
3. Open the hood. Protect yourself from engine
heat.
4. Locate the engine oil dipstick (highlighted in
yellow) and carefully pull it out of the engine.5. Wipe the dipstick clean and put it back into
position, making sure it is fully seated.
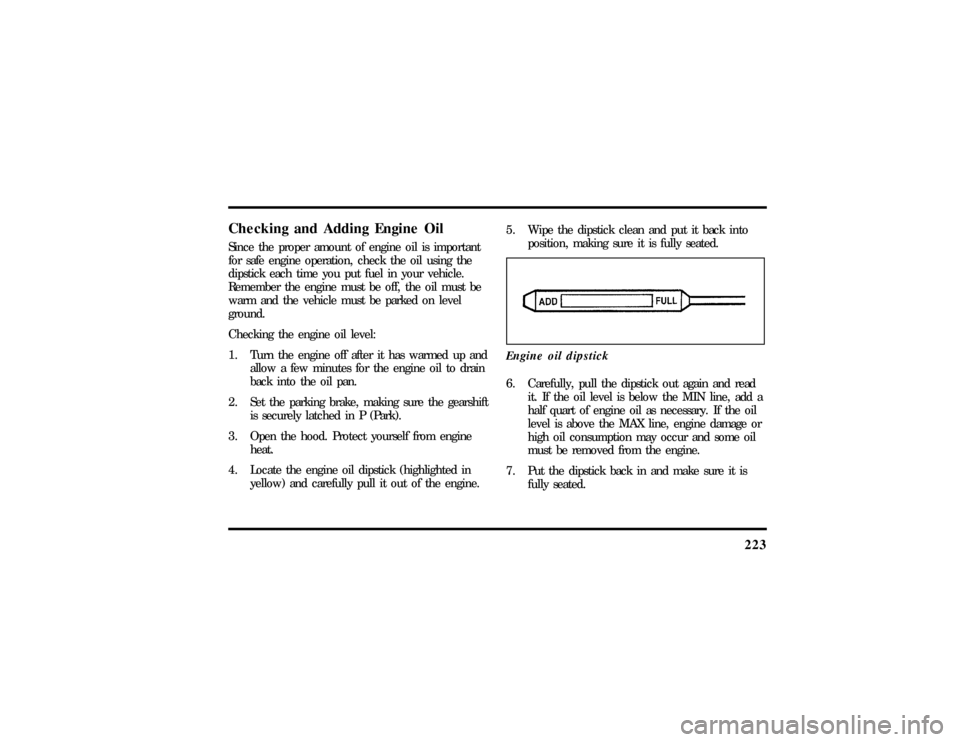
Engine oil dipstick
6. Carefully, pull the dipstick out again and read
it. If the oil level is below the MIN line, add a
half quart of engine oil as necessary. If the oil
level is above the MAX line, engine damage or
high oil consumption may occur and some oil
must be removed from the engine.
7. Put the dipstick back in and make sure it is
fully seated.
File:11fnmc8.ex
Update:Thu Jun 20 14:28:32 1996
Page 240 of 315

235
NOTE:If the vehicle has been operated for an
extended period at high speeds or in city traffic
during hot weather, or pulling a trailer, the vehicle
should be turned off for about 30 minutes to allow
the fluid to cool before checking.Checking the Automatic Transmission
FluidWith the vehicle on a level surface and the brake
fully applied, start the engine and move the gear
shift selector through all of the gears allowing
sufficient time for each position to engage. Securely
latch the gear shift selector in the P (Park) position.
Fully set the parking brake and leave the engine
running.
NOTE:Your vehicle should not be driven if the
fluid level does not appear on the dipstick tip and
outside temperatures are above50ÊF(10ÊC).
Wipe off the dipstick cap and pull the dipstick out.
Wipe the indicator end clean. Put the dipstick back
into the filler tube and make sure it is fully seated.Pull the dipstick out and read the fluid level.
When checking fluid at normal operating
temperatures150ÊF-170ÊF (66ÊC-77ÊC), thefluid
level should be within the ªHOTº notched area on
the dipstick. When the vehicle has not been driven,
and outside temperatures are above68ÊF(20ÊC),
the fluid levels should be between the ªHOTº
notch and the tip end of the dipstick.
Adding Automatic Transmission FluidBefore adding any fluid, be sure that the correct
type will be used. Use only MerconHFluid, as
shown on handle.
Add fluid in 1/2 pint (250ML) increments through
the filler tube to bring the level to the correct area
on the dipstick. DO NOT OVERFILL. If the level is
above the top hole on the dipstick, excess fluid
should be removed by a qualified technician.
File:11fnmc8.ex
Update:Thu Jun 20 14:28:32 1996