sensor LINCOLN MKC 2016 User Guide
[x] Cancel search | Manufacturer: LINCOLN, Model Year: 2016, Model line: MKC, Model: LINCOLN MKC 2016Pages: 432, PDF Size: 4.89 MB
Page 53 of 432
Your vehicle has a collection of crash and
occupant sensors which provide information
to the restraints control module which
deploys (activates) the front safety belt
pretensioners, driver airbag, passenger
airbag, knee airbag(s), seat mounted side
airbags, and the Safety Canopy. Based on
the type of accident (frontal impact, side
impact or rollover) the restraints control
module will deploy the appropriate safety
devices.
The restraints control module also monitors
the readiness of the above safety devices
plus the crash and occupant sensors. A
warning indicator light in the instrument
cluster indicates the readiness of the safety
system. If this warning indicator light is not
functioning and there is another fault within
the system, the message cluster may display
an airbag failure warning. See Information
Displays (page 109). You will hear five tones
that repeat periodically until you repair the
problem, the warning indicator light or both.
Routine maintenance of the airbag is not
required.
A difficulty with the system is indicated by
one or more of the following: •
The readiness light will not illuminate
immediately after the ignition is turned
on.
• The readiness light will either flash or
stay lit.
• A series of five beeps will be heard. The
tone pattern will repeat periodically until
the problem, the light or both are
repaired.
If any of these things happen, even
intermittently, have the supplemental
restraint system serviced at an authorized
dealer immediately. Unless serviced, the
system may not function properly in the
event of a crash.
The safety belt pretensioners and the airbag
supplemental restraint system is designed
to activate when your vehicle sustains frontal
or sideways deceleration sufficient to cause
the restraints control module to deploy a
safety device or when a certain likelihood of
a rollover event is detected by the rollover
sensor. The fact that the safety belt pretensioners or
airbags did not activate for both front seat
occupants in a crash does not mean that
something is wrong with the system. Rather,
it means the restraints control module
determined the accident conditions (for
example, crash severity, belt usage) were
not appropriate to activate these safety
devices.
•
The design of the front airbags is to
activate only in frontal and near-frontal
crashes (not rollovers, side impacts or
rear impacts) unless the crash causes
sufficient frontal deceleration.
• The safety belt pretensioners are
designed to activate in frontal,
near-frontal, side and rollover crashes.
• The design of the side airbags is to inflate
in certain side crashes. Side airbags may
activate in other types of crashes if the
vehicle experiences sufficient sideways
motion or deformation.
50
MKC (TME), enUSA, First Printing Supplementary Restraints System
Page 54 of 432
•
The knee airbag(s) may deploy based on
crash severity and occupant conditions.
• The design of the Safety Canopy is to
inflate in certain side impact crashes and
when a certain likelihood of rollover is
detected by the rollover sensor. The
Safety Canopy may activate in other
types of crashes if the vehicle
experiences sufficient sideways motion
or deformation, or a certain likelihood of
rollover.
AIRBAG DISPOSAL
Contact your authorized dealer as soon as
possible. Airbags must be disposed of by
qualified personnel.
51
MKC (TME), enUSA, First Printing Supplementary Restraints System
Page 69 of 432
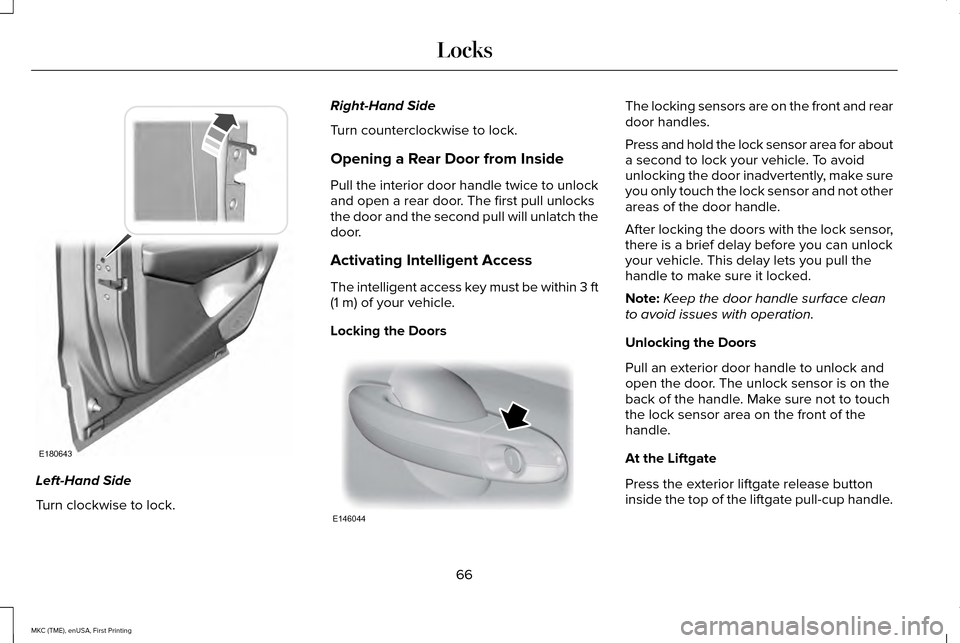
Left-Hand Side
Turn clockwise to lock. Right-Hand Side
Turn counterclockwise to lock.
Opening a Rear Door from Inside
Pull the interior door handle twice to unlock
and open a rear door. The first pull unlocks
the door and the second pull will unlatch the
door.
Activating Intelligent Access
The intelligent access key must be within 3 ft
(1 m) of your vehicle.
Locking the Doors The locking sensors are on the front and rear
door handles.
Press and hold the lock sensor area for about
a second to lock your vehicle. To avoid
unlocking the door inadvertently, make sure
you only touch the lock sensor and not other
areas of the door handle.
After locking the doors with the lock sensor,
there is a brief delay before you can unlock
your vehicle. This delay lets you pull the
handle to make sure it locked.
Note:
Keep the door handle surface clean
to avoid issues with operation.
Unlocking the Doors
Pull an exterior door handle to unlock and
open the door. The unlock sensor is on the
back of the handle. Make sure not to touch
the lock sensor area on the front of the
handle.
At the Liftgate
Press the exterior liftgate release button
inside the top of the liftgate pull-cup handle.
66
MKC (TME), enUSA, First Printing LocksE180643 E146044
Page 76 of 432
When Opening
The system stops when it detects an
obstacle and three tones sound. Once you
remove the obstacle, you can continue to
operate the liftgate.
Hands-Free Feature
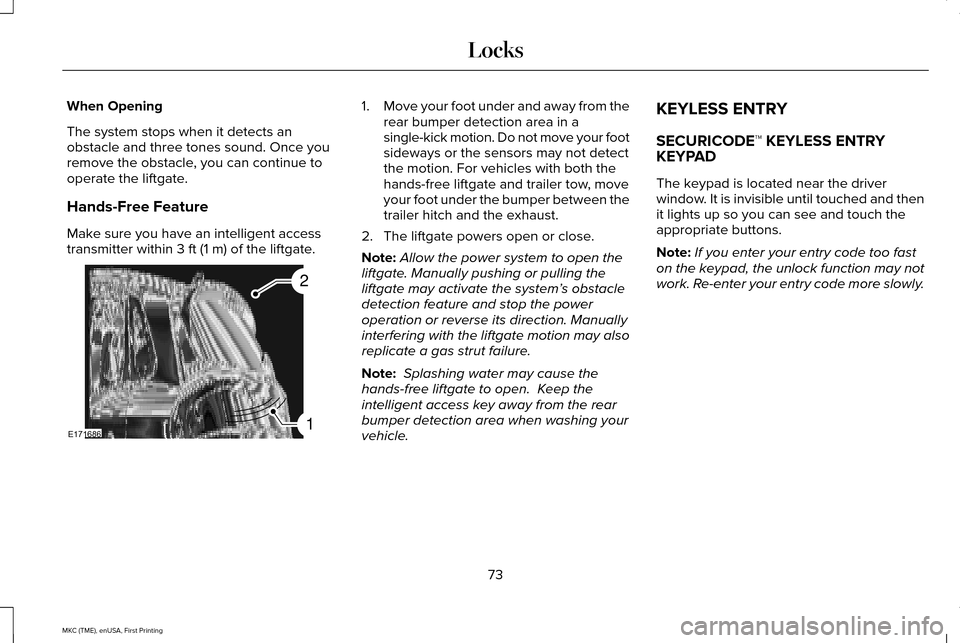
Make sure you have an intelligent access
transmitter within 3 ft (1 m) of the liftgate. 1.
Move your foot under and away from the
rear bumper detection area in a
single-kick motion. Do not move your foot
sideways or the sensors may not detect
the motion. For vehicles with both the
hands-free liftgate and trailer tow, move
your foot under the bumper between the
trailer hitch and the exhaust.
2. The liftgate powers open or close.
Note: Allow the power system to open the
liftgate. Manually pushing or pulling the
liftgate may activate the system’ s obstacle
detection feature and stop the power
operation or reverse its direction. Manually
interfering with the liftgate motion may also
replicate a gas strut failure.
Note: Splashing water may cause the
hands-free liftgate to open. Keep the
intelligent access key away from the rear
bumper detection area when washing your
vehicle. KEYLESS ENTRY
SECURICODE™ KEYLESS ENTRY
KEYPAD
The keypad is located near the driver
window. It is invisible until touched and then
it lights up so you can see and touch the
appropriate buttons.
Note:
If you enter your entry code too fast
on the keypad, the unlock function may not
work. Re-enter your entry code more slowly.
73
MKC (TME), enUSA, First Printing LocksE171686
2
1
Page 87 of 432

AUTOWIPERS (If Equipped)
Note: Fully defrost the windshield before
switching on the windshield wipers.
Note: Make sure you switch off the
windshield wipers before entering a car
wash.
Note: Clean the windshield and wiper blades
if they begin to leave streaks or smears. If
that does not resolve the issue, install new
wiper blades.
Note: If you switch autolamps on in
conjunction with autowipers, your low beam
headlamps will illuminate automatically when
the rain sensor activates the windshield
wipers continuously.
Note: Wet or winter driving conditions with
ice, snow or salty road mist can cause
inconsistent and unexpected wiping or
smearing. In these conditions, you can do the following
to help keep your windshield clear:
•
Lower the sensitivity of the autowipers
to reduce the amount of smearing.
• Switch to normal or high-speed wipe.
• Switch the autowipers off. Highest sensitivity
A
OnB
Lowest sensitivity
C The autowipers feature uses a rain sensor.
You will find it in the area around the interior
mirror. The rain sensor monitors the amount
of moisture on the windshield and
automatically turns on the wipers. It will
adjust the wiper speed by the amount of
moisture that the sensor detects on the
windshield.
Note:
This autowiper feature is automatically
set to on and remains on until you switch it
off in the information display. You can also
switch the feature back on at any time.
See
Autowipers (page 84).
Use the rotary control to adjust the sensitivity
of the rain sensor. Set the control to low
sensitivity, and the wipers will turn on when
the rain sensor detects a large amount of
moisture on the windshield. Set the control
to high sensitivity, and the wipers will turn
on when the rain sensor detects a small
amount of moisture on the windshield.
84
MKC (TME), enUSA, First Printing Wipers and WashersA
C
B
E169315
Page 88 of 432
Note:
When you set the wiper system to
intermittent wipe and the autowiper system
is on, the autowiper sensitivity setting adjusts
the wiper speed according to the moisture
on the windshield only. Use the wiper lever
to wipe the windshield on-demand.
Keep the outside of the windshield clean.
The rain sensor is very sensitive. If the area
around the mirror is dirty, then the wipers
may operate if dirt, mist or insects hit the
windshield.
WINDSHIELD WASHERS
Note: Do not operate the washers when the
washer reservoir is empty. This may cause
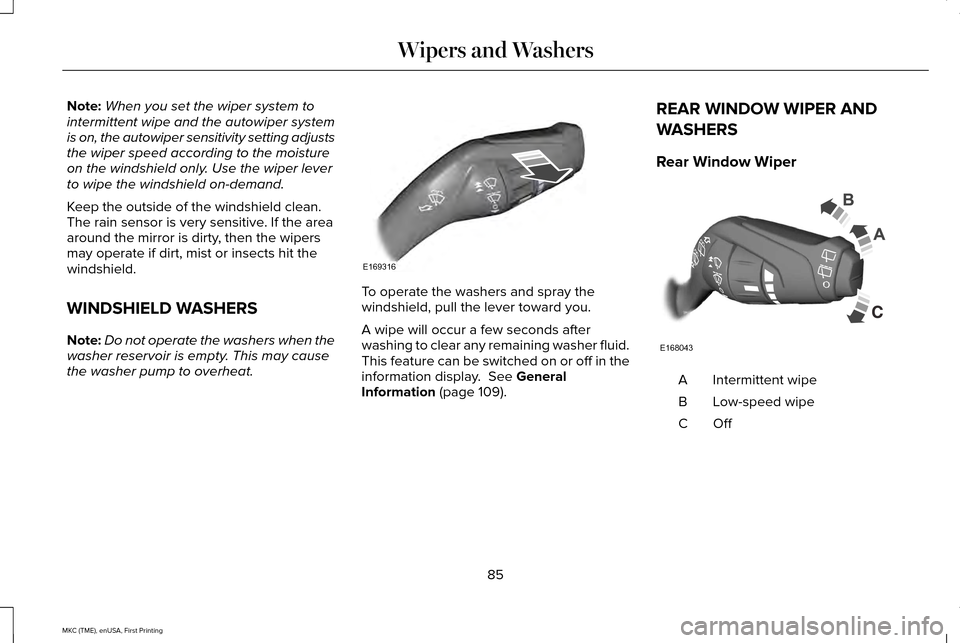
the washer pump to overheat. To operate the washers and spray the
windshield, pull the lever toward you.
A wipe will occur a few seconds after
washing to clear any remaining washer fluid.
This feature can be switched on or off in the
information display. See General
Information (page 109). REAR WINDOW WIPER AND
WASHERS
Rear Window Wiper
Intermittent wipe
A
Low-speed wipe
B
OffC
85
MKC (TME), enUSA, First Printing Wipers and WashersE169316 E168043
Page 89 of 432
Press the top of the button at the end of the
lever to switch on the intermittent wiper.
Press the button again to switch on
low-speed wipe. Press the bottom of the
button to switch the wiper off, or to change
the wiper speed from low-speed to
intermittent.
When you shift into R (Reverse), the rear
wiper will turn on to intermittent if the front
wiper sensor activates the front wipers.
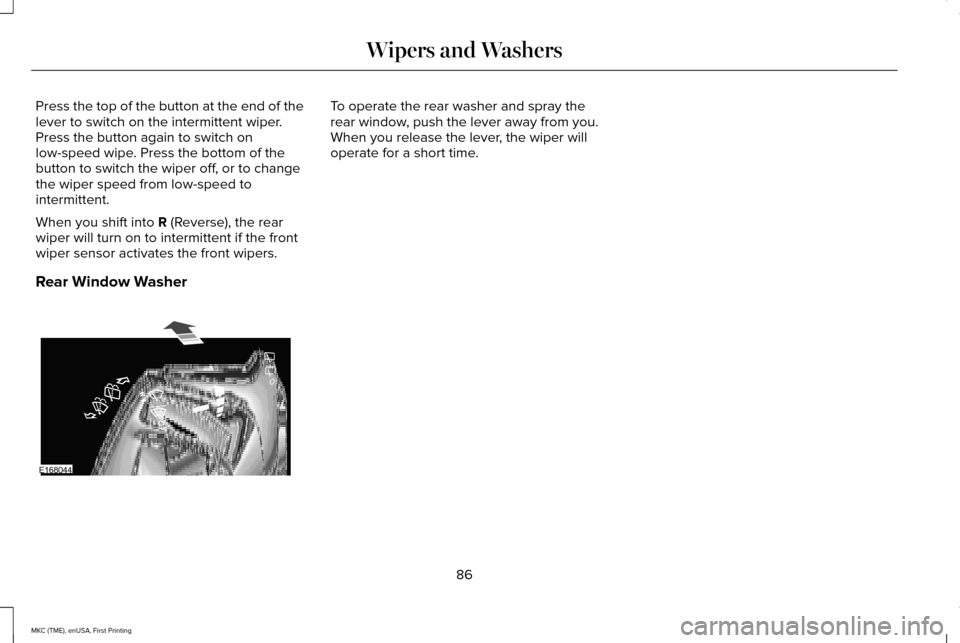
Rear Window Washer To operate the rear washer and spray the
rear window, push the lever away from you.
When you release the lever, the wiper will
operate for a short time.
86
MKC (TME), enUSA, First Printing Wipers and WashersE168044
Page 94 of 432
When switched off in the information display,
the daytime running lamps are off in all
lighting control switch positions.
AUTOMATIC HIGH BEAM
CONTROL (If Equipped)
The system automatically turns on the high
beams if it is dark enough and no other traffic
is present. When it detects the headlights of
an approaching vehicle, the rear lamps of
the preceding vehicle or street lighting, the
system turns off the high beams before they
distract other drivers. The low beams remain
on.
Note: If it appears that automatic high beam
is not functioning properly, check the
windshield in front of the camera for a
blockage. A clear view of the road is
required for proper system operation. Make
sure that authorized personnel repair any
windshield damage in the area of the
camera's field of view. Note:
If the system detects a blockage such
as bird droppings, bug splatter, snow or ice,
and you do not observe changes, the system
may go into low beam mode until you clear
the blockage. A message may also appear
in the information display noting the front
camera is blocked.
Note: Typical road dust, dirt and water spots
do not affect the performance of the
automatic high beam control. However, in
cold or inclement weather conditions, you
may notice a decrease in the availability of
the automatic high beam control, especially
at start up. If you want to change the beam
state independently of the system, you may
switch the high beams on or off using the
lighting control switch. Automatic high beam
control resumes when conditions are correct.
Note: Modification of your vehicle ride height
such as using much larger tires, may
degrade feature performance.
A camera sensor, centrally mounted behind
the windshield of your vehicle, continuously
monitors conditions to decide when to switch
the high beams off and on. Once the system is active, the high beams
switch on if:
•
The ambient light level is low enough.
• There is no traffic in front of the vehicle.
• The vehicle speed is greater than
31 mph
(50 km/h).
The high beams switch off if:
• The system detects the headlamps of an
approaching vehicle or the rear lamps of
a preceding vehicle.
• Vehicle speed falls below
26 mph
(42 km/h).
• The ambient light level is high enough
that high beams are not required.
• The system detects severe rain, snow or
fog.
• The camera is blocked.
Activating the System
Switch on the system in the information
display and switch the lighting control to the
autolamps position.
See Information
Displays (page 109). See Autolamps (page
88).
91
MKC (TME), enUSA, First Printing Lighting
Page 101 of 432
The image of the approaching vehicle is
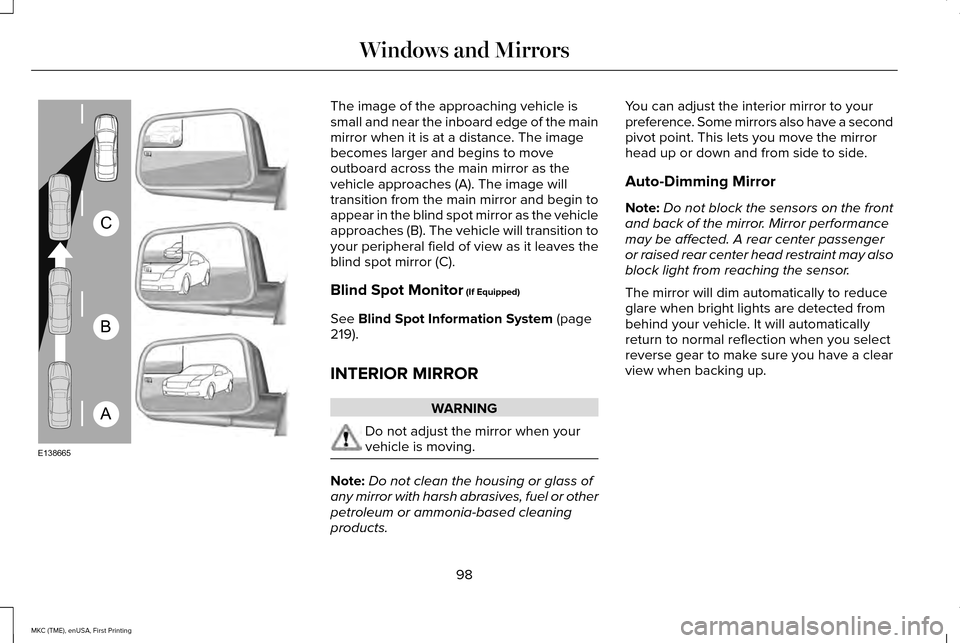
small and near the inboard edge of the main
mirror when it is at a distance. The image
becomes larger and begins to move
outboard across the main mirror as the
vehicle approaches (A). The image will
transition from the main mirror and begin to
appear in the blind spot mirror as the vehicle
approaches (B). The vehicle will transition to
your peripheral field of view as it leaves the
blind spot mirror (C).
Blind Spot Monitor (If Equipped)
See
Blind Spot Information System (page
219).
INTERIOR MIRROR WARNING
Do not adjust the mirror when your
vehicle is moving.
Note:
Do not clean the housing or glass of
any mirror with harsh abrasives, fuel or other
petroleum or ammonia-based cleaning
products. You can adjust the interior mirror to your
preference. Some mirrors also have a second
pivot point. This lets you move the mirror
head up or down and from side to side.
Auto-Dimming Mirror
Note:
Do not block the sensors on the front
and back of the mirror. Mirror performance
may be affected. A rear center passenger
or raised rear center head restraint may also
block light from reaching the sensor.
The mirror will dim automatically to reduce
glare when bright lights are detected from
behind your vehicle. It will automatically
return to normal reflection when you select
reverse gear to make sure you have a clear
view when backing up.
98
MKC (TME), enUSA, First Printing Windows and MirrorsA
B
C
E138665
Page 119 of 432
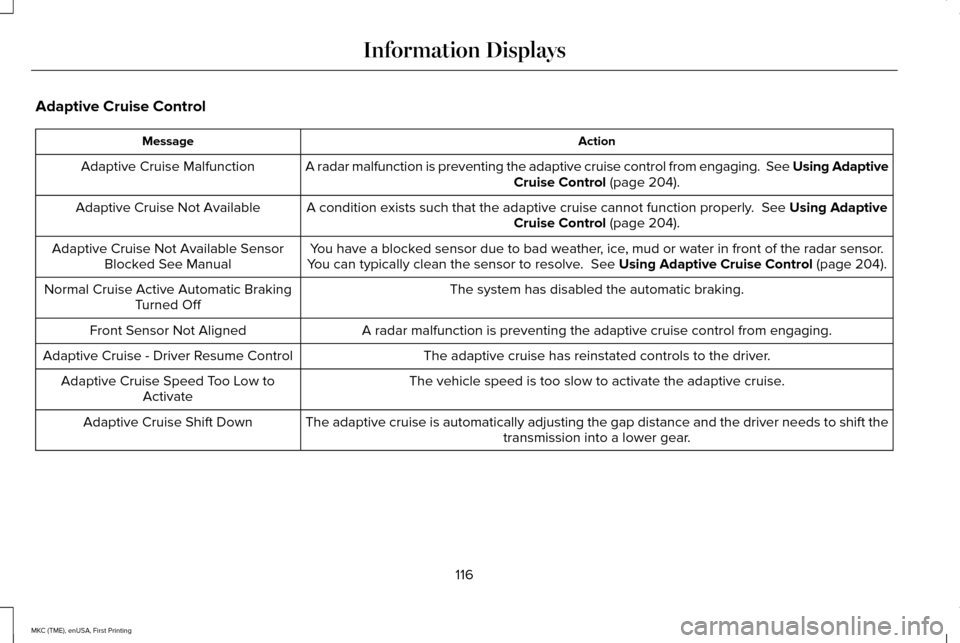
Adaptive Cruise Control
Action
Message
A radar malfunction is preventing the adaptive cruise control from engag\
ing. See Using Adaptive
Cruise Control (page 204).
Adaptive Cruise Malfunction
A condition exists such that the adaptive cruise cannot function properl\
y.
See Using Adaptive
Cruise Control (page 204).
Adaptive Cruise Not Available
You have a blocked sensor due to bad weather, ice, mud or water in front of the radar sensor.
You can typically clean the sensor to resolve.
See Using Adaptive Cruise Control (page 204).
Adaptive Cruise Not Available Sensor
Blocked See Manual
The system has disabled the automatic braking.
Normal Cruise Active Automatic Braking
Turned Off
A radar malfunction is preventing the adaptive cruise control from engag\
ing.
Front Sensor Not Aligned
The adaptive cruise has reinstated controls to the driver.
Adaptive Cruise - Driver Resume Control
The vehicle speed is too slow to activate the adaptive cruise.
Adaptive Cruise Speed Too Low to
Activate
The adaptive cruise is automatically adjusting the gap distance and the \
driver needs to shift the transmission into a lower gear.
Adaptive Cruise Shift Down
116
MKC (TME), enUSA, First Printing Information Displays