display LINCOLN MKC 2016 Owners Manual
[x] Cancel search | Manufacturer: LINCOLN, Model Year: 2016, Model line: MKC, Model: LINCOLN MKC 2016Pages: 432, PDF Size: 4.89 MB
Page 5 of 432
Security
Passive Anti-Theft System............................77
Anti-Theft Alarm..............................................78
Steering Wheel
Adjusting the Steering Wheel......................79
Audio Control..................................................80
Voice Control
....................................................81
Cruise Control...................................................81
Information Display Control
..........................81
Heated Steering Wheel
................................82
Wipers and Washers
Windshield Wipers
..........................................83
Autowipers.......................................................84
Windshield Washers
......................................85
Rear Window Wiper and Washers..............85
Lighting
General Information
.......................................87
Lighting Control
...............................................87
Autolamps.........................................................88
Instrument Lighting Dimmer........................89 Headlamp Exit Delay.....................................90
Daytime Running Lamps...............................90
Automatic High Beam Control.....................91
Direction Indicators
........................................92
Welcome Lighting
...........................................92
Interior Lamps
..................................................93
Ambient Lighting
.............................................93
Windows and Mirrors
Power Windows
..............................................94
Global Opening and Closing.......................95
Exterior Mirrors................................................95
Interior Mirror
...................................................98
Sun Visors
.........................................................99
Moonroof..........................................................99
Instrument Cluster
Gauges............................................................102
Warning Lamps and Indicators..................104
Audible Warnings and Indicators..............107
Information Displays
General Information
.....................................109 Information Messages
..................................115
Climate Control
Automatic Climate Control..........................133
Hints on Controlling the Interior Climate.........................................................135
Heated Windows and Mirrors....................136
Cabin Air Filter................................................137
Remote Start
...................................................137
Seats
Sitting in the Correct Position....................139
Head Restraints
.............................................139
Power Seats
....................................................142
Memory Function
..........................................144
Rear Seats
.......................................................145
Heated Seats..................................................146
Climate Controlled Seats.............................147
Rear Seat Armrest.........................................148
Universal Garage Door Opener
Universal Garage Door Opener................150
2
MKC (TME), enUSA, First Printing Table of Contents
Page 53 of 432
Your vehicle has a collection of crash and
occupant sensors which provide information
to the restraints control module which
deploys (activates) the front safety belt
pretensioners, driver airbag, passenger
airbag, knee airbag(s), seat mounted side
airbags, and the Safety Canopy. Based on
the type of accident (frontal impact, side
impact or rollover) the restraints control
module will deploy the appropriate safety
devices.
The restraints control module also monitors
the readiness of the above safety devices
plus the crash and occupant sensors. A
warning indicator light in the instrument
cluster indicates the readiness of the safety
system. If this warning indicator light is not
functioning and there is another fault within
the system, the message cluster may display
an airbag failure warning. See Information
Displays (page 109). You will hear five tones
that repeat periodically until you repair the
problem, the warning indicator light or both.
Routine maintenance of the airbag is not
required.
A difficulty with the system is indicated by
one or more of the following: •
The readiness light will not illuminate
immediately after the ignition is turned
on.
• The readiness light will either flash or
stay lit.
• A series of five beeps will be heard. The
tone pattern will repeat periodically until
the problem, the light or both are
repaired.
If any of these things happen, even
intermittently, have the supplemental
restraint system serviced at an authorized
dealer immediately. Unless serviced, the
system may not function properly in the
event of a crash.
The safety belt pretensioners and the airbag
supplemental restraint system is designed
to activate when your vehicle sustains frontal
or sideways deceleration sufficient to cause
the restraints control module to deploy a
safety device or when a certain likelihood of
a rollover event is detected by the rollover
sensor. The fact that the safety belt pretensioners or
airbags did not activate for both front seat
occupants in a crash does not mean that
something is wrong with the system. Rather,
it means the restraints control module
determined the accident conditions (for
example, crash severity, belt usage) were
not appropriate to activate these safety
devices.
•
The design of the front airbags is to
activate only in frontal and near-frontal
crashes (not rollovers, side impacts or
rear impacts) unless the crash causes
sufficient frontal deceleration.
• The safety belt pretensioners are
designed to activate in frontal,
near-frontal, side and rollover crashes.
• The design of the side airbags is to inflate
in certain side crashes. Side airbags may
activate in other types of crashes if the
vehicle experiences sufficient sideways
motion or deformation.
50
MKC (TME), enUSA, First Printing Supplementary Restraints System
Page 56 of 432
REMOTE CONTROL
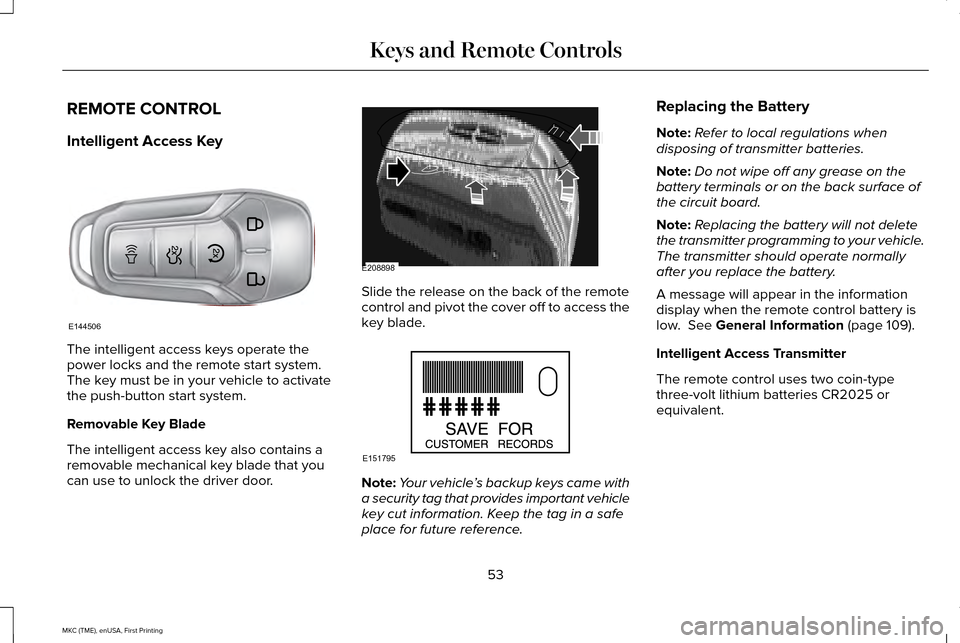
Intelligent Access Key
The intelligent access keys operate the
power locks and the remote start system.
The key must be in your vehicle to activate
the push-button start system.
Removable Key Blade
The intelligent access key also contains a
removable mechanical key blade that you
can use to unlock the driver door. Slide the release on the back of the remote
control and pivot the cover off to access the
key blade.
Note:
Your vehicle ’s backup keys came with
a security tag that provides important vehicle
key cut information. Keep the tag in a safe
place for future reference. Replacing the Battery
Note:
Refer to local regulations when
disposing of transmitter batteries.
Note: Do not wipe off any grease on the
battery terminals or on the back surface of
the circuit board.
Note: Replacing the battery will not delete
the transmitter programming to your vehicle.
The transmitter should operate normally
after you replace the battery.
A message will appear in the information
display when the remote control battery is
low. See General Information (page 109).
Intelligent Access Transmitter
The remote control uses two coin-type
three-volt lithium batteries CR2025 or
equivalent.
53
MKC (TME), enUSA, First Printing Keys and Remote ControlsE144506 E208898 E151795
Page 58 of 432
Vehicles with automatic climate control can
be configured to operate when the vehicle
is remote started. See Automatic Climate
Control (page 133).
Many states and provinces have restrictions
for the use of remote start. Check your local
and state or provincial laws for specific
requirements regarding remote start
systems.
The remote start system will not work if:
• The ignition is on.
• The alarm system is triggered.
• You switch off the feature in the
information display.
See General
Information (page 109).
• The hood is open.
• The transmission is not in
P.
• The vehicle battery voltage is too low.
• The service engine soon light is on. Remote Starting the Vehicle
Note:
You must press each button within
three seconds of each other. Your vehicle
will not remote start if you do not follow this
sequence. The tag with your transmitter details the
starting procedure.
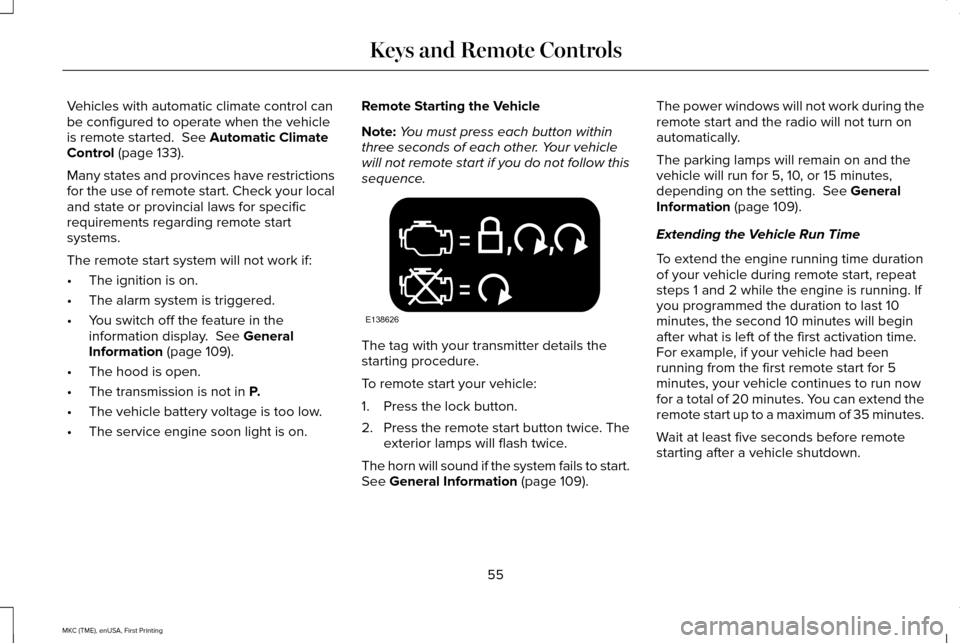
To remote start your vehicle:
1. Press the lock button.
2.
Press the remote start button twice. The
exterior lamps will flash twice.
The horn will sound if the system fails to start.
See
General Information (page 109). The power windows will not work during the
remote start and the radio will not turn on
automatically.
The parking lamps will remain on and the
vehicle will run for 5, 10, or 15 minutes,
depending on the setting.
See General
Information (page 109).
Extending the Vehicle Run Time
To extend the engine running time duration
of your vehicle during remote start, repeat
steps 1 and 2 while the engine is running. If
you programmed the duration to last 10
minutes, the second 10 minutes will begin
after what is left of the first activation time.
For example, if your vehicle had been
running from the first remote start for 5
minutes, your vehicle continues to run now
for a total of 20 minutes. You can extend the
remote start up to a maximum of 35 minutes.
Wait at least five seconds before remote
starting after a vehicle shutdown.
55
MKC (TME), enUSA, First Printing Keys and Remote ControlsE138626
Page 59 of 432
Turning the Vehicle Off After Remote
Starting
Press the button once. The parking
lamps will turn off.
You may have to be closer to your
vehicle to remotely switch off your vehicle
after remote starting. This is due to the
added noise of your running vehicle.
You can disable or enable the remote start
system through the information display. See
General Information (page 109).
Remote Control Feedback
An LED on the remote control provides status
feedback of remote start or stop commands. Status
LED
Remote start or
extension successful
Solid green
Remote stop
successful; engine off
Solid red
Remote start or stopfailed
Blinking red
Waiting for status
update from vehicle
Blinking green
Memory Feature
You can program your intelligent access key
to recall memory positions.
See Memory
Function (page 144). REPLACING A LOST KEY OR
REMOTE CONTROL
Replacement keys or remote controls can
be purchased from an authorized dealer.
Authorized dealers can program remote
controls for your vehicle.
See Passive
Anti-Theft System (page 77).
To re-program the passive anti-theft system
see an authorized dealer.
56
MKC (TME), enUSA, First Printing Keys and Remote ControlsE138625
Page 60 of 432
PRINCIPLE OF OPERATION
MyKey allows you to program keys with
restricted driving modes to promote good
driving habits. All but one of the keys can be
activated with these restricted modes.
Any keys that remain unprogrammed are
referred to as administrator keys or admin
keys. They can be used to:
•
Create a MyKey.
• Program configurable MyKey settings.
• Clear all MyKey features.
When you have created a MyKey, you can
access the following information by using
the information display to determine:
• How many admin keys and MyKeys are
programmed to your vehicle.
• The total distance your vehicle traveled
with a MyKey.
Note: Switch the vehicle on to use the
system.
Note: All MyKeys are programmed to the
same settings. You cannot program them
individually. Note:
For vehicles equipped with
push-button start, when both a MyKey and
an admin remote transmitter are present,
the admin remote transmitter will be
recognized by the vehicle while switching
the vehicle on to start the vehicle.
Non-configurable Settings
The following settings cannot be changed
by an admin key user:
• Safety belt reminder. You cannot disable
this feature. The audio system will mute
when the front seat passengers ’ safety
belts are not fastened.
• Early low fuel or charge. The low-fuel or
low charge warning activates earlier,
giving the MyKey user more time to refuel
or recharge.
• Driver assist features, if equipped on your
vehicle, are forced on: parking aid and
Blind Spot Information System (BLIS) with
cross traffic alert.
• Satellite radio adult content restrictions,
if equipped on your vehicle. Configurable Settings
With an admin key, you can configure certain
MyKey settings when you first create a
MyKey and before you recycle the key or
restart the vehicle. You can also change the
settings afterward with an admin key.
•
A vehicle speed limit can be set.
Warnings will be shown in the display
followed by an audible tone when your
vehicle reaches the set speed. You
cannot override the set speed by fully
depressing the accelerator pedal or by
setting cruise control. WARNING
Do not set MyKey maximum speed limit
to a limit that will prevent the driver
from maintaining a safe speed considering
posted speed limits and prevailing road
conditions. The driver is always responsible
to drive in accordance with local laws and
prevailing conditions. Failure to do so could
result in accident or injury. 57
MKC (TME), enUSA, First Printing MyKey™
Page 61 of 432
•
Various vehicle speed minders can be
set. Once you select a speed, it will be
shown in the display, followed by an
audible tone when the preselected
vehicle speed is exceeded.
• Audio system maximum volume of 45%.
A message will be shown in the display
when you attempt to exceed the limited
volume. Also, the speed-sensitive or
compensated automatic volume control
will be disabled. •
Always on setting. When this is selected,
you will not be able to switch off
AdvanceTrac ™ or traction control, 911
Assist or Emergency Assistance, or the
do not disturb feature (if your vehicle is
equipped with these features).
CREATING A MYKEY
Use the information display to create a
MyKey: 1. Insert the key you want to program into
the ignition. If your vehicle is equipped
with a push-button start, place the remote
control into the backup slot. The location
of your backup slot is in another chapter.
See Starting and Stopping the Engine
(page 158).
2. Switch the ignition on.
3. Access the main menu on the information
display controls. Use the arrow keys to
get to the following menu selections: Action and Description
Message
Press the
OK button or the right arrow key.
Settings
Press the
OK button or the right arrow key.
MyKey
Press the
OK button or the right arrow key.
Create MyKey
When prompted, hold the
OK button until
you see a message informing you to label
this key as a MyKey. The key will be
restricted at the next start.
MyKey is successfully created. Make sure
you label it so you can distinguish it from the
admin keys. You can also program configurable settings
for the key(s). See Programming/Changing
Configurable Settings
.
Programming/Changing Configurable
Settings
Use the information display to access your
configurable MyKey settings.
1.
Switch the ignition on using an admin key
or remote control.
58
MKC (TME), enUSA, First Printing MyKey™
Page 62 of 432
2.
Access the main menu on the information
display controls. Use the arrow keys to get to the following menu selections: Action and Description
Message
Press the OK button or the right arrow key.
Settings
Press the
OK button or the right arrow key.
MyKey
Note: You can clear or change your MyKey
settings at any time during the same key
cycle as you created the MyKey. Once you
have switched the vehicle off, however, you
will need an admin key to change or clear
your MyKey settings. CLEARING ALL MYKEYS
You can clear or change your MyKey settings
using the information display control on the
steering wheel.
See Information Displays
(page 109). Switch the ignition on using an admin key or
remote control.
To clear all MyKeys of all MyKey settings, press the left arrow button to access the main menu and scr\
oll to: Action and Description
Message
Press the
OK button.
Settings
Press the
OK button.
MyKey
Press and hold the
OK button until the following message displays.
Clear MyKey
59
MKC (TME), enUSA, First Printing MyKey™
Page 64 of 432
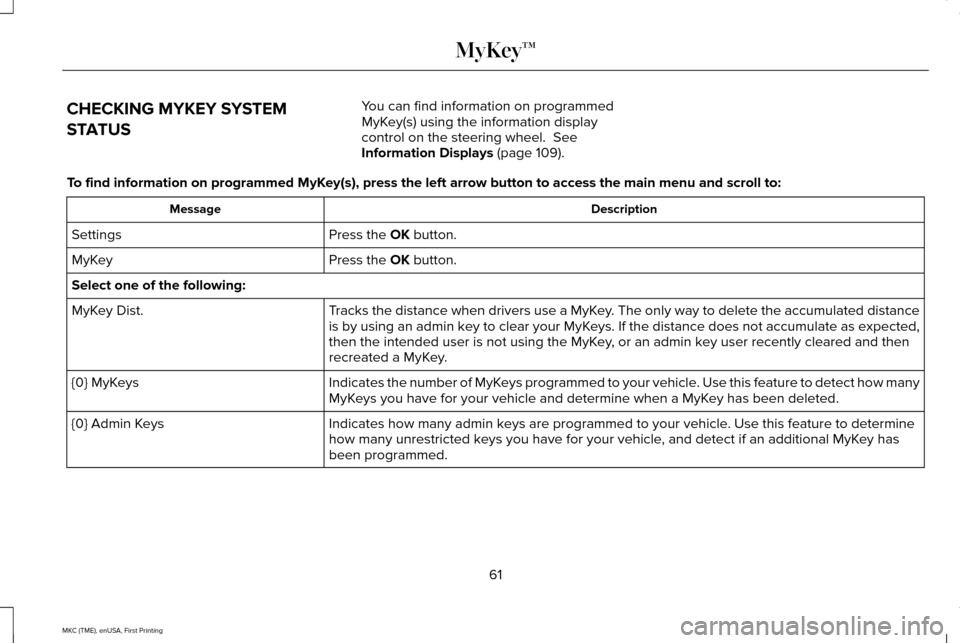
CHECKING MYKEY SYSTEM
STATUS
You can find information on programmed
MyKey(s) using the information display
control on the steering wheel. See
Information Displays (page 109).
To find information on programmed MyKey(s), press the left arrow button to access the main menu and scroll \
to: Description
Message
Press the
OK button.
Settings
Press the
OK button.
MyKey
Select one of the following:
Tracks the distance when drivers use a MyKey. The only way to delete the accumulated distance
is by using an admin key to clear your MyKeys. If the distance does not accumulate as expected,
then the intended user is not using the MyKey, or an admin key user recently cleared and then
recreated a MyKey.
MyKey Dist.
Indicates the number of MyKeys programmed to your vehicle. Use this feature to detect how many
MyKeys you have for your vehicle and determine when a MyKey has been deleted.
{0} MyKeys
Indicates how many admin keys are programmed to your vehicle. Use this feature to determine
how many unrestricted keys you have for your vehicle, and detect if an additional MyKey has
been programmed.
{0} Admin Keys
61
MKC (TME), enUSA, First Printing MyKey™
Page 67 of 432
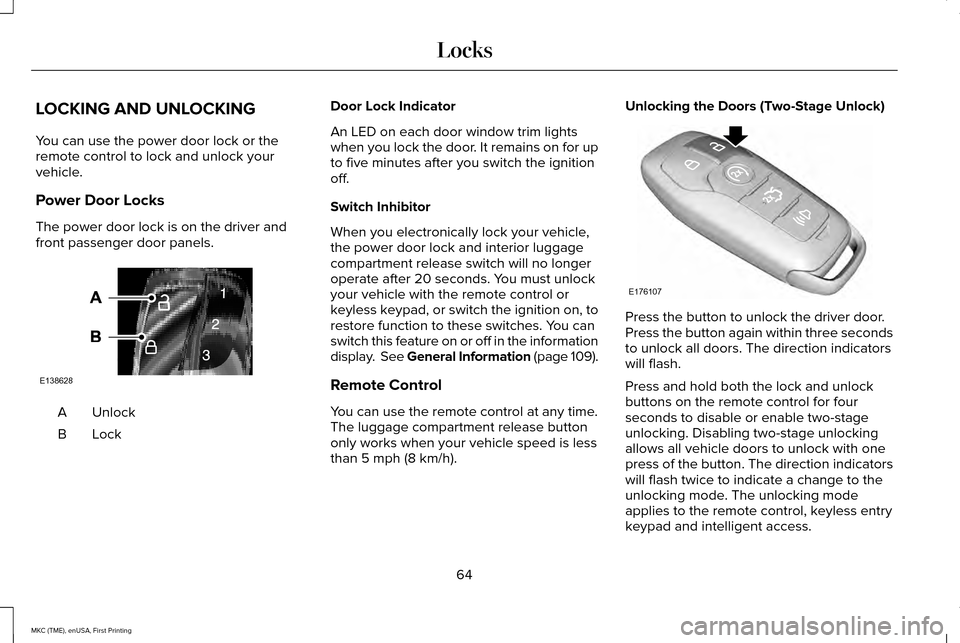
LOCKING AND UNLOCKING
You can use the power door lock or the
remote control to lock and unlock your
vehicle.
Power Door Locks
The power door lock is on the driver and
front passenger door panels.
Unlock
A
LockB Door Lock Indicator
An LED on each door window trim lights
when you lock the door. It remains on for up
to five minutes after you switch the ignition
off.
Switch Inhibitor
When you electronically lock your vehicle,
the power door lock and interior luggage
compartment release switch will no longer
operate after 20 seconds. You must unlock
your vehicle with the remote control or
keyless keypad, or switch the ignition on, to
restore function to these switches. You can
switch this feature on or off in the information
display. See General Information (page 109).
Remote Control
You can use the remote control at any time.
The luggage compartment release button
only works when your vehicle speed is less
than 5 mph (8 km/h).Unlocking the Doors (Two-Stage Unlock)
Press the button to unlock the driver door.
Press the button again within three seconds
to unlock all doors. The direction indicators
will flash.
Press and hold both the lock and unlock
buttons on the remote control for four
seconds to disable or enable two-stage
unlocking. Disabling two-stage unlocking
allows all vehicle doors to unlock with one
press of the button. The direction indicators
will flash twice to indicate a change to the
unlocking mode. The unlocking mode
applies to the remote control, keyless entry
keypad and intelligent access.
64
MKC (TME), enUSA, First Printing LocksE138628 E176107