engine LINCOLN MKC 2017 Repair Manual
[x] Cancel search | Manufacturer: LINCOLN, Model Year: 2017, Model line: MKC, Model: LINCOLN MKC 2017Pages: 538, PDF Size: 4.8 MB
Page 226 of 538
BLIND SPOT INFORMATION
SYSTEM (If Equipped)
WARNING
To help avoid injuries, NEVER use the
Blind Spot Information System as a
replacement for using the interior and
exterior mirrors or looking over your shoulder
before changing lanes. The Blind Spot
Information System is not a replacement for
careful driving. The Blind Spot Information System is
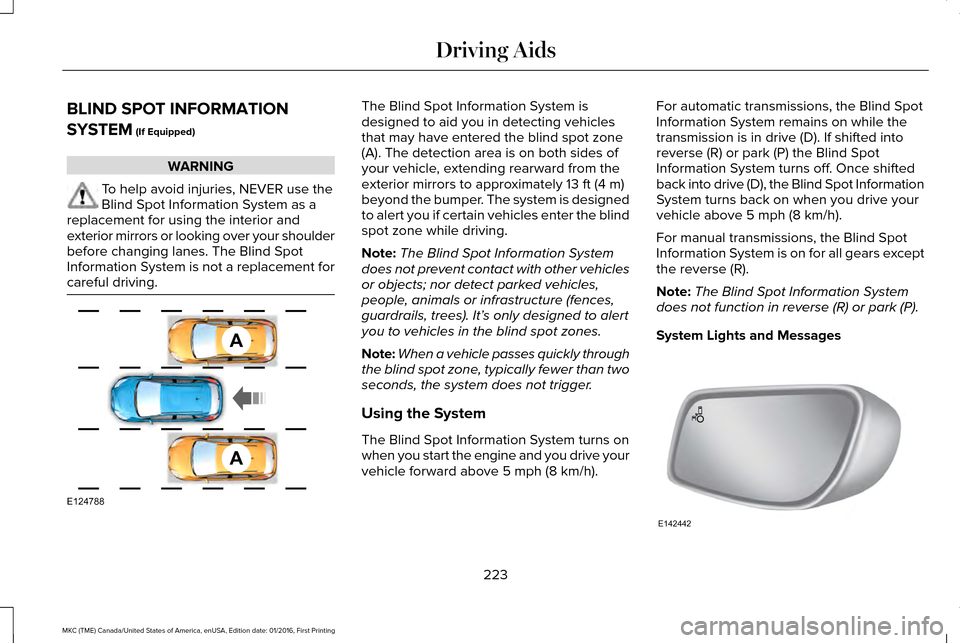
designed to aid you in detecting vehicles
that may have entered the blind spot zone
(A). The detection area is on both sides of
your vehicle, extending rearward from the
exterior mirrors to approximately
13 ft (4 m)
beyond the bumper. The system is designed
to alert you if certain vehicles enter the blind
spot zone while driving.
Note: The Blind Spot Information System
does not prevent contact with other vehicles
or objects; nor detect parked vehicles,
people, animals or infrastructure (fences,
guardrails, trees). It’ s only designed to alert
you to vehicles in the blind spot zones.
Note: When a vehicle passes quickly through
the blind spot zone, typically fewer than two
seconds, the system does not trigger.
Using the System
The Blind Spot Information System turns on
when you start the engine and you drive your
vehicle forward above
5 mph (8 km/h). For automatic transmissions, the Blind Spot
Information System remains on while the
transmission is in drive (D). If shifted into
reverse (R) or park (P) the Blind Spot
Information System turns off. Once shifted
back into drive (D), the Blind Spot Information
System turns back on when you drive your
vehicle above
5 mph (8 km/h).
For manual transmissions, the Blind Spot
Information System is on for all gears except
the reverse (R).
Note: The Blind Spot Information System
does not function in reverse (R) or park (P).
System Lights and Messages 223
MKC (TME) Canada/United States of America, enUSA, Edition date: 01/2016, First Printing Driving AidsA
A
E124788 E142442
Page 228 of 538
A "blocked" condition can be cleared in two
ways:
•
After the blockage in front of the sensors
is removed or the rainfall/snowfall rate
decreases or stops, drive for a few
minutes in traffic to allow the sensors to
detect passing vehicles.
• By cycling the ignition from ON to OFF
and then back ON.
Note: If your vehicle has a tow bar with a
factory equipped trailer tow module and it
is towing a trailer, the sensors will
automatically turn the Blind Spot Information
System off. If your vehicle has a tow bar but
no factory equipped trailer tow module, it is
recommended to turn the Blind Spot
Information System off manually. Operating
the Blind Spot Information System with a
trailer attached will cause poor system
performance. System Errors
If the system senses a problem with the left
or right sensor, the telltale will illuminate and
a message will appear in the information
display. See Information Messages (page
114).
Switching the System Off and On
You can temporarily switch the Blind Spot
Information System off in the information
display. See General Information (page 108).
When the Blind Spot Information System
switches off, you will not receive alerts and
the information display shows a system off
message. The telltale in the cluster also
illuminates. When you switch the Blind Spot
Information System on or off, the alert
indicators flash twice.
Note: The Blind Spot Information System
remembers the last selected on or off setting.
You can also have the Blind Spot Information
System switched off permanently at an
authorized dealer. Once switched off
permanently, the system can only be
switched back on at an authorized dealer. CROSS TRAFFIC ALERT
(If Equipped) WARNING
To help avoid personal injury, NEVER
use the Cross Traffic Alert system as a
replacement for using the interior and
exterior mirrors and looking over your
shoulder before backing out of a parking
space. Cross Traffic Alert is not a
replacement for careful driving. Cross Traffic Alert is designed to warn you
of vehicles approaching from the sides when
the transmission is in reverse (R).
Using the System
Cross Traffic Alert turns on when you start
the engine and you shift into reverse (R).
Once shifted out of reverse (R), Cross Traffic
Alert turns off.
Note:
Cross Traffic Alert only functions while
your transmission is in reverse (R).
225
MKC (TME) Canada/United States of America, enUSA, Edition date: 01/2016, First Printing Driving Aids
Page 237 of 538
These systems have a range of modes which
you can choose from in order to customize
your ideal driving experience:
•
Comfort – Provides a more relaxed
driving experience, maximizing comfort.
Your steering effort decreases and the
suspension movement is more fluid.
Comfort mode is ideal when you desire
enhanced traveling comfort.
• Normal – Delivers a balanced
combination of comfortable, controlled
ride and confident handling. This mode
provides an engaging drive experience
and a direct connection to the road
without sacrificing any of the composure
demanded from a luxury vehicle.
• Sport – Provides a sportier driving
experience. The suspension stiffens, with
an emphasis on handling and control.
The engine responds more directly to
your inputs and takes on a more powerful
tone. Sport mode is ideal for use during
more spirited driving.
You can change your vehicle ’s Drive Control
settings from the main menu on the
information display. See General
Information (page 108). Note:
Not all settings may be available.
Note: Lincoln Drive Control has diagnostic
checks that continuously monitor the system
to ensure proper operation. Certain types of
system errors will gray out the mode
selections within the information display,
preventing you from changing states when
the gear position is changed. Other types of
errors will produce a temporary message
that states Drive Control Malfunction. If either
condition persists for multiple key cycles,
have your vehicle checked by an authorized
dealer.
234
MKC (TME) Canada/United States of America, enUSA, Edition date: 01/2016, First Printing Driving Aids
Page 241 of 538
GAWR (Gross Axle Weight Rating)
GAWR is the maximum allowable weight
that a single axle (front or rear) can carry.
These numbers are on the Safety
Compliance Certification label. The label
is located on the door hinge pillar,
door-latch post, or the door edge that
meets the door-latch post, next to the
driver seating position.
The total load on each axle must never
exceed its Gross Axle Weight Rating.
GVWR (Gross Vehicle Weight Rating)
GVWR is the maximum allowable weight
of the fully loaded vehicle. This includes
all options, equipment, passengers and
cargo. It appears on the Safety
Compliance Certification label. The label
is located on the door hinge pillar,
door-latch post, or the door edge that
meets the door-latch post, next to the
driver seating position.
The gross vehicle weight must never
exceed the Gross Vehicle Weight Rating.
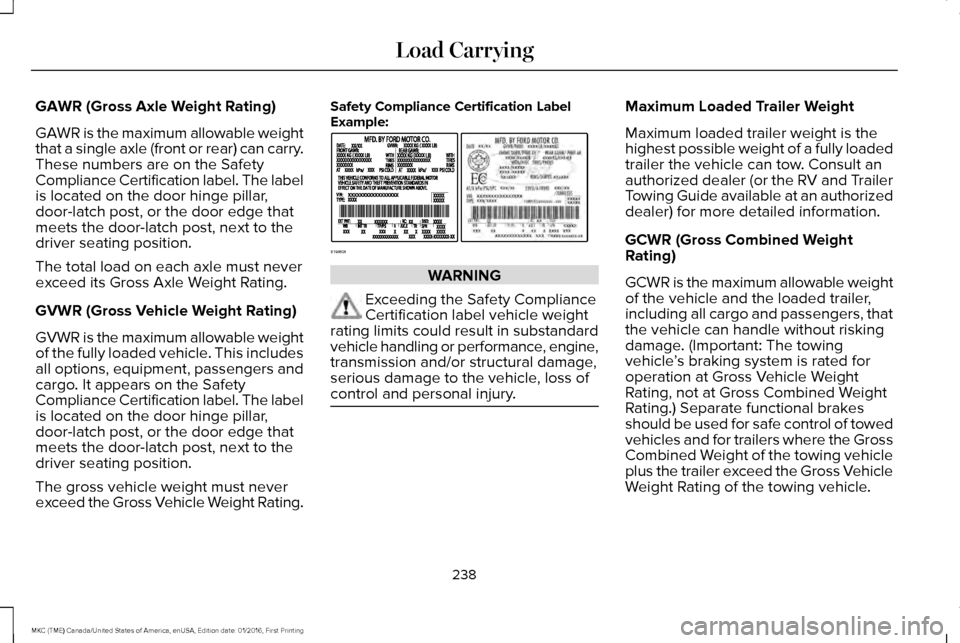
Safety Compliance Certification Label
Example:
WARNING
Exceeding the Safety Compliance
Certification label vehicle weight
rating limits could result in substandard
vehicle handling or performance, engine,
transmission and/or structural damage,
serious damage to the vehicle, loss of
control and personal injury. Maximum Loaded Trailer Weight
Maximum loaded trailer weight is the
highest possible weight of a fully loaded
trailer the vehicle can tow. Consult an
authorized dealer (or the RV and Trailer
Towing Guide available at an authorized
dealer) for more detailed information.
GCWR (Gross Combined Weight
Rating)
GCWR is the maximum allowable weight
of the vehicle and the loaded trailer,
including all cargo and passengers, that
the vehicle can handle without risking
damage. (Important: The towing
vehicle
’s braking system is rated for
operation at Gross Vehicle Weight
Rating, not at Gross Combined Weight
Rating.) Separate functional brakes
should be used for safe control of towed
vehicles and for trailers where the Gross
Combined Weight of the towing vehicle
plus the trailer exceed the Gross Vehicle
Weight Rating of the towing vehicle.
238
MKC (TME) Canada/United States of America, enUSA, Edition date: 01/2016, First Printing Load CarryingE198828
Page 244 of 538
TOWING A TRAILER
WARNINGS
Do not exceed the GVWR or the
GAWR specified on the certification
label. Towing trailers beyond the
maximum recommended gross
trailer weight exceeds the limit of the
vehicle and could result in engine
damage, transmission damage,
structural damage, loss of vehicle
control, vehicle rollover and personal
injury. Your vehicle may have electrical items,
such as fuses or relays, related to
towing. See Fuses (page 267). Your vehicle's load capacity designation
is by weight, not by volume, so you
cannot necessarily use all available
space when loading a vehicle or trailer.
Towing a trailer places an extra load on
your vehicle's engine, transmission, axle,
brakes, tires and suspension. Inspect
these components periodically during,
and after, any towing operation.
Load Placement
To help minimize how trailer movement
affects your vehicle when driving:
•
Load the heaviest items closest to
the trailer floor.
• Load the heaviest items centered
between the left and right side trailer
tires. •
Load the heaviest items above the
trailer axles or just slightly forward
toward the trailer tongue. Do not
allow the final trailer tongue weight
to go above or below 10-15% of the
loaded trailer weight.
• Select a ball mount with the correct
rise or drop. When both the loaded
vehicle and trailer are connected, the
trailer frame should be level, or
slightly angled down toward your
vehicle, when viewed from the side.
When driving with a trailer or payload, a
slight takeoff vibration or shudder may
be present due to the increased payload
weight. Additional information regarding
proper trailer loading and setting your
vehicle up for towing is located in
another chapter of this manual. See
Load Limit (page 236).
You can also find information in the
RV
& Trailer Towing Guide available at your
authorized dealer, or online.
241
MKC (TME) Canada/United States of America, enUSA, Edition date: 01/2016, First Printing Towing
Page 245 of 538
RV & Trailer Towing Guide Online
http://www.fleet.ford.com/towing-guides/
Website
TRAILER SWAY CONTROL (If Equipped) WARNING
Turning off trailer sway control
increases the risk of loss of vehicle
control, serious injury or death. Ford does
not recommend disabling this feature except
in situations where speed reduction may be
detrimental (such as hill climbing), the driver
has significant trailer towing experience, and
can control trailer sway and maintain safe
operation. Note:
This feature does not prevent trailer
sway, but reduces it when it begins.
Note: This feature cannot stop all trailers
from swaying. Note:
In some cases, if your vehicle speed
is too high, the system may turn on multiple
times, gradually reducing your vehicle speed.
The system applies the brakes to the
individual wheels and reduces engine torque
to aid vehicle stability. If the trailer begins
to sway, the stability control warning lamp
flashes and a message appears in the
information display. See Information
Messages (page 114). Slow your vehicle
down, pull safely to the side of the road and
check for correct load distribution.
You can switch this feature off in the
information display. When you switch the
ignition on, the system automatically turns
on. RECOMMENDED TOWING
WEIGHTS
Note:
Do not exceed the trailer weight
for your vehicle configuration listed in
the chart below.
Note: Be sure to take into consideration
trailer frontal area. Do not exceed 20
feet 2
(1.86 meters 2
) if your vehicle is not
equipped with a towing package or 30
feet 2
(2.79 meters 2
) if your vehicle is
equipped with a towing package.
Note: For high altitude operation,
reduce the gross combined weight by
2% per
1,000 ft (300 m) starting at the
1,000 ft (300 m) elevation point.
242
MKC (TME) Canada/United States of America, enUSA, Edition date: 01/2016, First Printing Towing
Page 249 of 538
Trailer lamps are required on most towed
vehicles. Make sure all running lights, brake
lights, turn signals and hazard lights are
working.
Before Towing a Trailer
Practice turning, stopping and backing up to
get the feel of your vehicle-trailer
combination before starting on a trip. When
turning, make wider turns so the trailer
wheels clear curbs and other obstacles.
When Towing a Trailer
•
Do not drive faster than 70 mph (113
km/h) during the first 500 miles (800
kilometers).
• Do not make full-throttle starts.
• Check your hitch, electrical connections
and trailer wheel lug nuts thoroughly after
you have traveled 50 miles (80
kilometers).
• When stopped in congested or heavy
traffic during hot weather, place the
gearshift in position P to aid engine and
transmission cooling and to help A/C
performance. •
Turn off the speed control with heavy
loads or in hilly terrain. The speed control
may turn off automatically when you are
towing on long, steep grades.
• Shift to a lower gear when driving down
a long or steep hill. Do not apply the
brakes continuously, as they may
overheat and become less effective.
• If your transmission is equipped with a
Grade Assist or Tow/Haul feature, use
this feature when towing. This provides
engine braking and helps eliminate
excessive transmission shifting for
optimum fuel economy and transmission
cooling.
• Allow more distance for stopping with a
trailer attached. Anticipate stops and
brake gradually.
• Avoid parking on a grade. However, if
you must park on a grade:
1. Turn the steering wheel to point your vehicle tires away from traffic flow.
2. Set your vehicle parking brake.
3. Place the automatic transmission in position
P. 4. Place wheel chocks in front and back of
the trailer wheels. (Chocks not included
with vehicle.)
Launching or Retrieving a Boat or
Personal Watercraft (PWC)
Note: Disconnect the wiring to the trailer
before
backing the trailer into the water.
Note: Reconnect the wiring to the trailer
after
removing the trailer from the water.
When backing down a ramp during boat
launching or retrieval:
• Do not allow the static water level to rise
above the bottom edge of the rear
bumper.
• Do not allow waves to break higher than
6 inches (15 centimeters) above the
bottom edge of the rear bumper.
Exceeding these limits may allow water to
enter vehicle components:
• Causing internal damage to the
components.
• Affecting driveability, emissions, and
reliability.
246
MKC (TME) Canada/United States of America, enUSA, Edition date: 01/2016, First Printing Towing
Page 252 of 538
BREAKING-IN
You need to break in new tires for
approximately 300 miles (480 kilometers).
During this time, your vehicle may exhibit
some unusual driving characteristics.
Avoid driving too fast during the first 1000
miles (1600 kilometers). Vary your speed
frequently and change up through the gears
early. Do not labor the engine.
Do not tow during the first 1000 miles (1600
kilometers).
ECONOMICAL DRIVING
Your fuel economy is affected by several
things, such as how you drive, the conditions
you drive under, and how you maintain your
vehicle.
You may improve your fuel economy by
keeping these things in mind:
•
Accelerate and slow down in a smooth,
moderate fashion.
• Drive at steady speeds without stopping. •
Anticipate stops; slowing down may
eliminate the need to stop.
• Combine errands and minimize
stop-and-go driving.
• Close the windows for high-speed
driving.
• Drive at reasonable speeds (traveling at
55 mph [88 km/h] uses 15% less fuel than
traveling at 65 mph [105 km/h]).
• Keep the tires properly inflated and use
only the recommended size.
• Use the recommended engine oil.
• Perform all regularly scheduled
maintenance.
Avoid these actions; they reduce your fuel
economy:
• Sudden accelerations or hard
accelerations.
• Revving the engine before turning it off.
• Idle for periods longer than one minute.
• Warm up your vehicle on cold mornings.
• Use the air conditioner or front defroster.
• Use the speed control in hilly terrain. •
Rest your foot on the brake pedal while
driving.
• Drive a heavily loaded vehicle or tow a
trailer.
• Carry unnecessary weight (approximately
1 mpg [0.4 km/L] is lost for every 400 lb
[180 kilogram] of weight carried).
• Driving with the wheels out of alignment.
Conditions
• Heavily loading a vehicle or towing a
trailer may reduce fuel economy at any
speed.
• Adding certain accessories to your
vehicle (for example bug deflectors,
rollbars, light bars, running boards, ski
racks or luggage racks) may reduce fuel
economy.
• To maximize the fuel economy, drive with
the tonneau cover installed (if equipped).
• Using fuel blended with alcohol may
lower fuel economy.
• Fuel economy may decrease with lower
temperatures during the first 8–10 miles
(12–16 kilometers) of driving.
249
MKC (TME) Canada/United States of America, enUSA, Edition date: 01/2016, First Printing Driving Hints
Page 253 of 538
•
Driving on flat terrain offers improved fuel
economy as compared to driving on hilly
terrain.
• Transmissions give their best fuel
economy when operated in the top cruise
gear and with steady pressure on the gas
pedal.
• Four-wheel-drive operation (if equipped)
is less fuel efficient than two-wheel-drive
operation.
• Close the windows for high-speed
driving.
DRIVING THROUGH WATER WARNING
Do not drive through flowing or deep
water as you may lose control of your
vehicle. Note:
Driving through standing water can
cause vehicle damage.
Note: Engine damage can occur if water
enters the air filter. Before driving through standing water, check
the depth. Never drive through water that is
higher than the bottom of the front rocker
area of your vehicle.
When driving through standing water, drive
very slowly and do not stop your vehicle.
Your brake performance and traction may
be limited. After driving through water and
as soon as it is safe to do so:
•
Lightly press the brake pedal to dry the
brakes and to check that they work.
• Check that the horn works. •
Check that the exterior lights work.
• Turn the steering wheel to check that the
steering power assist works.
FLOOR MATS WARNINGS
Always use floor mats that are
designed to fit the foot well of your
vehicle. Only use floor mats that leave the
pedal area unobstructed. Only use floor mats
that are firmly secured to retention posts so
that they cannot slip out of position and
interfere with the pedals or impair safe
operation of your vehicle in other ways. Pedals that cannot move freely can
cause loss of vehicle control and
increase the risk of serious personal injury. Always make sure that the floor mats
are properly attached to the retention
posts in the carpet that are supplied with
your vehicle. Floor mats must be properly
secured to both retention posts to make sure
mats do not shift out of position.
250
MKC (TME) Canada/United States of America, enUSA, Edition date: 01/2016, First Printing Driving HintsE176360
Page 256 of 538
Vehicles Sold in Canada: Getting
Roadside Assistance
To fully assist you should you have a vehicle
concern, Lincoln Motor Company offers a
complimentary roadside assistance program.
This program is eligible within Canada or the
continental United States.
This program is separate from the New
Vehicle Limited Warranty, but the coverage
is concurrent with the powertrain coverage
period of your vehicle.
Canadian customers who require roadside
assistance, call 1-800-387-5333.
Vehicles Sold in Canada: Using
Roadside Assistance
Complete the roadside assistance
identification card and place it in your wallet
for quick reference.
In Canada, this card is found in the Warranty
Guide in the glove compartment of your
vehicle.
Vehicles Sold in Canada: Roadside
Assistance Program Coverage
The service is available 24 hours a day,
seven days a week.
Canadian roadside coverage and benefits
may differ from the U.S. coverage.
For complete program coverage details
review your warranty guide, contact your
dealer, call us in Canada at 1-800-387-9333,
or visit our website at
www.lincolncanada.com.
HAZARD WARNING FLASHERS
Note:
If used when the vehicle is not running,
the battery will lose charge. There may be
insufficient power to restart your vehicle. The hazard warning button is
located on the instrument panel.
Use it when your vehicle is
creating a safety hazard for other motorists. •
Press the button to turn on the hazard
warning function, and the front and rear
direction indicators will flash.
• Press the button again to turn them off.
FUEL SHUTOFF WARNING
Failure to inspect and, if necessary,
repair fuel leaks after a collision may
increase the risk of fire and serious injury.
Ford Motor Company recommends that the
fuel system be inspected by an authorized
dealer after any collision. In the event of a moderate to severe
collision, this vehicle includes a fuel pump
shutoff feature that stops the flow of fuel to
the engine. Not every impact will cause a
shutoff.
253
MKC (TME) Canada/United States of America, enUSA, Edition date: 01/2016, First Printing Roadside Emergencies