steering LINCOLN MKC 2018 Workshop Manual
[x] Cancel search | Manufacturer: LINCOLN, Model Year: 2018, Model line: MKC, Model: LINCOLN MKC 2018Pages: 571, PDF Size: 4.39 MB
Page 276 of 571
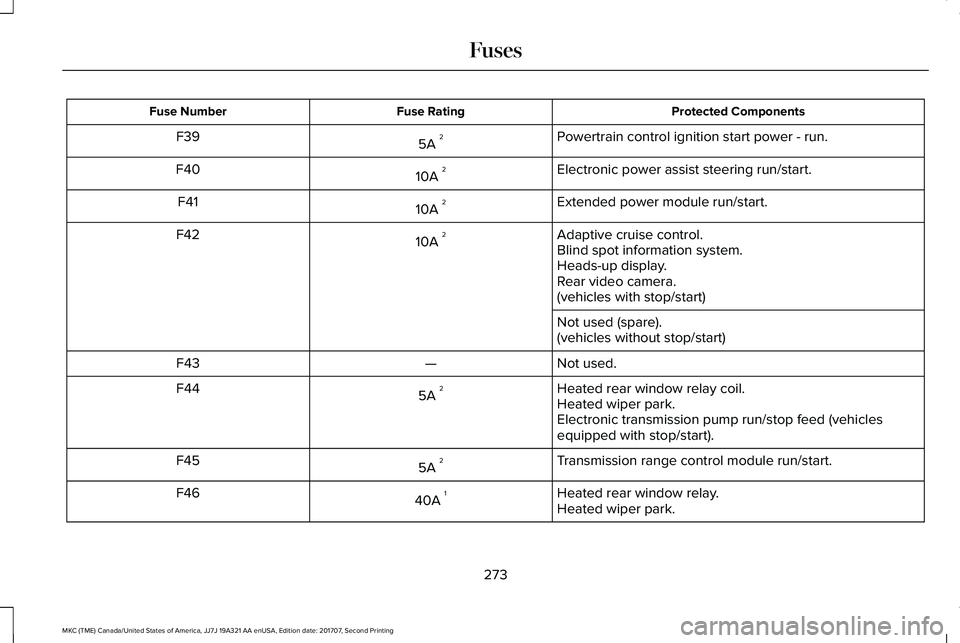
Protected ComponentsFuse RatingFuse Number
Powertrain control ignition start power - run.5A 2F39
Electronic power assist steering run/start.10A 2F40
Extended power module run/start.10A 2F41
Adaptive cruise control.10A 2F42Blind spot information system.Heads-up display.Rear video camera.(vehicles with stop/start)
Not used (spare).(vehicles without stop/start)
Not used.—F43
Heated rear window relay coil.5A 2F44Heated wiper park.Electronic transmission pump run/stop feed (vehiclesequipped with stop/start).
Transmission range control module run/start.5A 2F45
Heated rear window relay.40A 1F46Heated wiper park.
273
MKC (TME) Canada/United States of America, JJ7J 19A321 AA enUSA, Edition date: 201707, Second Printing
Fuses
Page 280 of 571
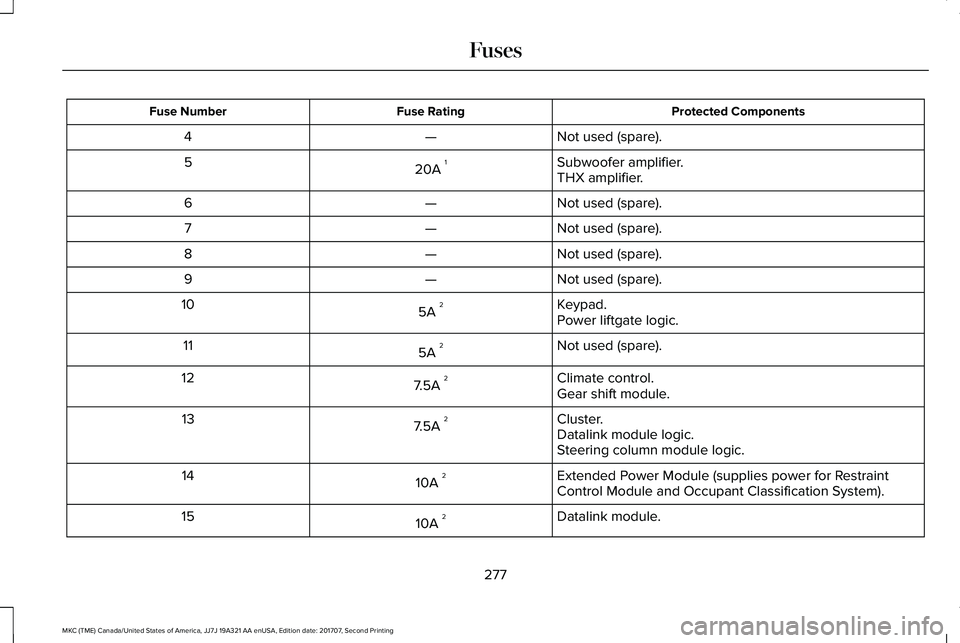
Protected ComponentsFuse RatingFuse Number
Not used (spare).—4
Subwoofer amplifier.20A 15THX amplifier.
Not used (spare).—6
Not used (spare).—7
Not used (spare).—8
Not used (spare).—9
Keypad.5A 210Power liftgate logic.
Not used (spare).5A 211
Climate control.7.5A 212Gear shift module.
Cluster.7.5A 213Datalink module logic.Steering column module logic.
Extended Power Module (supplies power for RestraintControl Module and Occupant Classification System).10A 214
Datalink module.10A 215
277
MKC (TME) Canada/United States of America, JJ7J 19A321 AA enUSA, Edition date: 201707, Second Printing
Fuses
Page 282 of 571
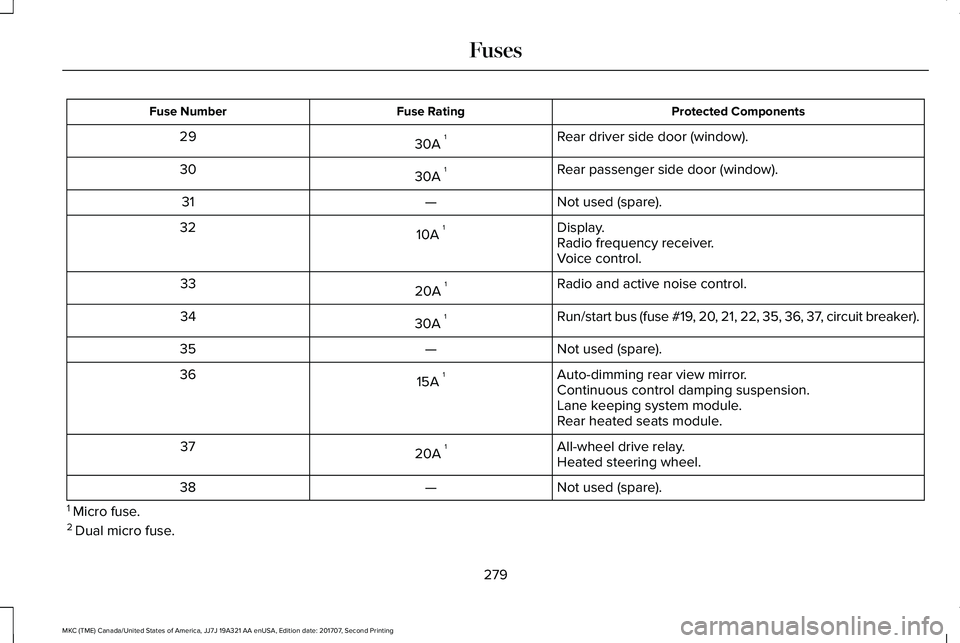
Protected ComponentsFuse RatingFuse Number
Rear driver side door (window).30A 129
Rear passenger side door (window).30A 130
Not used (spare).—31
Display.10A 132Radio frequency receiver.Voice control.
Radio and active noise control.20A 133
Run/start bus (fuse #19, 20, 21, 22, 35, 36, 37, circuit breaker).30A 134
Not used (spare).—35
Auto-dimming rear view mirror.15A 136Continuous control damping suspension.Lane keeping system module.Rear heated seats module.
All-wheel drive relay.20A 137Heated steering wheel.
Not used (spare).—38
1 Micro fuse.2 Dual micro fuse.
279
MKC (TME) Canada/United States of America, JJ7J 19A321 AA enUSA, Edition date: 201707, Second Printing
Fuses
Page 293 of 571
9. If the oil level is correct, replace thedipstick and make sure it is fully seated.
Note:Do not remove the dipstick when theengine is running.
Note: If the oil level is between themaximum and minimum marks, the oil levelis acceptable. Do not add oil.
Note:The oil consumption of new enginesreaches its normal level after approximately3,000 mi (5,000 km).
Adding Engine Oil
WARNINGS
Do not add engine oil when the engineis hot. Failure to follow this instructioncould result in personal injury.
Do not remove the filler cap when theengine is running.
Do not use supplemental engine oil additivesbecause they are unnecessary and couldlead to engine damage that may not becovered by the vehicle Warranty.
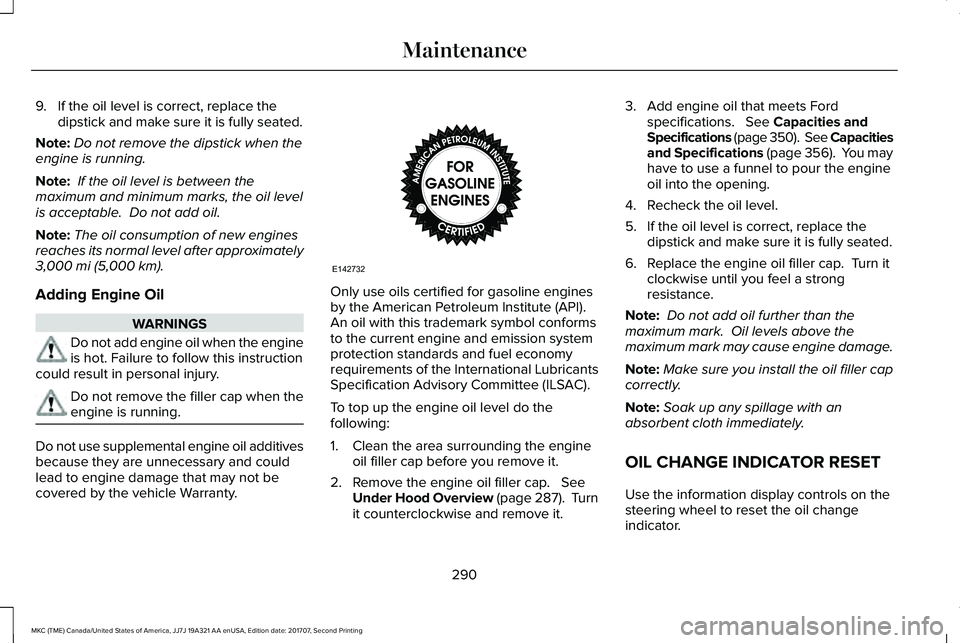
Only use oils certified for gasoline enginesby the American Petroleum Institute (API). An oil with this trademark symbol conformsto the current engine and emission systemprotection standards and fuel economyrequirements of the International LubricantsSpecification Advisory Committee (ILSAC).
To top up the engine oil level do thefollowing:
1. Clean the area surrounding the engineoil filler cap before you remove it.
2. Remove the engine oil filler cap. SeeUnder Hood Overview (page 287). Turnit counterclockwise and remove it.
3. Add engine oil that meets Fordspecifications. See Capacities andSpecifications (page 350). See Capacitiesand Specifications (page 356). You mayhave to use a funnel to pour the engineoil into the opening.
4. Recheck the oil level.
5. If the oil level is correct, replace thedipstick and make sure it is fully seated.
6. Replace the engine oil filler cap. Turn itclockwise until you feel a strongresistance.
Note: Do not add oil further than themaximum mark. Oil levels above themaximum mark may cause engine damage.
Note:Make sure you install the oil filler capcorrectly.
Note:Soak up any spillage with anabsorbent cloth immediately.
OIL CHANGE INDICATOR RESET
Use the information display controls on thesteering wheel to reset the oil changeindicator.
290
MKC (TME) Canada/United States of America, JJ7J 19A321 AA enUSA, Edition date: 201707, Second Printing
MaintenanceE142732
Page 297 of 571
How Fail-Safe Cooling Works
If the engine begins to overheat, the enginecoolant temperature gauge will move to thered (hot) area and:
A high engine temperaturemessage will appear in theinformation display.
The service engine soon indicatorwill light.
If the engine reaches a presetover-temperature condition, the engine willautomatically switch to alternating cylinderoperation. Each disabled cylinder acts as anair pump and cools the engine.
When this occurs the vehicle will still operate.However:
•The engine power will be limited.
•The air conditioning system will bedisabled.
Continued operation will increase the enginetemperature and the engine will completelyshut down, causing steering and brakingeffort to increase.
Once the engine temperature cools, theengine can be re-started. Take your vehicleto an authorized dealer as soon as possibleto minimize engine damage.
When Fail-Safe Mode Is Activated
WARNINGS
Fail-safe mode is for use duringemergencies only. Operate yourvehicle in fail-safe mode only as long asnecessary to bring your vehicle to rest in asafe location and seek immediate repairs.When in fail-safe mode, the vehicle will havelimited power, will not be able to maintainhigh-speed operation, and may completelyshut down without warning, potentially losingengine power, power steering assist, andpower brake assist, which may increase thepossibility of a crash resulting in seriousinjury.
Never remove the coolant reservoircap while the engine is running or hot.
You have limited engine power when in thefail-safe mode, so drive your vehicle withcaution. Your vehicle will not be able tomaintain high-speed operation and theengine will run rough. Remember that theengine is capable of completely shuttingdown automatically to prevent enginedamage, therefore:
1. Pull off the road as soon as safelypossible and switch the engine off.
2. Arrange for your vehicle to be taken toan authorized dealer.
3.If this is not possible, wait a short periodfor the engine to cool.
4. Check the coolant level and replenish iflow.
5.Re-start the engine and take your vehicleto an authorized dealer.
Note:Driving your vehicle without repairingthe engine problem increases the chance ofengine damage. Take your vehicle to anauthorized dealer as soon as possible.
294
MKC (TME) Canada/United States of America, JJ7J 19A321 AA enUSA, Edition date: 201707, Second Printing
Maintenance
Page 314 of 571
CLEANING THE INSTRUMENT
PANEL AND INSTRUMENT
CLUSTER LENS
WARNING
Do not use chemical solvents or strongdetergents when cleaning the steeringwheel or instrument panel to avoidcontamination of the airbag system.
Note:Follow the same procedure ascleaning leather seats for cleaning leatherinstrument panels and leather interior trimsurfaces. See Cleaning Leather Seats (page311).
Clean the instrument panel and cluster lenswith a clean, damp and soft cloth, then usea clean, dry and soft cloth to dry these areas.
•Avoid cleaners or polishes that increasethe gloss of the upper portion of theinstrument panel. The dull finish in thisarea helps protect you from undesirablewindshield reflection.
•Do not use any household cleaningproducts or glass cleaners as these maydamage the finish of the instrumentpanel, interior trim and cluster lens.
•Wash or wipe your hands clean if youhave been in contact with certainproducts such as insect repellent andsuntan lotion to avoid possible damageto the interior painted surfaces.
•Do not allow air fresheners and handsanitizers to spill onto interior surfaces.If a spill occurs, wipe off immediately.Your warranty may not cover thesedamages.
If a staining liquid like coffee or juice hasbeen spilled on the instrument panel or oninterior trim surfaces:
1.Wipe up spilled liquid using a clean, softcloth as quickly as possible.
2. Use Motorcraft Premium Leather andVinyl Cleaner or a commercially availableleather cleaning product for automotiveinteriors. Test any cleaner or stainremover on an inconspicuous area.
3. Alternatively, wipe the surface with aclean, soft cloth and a mild soap andwater solution. Dry the area with a clean,soft cloth.
4.If necessary, apply more soap and watersolution or cleaning product to a clean,soft cloth and press it onto the soiledarea. Allow this to set at roomtemperature for 30 minutes.
5. Remove the soaked cloth, then with aclean, damp cloth, use a rubbing motionfor 60 seconds on the soiled area.
6. Dry the area with a clean, soft cloth.
CLEANING LEATHER SEATS
Note:Follow the same procedure ascleaning leather seats for cleaning leatherinstrument panels and leather interior trimsurfaces.
311
MKC (TME) Canada/United States of America, JJ7J 19A321 AA enUSA, Edition date: 201707, Second Printing
Vehicle Care
Page 318 of 571
GENERAL INFORMATION
The recommended tire inflation pressuresare found on the Tire Label which is locatedon the B-pillar or the edge of the driver door.This information can also be found on theSafety Compliance Certification Label, affixedto either the door hinge pillar, door-latchpost, or the door edge that meets thedoor-latch post; next to the driver’s seatingposition.
We strongly recommend maintaining thesetire pressures at all times. Failure to followthe tire pressure recommendations cancause uneven treadwear patterns, reducedfuel economy, and adversely affect the wayyour vehicle handles.
Note:Check and set the tire pressure at theambient temperature in which you areintending to drive your vehicle and when thetires are cold.
Note:Check your tire pressures at least onceper month.
If your vehicle has a spare tire, set thepressure to the highest value given for yourvehicle and tire size combination.
Use only approved wheels and tire sizes,using other sizes could damage your vehicle.
If you change the diameter of the factoryinstalled tires, the speedometer may notdisplay the correct speed. Take your vehicleto an authorized dealer and have the enginemanagement system reprogrammed.
If you intend to change the size of the factoryinstalled tires, check the suitability with anauthorized dealer.
Additional information related to thefunctionality and maintenance of your tirescan be found in the Wheels and Tire section.See Tire Care (page 318).
Notice to utility vehicle and truckowners
WARNINGS
Vehicles with a higher center of gravity(utility and four-wheel drive vehicles)handle differently than vehicles with a lowercenter of gravity (passenger cars). Avoidsharp turns, excessive speed and abruptsteering in these vehicles. Failure to drivecautiously increases the risk of losing controlof your vehicle, vehicle rollover, personalinjury and death.
In a rollover crash, an unbelted personis significantly more likely to die thana person wearing a seatbelt.
315
MKC (TME) Canada/United States of America, JJ7J 19A321 AA enUSA, Edition date: 201707, Second Printing
Wheels and Tires
Page 320 of 571
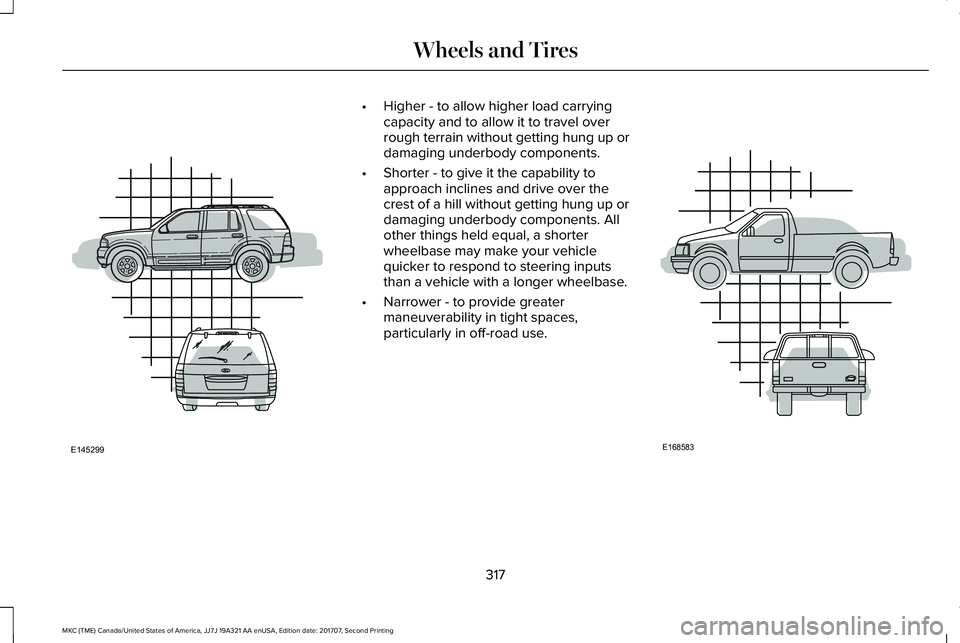
•Higher - to allow higher load carryingcapacity and to allow it to travel overrough terrain without getting hung up ordamaging underbody components.
•Shorter - to give it the capability toapproach inclines and drive over thecrest of a hill without getting hung up ordamaging underbody components. Allother things held equal, a shorterwheelbase may make your vehiclequicker to respond to steering inputsthan a vehicle with a longer wheelbase.
•Narrower - to provide greatermaneuverability in tight spaces,particularly in off-road use.
317
MKC (TME) Canada/United States of America, JJ7J 19A321 AA enUSA, Edition date: 201707, Second Printing
Wheels and TiresE145299 E168583
Page 332 of 571
WARNINGS
The use of non-recommended tiresand wheels could cause steering,suspension, axle, transfer case or powertransfer unit failure. If you havequestions regarding tire replacement,contact your authorized dealer as soonas possible.
To reduce the risk of serious injury,when mounting replacement tiresand wheels, you should not exceed themaximum pressure indicated on thesidewall of the tire to set the beadswithout additional precautions listedbelow. If the beads do not seat at themaximum pressure indicated,re-lubricate and try again.
When inflating the tire for mounting
pressures up to 20 psi (1.38 bar)greater than the maximum pressure onthe tire sidewall, the followingprecautions must be taken to protectthe person mounting the tire:
•Make sure that you have the correcttire and wheel size.
•Lubricate the tire bead and wheelbead seat area again.
•Stand at a minimum of 12 feet (3.66meters) away from the wheel and tire
assembly.
•Use both eye and ear protection.
WARNING
Always inflate steel carcass tireswith a remote air fill with the personinflating standing at a minimum of 12 ft(3.66 m) away from the wheel and tireassembly.
Important: Remember to replace thewheel valve stems when the road tires
are replaced on your vehicle.
It is recommended that the two fronttires or two rear tires generally bereplaced as a pair.
The tire pressure sensors mounted inthe wheels (originally installed on yourvehicle) are not designed to be used inaftermarket wheels.
The use of wheels or tires notrecommended by Ford Motor Companymay affect the operation of your tirepressure monitoring system.
If the tire pressure monitoring systemindicator is flashing, your system ismalfunctioning. Your replacement tiremight be incompatible with your tirepressure monitoring system, or somecomponent of the system may bedamaged.
Safety Practices
WARNINGS
If your vehicle is stuck in snow,mud or sand, do not rapidly spinthe tires; spinning the tires can tear thetire and cause an explosion. A tire canexplode in as little as three to fiveseconds.
329
MKC (TME) Canada/United States of America, JJ7J 19A321 AA enUSA, Edition date: 201707, Second Printing
Wheels and Tires
Page 334 of 571
Note:Your vehicle may be equippedwith a dissimilar spare wheel and tireassembly. A dissimilar spare wheel andtire assembly is defined as a sparewheel and tire assembly that is differentin brand, size or appearance from theroad tires and wheels. If you have adissimilar spare wheel and tireassembly, it is intended for temporaryuse only and should not be used in atire rotation.
Note:After having your tires rotated,inflation pressure must be checked andadjusted to the vehicle requirements.
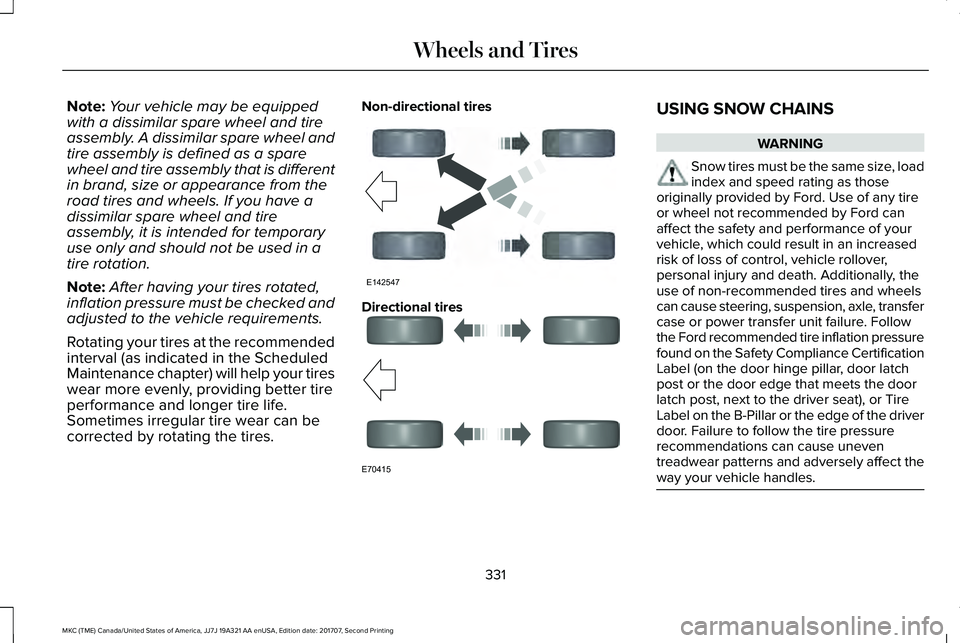
Rotating your tires at the recommendedinterval (as indicated in the ScheduledMaintenance chapter) will help your tireswear more evenly, providing better tire
performance and longer tire life.Sometimes irregular tire wear can becorrected by rotating the tires.
Non-directional tires
Directional tires
USING SNOW CHAINS
WARNING
Snow tires must be the same size, loadindex and speed rating as thoseoriginally provided by Ford. Use of any tireor wheel not recommended by Ford canaffect the safety and performance of yourvehicle, which could result in an increasedrisk of loss of control, vehicle rollover,personal injury and death. Additionally, theuse of non-recommended tires and wheelscan cause steering, suspension, axle, transfercase or power transfer unit failure. Followthe Ford recommended tire inflation pressurefound on the Safety Compliance CertificationLabel (on the door hinge pillar, door latchpost or the door edge that meets the doorlatch post, next to the driver seat), or TireLabel on the B-Pillar or the edge of the driverdoor. Failure to follow the tire pressurerecommendations can cause uneventreadwear patterns and adversely affect theway your vehicle handles.
331
MKC (TME) Canada/United States of America, JJ7J 19A321 AA enUSA, Edition date: 201707, Second Printing
Wheels and TiresE142547 E70415