check engine LINCOLN MKT 2016 User Guide
[x] Cancel search | Manufacturer: LINCOLN, Model Year: 2016, Model line: MKT, Model: LINCOLN MKT 2016Pages: 452, PDF Size: 4.69 MB
Page 165 of 452
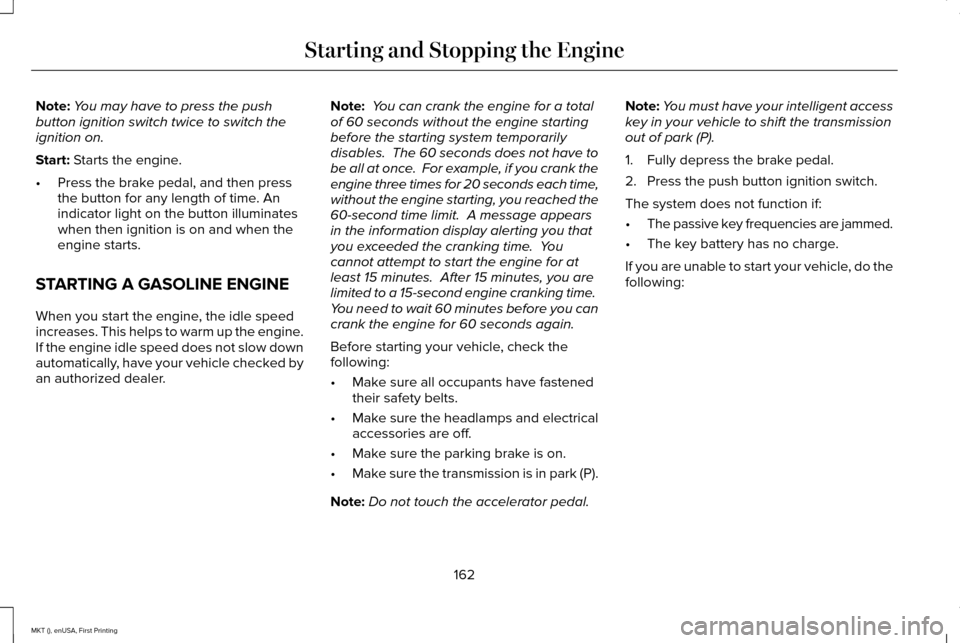
Note:
You may have to press the push
button ignition switch twice to switch the
ignition on.
Start: Starts the engine.
• Press the brake pedal, and then press
the button for any length of time. An
indicator light on the button illuminates
when then ignition is on and when the
engine starts.
STARTING A GASOLINE ENGINE
When you start the engine, the idle speed
increases. This helps to warm up the engine.
If the engine idle speed does not slow down
automatically, have your vehicle checked by
an authorized dealer. Note:
You can crank the engine for a total
of 60 seconds without the engine starting
before the starting system temporarily
disables. The 60 seconds does not have to
be all at once. For example, if you crank the
engine three times for 20 seconds each time,
without the engine starting, you reached the
60-second time limit. A message appears
in the information display alerting you that
you exceeded the cranking time. You
cannot attempt to start the engine for at
least 15 minutes. After 15 minutes, you are
limited to a 15-second engine cranking time.
You need to wait 60 minutes before you can
crank the engine for 60 seconds again.
Before starting your vehicle, check the
following:
• Make sure all occupants have fastened
their safety belts.
• Make sure the headlamps and electrical
accessories are off.
• Make sure the parking brake is on.
• Make sure the transmission is in park (P).
Note: Do not touch the accelerator pedal. Note:
You must have your intelligent access
key in your vehicle to shift the transmission
out of park (P).
1. Fully depress the brake pedal.
2. Press the push button ignition switch.
The system does not function if:
• The passive key frequencies are jammed.
• The key battery has no charge.
If you are unable to start your vehicle, do the
following:
162
MKT (), enUSA, First Printing Starting and Stopping the Engine
Page 168 of 452
4. Apply the parking brake.
Guarding Against Exhaust Fumes
WARNING
If you smell exhaust fumes inside your
vehicle, have your vehicle checked by
your authorized dealer immediately. Do not
drive your vehicle if you smell exhaust fumes.
Carbon monoxide is present in exhaust
fumes. Take precautions to avoid its
dangerous effects. Important Ventilating Information
If you stop your vehicle and then leave the
engine idling for long periods, we
recommend that you do one of the following:
•
Open the windows at least 1 in (3 cm).
• Set your climate control to outside air. ENGINE BLOCK HEATER
(If Equipped) WARNINGS
Failure to follow engine block heater
instructions could result in property
damage or serious personal injury. Do not use your heater with
ungrounded electrical systems or
two-pronged adapters. There is a risk of
electrical shock. Do not fully close the hood, or allow it
to drop under its own weight when
using the engine block heater. This could
damage the power cable and may cause an
electrical short resulting in fire, injury and
property damage. Note:
The heater is most effective when
outdoor temperatures are below 0°F (-18°C).
The heater acts as a starting aid by warming
the engine coolant. This allows the climate
control system to respond quickly. The
equipment includes a heater element
(installed in the engine block) and a wire
harness. You can connect the system to a
grounded 120-volt AC electrical source. We recommend that you do the following for
a safe and correct operation:
•
Use a 16-gauge outdoor extension cord
that is product certified by Underwriter’ s
Laboratory (UL) or Canadian Standards
Association (CSA). This extension cord
must be suitable for use outdoors, in cold
temperatures, and be clearly marked
Suitable for Use with Outdoor
Appliances. Do not use an indoor
extension cord outdoors. This could
result in an electric shock or become a
fire hazard.
• Use as short an extension cord as
possible.
• Do not use multiple extension cords.
• Make sure that when in operation, the
extension cord plug and heater cord plug
connections are free and clear of water.
This could cause an electric shock or fire.
• Make sure your vehicle is parked in a
clean area, clear of combustibles.
• Make sure the heater, heater cord and
extension cord are firmly connected.
165
MKT (), enUSA, First Printing Starting and Stopping the Engine
Page 169 of 452
•
Check for heat anywhere in the electrical
hookup once the system has been
operating for approximately 30 minutes.
• Make sure the system is unplugged and
properly stowed before starting and
driving your vehicle. Make sure the
protective cover seals the prongs of the
block heater cord plug when not in use.
• Make sure the heater system is checked
for proper operation before winter.
Using the Engine Block Heater
Make sure the receptacle terminals are clean
and dry prior to use. Clean them with a dry
cloth if necessary.
The heater uses 0.4 to 1.0 kilowatt-hours of
energy per hour of use. The system does not
have a thermostat. It achieves maximum
temperature after approximately three hours
of operation. Using the heater longer than
three hours does not improve system
performance and unnecessarily uses
electricity.
166
MKT (), enUSA, First Printing Starting and Stopping the Engine
Page 175 of 452
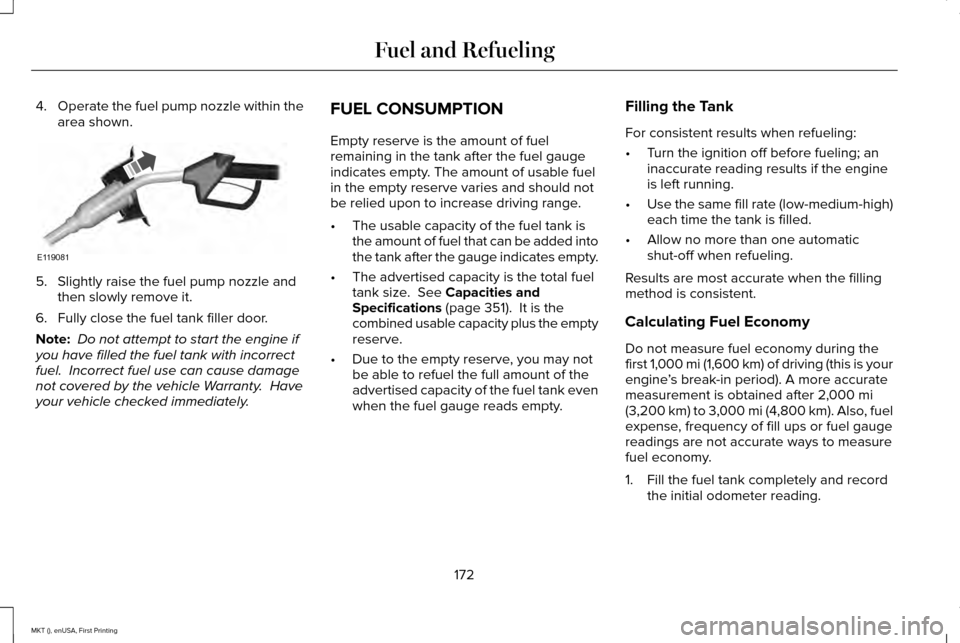
4.
Operate the fuel pump nozzle within the
area shown. 5. Slightly raise the fuel pump nozzle and
then slowly remove it.
6. Fully close the fuel tank filler door.
Note: Do not attempt to start the engine if
you have filled the fuel tank with incorrect
fuel. Incorrect fuel use can cause damage
not covered by the vehicle Warranty. Have
your vehicle checked immediately. FUEL CONSUMPTION
Empty reserve is the amount of fuel
remaining in the tank after the fuel gauge
indicates empty. The amount of usable fuel
in the empty reserve varies and should not
be relied upon to increase driving range.
•
The usable capacity of the fuel tank is
the amount of fuel that can be added into
the tank after the gauge indicates empty.
• The advertised capacity is the total fuel
tank size. See Capacities and
Specifications (page 351). It is the
combined usable capacity plus the empty
reserve.
• Due to the empty reserve, you may not
be able to refuel the full amount of the
advertised capacity of the fuel tank even
when the fuel gauge reads empty. Filling the Tank
For consistent results when refueling:
•
Turn the ignition off before fueling; an
inaccurate reading results if the engine
is left running.
• Use the same fill rate (low-medium-high)
each time the tank is filled.
• Allow no more than one automatic
shut-off when refueling.
Results are most accurate when the filling
method is consistent.
Calculating Fuel Economy
Do not measure fuel economy during the
first 1,000 mi (1,600 km) of driving (this is your
engine ’s break-in period). A more accurate
measurement is obtained after
2,000 mi
(3,200 km) to 3,000 mi (4,800 km). Also, fuel
expense, frequency of fill ups or fuel gauge
readings are not accurate ways to measure
fuel economy.
1. Fill the fuel tank completely and record the initial odometer reading.
172
MKT (), enUSA, First Printing Fuel and RefuelingE119081
Page 178 of 452
You can correct these temporary
malfunctions by filling the fuel tank with good
quality fuel, properly closing the fuel fill inlet
or letting the electrical system dry out. After
three driving cycles without these or any
other temporary malfunctions present, the
service engine soon indicator should stay off
the next time you start the engine. A driving
cycle consists of a cold engine startup
followed by mixed city and highway driving.
No additional vehicle service is required.
If the service engine soon indicator remains
on, have your vehicle serviced at the first
available opportunity. Although some
malfunctions detected by the OBD-II may not
have symptoms that are apparent, continued
driving with the service engine soon indicator
on can result in increased emissions, lower
fuel economy, reduced engine and
transmission smoothness and lead to more
costly repairs.
Readiness for Inspection and
Maintenance (I/M) Testing
Some state and provincial and local
governments may have
Inspection/Maintenance (I/M) programs to
inspect the emission control equipment on
your vehicle. Failure to pass this inspection
could prevent you from getting a vehicle
registration. If the service engine soon indicator
is on or the bulb does not work,
your vehicle may need service.
See On-Board Diagnostics.
Your vehicle may not pass the I/M test if the
service engine soon indicator is on or not
working properly (bulb is burned out), or if
the OBD-II system has determined that some
of the emission control systems have not
been properly checked. In this case, the
vehicle is not ready for I/M testing. If the vehicle
’s engine or transmission has
just been serviced, or the battery has
recently run down or been replaced, the
OBD-II system may indicate that the vehicle
is not ready for I/M testing. To determine if
the vehicle is ready for I/M testing, turn the
ignition key to the on position for 15 seconds
without cranking the engine. If the service
engine soon indicator blinks eight times, it
means that the vehicle is not ready for I/M
testing; if the service engine soon indicator
stays on solid, it means that your vehicle is
ready for I/M testing.
The OBD-II system checks the emission
control system during normal driving. A
complete check may take several days.
If the vehicle is not ready for I/M testing, you
can perform the following driving cycle
consisting of mixed city and highway driving:
1. 15 minutes of steady driving on an expressway or highway followed by 20
minutes of stop-and-go driving with at
least four 30-second idle periods.
175
MKT (), enUSA, First Printing Fuel and Refueling
Page 184 of 452
USING ALL-WHEEL DRIVE
All-wheel drive uses all four wheels to power
the vehicle. This increases traction, enabling
you to drive over terrain and road conditions
that a conventional two-wheel drive vehicle
cannot. The AWD system is active all the time
and requires no input from the operator.
Note:
Your AWD vehicle is not intended for
off-road use. The AWD feature gives your
vehicle some limited off-road capabilities in
which driving surfaces are relatively level,
obstruction-free and otherwise similar to
normal on-road driving conditions. Operating
your vehicle under other than those
conditions could subject the vehicle to
excessive stress which might result in
damage which is not covered under your
warranty.
Note: When an AWD system fault is present,
the warning Check AWD displays in the
information display. The AWD system is not
functioning correctly and defaults to
front-wheel drive. When this warning
displays, have your vehicle serviced at an
authorized dealer. Note:
The AWD OFF message may also
appear in the information display if the AWD
system overheats and defaults to front-wheel
drive. This may occur if the vehicle is
operated in extreme conditions with
excessive wheel slip, such as deep sand.
To resume normal AWD function as soon as
possible, stop the vehicle in a safe location
and stop the engine for at least 10 minutes.
After the engine has been restarted and the
AWD system has adequately cooled, the
AWD OFF
message will turn off and normal
AWD function returns. If the engine is not
stopped, the
AWD OFF message turns off
when the system cools and normal AWD
function returns.
181
MKT (), enUSA, First Printing All-Wheel Drive
(If Equipped)
Page 193 of 452
GENERAL INFORMATION
Note:
Occasional brake noise is normal. If a
metal-to-metal, continuous grinding or
continuous squeal sound is present, the
brake linings may be worn-out. Have the
system checked by an authorized dealer. If
your vehicle has continuous vibration or
shudder in the steering wheel while braking,
have it checked by an authorized dealer.
Note: Brake dust may accumulate on the
wheels, even under normal driving
conditions. Some dust is inevitable as the
brakes wear and does not contribute to
brake noise. See Cleaning the Alloy Wheels
(page 318).
Note: Depending on applicable laws and
regulations in the country for which your
vehicle was originally built, your brake lamps
may flash during heavy braking. Following
this, your hazard lights may also flash when
your vehicle comes to a stop. See
Warning Lamps and
Indicators (page 104). Wet brakes result in reduced braking
efficiency. Gently press the brake pedal a
few times when driving from a car wash or
standing water to dry the brakes.
Brake Over Accelerator
In the event the accelerator pedal becomes
stuck or entrapped, apply steady and firm
pressure to the brake pedal to slow the
vehicle and reduce engine power. If you
experience this condition, apply the brakes
and bring your vehicle to a safe stop. Move
the transmission to park (P), switch the
engine off and apply the parking brake.
Inspect the accelerator pedal for any
interference. If none are found and the
condition persists, have your vehicle towed
to the nearest authorized dealer.
Brake Assist
Brake assist detects when you brake rapidly
by measuring the rate at which you press the
brake pedal. It provides maximum braking
efficiency as long as you press the pedal,
and can reduce stopping distances in critical
situations. Anti-lock Brake System
This system helps you maintain steering
control during emergency stops by keeping
the brakes from locking. This lamp momentarily illuminates
when you turn the ignition on. If
the light does not illuminate during
start up, remains on or flashes, the system
may be disabled. Have the system checked
by an authorized dealer. If the anti-lock brake
system is disabled, normal braking is still
effective. If the brake warning lamp
illuminates when you release the
parking brake, have the system
checked by an authorized dealer.
HINTS ON DRIVING WITH ANTI-
LOCK BRAKES
Note: When the system is operating, the
brake pedal may pulse and may travel
further. Maintain pressure on the brake
pedal. You may also hear a noise from the
system. This is normal.
190
MKT (), enUSA, First Printing BrakesE144522 E144522
Page 236 of 452
Using Lincoln Drive Control
You can configure which of the Drive Control
modes are active when your vehicle is in
drive (D) or in Sport (S). The configuration
remains active until modified from the main
menu on the information display.
These systems have a range of modes which
you can choose from in order to customize
your ideal driving experience:
•
Comfort – Provides a more relaxed
driving experience, maximizing comfort.
Your steering effort decreases and the
suspension movement is more fluid.
Comfort mode is ideal when you desire
enhanced traveling comfort.
• Normal – Delivers a balanced
combination of comfortable, controlled
ride and confident handling. This mode
provides an engaging drive experience
and a direct connection to the road
without sacrificing any of the composure
demanded from a luxury vehicle.
• Sport – Provides a sportier driving
experience. The suspension stiffens, with
an emphasis on handling and control.
The engine responds more directly to
your inputs and takes on a more powerful
tone. Sport mode is ideal for use during
more spirited driving. You can change your vehicle
’s Drive
Control settings from the main menu on
the information display: Settings
Drive Control
Vehicle
Note: Not all settings may be available.
Note: Lincoln Drive Control has diagnostic
checks that continuously monitor the system
to ensure proper operation. Certain types of
system errors will gray out the mode
selections within the information display,
preventing you from changing states when
the gear position is changed. Other types of
errors produce a temporary message in the
information display. See Information
Messages (page 115). If either condition
persists for multiple key cycles, have your
vehicle checked by an authorized dealer.
233
MKT (), enUSA, First Printing Driving Aids
Page 247 of 452
RV & Trailer Towing Guide Online
http://www.fleet.ford.com/towing-guides/
Website
TRAILER SWAY CONTROL (If Equipped) WARNING
Turning off trailer sway control
increases the risk of loss of vehicle
control, serious injury or death. Ford does
not recommend disabling this feature except
in situations where speed reduction may be
detrimental (such as hill climbing), the driver
has significant trailer towing experience, and
can control trailer sway and maintain safe
operation. Note:
This feature does not prevent trailer
sway, but reduces it when it begins.
Note: This feature cannot stop all trailers
from swaying. Note:
In some cases, if your vehicle speed
is too high, the system may turn on multiple
times, gradually reducing your vehicle speed.
The system applies the brakes to the
individual wheels and reduces engine torque
to aid vehicle stability. If the trailer begins
to sway, the stability control warning lamp
flashes and a message appears in the
information display. See Information
Messages (page 115). Slow your vehicle
down, pull safely to the side of the road and
check for correct load distribution. See Load
Carrying
(page 234).
You can switch this feature off in the
information display. When you switch the
ignition on, the system automatically turns
on. RECOMMENDED TOWING
WEIGHTS
Note:
2.0L front-wheel drive and 3.7L
all-wheel drive applications, available
on Limousine and Livery only, cannot
tow a trailer.
Note: Do not exceed the trailer weight
for your vehicle configuration listed in
the chart below.
Note: Make sure to take into
consideration trailer frontal area. Do not
exceed 20 feet² (1.86 meters²) if your
vehicle can tow a class I trailer or 40
feet² (3.72 meters²) if your vehicle can
tow a class III trailer.
244
MKT (), enUSA, First Printing Towing
Page 251 of 452
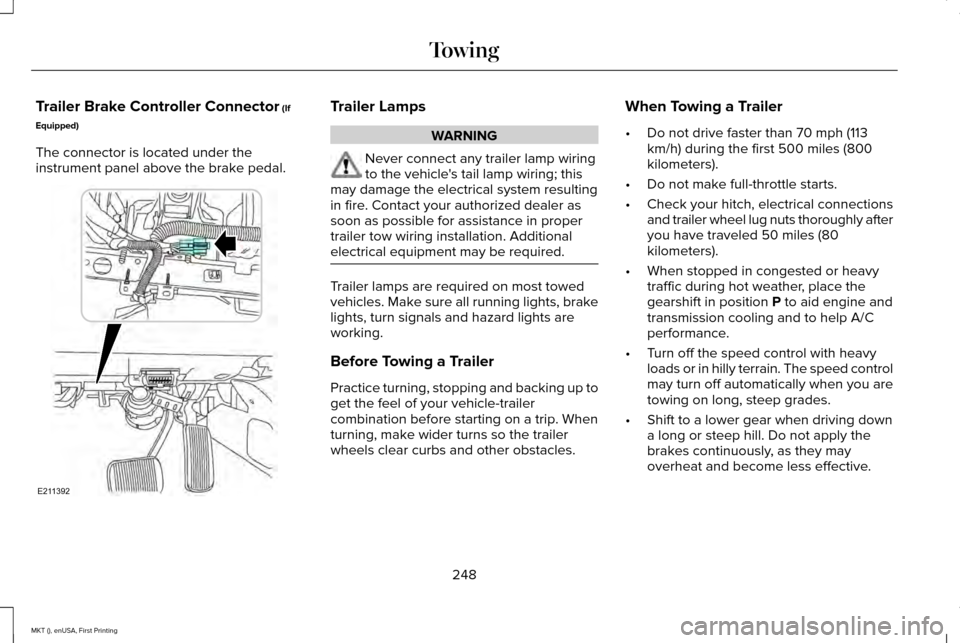
Trailer Brake Controller Connector (If
Equipped)
The connector is located under the
instrument panel above the brake pedal. Trailer Lamps
WARNING
Never connect any trailer lamp wiring
to the vehicle's tail lamp wiring; this
may damage the electrical system resulting
in fire. Contact your authorized dealer as
soon as possible for assistance in proper
trailer tow wiring installation. Additional
electrical equipment may be required. Trailer lamps are required on most towed
vehicles. Make sure all running lights, brake
lights, turn signals and hazard lights are
working.
Before Towing a Trailer
Practice turning, stopping and backing up to
get the feel of your vehicle-trailer
combination before starting on a trip. When
turning, make wider turns so the trailer
wheels clear curbs and other obstacles.When Towing a Trailer
•
Do not drive faster than 70 mph (113
km/h) during the first 500 miles (800
kilometers).
• Do not make full-throttle starts.
• Check your hitch, electrical connections
and trailer wheel lug nuts thoroughly after
you have traveled 50 miles (80
kilometers).
• When stopped in congested or heavy
traffic during hot weather, place the
gearshift in position
P to aid engine and
transmission cooling and to help A/C
performance.
• Turn off the speed control with heavy
loads or in hilly terrain. The speed control
may turn off automatically when you are
towing on long, steep grades.
• Shift to a lower gear when driving down
a long or steep hill. Do not apply the
brakes continuously, as they may
overheat and become less effective.
248
MKT (), enUSA, First Printing TowingE211392