four LINCOLN MKT 2017 Owners Manual
[x] Cancel search | Manufacturer: LINCOLN, Model Year: 2017, Model line: MKT, Model: LINCOLN MKT 2017Pages: 558, PDF Size: 4.59 MB
Page 7 of 558
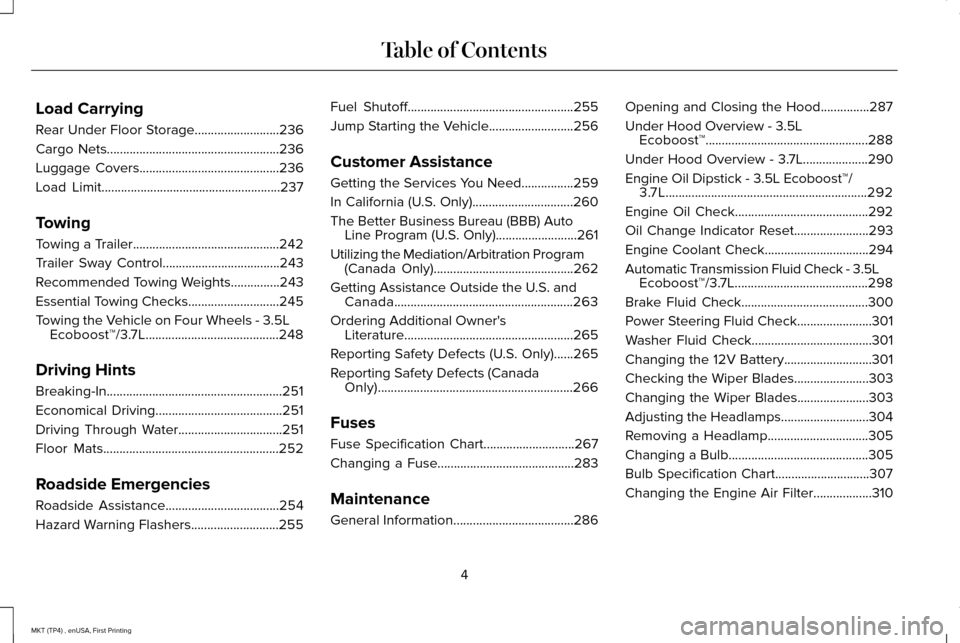
Load Carrying
Rear Under Floor Storage..........................236
Cargo Nets
.....................................................236
Luggage Covers
...........................................236
Load Limit
.......................................................237
Towing
Towing a Trailer.............................................242
Trailer Sway Control....................................243
Recommended Towing Weights...............243
Essential Towing Checks
............................245
Towing the Vehicle on Four Wheels - 3.5L Ecoboost™/3.7L.........................................248
Driving Hints
Breaking-In......................................................251
Economical Driving
.......................................251
Driving Through Water
................................251
Floor Mats
......................................................252
Roadside Emergencies
Roadside Assistance
...................................254
Hazard Warning Flashers
...........................255 Fuel Shutoff...................................................255
Jump Starting the Vehicle
..........................256
Customer Assistance
Getting the Services You Need................259
In California (U.S. Only)...............................260
The Better Business Bureau (BBB) Auto Line Program (U.S. Only)
.........................261
Utilizing the Mediation/Arbitration Program (Canada Only)
...........................................262
Getting Assistance Outside the U.S. and Canada.......................................................263
Ordering Additional Owner's Literature....................................................265
Reporting Safety Defects (U.S. Only)......265
Reporting Safety Defects (Canada Only)............................................................266
Fuses
Fuse Specification Chart............................267
Changing a Fuse..........................................283
Maintenance
General Information
.....................................286 Opening and Closing the Hood...............287
Under Hood Overview - 3.5L
Ecoboost™..................................................288
Under Hood Overview - 3.7L....................290
Engine Oil Dipstick - 3.5L Ecoboost™/ 3.7L..............................................................292
Engine Oil Check.........................................292
Oil Change Indicator Reset
.......................293
Engine Coolant Check................................294
Automatic Transmission Fluid Check - 3.5L Ecoboost™/3.7L.........................................298
Brake Fluid Check.......................................300
Power Steering Fluid Check.......................301
Washer Fluid Check.....................................301
Changing the 12V Battery...........................301
Checking the Wiper Blades.......................303
Changing the Wiper Blades......................303
Adjusting the Headlamps...........................304
Removing a Headlamp
...............................305
Changing a Bulb...........................................305
Bulb Specification Chart.............................307
Changing the Engine Air Filter
..................310
4
MKT (TP4) , enUSA, First Printing Table of Contents
Page 22 of 558
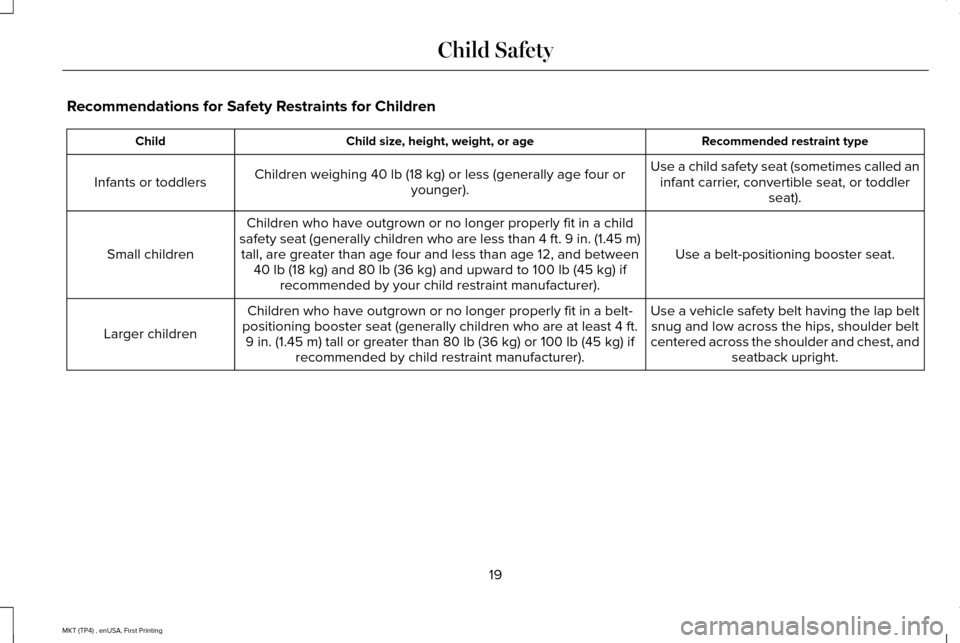
Recommendations for Safety Restraints for Children
Recommended restraint type
Child size, height, weight, or age
Child
Use a child safety seat (sometimes called aninfant carrier, convertible seat, or toddler seat).
Children weighing 40 lb (18 kg) or less (generally age four or
younger).
Infants or toddlers
Use a belt-positioning booster seat.
Children who have outgrown or no longer properly fit in a child
safety seat (generally children who are less than 4 ft. 9 in. (1.45 m)\
tall, are greater than age four and less than age 12, and between 40 lb (18 kg)
and 80 lb (36 kg) and upward to 100 lb (45 kg) if
recommended by your child restraint manufacturer).
Small children
Use a vehicle safety belt having the lap beltsnug and low across the hips, shoulder belt
centered across the shoulder and chest, and seatback upright.
Children who have outgrown or no longer properly fit in a belt-
positioning booster seat (generally children who are at least 4 ft. 9 in. (1.45 m) tall or greater than
80 lb (36 kg) or 100 lb (45 kg) if
recommended by child restraint manufacturer).
Larger children
19
MKT (TP4) , enUSA, First Printing Child Safety
Page 23 of 558

•
You are required by law to properly use
safety seats for infants and toddlers in
the United States and Canada.
• Many states and provinces require that
small children use approved booster
seats until they reach age eight, a height
of 4 feet 9 inches (1.45 meters) tall, or
80 lb (36 kg). Check your local and state
or provincial laws for specific
requirements about the safety of children
in your vehicle.
• When possible, always properly restrain
children 12 years of age and under in a
rear seating position of your vehicle.
Accident statistics suggest that children
are safer when properly restrained in the
rear seating positions than in a front
seating position.
See Front Passenger
Sensing System (page 53). INSTALLING CHILD RESTRAINTS
Child Seats
Use a child safety seat (sometimes called an
infant carrier, convertible seat, or toddler
seat) for infants, toddlers or children
weighing 40 lb (18 kg) or less (generally age
four or younger). Using Lap and Shoulder Belts WARNINGS
Airbags can kill or injure a child in a
child seat. Never place a rear-facing
child seat in front of an active airbag. If you
must use a forward-facing child seat in the
front seat, move the seat upon which the
child seat is installed all the way back. Airbags can kill or injure a child in a
child seat. Children 12 and under
should be properly restrained in the rear seat
whenever possible. Depending on where you secure a
child restraint, and depending on the
child restraint design, you may block access
to certain seatbelt buckle assemblies and
LATCH lower anchors, rendering those
features potentially unusable. To avoid risk
of injury, occupants should only use seating
positions where they are able to be properly
restrained. 20
MKT (TP4) , enUSA, First Printing Child SafetyE142594
Page 35 of 558

1. You may need to move the load floor
rearward to gain access to the top tether
anchors.
2. After attaching the tether strap, reposition
the load floor.
Third row seat Note:
The cargo tie downs at the rear edge
of the floor are not tether anchors. BOOSTER SEATS WARNING
Never place, or allow a child to place,
the shoulder belt under a child's arm
or behind the back because it reduces the
protection for the upper part of the body and
may increase the risk of injury or death in a
crash. Note:
Some booster seat safety belt guides
may not accommodate the shoulder portion
of the inflatable safety belt.
Use a belt-positioning booster seat for
children who have outgrown or no longer
properly fit in a child safety seat (generally
children who are less than 4 feet 9 inches
(1.45 meters) tall, are greater than age four
(4) and less than age twelve (12), and
between 40 pounds (18 kilograms) and 80
pounds (36 kilograms) and upward to 100 pounds (45 kilograms) if recommended by
your child restraint manufacturer). Many state
and provincial laws require that children use
approved booster seats until they reach age
eight, a height of 4 feet 9 inches (1.45 meters)
tall, or 80 pounds (36 kilograms).
Booster seats should be used until you can
answer YES to ALL of these questions when
seated without a booster seat:
•
Can the child sit all the way back against
their vehicle seat back with knees bent
comfortably at the edge of the seat
cushion?
• Can the child sit without slouching?
32
MKT (TP4) , enUSA, First Printing Child SafetyE190832 E142595
Page 84 of 558
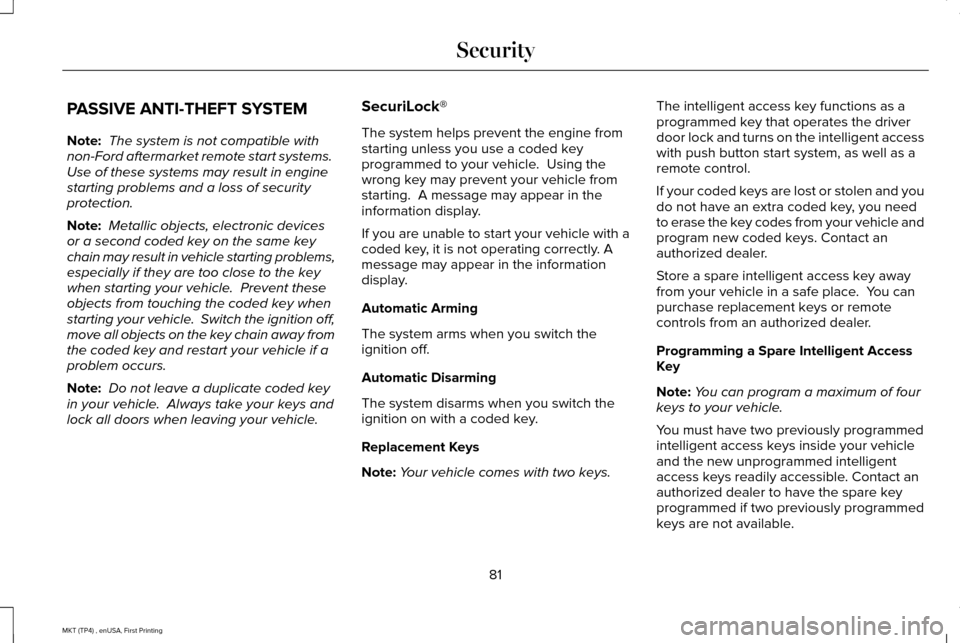
PASSIVE ANTI-THEFT SYSTEM
Note:
The system is not compatible with
non-Ford aftermarket remote start systems.
Use of these systems may result in engine
starting problems and a loss of security
protection.
Note: Metallic objects, electronic devices
or a second coded key on the same key
chain may result in vehicle starting problems,
especially if they are too close to the key
when starting your vehicle. Prevent these
objects from touching the coded key when
starting your vehicle. Switch the ignition off,
move all objects on the key chain away from
the coded key and restart your vehicle if a
problem occurs.
Note: Do not leave a duplicate coded key
in your vehicle. Always take your keys and
lock all doors when leaving your vehicle. SecuriLock®
The system helps prevent the engine from
starting unless you use a coded key
programmed to your vehicle. Using the
wrong key may prevent your vehicle from
starting. A message may appear in the
information display.
If you are unable to start your vehicle with a
coded key, it is not operating correctly. A
message may appear in the information
display.
Automatic Arming
The system arms when you switch the
ignition off.
Automatic Disarming
The system disarms when you switch the
ignition on with a coded key.
Replacement Keys
Note:
Your vehicle comes with two keys. The intelligent access key functions as a
programmed key that operates the driver
door lock and turns on the intelligent access
with push button start system, as well as a
remote control.
If your coded keys are lost or stolen and you
do not have an extra coded key, you need
to erase the key codes from your vehicle and
program new coded keys. Contact an
authorized dealer.
Store a spare intelligent access key away
from your vehicle in a safe place. You can
purchase replacement keys or remote
controls from an authorized dealer.
Programming a Spare Intelligent Access
Key
Note:
You can program a maximum of four
keys to your vehicle.
You must have two previously programmed
intelligent access keys inside your vehicle
and the new unprogrammed intelligent
access keys readily accessible. Contact an
authorized dealer to have the spare key
programmed if two previously programmed
keys are not available.
81
MKT (TP4) , enUSA, First Printing Security
Page 144 of 558
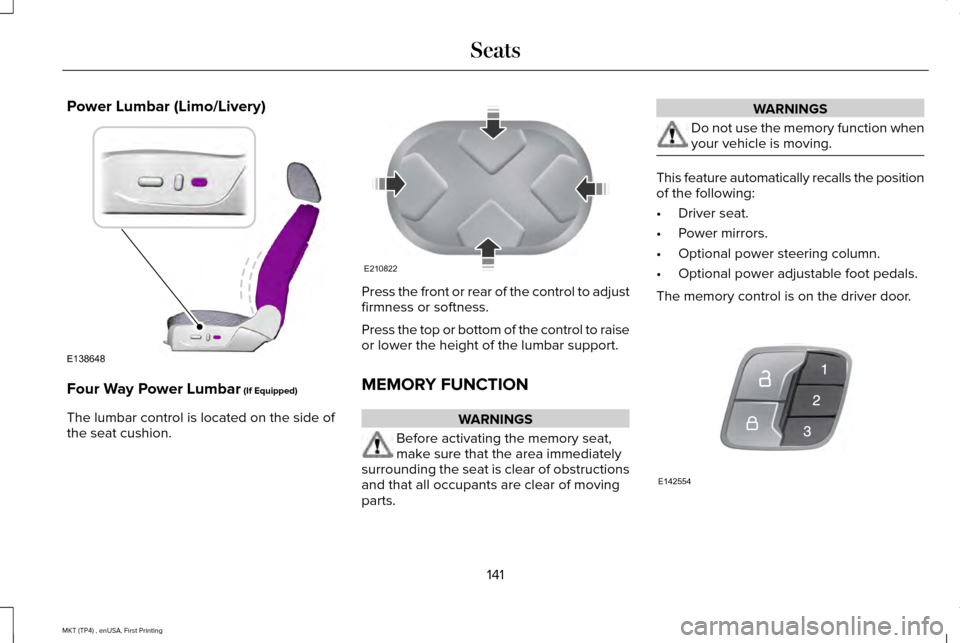
Power Lumbar (Limo/Livery)
Four Way Power Lumbar (If Equipped)
The lumbar control is located on the side of
the seat cushion. Press the front or rear of the control to adjust
firmness or softness.
Press the top or bottom of the control to raise
or lower the height of the lumbar support.
MEMORY FUNCTION
WARNINGS
Before activating the memory seat,
make sure that the area immediately
surrounding the seat is clear of obstructions
and that all occupants are clear of moving
parts. WARNINGS
Do not use the memory function when
your vehicle is moving.
This feature automatically recalls the position
of the following:
•
Driver seat.
• Power mirrors.
• Optional power steering column.
• Optional power adjustable foot pedals.
The memory control is on the driver door. 141
MKT (TP4) , enUSA, First Printing SeatsE138648 E210822 E142554
Page 182 of 558
Readiness for Inspection and
Maintenance (I/M) Testing
Some state and provincial and local
governments may have
Inspection/Maintenance (I/M) programs to
inspect the emission control equipment on
your vehicle. Failure to pass this inspection
could prevent you from getting a vehicle
registration.
If the service engine soon indicator
is on or the bulb does not work,
your vehicle may need service.
See On-Board Diagnostics.
Your vehicle may not pass the I/M test if the
service engine soon indicator is on or not
working properly (bulb is burned out), or if
the OBD-II system has determined that some
of the emission control systems have not
been properly checked. In this case, the
vehicle is not ready for I/M testing. If the vehicle
’s engine or transmission has
just been serviced, or the battery has
recently run down or been replaced, the
OBD-II system may indicate that the vehicle
is not ready for I/M testing. To determine if
the vehicle is ready for I/M testing, turn the
ignition key to the on position for 15 seconds
without cranking the engine. If the service
engine soon indicator blinks eight times, it
means that the vehicle is not ready for I/M
testing; if the service engine soon indicator
stays on solid, it means that your vehicle is
ready for I/M testing.
The OBD-II system checks the emission
control system during normal driving. A
complete check may take several days.
If the vehicle is not ready for I/M testing, you
can perform the following driving cycle
consisting of mixed city and highway driving:
1. 15 minutes of steady driving on an expressway or highway followed by 20
minutes of stop-and-go driving with at
least four 30-second idle periods. 2.
Allow your vehicle to sit for at least eight
hours with the ignition off. Then, start the
vehicle and complete the above driving
cycle. The vehicle must warm up to its
normal operating temperature. Once
started, do not turn off the vehicle until
the above driving cycle is complete.
If the vehicle is still not ready for I/M testing,
you need to repeat the above driving cycle.
179
MKT (TP4) , enUSA, First Printing Fuel and Refueling
Page 187 of 558
USING ALL-WHEEL DRIVE
All-wheel drive uses all four wheels to power
the vehicle. This increases traction, enabling
you to drive over terrain and road conditions
that a conventional two-wheel drive vehicle
cannot. The AWD system is active all the time
and requires no input from the operator.
Note:
Your AWD vehicle is not intended for
off-road use. The AWD feature gives your
vehicle some limited off-road capabilities in
which driving surfaces are relatively level,
obstruction-free and otherwise similar to
normal on-road driving conditions. Operating
your vehicle under other than those
conditions could subject the vehicle to
excessive stress which might result in
damage which is not covered under your
warranty.
Note: When an AWD system fault is present,
the warning Check AWD displays in the
information display. The AWD system is not
functioning correctly and defaults to
front-wheel drive. When this warning
displays, have your vehicle serviced at an
authorized dealer. Note:
The AWD OFF message may also
appear in the information display if the AWD
system overheats and defaults to front-wheel
drive. This may occur if the vehicle is
operated in extreme conditions with
excessive wheel slip, such as deep sand.
To resume normal AWD function as soon as
possible, stop the vehicle in a safe location
and stop the engine for at least 10 minutes.
After the engine has been restarted and the
AWD system has adequately cooled, the
AWD OFF
message will turn off and normal
AWD function returns. If the engine is not
stopped, the
AWD OFF message turns off
when the system cools and normal AWD
function returns.
184
MKT (TP4) , enUSA, First Printing All-Wheel Drive
(If Equipped)
Page 191 of 558
acceleration or braking which could result
in an increased risk of loss of vehicle
control, vehicle rollover and/or personal
injury. Use all available road surface to
return the vehicle to a safe direction of
travel.
• In the event of an emergency stop, avoid
skidding the tires and do not attempt any
sharp steering wheel movements.
• If the vehicle goes from one type of
surface to another (that is, from concrete
to gravel) there will be a change in the
way the vehicle responds to a maneuver
(steering, acceleration or braking). Again,
avoid these abrupt inputs.
Sand
Most of the time traction control improves
tire traction by managing wheel slip through
Brake, Engine, and AWD calibrations.
However, during low speed driving, disabling
traction control in deep sand can help keep
the wheels moving to maintain vehicle
momentum. When driving over sand, try to keep all four
wheels on the most solid area of the trail.
Avoid reducing the tire pressures but shift
to a lower gear and drive steadily through
the terrain. Apply the accelerator slowly and
avoid spinning the wheels.
Do not drive your vehicle in deep sand for
an extended period of time. This could cause
the AWD system to overheat and default to
front-wheel drive. If this occurs, an AWD OFF
message displays in the information display.
To resume normal AWD function as soon as
possible, stop the vehicle in a safe location
and stop the engine for at least 10 minutes.
After the engine has been restarted and the
AWD system has adequately cooled, the
AWD OFF message turns off and normal
AWD function returns. In the event the
engine is not stopped, the
AWD OFF
message turns off when the system cools
and normal AWD function returns.
When driving at slow speeds in deep sand
under high outside temperatures, use L (Low)
gear when possible. L (Low) gear operation
will maximize the engine and transmission
cooling capability. Under severe operating conditions, the A/C
may cycle on and off to protect overheating
of the engine.
Avoid excessive speed because vehicle
momentum can work against you and cause
the vehicle to become stuck to the point that
assistance may be required from another
vehicle. Remember, you may be able to back
out the way you came if you proceed with
caution.
Mud and Water
If you must drive through high water, drive
slowly. Traction or brake capability may be
limited.
When driving through water, determine the
depth; avoid water higher than the bottom
of the wheel rims (for cars) or the bottom of
the hubs (for trucks) (if possible) and proceed
slowly. If the ignition system gets wet, the
vehicle may stall.
188
MKT (TP4) , enUSA, First Printing All-Wheel Drive
(If Equipped)
Page 193 of 558
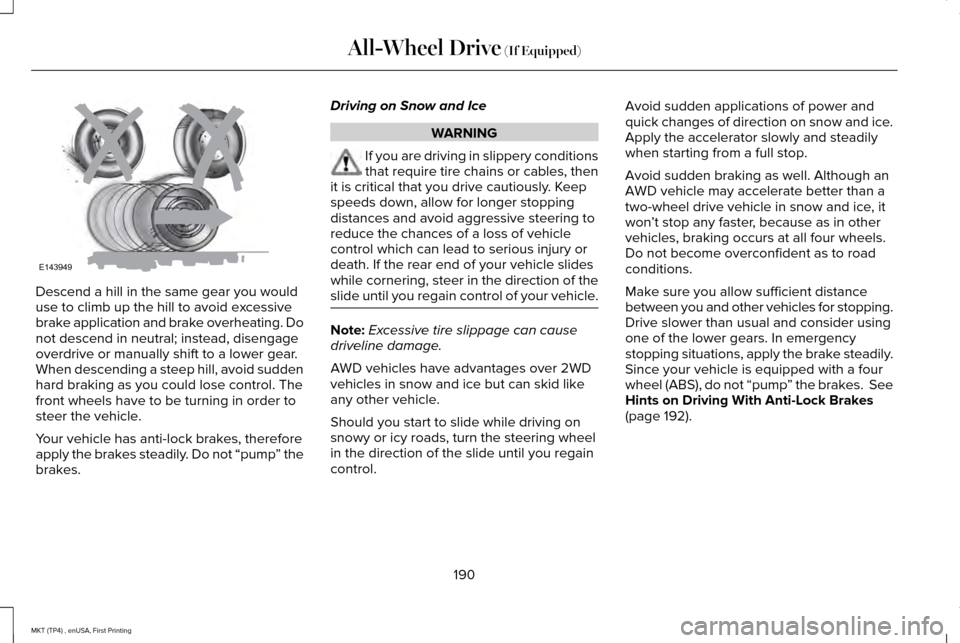
Descend a hill in the same gear you would
use to climb up the hill to avoid excessive
brake application and brake overheating. Do
not descend in neutral; instead, disengage
overdrive or manually shift to a lower gear.
When descending a steep hill, avoid sudden
hard braking as you could lose control. The
front wheels have to be turning in order to
steer the vehicle.
Your vehicle has anti-lock brakes, therefore
apply the brakes steadily. Do not “pump
” the
brakes. Driving on Snow and Ice WARNING
If you are driving in slippery conditions
that require tire chains or cables, then
it is critical that you drive cautiously. Keep
speeds down, allow for longer stopping
distances and avoid aggressive steering to
reduce the chances of a loss of vehicle
control which can lead to serious injury or
death. If the rear end of your vehicle slides
while cornering, steer in the direction of the
slide until you regain control of your vehicle. Note:
Excessive tire slippage can cause
driveline damage.
AWD vehicles have advantages over 2WD
vehicles in snow and ice but can skid like
any other vehicle.
Should you start to slide while driving on
snowy or icy roads, turn the steering wheel
in the direction of the slide until you regain
control. Avoid sudden applications of power and
quick changes of direction on snow and ice.
Apply the accelerator slowly and steadily
when starting from a full stop.
Avoid sudden braking as well. Although an
AWD vehicle may accelerate better than a
two-wheel drive vehicle in snow and ice, it
won
’t stop any faster, because as in other
vehicles, braking occurs at all four wheels.
Do not become overconfident as to road
conditions.
Make sure you allow sufficient distance
between you and other vehicles for stopping.
Drive slower than usual and consider using
one of the lower gears. In emergency
stopping situations, apply the brake steadily.
Since your vehicle is equipped with a four
wheel (ABS), do not “pump ” the brakes. See
Hints on Driving With Anti-Lock Brakes
(page 192).
190
MKT (TP4) , enUSA, First Printing All-Wheel Drive
(If Equipped)E143949