check engine LINCOLN MKT 2019 Owner's Manual
[x] Cancel search | Manufacturer: LINCOLN, Model Year: 2019, Model line: MKT, Model: LINCOLN MKT 2019Pages: 575, PDF Size: 4.66 MB
Page 211 of 575

Automatic cancellation can also occur when:
•The tires lose traction.
•The engine speed is too low.
•You apply the parking brake.
Hilly Condition Usage
Select a lower gear when the system isactive in situations such as prolongeddownhill driving on steep grades, forexample in mountainous areas. The systemneeds additional engine braking in thesesituations to reduce the load on the vehicle’sregular brake system to prevent it fromoverheating.
Note:An audible alarm sounds and thesystem shuts down if it applies brakes for anextended period of time. This allows thebrakes to cool. The system functionsnormally again after the brakes cool.
Switching Adaptive Cruise Control Off
Press and release the button whenthe system is in standby mode, orswitch the ignition off.
Note:You erase the set speed and gapsetting when you switch the system off.
Detection Issues
WARNING: On rare occasions,detection issues can occur due to the roadinfrastructures, for example bridges,tunnels and safety barriers. In these cases,the system may brake late orunexpectedly. At all times, you areresponsible for controlling your vehicle,supervising the system and intervening, ifrequired.
WARNING: If the systemmalfunctions, have your vehicle checkedas soon as possible.
The radar sensor has a limited field of view.It may not detect vehicles at all or detect avehicle later than expected in somesituations. The lead vehicle graphic does notilluminate if the system does not detect avehicle in front of you.
208
MKT (TP4) , enUSA, Edition date: 201803, Second-Printing
Cruise ControlE265297 E71621
Page 233 of 575
 or sport (S). The configurationremains active until modified from the mainmenu")
Using Lincoln Drive Control
You can configure which of the drive controlmodes are active when your vehicle is indrive (D) or sport (S). The configurationremains active until modified from the mainmenu on the information display.
These systems have a range of modes whichyou can choose from in order to customizeyour ideal driving experience:
•Comfort – Provides a more relaxeddriving experience, maximizing comfort.Your steering effort decreases and thesuspension movement is more fluid.Comfort mode is ideal when you desireenhanced traveling comfort.
•Normal – Delivers a balancedcombination of comfortable, controlledride and confident handling. This modeprovides an engaging drive experienceand a direct connection to the roadwithout sacrificing any of the composuredemanded from a luxury vehicle.
•Sport – Provides a sportier drivingexperience. The suspension stiffens, withan emphasis on handling and control.The engine responds more directly toyour inputs and takes on a more powerfultone. Sport mode is ideal for use duringmore spirited driving.
You can change your vehicle's Drive Controlsettings from the menu on the displayscreen. See General Information (page 369).
Note:Not all settings may be available.
Note:Lincoln Drive Control has diagnosticchecks that continuously monitor the systemto ensure proper operation. Certain types ofsystem errors gray out the mode selectionswithin the information display, preventingyou from changing states when the gearposition is changed. Other types of errorsproduce a temporary message in theinformation display. See InformationMessages (page 112). If either conditionpersists for multiple key cycles, see anauthorized dealer.
230
MKT (TP4) , enUSA, Edition date: 201803, Second-Printing
Driving Aids
Page 241 of 575

WARNING: Turning off trailer swaycontrol increases the risk of loss of vehiclecontro")
RV & Trailer Towing Guide Online
http://www.fleet.ford.com/towing-guides/Website
TRAILER SWAY CONTROL (If Equipped)
WARNING: Turning off trailer swaycontrol increases the risk of loss of vehiclecontrol, serious injury or death. Ford doesnot recommend disabling this featureexcept in situations where speed reductionmay be detrimental (such as hill climbing),the driver has significant trailer towingexperience, and can control trailer swayand maintain safe operation.
Note:This feature does not prevent trailersway, but reduces it when it begins.
Note:This feature cannot stop all trailersfrom swaying.
Note:In some cases, if your vehicle speedis too high, the system may turn on multipletimes, gradually reducing your vehicle speed.
The system applies the brakes to theindividual wheels and reduces engine torqueto aid vehicle stability. If the trailer beginsto sway, the stability control warning lampflashes and a message appears in theinformation display. See InformationMessages (page 112). Slow your vehicledown, pull safely to the side of the road andcheck for correct load distribution. See LoadCarrying (page 231).
You can switch this feature off in theinformation display. When you switch theignition on, the system automatically turnson.
RECOMMENDED TOWING
WEIGHTS
Note:Trailer tow is not permitted on allapplications of Livery and Limousine.
Note:Do not exceed the trailer weightfor your vehicle configuration listed inthe chart below.
Note:Make sure to take intoconsideration trailer frontal area. Do notexceed 20 ft² (1.86 m²) if your vehiclecan tow a class I trailer or 40 ft² (3.72m²) if your vehicle can tow a class IIItrailer.
Note:For high altitude operation,reduce the gross combined weight by2% per 1,000 ft (300 m) starting at the1,000 ft (300 m) elevation point.
238
MKT (TP4) , enUSA, Edition date: 201803, Second-Printing
Towing
Page 245 of 575
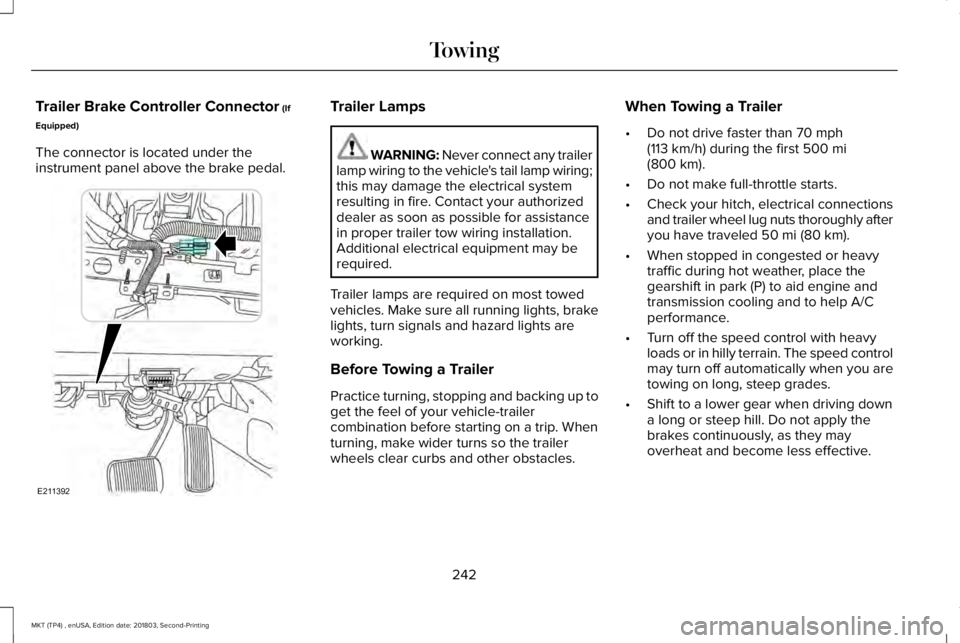
Trailer Brake Controller Connector (If
Equipped)
The connector is located under theinstrument panel above the brake pedal.
Trailer Lamps
WARNING: Never connect any trailerlamp wiring to the vehicle's tail lamp wiring;this may damage the electrical systemresulting in fire. Contact your authorizeddealer as soon as possible for assistancein proper trailer tow wiring installation.Additional electrical equipment may berequired.
Trailer lamps are required on most towedvehicles. Make sure all running lights, brakelights, turn signals and hazard lights areworking.
Before Towing a Trailer
Practice turning, stopping and backing up toget the feel of your vehicle-trailercombination before starting on a trip. Whenturning, make wider turns so the trailerwheels clear curbs and other obstacles.
When Towing a Trailer
•Do not drive faster than 70 mph(113 km/h) during the first 500 mi(800 km).
•Do not make full-throttle starts.
•Check your hitch, electrical connectionsand trailer wheel lug nuts thoroughly afteryou have traveled 50 mi (80 km).
•When stopped in congested or heavytraffic during hot weather, place thegearshift in park (P) to aid engine andtransmission cooling and to help A/Cperformance.
•Turn off the speed control with heavyloads or in hilly terrain. The speed controlmay turn off automatically when you aretowing on long, steep grades.
•Shift to a lower gear when driving downa long or steep hill. Do not apply thebrakes continuously, as they mayoverheat and become less effective.
242
MKT (TP4) , enUSA, Edition date: 201803, Second-Printing
TowingE211392
Page 252 of 575
. To obtain reimbursementin")
If you need to arrange roadside assistancefor yourself, Lincoln Motor Companyreimburses a reasonable amount for towingto the nearest Lincoln dealership within100 mi (160 km). To obtain reimbursementinformation, United States clients, call1-800-521-4140. Clients need to submit theiroriginal receipts.
Vehicles Sold in Canada: GettingRoadside Assistance
To fully assist you should you have a vehicleconcern, Lincoln Motor Company of Canada,Limited offers a complimentary roadsideassistance program. This program is eligiblewithin Canada or the continental UnitedStates.
The service is available 24 hours a day,seven days a week.
This program is separate from the NewVehicle Limited Warranty, but the coverageis concurrent with the powertrain coverageperiod of your vehicle. Canadian roadsidecoverage and benefits may differ from theU.S. coverage.
If you require more information, please callus in Canada at 1-800-387-9333, or visit ourwebsite at www.lincolncanada.com.
HAZARD FLASHERS
Note:The hazard flashers operate when theignition is in any position, or if the key is notin the ignition. If used when the vehicle is notrunning, the battery loses charge. As a result,there may be insufficient power to restartyour vehicle.
The flasher control is on theinstrument panel. Use your hazardflashers when your vehicle iscreating a safety hazard for other motorists.
•Press the flasher control and all front andrear direction indicators flash.
•Press the button again to switch them off.
FUEL SHUTOFF
WARNING: If your vehicle has beeninvolved in a crash, have the fuel systemchecked. Failure to follow this instructioncould result in fire, personal injury or death.
Note: When you try to restart your vehicleafter a fuel shutoff, the vehicle makes surethat various systems are safe to restart. Once the vehicle determines the systemsare safe, then the vehicle allows you torestart.
Note: In the event that your vehicle doesnot restart after your third attempt, contacta qualified technician.
The fuel pump shutoff stops the flow of fuelto the engine in the event of a moderate tosevere crash. Not every impact causes ashutoff.
Should your vehicle shut off after a crash,you may restart your vehicle.
249
MKT (TP4) , enUSA, Edition date: 201803, Second-Printing
Roadside Emergencies
Page 284 of 575

GENERAL INFORMATION
Have your vehicle serviced regularly to helpmaintain its roadworthiness and resale value.There is a large network of authorizeddealers that are there to help you with theirprofessional servicing expertise. We believethat their specially trained technicians arebest qualified to service your vehicle properlyand expertly. They are supported by a widerange of highly specialized tools developedspecifically for servicing your vehicle.
If your vehicle requires professional service,an authorized dealer can provide thenecessary parts and service. Check yourwarranty information to find out which partsand services are covered.
Use only recommended fuels, lubricants,fluids and service parts conforming tospecifications. Motorcraft® parts aredesigned and built to provide the bestperformance in your vehicle.
Precautions
•Do not work on a hot engine.
•Make sure that nothing gets caught inmoving parts.
•Do not work on a vehicle with the enginerunning in an enclosed space, unless youare sure you have enough ventilation.
•Keep all open flames and other burningmaterial (such as cigarettes) away fromthe battery and all fuel related parts.
Working with the Engine Off
1. Set the parking brake and shift thetransmission to park (P).
2. Switch off the engine.
3. Block the wheels.
Working with the Engine On
WARNING: To reduce the risk ofvehicle damage and personal burn injuries,do not start your engine with the aircleaner removed and do not remove itwhile the engine is running.
1. Set the parking brake and shift thetransmission to park (P).
2. Block the wheels.
281
MKT (TP4) , enUSA, Edition date: 201803, Second-Printing
Maintenance
Page 287 of 575
.A.
Engine oil filler cap. See EngineOil Check (page 286).B.
Engine oil dipstick. See Engine OilDipstick (page 286).C.
Brake fluid reserv")
Engine coolant reservoir. SeeEngine Coolant Check (page 288).A.
Engine oil filler cap. See EngineOil Check (page 286).B.
Engine oil dipstick. See Engine OilDipstick (page 286).C.
Brake fluid reservoir. See BrakeFluid Check (page 294).D.
Battery. See Changing the 12VBattery (page 295).E.
Engine compartment fuse box.See Fuses (page 262).F.
Air filter assembly. See Changingthe Engine Air Filter (page 301).G.
Automatic transmission dipstick.See Automatic Transmission FluidCheck (page 292).
H.
Washer fluid reservoir. SeeWasher Fluid Check (page 295).I.
UNDER HOOD OVERVIEW - 3.7L
284
MKT (TP4) , enUSA, Edition date: 201803, Second-Printing
Maintenance
Page 288 of 575
.A.
Engine oil filler cap. See EngineOil Check (page 286).B.
Engine oil dipstick. See Engine OilDipstick (page 286).C.
Brake fluid reserv")
Engine coolant reservoir. SeeEngine Coolant Check (page 288).A.
Engine oil filler cap. See EngineOil Check (page 286).B.
Engine oil dipstick. See Engine OilDipstick (page 286).C.
Brake fluid reservoir. See BrakeFluid Check (page 294).D.
Battery. See Changing the 12VBattery (page 295).E.
Engine compartment fuse box.See Fuses (page 262).F.
Air filter assembly. See Changingthe Engine Air Filter (page 301).G.
285
MKT (TP4) , enUSA, Edition date: 201803, Second-Printing
MaintenanceABCD
GHI
EF
E173333
Page 289 of 575
.
H.
Washer fluid reservoir. SeeWasher Fluid Check (page 295).I.
ENGINE OIL DIPSTICK
MINA
MAXB
ENGINE OIL CHECK
To chec")
Automatic transmission dipstick.See Automatic Transmission FluidCheck (page 292).
H.
Washer fluid reservoir. SeeWasher Fluid Check (page 295).I.
ENGINE OIL DIPSTICK
MINA
MAXB
ENGINE OIL CHECK
To check the engine oil level consistentlyand accurately, do the following:
1.Make sure the parking brake is on. Makesure the transmission is in park (P) orneutral (N).
2. Run the engine until it reaches normaloperating temperature.
3. Make sure that your vehicle is on levelground.
4.Switch the engine off and wait 15 minutesfor the oil to drain into the oil pan. Checking the engine oil level too soonafter you switch the engine off may resultin an inaccurate reading.
5. Open the hood. See Opening andClosing the Hood (page 282).
6. Remove the dipstick and wipe it with aclean, lint-free cloth. See Under HoodOverview (page 284).
7.Replace the dipstick and remove it againto check the oil level. See Under HoodOverview (page 284).
8. Make sure that the oil level is betweenthe maximum and minimum marks. If theoil level is at the minimum mark, add oilimmediately. See Capacities andSpecifications (page 355).
9. If the oil level is correct, replace thedipstick and make sure it is fully seated.
Note:Do not remove the dipstick when theengine is running.
Note: If the oil level is between themaximum and minimum marks, the oil levelis acceptable. Do not add oil.
Note:The oil consumption of new enginesreaches its normal level after approximately3,000 mi (5,000 km).
Adding Engine Oil
WARNING: Do not remove the fillercap when the engine is running.
Do not use supplemental engine oil additivesbecause they are unnecessary and couldlead to engine damage that may not becovered by the vehicle Warranty.
286
MKT (TP4) , enUSA, Edition date: 201803, Second-Printing
MaintenanceE146429
Page 290 of 575
. An oil with this trademark symbol conformsto the current engine and emission systemprotection standards and fuel")
Only use oils certified for gasoline enginesby the American Petroleum Institute (API). An oil with this trademark symbol conformsto the current engine and emission systemprotection standards and fuel economyrequirements of the International LubricantsSpecification Advisory Committee (ILSAC).
To top up the engine oil level do thefollowing:
1. Clean the area surrounding the engineoil filler cap before you remove it.
2. Remove the engine oil filler cap. SeeUnder Hood Overview (page 284). Turnit counterclockwise and remove it.
3. Add engine oil that meets ourspecifications. See Capacities andSpecifications (page 355). You may haveto use a funnel to pour the engine oil intothe opening.
4. Recheck the oil level.
5. If the oil level is correct, replace thedipstick and make sure it is fully seated.
6. Replace the engine oil filler cap. Turn itclockwise until you feel a strongresistance.
Note: Do not add oil further than themaximum mark. Oil levels above themaximum mark may cause engine damage.
Note:Make sure you install the oil filler capcorrectly.
Note:Soak up any spillage with anabsorbent cloth immediately.
OIL CHANGE INDICATOR RESET
Use the information display controls on thesteering wheel to reset the oil changeindicator.
From the main menu scroll to:
Action and descriptionMessage
Press the right arrow button,then from this menu scroll tothe following message.
Settings
Press the right arrow button,then from this menu scroll tothe following message.
Vehicle
Press the right arrow button,then from this menu scroll tothe following message.
Oil Life
Press and hold the OK buttonuntil the instrument clusterdisplays the followingmessage.
Hold OK toReset
Reset Successful
When the oil change indicatorresets the instrument clusterdisplays 100%.
Remaining Life
{00}%
287
MKT (TP4) , enUSA, Edition date: 201803, Second-Printing
MaintenanceE142732