tow LINCOLN MKT 2019 Owners Manual
[x] Cancel search | Manufacturer: LINCOLN, Model Year: 2019, Model line: MKT, Model: LINCOLN MKT 2019Pages: 575, PDF Size: 4.66 MB
Page 5 of 575
Liftgate
Power Liftgate.................................................74
Security
Passive Anti-Theft System...........................77
Anti-Theft Alarm.............................................79
Steering Wheel
Adjusting the Steering Wheel....................80
Audio Control..................................................81
Voice Control...................................................81
Cruise Control.................................................81
Information Display Control........................82
Heated Steering Wheel...............................82
Pedals
Adjusting the Pedals.....................................83
Wipers and Washers
Autowipers......................................................84
Windshield Washers.....................................84
Rear Window Wiper and Washers............85
Lighting
General Information......................................86
Lighting Control.............................................86
Autolamps........................................................87
Instrument Lighting Dimmer.......................88
Headlamp Exit Delay....................................88
Daytime Running Lamps..............................89
Automatic High Beam Control...................89
Front Fog Lamps.............................................91
Adaptive Headlamps.....................................91
Direction Indicators.......................................92
Interior Lamps.................................................92
Ambient Lighting...........................................93
Windows and Mirrors
Power Windows.............................................94
Global Opening and Closing......................95
Exterior Mirrors...............................................95
Interior Mirror..................................................97
Sun Visors........................................................97
Moonroof.........................................................98
Instrument Cluster
Gauges...........................................................100
Warning Lamps and Indicators..................101
Audible Warnings and Indicators.............104
Information Displays
General Information....................................105
Information Messages.................................112
Climate Control
Automatic Climate Control........................125
Hints on Controlling the Interior Climate.......................................................................126
Rear Passenger Climate Controls............127
Heated Rear Window..................................128
Heated Exterior Mirrors..............................128
Cabin Air Filter..............................................129
Remote Start..................................................129
Seats
Sitting in the Correct Position...................130
Head Restraints.............................................131
Power Seats...................................................133
2
MKT (TP4) , enUSA, Edition date: 201803, Second-Printing
Table of Contents
Page 7 of 575
Cross Traffic Alert........................................222
Steering.........................................................225
Collision Warning System.........................226
Drive Control................................................229
Load Carrying
Rear Under Floor Storage..........................231
Cargo Nets.....................................................231
Luggage Covers...........................................231
Load Limit......................................................232
Towing
Towing a Trailer............................................237
Trailer Sway Control...................................238
Recommended Towing Weights.............238
Essential Towing Checks..........................240
Towing the Vehicle on Four Wheels......243
Driving Hints
Breaking-In...................................................245
Economical Driving.....................................245
Driving Through Water..............................245
Floor Mats.....................................................246
Roadside Emergencies
Roadside Assistance..................................248
Hazard Flashers..........................................249
Fuel Shutoff..................................................249
Jump Starting the Vehicle........................250
Post-Crash Alert System...........................252
Transporting the Vehicle...........................253
Customer Assistance
Getting the Services You Need...............254
In California (U.S. Only)..............................255
The Better Business Bureau (BBB) AutoLine Program (U.S. Only).......................256
Utilizing the Mediation/Arbitration Program(Canada Only)..........................................257
Getting Assistance Outside the U.S. andCanada......................................................258
Ordering Additional Owner's Literature......................................................................260
Reporting Safety Defects (U.S. Only)......260
Reporting Safety Defects (Canada Only).......................................................................261
Fuses
Fuse Specification Chart...........................262
Changing a Fuse.........................................278
Maintenance
General Information....................................281
Opening and Closing the Hood..............282
Under Hood Overview - 3.5L...................283
Under Hood Overview - 3.7L...................284
Engine Oil Dipstick.....................................286
Engine Oil Check........................................286
Oil Change Indicator Reset.......................287
Engine Coolant Check...............................288
Automatic Transmission Fluid Check.....292
Brake Fluid Check......................................294
Power Steering Fluid Check....................295
Washer Fluid Check...................................295
Changing the 12V Battery.........................295
Checking the Wiper Blades......................297
Changing the Wiper Blades.....................297
Adjusting the Headlamps.........................298
Removing a Headlamp..............................300
Changing a Bulb..........................................300
4
MKT (TP4) , enUSA, Edition date: 201803, Second-Printing
Table of Contents
Page 18 of 575
PROTECTING THE ENVIRONMENT
You should play your part in protecting theenvironment. Correct vehicle usage and theauthorized disposal of waste, cleaning andlubrication materials are significant stepstoward this aim.
For details about Ford Motor Company'ssustainability progress and initiatives visit:
Web Address
www.sustainability.ford.com
15
MKT (TP4) , enUSA, Edition date: 201803, Second-Printing
Environment
Page 20 of 575
Air vent.A
Wiper lever. See Autowipers (page84).B
Direction Indicators. See DirectionIndicators (page 92).C
Information display control. SeeInformation Display Control (page82).
D
Instrument cluster. See InstrumentCluster (page 100).E
Information display control. SeeInformation Display Control (page82).
F
Audio system. See Audio System(page 364).G
Hazard flasher switch. See HazardFlashers (page 249).H
Information and entertainmentdisplay.I
Passenger airbag indicator light.See Front Passenger SensingSystem (page 52).
J
Climate controls. See ClimateControl (page 125).K
Keyless start button. See KeylessStarting (page 158).L
Audio control. See Audio Control(page 81).M
Horn.N
Steering wheel adjustment. SeeAdjusting the Steering Wheel(page 80).
O
Cruise control switches. SeeUsing Cruise Control (page 203).P
Hood release. See Opening andClosing the Hood (page 282).Q
Instrument panel dimmer control.See Instrument Lighting Dimmer(page 88).
R
Lighting control. See LightingControl (page 86).S
17
MKT (TP4) , enUSA, Edition date: 201803, Second-Printing
At a Glance
Page 21 of 575
GENERAL INFORMATION
See the following sections for directions onhow to properly use safety restraints forchildren.
WARNING: Always make sure yourchild is secured properly in a device thatis appropriate for their height, age andweight. Child safety restraints must bebought separately from your vehicle.Failure to follow these instructions andguidelines may result in an increased riskof serious injury or death to your child.
WARNING: All children are shapeddifferently. The National Highway TrafficSafety Administration and other safetyorganizations, base their recommendationsfor child restraints on probable child height,age and weight thresholds, or on theminimum requirements of the law. Werecommend that you check with a NHTSACertified Child Passenger SafetyTechnician (CPST) to make sure that youproperly install the child restraint in yourvehicle and that you consult yourpediatrician to make sure you have a childrestraint appropriate for your child. Tolocate a child restraint fitting station andCPST, contact NHTSA toll free at
1-888-327-4236 or go towww.nhtsa.dot.gov. In Canada, contactTransport Canada toll free at1-800-333-0371 or go to www.tc.gc.ca tofind a Child Car Seat Clinic in your area.Failure to properly restrain children in childrestraints made especially for their height,age and weight, may result in an increasedrisk of serious injury or death to your child.
WARNING: On hot days, thetemperature inside the vehicle can risevery quickly. Exposure of people or animalsto these high temperatures for even a shorttime can cause death or serious heatrelated injuries, including brain damage.Small children are particularly at risk.
18
MKT (TP4) , enUSA, Edition date: 201803, Second-Printing
Child Safety
Page 24 of 575
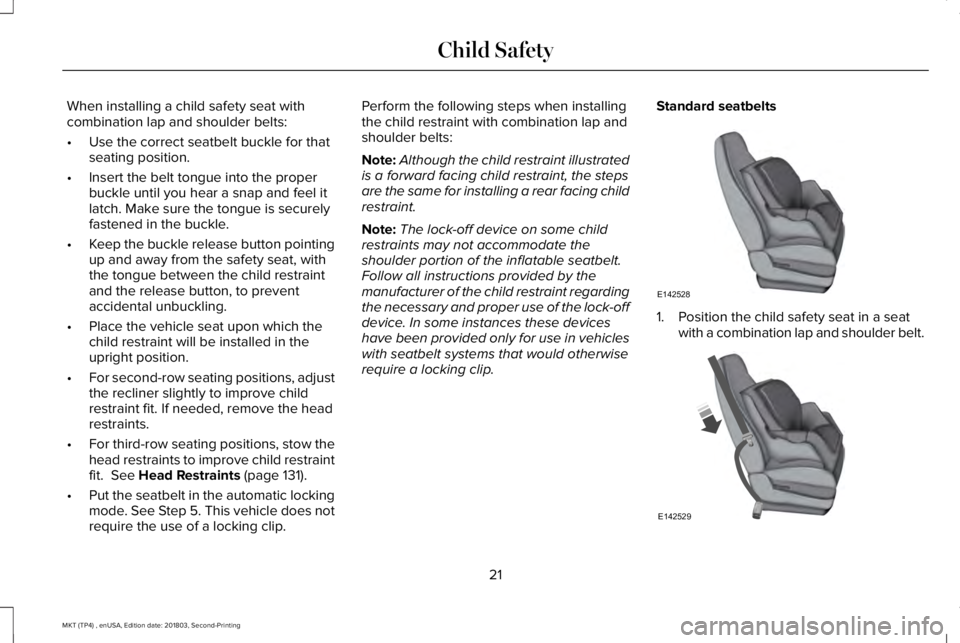
When installing a child safety seat withcombination lap and shoulder belts:
•Use the correct seatbelt buckle for thatseating position.
•Insert the belt tongue into the properbuckle until you hear a snap and feel itlatch. Make sure the tongue is securelyfastened in the buckle.
•Keep the buckle release button pointingup and away from the safety seat, withthe tongue between the child restraintand the release button, to preventaccidental unbuckling.
•Place the vehicle seat upon which thechild restraint will be installed in theupright position.
•For second-row seating positions, adjustthe recliner slightly to improve childrestraint fit. If needed, remove the headrestraints.
•For third-row seating positions, stow thehead restraints to improve child restraintfit. See Head Restraints (page 131).
•Put the seatbelt in the automatic lockingmode. See Step 5. This vehicle does notrequire the use of a locking clip.
Perform the following steps when installingthe child restraint with combination lap andshoulder belts:
Note:Although the child restraint illustratedis a forward facing child restraint, the stepsare the same for installing a rear facing childrestraint.
Note:The lock-off device on some childrestraints may not accommodate theshoulder portion of the inflatable seatbelt.Follow all instructions provided by themanufacturer of the child restraint regardingthe necessary and proper use of the lock-offdevice. In some instances these deviceshave been provided only for use in vehicleswith seatbelt systems that would otherwiserequire a locking clip.
Standard seatbelts
1. Position the child safety seat in a seatwith a combination lap and shoulder belt.
21
MKT (TP4) , enUSA, Edition date: 201803, Second-Printing
Child SafetyE142528 E142529
Page 26 of 575
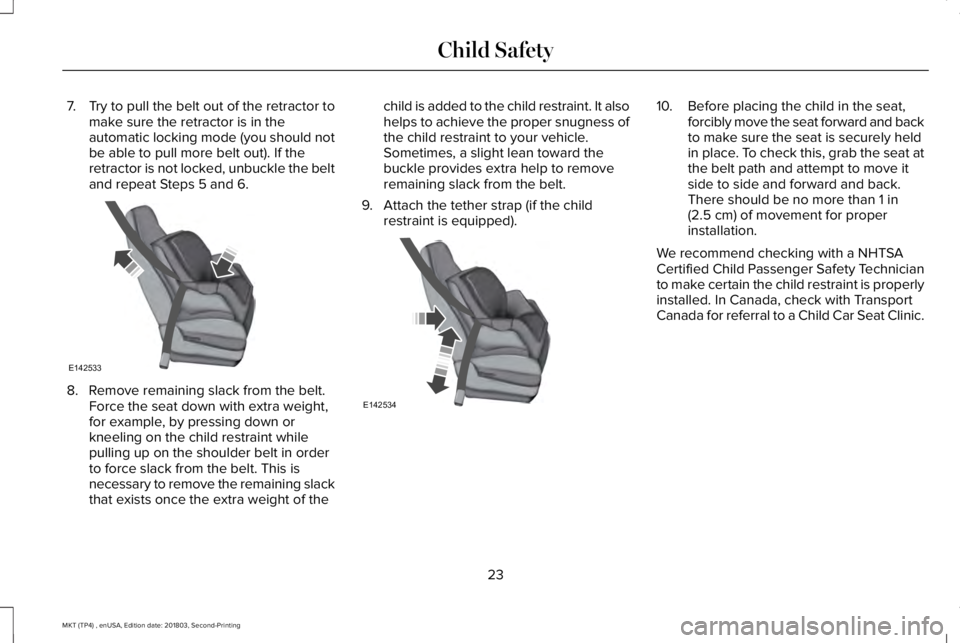
7.Try to pull the belt out of the retractor tomake sure the retractor is in theautomatic locking mode (you should notbe able to pull more belt out). If theretractor is not locked, unbuckle the beltand repeat Steps 5 and 6.
8. Remove remaining slack from the belt.Force the seat down with extra weight,for example, by pressing down orkneeling on the child restraint whilepulling up on the shoulder belt in orderto force slack from the belt. This isnecessary to remove the remaining slackthat exists once the extra weight of the
child is added to the child restraint. It alsohelps to achieve the proper snugness ofthe child restraint to your vehicle.Sometimes, a slight lean toward thebuckle provides extra help to removeremaining slack from the belt.
9. Attach the tether strap (if the childrestraint is equipped).
10. Before placing the child in the seat,forcibly move the seat forward and backto make sure the seat is securely heldin place. To check this, grab the seat atthe belt path and attempt to move itside to side and forward and back.There should be no more than 1 in(2.5 cm) of movement for properinstallation.
We recommend checking with a NHTSACertified Child Passenger Safety Technicianto make certain the child restraint is properlyinstalled. In Canada, check with TransportCanada for referral to a Child Car Seat Clinic.
23
MKT (TP4) , enUSA, Edition date: 201803, Second-Printing
Child SafetyE142533 E142534
Page 29 of 575
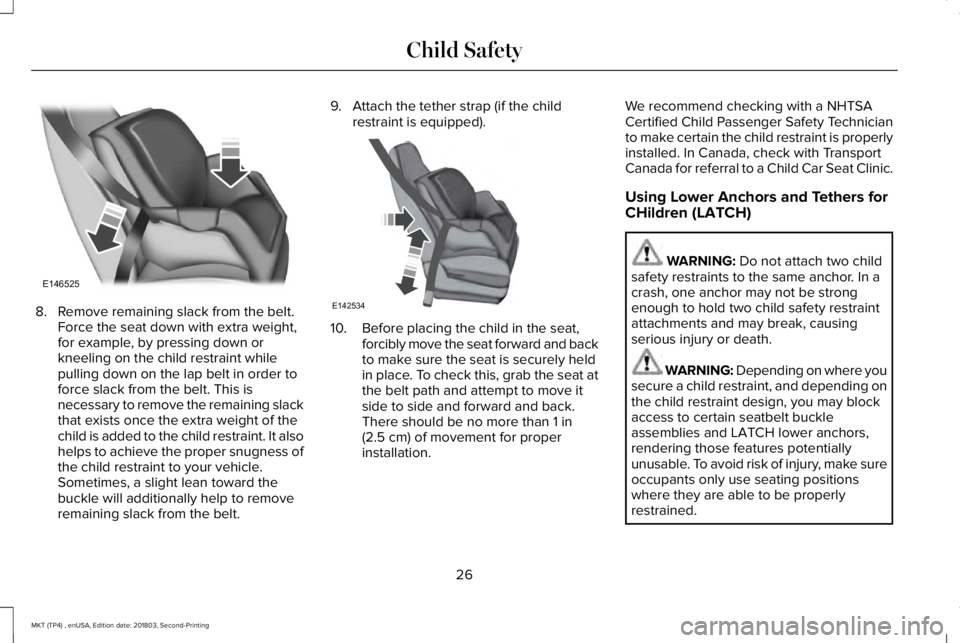
8. Remove remaining slack from the belt.Force the seat down with extra weight,for example, by pressing down orkneeling on the child restraint whilepulling down on the lap belt in order toforce slack from the belt. This isnecessary to remove the remaining slackthat exists once the extra weight of thechild is added to the child restraint. It alsohelps to achieve the proper snugness ofthe child restraint to your vehicle.Sometimes, a slight lean toward thebuckle will additionally help to removeremaining slack from the belt.
9. Attach the tether strap (if the childrestraint is equipped).
10. Before placing the child in the seat,forcibly move the seat forward and backto make sure the seat is securely heldin place. To check this, grab the seat atthe belt path and attempt to move itside to side and forward and back.There should be no more than 1 in(2.5 cm) of movement for properinstallation.
We recommend checking with a NHTSACertified Child Passenger Safety Technicianto make certain the child restraint is properlyinstalled. In Canada, check with TransportCanada for referral to a Child Car Seat Clinic.
Using Lower Anchors and Tethers for
CHildren (LATCH)
WARNING: Do not attach two childsafety restraints to the same anchor. In acrash, one anchor may not be strongenough to hold two child safety restraintattachments and may break, causingserious injury or death.
WARNING: Depending on where yousecure a child restraint, and depending onthe child restraint design, you may blockaccess to certain seatbelt buckleassemblies and LATCH lower anchors,rendering those features potentiallyunusable. To avoid risk of injury, make sureoccupants only use seating positionswhere they are able to be properlyrestrained.
26
MKT (TP4) , enUSA, Edition date: 201803, Second-Printing
Child SafetyE146525 E142534
Page 38 of 575
If the booster seat slides on the vehicle seatupon which it is being used, placing arubberized mesh sold as shelf or carpet linerunder the booster seat may improve thiscondition. Do not introduce any item thickerthan this under the booster seat. Check withthe booster seat manufacturer's instructions.
CHILD RESTRAINT POSITIONING
WARNING: Do not place a rearwardfacing child restraint in front of an activeairbag. Failure to follow this instructioncould result in personal injury or death.
WARNING: Properly secure children12 years old and under in a rear seatingposition whenever possible. If you areunable to properly secure all children in arear seating position, properly secure thelargest child on the front seat. If you mustuse a forward facing child restraint on thefront seat, move the seat as far back aspossible. Failure to follow theseinstructions could result in personal injuryor death.
WARNING: Always carefully followthe instructions and warnings provided bythe manufacturer of any child restraint todetermine if the restraint device isappropriate for your child's size, height,weight, or age. Follow the child restraintmanufacturer's instructions and warningsprovided for installation and use inconjunction with the instructions andwarnings provided by your vehicle
manufacturer. A safety seat that isimproperly installed or utilized, isinappropriate for your child's height, age,or weight or does not properly fit the childmay increase the risk of serious injury ordeath.
WARNING: Do not allow a passengerto hold a child on their lap when yourvehicle is moving. Failure to follow thisinstruction could result in personal injuryor death in the event of a sudden stop orcrash.
WARNING: Do not use pillows, booksor towels to boost your child's height.Failure to follow this instruction could resultin personal injury or death.
WARNING: Properly secure childrestraints or booster seats when they arenot in use. They could become projectilesin a sudden stop or crash. Failure to followthis instruction could result in personalinjury or death.
35
MKT (TP4) , enUSA, Edition date: 201803, Second-Printing
Child Safety
Page 43 of 575
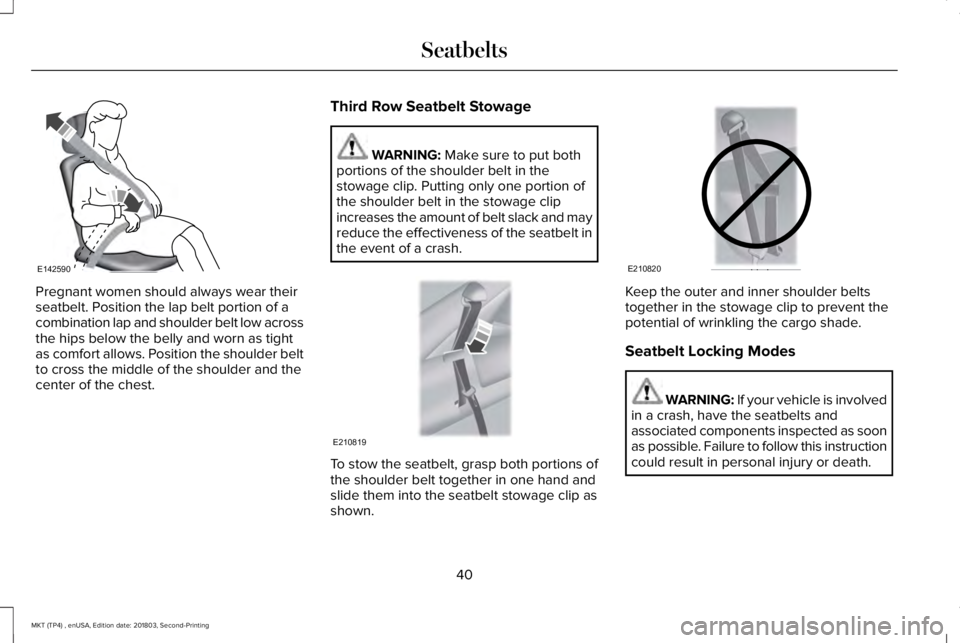
Pregnant women should always wear theirseatbelt. Position the lap belt portion of acombination lap and shoulder belt low acrossthe hips below the belly and worn as tightas comfort allows. Position the shoulder beltto cross the middle of the shoulder and thecenter of the chest.
Third Row Seatbelt Stowage
WARNING: Make sure to put bothportions of the shoulder belt in thestowage clip. Putting only one portion ofthe shoulder belt in the stowage clipincreases the amount of belt slack and mayreduce the effectiveness of the seatbelt inthe event of a crash.
To stow the seatbelt, grasp both portions ofthe shoulder belt together in one hand andslide them into the seatbelt stowage clip asshown.
Keep the outer and inner shoulder beltstogether in the stowage clip to prevent thepotential of wrinkling the cargo shade.
Seatbelt Locking Modes
WARNING: If your vehicle is involvedin a crash, have the seatbelts andassociated components inspected as soonas possible. Failure to follow this instructioncould result in personal injury or death.
40
MKT (TP4) , enUSA, Edition date: 201803, Second-Printing
SeatbeltsE142590 E210819 E210820