LINCOLN MKX 2011 Owners Manual
Manufacturer: LINCOLN, Model Year: 2011, Model line: MKX, Model: LINCOLN MKX 2011Pages: 367, PDF Size: 2.56 MB
Page 261 of 367
WARNING:To reduce risk of electrical shock, always replace
the cover to the power distribution box before reconnecting the
battery or refilling fluid reservoirs.
If the battery has been disconnected and reconnected, refer to the
Batterysection of theMaintenance and Specificationschapter.
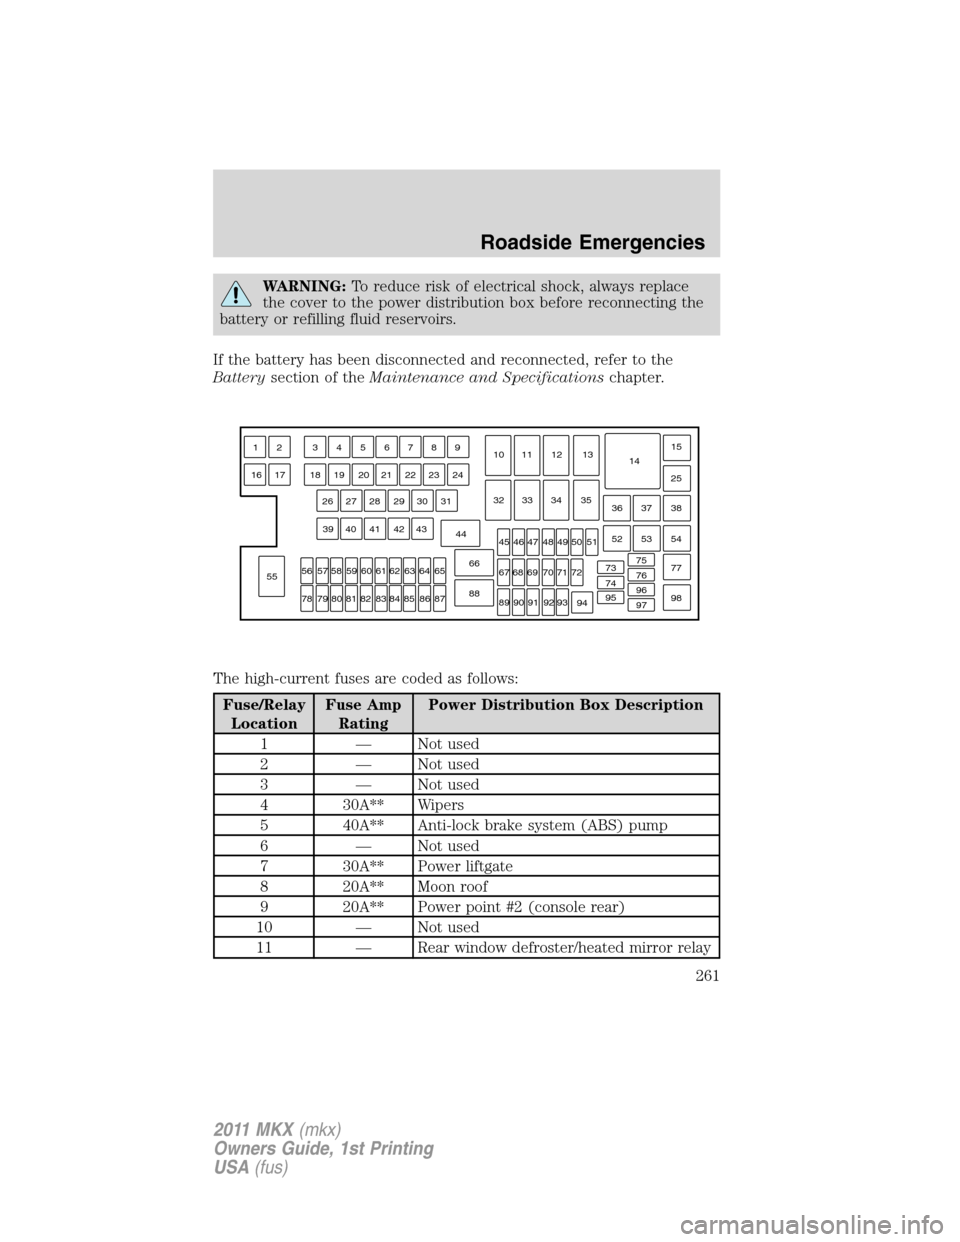
The high-current fuses are coded as follows:
Fuse/Relay
LocationFuse Amp
RatingPower Distribution Box Description
1 — Not used
2 — Not used
3 — Not used
4 30A** Wipers
5 40A** Anti-lock brake system (ABS) pump
6 — Not used
7 30A** Power liftgate
8 20A** Moon roof
9 20A** Power point #2 (console rear)
10 — Not used
11 — Rear window defroster/heated mirror relay
9798 77
96
95
94 93 92 91 90 89 88 66 44
78 5639 26 18 16 173 12 456789
19 20 21 22 23 24
27 28 29 30 31
40 41 42 43
5557 58 59 60 61 62 63 64 65
79 80 81 82 83 84 85 86 8767 45 32 10 11
1213
33 34 35
46 47 48 49 50 51
68 69 70 71 72
74 73
76 7553 37 36
54 38 25 15
14
52
Roadside Emergencies
261
2011 MKX(mkx)
Owners Guide, 1st Printing
USA(fus)
Page 262 of 367
Fuse/Relay
LocationFuse Amp
RatingPower Distribution Box Description
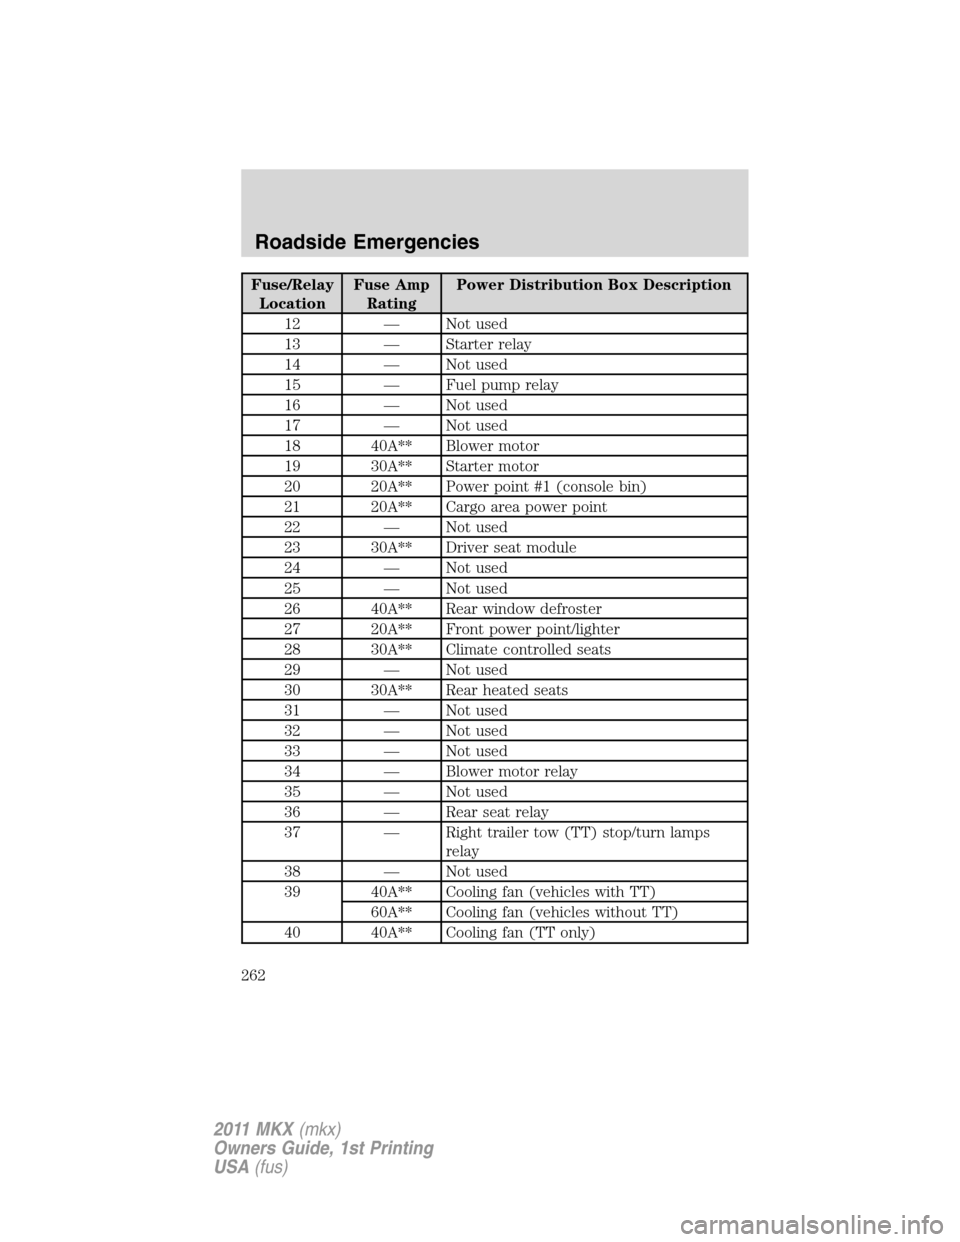
12 — Not used
13 — Starter relay
14 — Not used
15 — Fuel pump relay
16 — Not used
17 — Not used
18 40A** Blower motor
19 30A** Starter motor
20 20A** Power point #1 (console bin)
21 20A** Cargo area power point
22 — Not used
23 30A** Driver seat module
24 — Not used
25 — Not used
26 40A** Rear window defroster
27 20A** Front power point/lighter
28 30A** Climate controlled seats
29 — Not used
30 30A** Rear heated seats
31 — Not used
32 — Not used
33 — Not used
34 — Blower motor relay
35 — Not used
36 — Rear seat relay
37 — Right trailer tow (TT) stop/turn lamps
relay
38 — Not used
39 40A** Cooling fan (vehicles with TT)
60A** Cooling fan (vehicles without TT)
40 40A** Cooling fan (TT only)
Roadside Emergencies
262
2011 MKX(mkx)
Owners Guide, 1st Printing
USA(fus)
Page 263 of 367
Fuse/Relay
LocationFuse Amp
RatingPower Distribution Box Description
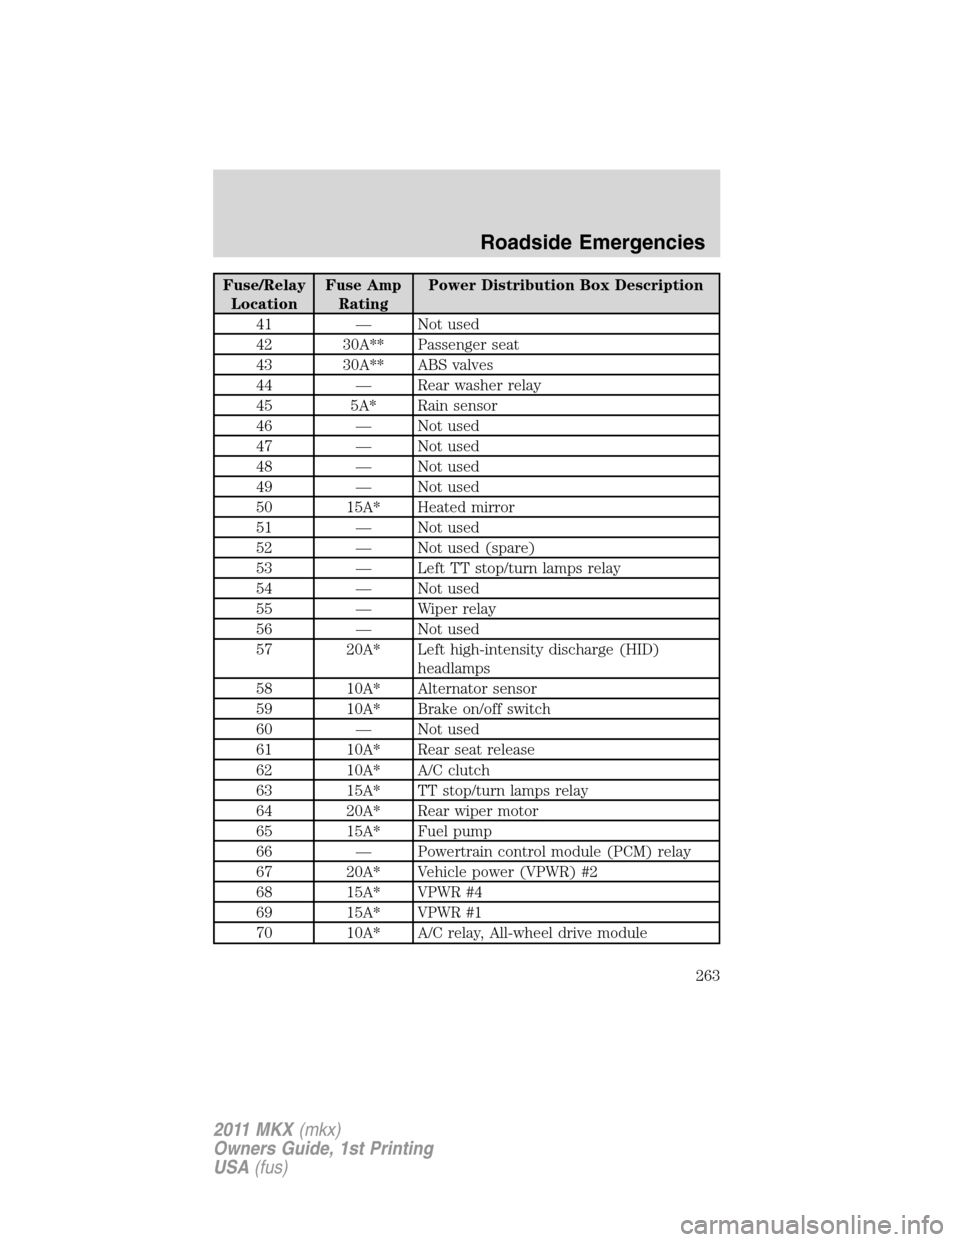
41 — Not used
42 30A** Passenger seat
43 30A** ABS valves
44 — Rear washer relay
45 5A* Rain sensor
46 — Not used
47 — Not used
48 — Not used
49 — Not used
50 15A* Heated mirror
51 — Not used
52 — Not used (spare)
53 — Left TT stop/turn lamps relay
54 — Not used
55 — Wiper relay
56 — Not used
57 20A* Left high-intensity discharge (HID)
headlamps
58 10A* Alternator sensor
59 10A* Brake on/off switch
60 — Not used
61 10A* Rear seat release
62 10A* A/C clutch
63 15A* TT stop/turn lamps relay
64 20A* Rear wiper motor
65 15A* Fuel pump
66 — Powertrain control module (PCM) relay
67 20A* Vehicle power (VPWR) #2
68 15A* VPWR #4
69 15A* VPWR #1
70 10A* A/C relay, All-wheel drive module
Roadside Emergencies
263
2011 MKX(mkx)
Owners Guide, 1st Printing
USA(fus)
Page 264 of 367
Fuse/Relay
LocationFuse Amp
RatingPower Distribution Box Description
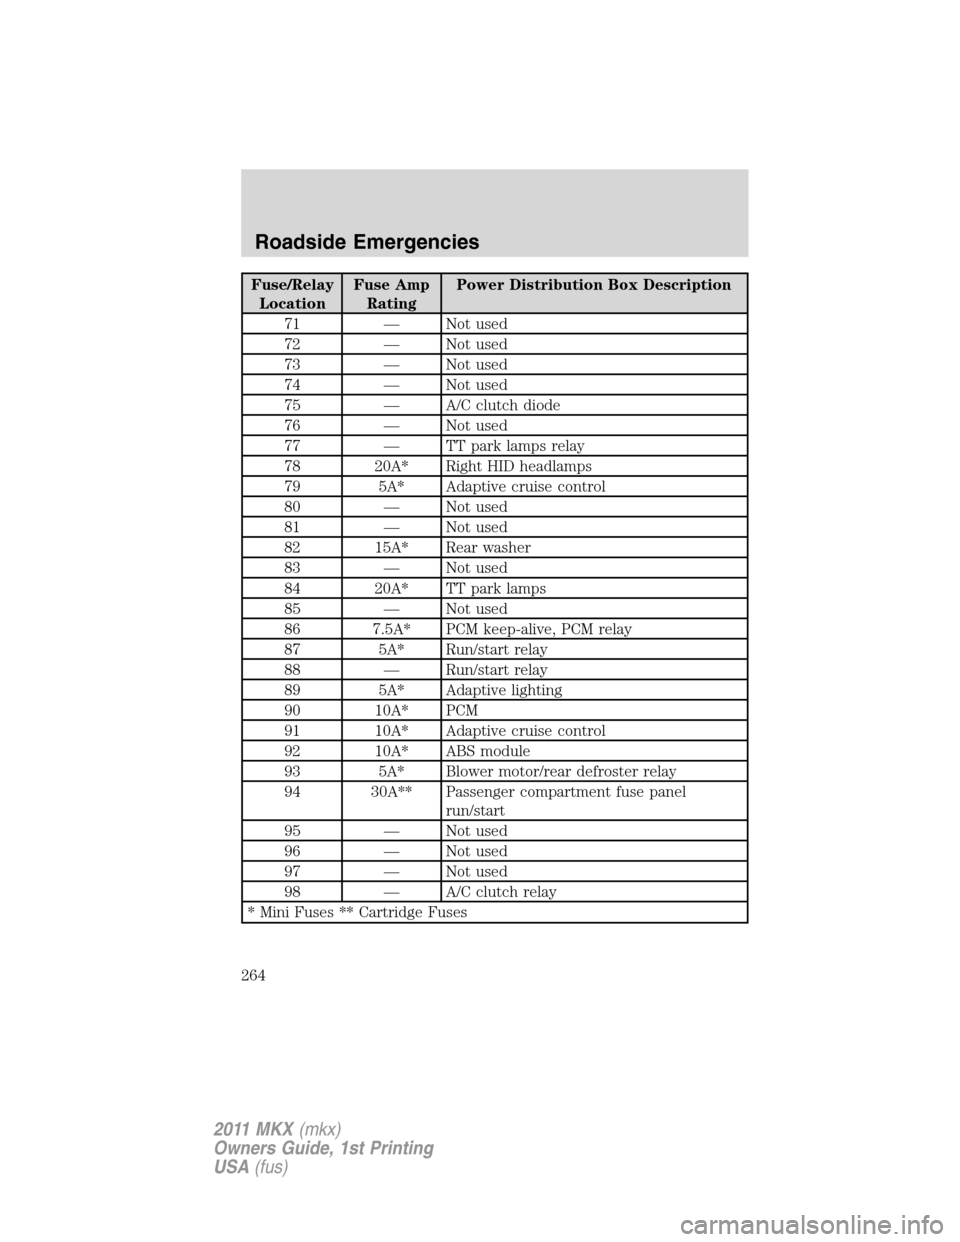
71 — Not used
72 — Not used
73 — Not used
74 — Not used
75 — A/C clutch diode
76 — Not used
77 — TT park lamps relay
78 20A* Right HID headlamps
79 5A* Adaptive cruise control
80 — Not used
81 — Not used
82 15A* Rear washer
83 — Not used
84 20A* TT park lamps
85 — Not used
86 7.5A* PCM keep-alive, PCM relay
87 5A* Run/start relay
88 — Run/start relay
89 5A* Adaptive lighting
90 10A* PCM
91 10A* Adaptive cruise control
92 10A* ABS module
93 5A* Blower motor/rear defroster relay
94 30A** Passenger compartment fuse panel
run/start
95 — Not used
96 — Not used
97 — Not used
98 — A/C clutch relay
* Mini Fuses ** Cartridge Fuses
Roadside Emergencies
264
2011 MKX(mkx)
Owners Guide, 1st Printing
USA(fus)
Page 265 of 367
CHANGING THE TIRES
If you get a flat tire while driving, do not apply the brake heavily.
Instead, gradually decrease your speed. Hold the steering wheel firmly
and slowly move to a safe place on the side of the road.
Note:The tire pressure monitoring system (TPMS) indicator light will
illuminate when the spare tire is in use. To restore the full functionality
of the monitoring system, all road wheels equipped with tire pressure
monitoring sensors must be mounted on the vehicle.
Have a flat serviced by an authorized dealer in order to prevent damage
to the TPMS sensors, refer toTire pressure monitoring system
(TPMS)in theTires, Wheels and Loadingchapter. Replace the spare
tire with a road tire as soon as possible. During repairing or replacing of
the flat tire, have the authorized dealer inspect the TPMS sensor for
damage.
WARNING:The use of tire sealants may damage your tire
pressure monitoring system (TPMS) and should not be used.
However, if you must use a sealant, the TPMS sensor and valve stem
on the wheel must be replaced by an authorized Ford dealer.
WARNING:Refer toTire pressure monitoring system (TPMS)
in theTires, Wheels and Loadingchapter for important
information. If the tire pressure monitor sensor becomes damaged, it
will no longer function.
Dissimilar spare tire/wheel information
WARNING:Failure to follow these guidelines could result in an
increased risk of loss of vehicle control, injury or death.
If you have a dissimilar spare tire/wheel, then it is intended for
temporary use only. This means that if you need to use it, you should
replace it as soon as possible with a road tire/wheel that is the same size
and type as the road tires and wheels that were originally provided by
Ford. If the dissimilar spare tire or wheel is damaged, it should be
replaced rather than repaired.
Roadside Emergencies
265
2011 MKX(mkx)
Owners Guide, 1st Printing
USA(fus)
Page 266 of 367
A dissimilar spare tire/wheel is defined as a spare tire and/or wheel that
is different in brand, size or appearance from the road tires and wheels
and can be one of three types:
1.T-type mini-spare:This spare tire begins with the letter “T” for tire
size and may have “Temporary Use Only” molded in the sidewall
2.Full-size dissimilar spare with label on wheel:This spare tire has
a label on the wheel that states: “THIS TIRE AND WHEEL FOR
TEMPORARY USE ONLY”
When driving with one of the dissimilar spare tires listed above,do not:
•Exceed 50 mph (80 km/h)
•Load the vehicle beyond maximum vehicle load rating listed on the
Safety Compliance Label
•Tow a trailer
•Use snow chains on the end of the vehicle with the dissimilar spare
tire
•Use more than one dissimilar spare tire at a time
•Use commercial car washing equipment
•Try to repair the dissimilar spare tire
Use of one of the dissimilar spare tires listed above at any one wheel
location can lead to impairment of the following:
•Handling, stability and braking performance
•Comfort and noise
•Ground clearance and parking at curbs
•Winter weather driving capability
•Wet weather driving capability
3.Full-size dissimilar spare without label on wheel
When driving with the full-size dissimilar spare tire/wheel,do not:
•Exceed 70 mph (113 km/h)
•Use more than one dissimilar spare tire/wheel at a time
•Use commercial car washing equipment
•Use snow chains on the end of the vehicle with the dissimilar spare
tire/wheel
Roadside Emergencies
266
2011 MKX(mkx)
Owners Guide, 1st Printing
USA(fus)
Page 267 of 367
The usage of a full-size dissimilar spare tire/wheel can lead to
impairment of the following:
•Handling, stability and braking performance
•Comfort and noise
•Ground clearance and parking at curbs
•Winter weather driving capability
•Wet weather driving capability
•All-wheel driving capability (if applicable)
•Load leveling adjustment (if applicable)
When driving with the full-size dissimilar spare tire/wheel additional
caution should be given to:
•Towing a trailer
•Driving vehicles equipped with a camper body
•Driving vehicles with a load on the cargo rack
Drive cautiously when using a full-size dissimilar spare tire/wheel and
seek service as soon as possible.
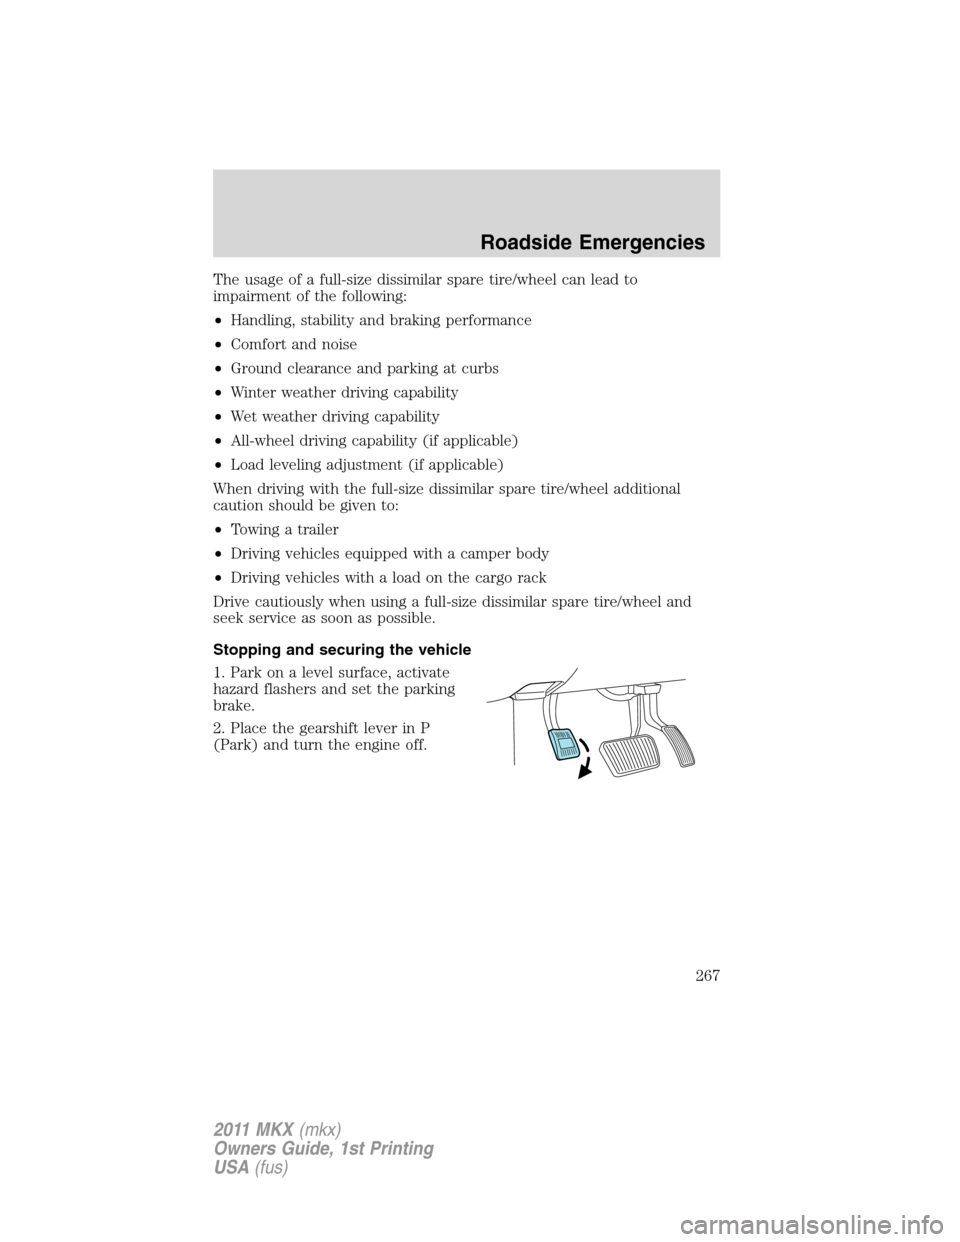
Stopping and securing the vehicle
1. Park on a level surface, activate
hazard flashers and set the parking
brake.
2. Place the gearshift lever in P
(Park) and turn the engine off.
Roadside Emergencies
267
2011 MKX(mkx)
Owners Guide, 1st Printing
USA(fus)
Page 268 of 367
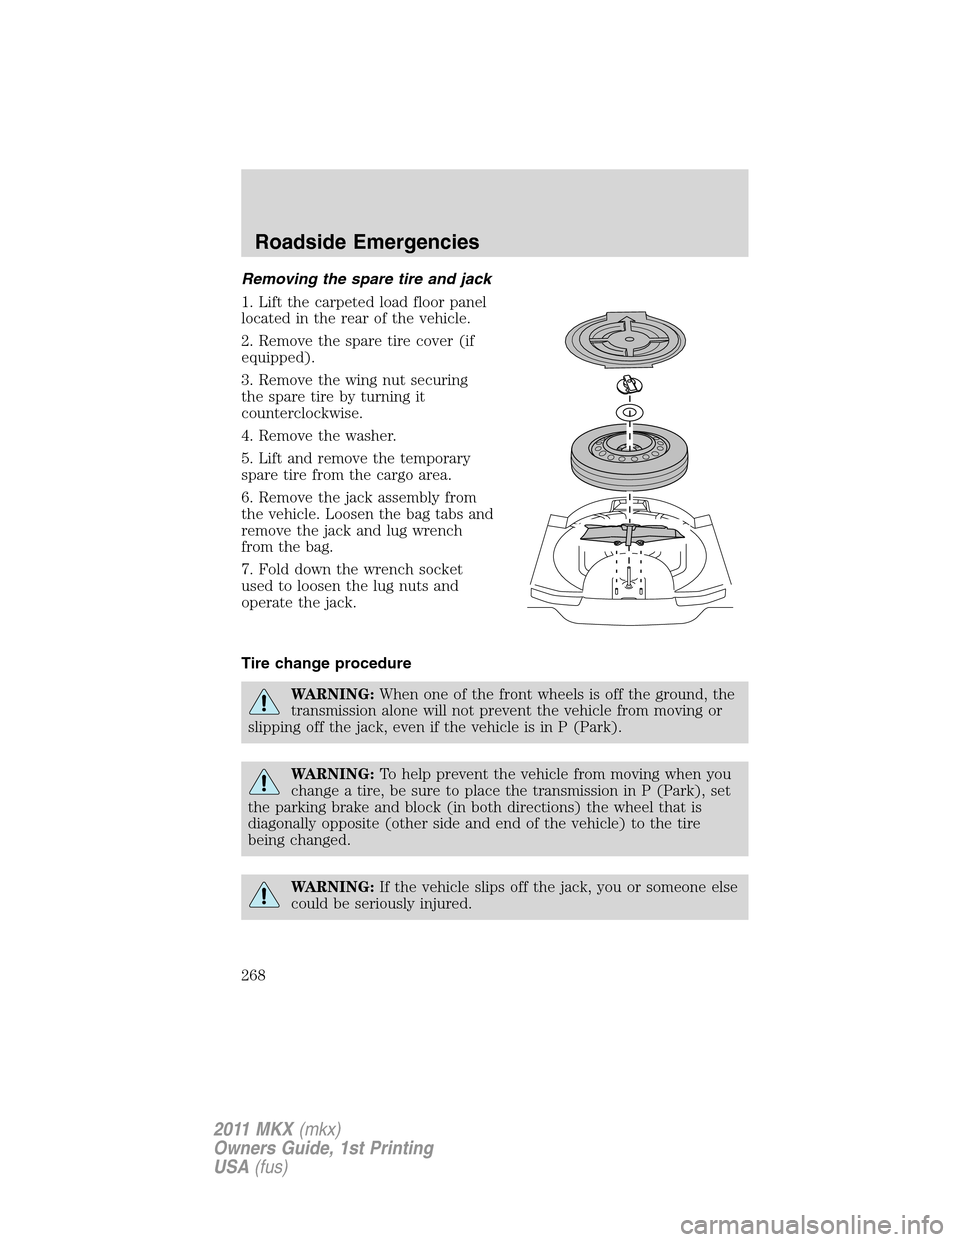
Removing the spare tire and jack
1. Lift the carpeted load floor panel
located in the rear of the vehicle.
2. Remove the spare tire cover (if
equipped).
3. Remove the wing nut securing
the spare tire by turning it
counterclockwise.
4. Remove the washer.
5. Lift and remove the temporary
spare tire from the cargo area.
6. Remove the jack assembly from
the vehicle. Loosen the bag tabs and
remove the jack and lug wrench
from the bag.
7. Fold down the wrench socket
used to loosen the lug nuts and
operate the jack.
Tire change procedure
WARNING:When one of the front wheels is off the ground, the
transmission alone will not prevent the vehicle from moving or
slipping off the jack, even if the vehicle is in P (Park).
WARNING:To help prevent the vehicle from moving when you
change a tire, be sure to place the transmission in P (Park), set
the parking brake and block (in both directions) the wheel that is
diagonally opposite (other side and end of the vehicle) to the tire
being changed.
WARNING:If the vehicle slips off the jack, you or someone else
could be seriously injured.
Roadside Emergencies
268
2011 MKX(mkx)
Owners Guide, 1st Printing
USA(fus)
Page 269 of 367
WARNING:Do not attempt to change a tire on the side of the
vehicle close to moving traffic. Pull far enough off the road to
avoid the danger of being hit when operating the jack or changing the
wheel.
Note:Passengers should not remain in the vehicle when the vehicle is
being jacked.
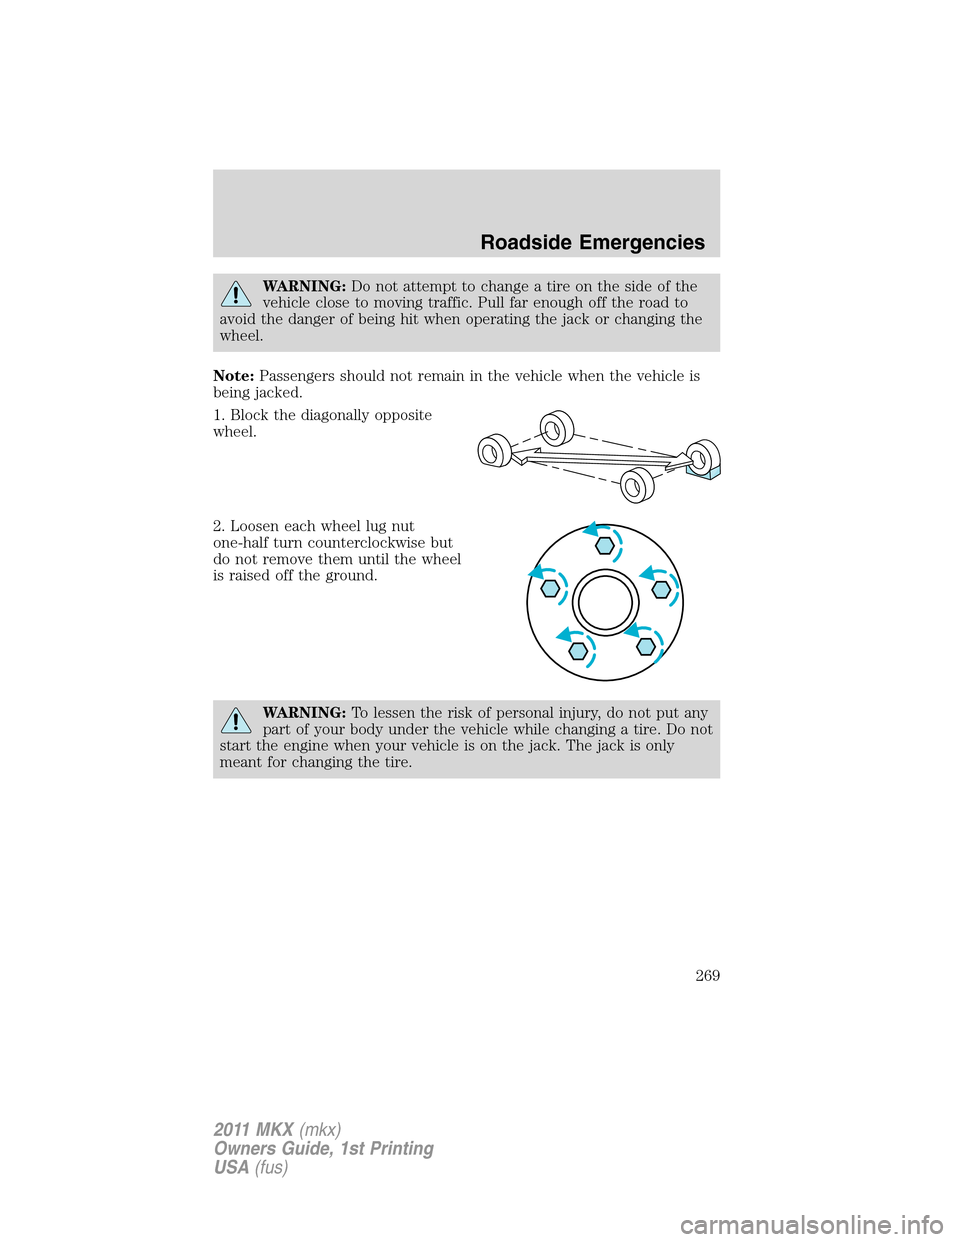
1. Block the diagonally opposite
wheel.
2. Loosen each wheel lug nut
one-half turn counterclockwise but
do not remove them until the wheel
is raised off the ground.
WARNING:To lessen the risk of personal injury, do not put any
part of your body under the vehicle while changing a tire. Do not
start the engine when your vehicle is on the jack. The jack is only
meant for changing the tire.
Roadside Emergencies
269
2011 MKX(mkx)
Owners Guide, 1st Printing
USA(fus)
Page 270 of 367
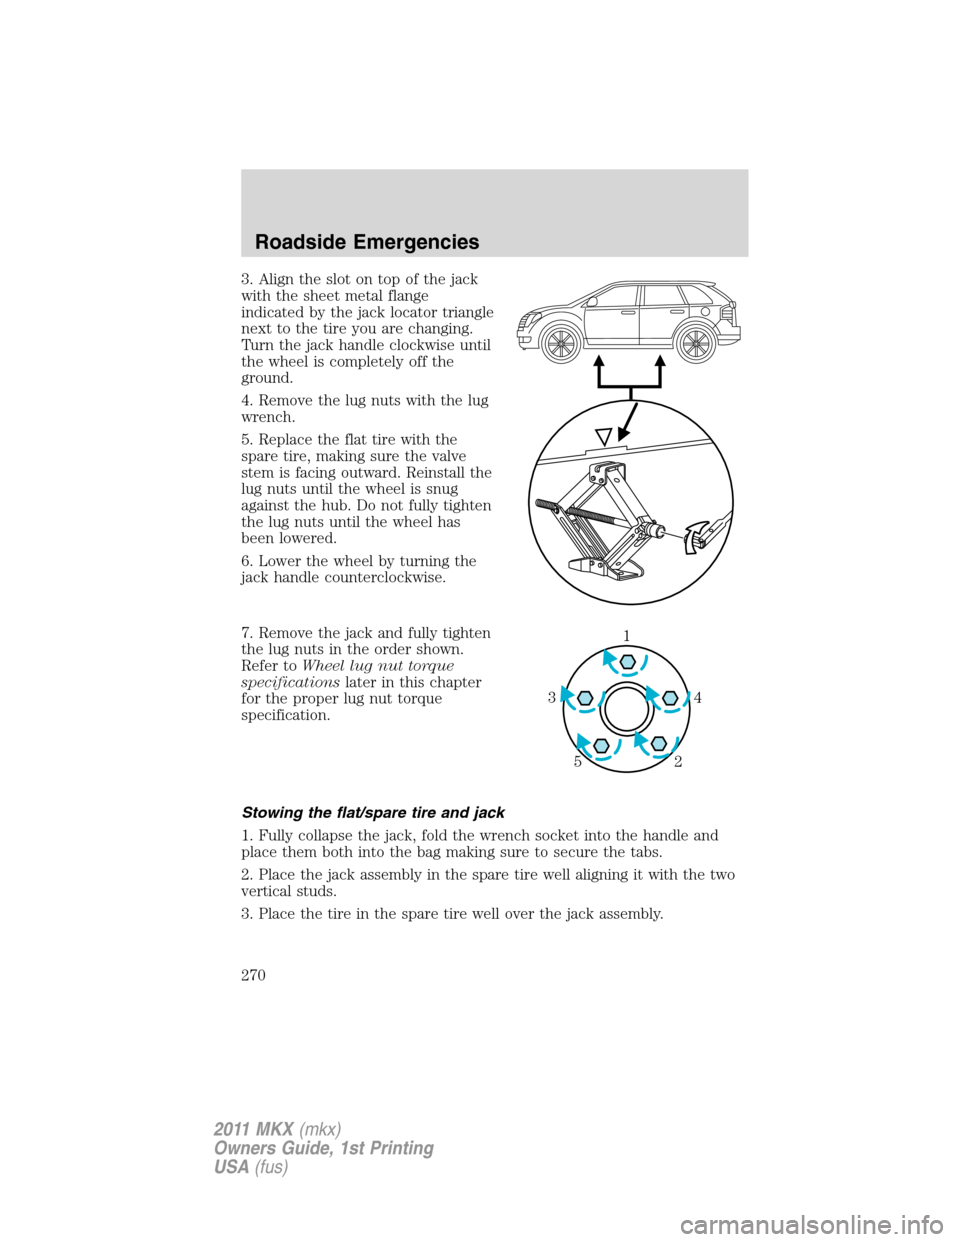
3. Align the slot on top of the jack
with the sheet metal flange
indicated by the jack locator triangle
next to the tire you are changing.
Turn the jack handle clockwise until
the wheel is completely off the
ground.
4. Remove the lug nuts with the lug
wrench.
5. Replace the flat tire with the
spare tire, making sure the valve
stem is facing outward. Reinstall the
lug nuts until the wheel is snug
against the hub. Do not fully tighten
the lug nuts until the wheel has
been lowered.
6. Lower the wheel by turning the
jack handle counterclockwise.
7. Remove the jack and fully tighten
the lug nuts in the order shown.
Refer toWheel lug nut torque
specificationslater in this chapter
for the proper lug nut torque
specification.
Stowing the flat/spare tire and jack
1. Fully collapse the jack, fold the wrench socket into the handle and
place them both into the bag making sure to secure the tabs.
2. Place the jack assembly in the spare tire well aligning it with the two
vertical studs.
3. Place the tire in the spare tire well over the jack assembly.
1
4 3
2 5
Roadside Emergencies
270
2011 MKX(mkx)
Owners Guide, 1st Printing
USA(fus)