sensor LINCOLN MKX 2018 User Guide
[x] Cancel search | Manufacturer: LINCOLN, Model Year: 2018, Model line: MKX, Model: LINCOLN MKX 2018Pages: 603, PDF Size: 4.94 MB
Page 58 of 603
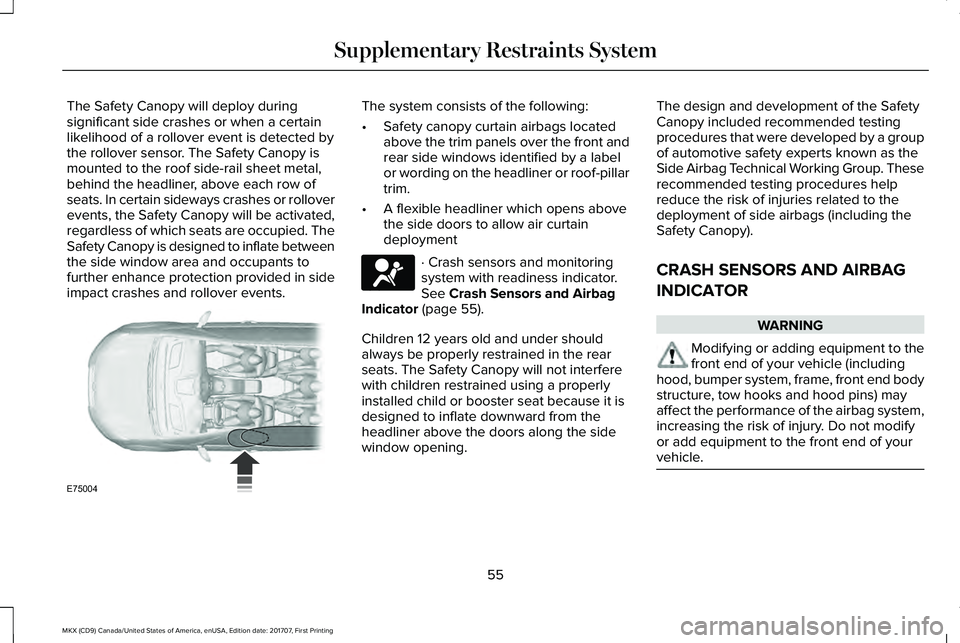
The Safety Canopy will deploy duringsignificant side crashes or when a certainlikelihood of a rollover event is detected bythe rollover sensor. The Safety Canopy ismounted to the roof side-rail sheet metal,behind the headliner, above each row ofseats. In certain sideways crashes or rolloverevents, the Safety Canopy will be activated,regardless of which seats are occupied. TheSafety Canopy is designed to inflate betweenthe side window area and occupants tofurther enhance protection provided in sideimpact crashes and rollover events.
The system consists of the following:
•Safety canopy curtain airbags locatedabove the trim panels over the front andrear side windows identified by a labelor wording on the headliner or roof-pillartrim.
•A flexible headliner which opens abovethe side doors to allow air curtaindeployment
· Crash sensors and monitoringsystem with readiness indicator.See Crash Sensors and AirbagIndicator (page 55).
Children 12 years old and under shouldalways be properly restrained in the rearseats. The Safety Canopy will not interferewith children restrained using a properlyinstalled child or booster seat because it isdesigned to inflate downward from theheadliner above the doors along the sidewindow opening.
The design and development of the SafetyCanopy included recommended testingprocedures that were developed by a groupof automotive safety experts known as theSide Airbag Technical Working Group. Theserecommended testing procedures helpreduce the risk of injuries related to thedeployment of side airbags (including theSafety Canopy).
CRASH SENSORS AND AIRBAG
INDICATOR
WARNING
Modifying or adding equipment to thefront end of your vehicle (includinghood, bumper system, frame, front end bodystructure, tow hooks and hood pins) mayaffect the performance of the airbag system,increasing the risk of injury. Do not modifyor add equipment to the front end of yourvehicle.
55
MKX (CD9) Canada/United States of America, enUSA, Edition date: 201707, First Printing
Supplementary Restraints SystemE75004 E67017
Page 59 of 603
Your vehicle has a collection of crash andoccupant sensors which provide informationto the restraints control module. Therestraints control module deploys (activates)the front seatbelt pretensioners, driverairbag, passenger airbag, knee airbag(s), seatmounted side airbags, the Safety Canopyand optional rear inflatable seatbelts. Basedon the type of crash, the restraints controlmodule deploys the appropriate safetydevices.
The restraints control module also monitorsthe readiness of the above safety devicesplus the crash and occupant sensors. Thereadiness of the safety system is indicatedby a warning indicator light in the instrumentcluster or by a backup tone if the warninglight is not working. Routine maintenance ofthe airbag is not required.
A difficulty with the system is indicated byone or more of the following:
•The readiness light will not illuminateimmediately after the ignition is switchedon.
•The readiness light either flashes or stayslit.
•A series of five beeps will be heard. Thetone pattern repeats periodically until theproblem, the light or both are repaired.
If any of these things happen, evenintermittently, have the supplementalrestraint system serviced at an authorizeddealer immediately. Unless serviced, thesystem may not function properly in theevent of a crash.
The seatbelt pretensioners and the frontairbag supplemental restraint system aredesigned to activate when the vehiclesustains frontal deceleration sufficient tocause the restraints control module to deploya safety device.
The fact that the seatbelt pretensioners orfront airbags did not activate for both frontseat occupants in a crash does not meanthat something is wrong with the system.Rather, it means the restraints control moduledetermined the accident conditions (crashseverity, belt usage) were not appropriate toactivate these safety devices.
•The design of the front airbags is toactivate only in frontal and near-frontalcrashes (not rollovers, side impacts orrear impacts) unless the crash causessufficient frontal deceleration.
•The design of the seatbelt pretensionersand optional rear inflatable seatbelts isto activate in frontal, near-frontal and sidecrashes, and in rollovers.
•The knee airbag(s) may deploy based oncrash severity and occupant conditions.
56
MKX (CD9) Canada/United States of America, enUSA, Edition date: 201707, First Printing
Supplementary Restraints SystemE67017
Page 77 of 603
Left-Hand Side
Turn clockwise to lock.
Right-Hand Side
Turn counterclockwise to lock.
Unlocking the Doors
If the central locking function does notoperate, unlock the driver door and thenunlock all other doors individually by pullingthe interior door handles.
Note:When the doors have been unlockedusing this method, the doors must be lockedindividually until the central locking functionhas been repaired.
Activating Intelligent Access
General Information
You can unlock and lock the vehicle withouttaking the keys out of your pocket or pursewhen your intelligent access key is within3 ft (1 m) of your vehicle. Intelligent accessuses a sensor on the back of the door handlefor unlocking and a separate sensor on theface of each door handle for locking.
The system will not function if:
•Your vehicle battery has no charge.
•The key battery has no charge.
•The passive key frequencies are jammed.
Note:The system may not function if thepassive key is close to metal objects orelectronic devices, for example keys or acell phone.
Note:If the system does not function, usethe key blade to lock and unlock yourvehicle. See Remote Control (page 58).
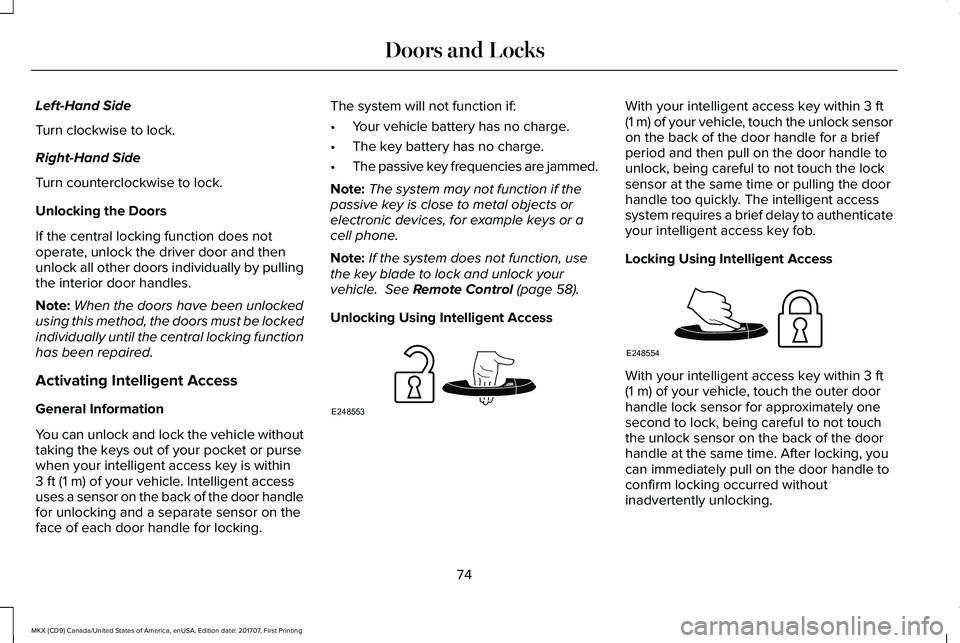
Unlocking Using Intelligent Access
With your intelligent access key within 3 ft(1 m) of your vehicle, touch the unlock sensoron the back of the door handle for a briefperiod and then pull on the door handle tounlock, being careful to not touch the locksensor at the same time or pulling the doorhandle too quickly. The intelligent accesssystem requires a brief delay to authenticateyour intelligent access key fob.
Locking Using Intelligent Access
With your intelligent access key within 3 ft(1 m) of your vehicle, touch the outer doorhandle lock sensor for approximately onesecond to lock, being careful to not touchthe unlock sensor on the back of the doorhandle at the same time. After locking, youcan immediately pull on the door handle toconfirm locking occurred withoutinadvertently unlocking.
74
MKX (CD9) Canada/United States of America, enUSA, Edition date: 201707, First Printing
Doors and LocksE248553 E248554
Page 87 of 603
Note:Once the liftgate has stopped moving,you can also manually move it to the desiredheight.
3.Press and hold the liftgate control buttonon the liftgate until a tone sounds,indicating programming is complete.
Note:You can only use the liftgate controlbutton to program the height.
Note:You cannot program the height if theliftgate position is too low.
The new open liftgate height is recalledwhen the power liftgate is opened. Tochange the programmed height, repeat theabove procedure. Once you open the powerliftgate, you can manually move it to adifferent height.
Note:The system recalls the newprogrammed height, even if you disconnectthe battery.
When operating the power liftgate after youhave programmed a lower height than fullyopen, you can fully open the liftgate bymanually pushing it upward to the maximumopen position.
Obstacle Detection
When Closing
The system stops when it detects anobstacle. A tone sounds and the systemreverses to open. Once you remove theobstacle, you can power close the liftgate.
Note:Entering your vehicle while the liftgateis closing can cause your vehicle to bounceand activate obstacle detection. To preventthis, let the power liftgate close completelybefore you enter your vehicle. Before drivingoff, check the instrument cluster for a liftgateor door ajar message or warning indicator.Failure to do this could result inunintentionally leaving the liftgate openwhile driving.
When Opening
The system stops when it detects anobstacle and a tone sounds. Once youremove the obstacle, you can continue tooperate the liftgate.
Hands-Free Feature (If Equipped)
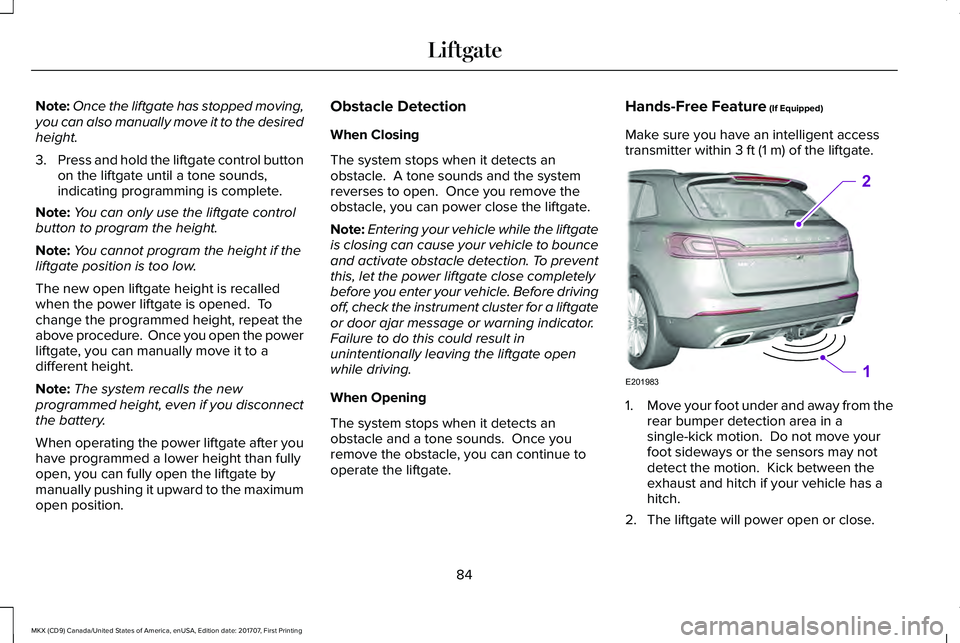
Make sure you have an intelligent accesstransmitter within 3 ft (1 m) of the liftgate.
1.Move your foot under and away from therear bumper detection area in asingle-kick motion. Do not move yourfoot sideways or the sensors may notdetect the motion. Kick between theexhaust and hitch if your vehicle has ahitch.
2. The liftgate will power open or close.
84
MKX (CD9) Canada/United States of America, enUSA, Edition date: 201707, First Printing
LiftgateE201983
2
1
Page 97 of 603
AUTOWIPERS (If Equipped)
Note:Fully defrost the windshield before youswitch the windshield wipers on.
Note:Make sure you switch the windshieldwipers off before entering a car wash.
Note: If streaks or smears appear on thewindshield, clean the windshield and thewiper blades. If that does not resolve theissue, install new wiper blades.
Note:If you switch autolamps andautowipers on, the headlamps turn on whenthe windshield wipers continuously operate.
Wet or winter driving conditions with ice,snow or salty road mist can causeinconsistent and unexpected wiping orsmearing.
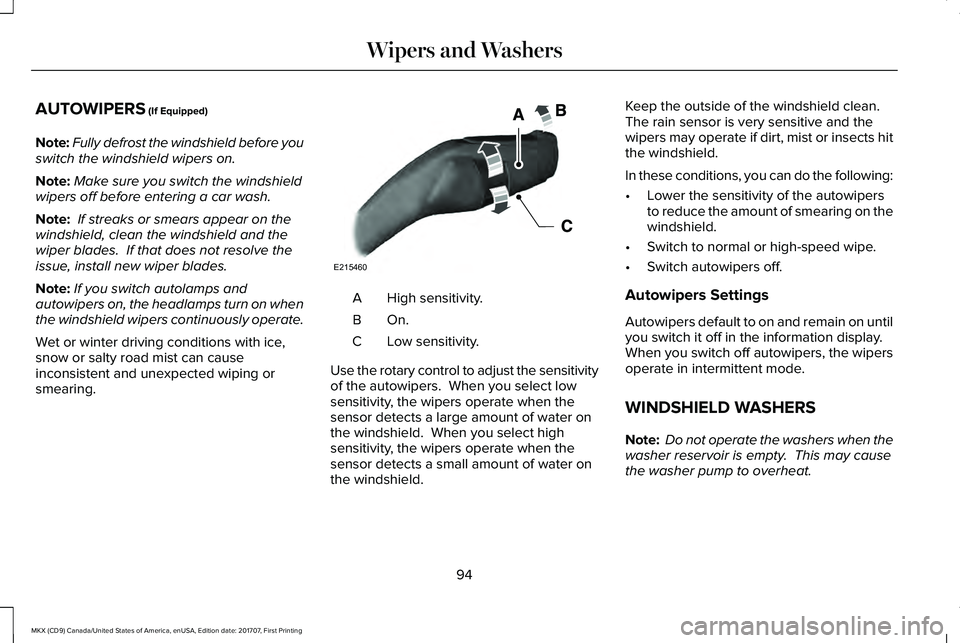
High sensitivity.A
On.B
Low sensitivity.C
Use the rotary control to adjust the sensitivityof the autowipers. When you select lowsensitivity, the wipers operate when thesensor detects a large amount of water onthe windshield. When you select highsensitivity, the wipers operate when thesensor detects a small amount of water onthe windshield.
Keep the outside of the windshield clean. The rain sensor is very sensitive and thewipers may operate if dirt, mist or insects hitthe windshield.
In these conditions, you can do the following:
•Lower the sensitivity of the autowipersto reduce the amount of smearing on thewindshield.
•Switch to normal or high-speed wipe.
•Switch autowipers off.
Autowipers Settings
Autowipers default to on and remain on untilyou switch it off in the information display.When you switch off autowipers, the wipersoperate in intermittent mode.
WINDSHIELD WASHERS
Note: Do not operate the washers when thewasher reservoir is empty. This may causethe washer pump to overheat.
94
MKX (CD9) Canada/United States of America, enUSA, Edition date: 201707, First Printing
Wipers and WashersE215460
Page 102 of 603
Type One - Conventional (Non-Configurable)
The daytime running lamps turn on when:
1. Switching the ignition on.
2. The transmission is not in park (P) forvehicles with automatic transmissions, orreleasing the parking brake for vehicleswith manual transmissions.
3. The lighting control is in the off, parkinglamp or autolamps positions.
4. The headlamps are off.
Type Two - Configurable
Switch the daytime running lamps on or offusing the information display. SeeInformation Displays (page 118).
The daytime running lamps turn on when:
1. The lamps are on in the informationdisplay.
2. Switching the ignition on.
3. The transmission is not in park (P) forvehicles with automatic transmissions, orreleasing the parking brake for vehicleswith manual transmissions.
4. The lighting control is in the autolampsposition.
5. The headlamps are off.
The other lighting control switch positionsdo not turn on the daytime running lamps.
If the daytime running lamps are off in theinformation display, the lamps stay off in allswitch positions.
AUTOMATIC HIGH BEAM
CONTROL (If Equipped)
WARNING
The system does not relieve you ofyour responsibility to drive with duecare and attention. You may need to overridethe system if it does not turn the high beamson or off.
The system turns on high beams if it is darkenough and no other traffic is present. If itdetects an approaching vehicle’s headlampsor tail lamps, or street lighting ahead, thesystem turns off high beams before they candistract other road users. Low beams remainon.
Note:The system may not operate properlyif the sensor is blocked. Keep the windshieldfree from obstruction or damage.
Note:The system may not operate properlyin cold or inclement conditions. You canswitch on the high beams by overriding thesystem.
Note:If the system detects a blockage, forexample bird droppings, bug splatter, snowor ice, the system goes into low beam modeuntil you clear the blockage. A message mayappear in the information display if thecamera is blocked.
Note:Using much larger tires or equippingvehicle accessories such as snowplows canmodify your vehicle's ride height anddegrade automatic high beam controlperformance.
99
MKX (CD9) Canada/United States of America, enUSA, Edition date: 201707, First Printing
Lighting
Page 103 of 603
A camera sensor, centrally mounted behindthe windshield of your vehicle, continuouslymonitors conditions to turn the high beamson and off.
Once the system is active, the high beamsturn on if:
•The ambient light level is low enough.
•There is no traffic in front of your vehicle.
•The vehicle speed is greater thanapproximately 32 mph (51 km/h).
The high beams turn off if:
•The ambient light level is high enoughthat high beams are not required.
•The system detects an approachingvehicle's headlamps or tail lamps.
•The vehicle speed falls belowapproximately 27 mph (44 km/h).
•The system detects severe rain, snow orfog.
•The camera is blocked.
Switching the System On and Off
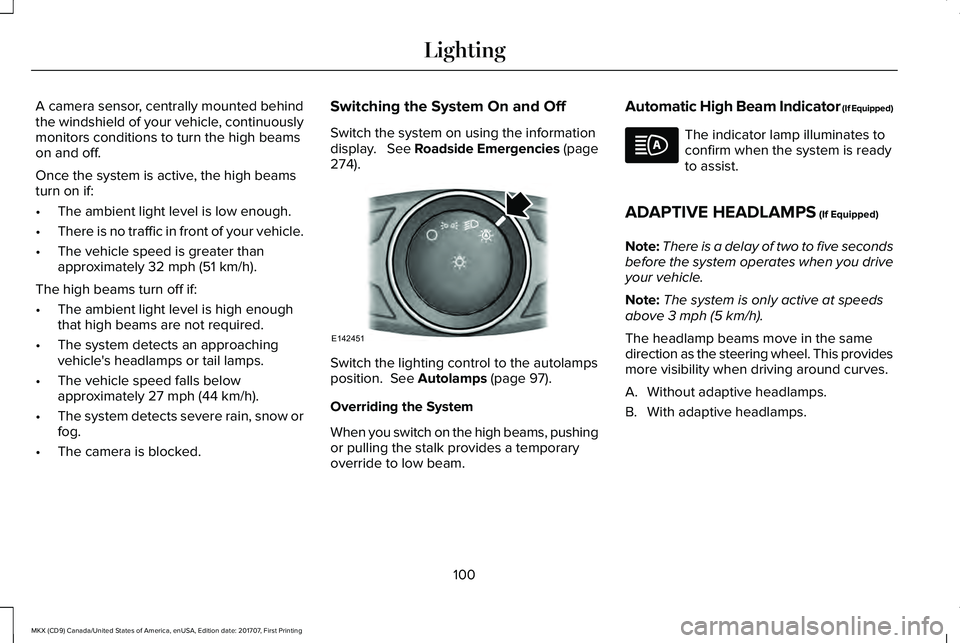
Switch the system on using the informationdisplay. See Roadside Emergencies (page274).
Switch the lighting control to the autolampsposition. See Autolamps (page 97).
Overriding the System
When you switch on the high beams, pushingor pulling the stalk provides a temporaryoverride to low beam.
Automatic High Beam Indicator (If Equipped)
The indicator lamp illuminates toconfirm when the system is readyto assist.
ADAPTIVE HEADLAMPS (If Equipped)
Note:There is a delay of two to five secondsbefore the system operates when you driveyour vehicle.
Note:The system is only active at speedsabove 3 mph (5 km/h).
The headlamp beams move in the samedirection as the steering wheel. This providesmore visibility when driving around curves.
A. Without adaptive headlamps.
B. With adaptive headlamps.
100
MKX (CD9) Canada/United States of America, enUSA, Edition date: 201707, First Printing
LightingE142451
Page 111 of 603
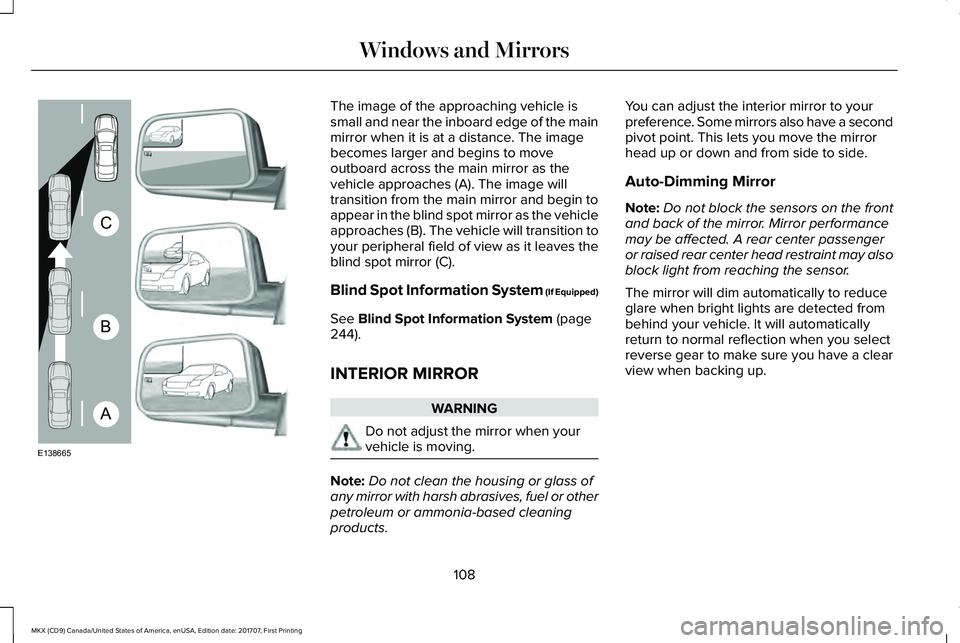
The image of the approaching vehicle issmall and near the inboard edge of the mainmirror when it is at a distance. The imagebecomes larger and begins to moveoutboard across the main mirror as thevehicle approaches (A). The image willtransition from the main mirror and begin toappear in the blind spot mirror as the vehicleapproaches (B). The vehicle will transition toyour peripheral field of view as it leaves theblind spot mirror (C).
Blind Spot Information System (If Equipped)
See Blind Spot Information System (page244).
INTERIOR MIRROR
WARNING
Do not adjust the mirror when yourvehicle is moving.
Note:Do not clean the housing or glass ofany mirror with harsh abrasives, fuel or otherpetroleum or ammonia-based cleaningproducts.
You can adjust the interior mirror to yourpreference. Some mirrors also have a secondpivot point. This lets you move the mirrorhead up or down and from side to side.
Auto-Dimming Mirror
Note:Do not block the sensors on the frontand back of the mirror. Mirror performancemay be affected. A rear center passengeror raised rear center head restraint may alsoblock light from reaching the sensor.
The mirror will dim automatically to reduceglare when bright lights are detected frombehind your vehicle. It will automaticallyreturn to normal reflection when you selectreverse gear to make sure you have a clearview when backing up.
108
MKX (CD9) Canada/United States of America, enUSA, Edition date: 201707, First Printing
Windows and MirrorsA
B
C
E138665
Page 129 of 603
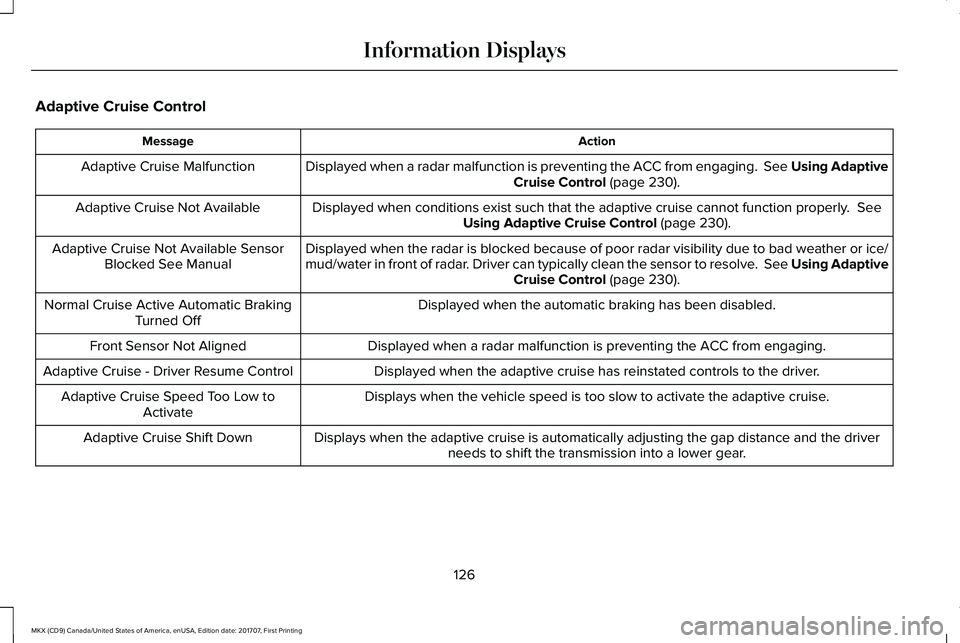
Adaptive Cruise Control
ActionMessage
Displayed when a radar malfunction is preventing the ACC from engaging. See Using AdaptiveCruise Control (page 230).Adaptive Cruise Malfunction
Displayed when conditions exist such that the adaptive cruise cannot function properly. SeeUsing Adaptive Cruise Control (page 230).Adaptive Cruise Not Available
Displayed when the radar is blocked because of poor radar visibility due to bad weather or ice/mud/water in front of radar. Driver can typically clean the sensor to resolve. See Using AdaptiveCruise Control (page 230).
Adaptive Cruise Not Available SensorBlocked See Manual
Displayed when the automatic braking has been disabled.Normal Cruise Active Automatic BrakingTurned Off
Displayed when a radar malfunction is preventing the ACC from engaging.Front Sensor Not Aligned
Displayed when the adaptive cruise has reinstated controls to the driver.Adaptive Cruise - Driver Resume Control
Displays when the vehicle speed is too slow to activate the adaptive cruise.Adaptive Cruise Speed Too Low toActivate
Displays when the adaptive cruise is automatically adjusting the gap distance and the driverneeds to shift the transmission into a lower gear.Adaptive Cruise Shift Down
126
MKX (CD9) Canada/United States of America, enUSA, Edition date: 201707, First Printing
Information Displays
Page 130 of 603
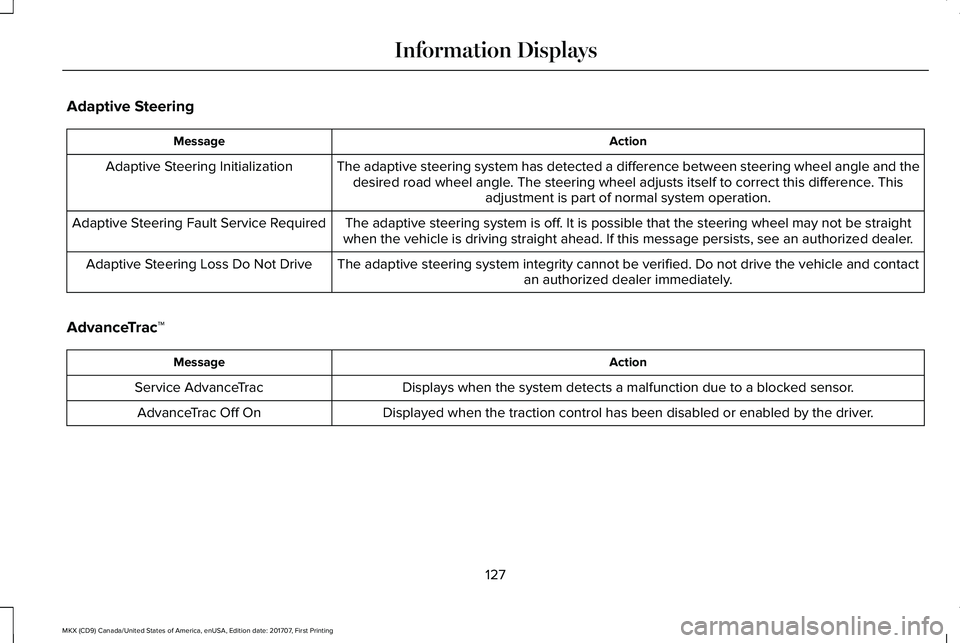
Adaptive Steering
ActionMessage
The adaptive steering system has detected a difference between steering wheel angle and thedesired road wheel angle. The steering wheel adjusts itself to correct this difference. Thisadjustment is part of normal system operation.
Adaptive Steering Initialization
The adaptive steering system is off. It is possible that the steering wheel may not be straightwhen the vehicle is driving straight ahead. If this message persists, see an authorized dealer.Adaptive Steering Fault Service Required
The adaptive steering system integrity cannot be verified. Do not drive the vehicle and contactan authorized dealer immediately.Adaptive Steering Loss Do Not Drive
AdvanceTrac™
ActionMessage
Displays when the system detects a malfunction due to a blocked sensor.Service AdvanceTrac
Displayed when the traction control has been disabled or enabled by the driver.AdvanceTrac Off On
127
MKX (CD9) Canada/United States of America, enUSA, Edition date: 201707, First Printing
Information Displays