warning light LINCOLN MKX 2018 Workshop Manual
[x] Cancel search | Manufacturer: LINCOLN, Model Year: 2018, Model line: MKX, Model: LINCOLN MKX 2018Pages: 603, PDF Size: 4.94 MB
Page 326 of 603
3.Rotate the air filter assembly slightly in acounterclockwise direction.
4. Check the fluid level. See Checking theTransmission Fluid Level.
5. Install in reverse order. Tighten the twoair filter assembly securing bolts until youfeel a strong resistance.
BRAKE FLUID CHECK
WARNINGS
Do not use any fluid other than therecommended brake fluid as this willreduce brake efficiency. Use of incorrect fluidcould result in the loss of vehicle control,serious personal injury or death.
Only use brake fluid from a sealedcontainer. Contamination with dirt,water, petroleum products or other materialsmay result in brake system damage or failure.Failure to adhere to this warning could resultin the loss of vehicle control, seriouspersonal injury or death.
WARNINGS
Do not allow the fluid to touch yourskin or eyes. If this happens, rinse theaffected areas immediately with plenty ofwater and contact your physician.
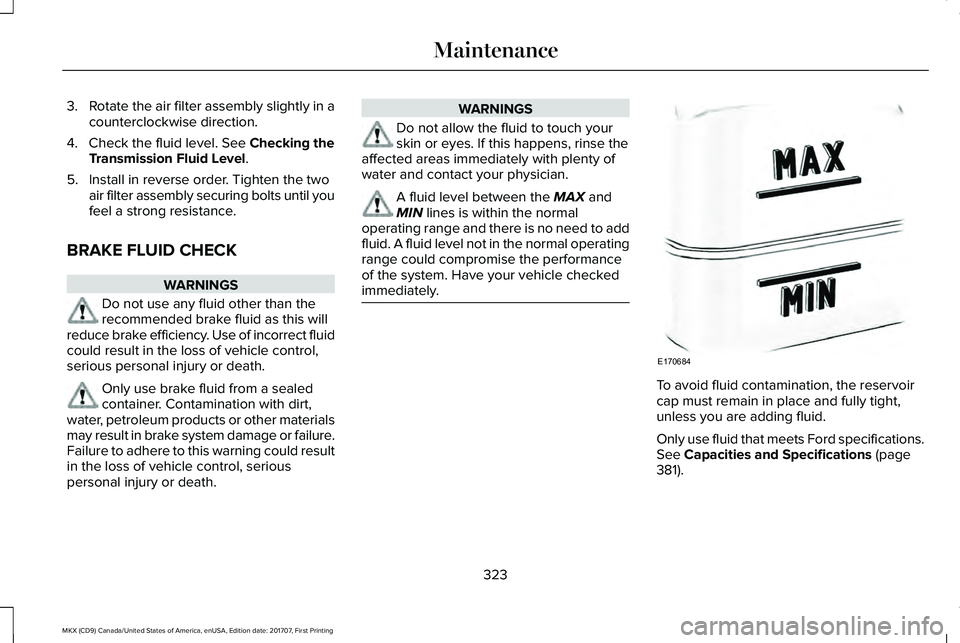
A fluid level between the MAX andMIN lines is within the normaloperating range and there is no need to addfluid. A fluid level not in the normal operatingrange could compromise the performanceof the system. Have your vehicle checkedimmediately.
To avoid fluid contamination, the reservoircap must remain in place and fully tight,unless you are adding fluid.
Only use fluid that meets Ford specifications.See Capacities and Specifications (page381).
323
MKX (CD9) Canada/United States of America, enUSA, Edition date: 201707, First Printing
MaintenanceE170684
Page 327 of 603
WASHER FLUID CHECK
WARNING
If you operate your vehicle intemperatures below 41.0°F (5°C), usewasher fluid with antifreeze protection.Failure to use washer fluid with antifreezeprotection in cold weather could result inimpaired windshield vision and increase therisk of injury or accident.
Note:The front and rear washer systemsare supplied from the same reservoir.
Add fluid to fill the reservoir if the level is low.Only use a washer fluid that meets Fordspecifications. See Capacities andSpecifications (page 381).
State or local regulations on volatile organiccompounds may restrict the use of methanol,a common windshield washer antifreezeadditive. Washer fluids containingnon-methanol antifreeze agents should beused only if they provide cold weatherprotection without damaging the vehicle’spaint finish, wiper blades or washer system.
FUEL FILTER
Your vehicle is equipped with a lifetime fuelfilter that is integrated with the fuel tank.Regular maintenance or replacement is notneeded.
CHANGING THE 12V BATTERY
WARNINGS
Batteries normally produce explosivegases which can cause personal injury.Therefore, do not allow flames, sparks orlighted substances to come near the battery.When working near the battery, always shieldyour face and protect your eyes. Alwaysprovide correct ventilation.
When lifting a plastic-cased battery,excessive pressure on the end wallscould cause acid to flow through the ventcaps, resulting in personal injury and damageto the vehicle or battery. Lift the battery witha battery carrier or with your hands onopposite corners.
WARNINGS
Keep batteries out of reach of children.Batteries contain sulfuric acid. Avoidcontact with skin, eyes or clothing. Shieldyour eyes when working near the battery toprotect against possible splashing of acidsolution. In case of acid contact with skin oreyes, flush immediately with water for aminimum of 15 minutes and get promptmedical attention. If acid is swallowed, call aphysician immediately.
Battery posts, terminals and relatedaccessories contain lead and leadcompounds. Wash hands after handling.
For vehicles with Auto-Start-Stop thebattery requirement is different. Youmust replace the battery with one of exactlythe same specification.
Your vehicle is fitted with a Motorcraftmaintenance-free battery which normallydoes not require additional water.
When a battery replacement is required, youmust use a recommended replacementbattery that matches the electricalrequirements of the vehicle.
324
MKX (CD9) Canada/United States of America, enUSA, Edition date: 201707, First Printing
Maintenance
Page 331 of 603
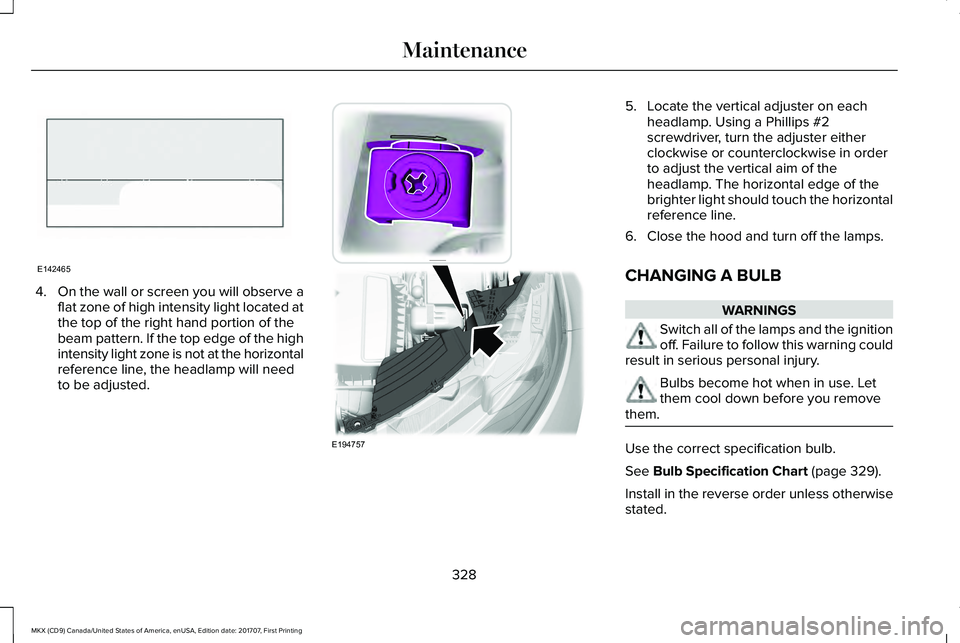
4.On the wall or screen you will observe aflat zone of high intensity light located atthe top of the right hand portion of thebeam pattern. If the top edge of the highintensity light zone is not at the horizontalreference line, the headlamp will needto be adjusted.
5. Locate the vertical adjuster on eachheadlamp. Using a Phillips #2screwdriver, turn the adjuster eitherclockwise or counterclockwise in orderto adjust the vertical aim of theheadlamp. The horizontal edge of thebrighter light should touch the horizontalreference line.
6. Close the hood and turn off the lamps.
CHANGING A BULB
WARNINGS
Switch all of the lamps and the ignitionoff. Failure to follow this warning couldresult in serious personal injury.
Bulbs become hot when in use. Letthem cool down before you removethem.
Use the correct specification bulb.
See Bulb Specification Chart (page 329).
Install in the reverse order unless otherwisestated.
328
MKX (CD9) Canada/United States of America, enUSA, Edition date: 201707, First Printing
MaintenanceE142465 E194757
Page 349 of 603
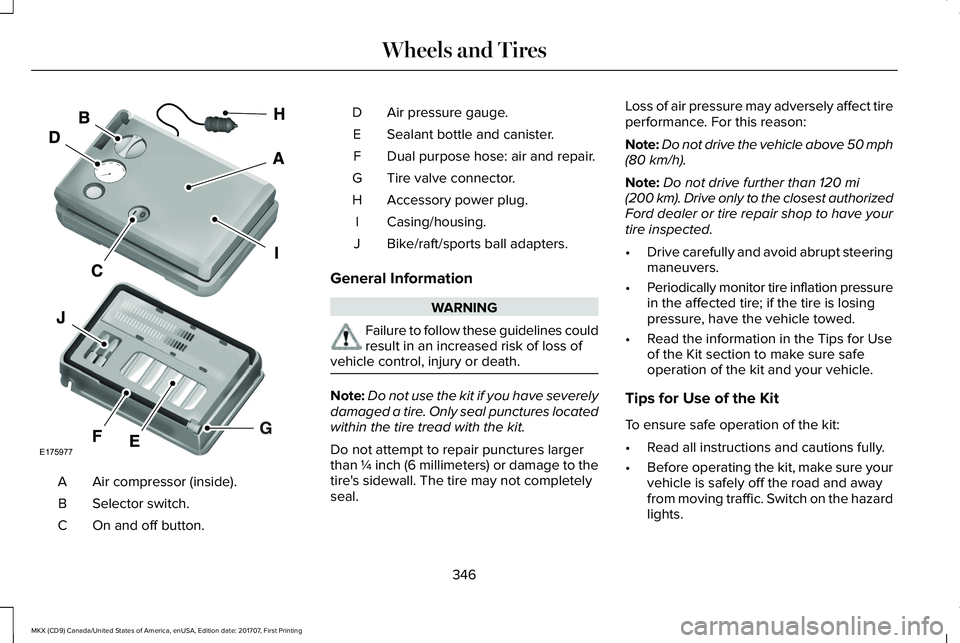
Air compressor (inside).A
Selector switch.B
On and off button.C
Air pressure gauge.D
Sealant bottle and canister.E
Dual purpose hose: air and repair.F
Tire valve connector.G
Accessory power plug.H
Casing/housing.I
Bike/raft/sports ball adapters.J
General Information
WARNING
Failure to follow these guidelines couldresult in an increased risk of loss ofvehicle control, injury or death.
Note:Do not use the kit if you have severelydamaged a tire. Only seal punctures locatedwithin the tire tread with the kit.
Do not attempt to repair punctures largerthan ¼ inch (6 millimeters) or damage to thetire's sidewall. The tire may not completelyseal.
Loss of air pressure may adversely affect tireperformance. For this reason:
Note:Do not drive the vehicle above 50 mph(80 km/h).
Note:Do not drive further than 120 mi(200 km). Drive only to the closest authorizedFord dealer or tire repair shop to have yourtire inspected.
•Drive carefully and avoid abrupt steeringmaneuvers.
•Periodically monitor tire inflation pressurein the affected tire; if the tire is losingpressure, have the vehicle towed.
•Read the information in the Tips for Useof the Kit section to make sure safeoperation of the kit and your vehicle.
Tips for Use of the Kit
To ensure safe operation of the kit:
•Read all instructions and cautions fully.
•Before operating the kit, make sure yourvehicle is safely off the road and awayfrom moving traffic. Switch on the hazardlights.
346
MKX (CD9) Canada/United States of America, enUSA, Edition date: 201707, First Printing
Wheels and TiresE175977
Page 351 of 603
WARNINGS
Do not run the engine when operatingthe air compressor unless the vehicleis outdoors or in a well-ventilated area.
Preparation: Park the vehicle in a safe, leveland secure area, away from moving traffic.
Switch the hazard lights on. Apply theparking brake and switch the engine off.Inspect the flat tire for visible damage.
Sealant compound contains latex. Useappropriate precautions to avoid any allergicreactions.
Do not remove any foreign object that haspierced the tire. If a puncture is located inthe tire sidewall, stop and call roadsideassistance.
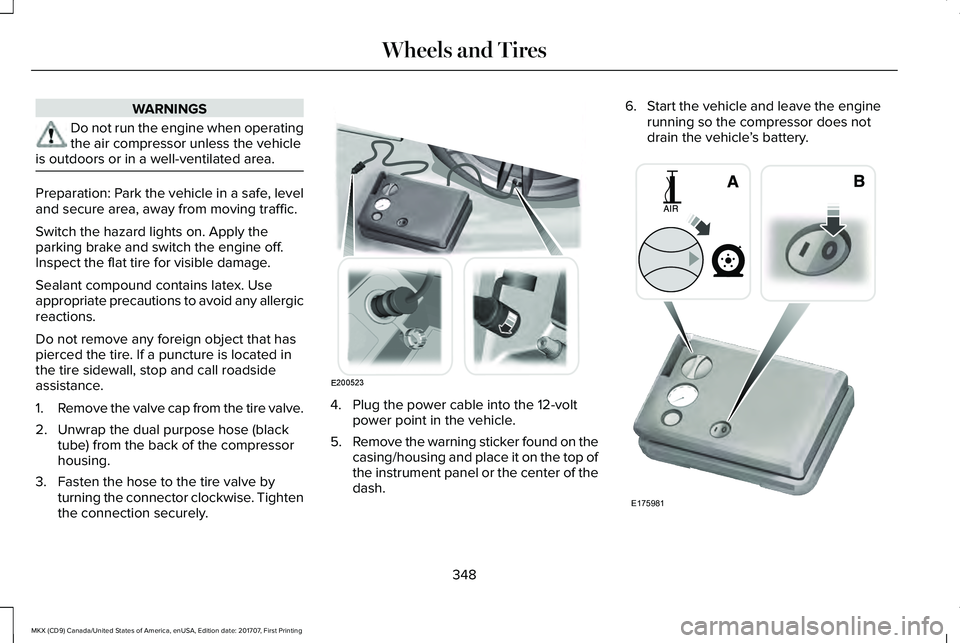
1.Remove the valve cap from the tire valve.
2. Unwrap the dual purpose hose (blacktube) from the back of the compressorhousing.
3. Fasten the hose to the tire valve byturning the connector clockwise. Tightenthe connection securely.
4. Plug the power cable into the 12-voltpower point in the vehicle.
5.Remove the warning sticker found on thecasing/housing and place it on the top ofthe instrument panel or the center of thedash.
6. Start the vehicle and leave the enginerunning so the compressor does notdrain the vehicle’s battery.
348
MKX (CD9) Canada/United States of America, enUSA, Edition date: 201707, First Printing
Wheels and TiresE200523 E175981
Page 357 of 603
Crossover vehicles have a significantlyhigher rollover rate than other types ofvehicles. To reduce this risk of seriousinjury or death from a rollover or othercrash you must:
•Avoid sharp turns and abruptmaneuvers.
•Drive at safe speeds for theconditions.
•Keep tires properly inflated.
•Never overload or improperly loadyour vehicle.
•Make sure every passenger isproperly restrained.
WARNING
In a rollover crash, an unbeltedperson is significantly more likelyto die than a person wearing a seatbelt.
Information About Uniform Tire QualityGrading
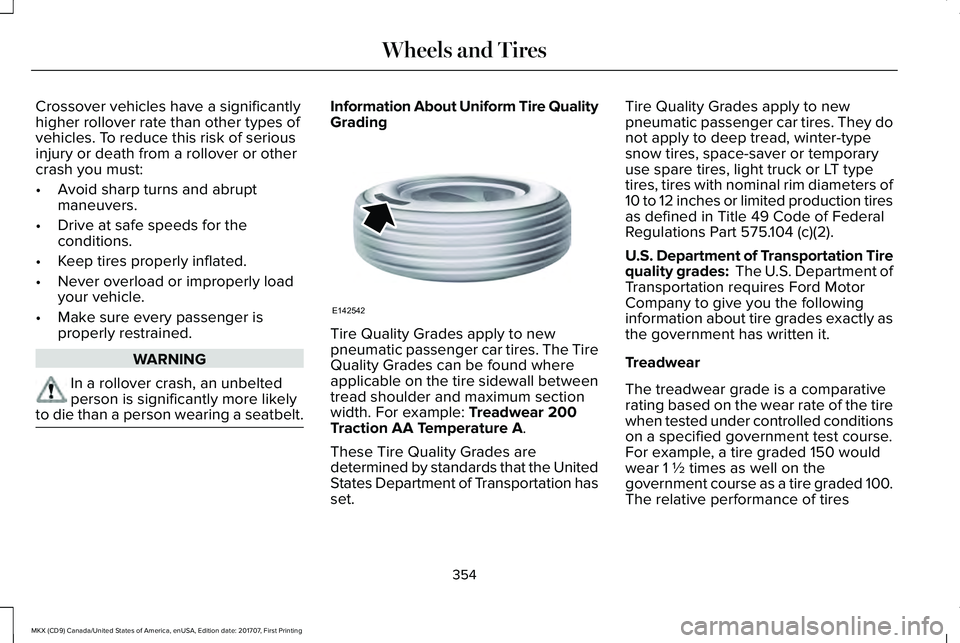
Tire Quality Grades apply to newpneumatic passenger car tires. The TireQuality Grades can be found whereapplicable on the tire sidewall betweentread shoulder and maximum sectionwidth. For example: Treadwear 200Traction AA Temperature A.
These Tire Quality Grades aredetermined by standards that the UnitedStates Department of Transportation hasset.
Tire Quality Grades apply to newpneumatic passenger car tires. They donot apply to deep tread, winter-typesnow tires, space-saver or temporaryuse spare tires, light truck or LT typetires, tires with nominal rim diameters of10 to 12 inches or limited production tiresas defined in Title 49 Code of FederalRegulations Part 575.104 (c)(2).
U.S. Department of Transportation Tirequality grades: The U.S. Department ofTransportation requires Ford MotorCompany to give you the followinginformation about tire grades exactly asthe government has written it.
Treadwear
The treadwear grade is a comparativerating based on the wear rate of the tirewhen tested under controlled conditionson a specified government test course.For example, a tire graded 150 wouldwear 1 ½ times as well on thegovernment course as a tire graded 100.The relative performance of tires
354
MKX (CD9) Canada/United States of America, enUSA, Edition date: 201707, First Printing
Wheels and TiresE142542
Page 364 of 603
A. T: Indicates a type of tire, designatedby the Tire and Rim Association, that isintended for temporary service on cars,sport-utility vehicles, minivans and lighttrucks.
B. 145: Indicates the nominal width ofthe tire in millimeters from sidewall edgeto sidewall edge. In general, the largerthe number, the wider the tire.
C. 80: Indicates the aspect ratio, whichgives the tire's ratio of height to width.Numbers of 70 or lower indicate a shortsidewall.
D. D: Indicates a diagonal type tire.
R: Indicates a radial type tire.
E. 16: Indicates the wheel or rimdiameter in inches. If you change your
wheel size, you will have to purchasenew tires to match the new wheeldiameter.
Location of the Tire Label
You will find a Tire Label containing tireinflation pressure by tire size and otherimportant information located on theB-Pillar or the edge of the driver’s door.
Inflating Your Tires
Safe operation of your vehicle requiresthat your tires are properly inflated.Remember that a tire can lose up to halfof its air pressure without appearing flat.
Every day before you drive, check yourtires. If one looks lower than the others,use a tire gauge to check pressure of alltires and adjust if required.
At least once a month and before longtrips, inspect each tire and check the tirepressure with a tire gauge (includingspare, if equipped). Inflate all tires to theinflation pressure recommended by FordMotor Company.
You are strongly urged to buy a reliabletire pressure gauge, as automaticservice station gauges may beinaccurate. Ford recommends the useof a digital or dial-type tire pressuregauge rather than a stick-type tirepressure gauge.
Use the recommended cold inflationpressure for optimum tire performanceand wear. Under-inflation orover-inflation may cause uneventreadwear patterns.
WARNING
Under-inflation is the most commoncause of tire failures and may resultin severe tire cracking, tread separationor blowout, with unexpected loss ofvehicle control and increased risk of
injury. Under-inflation increases sidewallflexing and rolling resistance, resultingin heat buildup and internal damage tothe tire. It also may result in unnecessarytire stress, irregular wear, loss of vehiclecontrol and accidents. A tire can lose upto half of its air pressure and not appearto be flat!
361
MKX (CD9) Canada/United States of America, enUSA, Edition date: 201707, First Printing
Wheels and Tires
Page 373 of 603
functioning properly. Always check the TPMSmalfunction telltale after replacing one ormore tires or wheels on your vehicle toensure that the replacement or alternate tiresand wheels allow the TPMS to continue tofunction properly.
This device complies with Part 15 of the FCCRules and with License exempt RSSStandards of Industry Canada. Operation issubject to the following two conditions:
1. This device may not cause harmfulinterference, and
2.This device must accept any interferencereceived, including interference that maycause undesired operation.
Note:Changes or modifications notexpressively approved by the partyresponsible for compliance could void theuser's authority to operate the equipment.The term "IC:" before the radio certificationnumber only signifies that Industry Canadatechnical specifications were met.
Changing Tires With a Tire PressureMonitoring System
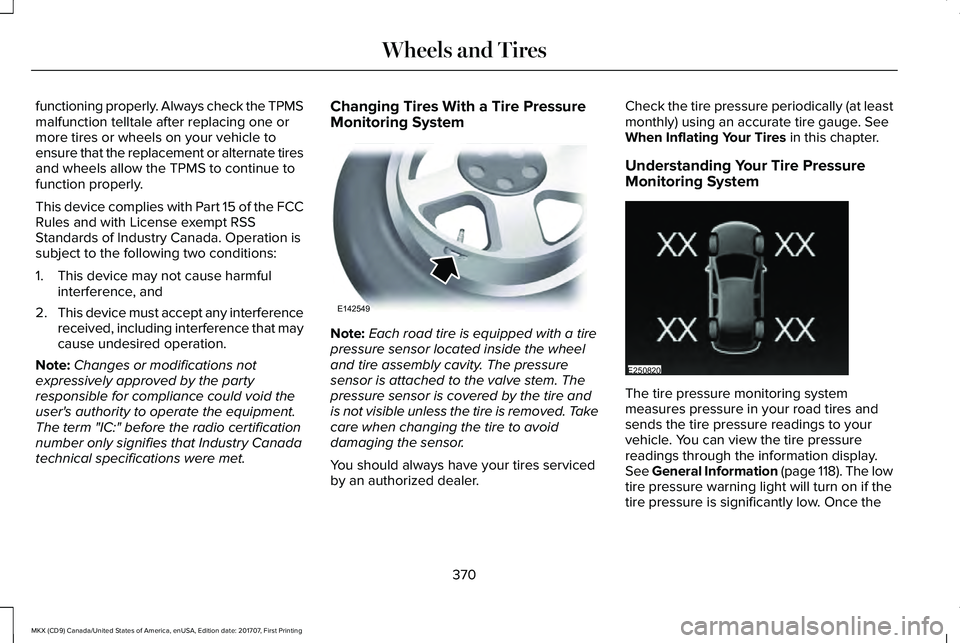
Note:Each road tire is equipped with a tirepressure sensor located inside the wheeland tire assembly cavity. The pressuresensor is attached to the valve stem. Thepressure sensor is covered by the tire andis not visible unless the tire is removed. Takecare when changing the tire to avoiddamaging the sensor.
You should always have your tires servicedby an authorized dealer.
Check the tire pressure periodically (at leastmonthly) using an accurate tire gauge. SeeWhen Inflating Your Tires in this chapter.
Understanding Your Tire PressureMonitoring System
The tire pressure monitoring systemmeasures pressure in your road tires andsends the tire pressure readings to yourvehicle. You can view the tire pressurereadings through the information display.See General Information (page 118). The lowtire pressure warning light will turn on if thetire pressure is significantly low. Once the
370
MKX (CD9) Canada/United States of America, enUSA, Edition date: 201707, First Printing
Wheels and TiresE142549 E250820
Page 375 of 603
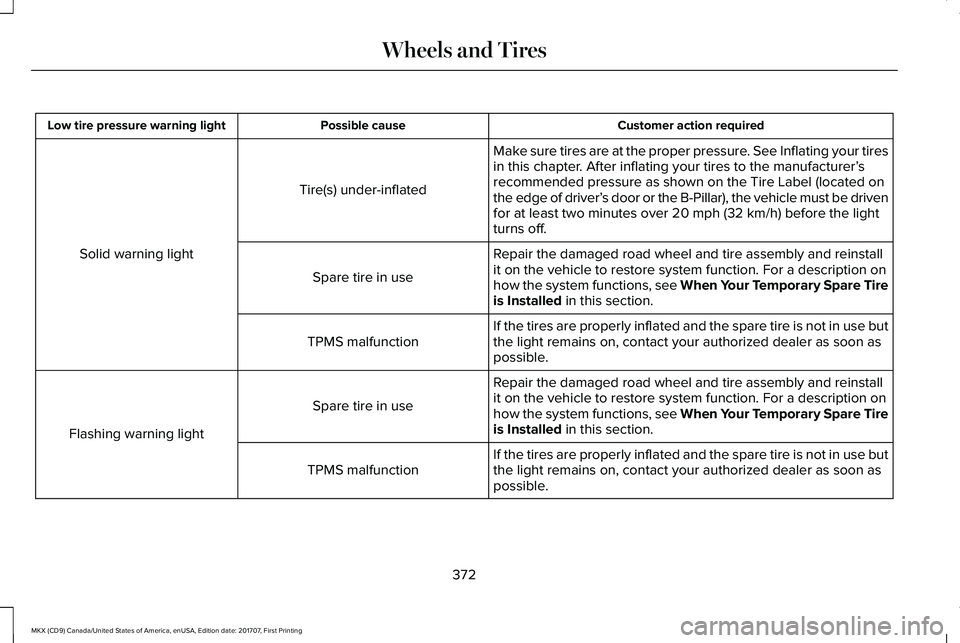
Customer action requiredPossible causeLow tire pressure warning light
Make sure tires are at the proper pressure. See Inflating your tiresin this chapter. After inflating your tires to the manufacturer’srecommended pressure as shown on the Tire Label (located onthe edge of driver’s door or the B-Pillar), the vehicle must be drivenfor at least two minutes over 20 mph (32 km/h) before the lightturns off.
Tire(s) under-inflated
Solid warning lightRepair the damaged road wheel and tire assembly and reinstallit on the vehicle to restore system function. For a description onhow the system functions, see When Your Temporary Spare Tireis Installed in this section.
Spare tire in use
If the tires are properly inflated and the spare tire is not in use butthe light remains on, contact your authorized dealer as soon aspossible.TPMS malfunction
Repair the damaged road wheel and tire assembly and reinstallit on the vehicle to restore system function. For a description onhow the system functions, see When Your Temporary Spare Tireis Installed in this section.
Spare tire in use
Flashing warning light
If the tires are properly inflated and the spare tire is not in use butthe light remains on, contact your authorized dealer as soon aspossible.TPMS malfunction
372
MKX (CD9) Canada/United States of America, enUSA, Edition date: 201707, First Printing
Wheels and Tires
Page 376 of 603
When Inflating Your Tires
WARNING
Do not use the tire pressure displayedin the information display as a tirepressure gauge. Failure to follow thisinstruction could result in personal injury ordeath.
When putting air into your tires (such as at agas station or in your garage), the tirepressure monitoring system may not respondimmediately to the air added to your tires.
It may take up to two minutes of driving over20 mph (32 km/h) for the light to turn off afteryou have filled your tires to therecommended inflation pressure.
How Temperature Affects Your TirePressure
The tire pressure monitoring system monitorstire pressure in each pneumatic tire. Whiledriving in a normal manner, a typicalpassenger tire inflation pressure mayincrease about 2–4 psi (14–28 kPa) from acold start situation. If the vehicle is stationary
overnight with the outside temperaturesignificantly lower than the daytimetemperature, the tire pressure may decreaseabout 3 psi (21 kPa) for a drop of 30°F (17°C)in ambient temperature. This lower pressurevalue may be detected by the tire pressuremonitoring system as being significantlylower than the recommended inflationpressure and activate the system warninglight for low tire pressure. If the low tirepressure warning light is on, visually checkeach tire to verify that no tire is flat. If one ormore tires are flat, repair as necessary.Check the air pressure in the road tires. Ifany tire is under-inflated, carefully drive thevehicle to the nearest location where air canbe added to the tires. Inflate all the tires tothe recommended inflation pressure.
CHANGING A ROAD WHEEL (If
Equipped)
WARNINGS
Do not use tire sealants as they maydamage the tire pressure monitoringsystem.
WARNINGS
If the tire pressure monitor sensorbecomes damaged it may not function.
Note:The use of tire sealant may damageyour tire pressure monitoring system andshould only be used in roadsideemergencies. If you must use a sealant, usethe Lincoln Tire Mobility Kit sealant. The tirepressure monitoring system sensor andvalve stem on the wheel must be replacedby an authorized dealer after use of thesealant.
Note:The tire pressure monitoring systemindicator light will illuminate when the sparetire is in use. To restore the full function ofthe monitoring system, all road wheelsequipped with tire pressure monitoringsensors must be mounted on the vehicle.
If you get a flat tire while driving, do not applythe brake heavily. Instead, graduallydecrease your speed. Hold the steeringwheel firmly and slowly move to a safe placeon the side of the road.
373
MKX (CD9) Canada/United States of America, enUSA, Edition date: 201707, First Printing
Wheels and Tires