ECU LINCOLN MKX 2018 Owners Manual
[x] Cancel search | Manufacturer: LINCOLN, Model Year: 2018, Model line: MKX, Model: LINCOLN MKX 2018Pages: 603, PDF Size: 4.94 MB
Page 5 of 603
Liftgate
Manual Liftgate................................................80
Power Liftgate...................................................81
Security
Passive Anti-Theft System............................86
Anti-Theft Alarm..............................................88
Steering Wheel
Adjusting the Steering Wheel - VehiclesWith: Power Adjustable SteeringColumn..........................................................89
Adjusting the Steering Wheel - VehiclesWith: Manual Adjustable SteeringColumn..........................................................90
Audio Control....................................................91
Voice Control....................................................91
Cruise Control.................................................92
Information Display Control.........................92
Heated Steering Wheel................................92
Wipers and Washers
Windshield Wipers..........................................93
Autowipers.......................................................94
Windshield Washers......................................94
Rear Window Wiper and Washers..............95
Lighting
General Information.......................................96
Lighting Control..............................................96
Autolamps.........................................................97
Instrument Lighting Dimmer........................98
Headlamp Exit Delay.....................................98
Daytime Running Lamps...............................98
Automatic High Beam Control....................99
Adaptive Headlamps...................................100
Direction Indicators.......................................101
Welcome Lighting..........................................101
Interior Lamps................................................102
Ambient Lighting...........................................103
Windows and Mirrors
Power Windows.............................................104
Global Opening and Closing......................105
Exterior Mirrors..............................................105
Interior Mirror.................................................108
Sun Visors.......................................................109
Moonroof.........................................................109
Instrument Cluster
Gauges...............................................................111
Warning Lamps and Indicators...................113
Audible Warnings and Indicators...............117
Information Displays
General Information.......................................118
Information Messages.................................125
Climate Control
Automatic Climate Control..........................145
Hints on Controlling the InteriorClimate.........................................................147
Heated Windows and Mirrors....................148
Cabin Air Filter...............................................148
Remote Start...................................................149
Seats
Sitting in the Correct Position....................150
Head Restraints.............................................150
Power Seats....................................................154
2
MKX (CD9) Canada/United States of America, enUSA, Edition date: 201707, First Printing
Table of Contents
Page 17 of 603

On Board Diagnostics Data LinkConnector
WARNING
Do not connect wireless plug-indevices to the data link connector.Unauthorized third parties could gain accessto vehicle data and impair the performanceof safety related systems. Only allow repairfacilities that follow our service and repairinstructions to connect their equipment tothe data link connector.
Your vehicle has an OBD Data LinkConnector (DLC) that is used in conjunctionwith a diagnostic scan tool for vehiclediagnostics, repairs and reprogrammingservices. Installing an aftermarket device thatuses the DLC during normal driving forpurposes such as remote insurance companymonitoring, transmission of vehicle data toother devices or entities, or altering theperformance of the vehicle, may cause
interference with or even damage to vehiclesystems. We do not recommend or endorsethe use of aftermarket plug-in devices unlessapproved by Ford. The vehicle Warranty willnot cover damage caused by an aftermarketplug-in device.
MOBILE COMMUNICATIONS
EQUIPMENT
WARNING
Driving while distracted can result inloss of vehicle control, crash and injury.We strongly recommend that you useextreme caution when using any device thatmay take your focus off the road. Yourprimary responsibility is the safe operationof your vehicle. We recommend against theuse of any hand-held device while drivingand encourage the use of voice-operatedsystems when possible. Make sure you areaware of all applicable local laws that mayaffect the use of electronic devices whiledriving.
Using mobile communications equipment isbecoming increasingly important in theconduct of business and personal affairs. However, you must not compromise yourown or others’ safety when using suchequipment. Mobile communications canenhance personal safety and security whenappropriately used, particularly in emergencysituations. Safety must be paramount whenusing mobile communications equipment toavoid negating these benefits. Mobilecommunication equipment includes, but isnot limited to, cellular phones, pagers,portable email devices, text messagingdevices and portable two-way radios.
EXPORT UNIQUE OPTIONS
For your particular global region, your vehiclemay be equipped with features and optionsthat are different from the features andoptions that are described in this Owner’sManual. A market unique supplement maybe supplied that complements this book. Byreferring to the market unique supplement,if provided, you can properly identify thosefeatures, recommendations and
14
MKX (CD9) Canada/United States of America, enUSA, Edition date: 201707, First Printing
Introduction
Page 22 of 603
GENERAL INFORMATION
See the following sections for directions onhow to properly use safety restraints forchildren.
WARNINGS
Always make sure your child is securedproperly in a device that is appropriatefor their height, age and weight. Child safetyrestraints must be bought separately fromyour vehicle. Failure to follow theseinstructions and guidelines may result in anincreased risk of serious injury or death toyour child.
WARNINGS
All children are shaped differently. TheNational Highway Traffic SafetyAdministration and other safetyorganizations, base their recommendationsfor child restraints on probable child height,age and weight thresholds, or on theminimum requirements of the law. Werecommend that you check with a NHTSACertified Child Passenger Safety Technician(CPST) to make sure that you properly installthe child restraint in your vehicle and thatyou consult your pediatrician to make sureyou have a child restraint appropriate foryour child. To locate a child restraint fittingstation and CPST, contact NHTSA toll freeat 1-888-327-4236 or go to
WARNINGS
www.nhtsa.dot.gov. In Canada, contactTransport Canada toll free at 1-800-333-0371or go to www.tc.gc.ca to find a Child Car SeatClinic in your area. Failure to properly restrainchildren in child restraints made especiallyfor their height, age and weight, may resultin an increased risk of serious injury or deathto your child.
On hot days, the temperature insidethe vehicle can rise very quickly.Exposure of people or animals to these hightemperatures for even a short time can causedeath or serious heat related injuries,including brain damage. Small children areparticularly at risk.
19
MKX (CD9) Canada/United States of America, enUSA, Edition date: 201707, First Printing
Child Safety
Page 24 of 603
•You are required by law to properly usesafety seats for infants and toddlers inthe United States and Canada.
•Many states and provinces require thatsmall children use approved boosterseats until they reach age eight, a heightof 4 feet 9 inches (1.45 meters) tall, or80 lb (36 kg). Check your local and stateor provincial laws for specificrequirements about the safety of childrenin your vehicle.
•When possible, always properly restrainchildren 12 years of age and under in arear seating position of your vehicle.Accident statistics suggest that childrenare safer when properly restrained in therear seating positions than in a frontseating position. See Front PassengerSensing System (page 50).
INSTALLING CHILD RESTRAINTS
Child Seats
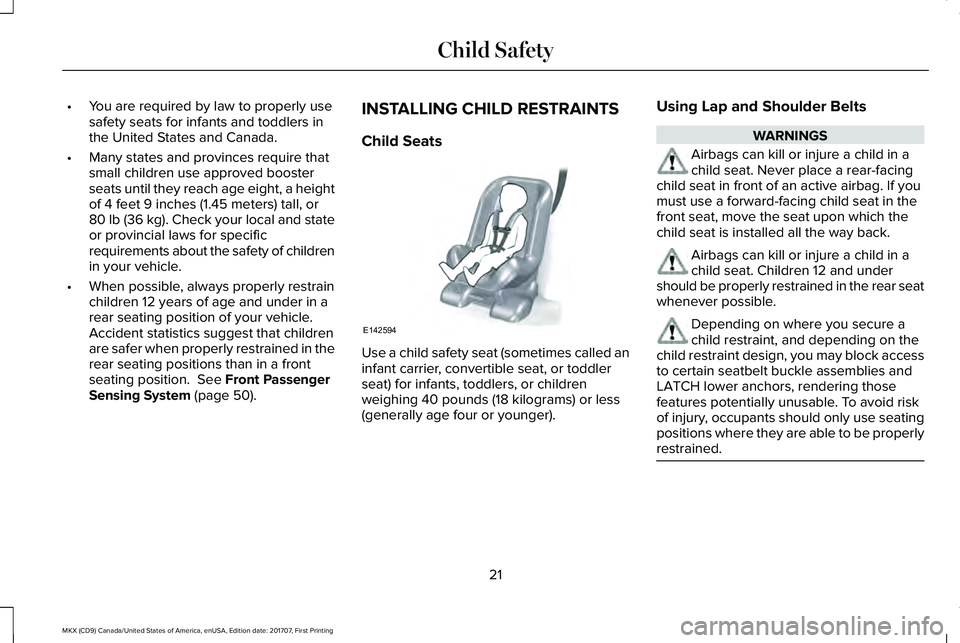
Use a child safety seat (sometimes called aninfant carrier, convertible seat, or toddlerseat) for infants, toddlers, or childrenweighing 40 pounds (18 kilograms) or less(generally age four or younger).
Using Lap and Shoulder Belts
WARNINGS
Airbags can kill or injure a child in achild seat. Never place a rear-facingchild seat in front of an active airbag. If youmust use a forward-facing child seat in thefront seat, move the seat upon which thechild seat is installed all the way back.
Airbags can kill or injure a child in achild seat. Children 12 and undershould be properly restrained in the rear seatwhenever possible.
Depending on where you secure achild restraint, and depending on thechild restraint design, you may block accessto certain seatbelt buckle assemblies andLATCH lower anchors, rendering thosefeatures potentially unusable. To avoid riskof injury, occupants should only use seatingpositions where they are able to be properlyrestrained.
21
MKX (CD9) Canada/United States of America, enUSA, Edition date: 201707, First Printing
Child SafetyE142594
Page 25 of 603
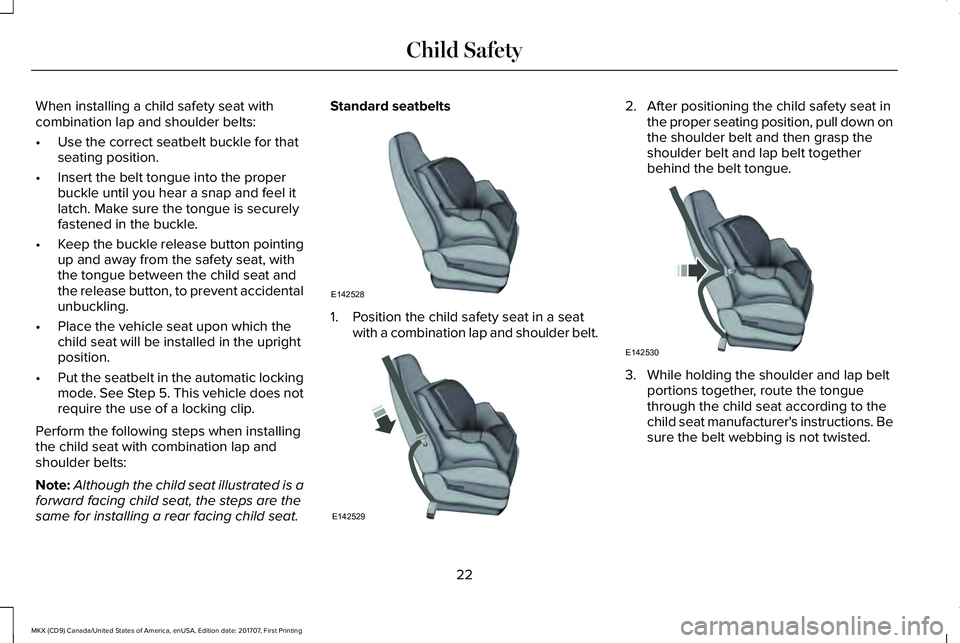
When installing a child safety seat withcombination lap and shoulder belts:
•Use the correct seatbelt buckle for thatseating position.
•Insert the belt tongue into the properbuckle until you hear a snap and feel itlatch. Make sure the tongue is securelyfastened in the buckle.
•Keep the buckle release button pointingup and away from the safety seat, withthe tongue between the child seat andthe release button, to prevent accidentalunbuckling.
•Place the vehicle seat upon which thechild seat will be installed in the uprightposition.
•Put the seatbelt in the automatic lockingmode. See Step 5. This vehicle does notrequire the use of a locking clip.
Perform the following steps when installingthe child seat with combination lap andshoulder belts:
Note:Although the child seat illustrated is aforward facing child seat, the steps are thesame for installing a rear facing child seat.
Standard seatbelts
1. Position the child safety seat in a seatwith a combination lap and shoulder belt.
2. After positioning the child safety seat inthe proper seating position, pull down onthe shoulder belt and then grasp theshoulder belt and lap belt togetherbehind the belt tongue.
3. While holding the shoulder and lap beltportions together, route the tonguethrough the child seat according to thechild seat manufacturer's instructions. Besure the belt webbing is not twisted.
22
MKX (CD9) Canada/United States of America, enUSA, Edition date: 201707, First Printing
Child SafetyE142528 E142529 E142530
Page 26 of 603
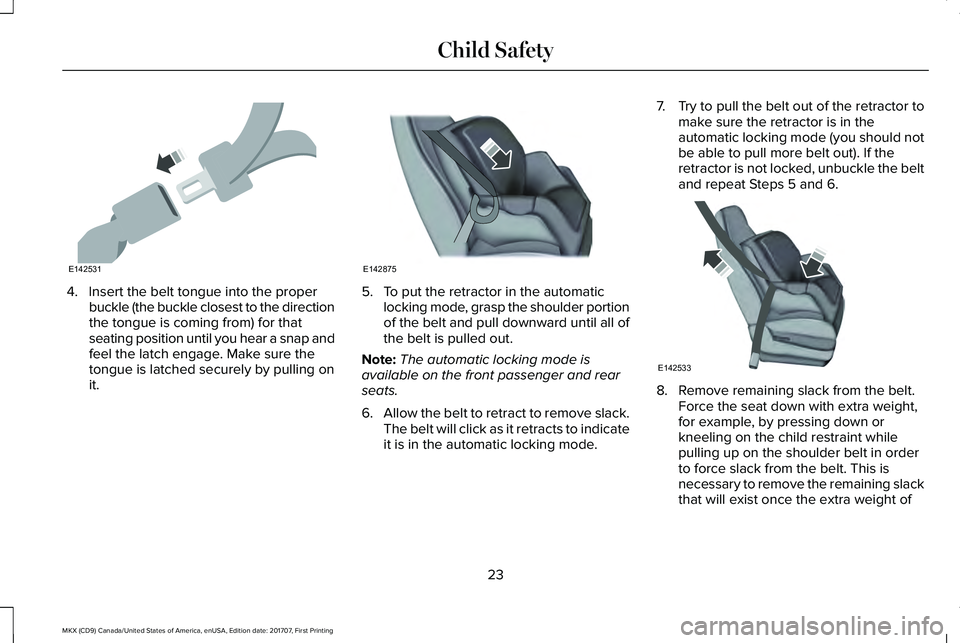
4. Insert the belt tongue into the properbuckle (the buckle closest to the directionthe tongue is coming from) for thatseating position until you hear a snap andfeel the latch engage. Make sure thetongue is latched securely by pulling onit.
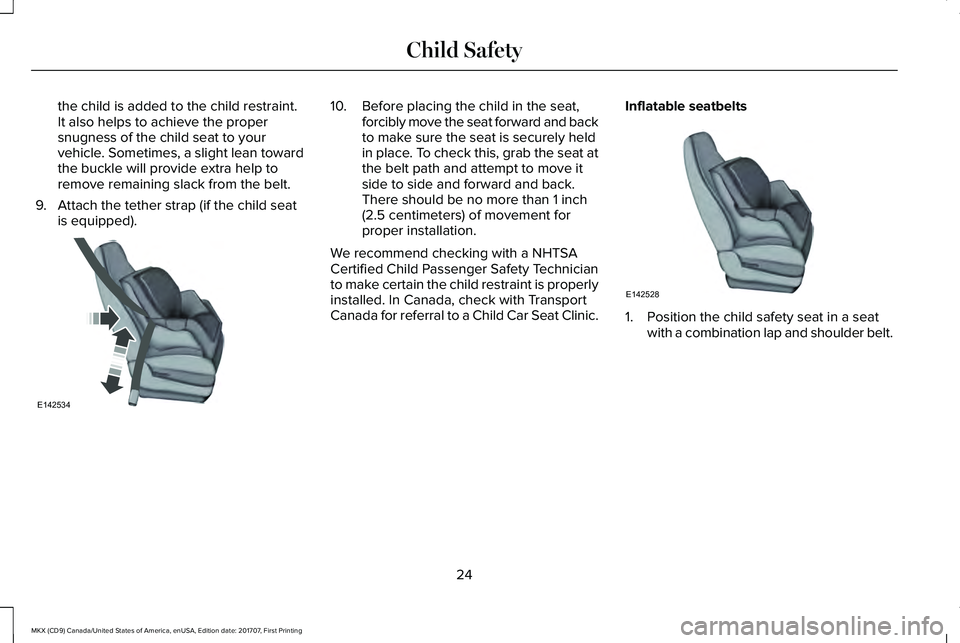
5. To put the retractor in the automaticlocking mode, grasp the shoulder portionof the belt and pull downward until all ofthe belt is pulled out.
Note:The automatic locking mode isavailable on the front passenger and rearseats.
6.Allow the belt to retract to remove slack.The belt will click as it retracts to indicateit is in the automatic locking mode.
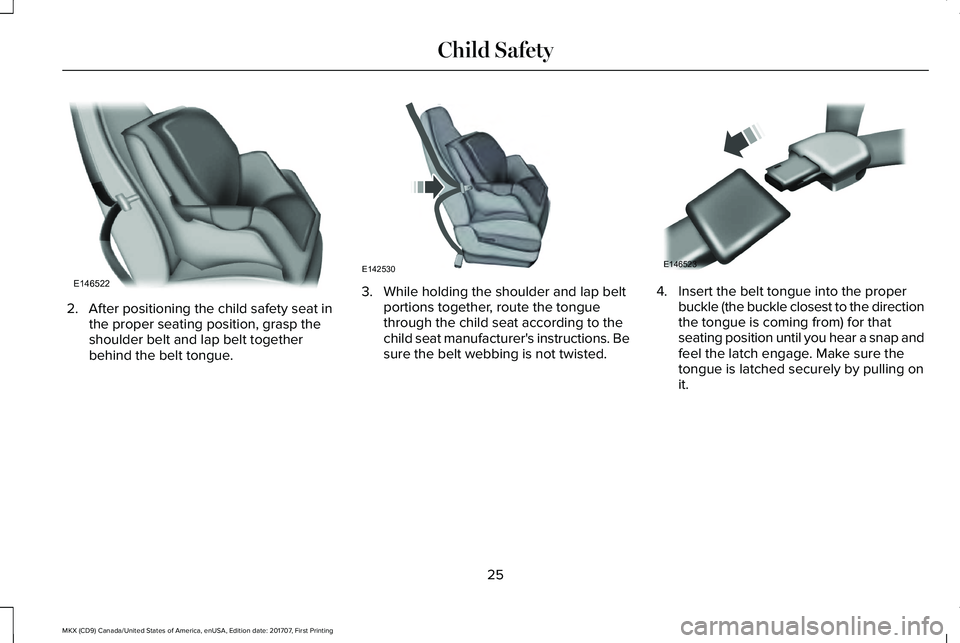
7.Try to pull the belt out of the retractor tomake sure the retractor is in theautomatic locking mode (you should notbe able to pull more belt out). If theretractor is not locked, unbuckle the beltand repeat Steps 5 and 6.
8. Remove remaining slack from the belt.Force the seat down with extra weight,for example, by pressing down orkneeling on the child restraint whilepulling up on the shoulder belt in orderto force slack from the belt. This isnecessary to remove the remaining slackthat will exist once the extra weight of
23
MKX (CD9) Canada/United States of America, enUSA, Edition date: 201707, First Printing
Child SafetyE142531 E142875 E142533
Page 27 of 603
the child is added to the child restraint.It also helps to achieve the propersnugness of the child seat to yourvehicle. Sometimes, a slight lean towardthe buckle will provide extra help toremove remaining slack from the belt.
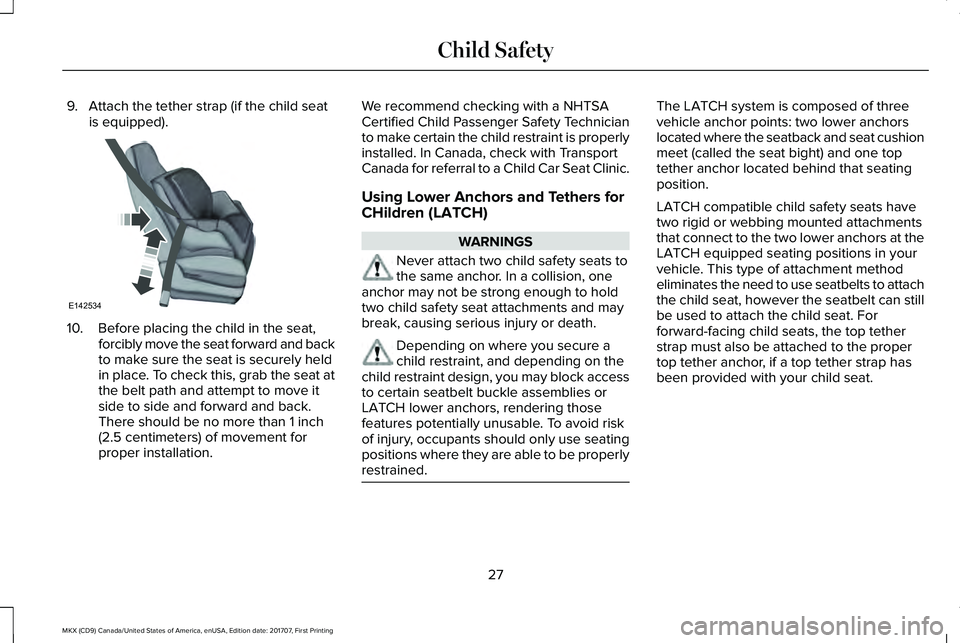
9. Attach the tether strap (if the child seatis equipped).
10. Before placing the child in the seat,forcibly move the seat forward and backto make sure the seat is securely heldin place. To check this, grab the seat atthe belt path and attempt to move itside to side and forward and back.There should be no more than 1 inch(2.5 centimeters) of movement forproper installation.
We recommend checking with a NHTSACertified Child Passenger Safety Technicianto make certain the child restraint is properlyinstalled. In Canada, check with TransportCanada for referral to a Child Car Seat Clinic.
Inflatable seatbelts
1. Position the child safety seat in a seatwith a combination lap and shoulder belt.
24
MKX (CD9) Canada/United States of America, enUSA, Edition date: 201707, First Printing
Child SafetyE142534 E142528
Page 28 of 603
2. After positioning the child safety seat inthe proper seating position, grasp theshoulder belt and lap belt togetherbehind the belt tongue.
3. While holding the shoulder and lap beltportions together, route the tonguethrough the child seat according to thechild seat manufacturer's instructions. Besure the belt webbing is not twisted.
4. Insert the belt tongue into the properbuckle (the buckle closest to the directionthe tongue is coming from) for thatseating position until you hear a snap andfeel the latch engage. Make sure thetongue is latched securely by pulling onit.
25
MKX (CD9) Canada/United States of America, enUSA, Edition date: 201707, First Printing
Child SafetyE146522 E142530 E146523
Page 30 of 603
9. Attach the tether strap (if the child seatis equipped).
10. Before placing the child in the seat,forcibly move the seat forward and backto make sure the seat is securely heldin place. To check this, grab the seat atthe belt path and attempt to move itside to side and forward and back.There should be no more than 1 inch(2.5 centimeters) of movement forproper installation.
We recommend checking with a NHTSACertified Child Passenger Safety Technicianto make certain the child restraint is properlyinstalled. In Canada, check with TransportCanada for referral to a Child Car Seat Clinic.
Using Lower Anchors and Tethers for
CHildren (LATCH)
WARNINGS
Never attach two child safety seats tothe same anchor. In a collision, oneanchor may not be strong enough to holdtwo child safety seat attachments and maybreak, causing serious injury or death.
Depending on where you secure achild restraint, and depending on thechild restraint design, you may block accessto certain seatbelt buckle assemblies orLATCH lower anchors, rendering thosefeatures potentially unusable. To avoid riskof injury, occupants should only use seatingpositions where they are able to be properlyrestrained.
The LATCH system is composed of threevehicle anchor points: two lower anchorslocated where the seatback and seat cushionmeet (called the seat bight) and one toptether anchor located behind that seatingposition.
LATCH compatible child safety seats havetwo rigid or webbing mounted attachmentsthat connect to the two lower anchors at theLATCH equipped seating positions in yourvehicle. This type of attachment methodeliminates the need to use seatbelts to attachthe child seat, however the seatbelt can stillbe used to attach the child seat. Forforward-facing child seats, the top tetherstrap must also be attached to the propertop tether anchor, if a top tether strap hasbeen provided with your child seat.
27
MKX (CD9) Canada/United States of America, enUSA, Edition date: 201707, First Printing
Child SafetyE142534
Page 31 of 603
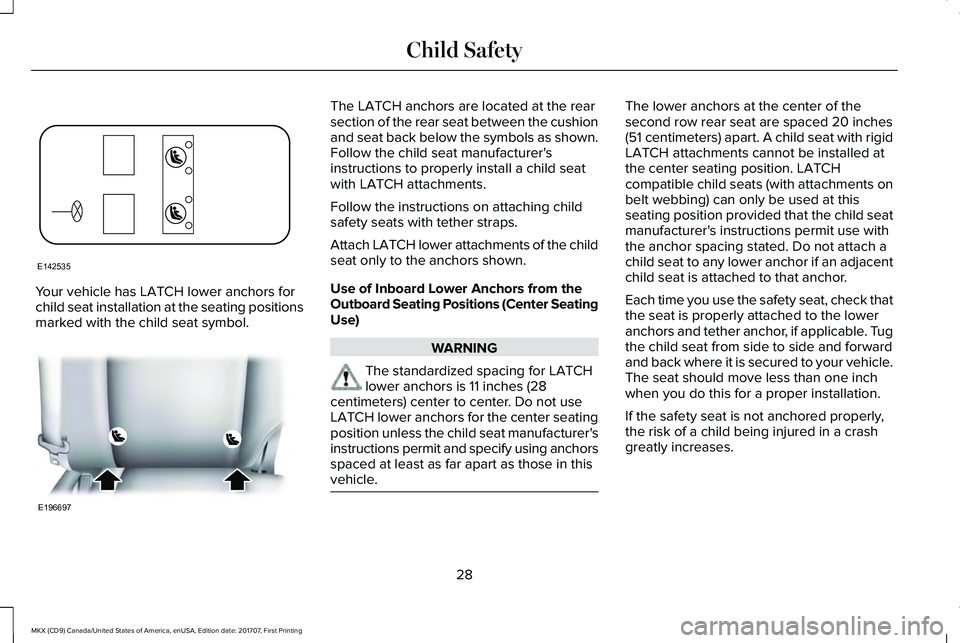
Your vehicle has LATCH lower anchors forchild seat installation at the seating positionsmarked with the child seat symbol.
The LATCH anchors are located at the rearsection of the rear seat between the cushionand seat back below the symbols as shown.Follow the child seat manufacturer'sinstructions to properly install a child seatwith LATCH attachments.
Follow the instructions on attaching childsafety seats with tether straps.
Attach LATCH lower attachments of the childseat only to the anchors shown.
Use of Inboard Lower Anchors from theOutboard Seating Positions (Center SeatingUse)
WARNING
The standardized spacing for LATCHlower anchors is 11 inches (28centimeters) center to center. Do not useLATCH lower anchors for the center seatingposition unless the child seat manufacturer'sinstructions permit and specify using anchorsspaced at least as far apart as those in thisvehicle.
The lower anchors at the center of thesecond row rear seat are spaced 20 inches(51 centimeters) apart. A child seat with rigidLATCH attachments cannot be installed atthe center seating position. LATCHcompatible child seats (with attachments onbelt webbing) can only be used at thisseating position provided that the child seatmanufacturer's instructions permit use withthe anchor spacing stated. Do not attach achild seat to any lower anchor if an adjacentchild seat is attached to that anchor.
Each time you use the safety seat, check thatthe seat is properly attached to the loweranchors and tether anchor, if applicable. Tugthe child seat from side to side and forwardand back where it is secured to your vehicle.The seat should move less than one inchwhen you do this for a proper installation.
If the safety seat is not anchored properly,the risk of a child being injured in a crashgreatly increases.
28
MKX (CD9) Canada/United States of America, enUSA, Edition date: 201707, First Printing
Child SafetyE142535 E196697