warning LINCOLN MKZ 2009 Owners Manual
[x] Cancel search | Manufacturer: LINCOLN, Model Year: 2009, Model line: MKZ, Model: LINCOLN MKZ 2009Pages: 292, PDF Size: 2.02 MB
Page 204 of 292
Under severe operating conditions, the A/C may cycle on and off to
protect overheating of the engine.
Basic operating principles
•Drive slower in strong crosswinds which can affect the normal steering
characteristics of your vehicle.
•Be extremely careful when driving on pavement made slippery by
loose sand, water, gravel, snow or ice.
If your vehicle goes off the edge of the pavement
•If your vehicle goes off the edge of the pavement, slow down, but
avoid severe brake application, ease the vehicle back onto the
pavement only after reducing your speed. Do not turn the steering
wheel too sharply while returning to the road surface.
•It may be safer to stay on the apron or shoulder of the road and slow
down gradually before returning to the pavement. You may lose
control if you do not slow down or if you turn the steering wheel too
sharply or abruptly.
•It often may be less risky to strike small objects, such as highway
reflectors, with minor damage to your vehicle rather than attempt a
sudden return to the pavement which could cause the vehicle to slide
sideways out of control or rollover. Remember, your safety and the
safety of others should be your primary concern.
If your vehicle gets stuck
If your vehicle gets stuck in mud or snow it may be rocked out by
shifting between forward and reverse gears, stopping between shifts, in a
steady pattern. Press lightly on the accelerator in each gear.
If your vehicle is equipped with Traction Control™, it may be beneficial
to disengage the Traction Control™ system while attempting to rock the
vehicle.
Do not rock the vehicle if the engine is not at normal operating
temperature or damage to the transmission may occur.
Do not rock the vehicle for more than a few minutes or damage
to the transmission and tires may occur or the engine may
overheat.
WARNING:Always set the parking brake fully and make sure
the gearshift is latched in P (Park). Turn the ignition to the OFF
position and remove the key whenever you leave your vehicle.
2009 MKZ(378)
Owners Guide
USA(fus)
Driving
204
Page 205 of 292
WARNING:If the parking brake is fully released, but the brake
warning lamp remains illuminated, the brakes may not be
working properly. See your authorized dealer.
WARNING:Do not spin the wheels at over 35 mph (56 km/h).
The tires may fail and injure a passenger or bystander.
Emergency maneuvers
•In an unavoidable emergency situation where a sudden sharp turn
must be made, remember to avoid “over-driving” your vehicle (i.e.,
turn the steering wheel only as rapidly and as far as required to avoid
the emergency). Excessive steering will result in less vehicle control,
not more. Additionally, smooth variations of the accelerator and/or
brake pedal pressure should be utilized if changes in vehicle speed are
called for. Avoid abrupt steering, acceleration or braking which could
result in an increased risk of loss of vehicle control, vehicle rollover
and/or personal injury. Use all available road surface to return the
vehicle to a safe direction of travel.
•In the event of an emergency stop, avoid skidding the tires and do not
attempt any sharp steering wheel movements.
•If the vehicle goes from one type of surface to another (i.e., from
concrete to gravel) there will be a change in the way the vehicle
responds to a maneuver (steering, acceleration or braking). Again,
avoid these abrupt inputs.
AWD Systems (if equipped)
AWD uses all four wheels to power the vehicle. This increases traction,
enabling you to drive over terrain and road conditions that a
conventional two-wheel drive vehicle cannot.
Sand
When driving over sand, try to keep all four wheels on the most solid
area of the trail. Avoid reducing the tire pressures but shift to a lower
gear and drive steadily through the terrain. Apply the accelerator slowly
and avoid spinning the wheels.
If your vehicle is equipped with an automatic transmission:When
driving at slow speeds in deep sand under high outside temperatures,
use L (Low) gear when possible. L (Low) gear operation will maximize
the engine and transmission cooling capability.
2009 MKZ(378)
Owners Guide
USA(fus)
Driving
205
Page 215 of 292
Fuse/Relay
LocationFuse Amp
RatingProtected Circuits
13 7.5A Cluster, Analog clock, Climate
control head units
14 15A Washer pump
15 20A Cigar lighter
16 15A Door lock actuator, Decklid lock
solenoid
17 20A Not used (Spare)
18 20A Radio head units, OBDII connector
19 7.5A Not used (Spare)
20 7.5A Power mirrors, Satellite radio
module, All wheel drive
21 7.5A Stop lamps, CHMSL
22 7.5A Audio
23 7.5A Wiper relay coil, Cluster logic
24 7.5A OCS (Passenger’s seat), PAD
indicator
25 7.5A RCM
26 7.5A PATS Transceiver, Brake shift
interlock solenoid, Brake pedal
switch, Automatic transmission
module
27 7.5A Cluster, Climate control head units
28 10A ABS/Traction Control, Heated seats,
Compass, Reverse sensing system
C/B 30A Circuit
BreakerMoon roof, Delayed accessory (SJB
fuse 12, rear power windows)
Power distribution box
The power distribution box is located in the engine compartment. The
power distribution box contains high-current fuses that protect your
vehicle’s main electrical systems from overloads.
WARNING:Always disconnect the battery before servicing high
current fuses.
2009 MKZ(378)
Owners Guide
USA(fus)
Roadside Emergencies
215
Page 216 of 292
WARNING:To reduce risk of electrical shock, always replace
the cover to the Power Distribution Box before reconnecting the
battery or refilling fluid reservoirs.
If the battery has been disconnected and reconnected, refer to the
Batterysection of theMaintenance and Specificationschapter.
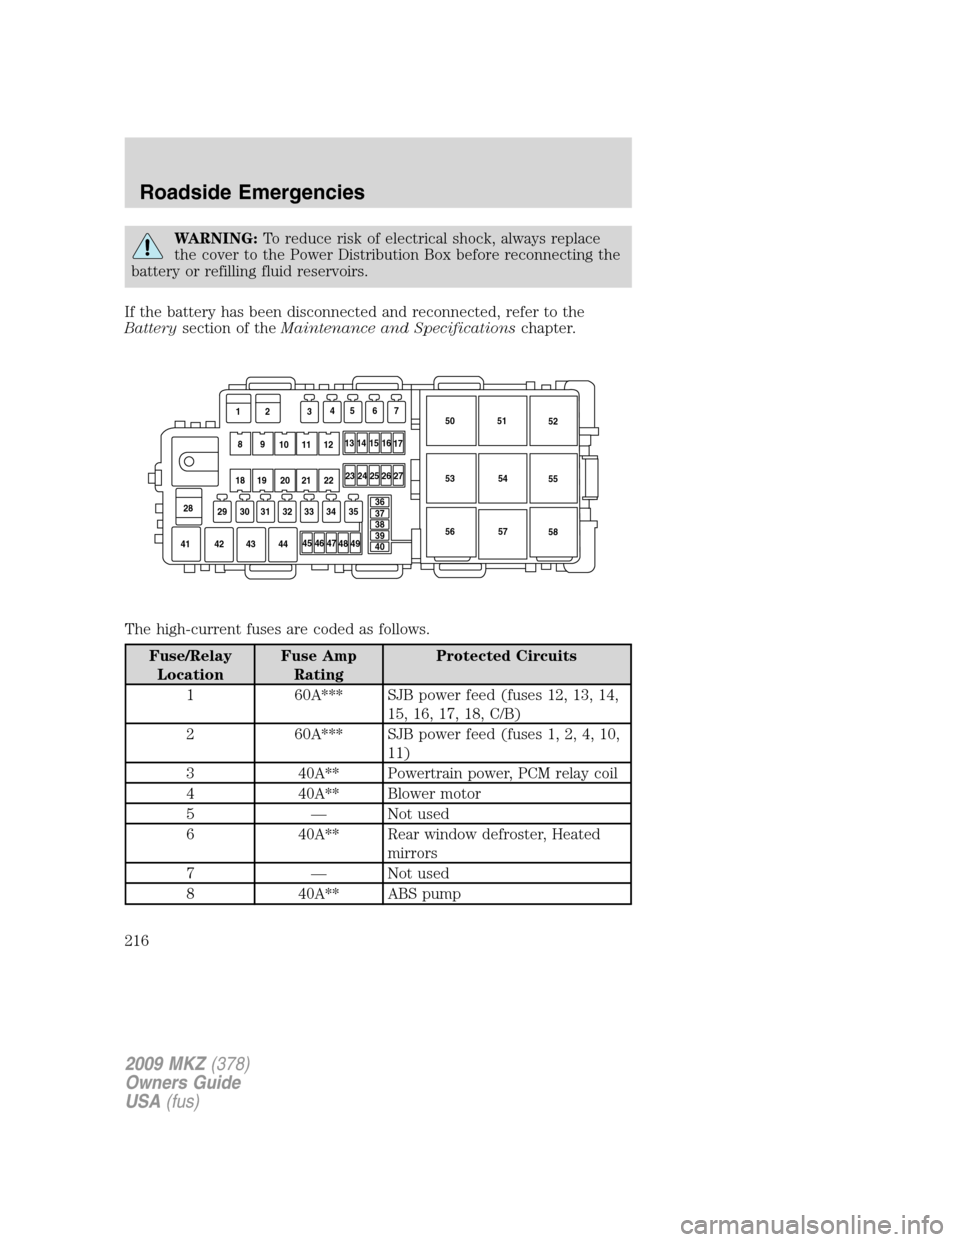
The high-current fuses are coded as follows.
Fuse/Relay
LocationFuse Amp
RatingProtected Circuits
1 60A*** SJB power feed (fuses 12, 13, 14,
15, 16, 17, 18, C/B)
2 60A*** SJB power feed (fuses 1, 2, 4, 10,
11)
3 40A** Powertrain power, PCM relay coil
4 40A** Blower motor
5 — Not used
6 40A** Rear window defroster, Heated
mirrors
7 — Not used
8 40A** ABS pump
45 46 47
48 4950 51
52
53
55
5654
57
58
41 42 43 44
23 24 25 26 27
28
29 30 31 32 33 34 35
13 12
89
10 11 12
18 19 20 21 22345 6 7
1415
16
17
36
37
38
39
40
2009 MKZ(378)
Owners Guide
USA(fus)
Roadside Emergencies
216
Page 219 of 292
Have a flat serviced by an authorized dealer in order to prevent damage
to the TPMS sensors, refer toTire pressure monitoring system
(TPMS)in theTires, Wheels and Loadingchapter. Replace the spare
tire with a road tire as soon as possible. During repairing or replacing of
the flat tire, have the authorized dealer inspect the TPMS sensor for
damage.
WARNING:The use of tire sealants may damage your Tire
Pressure Monitoring System and should not be used.
WARNING:Refer toTire pressure monitoring system (TPMS)
in theTires, Wheels and Loadingchapter for important
information. If the tire pressure monitor sensor becomes damaged, it
will no longer function.
Dissimilar spare tire/wheel information
WARNING:Failure to follow these guidelines could result in an
increased risk of loss of vehicle control, injury or death.
If you have a dissimilar spare tire/wheel, then it is intended for
temporary use only. This means that if you need to use it, you should
replace it as soon as possible with a road tire/wheel that is the same size
and type as the road tires and wheels that were originally provided by
Ford. If the dissimilar spare tire or wheel is damaged, it should be
replaced rather than repaired.
A dissimilar spare tire/wheel is defined as a spare tire and/or wheel that
is different in brand, size or appearance from the road tires and wheels
and can be one of three types:
1.T-type mini-spare:This spare tire begins with the letter “T” for tire
size and may have “Temporary Use Only” molded in the sidewall
2.Full-size dissimilar spare with label on wheel:This spare tire has
a label on the wheel that states: “THIS TIRE AND WHEEL FOR
TEMPORARY USE ONLY”
2009 MKZ(378)
Owners Guide
USA(fus)
Roadside Emergencies
219
Page 222 of 292
Tire change procedure
WARNING:To help prevent the vehicle from moving when you
change a tire, be sure the parking brake is set, then block (in
both directions) the wheel that is diagonally opposite (other side and
end of the vehicle) to the tire being changed.
WARNING:If the vehicle slips off the jack, you or someone else
could be seriously injured.
WARNING:Do not attempt to change a tire on the side of the
vehicle close to moving traffic. Pull far enough off the road to
avoid the danger of being hit when operating the jack or changing the
wheel.
Note:Passengers should not remain in the vehicle when the vehicle is
being jacked.
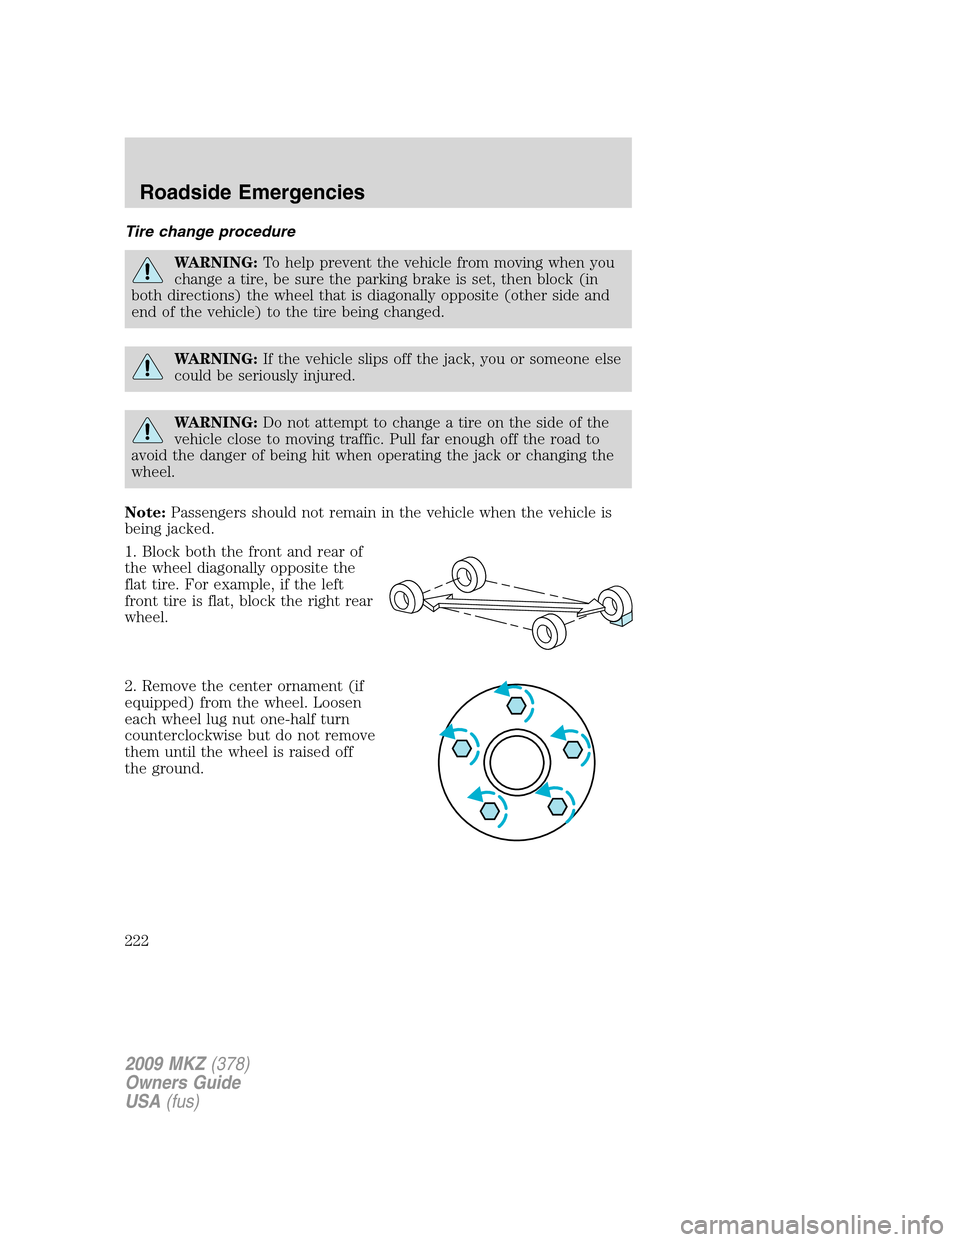
1. Block both the front and rear of
the wheel diagonally opposite the
flat tire. For example, if the left
front tire is flat, block the right rear
wheel.
2. Remove the center ornament (if
equipped) from the wheel. Loosen
each wheel lug nut one-half turn
counterclockwise but do not remove
them until the wheel is raised off
the ground.
2009 MKZ(378)
Owners Guide
USA(fus)
Roadside Emergencies
222
Page 223 of 292
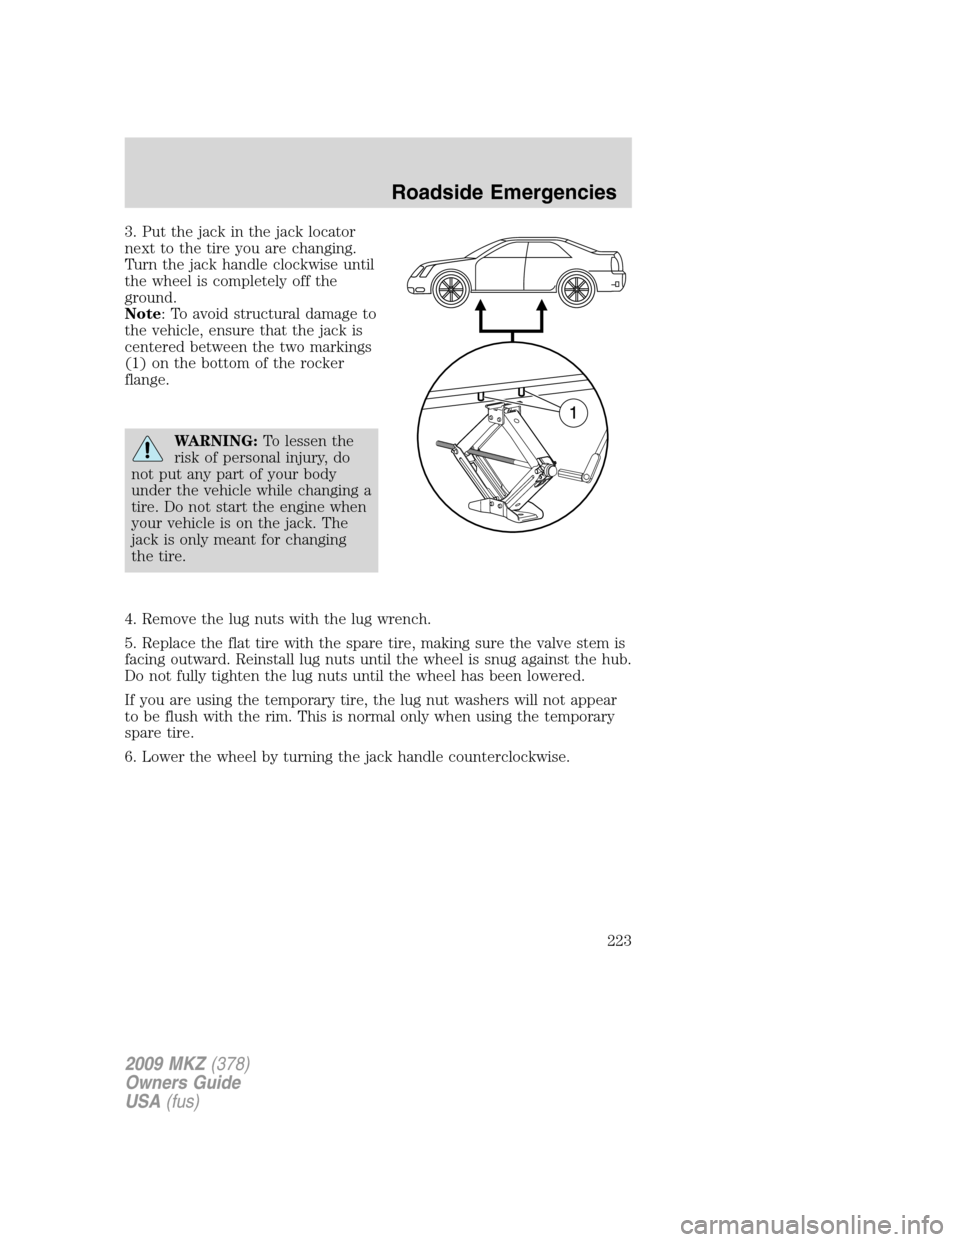
3. Put the jack in the jack locator
next to the tire you are changing.
Turn the jack handle clockwise until
the wheel is completely off the
ground.
Note: To avoid structural damage to
the vehicle, ensure that the jack is
centered between the two markings
(1) on the bottom of the rocker
flange.
WARNING:To lessen the
risk of personal injury, do
not put any part of your body
under the vehicle while changing a
tire. Do not start the engine when
your vehicle is on the jack. The
jack is only meant for changing
the tire.
4. Remove the lug nuts with the lug wrench.
5. Replace the flat tire with the spare tire, making sure the valve stem is
facing outward. Reinstall lug nuts until the wheel is snug against the hub.
Do not fully tighten the lug nuts until the wheel has been lowered.
If you are using the temporary tire, the lug nut washers will not appear
to be flush with the rim. This is normal only when using the temporary
spare tire.
6. Lower the wheel by turning the jack handle counterclockwise.
2009 MKZ(378)
Owners Guide
USA(fus)
Roadside Emergencies
223
Page 225 of 292
WARNING:When a wheel is installed, always remove any
corrosion, dirt or foreign materials present on the mounting
surfaces of the wheel or the surface of the wheel hub, brake drum or
brake disc that contacts the wheel. Ensure that any fasteners that
attach the rotor to the hub are secured so they do not interfere with
the mounting surfaces of the wheel. Installing wheels without correct
metal-to-metal contact at the wheel mounting surfaces can cause the
wheel nuts to loosen and the wheel to come off while the vehicle is in
motion, resulting in loss of control.
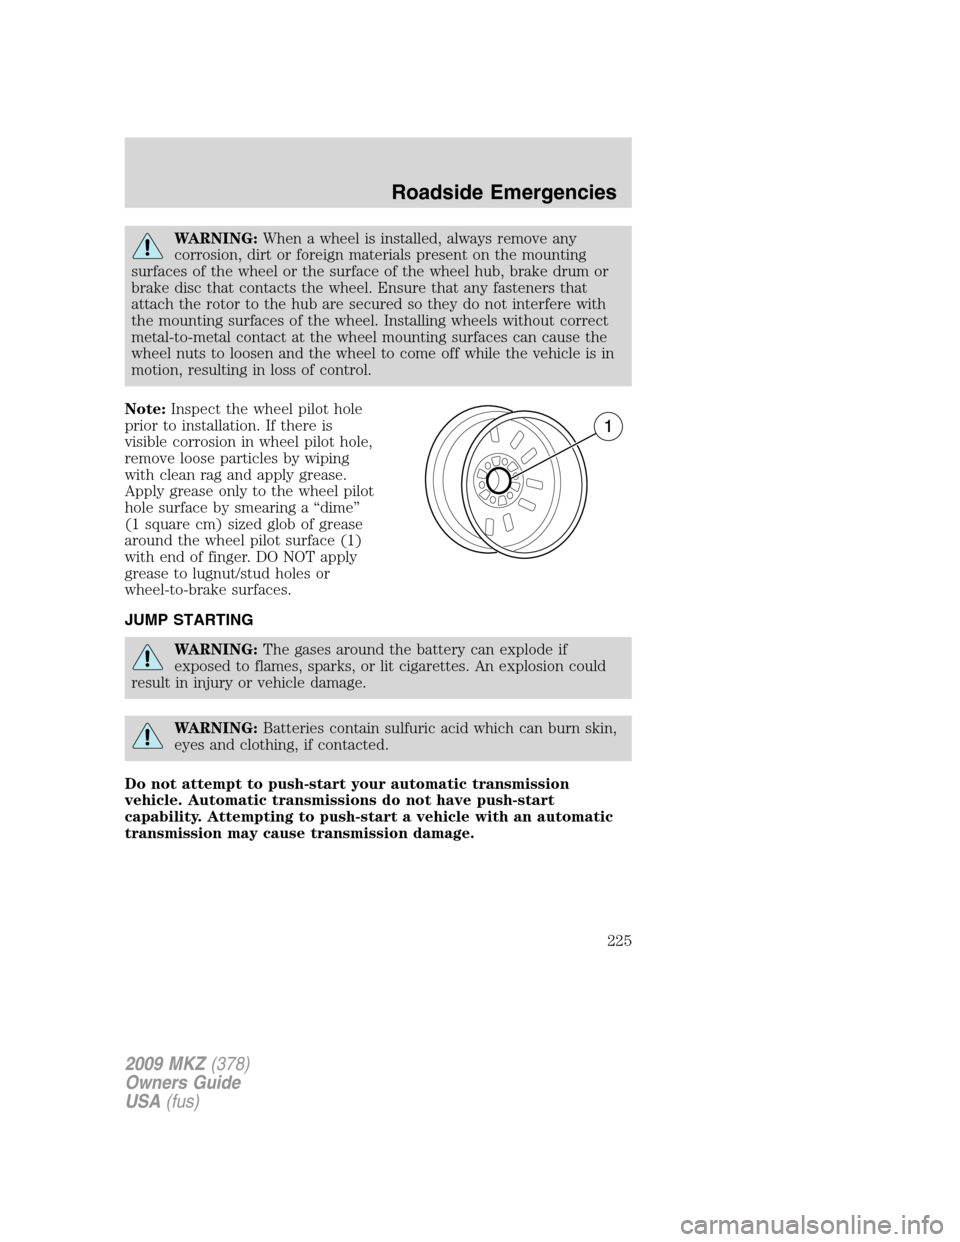
Note:Inspect the wheel pilot hole
prior to installation. If there is
visible corrosion in wheel pilot hole,
remove loose particles by wiping
with clean rag and apply grease.
Apply grease only to the wheel pilot
hole surface by smearing a “dime”
(1 square cm) sized glob of grease
around the wheel pilot surface (1)
with end of finger. DO NOT apply
grease to lugnut/stud holes or
wheel-to-brake surfaces.
JUMP STARTING
WARNING:The gases around the battery can explode if
exposed to flames, sparks, or lit cigarettes. An explosion could
result in injury or vehicle damage.
WARNING:Batteries contain sulfuric acid which can burn skin,
eyes and clothing, if contacted.
Do not attempt to push-start your automatic transmission
vehicle. Automatic transmissions do not have push-start
capability. Attempting to push-start a vehicle with an automatic
transmission may cause transmission damage.
2009 MKZ(378)
Owners Guide
USA(fus)
Roadside Emergencies
225
Page 228 of 292
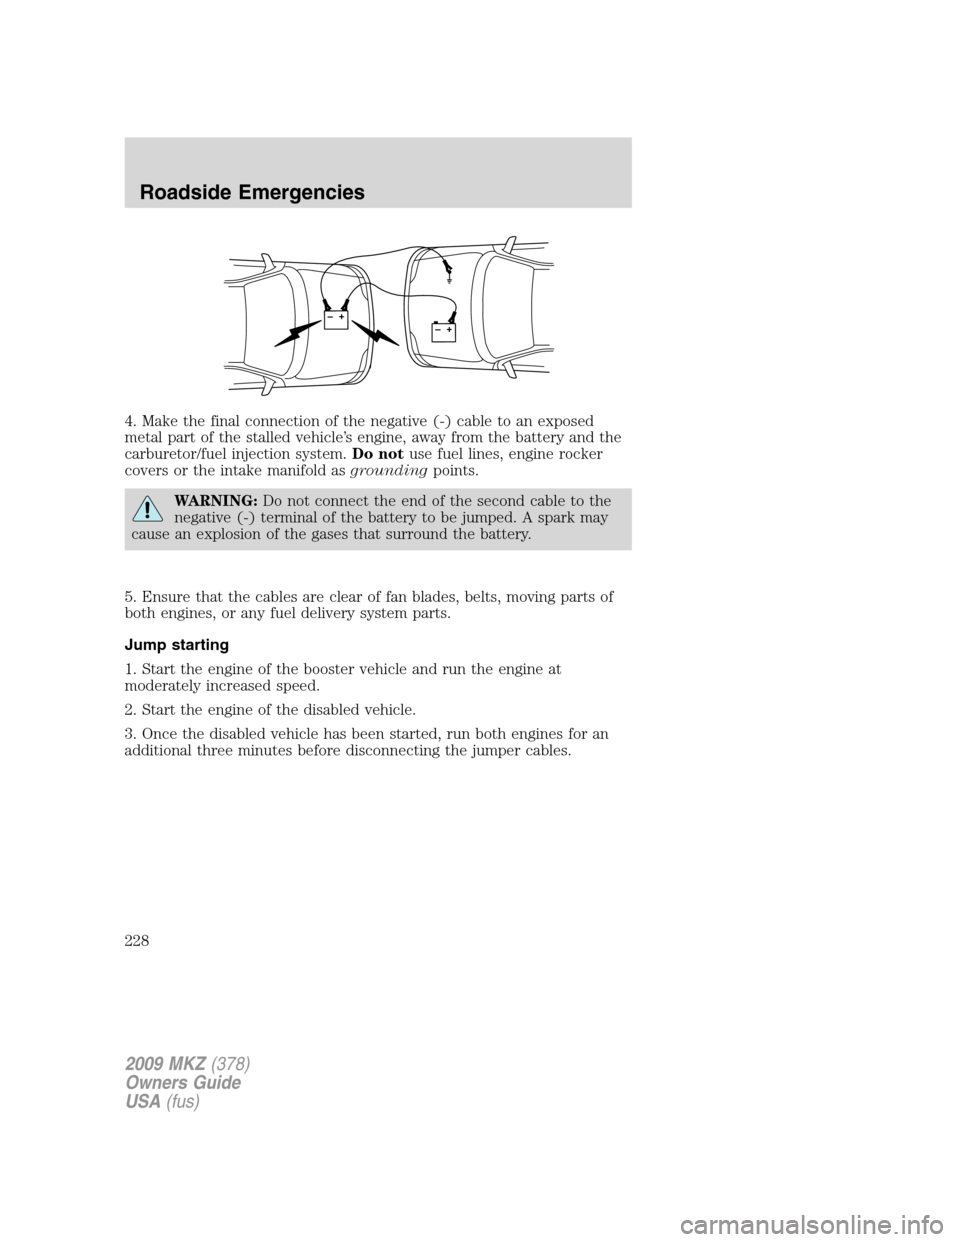
4. Make the final connection of the negative (-) cable to an exposed
metal part of the stalled vehicle’s engine, away from the battery and the
carburetor/fuel injection system.Do notuse fuel lines, engine rocker
covers or the intake manifold asgroundingpoints.
WARNING:Do not connect the end of the second cable to the
negative (-) terminal of the battery to be jumped. A spark may
cause an explosion of the gases that surround the battery.
5. Ensure that the cables are clear of fan blades, belts, moving parts of
both engines, or any fuel delivery system parts.
Jump starting
1. Start the engine of the booster vehicle and run the engine at
moderately increased speed.
2. Start the engine of the disabled vehicle.
3. Once the disabled vehicle has been started, run both engines for an
additional three minutes before disconnecting the jumper cables.
+–+–
2009 MKZ(378)
Owners Guide
USA(fus)
Roadside Emergencies
228
Page 245 of 292
INSTRUMENT PANEL/INTERIOR TRIM AND CLUSTER LENS
Clean the instrument panel, interior trim areas and cluster lens with a
clean and damp white cotton cloth, then with a clean and dry white
cotton cloth; you may also use Motorcraft Dash & Vinyl Cleaner
(ZC-38-A) on the instrument panel and interior trim areas.
•Avoid cleaners or polishes that increase the gloss of the upper portion
of the instrument panel. The dull finish in this area helps protect the
driver from undesirable windshield reflection.
•
Be certain to wash or wipe your hands clean if you have been in contact
with certain products such as insect repellent and suntan lotion in order
to avoid possible damage to the interior painted surfaces.
•Do not use household or glass cleaners as these may damage the
finish of the instrument panel, interior trim and cluster lens.
WARNING:Do not use chemical solvents or strong detergents
when cleaning the steering wheel or instrument panel to avoid
contamination of the airbag system.
If a staining liquid like coffee/juice has been spilled on the instrument
panel or on interior trim surfaces, clean as follows:
1. Wipe up spilled liquid using a clean, white, cotton cloth.
2. Apply Motorcraft Deluxe Leather and Vinyl Cleaner (ZC-11-A) [In
Canada use Motorcraft Multi-Purpose Cleaner (CXC-101)] to the wiped
area and spread around evenly.
3. Apply more Motorcraft cleaner to a clean, white, cotton cloth and
press the cloth onto the soiled area–allow this to set at room
temperature for 30 minutes.
4. Remove the soaked cloth, and if it is not soiled badly, use this cloth to
clean the area by using a rubbing motion for 60 seconds.
5. Following this, wipe area dry with a clean, white, cotton cloth.
INTERIOR
For fabric, carpets, cloth seats, safety belts and seats equipped with side
airbags:
•Remove dust and loose dirt with a vacuum cleaner.
•Remove light stains and soil with Motorcraft Professional Strength
Carpet & Upholstery Cleaner (ZC-54).
•If grease or tar is present on the material, spot-clean the area first
with Motorcraft Spot and Stain Remover (ZC-14). In Canada, use
Motorcraft Multi-Purpose Cleaner (CXC-101).
2009 MKZ(378)
Owners Guide
USA(fus)
Cleaning
245